Android进阶宝典 -- JetPack Navigation的高级用法(解决路由跳转新建Fragment页面问题)
Posted datian1234
tags:
篇首语:本文由小常识网(cha138.com)小编为大家整理,主要介绍了Android进阶宝典 -- JetPack Navigation的高级用法(解决路由跳转新建Fragment页面问题)相关的知识,希望对你有一定的参考价值。
相信有相当一部分的伙伴,在项目开发中依然使用Activity作为页面承载体,有10个页面就会有10个Activity,这种方式当然没问题,但是如果涉及到页面间数据共享,那么使用多Activity就不是很方便了,需要Activity传递各种数据,涉及到数据的序列化与反序列化;因此产生了单Activity和多Fragment架构,所有的Fragment可以共享Activity中的数据,不需要数据传递便可操作数据,而且Fragment相较于Activity更加轻量级。
但是为什么之前使用这种架构很少呢?是因为Fragment切换以及回退栈管理比较复杂,但是Navigation出现之后,局面完全逆转了,很多人都在尝试使用单Activity和多Fragment架构,那么本节就着重介绍Navigation的使用方式。
1 Navigation的基础使用
本文主要以单Activity和多Fragment架构为例介绍
//依赖配置
implementation 'androidx.navigation:navigation-fragment-ktx:2.5.2'
implementation 'androidx.navigation:navigation-ui-ktx:2.5.2'
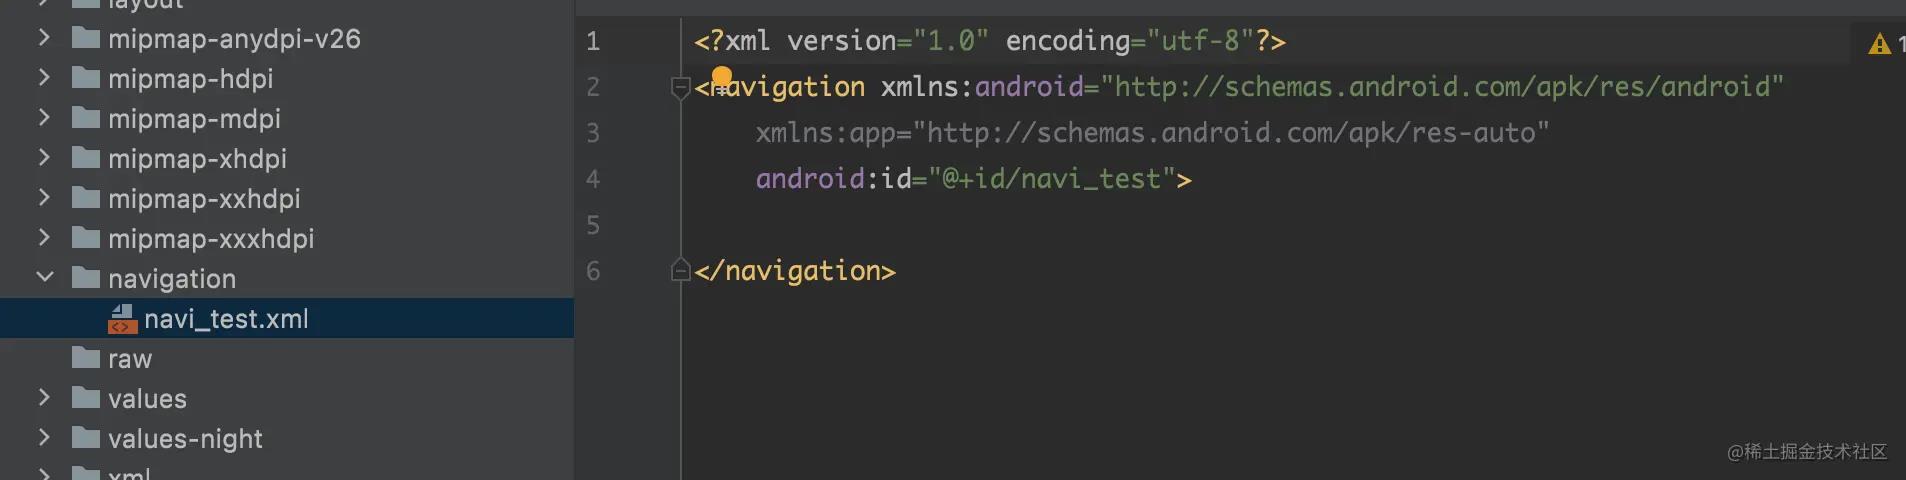
准备工作1:创建路由表,存储Fragment页面
准备工作2:创建多个Fragment
<?xml version="1.0" encoding="utf-8"?>
<navigation xmlns:android="http://schemas.android.com/apk/res/android"
    xmlns:app="http://schemas.android.com/apk/res-auto"
    android:id="@+id/navi_test"
    app:startDestination="@id/fragmentA">

    <fragment
        android:id="@+id/fragmentA"
        android:name="com.lay.image_process.navi.FragmentA"
        android:label="FragmentA" />
    <fragment
        android:id="@+id/fragmentB"
        android:name="com.lay.image_process.navi.FragmentB"
        android:label="FragmentB" />
</navigation>
准备工作3:注册路由表
<androidx.constraintlayout.widget.ConstraintLayout xmlns:android="http://schemas.android.com/apk/res/android"
    xmlns:app="http://schemas.android.com/apk/res-auto"
    xmlns:tools="http://schemas.android.com/tools"
    android:layout_width="match_parent"
    android:layout_height="match_parent"
    tools:context=".navi.NaviHolderActivity">

    <!-- defaultNavHost设置为true 回退栈将会由controller来管理-->
    <androidx.fragment.app.FragmentContainerView
        android:id="@+id/fragmentContainerView"
        android:name="androidx.navigation.fragment.NavHostFragment"
        android:layout_width="match_parent"
        android:layout_height="match_parent"
        app:defaultNavHost="true"
        app:navGraph="@navigation/navi_test" />
</androidx.constraintlayout.widget.ConstraintLayout>
如果我们需要将FragmentA和FragmentB放在一个Activity中,那么就需要使用FragmentContainerView承接,其中navGraph属性用来设置路由表,那么这张路由表中所有的Fragment都添加到了Activity中。

这样默认展示了FragmentA页面,因为在路由表中设置了起点就是fragmentA
1.1 页面跳转
前面只是完成了基础的准备工作,最关键的就是页面的跳转,那么就需要使用Navigation的能力
class NaviUtils

    private var controller:NavController? = null

    fun inject(fragmentManager: FragmentManager,containerId:Int)
        val fragment = fragmentManager.findFragmentById(containerId) as NavHostFragment
        controller = fragment.findNavController()

    //动态设置路由表
    fun inject(fragmentManager: FragmentManager,containerId:Int,naviGraph: Int)
        val fragment = fragmentManager.findFragmentById(containerId) as NavHostFragment
        controller = fragment.findNavController()
        val graph = controller?.navInflater?.inflate(naviGraph)
        controller?.graph = graph!!

    //动态加载路由表,设置路由起点
    fun inject(fragmentManager: FragmentManager,containerId:Int,naviGraph: Int,startDestination:Int)
        val fragment = fragmentManager.findFragmentById(containerId) as NavHostFragment
        controller = fragment.findNavController()
        val graph = controller?.navInflater?.inflate(naviGraph)
        graph?.setStartDestination(startDestination)
        controller?.graph = graph!!


    fun jump(id:Int)
        controller?.navigate(id)


    companion object

        private val controllerMap: MutableMap<Activity, NaviUtils> by lazy
            mutableMapOf()


        fun register(activity: Activity): NaviUtils
            if (!controllerMap.containsKey(activity))
                controllerMap[activity] = NaviUtils()

            return controllerMap[activity]!!


        fun unregister(activity: Activity)
            if (controllerMap.containsKey(activity))
                controllerMap.remove(activity)
这里我写了一个关于Navigation路由的封装,首先NaviUtils是一个单例,提供了3个重载方法inject,如果想要拿到NavController,需要调用NavHostFragment的findNavController方法,NavHostFragment其实就是在Activity中提供容器能力的FragmentContainerView;
class NaviHolderActivity : AppCompatActivity()

    private lateinit var binding:ActivityNaviHolderBinding
    override fun onCreate(savedInstanceState: Bundle?)
        super.onCreate(savedInstanceState)
        binding = ActivityNaviHolderBinding.inflate(layoutInflater)
        setContentView(binding.root)

        NaviUtils.register(this).inject(supportFragmentManager,R.id.fragmentContainerView)


    override fun onDestroy()
        super.onDestroy()
        NaviUtils.unregister(this)
在拿到NavController之后,调用其navigate方法就可以任意在路由表中跳转。例如从FragmentA跳转到FragmentB。
NaviUtils.register(requireActivity()).jump(R.id.action_fragmentA_to_fragmentB)
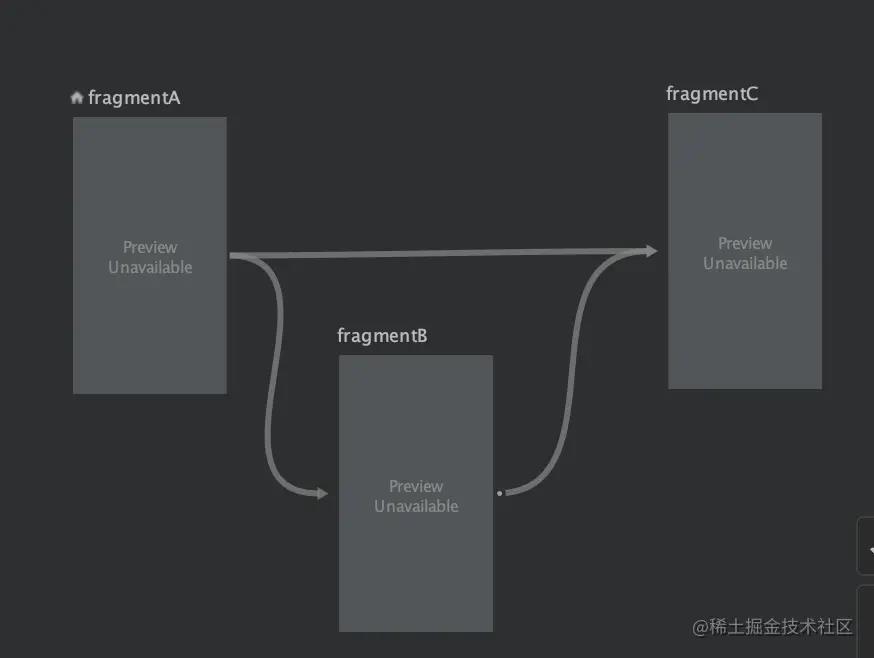
然后我们再加一个FragmentC,从A页面可以到C页面,从B页面也可以到C页面。之后如果新增其他页面,也需要跳转到C页面,这样的话,我们需要每个页面下都写一个到C的action,这样其实也没问题,但是其实是可以给抽出来做一个全局的action
<?xml version="1.0" encoding="utf-8"?>
<navigation xmlns:android="http://schemas.android.com/apk/res/android"
    xmlns:app="http://schemas.android.com/apk/res-auto"
    android:id="@+id/navi_test"
    app:startDestination="@id/fragmentA">

    <fragment
        android:id="@+id/fragmentA"
        android:name="com.lay.image_process.navi.FragmentA"
        android:label="FragmentA" >
        <action
            android:id="@+id/action_fragmentA_to_fragmentB"
            app:destination="@id/fragmentB" />
        <action
            android:id="@+id/action_fragmentA_to_fragmentC"
            app:destination="@id/fragmentC" />
    </fragment>
    <fragment
        android:id="@+id/fragmentB"
        android:name="com.lay.image_process.navi.FragmentB"
        android:label="FragmentB" >
        <action
            android:id="@+id/action_fragmentB_to_fragmentC"
            app:destination="@id/fragmentC" />
    </fragment>
    <fragment
        android:id="@+id/fragmentC"
        android:name="com.lay.image_process.navi.FragmentC"
        android:label="FragmentC" />
</navigation>
转换后的action
<?xml version="1.0" encoding="utf-8"?>
<navigation xmlns:android="http://schemas.android.com/apk/res/android"
    xmlns:app="http://schemas.android.com/apk/res-auto"
    android:id="@+id/navi_test"
    app:startDestination="@id/fragmentA">

    <action
        android:id="@+id/to_fragmentC"
        app:destination="@id/fragmentC" />

    <fragment
        android:id="@+id/fragmentA"
        android:name="com.lay.image_process.navi.FragmentA"
        android:label="FragmentA" >
        <action
            android:id="@+id/action_fragmentA_to_fragmentB"
            app:destination="@id/fragmentB" />
    </fragment>
    <fragment
        android:id="@+id/fragmentB"
        android:name="com.lay.image_process.navi.FragmentB"
        android:label="FragmentB" >
    </fragment>
    <fragment
        android:id="@+id/fragmentC"
        android:name="com.lay.image_process.navi.FragmentC"
        android:label="FragmentC" />
</navigation>
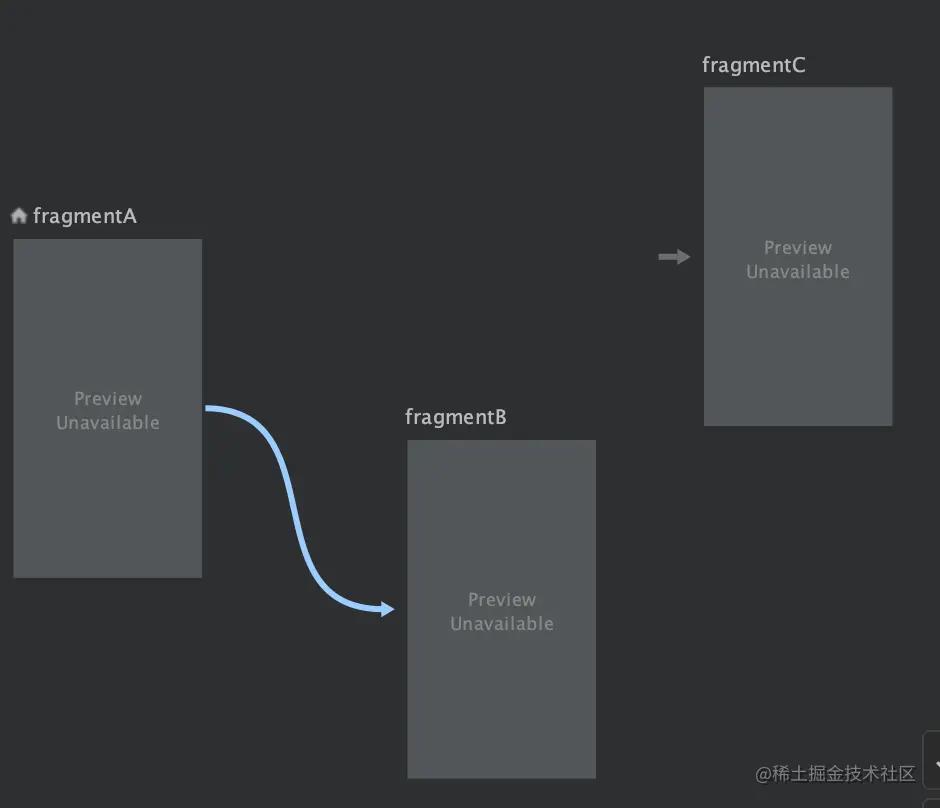
路由表也看的比较清晰了
NaviUtils.register(requireActivity()).jump(R.id.to_fragmentC)
    putString("msg","这是从A页面传递过来的信息")
1.2 回退栈
对于Navigation回退栈,也有相关的api可以借鉴
fun backStack()
    controller?.popBackStack()


fun backStack(desId:Int,popInclusive:Boolean)
    controller?.popBackStack(desId,popInclusive)
例如,从A页面到B页面,如果返回到A页面,那么就可以调用backStack方法;像这种进入退出都可以使用popBackStack来进行退栈处理;
如果从A跳转到B,从B跳转到C,然后从C退出后,直接回到A页面,该如何处理?
因为popBackStack返回只能返回到上一级,如果我们设置一个路由,从C直接到A是不是就可以解决了呢?试一下
<action
    android:id="@+id/to_fragmentA"
    app:destination="@id/fragmentA"/>
显然不可以,虽然跳转到了A页面,但是点击app退出的时候,又回到了C页面,因此在内存中还存在B C页面的任务栈,所以想要清除B C页面任务栈,需要两个属性popUpTo和popUpToInclusive
<action
    android:id="@+id/to_fragmentA"
    app:destination="@id/fragmentA"
    app:popUpTo="@id/fragmentA"
    app:popUpToInclusive="true"/>
使用popUpTo,那么除了fragmentA之外,其他所有的页面都会出栈,那么在跳转到A页面之后,点返回按钮就直接退出app了。
当然这是静态处理,那么如果想动态配置,那么可以调用NaviUtils中的backStack第二个重载函数。
NaviUtils.register(requireActivity()).backStack(R.id.fragmentA,true)
这个方法其实与上述XML布局中描述的一致
1.3 Fragment间数据传递
在前言中,我们提到了Fragment之间数据传递,其实如果使用Navigation,Fragment之间数据传递就太简单了,我们在NaviUtils中添加一个方法
fun jump(id: Int, args: Bundle.() -> Unit)
    val bundle = Bundle()
    bundle.args()
    controller?.navigate(id, bundle)
当页面跳转时,可以携带参数进行传递
NaviUtils.register(requireActivity()).jump(R.id.action_fragmentA_to_fragmentB)
    putString("msg","这是从A页面传递过来的信息")
那么在B页面就可以接受参数:
arguments?.let
    val msg = it.getString("msg")
    binding.tvMsg.text = msg
2 Navigation原理分析
本小节源码为kotlin源码,其实与Java版本基本一致,如果不熟悉Kotlin的小伙伴也可以跟一下,明白原理即可
2.1 NavHostFragment
从本文一开始准备工作中知道,路由表是放在NavHostFragment当中的,所以先从NavHostFragment中的源码看起,NavHostFragment其实也是一个Fragment,并实现了NavHost接口
public interface NavHost
    /**
     * The [navigation controller][NavController] for this navigation host.
     */
    public val navController: NavController
在NavHost接口中,有一个成员变量navController,其实就是我们用来配置导航的工具类,在NaviUtils中,我们通过id获取到NavHostFragment之后,拿到了NavController对象。
@CallSuper
public override fun onCreate(savedInstanceState: Bundle?)
    var context = requireContext()
    navHostController = NavHostController(context)
    navHostController!!.setLifecycleOwner(this)
    while (context is ContextWrapper)
        if (context is OnBackPressedDispatcherOwner)
            navHostController!!.setOnBackPressedDispatcher(
                (context as OnBackPressedDispatcherOwner).onBackPressedDispatcher
            )
            // Otherwise, caller must register a dispatcher on the controller explicitly
            // by overriding onCreateNavHostController()
            break

        context = context.baseContext

    // Set the default state - this will be updated whenever
    // onPrimaryNavigationFragmentChanged() is called
    navHostController!!.enableOnBackPressed(
        isPrimaryBeforeOnCreate != null && isPrimaryBeforeOnCreate as Boolean
    )
    isPrimaryBeforeOnCreate = null
    navHostController!!.setViewModelStore(viewModelStore)
    //创建navigator
    onCreateNavHostController(navHostController!!)
    var navState: Bundle? = null
    if (savedInstanceState != null)
        navState = savedInstanceState.getBundle(KEY_NAV_CONTROLLER_STATE)
        if (savedInstanceState.getBoolean(KEY_DEFAULT_NAV_HOST, false))
            defaultNavHost = true
            parentFragmentManager.beginTransaction()
                .setPrimaryNavigationFragment(this)
                .commit()

        graphId = savedInstanceState.getInt(KEY_GRAPH_ID)

    if (navState != null)
        // Navigation controller state overrides arguments
        navHostController!!.restoreState(navState)

    if (graphId != 0)
        // Set from onInflate()
        navHostController!!.setGraph(graphId)
     else
        // See if it was set by NavHostFragment.create()
        val args = arguments
        val graphId = args?.getInt(KEY_GRAPH_ID) ?: 0
        val startDestinationArgs = args?.getBundle(KEY_START_DESTINATION_ARGS)
        if (graphId != 0)
            navHostController!!.setGraph(graphId, startDestinationArgs)


    // We purposefully run this last as this will trigger the onCreate() of
    // child fragments, which may be relying on having the NavController already
    // created and having its state restored by that point.
    super.onCreate(savedInstanceState)
navController是在NavHostFragment的onCreate方法中初始化的,这里是创建了一个NavHostController对象,这个类的父类就是NavController
final override val navController: NavController
    get()
        checkNotNull(navHostController)  "NavController is not available before onCreate()"
        return navHostController as NavHostController
我们看下NavController的构造方法,我们可以看到,当创建NavController时,在_navigatorProvider中添加了2个Navigator
init
    _navigatorProvider.addNavigator(NavGraphNavigator(_navigatorProvider))
    _navigatorProvider.addNavigator(ActivityNavigator(context))
NavigatorProvider是什么,我们可以把他当做是路由表的提供者,我们之前写过的路由表navi_test就是其中之一,而且我们可以看到路由表中不仅仅支持Fragment,还支持NavGraph、Activity等
public open var navigatorProvider: NavigatorProvider
    get() = _navigatorProvider
    /**
     * @hide
     */
    set(navigatorProvider)
        check(backQueue.isEmpty())  "NavigatorProvider must be set before setGraph call"
        _navigatorProvider = navigatorProvider
先不着急看,回到之前的代码中,我们在创建了NavController之后,调用了NaviHostFragment的onCreateNavController方法,将NavController传递了进去,我们可以看到,又往NavController的navigatorProvider中添加了DialogFragmentNavigator和FragmentNavigator
protected open fun onCreateNavController(navController: NavController)
    navController.navigatorProvider +=
        DialogFragmentNavigator(requireContext(), childFragmentManager)
    navController.navigatorProvider.addNavigator(createFragmentNavigator())
2.2 Navigator
我们看到,在NavHostFragment的onCreate方法中,创建了多种Navigator,并添加到了NavController的navigatorProvider中,那么Navigator是什么呢?我们看下源码
public abstract class Navigator<D : NavDestination>
    /**
     * This annotation should be added to each Navigator subclass to denote the default name used
     * to register the Navigator with a [NavigatorProvider].
     *
     * @see NavigatorProvider.addNavigator
     * @see NavigatorProvider.getNavigator
     */
    @kotlin.annotation.Retention(AnnotationRetention.RUNTIME)
    @Target(AnnotationTarget.ANNOTATION_CLASS, AnnotationTarget.CLASS)
    public annotation class Name(val value: String)

    private var _state: NavigatorState? = null

    /**
     * Construct a new NavDestination associated with this Navigator.
     *
     * Any initialization of the destination should be done in the destination's constructor as
     * it is not guaranteed that every destination will be created through this method.
     * @return a new NavDestination
     */
    public abstract fun createDestination(): D

    /**
     * Navigate to a destination.
     *
     * Requests navigation to a given destination associated with this navigator in
     * the navigation graph. This method generally should not be called directly;
     * [NavController] will delegate to it when appropriate.
     *
     * @param entries destination(s) to navigate to
     * @param navOptions additional options for navigation
     * @param navigatorExtras extras unique to your Navigator.
     */
    @Suppress("UNCHECKED_CAST")
    public open fun navigate(
        entries: List<NavBackStackEntry>,
        navOptions: NavOptions?,
        navigatorExtras: Extras?
    )
        entries.asSequence().map  backStackEntry ->
            val destination = backStackEntry.destination as? D ?: return@map null
            val navigatedToDestination = navigate(
                destination, backStackEntry.arguments, navOptions, navigatorExtras
            )
            when (navigatedToDestination)
                null -> null
                destination -> backStackEntry
                else ->
                    state.createBackStackEntry(
                        navigatedToDestination,
                        navigatedToDestination.addInDefaultArgs(backStackEntry.arguments)
                    )


        .filterNotNull().forEach  backStackEntry ->
            state.push(backStackEntry)


    /**
     * Navigate to a destination.
     *
     * Requests navigation to a given destination associated with this navigator in
     * the navigation graph. This method generally should not be called directly;
     * [NavController] will delegate to it when appropriate.
     *
     * @param destination destination node to navigate to
     * @param args arguments to use for navigation
     * @param navOptions additional options for navigation
     * @param navigatorExtras extras unique to your Navigator.
     * @return The NavDestination that should be added to the back stack or null if
     * no change was made to the back stack (i.e., in cases of single top operations
     * where the destination is already on top of the back stack).
     */
    // TODO Deprecate this method once all call sites are removed
    @Suppress("UNUSED_PARAMETER", "RedundantNullableReturnType")
    public open fun navigate(
        destination: D,
        args: Bundle?,
        navOptions: NavOptions?,
        navigatorExtras: Extras?
    ): NavDestination? = destination

    /**
     * Attempt to pop this navigator's back stack, performing the appropriate navigation.
     *
     * All destinations back to [popUpTo] should be popped off the back stack.
     *
     * @param popUpTo the entry that should be popped off the [NavigatorState.backStack]
     * along with all entries above this entry.
     * @param savedState whether any Navigator specific state associated with [popUpTo] should
     * be saved to later be restored by a call to [navigate] with [NavOptions.shouldRestoreState].
     */
    @Suppress("UNUSED_PARAMETER")
    public open fun popBackStack(popUpTo: NavBackStackEntry, savedState: Boolean)
        val backStack = state.backStack.value
        check(backStack.contains(popUpTo))
            "popBackStack was called with $popUpTo which does not exist in back stack $backStack"

        val iterator = backStack.listIterator(backStack.size)
        var lastPoppedEntry: NavBackStackEntry? = null
        do
            if (!popBackStack())
                // Quit early if popBackStack() returned false
                break

            lastPoppedEntry = iterator.previous()
         while (lastPoppedEntry != popUpTo)
        if (lastPoppedEntry != null)
            state.pop(lastPoppedEntry, savedState)


    /**
     * Attempt to pop this navigator's back stack, performing the appropriate navigation.
     *
     * Implementations should return `true` if navigation
     * was successful. Implementations should return `false` if navigation could not
     * be performed, for example if the navigator's back stack was empty.
     *
     * @return `true` if pop was successful
     */
    // TODO Deprecate this method once all call sites are removed
    public open fun popBackStack(): Boolean = true

    /**
     * Called to ask for a [Bundle] representing the Navigator's state. This will be
     * restored in [onRestoreState].
     */
    public open fun onSaveState(): Bundle?
        return null


    /**
     * Restore any state previously saved in [onSaveState]. This will be called before
     * any calls to [navigate] or
     * [popBackStack].
     *
     * Calls to [createDestination] should not be dependent on any state restored here as
     * [createDestination] can be called before the state is restored.
     *
     * @param savedState The state previously saved
     */
    public open fun onRestoreState(savedState: Bundle)

    /**
     * Interface indicating that this class should be passed to its respective
     * [Navigator] to enable Navigator specific behavior.
     */
    public interface Extras
我们这里挑几个核心方法看下,首先createDestination,是创建了一个新的NavDestination,其实我们可以把它看做是一个页面,例如下面的FragmentA,就是一个NavDestination
<fragment
    android:id="@+id/fragmentA"
    android:name="com.lay.image_process.navi.FragmentA"
    android:label="FragmentA" >
    <action
        android:id="@+id/action_fragmentA_to_fragmentB"
        app:destination="@id/fragmentB" />
</fragment>
然后核心的就是navigate方法,其实我们已经调用过这个方法了,只是通过NavController来调用的,既然在NavController中存在NavigatorProvider存储这些Navigator,我们就能想到,有可能就是调用这个方法,我们先分别看下不同的Navigator的navigate方法是什么样的:
(1)FragmentNavigator # navigate
private fun createFragmentTransaction(
    entry: NavBackStackEntry,
    navOptions: NavOptions?
): FragmentTransaction
    //这里的 Destination就是即将跳转到的页面
    val destination = entry.destination as Destination
    val args = entry.arguments
    var className = destination.className
    if (className[0] == '.')
        className = context.packageName + className

    //每次跳转,都会新建一个新的Fragment
    val frag = fragmentManager.fragmentFactory.instantiate(context.classLoader, className)
    frag.arguments = args
    val ft = fragmentManager.beginTransaction()
    var enterAnim = navOptions?.enterAnim ?: -1
    var exitAnim = navOptions?.exitAnim ?: -1
    var popEnterAnim = navOptions?.popEnterAnim ?: -1
    var popExitAnim = navOptions?.popExitAnim ?: -1
    if (enterAnim != -1 || exitAnim != -1 || popEnterAnim != -1 || popExitAnim != -1)
        enterAnim = if (enterAnim != -1) enterAnim else 0
        exitAnim = if (exitAnim != -1) exitAnim else 0
        popEnterAnim = if (popEnterAnim != -1) popEnterAnim else 0
        popExitAnim = if (popExitAnim != -1) popExitAnim else 0
        ft.setCustomAnimations(enterAnim, exitAnim, popEnterAnim, popExitAnim)

    ft.replace(containerId, frag)
    ft.setPrimaryNavigationFragment(frag)
    ft.setReorderingAllowed(true)
    return ft
我们可以看到,Fragment之间的跳转,是通过事务的replace方法,而且每次跳转到新的页面,都会重新创建
(2)DialogFragmentNavigator # navigate
private fun navigate(
    entry: NavBackStackEntry
)
    val destination = entry.destination as Destination
    var className = destination.className
    if (className[0] == '.')
        className = context.packageName + className

    val frag = fragmentManager.fragmentFactory.instantiate(
        context.classLoader, className
    )
    require(DialogFragment::class.java.isAssignableFrom(frag.javaClass))
        "Dialog destination $destination.className is not an instance of DialogFragment"

    val dialogFragment = frag as DialogFragment
    dialogFragment.arguments = entry.arguments
    dialogFragment.lifecycle.addObserver(observer)
    dialogFragment.show(fragmentManager, entry.id)
    state.push(entry)
DialogFragment虽然是一个Fragment,但是也是弹窗的形式存在,因此展示的时候,采用Dialog常用的show方法也是理所应当的了。
(3)ActivityNavigator # navigate
override fun navigate(
    destination: Destination,
    args: Bundle?,
    navOptions: NavOptions?,
    navigatorExtras: Navigator.Extras?
): NavDestination?
    checkNotNull(destination.intent)
        ("Destination $destination.id does not have an Intent set.")

    val intent = Intent(destination.intent)
    //......
    val destId = destination.id
    intent.putExtra(EXTRA_NAV_CURRENT, destId)
    val resources = context.resources
    if (navOptions != null)
        val popEnterAnim = navOptions.popEnterAnim
        val popExitAnim = navOptions.popExitAnim
        if (
            popEnterAnim > 0 && resources.getResourceTypeName(popEnterAnim) == "animator" ||
            popExitAnim > 0 && resources.getResourceTypeName(popExitAnim) == "animator"
        )
            Log.w(
                LOG_TAG,
                "Activity destinations do not support Animator resource. Ignoring " +
                    "popEnter resource $resources.getResourceName(popEnterAnim) and " +
                    "popExit resource $resources.getResourceName(popExitAnim) when " +
                    "launching $destination"
            )
         else
            // For use in applyPopAnimationsToPendingTransition()
            intent.putExtra(EXTRA_POP_ENTER_ANIM, popEnterAnim)
            intent.putExtra(EXTRA_POP_EXIT_ANIM, popExitAnim)


    if (navigatorExtras is Extras)
        val activityOptions = navigatorExtras.activityOptions
        if (activityOptions != null)
            ActivityCompat.startActivity(context, intent, activityOptions.toBundle())
         else
            context.startActivity(intent)

     else
        context.startActivity(intent)

    if (navOptions != null && hostActivity != null)
        var enterAnim = navOptions.enterAnim
        var exitAnim = navOptions.exitAnim
        if (
            enterAnim > 0 && (resources.getResourceTypeName(enterAnim) == "animator") ||
            exitAnim > 0 && (resources.getResourceTypeName(exitAnim) == "animator")
        )
            Log.w(
                LOG_TAG,
                "Activity destinations do not support Animator resource. " +
                    "Ignoring " + "enter resource " + resources.getResourceName(enterAnim) +
                    " and exit resource " + resources.getResourceName(exitAnim) + "when " +
                    "launching " + destination
            )
         else if (enterAnim >= 0 || exitAnim >= 0)
            enterAnim = enterAnim.coerceAtLeast(0)
            exitAnim = exitAnim.coerceAtLeast(0)
            hostActivity.overridePendingTransition(enterAnim, exitAnim)


    // You can't pop the back stack from the caller of a new Activity,
    // so we don't add this navigator to the controller's back stack
    return null
看了前面两个,对于Activity的启动方式,大概率就是通过startActivity来实现的了;
其实看到这里,我们就大概知道了,Navigation路由表中支持的节点类型了,而且每个Navigator都包装了一个页面,每个类型的Navigator都有自己展示的形式
<activity></activity>
<dialog></dialog>
<NoOp></NoOp>
2.3 navigation布局文件解析
在之前NaviUtils中,inject有3个重载方法,然后第二个重载方法支持动态加载路由表,我们看到的是,通过NavController解析路由表,然后调用setGraph方法,将解析后的路由表添加进去
 //动态设置路由表
fun inject(fragmentManager: FragmentManager,containerId:Int,naviGraph: Int)
    val fragment = fragmentManager.findFragmentById(containerId) as NavHostFragment
    controller = fragment.findNavController()
    val graph = controller?.navInflater?.inflate(naviGraph)
    controller?.graph = graph!!
在NavController中有一个成员变量,就是NavInflater对象,看名字就是路由解析器,类似于LayoutInflater
public open val navInflater: NavInflater by lazy
    inflater ?: NavInflater(context, _navigatorProvider)
通过调用NavInflater的inflate方法,获取到一个NavGraph对象;首先我们先不看NavGraph是什么,我们看到inflate方法传入一个参数graphResId,这个就是我们的路由表文件R.navigation.xxx,它是通过XmlPullParser进行XML解析
public fun inflate(@NavigationRes graphResId: Int): NavGraph
    val res = context.resources
    val parser = res.getXml(graphResId)
    val attrs = Xml.asAttributeSet(parser)
    return try
        var type: Int
        while (parser.next().also  type = it  != XmlPullParser.START_TAG &&
            type != XmlPullParser.END_DOCUMENT
        )  /* Empty loop */

        if (type != XmlPullParser.START_TAG)
            throw XmlPullParserException("No start tag found")

        val rootElement = parser.name
        val destination = inflate(res, parser, attrs, graphResId)
        require(destination is NavGraph)
            "Root element <$rootElement> did not inflate into a NavGraph"

        destination
     catch (e: Exception)
        throw RuntimeException(
            "Exception inflating $res.getResourceName(graphResId) line $parser.lineNumber",
            e
        )
     finally
        parser.close()
通过2.2小节中对于Navigator的了解,我们知道NavGraph也是一种节点类型,而且一张路由表中全部的节点都是存在navigatorProvider中,然后在inflate方法中,根据路由表中节点的名字,例如fragment、dialog、action等,获取其对应的Navigator类型,然后创建其对应的Destination对象
@Throws(XmlPullParserException::class, IOException::class)
private fun inflate(
    res: Resources,
    parser: XmlResourceParser,
    attrs: AttributeSet,
    graphResId: Int
): NavDestination
    val navigator = navigatorProvider.getNavigator<Navigator<*>>(parser.name)
    val dest = navigator.createDestination()
    dest.onInflate(context, attrs)
    val innerDepth = parser.depth + 1
    var type: Int
    var depth = 0
    while (parser.next().also  type = it  != XmlPullParser.END_DOCUMENT &&
        (parser.depth.also  depth = it  >= innerDepth || type != XmlPullParser.END_TAG)
    )
        if (type != XmlPullParser.START_TAG)
            continue

        if (depth > innerDepth)
            continue

        val name = parser.name
        if (TAG_ARGUMENT == name)
            inflateArgumentForDestination(res, dest, attrs, graphResId)
         else if (TAG_DEEP_LINK == name)
            inflateDeepLink(res, dest, attrs)
         else if (TAG_ACTION == name)
            inflateAction(res, dest, attrs, parser, graphResId)
         else if (TAG_INCLUDE == name && dest is NavGraph)
            res.obtainAttributes(attrs, androidx.navigation.R.styleable.NavInclude).use
                val id = it.getResourceId(androidx.navigation.R.styleable.NavInclude_graph, 0)
                dest.addDestination(inflate(id))

         else if (dest is NavGraph)
            dest.addDestination(inflate(res, parser, attrs, graphResId))


    return dest
然后再往下看,是一个while循环,遍历路由表中全部的节点,然后会判断每个节点中标签
private const val TAG_ARGUMENT = "argument"
private const val TAG_DEEP_LINK = "deepLink"
private const val TAG_ACTION = "action"
private const val TAG_INCLUDE = "include"
将参数赋值给当前节点并返回,最终遍历完成全部节点之后,会返回一个NavGraph对象,调用NavController的setGraph方法,传入这个路由表
public open var graph: NavGraph
    @MainThread
    get()
        checkNotNull(_graph)  "You must call setGraph() before calling getGraph()"
        return _graph as NavGraph

    @MainThread
    @CallSuper
    set(graph)
        setGraph(graph, null)
我们继续看下setGraph方法,我们可以看到,如果是两张不同的路由表,那么就会直接进行替换,重新加载生成新的路由表
public open fun setGraph(graph: NavGraph, startDestinationArgs: Bundle?)
    if (_graph != graph)
        _graph?.let  previousGraph ->
            // Clear all saved back stacks by iterating through a copy of the saved keys,
            // thus avoiding any concurrent modification exceptions
            val savedBackStackIds = ArrayList(backStackMap.keys)
            savedBackStackIds.forEach  id ->
                clearBackStackInternal(id)

            // Pop everything from the old graph off the back stack
            popBackStackInternal(previousGraph.id, true)

        _graph = graph
        onGraphCreated(startDestinationArgs)
     else
        for (i in 0 until graph.nodes.size())
            val newDestination = graph.nodes.valueAt(i)
            _graph!!.nodes.replace(i, newDestination)
            backQueue.filter  currentEntry ->
                // Necessary since CI builds against ToT, can be removed once
                // androidx.collection is updated to >= 1.3.*
                @Suppress("UNNECESSARY_SAFE_CALL", "SAFE_CALL_WILL_CHANGE_NULLABILITY")
                currentEntry.destination.id == newDestination?.id
            .forEach  entry ->
                entry.destination = newDestination
如果是两张一样的路由表,那么只会针对路由表中的节点进行替换,例如fragment中某个action发生变化,或者路由表的起点startDestination属性发生变化,但是需要注意是一定要重新调用setGraph方法才会生效。
所以,当我们获取到了NavController之后,就相当于已经获取到了路由表中的全部节点,就能够灵活地实现跳转、传参等操作。
2.4 小结
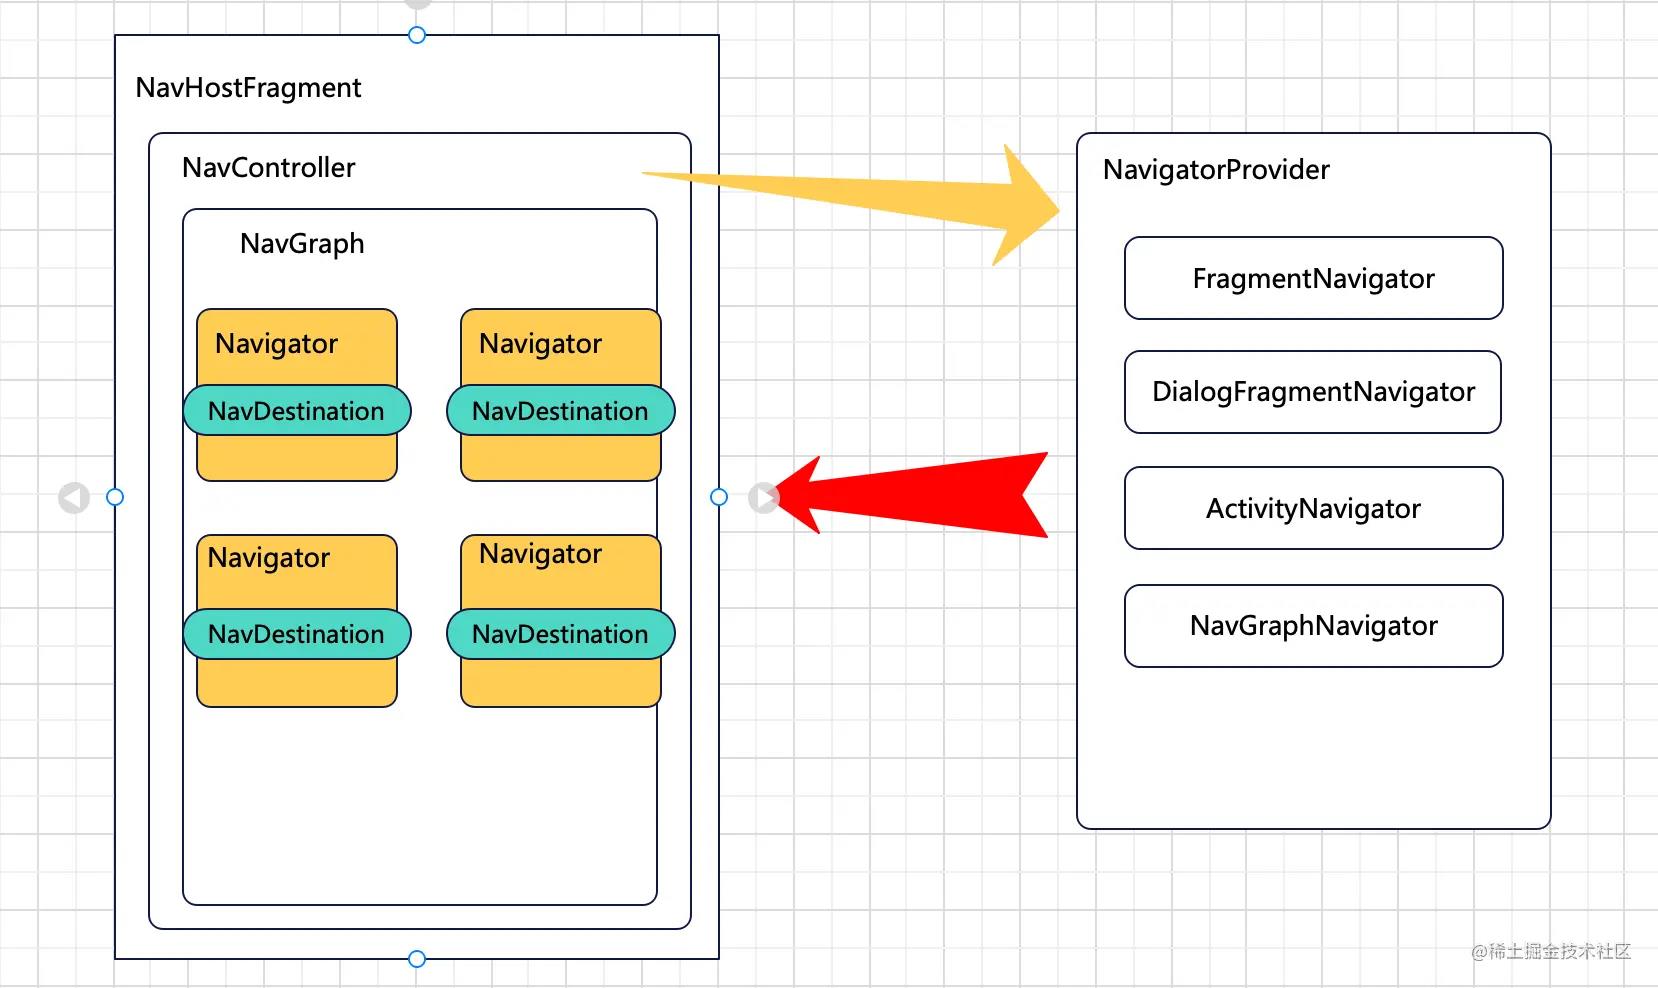
我这边画了一张图,总结一下Navigation是如何运作的:
(1)承载路由表的容器是NavHostFragment,它也是一个Fragment,因此在其初始化的时候,会调用其生命周期onCreate方法,在这个方法中完成NavController的初始化;
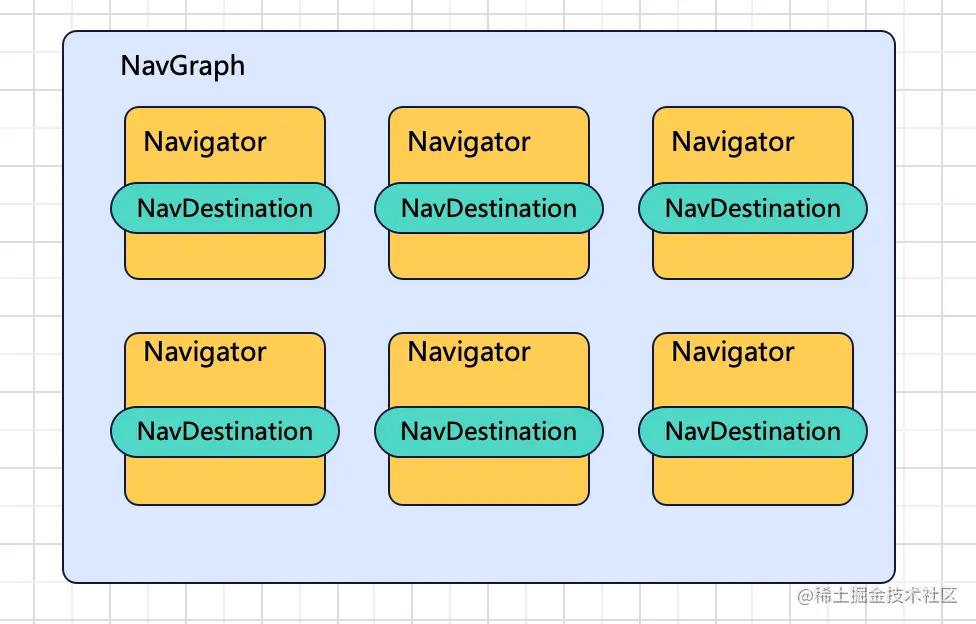
(2)在NavController中,存在一个Map集合,用于存储路由表中的节点,而且支持4种类型,分别为fragment、dialog、activity、navgraph,在NavController的构造方法中初始化完成;
(3)NavController初始化完成之后,将会解析默认的路由表,路由表解析是通过XmlPullParser来完成的,会通过while循环遍历获取节点,然后通过NavigatorProvider获取当前节点的类型,创建对应的页面,最终解析完成后,是将路由表转换为NavGraph对象
还有就是对于Navigator与NavDestination的关系就是:具体的NavDestination是通过特定的Navigator创建的(调用createDestination方法),里面存储了当前节点的信息

但是页面之间跳转的逻辑,都是由Navigator来实现的,所以我们在调用NavController来进行页面跳转的时候,其实真正的执行类就是Navigator,伙伴们都明白了吧。
3 Navigation优化
我们从之前源码中可以看到,当每次调用navigate方法的时候,都会新建一个Fragment的,而且无论当前Fragment是否已经存在了,都会新建,这样的话其实是比较浪费资源的,我们可以先验证一下。
2022-09-25 14:27:19.885 23844-23844/com.lay.image_process D/TAG: FragmentA onCreateView
2022-09-25 14:28:36.009 23844-23844/com.lay.image_process D/TAG: FragmentB onCreateView
2022-09-25 14:28:37.786 23844-23844/com.lay.image_process D/TAG: FragmentC onCreateView
2022-09-25 14:28:41.311 23844-23844/com.lay.image_process D/TAG: FragmentA onCreateView
从A切换到B,从B到C,再从C到A,每次跳转都是创建一个新的Fragment,那么罪魁祸首就是FragmentNavigator的navigate方法,跳转的方式是通过replace的方式,将新建的Fragment替换
val frag = fragmentManager.fragmentFactory.instantiate(context.classLoader, className)
frag.arguments = args
val ft = fragmentManager.beginTransaction()
var enterAnim = navOptions?.enterAnim ?: -1
var exitAnim = navOptions?.exitAnim ?: -1
var popEnterAnim = navOptions?.popEnterAnim ?: -1
var popExitAnim = navOptions?.popExitAnim ?: -1
if (enterAnim != -1 || exitAnim != -1 || popEnterAnim != -1 || popExitAnim != -1)
    enterAnim = if (enterAnim != -1) enterAnim else 0
    exitAnim = if (exitAnim != -1) exitAnim else 0
    popEnterAnim = if (popEnterAnim != -1) popEnterAnim else 0
    popExitAnim = if (popExitAnim != -1) popExitAnim else 0
    ft.setCustomAnimations(enterAnim, exitAnim, popEnterAnim, popExitAnim)

ft.replace(containerId, frag)
那么既然系统的方案是这么做的,那么我们也可以通过自己创建Navigator改变这种交互方式。
3.1 自定义Navigator
因为Fragment的创建,是通过FragmentNavigator来完成,因此如果想要修改Fragment的启动方式,通过继承FragmentNavigator,重写navigate方法即可。
通过前面对源码的解读,我们知道这个问题处理的核心就是解决createFragmentTransaction方法中Fragment的展示方式,处理方式如下:
val ft = fragmentManager.beginTransaction()
//首先获取当前展示的Fragment
val primaryNavigationFragment = fragmentManager.primaryNavigationFragment
//将当前展示的Fragment隐藏
ft.hide(primaryNavigationFragment!!)
//获取即将展示的Fragment
val tag = destination.id.toString()
var frag = fragmentManager.findFragmentByTag(tag)
//如果在fragmentManager中能获取到这个Fragment,说明已经创建过这个Fragment
if (frag != null)
    ft.show(frag)
 else
    //如果没有,就需要创建新的Fragment
    frag = fragmentManager.fragmentFactory.instantiate(context.classLoader, className)
    //将其放入fragmentManager中
    frag.arguments = args
    ft.add(frag, tag)
对于Fragment的显示和隐藏,通过FragmentTransaction来实现,对于没有创建过的Fragment是采用Navigation中原有的实现逻辑,创建新的Fragment,并添加到FragmentManager中,方便下次获取。
class MyFragmentNavigator(
    private val context: Context,
    private val fragmentManager: FragmentManager,
    private val containerId: Int
) : FragmentNavigator(context, fragmentManager, containerId)

    private var savedIds: MutableSet<String>? = null

    override fun navigate(
        entries: List<NavBackStackEntry>,
        navOptions: NavOptions?,
        navigatorExtras: Navigator.Extras?
    )
        if (fragmentManager.isStateSaved)
            Log.i(
                TAG, "Ignoring navigate() call: FragmentManager has already saved its state"
            )
            return

        for (entry in entries)
            navigate(entry, navOptions, navigatorExtras)


    private fun navigate(
        entry: NavBackStackEntry,
        navOptions: NavOptions?,
        navigatorExtras: Navigator.Extras?
    )

        //获取saveIds
        val savedIdsField = FragmentNavigator.javaClass.getDeclaredField("savedIds")
        savedIdsField.isAccessible = true
        //获取这个属性的值
        savedIds = savedIdsField.get(this) as MutableSet<String>

        val initialNavigation = state.backStack.value.isEmpty()
        val restoreState = (
                navOptions != null && !initialNavigation &&
                        navOptions.shouldRestoreState() &&
                        savedIds!!.remove(entry.id)
                )
        if (restoreState)
            // Restore back stack does all the work to restore the entry
            fragmentManager.restoreBackStack(entry.id)
            state.push(entry)
            return

        val ft = createFragmentTransaction(entry, navOptions)

        if (!initialNavigation)
            ft.addToBackStack(entry.id)


        if (navigatorExtras is Extras)
            for ((key, value) in navigatorExtras.sharedElements)
                ft.addSharedElement(key, value)


        ft.commit()
        // The commit succeeded, update our view of the world
        state.push(entry)


    private fun createFragmentTransaction(
        entry: NavBackStackEntry,
        navOptions: NavOptions?
    ): FragmentTransaction
        val destination = entry.destination as Destination
        val args = entry.arguments
        var className = destination.className
        if (className[0] == '.')
            className = context.packageName + className


        val ft = fragmentManager.beginTransaction()
        //首先获取当前展示的Fragment
        val primaryNavigationFragment = fragmentManager.primaryNavigationFragment
        //将当前展示的Fragment隐藏
        ft.hide(primaryNavigationFragment!!)
        //获取即将展示的Fragment
        val tag = destination.id.toString()
        var frag = fragmentManager.findFragmentByTag(tag)
        //如果在fragmentManager中能获取到这个Fragment,说明已经创建过这个Fragment
        if (frag != null)
            ft.show(frag)
         else
            //如果没有,就需要创建新的Fragment
            frag = fragmentManager.fragmentFactory.instantiate(context.classLoader, className)
            //将其放入fragmentManager中
            frag.arguments = args

            //注意这里需要加到containerId里,不然不会显示Fragment的UI
            ft.add(containerId,frag, tag)


        var enterAnim = navOptions?.enterAnim ?: -1
        var exitAnim = navOptions?.exitAnim ?: -1
        var popEnterAnim = navOptions?.popEnterAnim ?: -1
        var popExitAnim = navOptions?.popExitAnim ?: -1
        if (enterAnim != -1 || exitAnim != -1 || popEnterAnim != -1 || popExitAnim != -1)
            enterAnim = if (enterAnim != -1) enterAnim else 0
            exitAnim = if (exitAnim != -1) exitAnim else 0
            popEnterAnim = if (popEnterAnim != -1) popEnterAnim else 0
            popExitAnim = if (popExitAnim != -1) popExitAnim else 0
            ft.setCustomAnimations(enterAnim, exitAnim, popEnterAnim, popExitAnim)

        ft.setPrimaryNavigationFragment(frag)
        ft.setReorderingAllowed(true)
        return ft


    companion object
        private const val TAG = "MyFragmentNavigator"
3.2 自定义Navigator注入
既然我们写了一个自己的MyFragmentNavigator,那么怎么能放在navigation这个框架里使用呢?我们先看下原始的FragmentNavigator,有一个Navigator.Name的注解,细心的伙伴可能就发现了,这个就是我们在路由表中加入的标签。
@Navigator.Name("fragment")
public open class FragmentNavigator(
    private val context: Context,
    private val fragmentManager: FragmentManager,
    private val containerId: Int
) : Navigator<Destination>()
那么我们也可以自己定义一个标签 - my_fragment,这样当解析到这类标签的时候,就会使用我们自定义的CustomFragmentNavigator去创建页面,页面之间的跳转也会使用我们自定义的navigate,从而避免重复创建的问题
@Navigator.Name("my_fragment")
class CustomFragmentNavigator(
    private val context: Context,
    private val fragmentManager: FragmentManager,
    private val containerId: Int
) : FragmentNavigator(context, fragmentManager, containerId)
通过前面源码的阅读,我们知道FragmentNavigator是在NavHostFragment的onCreate方法中,调用onCreateNavHostController中创建的,因此我们可以继承NavHostFragment,重写这个方法,将我们自定义的CustomFragmentNavigator添加到NavController中
class MyNavHostFragment : NavHostFragment()

    override fun onCreateNavController(navController: NavController)
        navController.navigatorProvider += CustomFragmentNavigator(
            requireContext(),
            fragmentManager = childFragmentManager,
            id
        )
        super.onCreateNavController(navController)
这样,我们的navigation路由表需要做一些改造,将fragment标签换成我们自定义的my_fragment标签,即可实现我们的需求了。
<?xml version="1.0" encoding="utf-8"?>
<navigation xmlns:android="http://schemas.android.com/apk/res/android"
    xmlns:app="http://schemas.android.com/apk/res-auto"
    android:id="@+id/navi_test"
    app:startDestination="@id/fragmentA">

    <action
        android:id="@+id/to_fragmentC"
        app:destination="@id/fragmentC" />

    <action
        android:id="@+id/to_fragmentA"
        app:destination="@id/fragmentA"/>

    <my_fragment
        android:id="@+id/fragmentA"
        android:name="com.lay.image_process.navi.FragmentA"
        android:label="FragmentA" >
        <action
            android:id="@+id/action_fragmentA_to_fragmentB"
            app:destination="@id/fragmentB" />
    </my_fragment>
    <my_fragment
        android:id="@+id/fragmentB"
        android:name="com.lay.image_process.navi.FragmentB"
        android:label="FragmentB" >
    </my_fragment>
    <my_fragment
        android:id="@+id/fragmentC"
        android:name="com.lay.image_process.navi.FragmentC"
        android:label="FragmentC" />

</navigation>
还需要注意一点的就是,FragmentContainerView中的NavHostFragment要替换成我们自定义的NavHostFragment。
<androidx.fragment.app.FragmentContainerView
    android:id="@+id/fragmentContainerView"
    android:name="com.lay.image_process.utils.MyNavHostFragment"
    android:layout_width="match_parent"
    android:layout_height="match_parent"
    app:defaultNavHost="true"
    app:navGraph="@navigation/navi_test" />
我们可以自己验证一下,当使用Google原生的Navigation,跳转回退都会新建新的Fragment;当使用我们自己的Navigator后,就不再有这种情况。
作者:想要成为专家的Lay
链接:https://juejin.cn/post/7147265281973288973
更多Android学习资料可点击下方卡片了解~
以上是关于Android进阶宝典 -- JetPack Navigation的高级用法(解决路由跳转新建Fragment页面问题)的主要内容,如果未能解决你的问题,请参考以下文章