基于ansible部署lamp架构(源码安装)
Posted Blue Dream~
tags:
篇首语:本文由小常识网(cha138.com)小编为大家整理,主要介绍了基于ansible部署lamp架构(源码安装)相关的知识,希望对你有一定的参考价值。
文章目录
一、配置apache
1、首先在角色中手动定义三个服务角色
[student@server roles]$ ansible-galaxy init apache
- Role apache was created successfully
[student@server roles]$ ansible-galaxy init mysql
- Role mysql was created successfully
[student@server roles]$ ansible-galaxy init php
- Role php was created successfully
[student@server roles]$ cd apache/
//这次服务主要用到的模块
[student@server apache]$ tree
.
├── defaults
│   └── main.yml
├── files       //用于存放软件包和脚本
├── handlers
│   └── main.yml
├── meta
│   └── main.yml
├── README.md
├── tasks     //用于存放play主模块
│   └── main.yml
├── templates   //用于写入启动服务的j2文件
├── tests
│   ├── inventory
│   └── test.yml
└── vars         //用于定义需要下载的服务名
    └── main.yml

8 directories, 8 files
2、定义files中的脚本
首先定义好yum源地址
[student@server files]$ cat yum.sh
#!/bin/bash
/usr/bin/curl -o /etc/yum.repos.d/CentOS-Base.repo https://mirrors.aliyun.com/repo/Centos-vault-8.5.2111.repo
yum reinstall -y https://mirrors.aliyun.com/epel/epel-release-latest-8.noarch.rpm
/usr/bin/sed -i 's|^#baseurl=https://download.example/pub|baseurl=https://mirrors.aliyun.com|' /etc/yum.repos.d/epel*
/usr/bin/sed -i 's|^metalink|#metalink|' /etc/yum.repos.d/epel*
定义预编译程序
预编译三部曲
[student@server files]$ cat apache.sh
#!/bin/bash
cd /opt/apr-1.7.0
sed -i '/$RM "$cfgfile"/d' configure
./configure --prefix=/usr/local/apr
make
make install

cd /opt/apr-util-1.6.1
./configure --prefix=/usr/local/apr-util --with-apr=/usr/local/apr
make
make install

cd /opt/httpd-2.4.54
./configure --prefix=/usr/local/apache \\
	--sysconfdir=/etc/httpd24 \\
	--enable-so \\
	--enable-ssl \\
	--enable-cgi \\
	--enable-rewrite \\
	--with-zlib \\
	--with-pcre \\
	--with-apr=/usr/local/apr \\
	--with-apr-util=/usr/local/apr-util/ \\
	--enable-modules=most \\
	--enable-mpms-shared=all \\
	--with-mpm=prefork
make
make install
定义环境变量
[student@server files]$ cat httpd.sh
echo 'export PATH=/usr/local/apache/bin/:$PATH' > /etc/profile.d/httpd.sh
source /etc/profile.d/httpd.sh
3、定义清单任务模块
[student@server apache]$ cat tasks/main.yml
---
# tasks file for apache
- name stop firewalld     ——关闭防火墙
  service:
    name: firewalld
    state: stopped
    enabled: no

- name: stop selinux    ——永久关闭
  lineinfile:
    path: /etc/selinux/config
    regexp: '^SELINUX='
    line: SELINUX=disabled

- name: stop selinux1    ——关闭防火墙并加载
  shell:
    cmd: setenforce 0

- name: set yum        ——指定file中定义的yum源脚本
  script: yum.sh

- name: install pkgs   ——下载所需的安装环境
  shell:
    cmd: yum -y install bzip2  vim make wget openssl-devel pcre-devel expat-devel libtool gcc gcc-c++ libxml2-devel --allowerasing

- name: unzip       ——解压缩到/opt下
  unarchive:
    src: apr-1.7.0.tar.gz
    dest: /opt/

- name: unzip
  unarchive:
    src: apr-util-1.6.1.tar.gz
    dest: /opt/

- name: unzip
  unarchive:
    src: httpd-2.4.54.tar.gz
    dest: /opt/


- name: cr apache      ——创建系统用户
  user:
    name: apache
    system: yes
    shell: /sbin/nologin
    create_home: no
    state: present

- name: apache.sh      ——执行预编译脚本
  script: apache.sh

- name: httpd.sh      ——环境变量脚本
  script: httpd.sh

- name: cp config     ——调用system服务
  template:
    src: httpd.service.j2
    dest: /usr/lib/systemd/system/httpd.service

- name: apply config   ——重启系统服务
  shell:
    cmd: systemctl daemon-reload

- name: restart httpd    ——开启服务
  service:
    name: httpd
    state: started
    enabled: yes
定义system服务启动
[student@server templates]$ cat httpd.service.j2
[Unit]
Description=httpd server daemon
After=network.target
[Service]
Type=forking
ExecStart=/usr/local/apache/bin/apachectl start
ExecStop=/usr/local/apache/bin/apachectl stop
ExecReload=/bin/kill -HUP $MAINPID
[Install]
WantedBy=multi-user.target
创建用户
[student@server ansible]$ cat apache.yml
---
- name: use apache role
  hosts: node1
  roles:
    - apache
4、执行apache—playbook任务
[student@server ansible]$ ansible-playbook apache.yml

PLAY [use apache role] *********************************************************

TASK [Gathering Facts] *********************************************************
ok: [node1]

TASK [apache : stop firewalld] *************************************************
ok: [node1]

TASK [apache : stop selinux] ***************************************************
ok: [node1]

TASK [apache : set yum] ********************************************************
changed: [node1]

TASK [apache : install pkgs] ***************************************************
changed: [node1]

TASK [apache : unzip] **********************************************************
ok: [node1]

TASK [apache : unzip] **********************************************************
ok: [node1]

TASK [apache : unzip] **********************************************************
changed: [node1]

TASK [cr apache] ***************************************************************
ok: [node1]

TASK [apache.sh] ***************************************************************
changed: [node1]

TASK [apache : httpd.sh] *******************************************************
changed: [node1]

TASK [apache : cp config] ******************************************************
changed: [node1]

TASK [apache : apply config] ***************************************************
changed: [node1]

TASK [apache : restart httpd] **************************************************
ok: [node1]

PLAY RECAP *********************************************************************
node1                      : ok=14   changed=7    unreachable=0    failed=0    skipped=0    rescued=0    ignored=0
查看node1IP地址是否访问成功

二、配置MySQL
1、主任务模块
[student@server mysql]$ cat tasks/main.yml
---
# tasks file for mysql
- name: create user mysql     ——设置用户
  user:
    name: mysql
    system: yes
    shell: /sbin/nologin
    create_home: no
    state: present

- name: install pkgs   ——安装依赖包
  yum:
    name: "libncurses*"
    state: present

- name: unzip
  unarchive:
    src: mysql-5.7.37-linux-glibc2.12-x86_64.tar.gz
    dest: /usr/local/

- name: create link     ——设置软链接
  file:
    src: /usr/local/mysql-5.7.37-linux-glibc2.12-x86_64
    dest: /usr/local/mysql
    owner: mysql
    group: mysql
    state: link

- name: create data ml   ——设置工作目录
  file:
    path: /opt/data
    owner: mysql
    group: mysql
    state: directory

- name: mysql-csh.sh  ——数据库初始化
  script: mysql-csh.sh

- name: cp config   ——数据库服务位置
  template:
    src: my.cnf.j2
    dest: /etc/my.cnf

- name: replace file1     ——使其sql服务访问
  replace:
    path: /usr/local/mysql/support-files/mysql.server
    regexp: "#^(basedir=).*"
    replace: "basedir=/usr/local/mysql"

- name: replace file2
  replace:
    path: /usr/local/mysql/support-files/mysql.server
    regexp: "#^(datadir=).*"
    replace: "datadir=/opt/data"

- name: cp mysqld.service
  template:
    src: mysqld.service.j2
    dest: /usr/lib/systemd/system/mysqld.service

- name: apply config
  shell:
    cmd: systemctl daemon-reload

- name: restart mysqld
  service:
    name: mysqld
    state: started
    enabled: yes

- name: set mysql passwd   ——设置密码
  shell:
    cmd: /usr/local/mysql/bin/mysql -uroot -e "set password=password('$redhat')"

- name: set mysql env      ——环境变量
  script: mysqlbl.sh
2、file脚本环境变量
//软件包
[student@server files]$ ls
mysql-5.7.37-linux-glibc2.12-x86_64.tar.gz
数据库初始化
[student@server files]$ cat mysql-csh.sh
#!/bin/bash
/usr/local/mysql/bin/mysqld --initialize-insecure --user=mysql --datadir=/opt/data/
ln -sv /usr/local/mysql/include/ /usr/local/include/mysql
echo '/usr/local/mysql/lib' > /etc/ld.so.conf.d/mysql.conf
ldconfig
//环境配置
[student@server files]$ cat mysqlbl.sh
echo 'export PATH=/usr/local/mysql/bin:/usr/local/mysql/lib:$PATH' >> /etc/profile.d/mysql.sh
source /etc/profile.d/mysql.sh
3、templates定义模具
定义数据库工作对象
[student@server mysql]$ cat templates/my.cnf.j2
[mysqld]
basedir = /usr/local/mysql
datadir = /opt/data
socket = /tmp/mysql.sock
port = 3306
pid-file = /opt/data/mysql.pid
user = mysql
skip-name-resolve
配置启动服务文件
[student@server mysql]$ cat templates/mysqld.service.j2
[Unit]
Description=mysql server daemon
After=network.targe
[Service]
Type=forking
ExecStart=/usr/local/基于ansible role实现LAMP平台批量部署
前言
作为运维人员,当面对几十台或上百台服务器需要修改某个参数或部署某个平台,你将从何入手呢?ansible的出现很好的解决了这一困扰,ansible基于Python开发,集合了众多运维工具(puppet、cfengine、chef、func、fabric)的优点,实现了批量系统配置、批量程序部署、批量运行命令等功能。本文带来的是基于Ansible Role实现LAMP平台批量部署。
ansible简介
特性
No agents:不需要在被管控主机上安装任意客户端
No server:无服务器端,使用时直接运行命令即可
Modules in any languages:基于模块工作,可使用任意语言开发模块
YAML,not code:使用yaml语言定制剧本playbook
SSH by default:基于SSH工作
Strong multi-tier solution:可实现多级指挥
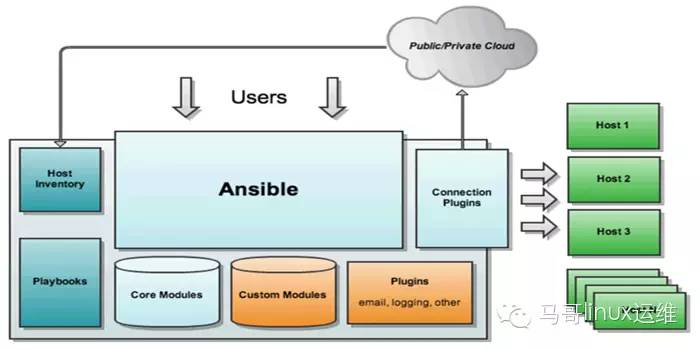
基本架构

命令格式
1
以上是关于基于ansible部署lamp架构(源码安装)的主要内容,如果未能解决你的问题,请参考以下文章