iOS开发系列--通讯录蓝牙内购GameCenteriCloudPassbook系统服务开发汇总
Posted 灯火阑处
tags:
篇首语:本文由小常识网(cha138.com)小编为大家整理,主要介绍了iOS开发系列--通讯录蓝牙内购GameCenteriCloudPassbook系统服务开发汇总相关的知识,希望对你有一定的参考价值。
--系统应用与系统服务
ios开发过程中有时候难免会使用iOS内置的一些应用软件和服务,例如QQ通讯录、微信电话本会使用iOS的通讯录,一些第三方软件会在应用内发送短信等。今天将和大家一起学习如何使用系统应用、使用系统服务:
系统应用
在开发某些应用时可能希望能够调用iOS系统内置的电话、短信、邮件、浏览器应用,此时你可以直接使用UIApplication的OpenURL:方法指定特定的协议来打开不同的系统应用。常用的协议如下:
打电话:tel:或者tel://、telprompt:或telprompt://(拨打电话前有提示)
发短信:sms:或者sms://
发送邮件:mailto:或者mailto://
启动浏览器:http:或者http://
下面以一个简单的demo演示如何调用上面几种系统应用:
//
//  ViewController.m
//  iOSSystemApplication
//
//  Created by Kenshin Cui on 14/04/05.
//  Copyright (c) 2014年 cmjstudio. All rights reserved.
//

#import "ViewController.h"

@interface ViewController ()

@end

@implementation ViewController

- (void)viewDidLoad
    [super viewDidLoad];


#pragma mark - UI事件
//打电话
- (IBAction)callClicK:(UIButton *)sender
    NSString *phoneNumber=@"18500138888";
//    NSString *url=[NSString stringWithFormat:@"tel://%@",phoneNumber];//这种方式会直接拨打电话
    NSString *url=[NSString stringWithFormat:@"telprompt://%@",phoneNumber];//这种方式会提示用户确认是否拨打电话
    [self openUrl:url];


//发送短信
- (IBAction)sendMessageClick:(UIButton *)sender
    NSString *phoneNumber=@"18500138888";
    NSString *url=[NSString stringWithFormat:@"sms://%@",phoneNumber];
    [self openUrl:url];


//发送邮件
- (IBAction)sendEmailClick:(UIButton *)sender
    NSString *mailAddress=@"kenshin@hotmail.com";
    NSString *url=[NSString stringWithFormat:@"mailto://%@",mailAddress];
    [self openUrl:url];


//浏览网页
- (IBAction)browserClick:(UIButton *)sender
    NSString *url=@"http://www.cnblogs.com/kenshincui";
    [self openUrl:url];


#pragma mark - 私有方法
-(void)openUrl:(NSString *)urlStr
    //注意url中包含协议名称,iOS根据协议确定调用哪个应用,例如发送邮件是“sms://”其中“//”可以省略写成“sms:”(其他协议也是如此)
    NSURL *url=[NSURL URLWithString:urlStr];
    UIApplication *application=[UIApplication sharedApplication];
    if(![application canOpenURL:url])
        NSLog(@"无法打开\\"%@\\",请确保此应用已经正确安装.",url);
        return;

    [[UIApplication sharedApplication] openURL:url];


@end
不难发现当openURL:方法只要指定一个URL Schame并且已经安装了对应的应用程序就可以打开此应用。当然,如果是自己开发的应用也可以调用openURL方法来打开。假设你现在开发了一个应用A,如果用户机器上已经安装了此应用,并且在应用B中希望能够直接打开A。那么首先需要确保应用A已经配置了Url Types,具体方法就是在plist文件中添加URL types节点并配置URL Schemas作为具体协议,配置URL identifier作为这个URL的唯一标识,如下图:
然后就可以调用openURL方法像打开系统应用一样打开第三方应用程序了:
//打开第三方应用
- (IBAction)thirdPartyApplicationClick:(UIButton *)sender
    NSString *url=@"cmj://myparams";
    [self openUrl:url];
就像调用系统应用一样,协议后面可以传递一些参数(例如上面传递的myparams),这样一来在应用中可以在AppDelegate的-(BOOL)application:(UIApplication *)application openURL:(NSURL *)url sourceApplication:(NSString *)sourceApplication annotation:(id)annotation代理方法中接收参数并解析。
-(BOOL)application:(UIApplication *)application openURL:(NSURL *)url sourceApplication:(NSString *)sourceApplication annotation:(id)annotation
    NSString *str=[NSString stringWithFormat:@"url:%@,source application:%@,params:%@",url,sourceApplication,[url host]];
    NSLog(@"%@",str);
    return YES;//是否打开
系统服务
短信与邮件
调用系统内置的应用来发送短信、邮件相当简单,但是这么操作也存在着一些弊端:当你点击了发送短信(或邮件)操作之后直接启动了系统的短信(或邮件)应用程序,我们的应用其实此时已经处于一种挂起状态,发送完(短信或邮件)之后无法自动回到应用界面。如果想要在应用程序内部完成这些操作则可以利用iOS中的MessageUI.framework,它提供了关于短信和邮件的UI接口供开发者在应用程序内部调用。从框架名称不难看出这是一套UI接口,提供有现成的短信和邮件的编辑界面,开发人员只需要通过编程的方式给短信和邮件控制器设置对应的参数即可。
在MessageUI.framework中主要有两个控制器类分别用于发送短信(MFMessageComposeViewController)和邮件(MFMailComposeViewController),它们均继承于UINavigationController。由于两个类使用方法十分类似,这里主要介绍一下MFMessageComposeViewController使用步骤:
- 创建MFMessageComposeViewController对象。
- 设置收件人recipients、信息正文body,如果运行商支持主题和附件的话可以设置主题subject、附件attachments(可以通过canSendSubject、canSendAttachments方法判断是否支持)
- 设置代理messageComposeDelegate(注意这里不是delegate属性,因为delegate属性已经留给UINavigationController,MFMessageComposeViewController没有覆盖此属性而是重新定义了一个代理),实现代理方法获得发送状态。
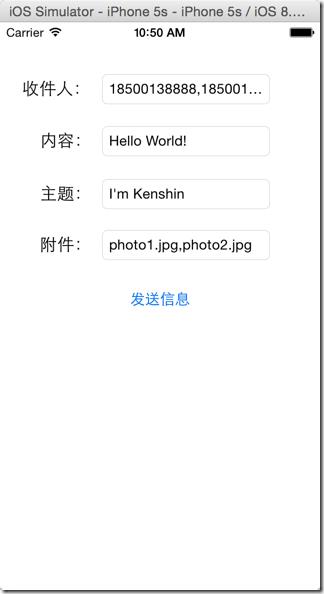
下面自定义一个发送短信的界面演示MFMessageComposeViewController的使用:
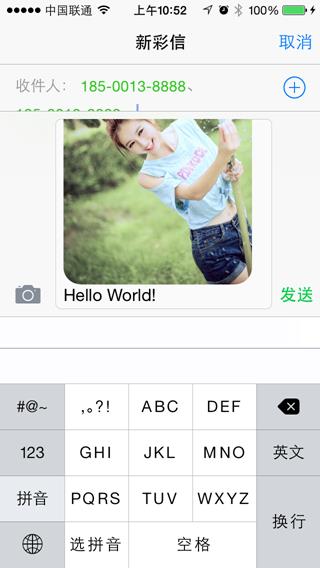
用户通过在此界面输入短信信息点击“发送信息”调用MFMessageComposeViewController界面来展示或进一步编辑信息,点击MFMessageComposeViewController中的“发送”来完成短信发送工作,当然用户也可能点击“取消”按钮回到前一个短信编辑页面。
实现代码:
//
//  KCSendMessageViewController.m
//  iOSSystemApplication
//
//  Created by Kenshin Cui on 14/04/05.
//  Copyright (c) 2014年 cmjstudio. All rights reserved.
//

#import "KCSendMessageViewController.h"
#import <MessageUI/MessageUI.h>

@interface KCSendMessageViewController ()<MFMessageComposeViewControllerDelegate>

@property (weak, nonatomic) IBOutlet UITextField *receivers;
@property (weak, nonatomic) IBOutlet UITextField *body;
@property (weak, nonatomic) IBOutlet UITextField *subject;
@property (weak, nonatomic) IBOutlet UITextField *attachments;

@end

@implementation KCSendMessageViewController
#pragma mark - 控制器视图方法
- (void)viewDidLoad
    [super viewDidLoad];


#pragma mark - UI事件
- (IBAction)sendMessageClick:(UIButton *)sender
    //如果能发送文本信息
    if([MFMessageComposeViewController canSendText])
        MFMessageComposeViewController *messageController=[[MFMessageComposeViewController alloc]init];
        //收件人
        messageController.recipients=[self.receivers.text componentsSeparatedByString:@","];
        //信息正文
        messageController.body=self.body.text;
        //设置代理,注意这里不是delegate而是messageComposeDelegate
        messageController.messageComposeDelegate=self;
        //如果运行商支持主题
        if([MFMessageComposeViewController canSendSubject])
            messageController.subject=self.subject.text;

        //如果运行商支持附件
        if ([MFMessageComposeViewController canSendAttachments])
            /*第一种方法*/
            //messageController.attachments=...;

            /*第二种方法*/
            NSArray *attachments= [self.attachments.text componentsSeparatedByString:@","];
            if (attachments.count>0)
                [attachments enumerateObjectsUsingBlock:^(id obj, NSUInteger idx, BOOL *stop)
                    NSString *path=[[NSBundle mainBundle]pathForResource:obj ofType:nil];
                    NSURL *url=[NSURL fileURLWithPath:path];
                    [messageController addAttachmentURL:url withAlternateFilename:obj];
                ];


            /*第三种方法*/
//            NSString *path=[[NSBundle mainBundle]pathForResource:@"photo.jpg" ofType:nil];
//            NSURL *url=[NSURL fileURLWithPath:path];
//            NSData *data=[NSData dataWithContentsOfURL:url];
            /**
             *  attatchData:文件数据
             *  uti:统一类型标识,标识具体文件类型,详情查看:帮助文档中System-Declared Uniform Type Identifiers
             *  fileName:展现给用户看的文件名称
             */
//            [messageController addAttachmentData:data typeIdentifier:@"public.image"  filename:@"photo.jpg"];

        [self presentViewController:messageController animated:YES completion:nil];


#pragma mark - MFMessageComposeViewController代理方法
//发送完成,不管成功与否
-(void)messageComposeViewController:(MFMessageComposeViewController *)controller didFinishWithResult:(MessageComposeResult)result
    switch (result)
        case MessageComposeResultSent:
            NSLog(@"发送成功.");
            break;
        case MessageComposeResultCancelled:
            NSLog(@"取消发送.");
            break;
        default:
            NSLog(@"发送失败.");
            break;

    [self dismissViewControllerAnimated:YES completion:nil];


@end
这里需要强调一下:
- MFMessageComposeViewController的代理不是通过delegate属性指定的而是通过messageComposeDelegate指定的。
- 可以通过几种方式来指定发送的附件,在这个过程中请务必指定文件的后缀,否则在发送后无法正确识别文件类别(例如如果发送的是一张jpg图片,在发送后无法正确查看图片)。
- 无论发送成功与否代理方法-(void)messageComposeViewController:(MFMessageComposeViewController *)controller didFinishWithResult:(MessageComposeResult)result都会执行,通过代理参数中的result来获得发送状态。
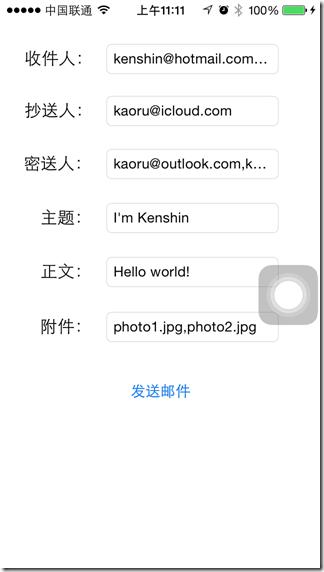
其实只要熟悉了MFMessageComposeViewController之后,那么用于发送邮件的MFMailComposeViewController用法和步骤完全一致,只是功能不同。下面看一下MFMailComposeViewController的使用:
//
//  KCSendEmailViewController.m
//  iOSSystemApplication
//
//  Created by Kenshin Cui on 14/04/05.
//  Copyright (c) 2014年 cmjstudio. All rights reserved.
//

#import "KCSendEmailViewController.h"
#import <MessageUI/MessageUI.h>

@interface KCSendEmailViewController ()<MFMailComposeViewControllerDelegate>
@property (weak, nonatomic) IBOutlet UITextField *toTecipients;//收件人
@property (weak, nonatomic) IBOutlet UITextField *ccRecipients;//抄送人
@property (weak, nonatomic) IBOutlet UITextField *bccRecipients;//密送人
@property (weak, nonatomic) IBOutlet UITextField *subject; //主题
@property (weak, nonatomic) IBOutlet UITextField *body;//正文
@property (weak, nonatomic) IBOutlet UITextField *attachments;//附件

@end

@implementation KCSendEmailViewController

- (void)viewDidLoad
    [super viewDidLoad];


#pragma mark - UI事件

- (IBAction)sendEmailClick:(UIButton *)sender
    //判断当前是否能够发送邮件
    if ([MFMailComposeViewController canSendMail])
        MFMailComposeViewController *mailController=[[MFMailComposeViewController alloc]init];
        //设置代理,注意这里不是delegate,而是mailComposeDelegate
        mailController.mailComposeDelegate=self;
        //设置收件人
        [mailController setToRecipients:[self.toTecipients.text componentsSeparatedByString:@","]];
        //设置抄送人
        if (self.ccRecipients.text.length>0)
            [mailController setCcRecipients:[self.ccRecipients.text componentsSeparatedByString:@","]];

        //设置密送人
        if (self.bccRecipients.text.length>0)
            [mailController setBccRecipients:[self.bccRecipients.text componentsSeparatedByString:@","]];

        //设置主题
        [mailController setSubject:self.subject.text];
        //设置内容
        [mailController setMessageBody:self.body.text ishtml:YES];
        //添加附件
        if (self.attachments.text.length>0)
            NSArray *attachments=[self.attachments.text componentsSeparatedByString:@","] ;
            [attachments enumerateObjectsUsingBlock:^(id obj, NSUInteger idx, BOOL *stop)
                NSString *file=[[NSBundle mainBundle] pathForResource:obj ofType:nil];
                NSData *data=[NSData dataWithContentsOfFile:file];
                [mailController addAttachmentData:data mimeType:@"image/jpeg" fileName:obj];//第二个参数是mimeType类型,jpg图片对应image/jpeg
            ];

        [self presentViewController:mailController animated:YES completion:nil];


#pragma mark - MFMailComposeViewController代理方法
-(void)mailComposeController:(MFMailComposeViewController *)controller didFinishWithResult:(MFMailComposeResult)result error:(NSError *)error
    switch (result)
        case MFMailComposeResultSent:
            NSLog(@"发送成功.");
            break;
        case MFMailComposeResultSaved://如果存储为草稿(点取消会提示是否存储为草稿,存储后可以到系统邮件应用的对应草稿箱找到)
            NSLog(@"邮件已保存.");
            break;
        case MFMailComposeResultCancelled:
            NSLog(@"取消发送.");
            break;

        default:
            NSLog(@"发送失败.");
            break;

    if (error)
        NSLog(@"发送邮件过程中发生错误,错误信息:%@",error.localizedDescription);

    [self dismissViewControllerAnimated:YES completion:nil];


@end
运行效果:
通讯录
AddressBook
iOS中带有一个Contacts应用程序来管理联系人,但是有些时候我们希望自己的应用能够访问或者修改这些信息,这个时候就要用到AddressBook.framework框架。iOS中的通讯录是存储在数据库中的,由于iOS的权限设计,开发人员是不允许直接访问通讯录数据库的,必须依靠AddressBook提供的标准API来实现通讯录操作。通过AddressBook.framework开发者可以从底层去操作AddressBook.framework的所有信息,但是需要注意的是这个框架是基于C语言编写的,无法使用ARC来管理内存,开发者需要自己管理内存。下面大致介绍一下通讯录操作中常用的类型:
- ABAddressBookRef:代表通讯录对象,通过该对象开发人员不用过多的关注通讯录的存储方式,可以直接以透明的方式去访问、保存(在使用AddressBook.framework操作联系人时,所有的增加、删除、修改后都必须执行保存操作,类似于Core Data)等。
- ABRecordRef:代表一个通用的记录对象,可以是一条联系人信息,也可以是一个群组,可以通过ABRecordGetRecordType()函数获得具体类型。如果作为联系人(事实上也经常使用它作为联系人),那么这个记录记录了一个完整的联系人信息(姓名、性别、电话、邮件等),每条记录都有一个唯一的ID标示这条记录(可以通过ABRecordGetRecordID()函数获得)。
- ABPersonRef:代表联系人信息,很少直接使用,实际开发过程中通常会使用类型为“kABPersonType”的ABRecordRef来表示联系人(由此可见ABPersonRef其实是一种类型为“kABPersonType”的ABRecordRef)
- ABGroupRef:代表群组,与ABPersonRef类似,很少直接使用ABGroupRef,而是使用类型为“kABGroupType”的ABRecordRef来表示群组,一个群组可以包含多个联系人,一个联系人也同样可以多个群组。
由于通讯录操作的关键是对ABRecordRef的操作,首先看一下常用的操作通讯录记录的方法:
ABPersonCreate():创建一个类型为“kABPersonType”的ABRecordRef。
ABRecordCopyValue():取得指定属性的值。
ABRecordCopyCompositeName():取得联系人(或群组)的复合信息(对于联系人则包括:姓、名、公司等信息,对于群组则返回组名称)。
ABRecordSetValue():设置ABRecordRef的属性值。注意在设置ABRecordRef的值时又分为单值属性和多值属性:单值属性设置只要通过ABRecordSetValue()方法指定属性名和值即可;多值属性则要先通过创建一个ABMutableMultiValueRef类型的变量,然后通过ABMultiValueAddValueAndLabel()方法依次添加属性值,最后通过ABRecordSetValue()方法将ABMutableMultiValueRef类型的变量设置为记录值。
ABRecordRemoveValue():删除指定的属性值。
注意:
由于联系人访问时(读取、设置、删除时)牵扯到大量联系人属性,可以到ABPerson.h中查询或者直接到帮助文档“Personal Information Properties”
通讯录的访问步骤一般如下:
- 调用ABAddressBookCreateWithOptions()方法创建通讯录对象ABAddressBookRef。
- 调用ABAddressBookRequestAccessWithCompletion()方法获得用户授权访问通讯录。
- 调用ABAddressBookCopyArrayOfAllPeople()、ABAddressBookCopyPeopleWithName()方法查询联系人信息。
- 读取联系人后如果要显示联系人信息则可以调用ABRecord相关方法读取相应的数据;如果要进行修改联系人信息,则可以使用对应的方法修改ABRecord信息,然后调用ABAddressBookSave()方法提交修改;如果要删除联系人,则可以调用ABAddressBookRemoveRecord()方法删除,然后调用ABAddressBookSave()提交修改操作。
- 也就是说如果要修改或者删除都需要首先查询对应的联系人,然后修改或删除后提交更改。如果用户要增加一个联系人则不用进行查询,直接调用ABPersonCreate()方法创建一个ABRecord然后设置具体的属性,调用ABAddressBookAddRecord方法添加即可。
下面就通过一个示例演示一下如何通过ABAddressBook.framework访问通讯录,这个例子中通过一个UITableViewController模拟一下通讯录的查看、删除、添加操作。
主控制器视图,用于显示联系人,修改删除联系人:
KCContactViewController.h
//
//  KCTableViewController.h
//  AddressBook
//
//  Created by Kenshin Cui on 14/04/05.
//  Copyright (c) 2014年 cmjstudio. All rights reserved.
//

#import <UIKit/UIKit.h>

/**
 *  定义一个协议作为代理
 */
@protocol KCContactDelegate
//新增或修改联系人
-(void)editPersonWithFirstName:(NSString *)firstName lastName:(NSString *)lastName workNumber:(NSString *)workNumber;
//取消修改或新增
-(void)cancelEdit;
@end

@interface KCContactTableViewController : UITableViewController

@end
KCContactViewController.m
//
//  KCTableViewController.m
//  AddressBook
//
//  Created by Kenshin Cui on 14/04/05.
//  Copyright (c) 2014年 cmjstudio. All rights reserved.
//

#import "KCContactTableViewController.h"
#import <AddressBook/AddressBook.h>
#import "KCAddPersonViewController.h"

@interface KCContactTableViewController ()<KCContactDelegate>

@property (assign,nonatomic) ABAddressBookRef addressBook;//通讯录
@property (strong,nonatomic) NSMutableArray *allPerson;//通讯录所有人员

@property (assign,nonatomic) int isModify;//标识是修改还是新增,通过选择cell进行导航则认为是修改,否则视为新增
@property (assign,nonatomic) UITableViewCell *selectedCell;//当前选中的单元格

@end

@implementation KCContactTableViewController

#pragma mark - 控制器视图
- (void)viewDidLoad
    [super viewDidLoad];

    //请求访问通讯录并初始化数据
    [self requestAddressBook];


//由于在整个视图控制器周期内addressBook都驻留在内存中,所有当控制器视图销毁时销毁该对象
-(void)dealloc
    if (self.addressBook!=NULL)
        CFRelease(self.addressBook);


#pragma mark - UI事件
//点击删除按钮
- (IBAction)trashClick:(UIBarButtonItem *)sender
    self.tableView.editing=!self.tableView.editing;


#pragma mark - UITableView数据源方法

- (NSInteger)numberOfSectionsInTableView:(UITableView *)tableView
    return 1;


- (NSInteger)tableView:(UITableView *)tableView numberOfRowsInSection:(NSInteger)section
    return self.allPerson.count;


- (UITableViewCell *)tableView:(UITableView *)tableView cellForRowAtIndexPath:(NSIndexPath *)indexPath
    static NSString *identtityKey=@"myTableViewCellIdentityKey1";
    UITableViewCell *cell=[tableView dequeueReusableCellWithIdentifier:identtityKey];
    if(cell==nil)
        cell=[[UITableViewCell alloc]initWithStyle:UITableViewCellStyleValue1 reuseIdentifier:identtityKey];

    //取得一条人员记录
    ABRecordRef recordRef=(__bridge ABRecordRef)self.allPerson[indexPath.row];
    //取得记录中得信息
    NSString *firstName=(__bridge NSString *) ABRecordCopyValue(recordRef, kABPersonFirstNameProperty);//注意这里进行了强转,不用自己释放资源
    NSString *lastName=(__bridge NSString *)ABRecordCopyValue(recordRef, kABPersonLastNameProperty);

    ABMultiValueRef phoneNumbersRef= ABRecordCopyValue(recordRef, kABPersonPhoneProperty);//获取手机号,注意手机号是ABMultiValueRef类,有可能有多条
//    NSArray *phoneNumbers=(__bridge NSArray *)ABMultiValueCopyArrayOfAllValues(phoneNumbersRef);//取得CFArraryRef类型的手机记录并转化为NSArrary
    long count= ABMultiValueGetCount(phoneNumbersRef);
//    for(int i=0;i<count;++i)
//        NSString *phoneLabel= (__bridge NSString *)(ABMultiValueCopyLabelAtIndex(phoneNumbersRef, i));
//        NSString *phoneNumber=(__bridge NSString *)(ABMultiValueCopyValueAtIndex(phoneNumbersRef, i));
//        NSLog(@"%@:%@",phoneLabel,phoneNumber);
//

    cell.textLabel.text=[NSString stringWithFormat:@"%@ %@",firstName,lastName];
    if (count>0)
        cell.detailTextLabel.text=(__bridge NSString *)(ABMultiValueCopyValueAtIndex(phoneNumbersRef, 0));

    if(ABPersonHasImageData(recordRef))//如果有照片数据
        NSData *imageData= (__bridge NSData *)(ABPersonCopyImageData(recordRef));
        cell.imageView.image=[UIImage imageWithData:imageData];
    else
        cell.imageView.image=[UIImage imageNamed:@"avatar"];//没有图片使用默认头像

    //使用cell的tag存储记录id
    cell.tag=ABRecordGetRecordID(recordRef);

    return cell;


- (void)tableView:(UITableView *)tableView commitEditingStyle:(UITableViewCellEditingStyle)editingStyle forRowAtIndexPath:(NSIndexPath *)indexPath
    if (editingStyle == UITableViewCellEditingStyleDelete)
        ABRecordRef recordRef=(__bridge ABRecordRef )self.allPerson[indexPath.row];
        [self removePersonWithRecord:recordRef];//从通讯录删除
        [self.allPerson removeObjectAtIndex:indexPath.row];//从数组移除
        [tableView deleteRowsAtIndexPaths:@[indexPath] withRowAnimation:UITableViewRowAnimationFade];//从列表删除
     else if (editingStyle == UITableViewCellEditingStyleInsert)
        // Create a new instance of the appropriate class, insert it into the array, and add a new row to the table view


#pragma mark - UITableView代理方法
-(void)tableView:(UITableView *)tableView didSelectRowAtIndexPath:(NSIndexPath *)indexPath
    self.isModify=1;
    self.selectedCell=[tableView cellForRowAtIndexPath:indexPath];
    [self performSegueWithIdentifier:@"AddPerson" sender:self];


#pragma mark - Navigation
- (void)prepareForSegue:(UIStoryboardSegue *)segue sender:(id)sender
    if([segue.identifier isEqualToString:@"AddPerson"])
        UINavigationController *navigationController=(UINavigationController *)segue.destinationViewController;
        //根据导航控制器取得添加/修改人员的控制器视图
        KCAddPersonViewController *addPersonController=(KCAddPersonViewController *)navigationController.topViewController;
        addPersonController.delegate=self;
        //如果是通过选择cell进行的导航操作说明是修改,否则为添加
        if (self.isModify)
            UITableViewCell *cell=self.selectedCell;
            addPersonController.recordID=(ABRecordID)cell.tag;//设置
            NSArray *array=[cell.textLabel.text componentsSeparatedByString:@" "];
            if (array.count>0)
                addPersonController.firstNameText=[array firstObject];

            if (array.count>1)
                addPersonController.lastNameText=[array lastObject];

            addPersonController.workPhoneText=cell.detailTextLabel.text;


#pragma mark - KCContact代理方法
-(void)editPersonWithFirstName:(NSString *)firstName lastName:(NSString *)lastName workNumber:(NSString *)workNumber
    if (self.isModify)
        UITableViewCell *cell=self.selectedCell;
        NSIndexPath *indexPath= [self.tableView indexPathForCell:cell];
        [self modifyPersonWithRecordID:(ABRecordID)cell.tag firstName:firstName lastName:lastName workNumber:workNumber];
        [self.tableView reloadRowsAtIndexPaths:@[indexPath] withRowAnimation:UITableViewRowAnimationRight];
    else
        [self addPersonWithFirstName:firstName lastName:lastName workNumber:workNumber];//通讯簿中添加信息
        [self initAllPerson];//重新初始化数据
        [self.tableView reloadData];

    self.isModify=0;

-(void)cancelEdit
    self.isModify=0;


#pragma mark - 私有方法
/**
 *  请求访问通讯录
 */
-(void)requestAddressBook
    //创建通讯录对象
    self.addressBook=ABAddressBookCreateWithOptions(NULL, NULL);

    //请求访问用户通讯录,注意无论成功与否block都会调用
    ABAddressBookRequestAccessWithCompletion(self.addressBook, ^(bool granted, CFErrorRef error)
        if (!granted)
            NSLog(@"未获得通讯录访问权限!");

        [self initAllPerson];

    );

/**
 *  取得所有通讯录记录
 */
-(void)initAllPerson
    //取得通讯录访问授权
    ABAuthorizationStatus authorization= ABAddressBookGetAuthorizationStatus();
    //如果未获得授权
    if (authorization!=kABAuthorizationStatusAuthorized)
        NSLog(@"尚未获得通讯录访问授权!");
        return ;

    //取得通讯录中所有人员记录
    CFArrayRef allPeople= ABAddressBookCopyArrayOfAllPeople(self.addressBook);
    self.allPerson=(__bridge NSMutableArray *)allPeople;

    //释放资源
    CFRelease(allPeople);


/**
 *  删除指定的记录
 *
 *  @param recordRef 要删除的记录
 */
-(void)removePersonWithRecord:(ABRecordRef)recordRef
    ABAddressBookRemoveRecord(self.addressBook, recordRef, NULL);//删除
    ABAddressBookSave(self.addressBook, NULL);//删除之后提交更改

/**
 *  根据姓名删除记录
 */
-(void)removePersonWithName:(NSString *)personName
    CFStringRef personNameRef=(__bridge CFStringRef)(personName);
    CFArrayRef recordsRef= ABAddressBookCopyPeopleWithName(self.addressBook, personNameRef);//根据人员姓名查找
    CFIndex count= CFArrayGetCount(recordsRef);//取得记录数
    for (CFIndex i=0; i<count; ++i)
        ABRecordRef recordRef=CFArrayGetValueAtIndex(recordsRef, i);//取得指定的记录
        ABAddressBookRemoveRecord(self.addressBook, recordRef, NULL);//删除

    ABAddressBookSave(self.addressBook, NULL);//删除之后提交更改
    CFRelease(recordsRef);


/**
 *  添加一条记录
 *
 *  @param firstName  名
 *  @param lastName   姓
 *  @param iPhoneName iPhone手机号
 */
-(void)addPersonWithFirstName:(NSString *)firstName lastName:(NSString *)lastName workNumber:(NSString *)workNumber
    //创建一条记录
    ABRecordRef recordRef= ABPersonCreate();
    ABRecordSetValue(recordRef, kABPersonFirstNameProperty, (__bridge CFTypeRef)(firstName), NULL);//添加名
    ABRecordSetValue(recordRef, kABPersonLastNameProperty, (__bridge CFTypeRef)(lastName), NULL);//添加姓

    ABMutableMultiValueRef multiValueRef =ABMultiValueCreateMutable(kABStringPropertyType);//添加设置多值属性
    ABMultiValueAddValueAndLabel(multiValueRef, (__bridge CFStringRef)(workNumber), kABWorkLabel, NULL);//添加工作电话
    ABRecordSetValue(recordRef, kABPersonPhoneProperty, multiValueRef, NULL);

    //添加记录
    ABAddressBookAddRecord(self.addressBook, recordRef, NULL);

    //保存通讯录,提交更改
    ABAddressBookSave(self.addressBook, NULL);
    //释放资源
    CFRelease(recordRef);
    CFRelease(multiValueRef);


/**
 *  根据RecordID修改联系人信息
 *
 *  @param recordID   记录唯一ID
 *  @param firstName  姓
 *  @param lastName   名
 *  @param homeNumber 工作电话
 */
-(void)modifyPersonWithRecordID:(ABRecordID)recordID firstName:(NSString *)firstName lastName:(NSString *)lastName workNumber:(NSString *)workNumber
    ABRecordRef recordRef=ABAddressBookGetPersonWithRecordID(self.addressBook,recordID);
    ABRecordSetValue(recordRef, kABPersonFirstNameProperty, (__bridge CFTypeRef)(firstName), NULL);//添加名
    ABRecordSetValue(recordRef, kABPersonLastNameProperty, (__bridge CFTypeRef)(lastName), NULL);//添加姓

    ABMutableMultiValueRef multiValueRef =ABMultiValueCreateMutable(kABStringPropertyType);
    ABMultiValueAddValueAndLabel(multiValueRef, (__bridge CFStringRef)(workNumber), kABWorkLabel, NULL);
    ABRecordSetValue(recordRef, kABPersonPhoneProperty, multiValueRef, NULL);
    //保存记录,提交更改
    ABAddressBookSave(self.addressBook, NULL);
    //释放资源
    CFRelease(multiValueRef);

@end
新增或修改控制器视图,用于显示一个联系人的信息或者新增一个联系人:
KCAddPersonViewController.h
//
//  KCAddPersonViewController.h
//  AddressBook
//
//  kABPersonFirstNameProperty
//  Copyright (c) 2014年 cmjstudio. All rights reserved.
//

#import <UIKit/UIKit.h>
@protocol KCContactDelegate;

@interface KCAddPersonViewController : UIViewController

@property (assign,nonatomic) int recordID;//通讯录记录id,如果ID不为0则代表修改否则认为是新增
@property (strong,nonatomic) NSString *firstNameText;
@property (strong,nonatomic) NSString *lastNameText;
@property (strong,nonatomic) NSString *workPhoneText;

@property (strong,nonatomic) id<KCContactDelegate> delegate;

@end
KCAddPersonViewController.m


