QT quick基础QML学习2
Posted 路奇怪
tags:
篇首语:本文由小常识网(cha138.com)小编为大家整理,主要介绍了QT quick基础QML学习2相关的知识,希望对你有一定的参考价值。
目录
布局管理器(GridLayout、RowLayout、ColumnLayout)
布局简述:Qt布局有可以分为
- 行、列、网格
- 水平、垂直、网格
- x、y(这里不再讨论)
- 锚
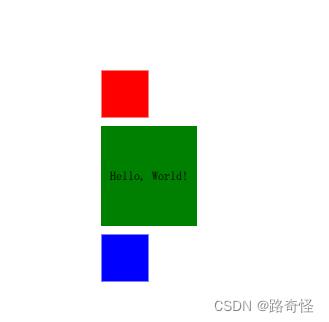
Row(行)、Column(列(不演示了))
下面我们实操一下布局1,线上代码(编码是vs创建QML)
//GreenRectangle.qml
import QtQuick 2.3    //QtQuick 版本

Rectangle
    width: 200
    height: 100
    color: "red"

    Text
        anchors.centerIn: parent    //将text放在控件正中心,这里并是程序界面正中心哦
        text: "Hello, World!"
//RedRectangle.qml
import QtQuick 2.3

Rectangle
    width: 48
    height: 48
    color: "red"
    border.color: Qt.lighter(color)    //边框色,跟Qt.lighter里的颜色保持一致
//BlueRectangle.qml
import QtQuick 2.3

 Rectangle
    width: 48
    height: 48
    color: "blue"
    border.color: Qt.lighter(color)
import QtQuick 2.9
import QtQuick.Window 2.2

Window
    id: roots    //程序里程序标识
    visible: true    //是否可见
    width: 640
    height: 480
    title: qsTr("Hello World")    //名称


    Column
        id: row
        anchors.centerIn: parent
        spacing: 8    //间距
        RedRectangle
        GreenRectangle  width: 96
        BlueRectangle
效果如下(其他的就不演示了):
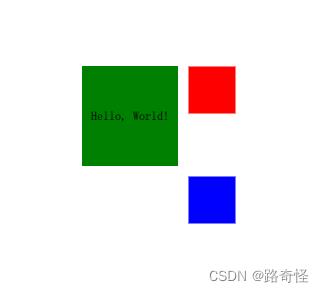
Grid(网格)
Window
    id: roots
    visible: true

    width: 640
    height: 480
    title: qsTr("Hello World")
    Grid
        anchors.centerIn: parent
        rows:2
        columns:2
        layoutDirection: Qt.RightToLeft    // 排序方式默认是Qt.LeftToRight
        //flow: Grid.TopToBottom
        rowSpacing:10
        columnSpacing:10
        RedRectangle
        GreenRectangle  width: 96
        BlueRectangle
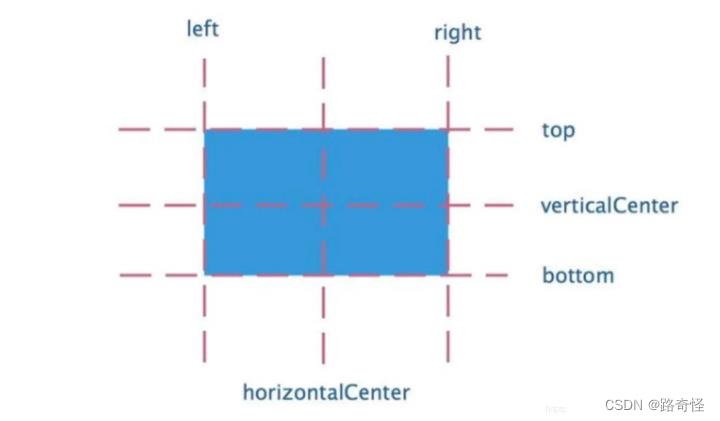
锚(anchors) 布局
锚的部分可以分着下图几种方式
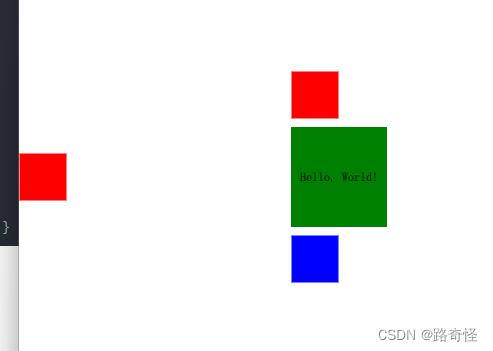
以上面例子:
Window
    id: roots
    visible: true
    width: 640
    height: 480
    title: qsTr("Hello World")

    RedRectangle
            anchors.right:roots.right
            anchors.verticalCenter:parent.verticalCenter //这里不能是roots


    Column
        id: row
        anchors.centerIn: parent
        spacing: 8
        RedRectangle
            anchors.right:roots.right

        GreenRectangle  width: 96
        BlueRectangle
效果如下:
布局管理器(GridLayout、RowLayout、ColumnLayout)
| 属性 | 解释 |
| anchors.topMargin | 元素上边距,需要先设置好anchors.top属性的值 |
| anchors.bottomMargin | 元素下边距,需要先设置好anchors.bottom属性的值 |
| anchors.leftMargin | 元素左边距,需要先设置好anchors.left属性的值 |
| anchors.rightMargin | 元素右边距,需要先设置好anchors.right属性的值 |
| anchors.margins | 元素上下左右四个边距(同等距离),需要先设置好anchors.top,anchors.bottom, anchors.left和anchors.right属性的值。如果元素只元设置了anchors.top,那只有上边距起作用。 |
| anchors.horizontalCenterOffset | 相对于水平居中线位置的偏移量,需要先设置好anchors.horizontalCenter属性的值 |
| anchors.vrerticalCenterOffset | 相对于垂直居中线位置的偏移量,需要先设置好anchors.vrerticalCenter属性的值 |
| anchors.centerIn | 将当前元素放在其他元素的正中位置 |
| anchors.fill | 让当前元素填充到其他元素中 |
RowLayout
Window
    id: roots
    visible: true

    width: 640
    height: 480
    title: qsTr("Hello World")

    RowLayout
        anchors.centerIn:parent
        width:roots.width
        height:roots.height

        RedRectangle
        GreenRectangle  width: 96
        BlueRectangle
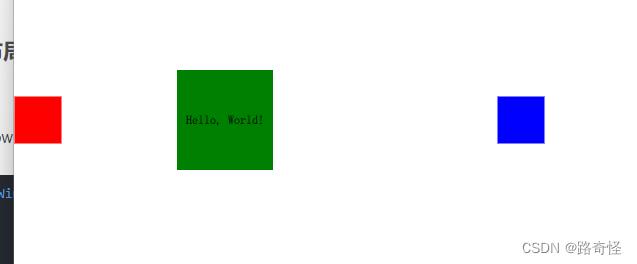
ColumnLayout 与RowLayout差不多,这里不再概述
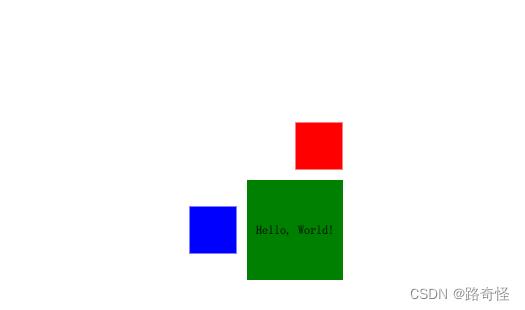
GridLayout
GridLayout与Grid差不多,但是会比RowLayout多几个属性
| 属性 | 解释 |
| Layout.row | 元素所在的行索引(0表示第1行) |
| Layout.column | 元素所在的列索引(0表示第1列) |
| Layout.rowSpan | 元素占据的行数(默认是1) |
| Layout.columnSpan | 元素占据的列数(默认是1) |
    GridLayout
        anchors.centerIn: parent
        rows:2
        columns:2
        rowSpacing:10
        columnSpacing:10
        layoutDirection: Qt.RightToLeft
        //flow: Grid.TopToBottom
        RedRectangle
            Layout.row: 0
            Layout.rowSpan: 1


        GreenRectangle  width: 96
            Layout.row: 1
            Layout.column: 0

        BlueRectangle
            Layout.row: 1
            Layout.column:1
VS开发QML问题
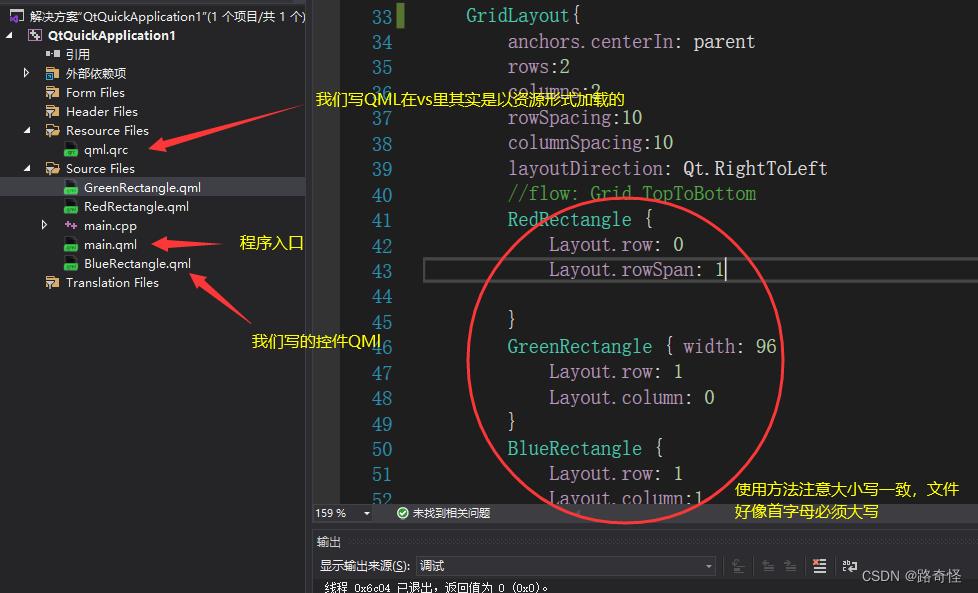
关于这里插件开发是用vs2019开的,但是编程感觉支持不太好,可能是我环境没有装javascript原因吧,这里说下怎么vs开发QML问题

Qt 6.x中Qt Quick简介及示例
Qt Quick首次在Qt 4.7和Qt Creator 2.1中引入,是一种高级UI技术。
Qt Quick模块是用于编写QML(Qt Meta-Object Language, Qt元对象语言)应用程序的标准库。Qt QML模块提供了QML引擎(engine)和语言基础设施,而Qt Quick模块提供了使用QML创建用户界面所需的所有基本类型。它提供了一个可视画布(visual canvas),包括用于创建和动画可视组件、接收用户输入、创建数据模型和视图以及延迟对象实例化的类型。
Qt Quick是QML类型和功能的标准库。它包括视觉类型,交互类型,动画,模型和视图,粒子效果和着色器效果。QML应用程序开发人员可以通过一个import语句访问所有这些功能。
Qt Quick模块既提供了一个QML API(使用QML语言创建用户界面的QML类型),也提供了一个C++ API(用于使用C++代码扩展QML应用程序):
(1).QML API:模块的QML类型可通过QtQuick导入获得。若要使用这些类型,需在.qml文件中添加import语句:import QtQuick
(2).C++ API:使用Qt模块需要直接或通过其它依赖项链接到模块库。一些构建工具对此提供了专门的支持,包括CMake和qmake。
QML是一种声明式语言(QML is a declarative language),它允许根据用户界面的可视组件以及它们如何相互交互和关联来描述用户界面。它是一种高度可读的语言,旨在使组件能够以动态方式互连,并允许在用户界面中轻松重用和自定义组件。使用QtQuick模块,设计人员和开发人员可以轻松地在QML中构建流畅的动画用户界面,并可以选择将这些用户界面连接到任何后端C++库。
QML文档(QML Document)定义了具有高度可读的结构化布局的对象层次结构。每个QML文档都由两部分组成:导入部分和对象声明部分。用户界面最常见的类型和功能在QtQuick导入中提供。文档中的导入部分包含导入语句,这些语句定义文档可以使用哪些QML对象类型和JavaScript资源。对象声明部分定义在实例化文档定义的对象类型时要创建的对象树。
QML文档中的对象声明(object declaration)定义了将在视觉场景中显示的内容。Qt Quick为所有用户界面提供了基本的构建块,例如用于显示图像和文本以及处理用户输入的对象。
QML文档是符合QML文档语法的字符串(A QML document is a string which conforms to QML document syntax)。文档定义QML对象类型。文档通常从本地或远程存储的".qml"文件加载,但可以在代码中手动构造。文档定义的对象类型的实例可以使用QML代码中的组件(Component)或C++中的QQmlComponent来创建。或者,如果对象类型显式公开给具有特定类型名称的QML类型系统,则该类型可以直接在其它文档的对象声明中使用。
在文档中定义可重用的QML对象类型的能力是允许客户端编写模块化、高度可读和可维护代码的重要推动因素。
从Qt 5.4开始,文档也可以具有文件扩展名".ui.qml"。QML引擎像处理标准.qml文件一样处理这些文件,并忽略扩展名的.ui部分。Qt Design Studio将这些文件作为UI文件处理。这些文件只能包含QML语言功能的子集。
注:以上内容来自于网络整理
以下为测试代码:通过vs2022创建的Qt Quick Application项目
main.qml:
import QtQuick 2.15
import QtQuick.Window 2.15
import QtQuick.Controls 2.15
import QtQuick.Dialogs

Window
    visible: true
    width: 640
    height: 480
    title: qsTr("Qt Quick Test")

    Image  // 背景色
        id: image_backgroud
        width: 640; height: 480
        focus: true
        //fillMode: Image.PreserveAspectFit
        source: "test.jpg"
        anchors.centerIn:parent


    Button  // 关闭窗口按钮
        id: button_close
        // 此按钮的起始点坐标
        x: 580; y: 420
        text: "Close"
        highlighted: true
        flat: true
        onClicked: Qt.exit(0) // 槽函数


    MessageDialog  // csdn对话框
        id: dialog_csdn
        title: qsTr("csdn address")
        text: qsTr("https://blog.csdn.net/fengbingchun/")
        buttons: MessageDialog.Ok | MessageDialog.Cancel


    Button  // 单击弹出csdn对话框
        id: button_csdn_address
        x: 20; y: 20
        text: "csdn address"
        highlighted: true
        flat: true
        onClicked: dialog_csdn.open()


    MessageDialog
        id: dialog_github
        title: qsTr("github address")
        text: qsTr("https://github.com/fengbingchun")
        buttons: MessageDialog.Ok | MessageDialog.Cancel


    Button
        id: button_github_address
        x: 120; y: 20
        text: "github address"
        highlighted: true
        flat: true
        onClicked: dialog_github.open()
main.cpp:
#include <QGuiApplication>
#include <QQmlApplicationEngine>
#include <iostream>

int main(int argc, char *argv[])

#if defined(Q_OS_WIN)
    QCoreApplication::setAttribute(Qt::AA_EnableHighDpiScaling);
#endif

    QGuiApplication app(argc, argv);

    QQmlApplicationEngine engine;
    engine.load(QUrl(QStringLiteral("qrc:/main.qml")));
    if (engine.rootObjects().isEmpty())
        return -1;

    fprintf(stdout, "test finish\\n");
    return app.exec();
qml.qrc:
<RCC>
    <qresource prefix="/">
        <file>main.qml</file>
        <file>test.jpg</file>
    </qresource>
</RCC>
执行结果如下图所示:点击csdn address按钮,会弹出对话框,显示csdn地址;点击github address按钮,会弹出对话框,显示github地址;点击右下角的Close按钮,关闭应用程序

GitHub:https://github.com/fengbingchun/Qt_Test
以上是关于QT quick基础QML学习2的主要内容,如果未能解决你的问题,请参考以下文章