智能合约开发 基于Hardhat(实操)
Posted linzhiji
tags:
篇首语:本文由小常识网(cha138.com)小编为大家整理,主要介绍了智能合约开发 基于Hardhat(实操)相关的知识,希望对你有一定的参考价值。
Hardhat是一个编译、部署、测试和调试以太坊应用的开发环境。
Hardhat内置了Hardhat网络,这是一个专为开发设计的本地以太坊网络。主要功能有Solidity调试,跟踪调用堆栈、 console.log() 和交易失败时的明确错误信息提示等
安装
# 创建项目目录
mkdir hardhat-tutorial
cd hardhat-tutorial

# 初始化node.js环境
npm init

# 安装 hardhat
npm install --save-dev hardhat
npx hardhat

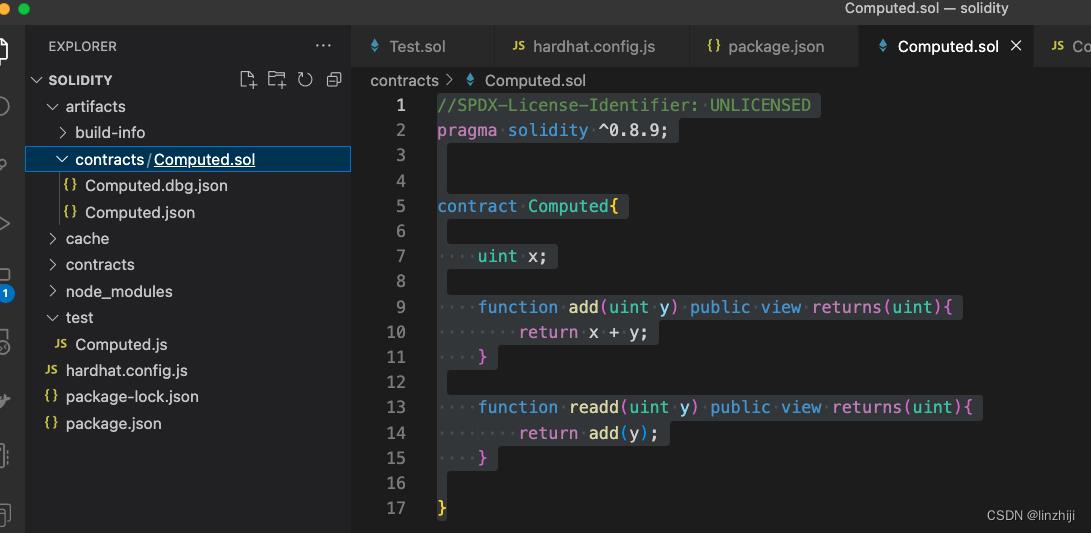
编写合约代码
编写代码,注意目录,文件名

//SPDX-License-Identifier: UNLICENSED
pragma solidity ^0.8.9;


contract Computed

    uint x;

    function add(uint y) public view returns(uint)
        return x + y;


    function readd(uint y) public view returns(uint)
        return add(y);
编译
npx hardhat compile编译成功后

测试
# 安装工具
npm install --save-dev @nomicfoundation/hardhat-toolbox
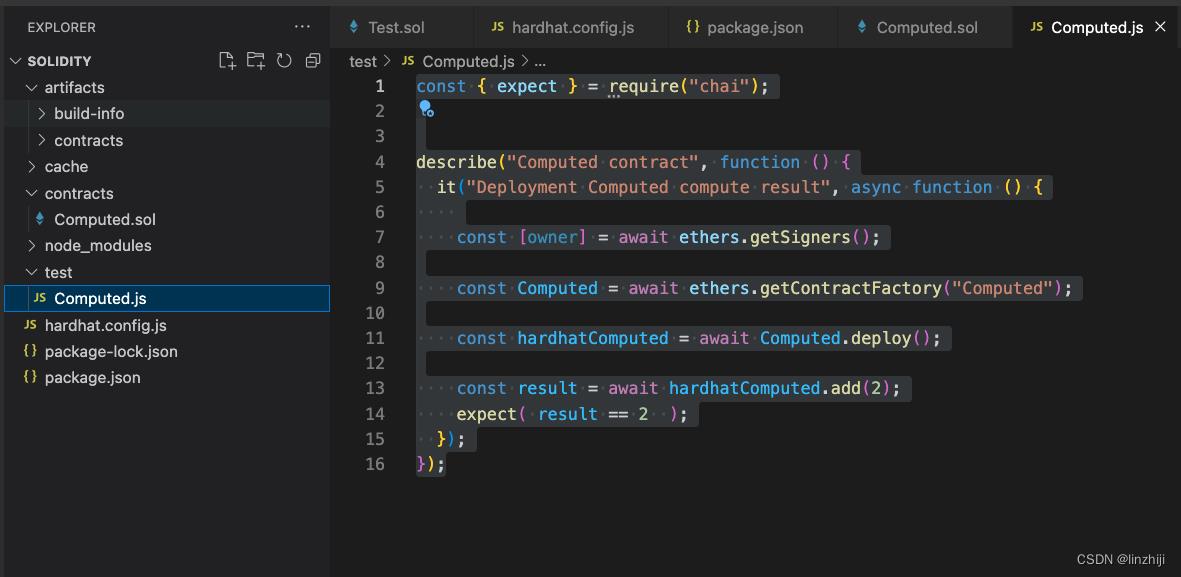
创建测试文件 computed.js,注意文件夹和文件名

const  expect  = require("chai");


describe("Computed contract", function ()
  it("Deployment Computed compute result", async function ()

    // ether.js里getSigners 表示账户
    const [owner] = await ethers.getSigners();

    // ether.js里getContractFactory 是部署合约的抽象类
    const Computed = await ethers.getContractFactory("Computed");

    // 部署合约
    const hardhatComputed = await Computed.deploy();

    // 调用合约函数
    const result = await hardhatComputed.add(2);


    expect( result == 2  );
  );
);
#执行测试
npx hardhat testdebug
// Computed.sol 里添加

pragma solidity ^0.8.9;

//添加内容
import "hardhat/console.sol";

contract Computed

    uint x;

    function add(uint y) public view returns(uint)
        // 打印日志
        console.log(
            "start add",
            msg.sender,
            x,
            y
        );
        return x + y;


    function readd(uint y) public view returns(uint)
        return add(y);
执行结果

部署测试网、主网
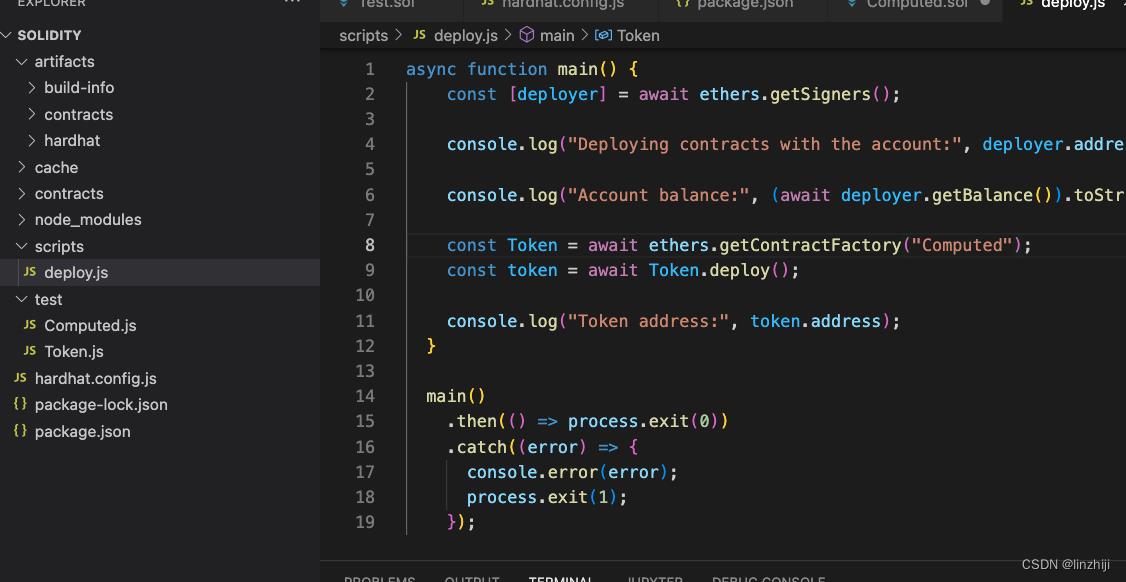
新建目录,文件 deploy.js

async function main()
    const [deployer] = await ethers.getSigners();

    console.log("Deploying contracts with the account:", deployer.address);

    console.log("Account balance:", (await deployer.getBalance()).toString());

    const Token = await ethers.getContractFactory("Computed");
    const token = await Token.deploy();

    console.log("Token address:", token.address);


  main()
    .then(() => process.exit(0))
    .catch((error) =>
      console.error(error);
      process.exit(1);
    );
修改 hardhat.config.js
require("@nomicfoundation/hardhat-toolbox");

// 到  https://www.alchemyapi.io, 创建dAPP,找到key , 替换 KEY
const ALCHEMY_API_KEY = "KEY";

// 替换钱包私钥,记得这是Goerli测试网
// 打开小狐狸 Metamask 钱包
// 打开 Account Details > 导出 Private Key
// 注意: 不要往测试网里转主网(真实账号)的eth
const GOERLI_PRIVATE_KEY = "YOUR GOERLI PRIVATE KEY";

module.exports =
  solidity: "0.8.9",
  networks:
    goerli:
      url: `https://eth-goerli.alchemyapi.io/v2/$ALCHEMY_API_KEY`,
      accounts: [GOERLI_PRIVATE_KEY]


;
以下2个可以 Goerli 水龙头可以领取 测试网的eth
部署:
npx hardhat run scripts/deploy.js --network Goerli
dAPP
官网的solidity代码是Token,项目地址:
GitHub - NomicFoundation/hardhat-boilerplate
git clone https://github.com/NomicFoundation/hardhat-boilerplate

cd hardhat-boilerplate
npm install
npx hardhat node
这里的 account 和 private key 都是测试用的钱包公钥私钥
checkout 代码后,安装依赖。 npx hardhat node 是建立本地Hardhat Network,这样小狐狸钱包就能访问了
接着部署合约
npx hardhat --network localhost run scripts/deploy.js
运行前端代码
cd frontend
npm install
npm run start
打开 http://127.0.0.1:3000/ 访问

添加metamask网络

这样点击connect wallet

可以看到当前wallet的余额是0,无法调用转账功能。开水龙头给你的钱包来点东西(send 100 MHT and 1 ETH to your address)
npx hardhat --network localhost faucet <your address>

查看Hardhat命令
npx hardhat hardhat.config.js 添加
require("@nomicfoundation/hardhat-toolbox");

参考:
Solidity智能合约单元测试介绍
Solidity智能合约单元测试介绍
当前在各种区块链中,生态最全的要属兼容EVM的区块链,在该类区块链上的智能合约绝大部分使用Solidity编写。因此,对Solidity编写的智能合约进行单元测试便成为一项经常性的工作。本文简要的介绍一下怎样使用hardhat进行Solidity智能合约单元测试。
一、什么是Hardhat
我们来看其官方文档的描述:
Hardhat is a development environment to compile, deploy, test, and debug your Ethereum software.
意思为 Hardhat是一个编译,部署,测试和调试以太坊程序的开发环境,在这里本文只涉及到其测试功能。
在Hardhat之前,我们使用truffle做为开发、部署和测试环境。作为后来者,Hardhat的功能更强大,因此现在我们一般使用Hardhat来作为智能合约开发和测试工具。
官方文档介绍了两种测试方式:ethers.js + Waffle和Web3.js + Truffle。在这里我们使用ethers.js + Waffle模式。
二、测试内容
我们进行单元测试,经常性的测试内容有:
- 状态检查,例如合约部署后检查初始状态是否正确,函数调用后检查状态是否改变。一般状态检查为读取view函数。
- 事件触发。基本上,合约中的关键操作都应该触发事件进行相应追踪。在单元测试中了可以测试事件是否触发,抛出的参数是否正确。
- 交易重置。在测试一些非预期条件时,交易应当重置并给出相应的原因。使用单元测试可以检测是否重置及错误原因是否相同。
- 函数计算。例如要计算不同条件下某函数的返回值(例如奖励值),我们需要循环调用 某个函数并输入不同的参数,看是否结果相符。
- 完全功能测试。例如我们合约中涉及到了区块高度或者 区块时间,比如质押一年后才能提取。此时我们一般需要加速区块时间或者区块高度来进行测试。幸运的是,
hardhat提供了接口可以方便的进行此项测试。 - 测试覆盖率。包含代码覆盖率,函数覆盖率和分支覆盖率。一般情况下,应该追求 100%完全覆盖。比如你写了一个
modifier,但是忘记加到函数上去了,而单元测试也漏掉了,此时代码覆盖就会显示该代码未测试,这样可以发现一些简单的BUG。特殊情况下或者确定有代码不会执行的情况下,不追求100%覆盖率。
接下来我们来详细介绍每项内容的测试方法。
三、示例合约
我们按照官方介绍新建一个示例工程Greeting。在工作目录下运行下列命令:
mkdir Greeting
cd Greeting
npm install --save-dev hardhat
npx hardhat
此时选择第二项,创建一个高级示例项目(当然也可以选第3项使用typescrit),等待依赖库安装完毕。
运行code .使用vocode打开当前目录。
我们可以看到项目的contracts目录下已经生成了一个示例合约Greeter.sol,内容如下:
//SPDX-License-Identifier: Unlicense
pragma solidity ^0.8.0;

import "hardhat/console.sol";

contract Greeter
    string private greeting;

    constructor(string memory _greeting)
        console.log("Deploying a Greeter with greeting:", _greeting);
        greeting = _greeting;


    function greet() public view returns (string memory)
        return greeting;


    function setGreeting(string memory _greeting) public
        console.log("Changing greeting from '%s' to '%s'", greeting, _greeting);
        greeting = _greeting;
代码比较简单,需要注意的是它使用了一个hardhat/console.sol插件,该插件可以在hardhat netwrok环境中打印出相应的值,方便开发时调试。可以看到,它支持占位符模式。
进一步查看其文档,它实现了类似Node.js的console.log格式,其底层调用是util.format。这里我们看到它只使用了%s这一种占位符。
四、示例测试
打开项目根目录下的test目录,我们可以看到有一个sample-test.js的文件,其内容如下:
const  expect  = require("chai");
const  ethers  = require("hardhat");

describe("Greeter", function ()
  it("Should return the new greeting once it's changed", async function ()
    const Greeter = await ethers.getContractFactory("Greeter");
    const greeter = await Greeter.deploy("Hello, world!");
    await greeter.deployed();

    expect(await greeter.greet()).to.equal("Hello, world!");

    const setGreetingTx = await greeter.setGreeting("Hola, mundo!");

    // wait until the transaction is mined
    await setGreetingTx.wait();

    expect(await greeter.greet()).to.equal("Hola, mundo!");
  );
);
这里的测试也比较简单,一般使用describe来代表测试某个项目或者功能,使用it来代表具体某项测试。注意,describe和it是函数,在javascript中,一切都是函数。因此,我们可以在describe中再次嵌套describe,这样最外层的describe代表整个项目,内部的describe代表某项目功能。
在该测试文件中,先进行了合约的部署,然后验证合约的状态变量greeting是否为部署时提供的Hello, world!。然后运行setGreeting函数改变问候语为Hola, mundo!,并再次验证更改后的greeting。
五、运行测试
我们运行npx hardhat test ./test/sample-test.js,结果如下:
Compiled 2 Solidity files successfully


  Greeter
Deploying a Greeter with greeting: Hello, world!
Changing greeting from 'Hello, world!' to 'Hola, mundo!'
    ✔ Should return the new greeting once it's changed (946ms)


  1 passing (949ms)
这里可以看到,我们打印出来了两个日志,刚好是我们合约中的console.log语句。
六、测试console
这里,console.log支持的数据类型有限,它仅支持4种数据类型:
- uint
- string
- bool
- address
但是它又提供了额外的API来支持其它类型,如console.logBytes(bytes memory b)等。详情见https://hardhat.org/hardhat-network/reference/#console-log 。
我们来简单测试一下,在Greeter.sol中添加如下函数:
function testConsole() public view returns(bool)
    console.log("Caller is '%s'", msg.sender);
    console.log("Caller is '%d'", msg.sender);
    console.log("Caller is ", msg.sender);
    console.log("Number is '%s'", 0xff);
    console.log("Number is '%d'", 0xff);
    console.logBytes1(bytes1(0xff));
    console.logBytes(abi.encode(msg.sender));
    console.log("Reslut is ", true);
    return true;
在sample-test.js中添加一行代码expect(await greeter.testConsole()).to.be.equal(true);,再次运行npx hardhat test ./test/sample-test.js,结果如下:
Compiled 1 Solidity file successfully


  Greeter
Deploying a Greeter with greeting: Hello, world!
Changing greeting from 'Hello, world!' to 'Hola, mundo!'
Caller is '0xf39fd6e51aad88f6f4ce6ab8827279cfffb92266'
Caller is '1.3908492957860717e+48'
Caller is  0xf39fd6e51aad88f6f4ce6ab8827279cfffb92266
Number is '255'
Number is '255'
0xff
0x000000000000000000000000f39fd6e51aad88f6f4ce6ab8827279cfffb92266
Reslut is  true
    ✔ Should return the new greeting once it's changed (707ms)


  1 passing (709ms)
可以看到,当我们把地址类型当成整数打印时,它打印了对应的整数值。通常情况下,对于console.log支持的四种类型,我们可以不使用通配符或者全部使用%s作为字符串输出,特殊类型的数据使用相应的API进行打印。
七、事件测试
我们知道,合约中重要的操作基本上都会触发事件,因此,捕获抛出的事件并检查事件中的参数也是一项经常性的工作。在合约中添加如下代码。
function eventTest() public
    emit CallerEmit(msg.sender, 500);
我们这次修改我们的测试文件,将各功能均写一个describe来进行,代码如下:
const  expect, util, assert  = require("chai");
const  ethers  = require("hardhat");

describe("Greeter", function ()
  let greeter;
  let owner, user1, users;

  beforeEach(async () =>
    [owner, user1, ...users] = await ethers.getSigners();
    const Greeter = await ethers.getContractFactory("Greeter");
    greeter = await Greeter.deploy("Hello, world!");
    await greeter.deployed();
  );
  describe("State check test", function ()
    it("Should return the new greeting once it's changed", async function ()
      expect(await greeter.greet()).to.equal("Hello, world!");

      const setGreetingTx = await greeter.setGreeting("Hola, mundo!");

      // wait until the transaction is mined
      await setGreetingTx.wait();
      expect(await greeter.greet()).to.equal("Hola, mundo!");
    );
  );

  describe("Console test", function ()
    it("Console.log should be successful", async function ()
      expect(await greeter.testConsole()).to.be.equal(true);
    );
  );

  describe("Event test", function ()
    it("owner emit test", async () =>
      await expect(greeter.eventTest())
        .to.be.emit(greeter, "CallerEmit")
        .withArgs(owner.address, 500);
    );
    it("user1 emit test", async () =>
      await expect(greeter.connect(user1).eventTest())
        .to.be.emit(greeter, "CallerEmit")
        .withArgs(user1.address, 500);
    );
    it("Get emit params test", async () =>
      const tx = await greeter.connect(users[0]).eventTest();
      await tx.wait();
      const receipt = await ethers.provider.getTransactionReceipt(tx.hash);
      const hash = ethers.utils.solidityKeccak256(
        ["string"],
        ["CallerEmit(address,uint256)"]
      );
      const infos = receipt.logs[0];
      assert.equal(infos.topics[0], hash);
      const sender = ethers.utils.getAddress(
        "0x" + infos.topics[1].substring(26)
      );
      assert.equal(sender, users[0].address);
      const value = ethers.BigNumber.from(infos.data);
      expect(value).to.be.equal(500);
    );
  );
);
可以看到,我们测试事件时进行了三项测试,分别为:
- 正常测试,主要是检查事件是否触发,参数是否正确。
- 同上,主要是切换合约调用者为
user1。 - 这里是解析事件来获取事件参数,此场景应用于某些事件参数无法提前获取等,比如一个伪随机数。
八、重置测试
我们来测试条件不满足时的交易重置,在合约中添加如下代码:
function revertTest(uint a, uint b) public
    require(a > 10, "a <= 10");
    if(b > 10)
        revert("b > 10 ");
    else
        revert();
注意:这里会有编译警告,提示我们最后一个revert缺少提示字符串,我们是故意这样的,请忽略它。
在测试文件中添加如下describe:
describe("Revert test", function ()
    it("a < 10 should be failed", async () =>
      await expect(greeter.revertTest(5, 5)).to.be.revertedWith("a <= 10");
    );
    it("b > 10 should be failed", async () =>
      await expect(greeter.revertTest(15, 55)).to.be.revertedWith("b > 10");
    );
    it("b < 10 should be failed", async () =>
      await expect(greeter.revertTest(15, 5)).to.be.reverted;
    );
);
然后我们运行测试通过。
九、区块测试
当我们合约中的内容涉及到区块时,一般需要进行相应区块高度或者区块时间的条件测试。先在测试合约中添加如下内容:
function blockNumberTest() public
    require(block.number >= 10000,"not matched block number");
    console.log("block number: %d", block.number);


function blockTimeTest() public
    require(block.timestamp >= 1750631915,"not matched block time");
    console.log("block timestamp: %d", block.timestamp);
编译时会提示上面两个函数为view函数,但是如果我们把它标记为view函数,那么测试时便不会mine一个新区块。为了模拟真实场景,我们不把它标记为view函数,从而在调用时产生一个新的区块。
然后在测试文件中增加如下describe:
describe("Block test", () =>
    let block;
    let timestamp;

    // 用来去除16进制的左边自动补零
    function convertNum(num)
        let big = ethers.BigNumber.from("" + num)
        let str = big.toHexString()
        let index = 0
        for(let i=2;i<str.length;i++)
            if(str[i] !== "0")
                index = i;
                break;


        if(index === 0)
            return str;
        else
            return str.substring(0,2) + str.substring(index)


    beforeEach(async () =>
      block = await ethers.provider.getBlockNumber();
      timestamp = (await ethers.provider.getBlock(block)).timestamp;
    );
    // 注意,这里hardhat network 默认是一秒一个区块
  	it("Call before timestamp 1651631915 should be failed", async () =>
      assert.ok(timestamp < 1651631915);
      await expect(greeter.blockTimeTest()).to.be.revertedWith(
        "not matched block time"
      );
    );

    it("Call at timestamp 1651631915 should be successfult", async () =>
      await ethers.provider.send("evm_mine", [1651631915 - 1]);
      await greeter.blockTimeTest();
    );
    it("Call before block 10000 should  be failed", async () =>
      assert.ok(block < 10000);
      await expect(greeter.blockNumberTest()).to.be.revertedWith(
        "not matched block number"
      );
    );

    it("Call at block 10000 should be successful", async () =>
      let value = 10000 - block - 1;
      //快速推进到100000区块前一个
      await ethers.provider.send("hardhat_mine", [convertNum(value]);
      await greeter.blockNumberTest();
    );
);
注意,在上面的子describe中又使用了beforeEach函数。这里讲一下beforeEach和before的区别,beforeEach 顾名思义,在每项it测试前都会执行一次;而before,在一个describe中只会执行一次。
这里it函数要使用的describe函数内的变量都放在describe中定义,通常我们测试时会使用一个全新的状态,所以一般使用beforeEach而不是before。但特殊场景会有时会使用before,比如后面的测试依赖于前面的测试结果的。
执行测试后输出的结果显示,我们确定是在block == 10000和timestamp == 5555555555调用了相应的函数。
这里,我们采用的是hardhat自动出块策略。此时,每笔交易不管成功还是失败,都会出一个块,并且每个区块内就只有一个交易。但是如果我们想一个区块内包含多个交易怎么办?hardhat也提供了相应的rpc接口,例如evm_setAutomine和evm_setIntervalMining来模拟真实的出块场景。
我们在测试合约中增加如下代码:
uint public curBlock;
uint public counter;
modifier oneBlock()
    if(curBlock != 0)
        require(block.number == curBlock,"not in one block");

    _;
    if(curBlock == 0)
        curBlock = block.number;


function addCounter() external oneBlock
    counter ++;
这里增加了一个函数addCounter用来在一个区块内改变记数器。如果不在一个区块内,则会revert。
相应的测试文件增加如下代码,在Block test里增加:
it("addCounter test", async () =>
    expect(await greeter.counter()).to.be.equal(0);
    expect(await greeter.curBlock())以上是关于智能合约开发 基于Hardhat(实操)的主要内容,如果未能解决你的问题,请参考以下文章

