卷积神经网络 手写数字识别(包含Pytorch实现代码)
Posted 六个核桃Lu
tags:
篇首语:本文由小常识网(cha138.com)小编为大家整理,主要介绍了卷积神经网络 手写数字识别(包含Pytorch实现代码)相关的知识,希望对你有一定的参考价值。
Hello!欢迎来到六个核桃Lu!
运用卷积神经网络 实现手写数字识别
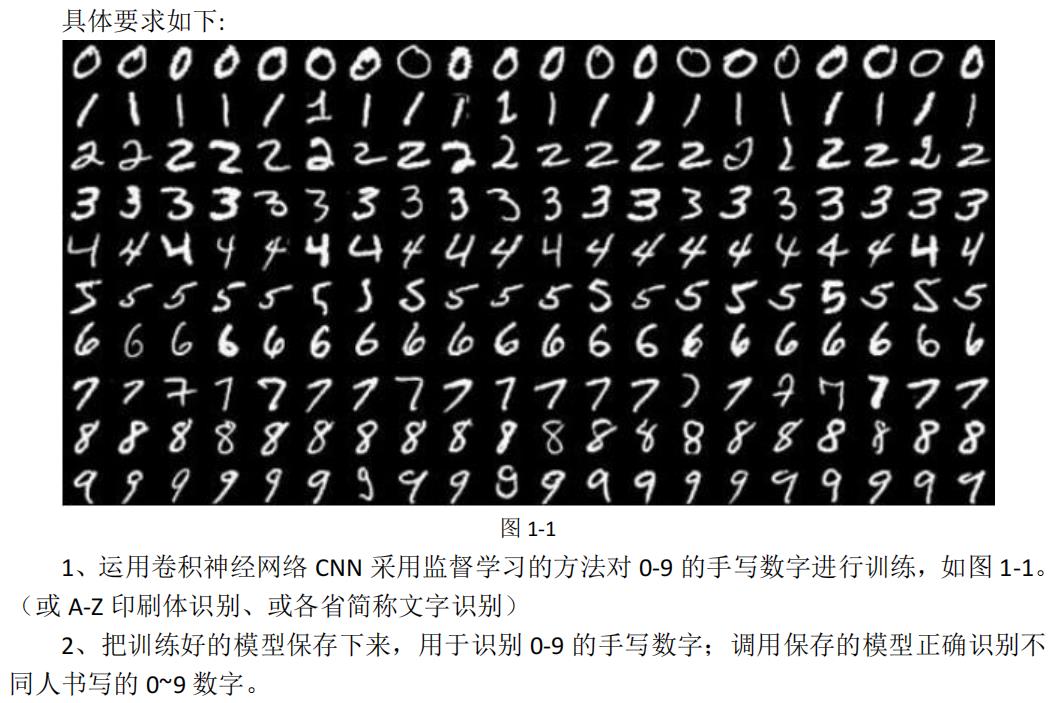
1 算法分析及设计
卷积神经网络:
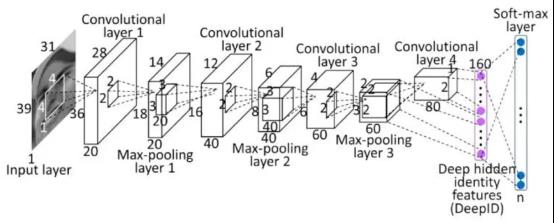
图1-2
如图1-2,卷积神经网络由若干个方块盒子构成,盒子从左到右仿佛越来越小,但却越来越厚;最左边是一张图像,最右边则变成了两排园圈。其实,每—个方块都是由大量神经元细胞构成的,只不过它们排成了立方体的形状。左边图像上的每个元素相当于一个神经元细胞,构成了这个卷积神经网络的输入单元。最右侧的圆圈也是神经元细胞,它们排列成了两条直线,构成了该网络的输出,这与普通神经网络中的细胞没有区别。
卷积神经网络其实也是一个前馈神经网络,承载了深层的信息处理过程。信息从左侧输人一层一层加工处理,最后到右侧输出。对图像分类任务而言,输人的是一张图像,历经一系列卷积层、池化层和完全连接层的运算,最终得到输出,输出;是一组分类的概率,要分成多少类别就有多少个输出层神经元。相邻两层的神经元连按用图中的小立体锥形近似表示,实际上这种锥形遍布更高一层(右侧)立方体中的所有神经元。低层(左侧)到高层(右侧)的运算主要分为两大类:卷积和池化。一层卷积,一层池化,这两种运算交替进行,直到最后一层,我们又把立方体中的神经元拉平成了线性排列的神经元,与最后的输出层进行全连接。
2 程序设计
2.1 手写数字识别任务的卷积神经网络及运算过程
灰度图是计算机中最简单的一种图像,如图2-1,数字8栅格图像和图像的二维矩 阵数据。数字8的灰度图图像只有明暗的区别,图像的二维矩阵数据都在0~255之间,只用一个数字表示出不同的灰度,0表示最明亮的白色,255表示最暗的黑色,介于0~255之间的整数则表示不同明暗程序的灰色。

图2-1
在计算机中,这张输人的图像被表示成了一个尺寸为(28,28)的张量(一个28行28列的矩阵),其中张量的任意一个元素都是一个0~255的数宇,表示这一个像素点的灰度值,越接近255,这个点就会越白。这些输人像素点就自然构成了卷积神经网络的输人层神经元细胞,因此,输人层神经元排布成了一个正方形。
为了完成这个手写数字识别任务,我们设计了如图2-2所示架构的卷积神经网络(在具体设计网络架构的时候,网络有名少层,每一层有多少神经元,这些都可以作为超参数而重新选择)。

图2-2
整个架构可以分为两大部分,第一部分是由输人图像和4个立方体构成的图像处理部分,在这部分中,图像被不断加工成尺寸更小、数量更多的图像;第二部分则是由一系列线性排布的神经元构成的普通前馈多层神经网络。
首先,输入图像经过一层卷积操作,变成了图中第一个立方体,尺寸为(28,28,4)。实际上这是4张28×28像素的图像;之后,这些图像经过池化的操作,尺寸缩小了一半,变成了4张14×14像素的小图,排布成了厚度为4、长宽为14的立方体;之后,这些图像又经历了一次卷积运算,变成了8张图像,尺寸仍然为14×14像素;最后,这8张图像又经历了一次池化操作,尺寸又变小一半,成为8张7×7像素的小图片。
至此,第一部分的图像操作完成,下面就要进入第二部分。首先,我们将392(8×7×7)像素的神经元拉伸为一个长度为392的向量,这些神经元构成了前馈网络部分的输入单元,之后经过一层隐含层,再映射到输出层单元,输出10个(0,1)区间中的小数,表示隶属于0~9这10个数字的概率,且这些数字加起来等于1。最后,我们再选取最大的数值所对应的数字,作为最后的分类输出所有的卷积、池化运算都是依靠两层之问的神经元连按完成的(在图2-2中,这些连接表示为小立方锥体),这些连接与普通的前馈神经网络的连接并无本质区别,也对应了一组权重值。用这组权重值乘以相应的输入神经元就得到了计算结果。同理,第二部分网络的一层层运算也是由层与层之问的神经元连接完成的,它们也有相应的权重。
整个卷积神经网络的运作分成了两个阶段:前馈运算阶段和反馈学习阶段。在网络的前馈阶段(从输人图像到输出数字),所有连接的权重值都不改变,系统会根据输人图像计算输出分类,并根据网络的分类与数据中的标签(标准答案)进行比较计算出交叉熵作为损失函数。接下来,在反馈阶段,根据前馈阶段的损失两数调整所有连接上的权重值,从而完成神经网络的学习过程。



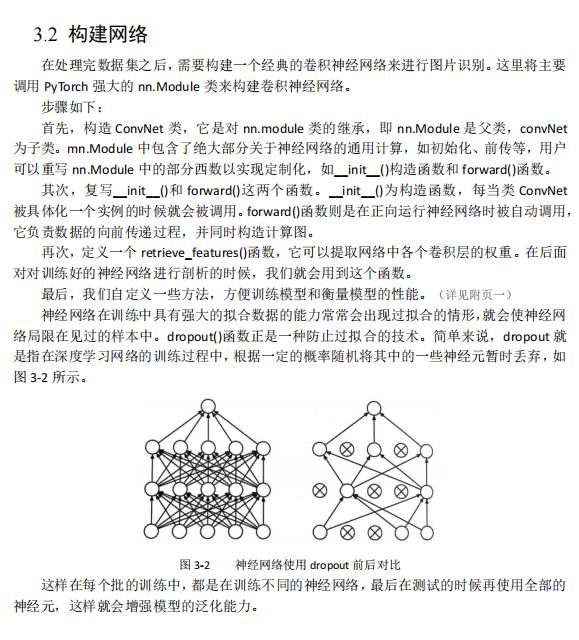
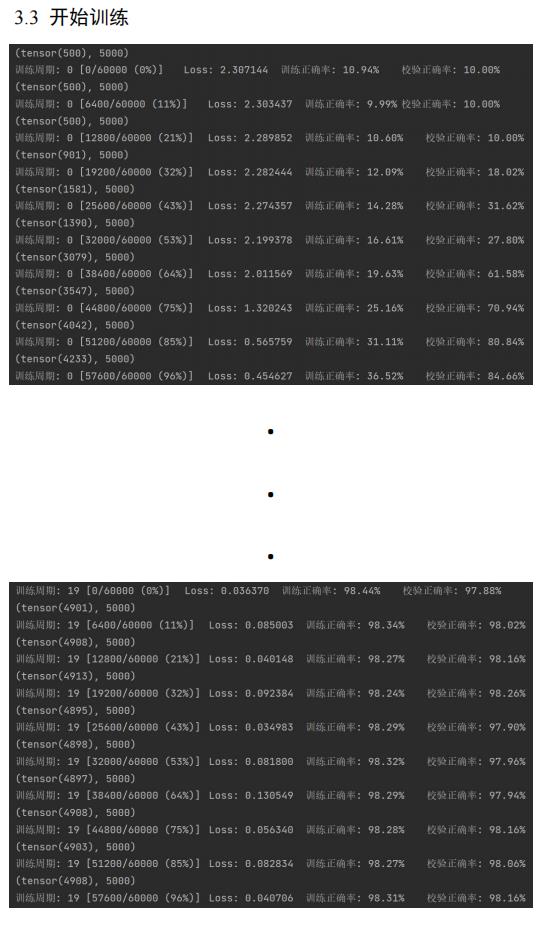

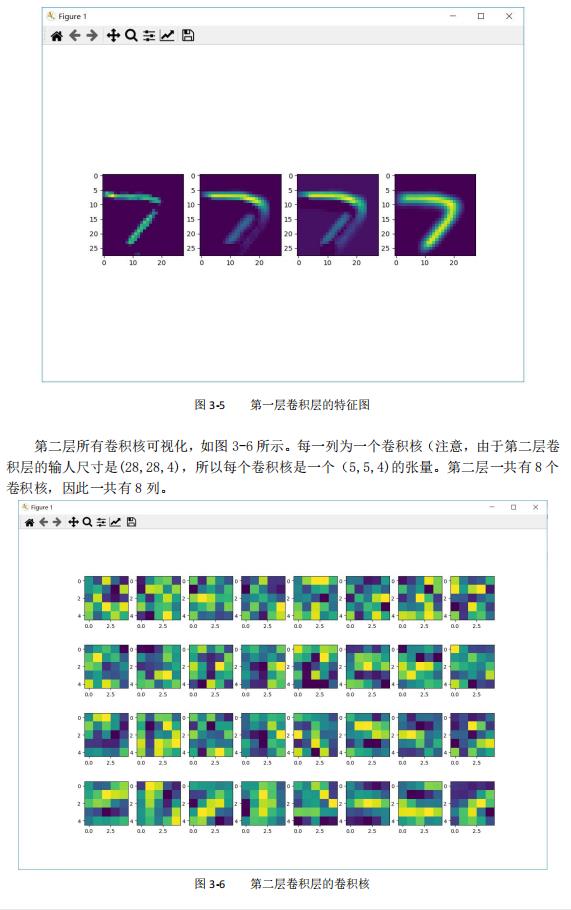
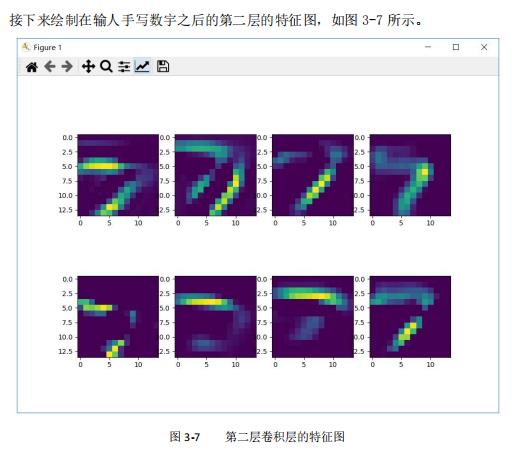
4 总结
首先,卷积运算可以实现各种各样的图像操作。我们知道,绝大部分的图像处理操作,诸如锐化图像(强调细节)、模糊图像(减少细节)都可以看作某种特定权重的卷积核在原始图像上的卷积操作。换向话说,这些操作都是可被卷积神经网络学习到的。于是,学好的卷积核就能对图像进行去噪、提炼等信息过滤和提取的工作。
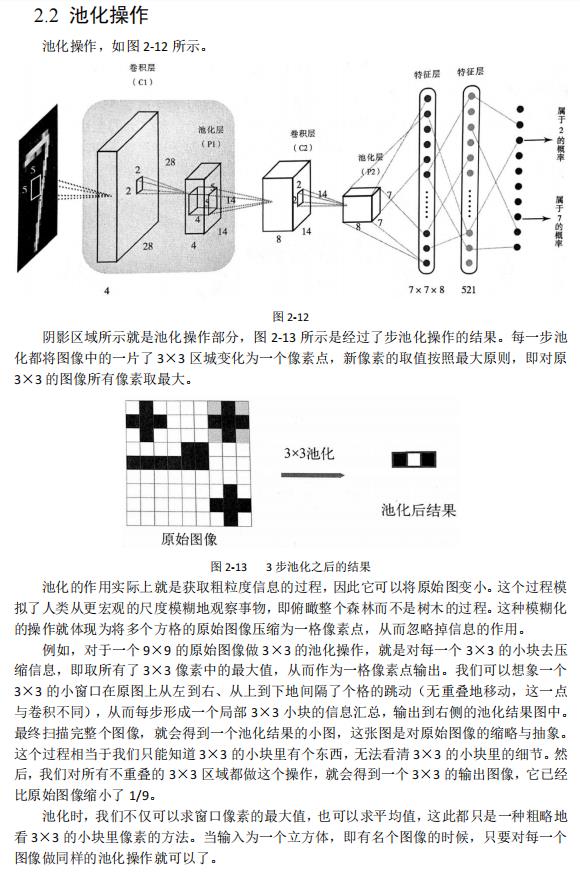
其次,卷积神经网络中的池化操作可以提取大尺度特征。池化操作就是忽略掉图像中的细节信息,从而保留、提炼出;图像中的大尺度信息。这些信息可以帮助卷积神经网络从鉴体把握图像的分类。
卷积操作虽然与普通的神经网络运算非常相似,只不过卷积核会沿着输人图像平移;池化操作则将图像压缩。因此,看起来普通神经网络的反向传播BP算法并不能直接用在卷积和化操作上,而需要给出适合它们的特殊BP算法。
所幸,卷积与池化以及构建卷积神经网络过程中的所有计算都是可微分的,可以利用PyTorch的动态计算图调用backward两数自动计算出每个参数的梯度,并最终完成BP算法。
所谓的卷积操作,其实可以看作一种模板匹配的过程。卷积核就是模板,特征图则是这个模板匹配的结果显示。池化操作则是一种对原始图像进行更大尺度的特征提取过程,它可以提炼出数据中的高尺度信息。将卷积和池化交替组装成多层的卷积神经网络模型,便有了强大的多尺度特征提取能力。
参考资料:
- 集智俱乐部. 《深度学习原理与PyTorch》. 人民邮电出版社
- https://www.bilibili.com/video/BV1T64y167fK?p=13
- https://blog.csdn.net/Bokman/article/details/109549191
- https://blog.csdn.net/qq_41503660/article/details/103833961
- https://zhuanlan.zhihu.com/p/139052035
- Ian Goodfellow,Yoshua Bengio. 《深度学习》. 人民邮电出版社
——代码——
import torch
import torch.nn as nn
from torch. autograd import Variable
import torch.optim as optim
import torch.nn. functional as F
import torchvision.datasets as dsets
import torchvision.transforms as transforms
import matplotlib.pyplot as plt     # %matplotlib inline 可以让Jupyter Notebook直接输出图像
import pylab                        # 但我写上%matplotlib inline就报错 所以我就用了pylab.show()函数显示图像

# 接着定义一些训练用的超参数:
image_size = 28      # 图像的总尺寸为 28x28
num_classes = 10     # 标签的种类数
num_epochs = 20      # 训练的总猜环周期
batch_size = 64      # 一个批次的大小,64张图片

'''______________________________开始获取数据的过程______________________________'''
# 加载MNIST数据 MNIST数据属于 torchvision 包自带的数据,可以直接接调用
# 当用户想调用自己的图俱数据时,可以用torchvision.datasets.ImageFolder或torch.utils.data. TensorDataset来加载
train_dataset = dsets.MNIST(root='./data',    # 文件存放路径
                            train=True,        # 提取训练集
                            # 将图像转化为 Tensor,在加载數据时,就可以对图像做预处理
                            transform=transforms.ToTensor(),
                            download=True)      # 当找不到文件的时候,自动下載
# 加载测试数据集
test_dataset = dsets.MNIST(root='./data',
                           train=False,
                           transform=transforms.ToTensor())
# 训练数据集的加载器,自动将数据切分成批,顺序随机打乱
train_loader = torch.utils.data.DataLoader(dataset=train_dataset,
                                           batch_size=batch_size,
                                           shuffle=True)
'''
将测试数据分成两部分,一部分作为校验数据,一部分作为测试数据。
校验数据用于检测模型是否过拟合并调整参数,测试数据检验整个模型的工作
'''
# 首先,定义下标数组 indices,它相当于对所有test_dataset 中数据的编码
# 然后,定义下标 indices_val 表示校验集数据的下标,indices_test 表示测试集的下标
indices = range(len(test_dataset))
indices_val = indices[: 5000]
indices_test = indices[5000:]
# 根据下标构造两个数据集的SubsetRandomSampler 来样器,它会对下标进行来样
sampler_val = torch.utils.data.sampler.SubsetRandomSampler(indices_val)
sampler_test = torch.utils.data.sampler. SubsetRandomSampler(indices_test)
# 根据两个采样器定义加载器
# 注意将sampler_val 和sampler_test 分别賦值给了 validation_loader 和 test_loader
validation_loader = torch.utils.data.DataLoader(dataset=test_dataset,
                                                batch_size=batch_size,
                                                shuffle=False,
                                                sampler=sampler_val)
test_loader = torch. utils.data.DataLoader(dataset=test_dataset,
                                           batch_size=batch_size,
                                           shuffle=False,
                                           sampler=sampler_test)
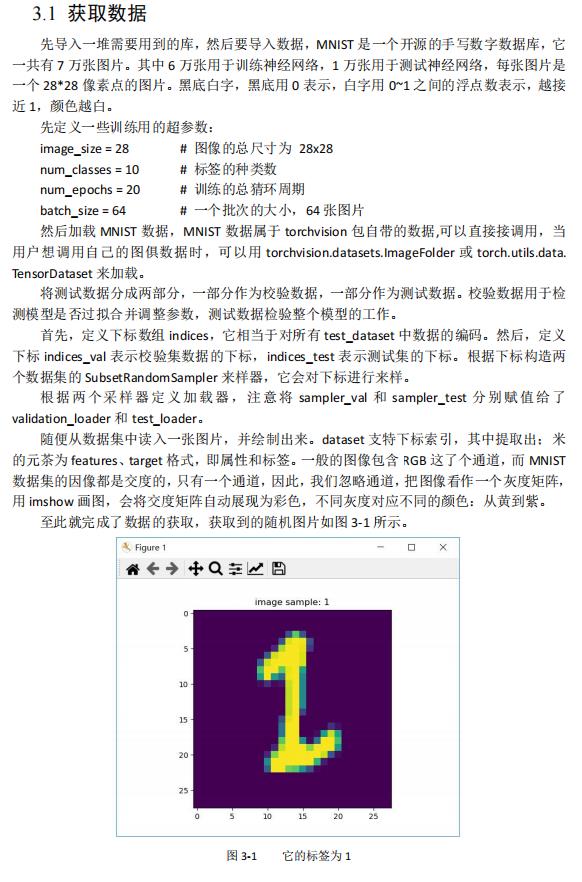
# 随便从数据集中读入一张图片,并绘制出来
idx = 70    # random.randint(1, 100)
# dataset支特下标索引,其中提取出来的元素为 features、target 格式,即属性和标签。[0]表示索引 features
muteimg = train_dataset[idx][0].numpy()
# 一般的图像包含RGB 这了个通道,而 MNIST 数据集的因像都是交度的,只有一个通道
# 因此,我们忽略通道,把图像看作一个灰度矩阵
# 用 imshow 画图,会将交度矩阵自动展现为彩色,不同灰度对应不同的颜色:从黄到紫
plt.imshow(muteimg[0, ...])
plt.title(": ".format('image sample', train_dataset[idx][1]))   # 显示获取到的图片的标签
pylab.show()
'''______________________________获取数据的过程完成______________________________'''


'''______________________________开始构建网络的过程______________________________'''
# 定义卷积神经网络:4和8为人为指定的两个卷积层的厚度(feature map的数量)
depth = [4, 8]
class ConvNet(nn.Module):
    def __init__(self):
        # 该函数在创建一个ConvNet对象即调用语句net=ConvNet()时就会被调用
        # 首先调用父类相应的构造函数
        super(ConvNet, self).__init__()

        # 其次构造ConvNet需要用到的各个神经模块
        # 注意,定义组件并不是卖正搭建组件,只是把基本建筑砖块先找好
        self.conv1 = nn. Conv2d(1, 4, 5, padding=2)     # 定义一个卷积层,输入通道为1,输出通道为4,窗口大小为5,padding为2
        self.pool = nn.MaxPool2d(2, 2)   # 定义一个池化层,一个窗口为2x2的池化运箅
        # 第二层卷积,输入通道为depth[o],输出通道为depth[2],窗口为 5,padding 为2
        self.conv2 = nn. Conv2d(depth[0], depth[1], 5, padding=2)    # 输出通道为depth[1],窗口为5,padding为2
        # 一个线性连接层,输入尺寸为最后一层立方体的线性平铺,输出层 512个节点
        self.fc1 = nn. Linear(image_size // 4 * image_size // 4 * depth[1], 512)

        self. fc2 = nn. Linear(512, num_classes)    # 最后一层线性分类单元,输入为 512,输出为要做分类的类别数

    def forward(self, x):    # 该函数完成神经网络真正的前向运算,在这里把各个组件进行实际的拼装
        # x的尺寸:(batch_size, image_channels, image_width, image_height)
        x = self.conv1(x)   # 第一层卷积
        x = F.relu(x)       # 激活函数用ReLU,防止过拟合
        # x的尺寸:(batch_size, num_filters, image_width, image_height)

        x = self.pool(x)    # 第二层池化,将图片变小
        # x的尺寸:(batch_size, depth[0], image_width/ 2, image_height/2)

        x = self.conv2(x)   # 第三层又是卷积,窗口为5,输入输出通道分列为depth[o]=4,depth[1]=8
        x = F.relu(x)       # 非线性函数
        # x的尺寸:(batch_size, depth[1], image_width/2, image_height/2)

        x = self.pool(x)    # 第四层池化,将图片缩小到原来的 1/4
        # x的尺寸:(batch_size, depth[1], image_width/ 4, image_height/4)

        # 将立体的特征图 tensor 压成一个一维的向量
        # view 函数可以将一个tensor 按指定的方式重新排布
        # 下面这个命令就是要让x按照batch_size * (image_ size//4)^2*depth[1]的方式来排布向量
        x = x.view(-1, image_size // 4 * image_size // 4 * depth[1])
        # x的尺寸:(batch_ size, depth[1J*image width/4*image height/4)

        x = F.relu(self.fc1(x))     # 第五层为全连接,ReLU激活函数
        # x的尺才:(batch_size, 512)

        # 以默认0.5的概率对这一层进行dropout操作,防止过拟合
        x = F.dropout(x, training=self.training)
        x = self.fc2(x)         # 全连接
        # X的尺寸:(batch_size, num_classes)

        # 输出层为 log_Softmax,即概率对数值 log(p(×))。采用log_softmax可以使后面的交叉熵计算更快
        x = F.log_softmax(x, dim=1)
        return x

    def retrieve_features(self, x):
        # 该函数用于提取卷积神经网络的特征图,返回feature_map1,feature_map2为前两层卷积层的特征图
        feature_map1 = F.relu(self.conv1(x))    # 完成第一层卷积
        x = self.pool(feature_map1)             # 完成第一层池化
        # 第二层卷积,两层特征图都存储到了 feature_map1,feature map2 中
        feature_map2 = F.relu(self.conv2(x))
        return (feature_map1, feature_map2)
'''______________________________构造网络的过程完成______________________________'''


'''________________________________开始训练的过程________________________________'''
net = ConvNet()     # 新建一个卷积神经网络的实例。此时convNet的__init()__函数会被自动调用
criterion = nn.CrossEntropyLoss()   # Loss 函数的定义,交叉熵
optimizer = optim.SGD(net.parameters(), lr=0.001, momentum=0.9)    # 定义优化器,普通的随机梯度下降算法
record = []     # 记录准确率等数值的容器
weights = []     # 每若干步就记录一次卷积核

# 开始训练循环
def rightness(output, target):
    preds = output.data.max(dim=1, keepdim=True)[1]
    return preds.eq(target.data.view_as(preds)).cpu().sum(), len(target)

for epoch in range(num_epochs):
    train_rights = []   # 记录训练数据集准确率的容器
    '''
    下面的enumerate起到构道一个枚举器的作用。在对train_loader做循环选代时,enumerate会自动输出一个数宇指示循环了几次,
    并记录在batch_idx中,它就等于0,1,2,...
    train_loader 每选代一次,就会输出一对数据data和target,分别对应一个批中的手写数宇图及对应的标签。
    '''
    for batch_idx, (data, target) in enumerate(train_loader):   # 针对容器中的每一个批进行循环
        # 将 Tensor 转化为 Variable, data 为一批图像,target 为一批标签
        data, target = Variable(data), Variable(target)
        # 给网络模型做标记,标志着模型在训练集上训练
        # 这种区分主要是为了打开关闭net的training标志,从而决定是否运行dropout
        net.train()

        output = net(data)  # 神经网络完成一次前馈的计算过程,得到预测输出output
        loss = criterion(output, target)  # 将output与标签target比较,计算误差
        optimizer.zero_grad()  # 清空梯度
        loss.backward()  # 反向传播
        optimizer.step()  # 一步随机梯度下降算法
        right = rightness(output, target)  # 计算准确率所需数值,返回数值为(正确样例数,总样本数)
        train_rights.append(right)  # 将计算结果装到列表容器train_rights中

        if batch_idx % 100 == 0:    # 每间隔100个batch 执行一次打印操作
            net.eval()  # 给网络楧型做标记,标志着模型在训练集上训练
            val_rights = []       # 记录校验数据集准确率的容器

            # 开始在校验集上做循环,计算校验集上的准确度
            for (data, target) in validation_loader:
                data, target = Variable(data), Variable(target)
                # 完成一次前馈计算过程,得到目前训练得到的模型net在校验集上的表现
                output = net(data)
                # 计算准确率所需数值,返回正确的数值为(正确样例数,总样本数)
                right = rightness(output, target)
                val_rights.append(right)
            # 分别计算目前已经计算过的测试集以及全部校验集上模型的表现:分类准确率
            # train_r为一个二元组,分别记录经历过的所有训练集中分类正确的数量和该集合中总的样本数
            # train_r[0]/train_r[1]是训练集的分类准殖度,val_[0]/val_r[1]是校验集的分类准确度
            train_r = (sum([tup[0] for tup in train_rights]), sum([tup[1] for tup in train_rights]))
            # val_r为一个二元组,分别记录校验集中分类正确的数量和该集合中总的样本数
            val_r = (sum([tup[0] for tup in val_rights]), sum([tup[1] for tup in val_rights]))

            # 打印准确率等数值,其中正确率为本训练周期epoch 开始后到目前批的正确率的平均值
            print(val_r)
            print('训练周期:  [/ (:.0f%)]\\tLoss: :.6f\\t训练正确率: :.2f%\\t校验正确率: :.2f%'.format(
                epoch, batch_idx * batch_size, len(train_loader.dataset),
                       100. * batch_idx / len(train_loader),
                loss.data,
                       100. * train_r[0].numpy() / train_r[1],
                       100. * val_r[0].numpy() / val_r[1]))

            # 将准确率和权重等数值加载到容器中,方便后续处理
            record.append((100 -100.* train_r[0] / train_r[1], 100 - 100. * val_r[0] / val_r[1]))

            # weights 记录了训练周期中所有卷积核的演化过程,net.conv1.weight 提取出了第一层卷积核的权重
            # Clone 是将weight.data 中的数据做一个备份放到列表中
            # 否则当 weight.data 变化时,列表中的每一项数值也会联动
            # 这里使用clone这个函数很重要
            weights.append([net.conv1.weight.data.clone(), net.conv1.bias.data.clone(),
                            net.conv2.weight.data.clone(), net.conv2.bias.data.clone()])
'''______________________________训练的过程完成______________________________'''

# 绘制训练过程的误差曲线,校验集和测试集上的错误率。
plt.figure(figsize=(10, 7))
plt.title('Training loss curve')
plt.plot(record)  # record记载了每一个打印周期记录的训练和校验数据集上的准确度
plt.xlabel('Steps')
plt.ylabel('Error rate')
pylab.show()


''' 可视化第一层卷积核与特征图 '''
# 提取第一层卷积层的卷积核
plt.figure(figsize=(10, 7))
for i in range(4):
    plt.subplot(1, 4, i+1)
    # 提取第一层卷积核中的权重值,注意conv1是net的属性
    plt.imshow(net.conv1.weight.data.numpy()[i, 0, ...])
plt.title('Convolution kernel of the first convolution layer')
pylab.show()

# 调用net的retrieve_features方法可以抽取出输入当前数据后输出的所有特征图(第一个卷积层和第二个卷积层)
# 首先定义读入的图片,它是从test_dataset中提取第idx个批次的第0个图
# 其次unsqueeze的作用是在最前面添加一维
# 目的是让这个input_x的tensor是四维的,这样才能输给net。补充的那一维表示batch
input_x = test_dataset[idx][0].unsqueeze(0)
# feature maps是有两个元素的列表,分别表示第一层和第二层卷积的所有特征因
feature_maps = net. retrieve_features(Variable(input_x))
plt.figure(figsize=(10, 7))
# 打印出4个特征图
for i in range(4):
    plt.subplot(1, 4, i + 1)
    plt.imshow(feature_maps[0][0, i, ...].data.numpy())
plt.title('Characteristic diagram of the first layer of convolution')
pylab.show()

''' 可视化第二层卷积核与特征图 '''
# 绘制第二层的卷积核,每一列对应一个卷积核,一共有8个卷积核
plt.figure(figsize=(15, 10))
plt.title('Characteristic diagram of the second layer of convolution')
for i in range(4):
    for j in range(8):
        plt.subplot(4, 8, i * 8 + j + 1)
        plt.imshow(net.conv2.weight.data.numpy()[j, i, ...])
pylab.show()

# 绘制第二层的特征图,一共有8个
plt.figure(figsize=(10, 7))
plt.title('Characteristic diagram of the second layer of convolution')
for i in range(8):
    plt. subplot(2, 4, i + 1)
    plt. imshow(feature_maps[1][0, i, ...].data.numpy())
pylab.show()
[Pytorch系列-40]:卷积神经网络 - 模型的恢复/加载 - 搭建LeNet-5网络与MNIST数据集手写数字识别
作者主页(文火冰糖的硅基工坊):文火冰糖(王文兵)的博客_文火冰糖的硅基工坊_CSDN博客
本文网址:https://blog.csdn.net/HiWangWenBing/article/details/121132377
目录
第6章 模型评估 - 训练过程(可选,仅用于需要进一步训练的场合)
第1章 模型的恢复与加载
1.1 概述
深度学习的模型训练时一个漫长的过程,保存已有的模型就显得非常重要,保存的目的是为了后续进一步的使用,包括:
(1)在已有模型的基础之上进一步的训练(fine tunning)
(2)直接利用已有的模型进行预测
1.2 模型的恢复与加载类型
(1)加载自定义的模型以及相应的训练参数:任意模型
(2)加载自定义的模型的训练参数:需要当前的网络模型与加载参数对应的网络模型一致
(3)加载Pytorch预训练模型以及相应的参数(与第一种方式本质是一致的)
1.3 模型的保存的API函数:代码示例
(1)保存模型(包括模型结构与参数)
#存储模型
torch.save(net, "models/lenet_cifar10_model.pkl")
(2)保存模板参数
#存储参数
torch.save(net.state_dict() , "models/lenet_cifar10_model_params.pkl")
(3)代码实例
1.4 模型的恢复与加载的API函数:代码示例
(1)恢复模型(包括模型结构与参数)
net_a_load = torch.load("models/lenet_cifar10_model.pkl")备注:
本文关注模型的恢复/加载。
(2)恢复模型参数
# 从模型文件中加载模型参数
MODEL_PARAM_PATH = "models/lenet_cifar10_model_params.pkl"
net_params = torch.load(MODEL_PARAM_PATH)
print(net_params)
# 把加载的参数应用到模型中
net_a.load_state_dict(net_params)
print(net_a)第2章 定义前向运算:加载CFAR10数据集
2.1 前置条件
#环境准备
import numpy as np              # numpy数组库
import math                     # 数学运算库
import matplotlib.pyplot as plt # 画图库

import torch             # torch基础库
import torch.nn as nn    # torch神经网络库
import torch.nn.functional as F
import torchvision.datasets as dataset  #公开数据集的下载和管理
import torchvision.transforms as transforms  #公开数据集的预处理库,格式转换
import torchvision.utils as utils
import torch.utils.data as data_utils  #对数据集进行分批加载的工具集
from PIL import Image #图片显示
from collections import OrderedDict

print("Hello World")
print(torch.__version__)
print(torch.cuda.is_available())
Hello World 1.8.0 False
2.2 定义数据预处理(数据强化)
2.3 下载并加载数据集
#2-1 准备数据集
transform_train = transforms.Compose(
    [transforms.ToTensor()])

transform_test = transforms.Compose(
    [transforms.ToTensor()])

train_data = dataset.MNIST(root = "cifar10",
                           train = True,
                           transform = transform_train,
                           download = True)


test_data = dataset.MNIST(root = "cifar10",
                           train = False,
                           transform = transform_test,
                           download = True)

print(train_data)
print("size=", len(train_data))
print("")
print(test_data)
print("size=", len(test_data))
Dataset MNIST
Number of datapoints: 60000
Root location: cifar10
Split: Train
StandardTransform
Transform: Compose(
ToTensor()
)
size= 60000
Dataset MNIST
Number of datapoints: 10000
Root location: cifar10
Split: Test
StandardTransform
Transform: Compose(
ToTensor()
)
size= 10000
2.4 定义batch Loader
# 批量数据读取
batch_size = 64

train_loader = data_utils.DataLoader(dataset = train_data,  #训练数据
                                  batch_size = batch_size,   #每个批次读取的图片数量
                                  shuffle = True)           #读取到的数据,是否需要随机打乱顺序

test_loader = data_utils.DataLoader(dataset = test_data,   #测试数据集
                                  batch_size = batch_size,
                                  shuffle = True)

print(train_loader)
print(test_loader)
print(len(train_data), len(train_data)/batch_size)
print(len(test_data),  len(test_data)/batch_size)
<torch.utils.data.dataloader.DataLoader object at 0x000001768933C2B0> <torch.utils.data.dataloader.DataLoader object at 0x000001768933C400> 60000 937.5 10000 156.25
备注:
- 每个batch读取64个图片
- 训练数据集次数:50000/64 = 781.25
- 测试数据集次数:10000/64 = 156.25
2.5 可视化部分数据集数据
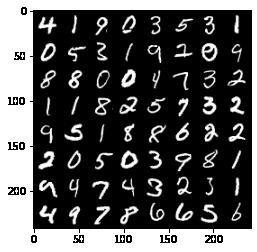
#显示一个batch图片
print("获取一个batch组图片")
imgs, labels = next(iter(train_loader))
print(imgs.shape)
print(labels.shape)
print(labels.size()[0])

print("\\n合并成一张三通道灰度图片")
images = utils.make_grid(imgs)
print(images.shape)
print(labels.shape)

print("\\n转换成imshow格式")
images = images.numpy().transpose(1,2,0)
print(images.shape)
print(labels.shape)

print("\\n显示样本标签")
#打印图片标签
for i in range(batch_size):
    print(labels[i], end=" ")
    i += 1
    #换行
    if i%8 == 0:
        print(end='\\n')

print("\\n显示图片")
plt.imshow(images)
plt.show()
获取一个batch组图片 torch.Size([64, 1, 28, 28]) torch.Size([64]) 64 合并成一张三通道灰度图片 torch.Size([3, 242, 242]) torch.Size([64]) 转换成imshow格式 (242, 242, 3) torch.Size([64]) 显示样本标签 tensor(4) tensor(1) tensor(9) tensor(0) tensor(3) tensor(5) tensor(3) tensor(1) tensor(0) tensor(5) tensor(3) tensor(1) tensor(9) tensor(2) tensor(0) tensor(9) tensor(8) tensor(8) tensor(0) tensor(0) tensor(4) tensor(7) tensor(3) tensor(2) tensor(1) tensor(1) tensor(8) tensor(2) tensor(5) tensor(7) tensor(3) tensor(2) tensor(9) tensor(5) tensor(1) tensor(8) tensor(8) tensor(6) tensor(2) tensor(2) tensor(2) tensor(0) tensor(5) tensor(0) tensor(3) tensor(9) tensor(8) tensor(1) tensor(9) tensor(4) tensor(7) tensor(4) tensor(3) tensor(2) tensor(3) tensor(1) tensor(4) tensor(9) tensor(7) tensor(8) tensor(6) tensor(6) tensor(5) tensor(6) 显示图片
第3章 定义前向运算:加载网络/模型
3.1 定义网络 (可选,仅供个人学习时的比较)
(1)LeNet5A
# 来自官网
class LeNet5A(nn.Module):
    def __init__(self):
        super(LeNet5A, self).__init__()
        # 1 input image channel, 6 output channels, 5x5 square convolution kernel
        self.conv1 = nn.Conv2d(in_channels = 1, out_channels = 6,  kernel_size = 5)   # 6 * 24 * 24
        self.conv2 = nn.Conv2d(in_channels = 6, out_channels = 16, kernel_size = 5)   # 16 * 8 * 8

        # an affine operation: y = Wx + b
        self.fc1 = nn.Linear(in_features = 16 * 4 * 4, out_features= 120)             # 16 * 4 * 4
        self.fc2 = nn.Linear(in_features = 120, out_features = 84)
        self.fc3 = nn.Linear(in_features = 84,  out_features = 10)

    def forward(self, x):
        # Max pooling over a (2, 2) window
        x = F.max_pool2d(F.relu(self.conv1(x)), (2, 2))
        # If the size is a square, you can specify with a single number
        x = F.max_pool2d(F.relu(self.conv2(x)), 2)

        x = torch.flatten(x, 1) # flatten all dimensions except the batch dimension
        x = F.relu(self.fc1(x))
        x = F.relu(self.fc2(x))
        x = self.fc3(x)
        #x = F.log_softmax(x,dim=1)
        return x
(2)LeNet5B
class LeNet5B(nn.Module):
    def __init__(self):
        super(LeNet5B, self).__init__()

        self.feature_convnet = nn.Sequential(OrderedDict([
            ('conv1', nn.Conv2d (in_channels = 1, out_channels = 6, kernel_size= (5, 5), stride = 1)),   # 6 * 24 * 24
            ('relu1', nn.ReLU()),
            ('pool1', nn.MaxPool2d(kernel_size=(2, 2))),                                                 # 6 * 12 * 12
            ('conv2', nn.Conv2d (in_channels = 6, out_channels = 16, kernel_size=(5, 5))),               # 16 * 8 * 8
            ('relu2', nn.ReLU()),
            ('pool2', nn.MaxPool2d(kernel_size=(2, 2))),                                                 # 16 * 4 * 4
        ]))

        self.class_fc = nn.Sequential(OrderedDict([
            ('fc1', nn.Linear(in_features = 16 * 4 * 4, out_features = 120)),     # 16 * 4 * 4
            ('relu3', nn.ReLU()),
            ('fc2', nn.Linear(in_features = 120, out_features = 84)),
            ('relu4', nn.ReLU()),
            ('fc3', nn.Linear(in_features = 84, out_features = 10)),
        ]))

    def forward(self, img):
        output = self.feature_convnet(img)
        output = output.view(-1, 16 * 4 * 4)   #相当于Flatten()
        output = self.class_fc(output)
        return output
3.2 生成网络 (可选,仅供个人学习时的比较)
(1)LeNet5A
net_a = LeNet5A()
print(net_a)
LeNet5A( (conv1): Conv2d(1, 6, kernel_size=(5, 5), stride=(1, 1)) (conv2): Conv2d(6, 16, kernel_size=(5, 5), stride=(1, 1)) (fc1): Linear(in_features=256, out_features=120, bias=True) (fc2): Linear(in_features=120, out_features=84, bias=True) (fc3): Linear(in_features=84, out_features=10, bias=True) )
(2)LeNet5B
net_b = LeNet5B()
print(net_b)LeNet5B(
(feature_convnet): Sequential(
(conv1): Conv2d(1, 6, kernel_size=(5, 5), stride=(1, 1))
(relu1): ReLU()
(pool1): MaxPool2d(kernel_size=(2, 2), stride=(2, 2), padding=0, dilation=1, ceil_mode=False)
(conv2): Conv2d(6, 16, kernel_size=(5, 5), stride=(1, 1))
(relu2): ReLU()
(pool2): MaxPool2d(kernel_size=(2, 2), stride=(2, 2), padding=0, dilation=1, ceil_mode=False)
)
(class_fc): Sequential(
(fc1): Linear(in_features=256, out_features=120, bias=True)
(relu3): ReLU()
(fc2): Linear(in_features=120, out_features=84, bias=True)
(relu4): ReLU()
(fc3): Linear(in_features=84, out_features=10, bias=True)
)
)
3.3 加载已经训练过的模型/网络
net_a_load = torch.load("models/lenet_cifar10_model.pkl")
print(net_a_load)LeNet5A( (conv1): Conv2d(1, 6, kernel_size=(5, 5), stride=(1, 1)) (conv2): Conv2d(6, 16, kernel_size=(5, 5), stride=(1, 1)) (fc1): Linear(in_features=256, out_features=120, bias=True) (fc2): Linear(in_features=120, out_features=84, bias=True) (fc3): Linear(in_features=84, out_features=10, bias=True) )
备注:
从打印信息,可以看出,加载后的网络与LeNet5A是一致的!!
3.4 测试加载的网络的输出
# 2-4 定义网络预测输出
# 测试网络是否能够工作
print("定义测试数据")
input = torch.randn(1, 1, 28, 28)
print("")
print("net_a_load的输出方法1:")
out = net_a_load(input)
print(out)
print("")
print("net_a_load的输出方法2:")
out = net_a_load.forward(input)
print(out)
print("")定义测试数据
net_a_load的输出方法1:
tensor([[-4.7942, 1.4898, 2.1154, 7.8800, -4.2342, 5.5373, -3.7926, -4.5306,
5.5041, -1.3831]], grad_fn=<AddmmBackward>)
net_a_load的输出方法2:
tensor([[-4.7942, 1.4898, 2.1154, 7.8800, -4.2342, 5.5373, -3.7926, -4.5306,
5.5041, -1.3831]], grad_fn=<AddmmBackward>)
3.5 选择后续进一步处理的网络
# 选定最终的网络
net = net_a_load3.6 加载后网络的使用
(1)可以进一步的训练(可选)
(2)直接用于预测
第4章 定义反向运算:损失函数与优化器(可选)
4.1 定义损失函数
# 3-1 定义loss函数:
loss_fn = nn.CrossEntropyLoss()
print(loss_fn)CrossEntropyLoss()
4.2 定义优化器
# 3-2 定义优化器
Learning_rate = 0.01 #学习率
# optimizer = SGD: 基本梯度下降法
# parameters:指明要优化的参数列表
# lr:指明学习率
#optimizer = torch.optim.Adam(model.parameters(), lr = Learning_rate)
optimizer = torch.optim.SGD(net.parameters(), lr = Learning_rate, momentum=0.9)
print(optimizer)SGD (
Parameter Group 0
dampening: 0
lr: 0.01
momentum: 0.9
nesterov: False
weight_decay: 0
)
第5章 定义反向运算:模型训练
5.1 训练前的准备
# 3-3 模型训练: 训练前的准备
# 动态选择GPU或CPU
# Assume that we are on a CUDA machine, then this should print a CUDA device:
device = torch.device("cuda:0" if torch.cuda.is_available() else "cpu")
print(device)
# 定义迭代次数
epochs = 1
loss_history = [] #训练过程中的loss数据
accuracy_history =[] #中间的预测结果
accuracy_batch = 0.0
#设置网络参数的运算设备
net.to(device)cpu
LeNet5A(
  (conv1): Conv2d(1, 6, kernel_size=(5, 5), stride=(1, 1))
  (conv2): Conv2d(6, 16, kernel_size=(5, 5), stride=(1, 1))
  (fc1): Linear(in_features=256, out_features=120, bias=True)
  (fc2): Linear(in_features=120, out_features=84, bias=True)
  (fc3): Linear(in_features=84, out_features=10, bias=True)
)
5.2 开始训练 (可选,仅用于需要进一步训练的场合)
# 3-3 模型训练: 开始训练
for i in range(0, epochs):
    for j, (x_train, y_train) in enumerate(train_loader):

        #指定数据处理的运算设备
        x_train = x_train.to(device)
        y_train = y_train.to(device)

        #(0) 复位优化器的梯度
        optimizer.zero_grad()

        #(1) 前向计算
        y_pred = net(x_train)

        #(2) 计算loss
        loss = loss_fn(y_pred, y_train)

        #(3) 反向求导
        loss.backward()

        #(4) 反向迭代
        optimizer.step()

        # 记录训练过程中的损失值
        loss_history.append(loss.item())  #loss for a batch

        # 记录训练过程中的在训练集上该批次的准确率
        number_batch = y_train.size()[0]                    # 训练批次中图片的个数
        _, predicted = torch.max(y_pred.data, dim = 1)      # 选出最大可能性的预测
        correct_batch = (predicted == y_train).sum().item() # 获得预测正确的数目
        accuracy_batch = 100 * correct_batch/number_batch   # 计算该批次上的准确率
        accuracy_history.append(accuracy_batch)             #  该批次的准确率添加到log中

        if(j % 100 == 0):
            print('epoch {} batch {} In {} loss = {:.4f} accuracy = {:.4f}%'.format(i, j , len(train_data)/batch_size, loss.item(), accuracy_batch))

print("\\n迭代完成")
print("final loss =", loss.item())
print("final accu =", accuracy_batch)
epoch 0 batch 0 In 937.5 loss = 0.0570 accuracy = 96.8750%
epoch 0 batch 100 In 937.5 loss = 0.1146 accuracy = 98.4375%
epoch 0 batch 200 In 937.5 loss = 0.0325 accuracy = 98.4375%
epoch 0 batch 300 In 937.5 loss = 0.0326 accuracy = 98.4375%
epoch 0 batch 400 In 937.5 loss = 0.0779 accuracy = 96.8750%
epoch 0 batch 500 In 937.5 loss = 0.0160 accuracy = 100.0000%
epoch 0 batch 600 In 937.5 loss = 0.1101 accuracy = 98.4375%
epoch 0 batch 700 In 937.5 loss = 0.0523 accuracy = 98.4375%
epoch 0 batch 800 In 937.5 loss = 0.0252 accuracy = 98.4375%
epoch 0 batch 900 In 937.5 loss = 0.0265 accuracy = 100.0000%
迭代完成
final loss = 0.005106988362967968
final accu = 100.0
5.3 说明
从训练的结果可看出,由于是在已经训练过的模型的基础之上的进一步训练,
因此,准确率一开始就很高!
第6章 模型评估 - 训练过程(可选,仅用于需要进一步训练的场合)
6.1 可视化loss迭代过程
#显示loss的历史数据
plt.grid()
plt.xlabel("iters")
plt.ylabel("")
plt.title("loss", fontsize = 12)
plt.plot(loss_history, "r")
plt.show()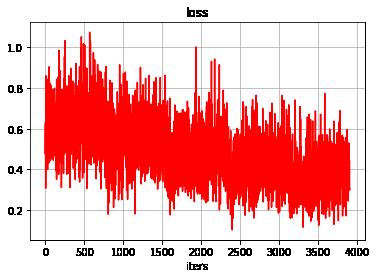
6.2 可视化精度变化过程
#显示准确率的历史数据
plt.grid()
plt.xlabel("iters")
plt.ylabel("%")
plt.title("accuracy", fontsize = 12)
plt.plot(accuracy_history, "b+")
plt.show()
第7章 模型评估 - 训练结果
7.1 手工验证
# 手工检查
net_b.eval()

index = 0
print("获取一个batch样本")
images, labels = next(iter(test_loader))
images = images.to(device)
labels = labels.to(device)
print(images.shape)
print(labels.shape)
print(labels)


print("\\n对batch中所有样本进行预测")
outputs = net(images)
print(outputs.data.shape)

print("\\n对batch中每个样本的预测结果,选择最可能的分类")
_, predicted = torch.max(outputs, 1)
print(predicted.data.shape)
print(predicted)


print("\\n对batch中的所有结果进行比较")
bool_results = (predicted == labels)
print(bool_results.shape)
print(bool_results)

print("\\n统计预测正确样本的个数和精度")
corrects = bool_results.sum().item()
accuracy = corrects/(len(bool_results))
print("corrects=", corrects)
print("accuracy=", accuracy)

print("\\n样本index =", index)
print("标签值    :", labels[index]. item())
print("分类可能性:", outputs.data[index].cpu().numpy())
print("最大可能性:",predicted.data[index].item())
print("正确性    :",bool_results.data[index].item())
获取一个batch样本
torch.Size([64, 1, 28, 28])
torch.Size([64])
tensor([2, 8, 6, 4, 7, 1, 2, 7, 3, 4, 5, 2, 1, 0, 4, 2, 4, 8, 6, 2, 1, 0, 1, 0,
0, 7, 3, 7, 1, 4, 8, 0, 5, 1, 8, 0, 5, 7, 1, 9, 2, 9, 5, 9, 2, 6, 4, 7,
2, 6, 8, 9, 7, 2, 1, 2, 3, 1, 2, 2, 4, 4, 6, 3])
对batch中所有样本进行预测
torch.Size([64, 10])
对batch中每个样本的预测结果,选择最可能的分类
torch.Size([64])
tensor([2, 8, 6, 4, 7, 1, 2, 7, 3, 4, 5, 2, 1, 0, 4, 2, 4, 8, 6, 2, 1, 0, 1, 0,
0, 7, 3, 7, 1, 4, 8, 0, 5, 1, 8, 0, 5, 7, 1, 9, 2, 9, 5, 9, 2, 6, 4, 7,
2, 6, 8, 9, 7, 2, 1, 2, 3, 1, 2, 2, 4, 4, 6, 3])
对batch中的所有结果进行比较
torch.Size([64])
tensor([True, True, True, True, True, True, True, True, True, True, True, True,
True, True, True, True, True, True, True, True, True, True, True, True,
True, True, True, True, True, True, True, True, True, True, True, True,
True, True, True, True, True, True, True, True, True, True, True, True,
True, True, True, True, True, True, True, True, True, True, True, True,
True, True, True, True])
统计预测正确样本的个数和精度
corrects= 64
accuracy= 1.0
样本index = 0
标签值 : 2
分类可能性: [ 1.2355812 2.7528806 17.141403 4.295339 -3.6761677 -9.359661
-8.040263 4.906373 5.9730754 -6.2058544]
最大可能性: 2
正确性 : True
7.2 训练集上的验证
# 对训练后的模型进行评估:测试其在训练集上总的准确率
correct_dataset  = 0
total_dataset    = 0
accuracy_dataset = 0.0

# 进行评测的时候网络不更新梯度
net_b.eval()
with torch.no_grad():
    for i, data in enumerate(train_loader):
        #获取一个batch样本"
        images, labels = data
        images = images.to(device)
        labels = labels.to(device)

        #对batch中所有样本进行预测
        outputs = net(images)

        #对batch中每个样本的预测结果,选择最可能的分类
        _, predicted = torch.max(outputs.data, 1)

        #对batch中的样本数进行累计
        total_dataset += labels.size()[0]

        #对batch中的所有结果进行比较"
        bool_results = (predicted == labels)

        #统计预测正确样本的个数
        correct_dataset += bool_results.sum().item()

        #统计预测正确样本的精度
        accuracy_dataset = 100 * correct_dataset/total_dataset

        if(i % 100 == 0):
            print('batch {} In {} accuracy = {:.4f}'.format(i, len(train_data)/batch_size, accuracy_dataset))

print('Final result with the model on the dataset, accuracy =', accuracy_dataset)
batch 0 In 937.5 accuracy = 95.3125
batch 100 In 937.5 accuracy = 97.8960
batch 200 In 937.5 accuracy = 97.9711
batch 300 In 937.5 accuracy = 97.9599
batch 400 In 937.5 accuracy = 97.9660
batch 500 In 937.5 accuracy = 98.0009
batch 600 In 937.5 accuracy = 97.9825
batch 700 In 937.5 accuracy = 98.0073
batch 800 In 937.5 accuracy = 98.0415
batch 900 In 937.5 accuracy = 98.0490
Final result with the model on the dataset, accuracy = 98.055
7.3 在测试集上的验证
# 对训练后的模型进行评估:测试其在训练集上总的准确率
correct_dataset  = 0
total_dataset    = 0
accuracy_dataset = 0.0

# 进行评测的时候网络不更新梯度
net_b.eval()
with torch.no_grad():
    for i, data in enumerate(test_loader):
        #获取一个batch样本"
        images, labels = data
        images = images.to(device)
        labels = labels.to(device)

        #对batch中所有样本进行预测
        outputs = net(images)

        #对batch中每个样本的预测结果,选择最可能的分类
        _, predicted = torch.max(outputs.data, 1)

        #对batch中的样本数进行累计
        total_dataset += labels.size()[0]

        #对batch中的所有结果进行比较"
        bool_results = (predicted == labels)

        #统计预测正确样本的个数
        correct_dataset += bool_results.sum().item()

        #统计预测正确样本的精度
        accuracy_dataset = 100 * correct_dataset/total_dataset

        if(i % 100 == 0):
            print('batch {} In {} accuracy = {:.4f}'.format(i, len(test_data)/batch_size, accuracy_dataset))

print('Final result with the model on the dataset, accuracy =', accuracy_dataset)
batch 0 In 156.25 accuracy = 100.0000
batch 100 In 156.25 accuracy = 97.9889
Final result with the model on the dataset, accuracy = 97.98
第8章 模型的存储与保存 (可选,如果需要保存新参数)
辛辛苦苦顺利模型不容易,需要把训练的模型保存下来。
#存储模型
# torch.save(model, "models/alexnet_model.pkl")

#存储参数
# torch.save(model.state_dict() , "models/alexnet_params.pkl")作者主页(文火冰糖的硅基工坊):文火冰糖(王文兵)的博客_文火冰糖的硅基工坊_CSDN博客
本文网址:https://blog.csdn.net/HiWangWenBing/article/details/121132377
以上是关于卷积神经网络 手写数字识别(包含Pytorch实现代码)的主要内容,如果未能解决你的问题,请参考以下文章
 https://blog.csdn.net/HiWangWenBing/article/details/121050469