FFmpeg进阶:给视频添加文字水印
Posted 码农飞飞
tags:
篇首语:本文由小常识网(cha138.com)小编为大家整理,主要介绍了FFmpeg进阶:给视频添加文字水印相关的知识,希望对你有一定的参考价值。
文章目录
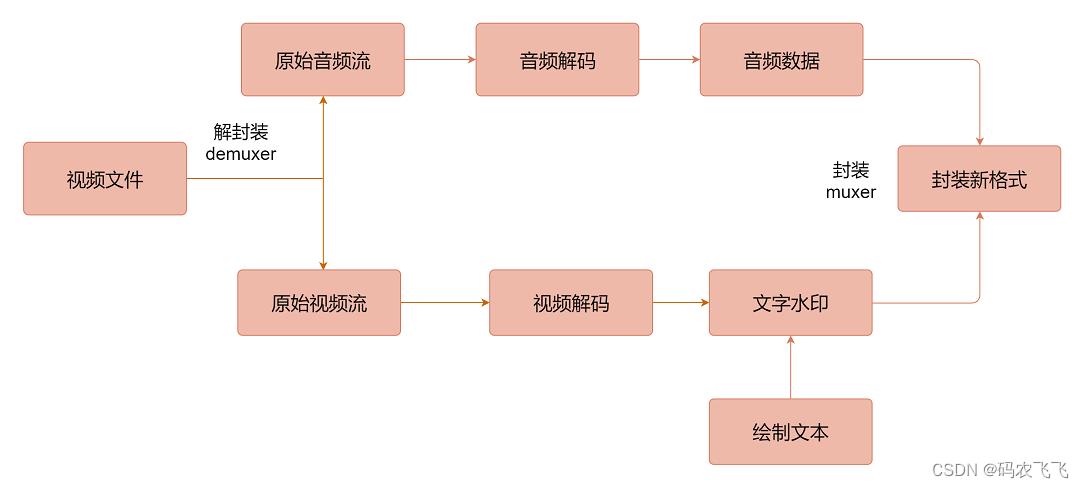
和图片水印一样,很多时候为了声明视频的原创性,我们会给视频添加文字水印进行版权保护。添加文字水印和添加图片水印的流程相似,但又略有不同,这里介绍一下如何通过FFmpeg给视频添加文字水印。添加文字水印的流程图如下图所示:
文字水印配置项
在讲文字水印之前先介绍一下文字水印支持的那些配置,方便大家的使用。
| 项目 | 介绍 |
|---|---|
| 使用格式 | drawtext=fontfile=font_f:text=text1…(通过冒号分割配置项,通过=给配置项赋值) |
| fontfile | 用于绘制文本的字体文件的正确路径,强制参数 |
| text | 要绘制的文本字符串,必须是UTF-8编码的字符序列 |
| x,y | 绘制的位置的起始坐标值 |
| fontcolor | 字体颜色名称或0xRRGGBB[AA]格式的颜色,默认为黑色 |
| fontsize | 要绘制的文本字体大小,默认值为16 |
| tabsize | 用于呈现选项卡的空间大小,默认值为4 |
| line_h,lh | 每个文本行的高度 |
| main_h,h,H | 输入的高度 |
| main_w,w,W | 输入的宽度 |
常用的配置项主要有这些,如果需要其他的配置可以参考官方文档介绍。
文字水印关键点
中文的支持
和QT一样,FFmpeg绘制文字水印也存在中文乱码的问题。在windows下解决中文乱码主要需要以下几点:
1.将源码文件修改为utf-8编码
2.将编译编码类型修改为utf-8编码对应的配置如下:
#pragma execution_character_set("utf-8")
同时我们还应该确保使用的字体支持中文。
字体路径问题
指定字体文件路径是强制参数,可以使用绝对路径和相对路径
//使用工程相对路径下的字体
fontfile=.//simsun.ttc
//使用D盘绝对路径下的字体,要对斜杠进行转义
fontfile=D\\\\\\\\:simun.ttc
定义滤镜实现
文字水印对应的绘制流程图如下图所示:

文字水印滤镜的实现如下:
int InitFilter(AVCodecContext * codecContext)

	char args[512];
	int ret = 0;
	//缓存输入和缓存输出
	const AVFilter *buffersrc = avfilter_get_by_name("buffer");
	const AVFilter *buffersink = avfilter_get_by_name("buffersink");

	//创建输入输出参数
	AVFilterInOut *outputs = avfilter_inout_alloc();
	AVFilterInOut *inputs = avfilter_inout_alloc();

	//滤镜的描述
	//使用simhei字体,绘制的字体大小为100,文本内容为"鬼灭之刃",绘制位置为(100,100)
	//绘制的字体颜色为白色
	string  filters_descr = "drawtext=fontfile=.//simsun.ttc:fontsize=100:text=鬼灭之刃:x=100:y=100:fontcolor=0xFFFFFF";
	enum AVPixelFormat pix_fmts[] =  AV_PIX_FMT_YUV420P, AV_PIX_FMT_YUV420P ;

	//创建滤镜容器
	filter_graph = avfilter_graph_alloc();
	if (!outputs || !inputs || !filter_graph)

		ret = AVERROR(ENOMEM);
		goto end;


	//初始化数据帧的格式
	sprintf_s(args, sizeof(args),
		"video_size=%dx%d:pix_fmt=%d:time_base=%d/%d:pixel_aspect=%d/%d",
		codecContext->width, codecContext->height, codecContext->pix_fmt,
		codecContext->time_base.num, codecContext->time_base.den,
		codecContext->sample_aspect_ratio.num, codecContext->sample_aspect_ratio.den);

	//输入数据缓存
	ret = avfilter_graph_create_filter(&buffersrc_ctx, buffersrc, "in",
		args, NULL, filter_graph);

	if (ret < 0)
		goto end;


	//输出数据缓存
	ret = avfilter_graph_create_filter(&buffersink_ctx, buffersink, "out",
		NULL, NULL, filter_graph);

	if (ret < 0)

		av_log(NULL, AV_LOG_ERROR, "Cannot create buffer sink\\n");
		goto end;


	//设置元素样式
	ret = av_opt_set_int_list(buffersink_ctx, "pix_fmts", pix_fmts,
		AV_PIX_FMT_YUV420P, AV_OPT_SEARCH_CHILDREN);
	if (ret < 0)

		av_log(NULL, AV_LOG_ERROR, "Cannot set output pixel format\\n");
		goto end;


	//设置滤镜的端点
	outputs->name = av_strdup("in");
	outputs->filter_ctx = buffersrc_ctx;
	outputs->pad_idx = 0;
	outputs->next = NULL;

	inputs->name = av_strdup("out");
	inputs->filter_ctx = buffersink_ctx;
	inputs->pad_idx = 0;
	inputs->next = NULL;

	//初始化滤镜
	if ((ret = avfilter_graph_parse_ptr(filter_graph, filters_descr.c_str(),
		&inputs, &outputs, NULL)) < 0)
		goto end;

	//滤镜生效
	if ((ret = avfilter_graph_config(filter_graph, NULL)) < 0)
		goto end;
end:
	//释放对应的输入输出
	avfilter_inout_free(&inputs);
	avfilter_inout_free(&outputs);
	return ret;
项目工程源码
给视频文件添加文字水印的工程源码如下,欢迎参考,如有问题欢迎反馈。
#pragma execution_character_set("utf-8")
#include <string>
#include <iostream>
#include <thread>
#include <memory>
#include <iostream>
#include <fstream>
extern "C"
#include <libavcodec/avcodec.h>
#include <libavdevice/avdevice.h>
#include <libavfilter/avfilter.h>
#include <libavformat/avformat.h>
#include <libavformat/avio.h>
#include <libavutil/avutil.h>
#include <libswresample/swresample.h>
#include <libswscale/swscale.h>
#include <libavutil/frame.h>
#include <libavutil/imgutils.h>
#include <libavformat/avformat.h>
#include <libavutil/time.h>
#include <libavfilter/avfilter.h>
#include <libavfilter/buffersink.h>
#include <libavfilter/buffersrc.h>
#include <libswscale/swscale.h>
#include <libswresample/swresample.h>
#include <libavdevice/avdevice.h>
using namespace std;
//输入媒体文件的上下文
AVFormatContext * input_format_ctx = nullptr;
//输出媒体文件的上下文
AVFormatContext* output_format_ctx;
//输出视频编码器
AVCodecContext* ouput_video_encode_ctx = NULL;
//音视频解码器
AVCodecContext *video_decode_ctx = NULL;
AVCodecContext *audio_decode_ctx = NULL;
//视频索引和音频索引
int video_stream_index = -1;
int audio_stream_index = -1;
//输出编码器
static AVCodec * output_video_codec;
//滤镜容器和缓存
AVFilterGraph * filter_graph = nullptr;
AVFilterContext *buffersink_ctx = nullptr;;
AVFilterContext *buffersrc_ctx = nullptr;;
AVPacket packet;
//起始时间
static int64_t startTime;
int OpenOutput(char *fileName)
//创建输出流,输出flv格式视频
int ret = 0;
ret = avformat_alloc_output_context2(&output_format_ctx, NULL, "flv", fileName);
if (ret < 0)
return -1;
//打开输出流
ret = avio_open(&output_format_ctx->pb, fileName, AVIO_FLAG_READ_WRITE);
if (ret < 0)
return -2;
//创建输出流
for (int index = 0; index < input_format_ctx->nb_streams; index++)
if (index == video_stream_index)
AVStream * stream = avformat_new_stream(output_format_ctx, output_video_codec);
avcodec_parameters_from_context(stream->codecpar, ouput_video_encode_ctx);
stream->codecpar->codec_tag = 0;
else if (index == audio_stream_index)
AVStream * stream = avformat_new_stream(output_format_ctx, NULL);
stream->codecpar = input_format_ctx->streams[audio_stream_index]->codecpar;
stream->codecpar->codec_tag = 0;
//写文件头
ret = avformat_write_header(output_format_ctx, nullptr);
if (ret < 0)
return -3;
if (ret >= 0)
cout << "open output stream successfully" << endl;
return ret;
//初始化输出视频的编码器
int InitEncoderCodec(int iWidth, int iHeight)
output_video_codec = avcodec_find_encoder(AV_CODEC_ID_H264);
if (NULL == output_video_codec)
return -1;
//指定编码器的参数
ouput_video_encode_ctx = avcodec_alloc_context3(output_video_codec);
ouput_video_encode_ctx->time_base = input_format_ctx->streams[video_stream_index]->time_base;
ouput_video_encode_ctx->flags |= AV_CODEC_FLAG_GLOBAL_HEADER;
ouput_video_encode_ctx->sample_fmt = AV_SAMPLE_FMT_S16;
ouput_video_encode_ctx->width = iWidth;
ouput_video_encode_ctx->height = iHeight;
ouput_video_encode_ctx->bit_rate = input_format_ctx->streams[video_stream_index]->codecpar->bit_rate;
ouput_video_encode_ctx->pix_fmt = (AVPixelFormat)*output_video_codec->pix_fmts;
ouput_video_encode_ctx->profile = FF_PROFILE_H264_MAIN;
ouput_video_encode_ctx->level = 41;
ouput_video_encode_ctx->thread_count = 8;
return 0;
int InitFilter(AVCodecContext * codecContext)
char args[512];
int ret = 0;
//缓存输入和缓存输出
const AVFilter *buffersrc = avfilter_get_by_name("buffer");
const AVFilter *buffersink = avfilter_get_by_name("buffersink");
//创建输入输出参数
AVFilterInOut *outputs = avfilter_inout_alloc();
AVFilterInOut *inputs = avfilter_inout_alloc();
//滤镜的描述
//使用simhei字体,绘制的字体大小为100,文本内容为"鬼灭之刃",绘制位置为(100,100)
//绘制的字体颜色为白色
string filters_descr = "drawtext=fontfile=.//simsun.ttc:fontsize=100:text=鬼灭之刃:x=100:y=100:fontcolor=0xFFFFFF";
enum AVPixelFormat pix_fmts[] = AV_PIX_FMT_YUV420P, AV_PIX_FMT_YUV420P ;
//创建滤镜容器
filter_graph = avfilter_graph_alloc();
if (!outputs || !inputs || !filter_graph)
ret = AVERROR(ENOMEM);
goto end;
//初始化数据帧的格式
sprintf_s(args, sizeof(args),
"video_size=%dx%d:pix_fmt=%d:time_base=%d/%d:pixel_aspect=%d/%d",
codecContext->width, codecContext->height, codecContext->pix_fmt,
codecContext->time_base.num, codecContext->time_base.den,
codecContext->sample_aspect_ratio.num, codecContext->sample_aspect_ratio.den);
//输入数据缓存
ret = avfilter_graph_create_filter(&buffersrc_ctx, buffersrc, "in",
args, NULL, filter_graph);
if (ret < 0)
goto end;
//输出数据缓存
ret = avfilter_graph_create_filter(&buffersink_ctx, buffersink, "out",
NULL, NULL, filter_graph);
if (ret < 0)
av_log(NULL, AV_LOG_ERROR, "Cannot create buffer sink\\n");
goto end;
//设置元素样式
ret = av_opt_set_int_list(buffersink_ctx, "pix_fmts", pix_fmts,
AV_PIX_FMT_YUV420P, AV_OPT_SEARCH_CHILDREN);
if (ret < 0)
av_log(NULL, AV_LOG_ERROR, "Cannot set output pixel format\\n");
goto end;
//设置滤镜的端点
outputs->name = av_strdup("in");
outputs->filter_ctx = buffersrc_ctx;
outputs->pad_idx = 0;
outputs->next = NULL;
inputs->name = av_strdup("out");
inputs->filter_ctx = buffersink_ctx;
inputs->pad_idx = 0;
inputs->next = NULL;
//初始化滤镜
if ((ret = avfilter_graph_parse_ptr(filter_graph, filters_descr.c_str(),
&inputs, &outputs, NULL)) < 0)
goto end;
//滤镜生效
if ((ret = avfilter_graph_config(filter_graph, NULL)) < 0)
goto end;
end:
//释放对应的输入输出
avfilter_inout_free(&inputs);
avfilter_inout_free(&outputs);
return ret;
//将加水印之后的图像帧输出到文件中
static int output_frame(AVFrame *frame, AVRational time_base)
int code;
AVPacket packet = 0 ;
av_init_packet(&packet);
int ret = avcodec_send_frame(ouput_video_encode_ctx, frame);
if (ret < 0)
printf("Error sending a frame for encoding\\n");
return -1;
while (ret >= 0)
ret = avcodec_receive_packet(ouput_video_encode_ctx, &packet);
if (ret == AVERROR(EAGAIN) || ret == AVERROR_EOF)
return (ret == AVERROR(EAGAIN)) ? 0 : 1;
else if (ret < 0)
printf("Error during encoding\\n");
exit(1);
AVRational avTimeBaseQ = 1, AV_TIME_BASE ;
int64_t ptsTime = av_rescale_q(frame->pts, input_format_ctx->streams[video_stream_index]->time_base, avTimeBaseQ);
int64_t nowTime = av_gettime() - startTime;
if ((ptsTime > nowTime))
int64_t sleepTime = ptsTime - nowTime;
av_usleep((sleepTime));
else
printf("not sleeping\\n");
packet.pts = av_rescale_q_rnd(packet.pts, time_base, output_format_ctx->streams[video_stream_index]->time_base, (AVRounding)(AV_ROUND_INF | AV_ROUND_PASS_MINMAX));
packet.dts = av_rescale_q_rnd(packet.dts, time_base, output_format_ctx->streams[video_stream_index]->time_base, (AVRounding)(AV_ROUND_INF | AV_ROUND_PASS_MINMAX));
packet.stream_index = video_stream_index;
code = av_interleaved_write_frame(output_format_ctx, &packet);
av_packet_unref(&packet);
if (code < 0)
av_log(NULL, AV_LOG_ERROR, "[ERROR] Writing Live Stream Interleaved Frame");
if (ret < 0)
exit(1);
av_packet_unref(&packet);
int main(int argc, char* argv[])
if (argc != 3)
printf("usage:%1 input filepath %2 outputfilepath");
return -1;
//输入文件地址、输出文件地址
string fileInput = std::string(argv[1]);
string fileOutput = std::string(argv[2]);
//初始化各种配置
avformat_network_init();
av_log_set_level(AV_LOG_ERROR);
//打开输入文件
int ret = avformat_open_input(&input_format_ctx, fileInput.c_str(), NULL, NULL);
if (ret < 0)
return ret;
ret Java后台用ffmpeg命令给视频添加水印 - ^身后有尾巴^ - 博客园 (cnblogs.com)
1:先去ffmpeg官网下载其压缩包 Download FFmpeg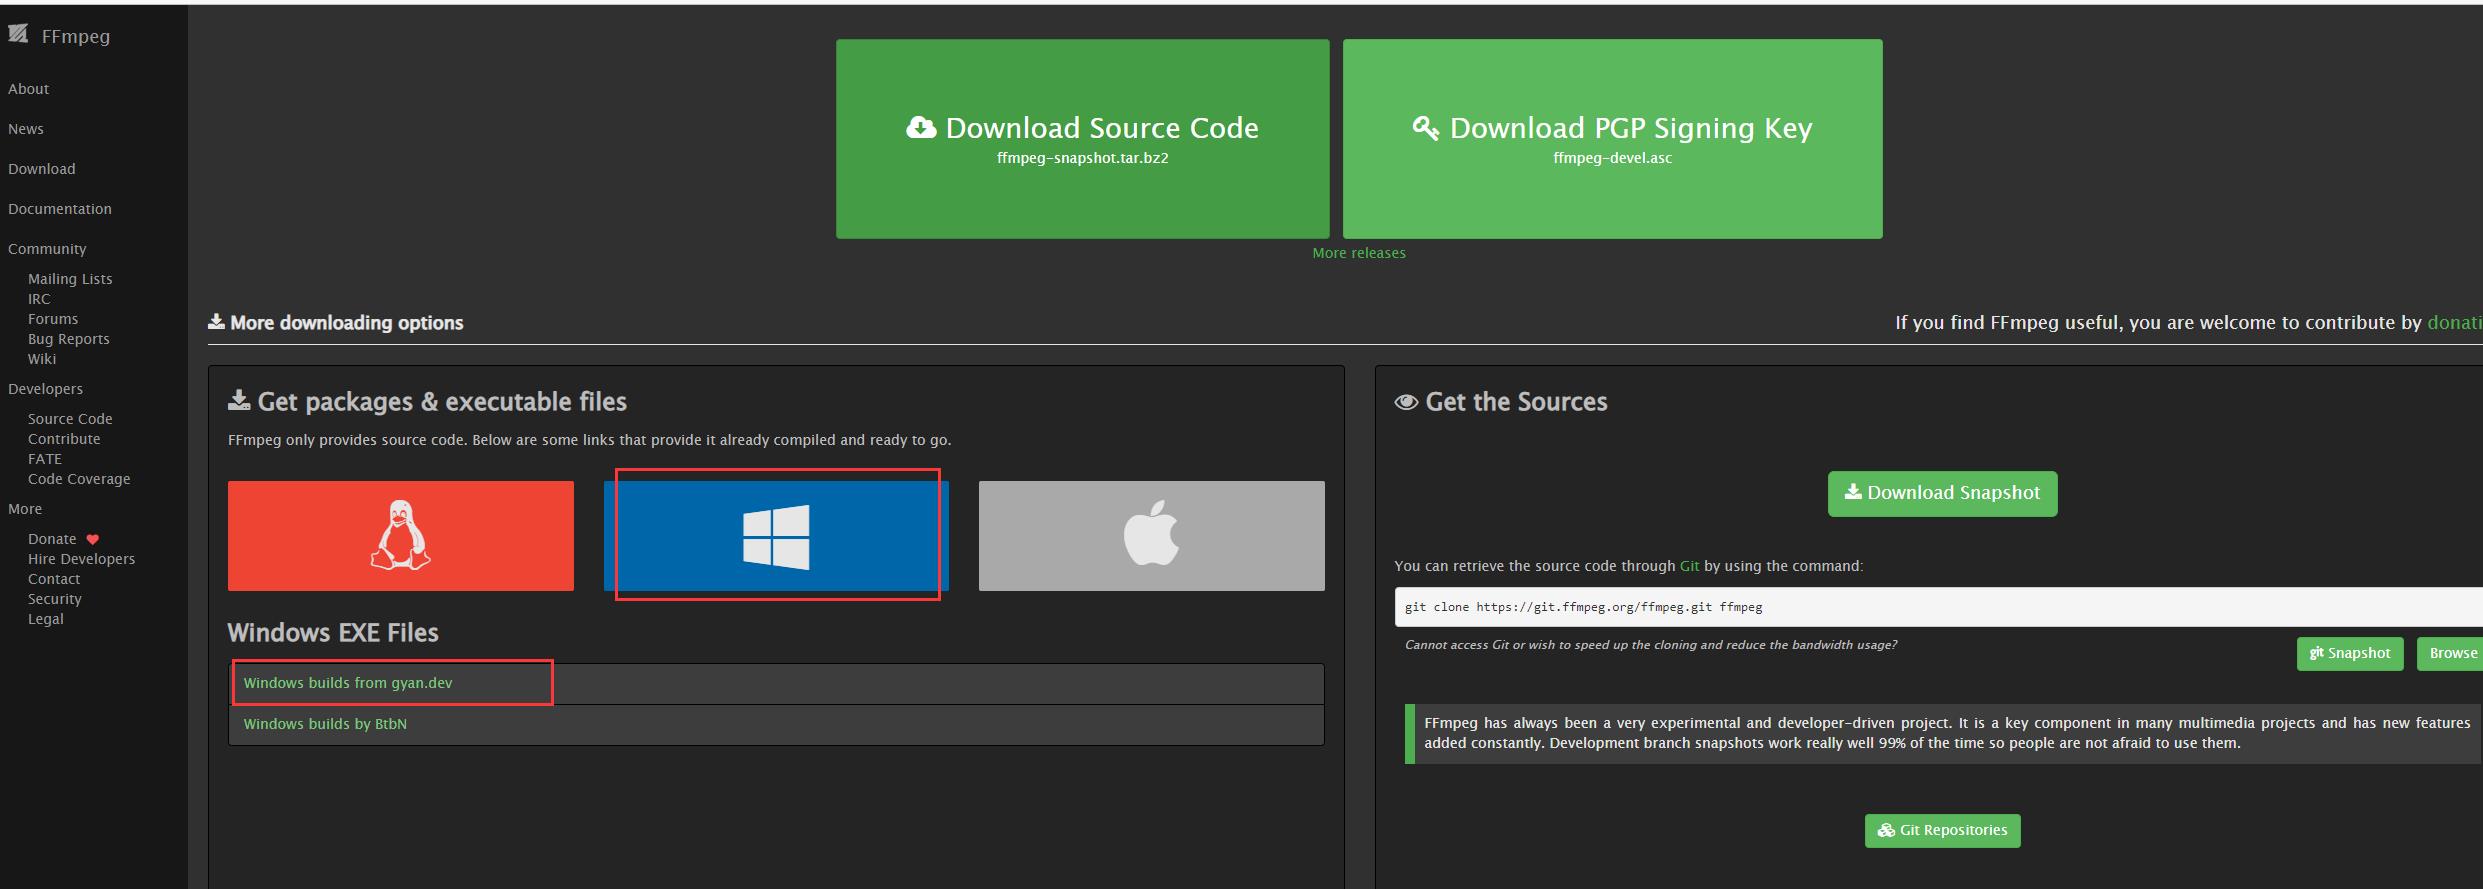
下载,解压到指定位置
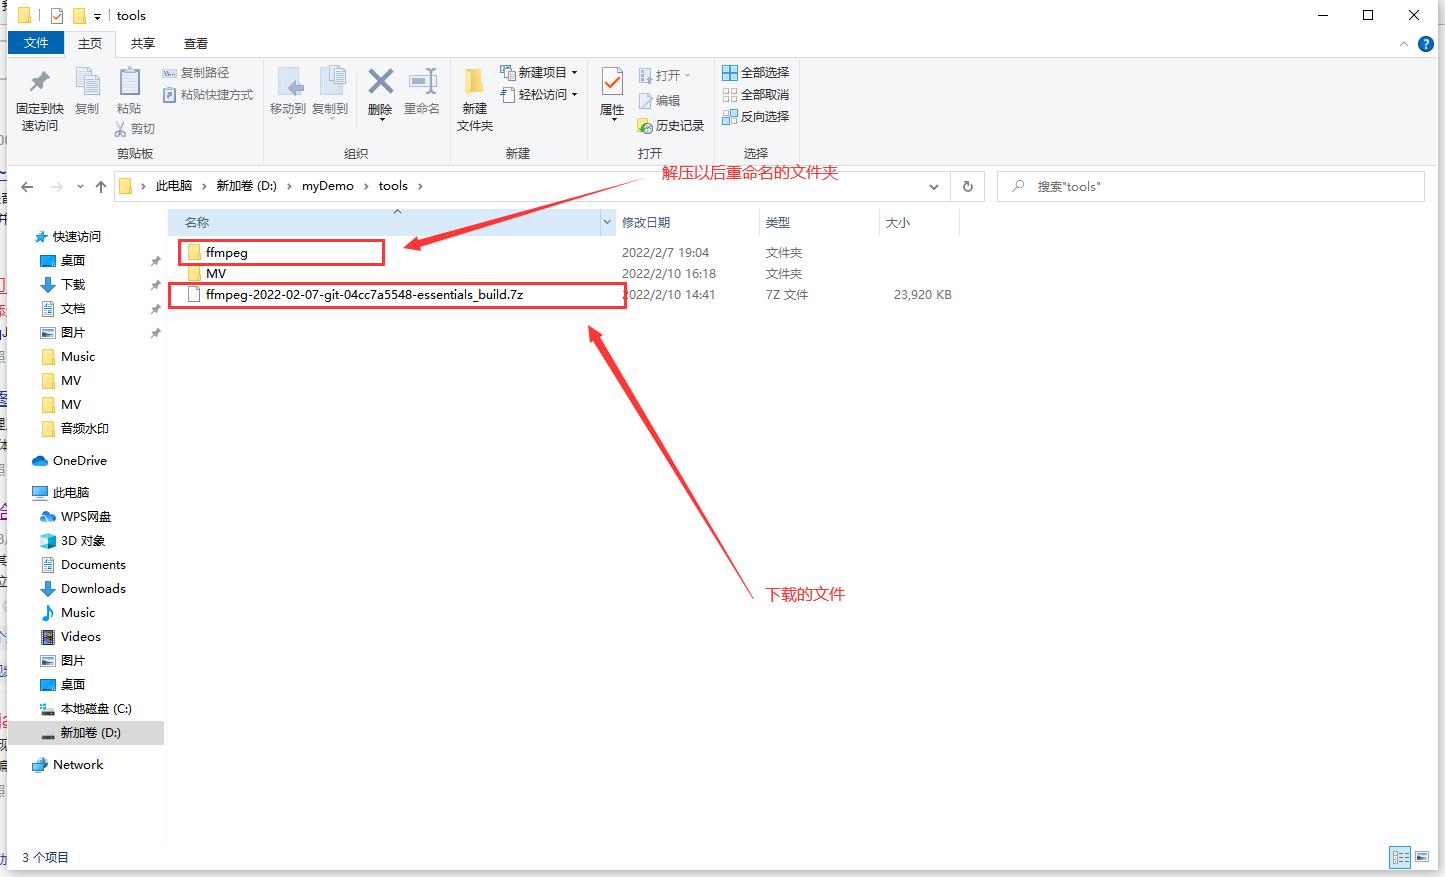
2.将压缩包拷贝到你想的任意位置并解压,正常解压出来的文件名过长,也可能会有空格,我们最好将文件夹下的文件拷贝出来到一个新的文件夹FFmpeg下
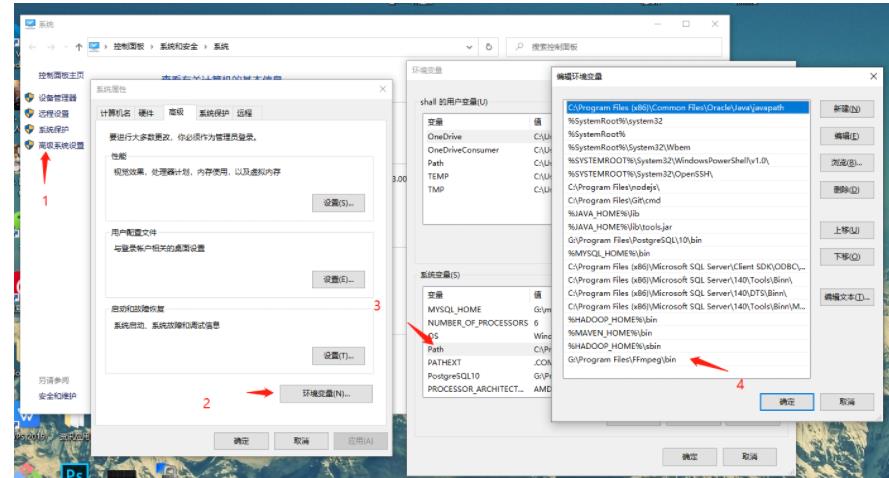
3.配置环境变量
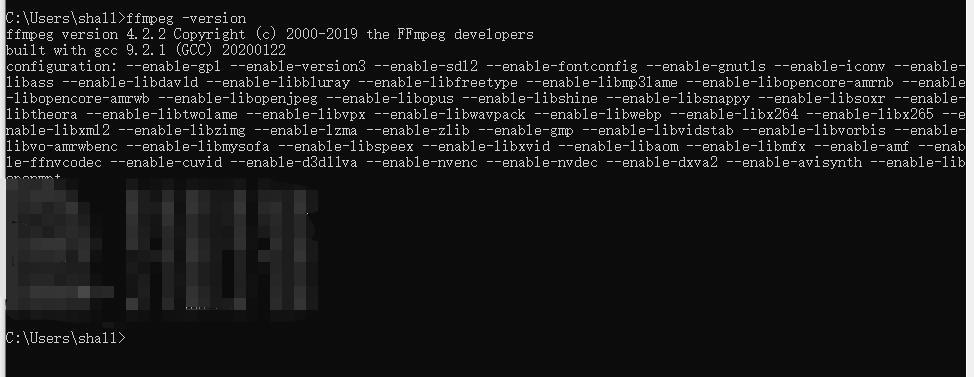
4.查看你的ffmpeg是否安装好,win+r 输入cmd,在里面输入ffmpeg -version,显示如下则安装成功
2.给视频添加水印
1.在你的项目下新增工具类ProcessExec 一下是工具类里的代码
/**
* @author JingJian
* @version 1.0
* @date 2022/2/10 14:43
*/
import com.baomidou.mybatisplus.toolkit.StringUtils;
import java.io.IOException;
import java.io.InputStream;
import java.util.Map;
import java.util.concurrent.ExecutorService;
import java.util.concurrent.Executors;
public class ProcessExec
private Process process;
public void execute(Map<String, String> dto)
StringBuffer waterlogo = new StringBuffer();
waterlogo.append(" -i ");
// 输入文件
if (null != dto.get("input_path") && StringUtils.isNotEmpty(dto.get("input_path")))
waterlogo.append(dto.get("input_path"));
waterlogo.append(" -vf \\"movie=");
// 添加的水印
if (null != dto.get("logo") && StringUtils.isNotEmpty(dto.get("logo")))
waterlogo.append(dto.get("logo"));
// 宽:高
if (null != dto.get("wh") && StringUtils.isNotEmpty(dto.get("wh")))
waterlogo.append(",scale= ");
waterlogo.append(dto.get("wh"));
else
waterlogo.append(",scale= 60: 60");
waterlogo.append(" [watermark]; [in][watermark] overlay=main_w-overlay_w-10:main_h-overlay_h-10 [out]\\" ");
if (null != dto.get("video_converted_path") && StringUtils.isNotEmpty(dto.get("video_converted_path")))
waterlogo.append(dto.get("video_converted_path"));
System.out.println(waterlogo);
Runtime run = Runtime.getRuntime();
String ffmegPath = null;
if (StringUtils.isNotEmpty(dto.get("ffmpeg_path")))
ffmegPath = dto.get("ffmpeg_path");
// 执行命令
try
System.out.println("执行的命令"+waterlogo);
java.lang.Process process = run.exec(ffmegPath + waterlogo);
// 异步读取输出
InputStream inputStream = process.getInputStream();
InputStream errorStream = process.getErrorStream();
/* BufferedReader br=new BufferedReader(new InputStreamReader(inputStream,"gbk"));
String str1="";
while((str=br.readLine())!=null)
System.out.println(str1);
*/
ExecutorService service = Executors.newFixedThreadPool(2);
ResultStreamHandler inputStreamHandler = new ResultStreamHandler(inputStream);
ResultStreamHandler errorStreamHandler = new ResultStreamHandler(errorStream);
service.execute(inputStreamHandler);
service.execute(errorStreamHandler);
process.waitFor();
service.shutdownNow();
catch (IOException e)
e.printStackTrace();
catch (InterruptedException e)
e.printStackTrace();
2.新增控制台输入代码 ResultStreamHandler
/**
* @author JingJian
* @version 1.0
* @date 2022/2/10 14:45
*/
import java.io.BufferedReader;
import java.io.IOException;
import java.io.InputStream;
import java.io.InputStreamReader;
public class ResultStreamHandler
implements Runnable
private InputStream inputStream;
ResultStreamHandler( InputStream inputStream )
this.inputStream = inputStream;
public void run()
BufferedReader bufferedReader = null;
try
bufferedReader = new BufferedReader( new InputStreamReader( inputStream,"gbk" ) );
String line = null;
while ( ( line = bufferedReader.readLine() ) != null )
System.out.println( line );
catch ( Throwable t )
finally
try
bufferedReader.close();
catch ( IOException e )
3.CmdOutputGetter接口代码
public interface CmdOutputGetter
public void dealLine(String str);
4..调用添加水印工具类代码
/**
* @author JingJian
* @version 1.0
* @date 2022/2/10 14:46
* 视频添加水印logo
*/
import java.util.HashMap;
public class test
public static void main(String[] args)
ProcessExec ps = new ProcessExec();
HashMap<String, String> dto=new HashMap<String, String>();
//必填:此处是ffmpeg.exe所在位置,也就FFmpeg文件夹bin目录下的ffmpeg.exe
dto.put("ffmpeg_path","D:\\\\myDemo\\\\tools\\\\ffmpeg\\\\bin\\\\ffmpeg.exe");
//必填;此处是你要处理的视频位置
dto.put("input_path", "D:\\\\myDemo\\\\tools\\\\MV\\\\test.mp4");
//必填;此处是完成添加水印后输入视频的位置并重新命名该视频
dto.put("video_converted_path", "D:\\\\myDemo\\\\tools\\\\MV\\\\TEST3.mp4");
//必填;此处是你要添加的水印位置,注意此处图片位置一定要加上转译符,否则识别不了盘符
dto.put("logo", "d\\\\\\\\:/myDemo/tools/MV/icon-my.png");
// 宽度:高度 (不是比例,是尺寸,默认 60:60)
dto.put("wh", "80: 60");
ps.execute(dto);
3.给音频添加水印
1.首先maven引入第三方工具包:
<!-- 引入三方工具包 -->
<dependency>
<groupId>cn.hutool</groupId>
<artifactId>hutool-all</artifactId>
<version>5.4.6</version>
</dependency>
<dependency>
<groupId>org</groupId>
<artifactId>jaudiotagger</artifactId>
<version>2.0.1</version>
</dependency>
2.创建一个工具类:AudioUtils,并添加以下方法
import org.jaudiotagger.audio.mp3.MP3AudioHeader;
import org.jaudiotagger.audio.mp3.MP3File;
/**
* @author JingJian
* @version 1.0
* @date 2022/2/10 14:50
*/
public class AudioUtils
// public static String
/**
* 获取音频播放时长,返回值单位秒
*
* @param path 音频路径
* @return
*/
public static Integer getAudioDuration(String path)
try
MP3File file = new MP3File(path);
MP3AudioHeader audioHeader = (MP3AudioHeader) file.getAudioHeader();
return audioHeader.getTrackLength();
catch (Exception e)
System.out.println("获取音频播放时长失败!ERROR:");
return null;
3.再创建一个工具类:CmdExecutor,用来执行FFmpeg指令
import java.io.BufferedReader;
import java.io.InputStreamReader;
/**
* 脚本命令执行器
* @author JingJian
* @version 1.0
* @date 2022/2/10 14:51
*/
public class CmdExecutor
/**
* CMD操作
* @param getter 获取控制台打印信息
* @param cmd 命令
*/
public static void exec(CmdOutputGetter getter, String... cmd)
try
// 创建新线程
ProcessBuilder builder = new ProcessBuilder();
// 执行命令
builder.command(cmd);
builder.redirectErrorStream(true);
Process proc = builder.start();
BufferedReader stdout = new BufferedReader(new InputStreamReader(proc.getInputStream()));
String line;
while ((line = stdout.readLine()) != null)
if (getter != null)
getter.dealLine(line);
proc.waitFor();
stdout.close();
catch (Exception e)
4.测试代码
import org.junit.Test;
import java.io.File;
import java.util.Objects;
/**
* 为音频添加水印
* @author JingJian
* @version 1.0
* @date 2022/2/10 14:51
*/
//一般水印音频都是一段口播文字,可以到这个网站(https://www.zaixianai.cn/voiceCompose)去花去1块钱文字转语音一下
public class FFmpegTest
/**
* 为音频文件添加水印
* @param watermarkFilePath 水印文件路径
* @param audioPath 源音频文件路径
* @param ffmpegFile ffmpeg程序位置
*/
public static String addWatermark4Audio(String watermarkFilePath, String audioPath,String ffmpegFile)
// 获取源音频文件播放时长
Integer duration = AudioUtils.getAudioDuration(audioPath);
if (Objects.isNull(duration))
System.out.println("获取音频文件时长失败");
return audioPath;
System.out.println("源音频时长:" + duration);
final String separator = File.separator;
String newAudioPath =audioPath.substring(0,audioPath.lastIndexOf(separator)+1)+"w"+audioPath.substring(audioPath.lastIndexOf(separator)+1);
String[] command4addWatermark = ffmpegFile, "-i", audioPath, "-stream_loop", "-1", "-i", watermarkFilePath,
"-filter_complex", "[1:a][0:a]amix", "-t", duration + "", "-ar", "48000", "-f", "mp3", newAudioPath,
"-y";
CmdExecutor.exec(new CmdOutputGetter()
@Override
public void dealLine(String line)
//把cmd输出的信息每行syso,这个是实时输出的,可以换其他的处理方式
System.out.println(line);
, command4addWatermark);
System.out.println("添加音频水印完成!路径:" + newAudioPath);
return newAudioPath.substring(newAudioPath.lastIndexOf(separator)+1);
@Test
public void addWaterMark()
String ffmpegFile = "D:/myDemo/tools/ffmpeg/bin/ffmpeg.exe";
// 音频水印文件地址 会一直重复播放,如果需要间隔,可以使用格式工厂等制作间隔水印
String watermarkFilePath = "C:/Users/admin/Music/音频水印/watermark.mp3";
// 需要添加水印的音频文件
String audioPath = "C:/Users/admin/Music/Paradise.mp3";
// 添加水印
addWatermark4Audio(watermarkFilePath, audioPath,ffmpegFile);
以上是关于FFmpeg进阶:给视频添加文字水印的主要内容,如果未能解决你的问题,请参考以下文章