若依框架前后端各个请求方式参数传递示例
Posted D__O__N
tags:
篇首语:本文由小常识网(cha138.com)小编为大家整理,主要介绍了若依框架前后端各个请求方式参数传递示例相关的知识,希望对你有一定的参考价值。
- get请求
1.1 不带params(Restful风格)
封装方法getBanner
export function getBanner(customerBannerId)
  return request(
    url: '/recruit/banner/' + customerBannerId,
    method: 'get'
  )
getBanner方法调用(customerBannerId是一个数字)
import getBanner from "@/api/recruit/banner";

    handleUpdate(row)
      this.reset();
      this.pageStatus = "edit";
      const customerBannerId = row.customerBannerId || this.ids;
      getBanner(customerBannerId).then(response =>
        if (response.code === 200)
          this.form = response.data;
          this.open = true;
          this.title = "修改【" + row.name + "】横幅";
         else this.$modal.msgError("请求横幅信息失败,请刷新页面后重试!");
      );
后端接口(@PathVariable 注解取得请求路径中的参数,注意此处的三个参数名要一致)
    @GetMapping(value = "/customerBannerId")
    public AjaxResult getInfo(@PathVariable("customerBannerId") Long customerBannerId)
        return AjaxResult.success(customerBannerService.getById(customerBannerId));
1.2 带params(传统风格)
封装方法getBanner
export function getBanner(customerBannerId)
  return request(
    url: '/recruit/banner/view',
    method: 'get',
    params: customerBannerId
  )
getBanner方法调用(customerBannerId是一个对象,这里属性名与属性值一致,简写)
import getBanner from "@/api/recruit/banner";

    handleUpdate(row)
      this.reset();
      this.pageStatus = "edit"
      const customerBannerId = row.customerBannerId || this.ids
      getBanner(customerBannerId).then(response =>
        if (response.code === 200)
          this.form = response.data;
          this.open = true;
          this.title = "修改【" + row.name + "】横幅";
         else this.$modal.msgError("请求横幅信息失败,请刷新页面后重试!");
      );
    ,
后端接口(前端传递的对象的属性名要与此处的参数名一致,否则接收不到)
    @GetMapping(value = "/view")
    public AjaxResult getInfo(Long customerBannerId)
        return AjaxResult.success(customerBannerService.getById(customerBannerId));
1.3 带params(传统风格,后端用@RequestParam注解绑定参数值)
封装方法delBanner
export function delBanner(customerBannerId)
  return request(
    url: '/recruit/banner/del',
    method: 'get',
    params: customerBannerId
  )
delBanner方法调用(传入参数要为对象形式)
import delBanner from "@/api/recruit/banner";

    handleDelete(row)
      this.$modal.confirm('是否确认删除横幅名称为【' + row.name + '】的数据项?').then(function ()
        return delBanner(customerBannerId: row.customerBannerId);
      ).then(res =>
        if (res.code === 200)
          this.getList();
          this.$modal.msgSuccess("删除成功");
         else this.$modal.msgError("删除失败,请刷新页面后重试!");
      ).catch(err =>
        console.log(err)
      );
后端接口(@RequestParam注解绑定参数值)
    @GetMapping("/del")
    public AjaxResult remove(@RequestParam("customerBannerId") Long customerBannerId)
        // 处于显示状态不能删除
        CustomerBanner banner = customerBannerService.getById(customerBannerId);
        if (banner.getIsShow() == 0 || banner.getIsShow().equals(0))
            return AjaxResult.error("【" + banner.getName() + "】横幅处于显示状态,不能删除");

        return toAjax(customerBannerService.removeById(customerBannerId));
2. post请求
封装方法addBanner
export function addBanner(data)
  return request(
    url: '/recruit/banner/create',
    method: 'post',
    data: data
  )
addBanner方法调用(this.form 为一个对象)
import addBanner from "@/api/recruit/banner";

    addBanner(this.form).then(response =>
      if (response.code === 200)
        this.$modal.msgSuccess("新增成功");
        this.open = false;
        this.getList();
       else this.$modal.msgError("新增失败,请刷新页面后重试!");
    );
后端接口(@RequestBody 注解读出前端传递data的各个属性,前提是data的属性名要与CustomerBanner的属性名一致)
    @PostMapping("/create")
    public AjaxResult add(@RequestBody CustomerBanner customerBanner)
        String userNickname = SecurityUtils.getUserNickname();//getUserNickname():自己在若依框架SecurityUtils类添加的一个方法
        Long userId = SecurityUtils.getUserId();//获取登录用户id
        customerBanner.setCreateBy(userNickname);
        customerBanner.setCreateById(userId);
        customerBanner.setCreateTime(new Date());
        return toAjax(customerBannerService.save(customerBanner));


    /**
     * 获取登录用户昵称,数据库用户名字段存储的是电话号码,真正的用户名存储在昵称字段
     */
    public static String getUserNickname()

        LoginUser loginUser = SecurityContextHolder.get(SecurityConstants.LOGIN_USER, LoginUser.class);
        return loginUser.getSysUser().getNickName();
3. put请求
方法封装updateBanner
export function updateBanner(data)
  return request(
    url: '/recruit/banner',
    method: 'put',
    data: data
  )
updateBanner方法调用
import updateBanner from "@/api/recruit/banner";

    updateBanner(this.form).then(response =>
      if (response.code === 200)
        this.$modal.msgSuccess("修改成功");
        this.open = false;
        this.getList();
       else this.$modal.msgError("修改失败,请刷新页面后重试!");
    );
后端接口(@RequestBody 注解读出前端传递data的各个属性,前提是data的属性名要与CustomerBanner的属性名一致)
    @PutMapping
    public AjaxResult edit(@RequestBody CustomerBanner customerBanner)
        String userNickname = SecurityUtils.getUserNickname();
        Long userId = SecurityUtils.getUserId();
        customerBanner.setUpdateBy(userNickname);
        customerBanner.setUpdateById(userId);
        customerBanner.setUpdateTime(new Date());
        return toAjax(customerBannerService.updateById(customerBanner));
4. delete请求
封装方法delBanner
export function delBanner(customerBannerId)
  return request(
    url: '/recruit/banner/' + customerBannerId,
    method: 'delete'
  )
delBanner方法调用
import delBanner from "@/api/recruit/banner";

    handleDelete(row)
      const customerBannerIds = row.customerBannerId;
      this.$modal.confirm('是否确认删除横幅名称为【' + row.name + '】的数据项?').then(function ()
        return delBanner(customerBannerIds);
      ).then(res =>
        if (res.code === 200)
          this.getList();
          this.$modal.msgSuccess("删除成功");
         else this.$modal.msgError("删除失败,请刷新页面后重试!");
      ).catch(err =>
        console.log(err)
      );
后端接口(@PathVariable 注解取得请求路径中的参数,此时方法参数名称和需要绑定的url中变量名称一致,可以简写)
    @DeleteMapping("/customerBannerIds")
    @Transactional
    public AjaxResult remove(@PathVariable Long[] customerBannerIds)
        // 处于显示状态不能删除
        for (Long customerBannerId : customerBannerIds)
            CustomerBanner banner = customerBannerService.getById(customerBannerId);
            if (banner.getIsShow() == 0 || banner.getIsShow().equals(0))
                return AjaxResult.error("【" + banner.getName() + "】横幅处于显示状态,不能删除");


        return toAjax(customerBannerService.removeBatchByIds(Arrays.asList(customerBannerIds)));
若依前后端分离发布富文本框内容 | uni-app微信小程序展示富文本框内容
微信小程序端引入富文本样式
富文本提交图片json error
一、展示示例:
1.PC端前端发布界面
可以设置文字大小,居中,可以插入图片,设置图片大小,居中。

2.小程序端展示

二、基于若依框架踩坑和实现
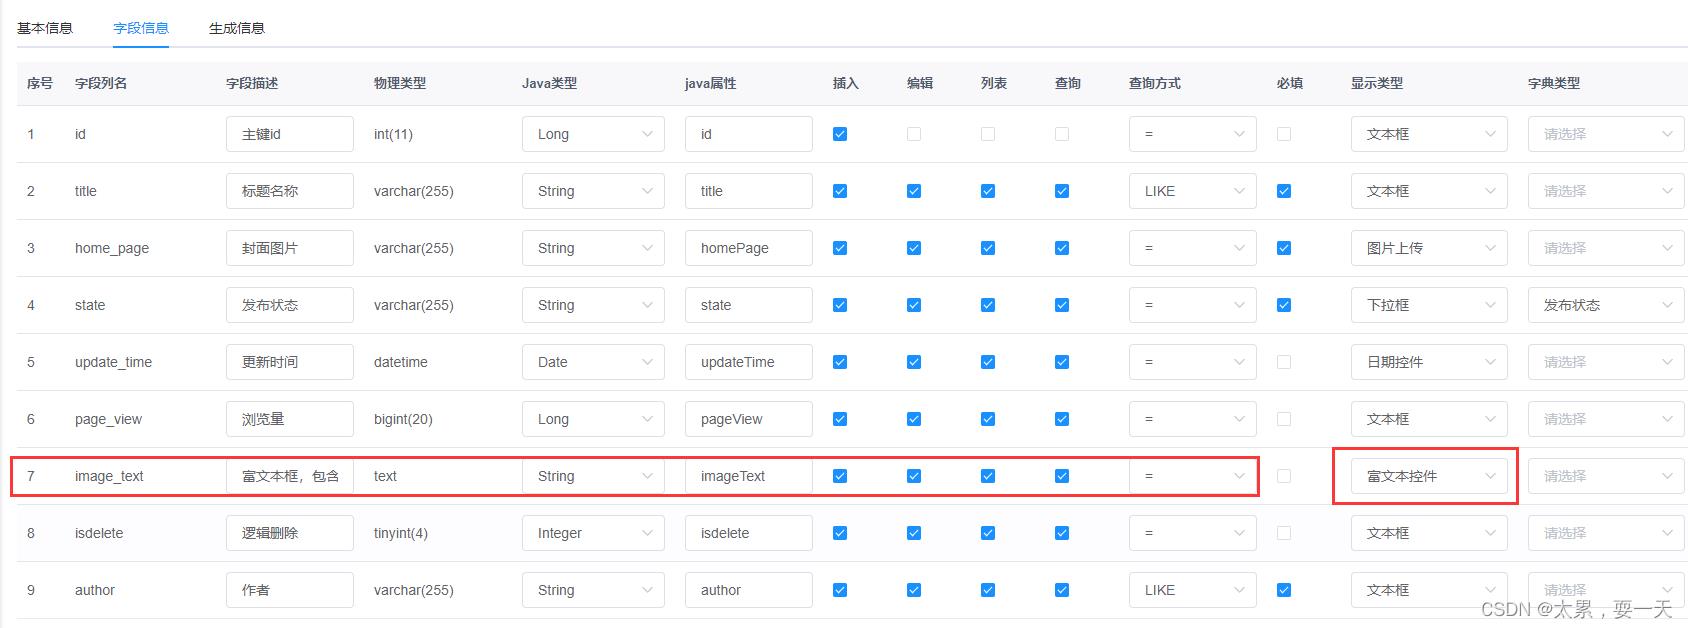
1.数据库字段设计

2.利用若依框架代码生成
在定义的富文本框字段【显示类型】需要选择【富文本控件】
3.富文本框添加图片踩坑
3.1
**遇到问题:**生成代码后会在添加列表的弹框中出现富文本框,但是在富文本中上传图片的时候会显示json错误,无法上传图片包括富文本下面上传封面图片的时候也会出现无法上传图片的情况。
解决方法:
在application.yml文件中把不做仿xss攻击的路径加上
 来源:
来源:
富文本提交图片json error
3.2
遇到问题:
富文本下面上传封面图片的时候会出现无法上传图片的情况,图片闪一下就消失了。
解决办法:
把此文件中的这一段注释掉即可。

3.3
**遇到问题:**富文本框中的图片插入后过大,没办法改变大小
**解决办法:**通过阅读博客【若依(ruoyi)前后端分离 quill-editor 实现图片上传拖拽修改图片大小】解决
若依(ruoyi)前后端分离 quill-editor 实现图片上传拖拽修改图片大小
具体解决方法:
步骤1:在vue.config.js 文件中添加 一下内容
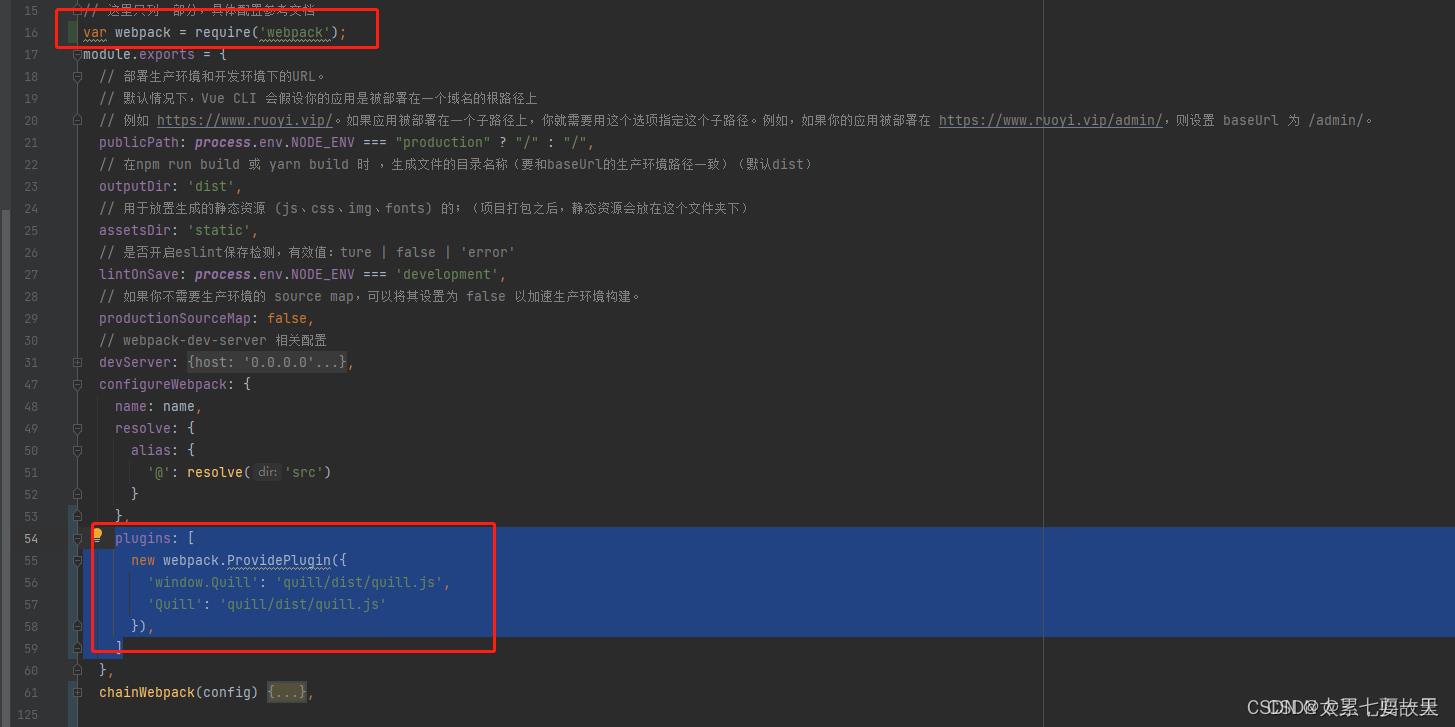
var webpack = require('webpack');
plugins: [ new webpack.ProvidePlugin( 'window.Quill': 'quill/dist/quill.js', 'Quill': 'quill/dist/quill.js' ), ]
步骤2:
在terminal终端命令行输入:
npm install quill-image-drop-module --save
npm i quill-image-resize-module --save
npm install quill-image-extend-module --save
步骤3:在一下内容按照图片位置放在指定位置
import  ImageDrop  from 'quill-image-drop-module'
Quill.register('modules/imageDrop', ImageDrop);
import  ImageExtend  from 'quill-image-extend-module'
// quill-image-resize-module该插件是用于控制上传的图片的大小
import ImageResize from 'quill-image-resize-module'
Quill.register('modules/imageResize', ImageExtend);
Quill.register('modules/imageResize', ImageResize);
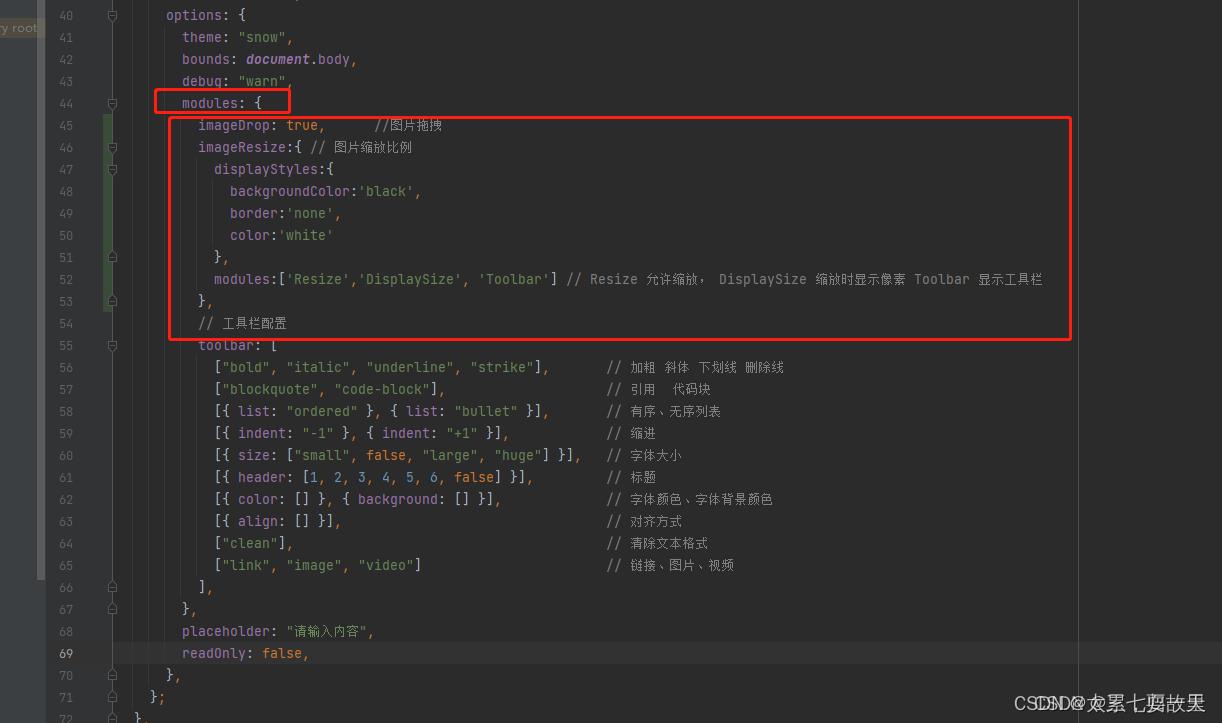
imageDrop: true,      //图片拖拽
          imageResize: // 图片缩放比例
            displayStyles:
              backgroundColor:'black',
              border:'none',
              color:'white'
            ,
            modules:['Resize','DisplaySize', 'Toolbar'] // Resize 允许缩放, DisplaySize 缩放时显示像素 Toolbar 显示工具栏
          ,

 以上亲测可用。
4.基于uni-app的微信小程序端展示富文本框
4.1首先用.js文件从后端获取数据
export function listHealthyLife(query)
  return request(
    url: '/system/healthyLife/list',
    method: 'get',
    params: query
  )
4.2新建页面,不要忘记在page.json中注册
新建列表页面:
<template>
  <view class="page">
    <view class="box_1">
      <view class="list_1">
        <view class="list-items_1-0" v-for="(item, key) in listHealthyLife" :key="key"  @click="showDetails(item.imageText)">
          <view class="group_6-0">
			  <image class="image_2-0" :src="item.homePage" mode="aspectFill"></image>
            <!-- <img src="D:\\ruoyi\\uploadPath\\upload\\2022\\06\\21\\11.jpg" class="image_2-0"></img> -->
            <view class="text-wrapper_3-0">
              <text lines="1" class="text_4-0">item.title</text>
              <text lines="1" class="text_5-0">item.updateTime</text>
            </view>
          </view>
        </view>
        <uni-pagination style="margin-top: 50rpx;" v-show="total>0" :total="total" :current="current" :pageSize="pageSize" @change="handlePage">
        </uni-pagination>
      </view>
    </view>
  </view>
</template>
<script>
	import listHealthyLife from "@/api/system/healthyLife.js"
export default
  data()
    return
      constants: ,
	  listHealthyLife: [],
	  // 分页参数
	  total: 0,
	  current: 1,
	  pageSize: 7,
    ;
  ,
  created()
  this.getList();
  ,
  methods:
	  getList()
	  	listHealthyLife(pageNum: this.current, pageSize: this.pageSize).then(response =>
	  		this.listHealthyLife = response.rows;
	  		this.total = response.total;
	  		console.log(this.total)
	  	);
	  ,
	  	  // 触发跳转
	  	  showDetails(index)
	  		uni.navigateTo(
	  		url: '/pages/jiankangshenghuo/details?detail='+encodeURIComponent(JSON.stringify(index))
	  		);
		  // 分页点击事件
		  handlePage(params)
		  	console.log(params)  //可以打印看看params
		  	this.current = params.current;
		  	this.getList() // 点击的时候去请求查询列表
		  ,

;
</script>
新建详情页面:
<template>
	<view class="page">
		<view class="friendsCircle-content">
			<rich-text :nodes="article" class="ql-editor"></rich-text>
		</view>
	</view>
</template>
<script>
	import '@/components/quillCSS/quill.bubble.css'
	import '@/components/quillCSS/quill.core.css'
	import '@/components/quillCSS/quill.snow.css'
	export default
		components:
		    uParse  //注册组件
		  ,
		data()
		  return
			      article:'',
		  ;
		,
	onLoad: function (option)  //option为object类型,会序列化上个页面传递的参数
		 this.article=JSON.parse(decodeURIComponent(option.detail));
		 console.log(this.article)
		,
		methods:


</script>
**遇到问题:**但是此时,会有的富文本样式显示不出来的情况,所以需要再修改一下
解决办法:
步骤1:
在ruoyi-ui中找到quill源文件,在dist目录下可以看到
quill.bubble.css
quill.core.css
quill.snow.css
以上三个文件,把这三个文件复制到一个文件夹中,打开这三个文件把所有带*号的部分都删除
步骤2:
在微信小程序详情页面应用这三个文件
/*Vue-Quill-Editor样式*/
@import 'mdui/quill.bubble.css';
@import 'mdui/quill.core.css';
@import 'mdui/quill.snow.css';
步骤3:
在小程序富文本中加入 class=“ql-editor”,如下:
<rich-text :nodes="article" class="ql-editor"></rich-text>
再次运行即可。
参考
Vue-Quill-Editor编辑器的富文本,在uniapp开发的小程序显示错误
以上是关于若依框架前后端各个请求方式参数传递示例的主要内容,如果未能解决你的问题,请参考以下文章