前端基础从头学——VsCode使用教程+html基础(入门篇)
Posted 小魔女千千鱼
tags:
篇首语:本文由小常识网(cha138.com)小编为大家整理,主要介绍了前端基础从头学——VsCode使用教程+html基础(入门篇)相关的知识,希望对你有一定的参考价值。
作者简介:hello!大家好,初学前端知识,请多多指教。
希望我的分享能够帮助到更多的人,如果觉得我的分享有帮助的话,请大家一键三连支持一下哦~
文章目录
前言
————————————————————————————
刚接触前端,零基础小白,从头开始学起,请大家多多指教~
下面是VsCode使用教程和html基础知识的简单介绍,希望这篇文章能帮助到更多初学前端的人,加油吧!
一、VsCode编辑器使用教程
1、VsCode的下载与安装
官网下载地址:https://code.visualstudio.com/

2、安装两个有用的插件
在VsCode编辑器里,这两个插件很有用哦,一定要提前安装好~

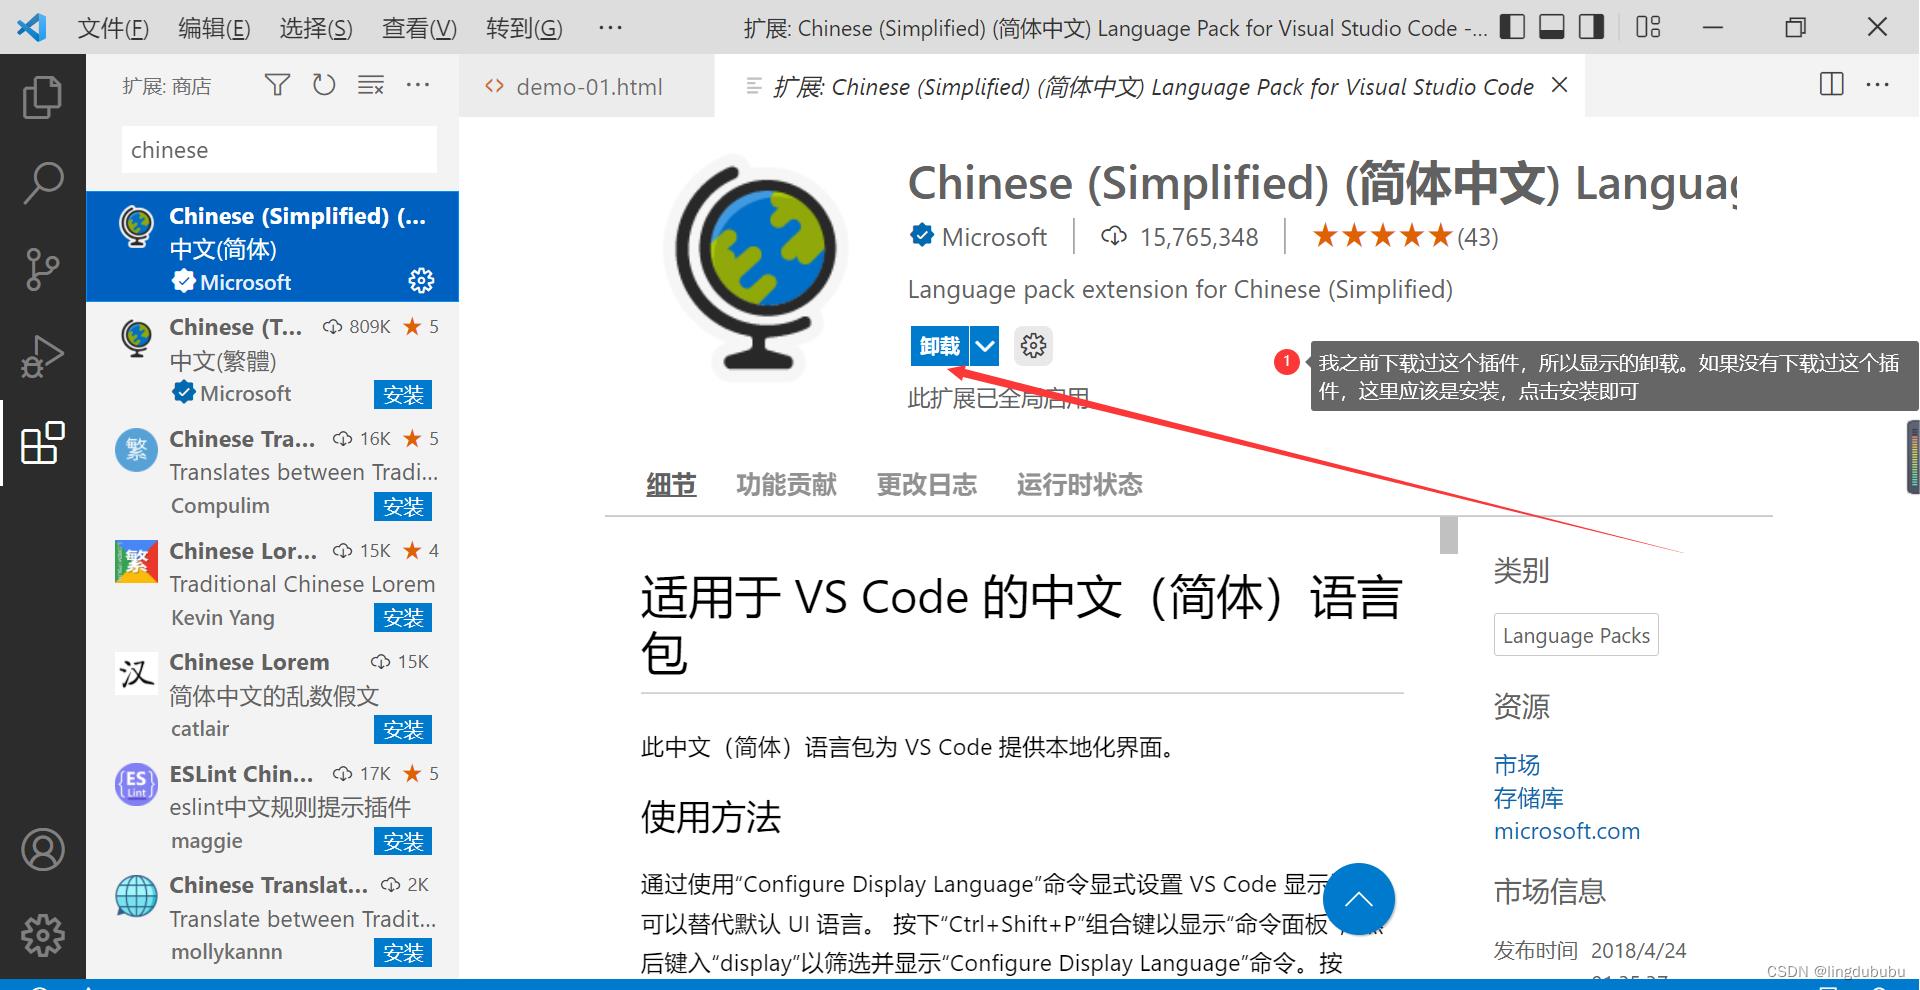

3、新建文件
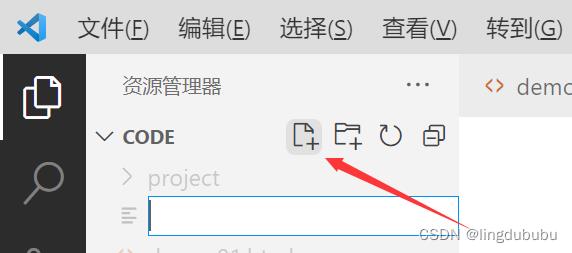 在这里创建一个文件,名字是demo-01.html,然后回车
*注意是html结尾的文件名
 如果不是html后缀的,就是这个样子,这时候不要慌,右击然后重新命名就可以了
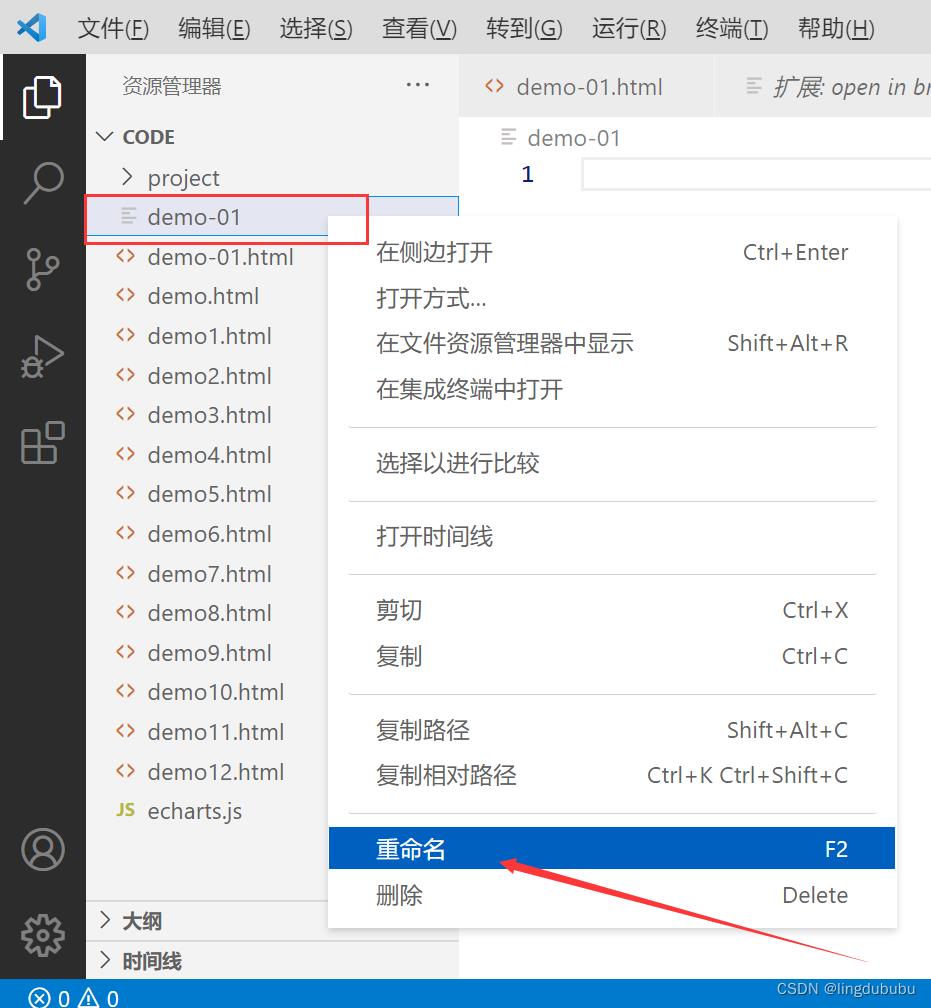
二、第一个小项目
shift+1输入一个感叹号,然后回车

回车之后就出现这几行代码啦,直接在< body >< /body>里写代码就好了,
 我们先写一个hello world
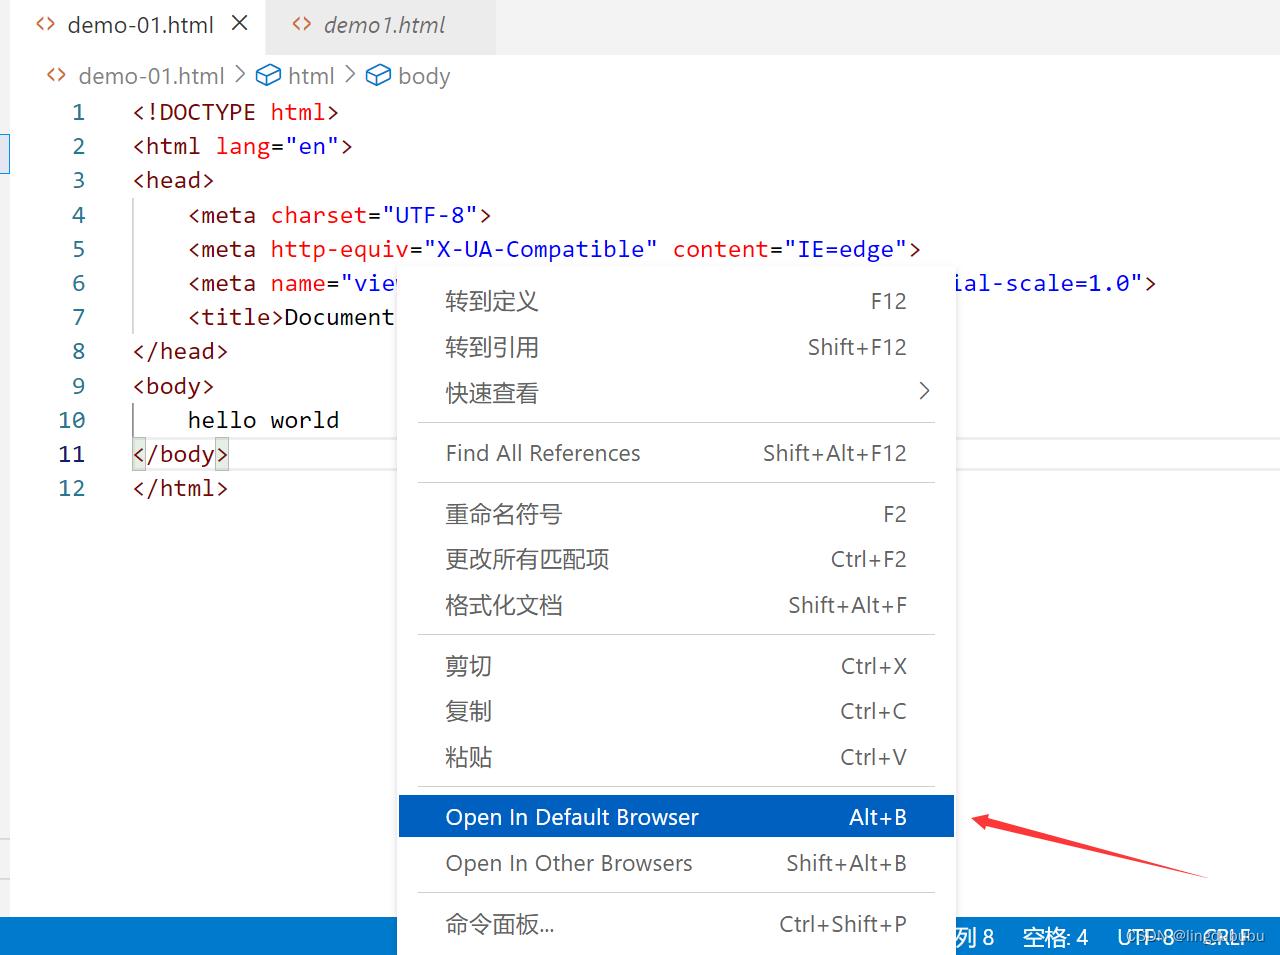
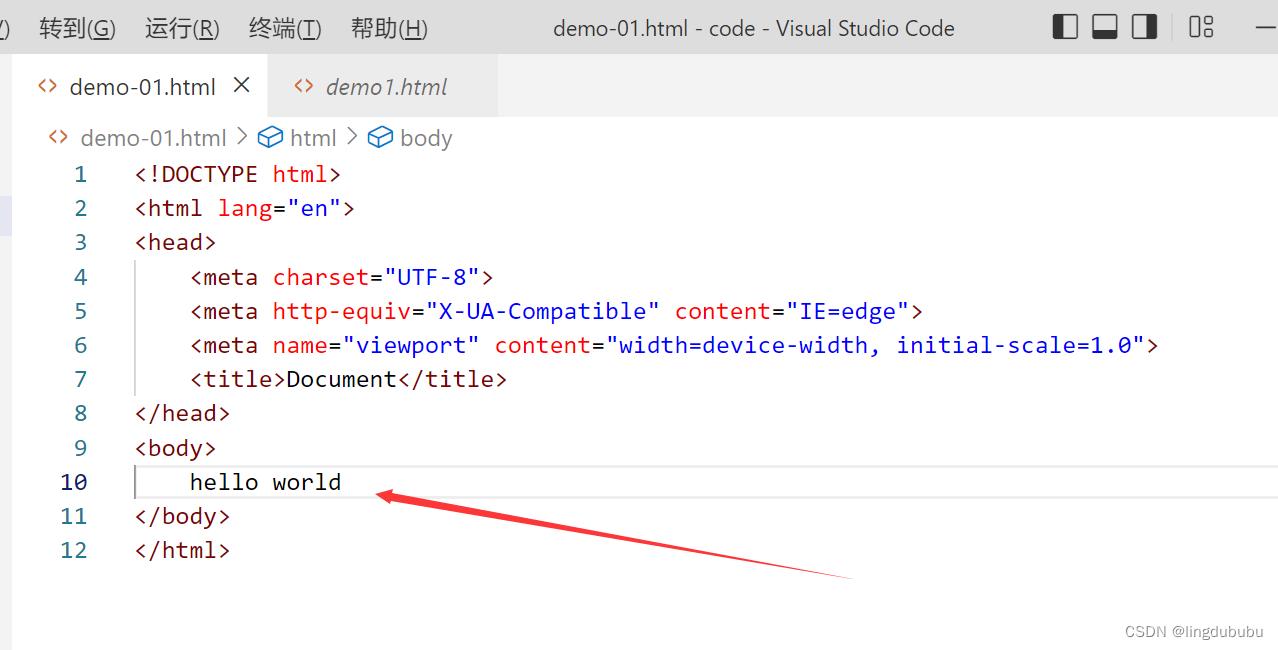 然后右击面板,点击这里,自己选浏览器
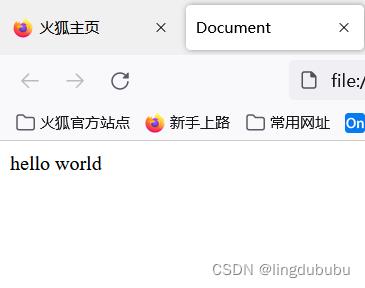
 此时,浏览器里就会出现hello world了
三、HTML基础知识
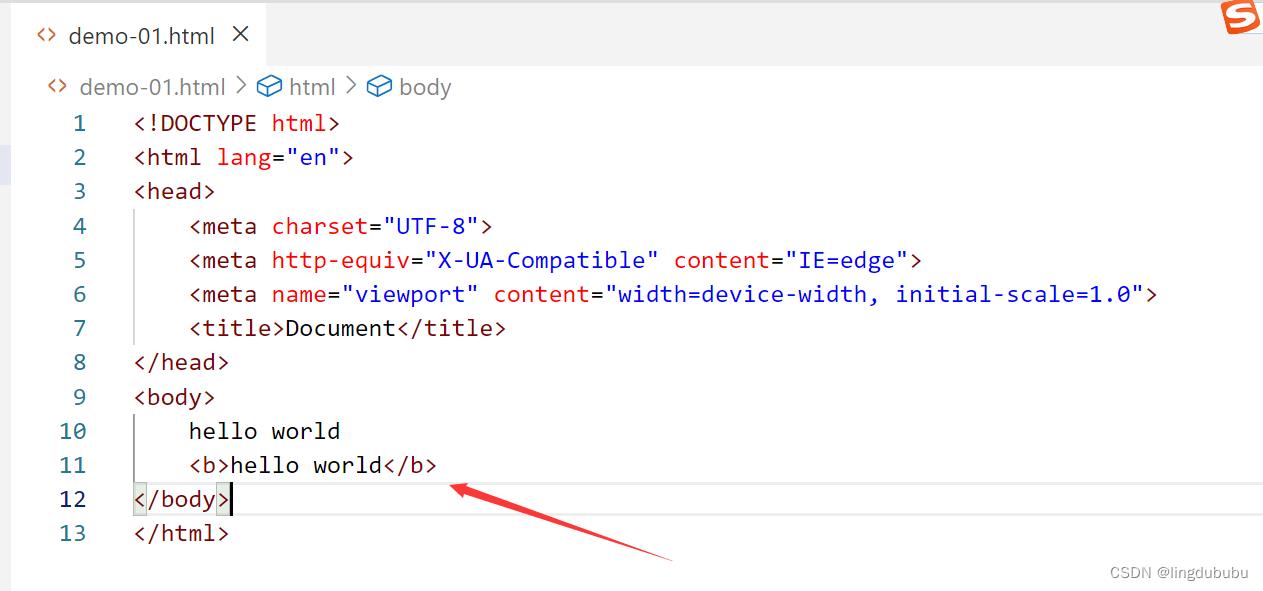
1、 < b > 标签定义及用法
< b >标签是使用来定义粗体的文本,意思就是在该标签中的文本将显示为粗体。
< b > 文本内容 < /b >
说明:文本内容将显示为粗体

2、< i > 标签定义及用法
说明:文本内容将倾斜显示
3、< u > 标签定义及用法
说明:j将在文本内容下显示下划线
4、< s > 标签定义及用法
说明:文本内容将显示删除线
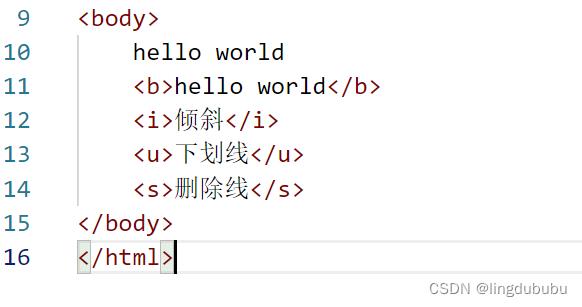 效果如下:
效果如下:
 标题标签:h1-h6
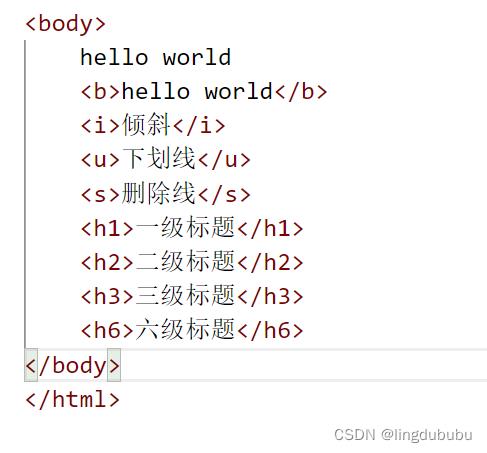
现在的效果如下:
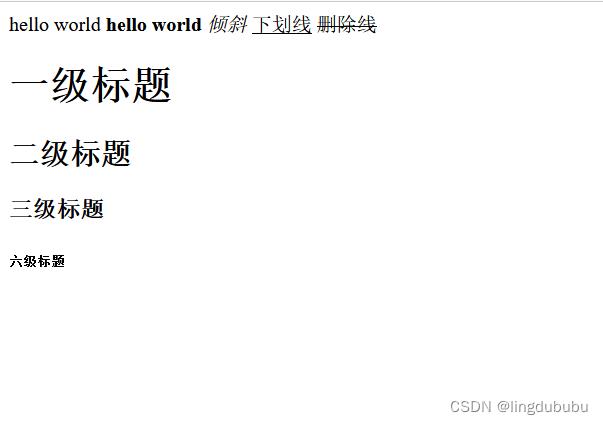
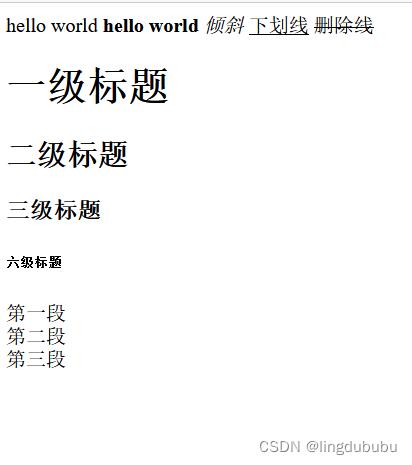
5、< br >标签定义及用法

现在效果是这样的:
6、图像标签(< img >)和源属性(src)
在 HTML 中,图像由 < img> 标签定义。
< img> 是空标签,意思是说,它只包含属性,并且没有闭合标签。
要在页面上显示图像,你需要使用源属性(src)。src 指 “source”。源属性的值是图像的 URL 地址。
定义图像的语法是:
< img src=“url” />
URL 指存储图像的位置。
浏览器将图像显示在文档中图像标签出现的地方。如果你将图像标签置于两个段落之间,那么浏览器会首先显示第一个段落,然后显示图片,最后显示第二段。
替换文本属性(Alt)
alt 属性用来为图像定义一串预备的可替换的文本。替换文本属性的值是用户定义的。
先把要放的图片放到这个html文件相同的路径下
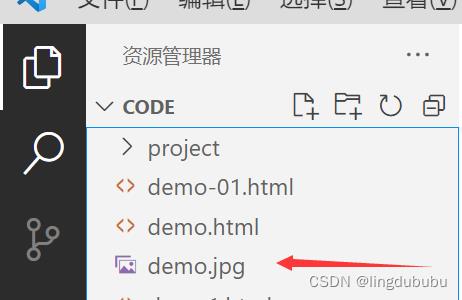
<img src="./demo.jpg" alt="">


HTML 文件路径
<img src="demo.jpg"> 	        picture.jpg 位于与当前网页相同的文件夹
<img src="images/demo.jpg">   	picture.jpg 位于当前文件夹的 images 文件夹中
<img src="/images/demo.jpg"> 	picture.jpg 当前站点根目录的 images 文件夹中
<img src="../demo.jpg"> 		picture.jpg 位于当前文件夹的上一级文件夹中
好啦,看到这里,想必你对html基础知识一定也有了初步认识了,下边是以上操作的所有代码
<!DOCTYPE html>
<html lang="en">
<head>
    <meta charset="UTF-8">
    <meta http-equiv="X-UA-Compatible" content="IE=edge">
    <meta name="viewport" content="width=device-width, initial-scale=1.0">
    <title>Document</title>
</head>
<body>
    hello world
    <b>hello world</b>
    <i>倾斜</i>
    <u>下划线</u>
    <s>删除线</s>
    <h1>一级标题</h1>
    <h2>二级标题</h2>
    <h3>三级标题</h3>
    <h6>六级标题</h6>
    第一段<br>第二段<br>第三段<br>
    <img src="./demo.jpg" alt="">
</body>
</html>
写在最后
原创不易,希望大家多多支持!
点赞+收藏+评论
之后我会继续更新前端学习小知识,关注我不迷路
一键三连~
[从头学数学] 第158节 反比例函数
剧情提要:[机器小伟]在[工程师阿伟]的陪同下进入了筑基后期的修炼,
这次要修炼的目标是[反比例函数]。
正剧开始:
星历2016年04月03日 09:22:03, 银河系厄尔斯星球中华帝国江南行省。
[工程师阿伟]正在和[机器小伟]一起研究[反比例函数]。
今天,小伟又去向[人叫板老师]要来了筑基后期的后半层功法,到此为止,
筑基期的功法就全了:
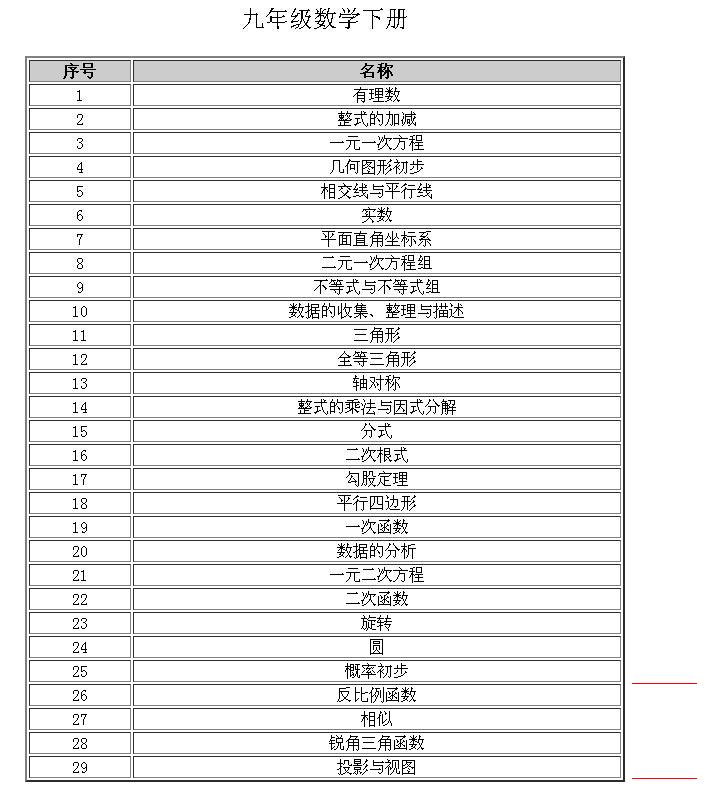
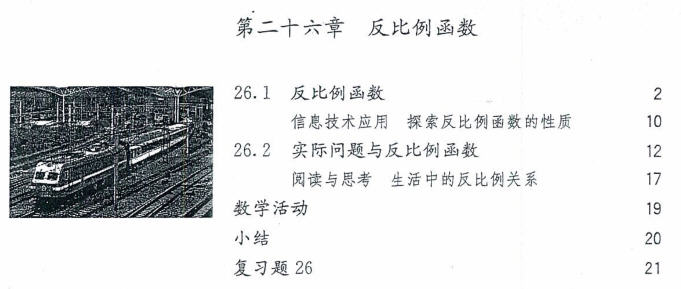
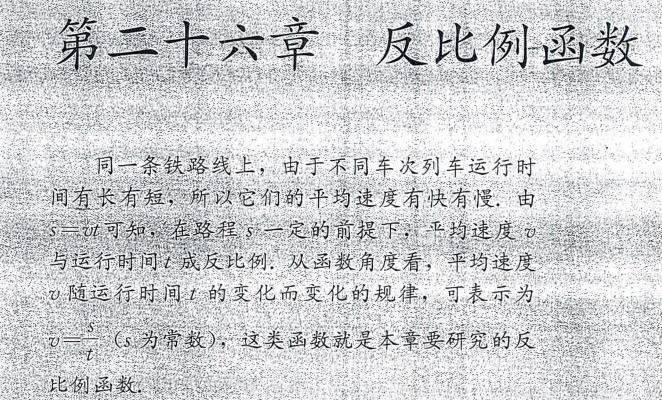
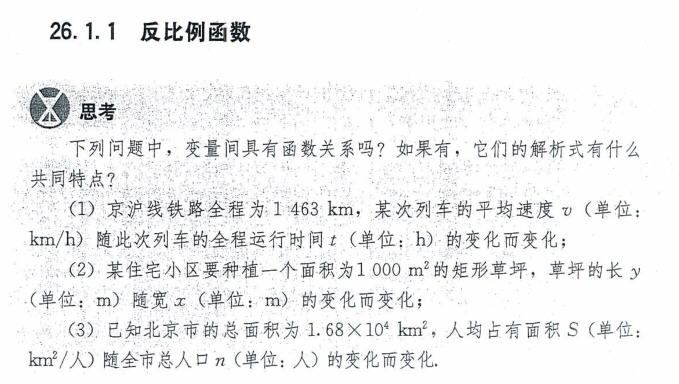
而今天主要研究的,就是这个第26章:反比例函数。
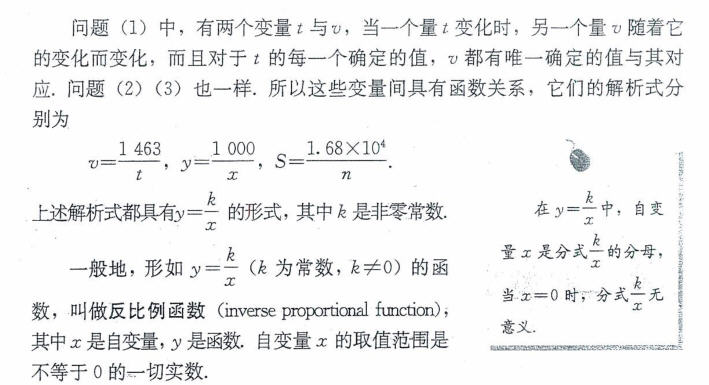

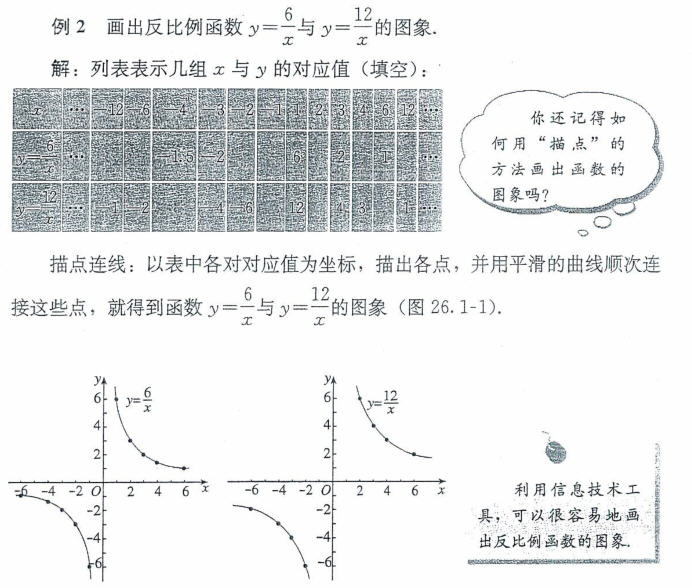
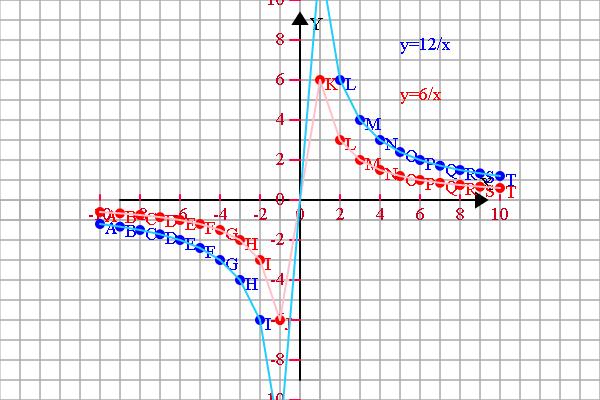
<span style="font-size:18px;">	if (1) {

		var r = 20;
        config.setSector(1,1,1,1);
        config.graphPaper2D(0, 0, r);
        config.axis2D(0, 0,180, 1);

        var scaleX = 2*r, scaleY = 2*r;
        var spaceX = 2, spaceY = 2;
        var xS = -10, xE = 10;
        var yS = -10, yE = 10;
        config.axisSpacing(xS, xE, spaceX, scaleX, 'X');
        config.axisSpacing(yS, yE, spaceY, scaleY, 'Y');

        var transform = new Transform();
        var a = [], b = [], c = [];

        for (var x = xS; x <= xE; x+=1) {
			if (x != 0) {
				a.push([x, 6/x]);
				b.push([x, 12/x]);
			}
        }


        a = transform.scale(transform.translate(a, 0, 0), scaleX/spaceX, scaleY/spaceY);
        b = transform.scale(transform.translate(b, 0, 0), scaleX/spaceX, scaleY/spaceY);

        var tmp = [].concat(a);
        shape.pointDraw(tmp, 'red');
        tmp = [].concat(a);
        shape.multiLineDraw(tmp, 'pink');

		plot.setFillStyle('red');
        plot.fillText('y=6/x', 100, -100, 200);


        tmp = [].concat(b);
        shape.pointDraw(tmp, 'blue');
        tmp = [].concat(b);
        shape.multiLineDraw(tmp, '#22CCFF');

		plot.setFillStyle('blue');
		plot.fillText('y=12/x', 100, -150, 200);

	}</span>
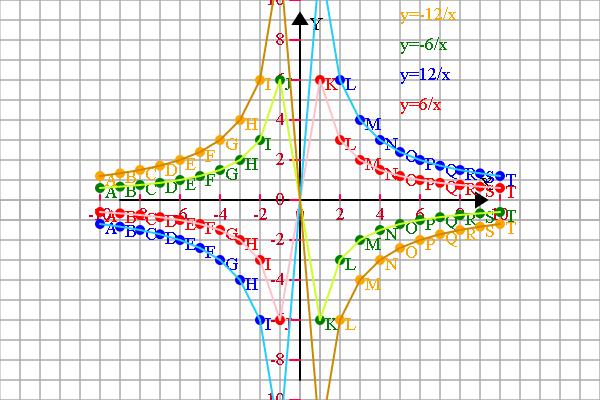
<span style="font-size:18px;">		var r = 20;
        config.setSector(1,1,1,1);
        config.graphPaper2D(0, 0, r);
        config.axis2D(0, 0,180, 1);

		//坐标轴设定
        var scaleX = 2*r, scaleY = 2*r;
        var spaceX = 2, spaceY = 2;
        var xS = -10, xE = 10;
        var yS = -10, yE = 10;
        config.axisSpacing(xS, xE, spaceX, scaleX, 'X');
        config.axisSpacing(yS, yE, spaceY, scaleY, 'Y');

        var transform = new Transform();
		//存放函数图像上的点
        var a = [], b = [], c = [], d = [];

		//需要显示的函数说明
		var f1 = 'y=6/x', f2 = 'y=12/x', f3 = 'y=-6/x', f4 = 'y=-12/x';
		//函数描点
        for (var x = xS; x <= xE; x+=1) {
			if (x != 0) {
				a.push([x, 6/x]);
				b.push([x, 12/x]);
				c.push([x, -6/x]);
				d.push([x, -12/x]);
			}
        }

		//存放临时数组
		var tmp = [];

        //显示变换
		if (a != []) {
			a = transform.scale(transform.translate(a, 0, 0), scaleX/spaceX, scaleY/spaceY);
			//函数1
			tmp = [].concat(a);
			shape.pointDraw(tmp, 'red');
			tmp = [].concat(a);
			shape.multiLineDraw(tmp, 'pink');

			plot.setFillStyle('red');
			plot.fillText(f1, 100, -90, 200);
		}

		if (b != []) {
			b = transform.scale(transform.translate(b, 0, 0), scaleX/spaceX, scaleY/spaceY);
			//函数2
			tmp = [].concat(b);
			shape.pointDraw(tmp, 'blue');
			tmp = [].concat(b);
			shape.multiLineDraw(tmp, '#22CCFF');

			plot.setFillStyle('blue');
			plot.fillText(f2, 100, -120, 200);

		}

		if (c != []) {
			c = transform.scale(transform.translate(c, 0, 0), scaleX/spaceX, scaleY/spaceY);
			tmp = [].concat(c);
			shape.pointDraw(tmp, 'green');
			tmp = [].concat(c);
			shape.multiLineDraw(tmp, '#CCFF22');
			plot.setFillStyle('green');
			plot.fillText(f3, 100, -150, 200);
		}

		if (d != []) {
			d = transform.scale(transform.translate(d, 0, 0), scaleX/spaceX, scaleY/spaceY);
			tmp = [].concat(d);
			shape.pointDraw(tmp, 'orange');
			tmp = [].concat(d);
			shape.multiLineDraw(tmp, '#CC8800');
			plot.setFillStyle('orange');
			plot.fillText(f4, 100, -180, 200);
		}


	}
	</span>
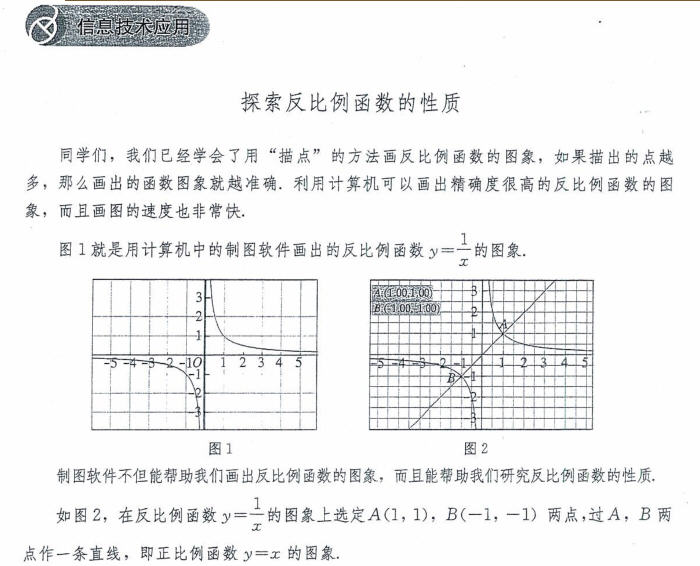
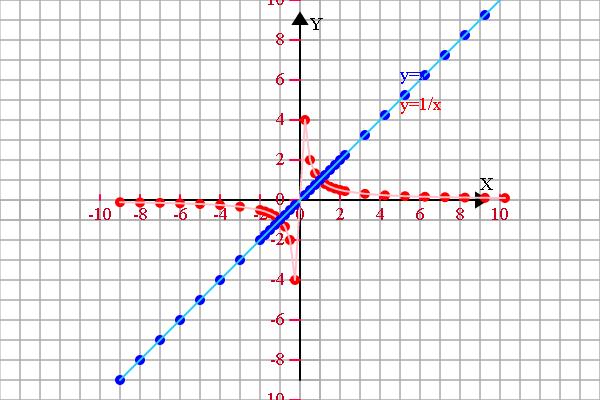
<span style="font-size:18px;">	if (1) {

		var r = 20;
        config.setSector(1,1,1,1);
        config.graphPaper2D(0, 0, r);
        config.axis2D(0, 0,180, 1);

		//坐标轴设定
        var scaleX = 2*r, scaleY = 2*r;
        var spaceX = 2, spaceY = 2;
        var xS = -10, xE = 10;
        var yS = -10, yE = 10;
        config.axisSpacing(xS, xE, spaceX, scaleX, 'X');
        config.axisSpacing(yS, yE, spaceY, scaleY, 'Y');

        var transform = new Transform();

		//存放函数图像上的点
        var a = [], b = [], c = [], d = [];

		//需要显示的函数说明
		var f1 = 'y=1/x', f2 = 'y=x', f3 = '', f4 = '';
		//函数描点

		var x = xS;

		while (x <= xE) {
			if (Math.abs(x) <= 2) {
				x += 0.25;
			}
			else {
				x += 1;
			}

			if (x != 0) {
				a.push([x, 1/x]);
				b.push([x, x]);

			}
		}


		//存放临时数组
		var tmp = [];

        //显示变换
		if (a.length > 0) {
			a = transform.scale(transform.translate(a, 0, 0), scaleX/spaceX, scaleY/spaceY);
			//函数1
			tmp = [].concat(a);
			shape.pointDraw(tmp, 'red');
			tmp = [].concat(a);
			shape.multiLineDraw(tmp, 'pink');

			plot.setFillStyle('red');
			plot.fillText(f1, 100, -90, 200);
		}

		if (b.length > 0) {
			b = transform.scale(transform.translate(b, 0, 0), scaleX/spaceX, scaleY/spaceY);
			//函数2
			tmp = [].concat(b);
			shape.pointDraw(tmp, 'blue');
			tmp = [].concat(b);
			shape.multiLineDraw(tmp, '#22CCFF');

			plot.setFillStyle('blue');
			plot.fillText(f2, 100, -120, 200);

		}

		if (c.length > 0) {
			c = transform.scale(transform.translate(c, 0, 0), scaleX/spaceX, scaleY/spaceY);
			tmp = [].concat(c);
			shape.pointDraw(tmp, 'green');
			tmp = [].concat(c);
			shape.multiLineDraw(tmp, '#CCFF22');
			plot.setFillStyle('green');
			plot.fillText(f3, 100, -150, 200);
		}

		if (d.length > 0) {
			d = transform.scale(transform.translate(d, 0, 0), scaleX/spaceX, scaleY/spaceY);
			tmp = [].concat(d);
			shape.pointDraw(tmp, 'orange');
			tmp = [].concat(d);
			shape.multiLineDraw(tmp, '#CC8800');
			plot.setFillStyle('orange');
			plot.fillText(f4, 100, -180, 200);
		}


	}</span>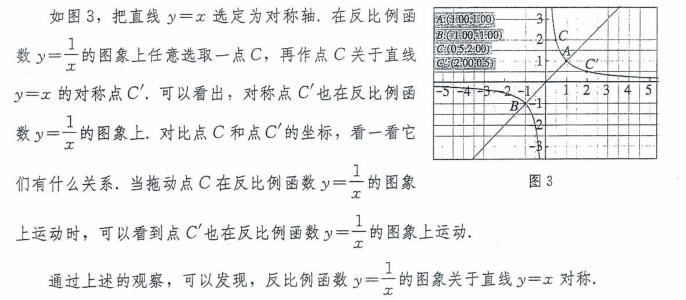
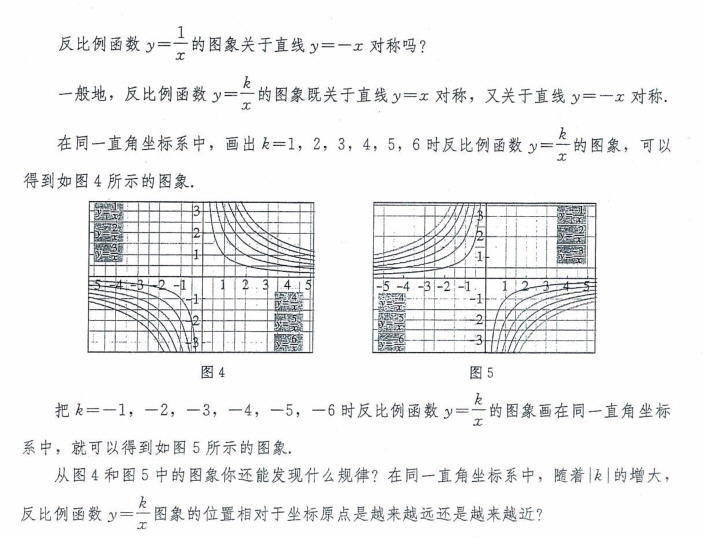
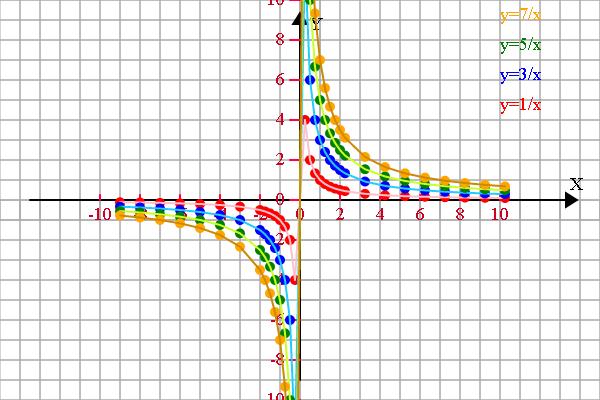
<span style="font-size:18px;">	if (1) {

		var r = 20;
        config.setSector(1,1,1,1);
        config.graphPaper2D(0, 0, r);
        config.axis2D(0, 0,180, 1.5);

		//坐标轴设定
        var scaleX = 2*r, scaleY = 2*r;
        var spaceX = 2, spaceY = 2;
        var xS = -10, xE = 10;
        var yS = -10, yE = 10;
        config.axisSpacing(xS, xE, spaceX, scaleX, 'X');
        config.axisSpacing(yS, yE, spaceY, scaleY, 'Y');

        var transform = new Transform();

		//存放函数图像上的点
        var a = [], b = [], c = [], d = [];

		//需要显示的函数说明
		var f1 = 'y=1/x', f2 = 'y=3/x', f3 = 'y=5/x', f4 = 'y=7/x';
		//函数描点

		var x = xS;

		while (x <= xE) {
			if (Math.abs(x) <= 2) {
				x += 0.25;
			}
			else {
				x += 1;
			}

			if (x != 0) {
				a.push([x, 1/x]);
				b.push([x, 3/x]);
				c.push([x, 5/x]);
				d.push([x, 7/x]);

			}
		}


		//存放临时数组
		var tmp = [];

        //显示变换
		if (a.length > 0) {
			a = transform.scale(transform.translate(a, 0, 0), scaleX/spaceX, scaleY/spaceY);
			//函数1
			tmp = [].concat(a);
			shape.pointDraw(tmp, 'red');
			tmp = [].concat(a);
			shape.multiLineDraw(tmp, 'pink');

			plot.setFillStyle('red');
			plot.fillText(f1, 200, -90, 200);
		}

		if (b.length > 0) {
			b = transform.scale(transform.translate(b, 0, 0), scaleX/spaceX, scaleY/spaceY);
			//函数2
			tmp = [].concat(b);
			shape.pointDraw(tmp, 'blue');
			tmp = [].concat(b);
			shape.multiLineDraw(tmp, '#22CCFF');

			plot.setFillStyle('blue');
			plot.fillText(f2, 200, -120, 200);

		}

		if (c.length > 0) {
			c = transform.scale(transform.translate(c, 0, 0), scaleX/spaceX, scaleY/spaceY);
			tmp = [].concat(c);
			shape.pointDraw(tmp, 'green');
			tmp = [].concat(c);
			shape.multiLineDraw(tmp, '#CCFF22');
			plot.setFillStyle('green');
			plot.fillText(f3, 200, -150, 200);
		}

		if (d.length > 0) {
			d = transform.scale(transform.translate(d, 0, 0), scaleX/spaceX, scaleY/spaceY);
			tmp = [].concat(d);
			shape.pointDraw(tmp, 'orange');
			tmp = [].concat(d);
			shape.multiLineDraw(tmp, '#CC8800');
			plot.setFillStyle('orange');
			plot.fillText(f4, 200, -180, 200);
		}


	}</span>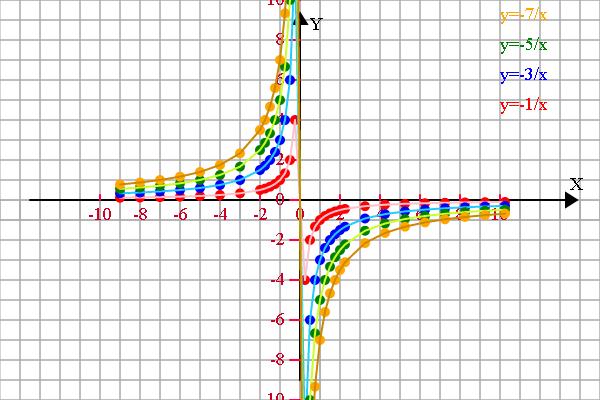
<span style="font-size:18px;">	if (1) {

		var r = 20;
        config.setSector(1,1,1,1);
        config.graphPaper2D(0, 0, r);
        config.axis2D(0, 0,180, 1.5);

		//坐标轴设定
        var scaleX = 2*r, scaleY = 2*r;
        var spaceX = 2, spaceY = 2;
        var xS = -10, xE = 10;
        var yS = -10, yE = 10;
        config.axisSpacing(xS, xE, spaceX, scaleX, 'X');
        config.axisSpacing(yS, yE, spaceY, scaleY, 'Y');

        var transform = new Transform();

		//存放函数图像上的点
        var a = [], b = [], c = [], d = [];

		//需要显示的函数说明
		var f1 = 'y=-1/x', f2 = 'y=-3/x', f3 = 'y=-5/x', f4 = 'y=-7/x';
		//函数描点

		var x = xS;

		while (x <= xE) {
			if (Math.abs(x) <= 2) {
				x += 0.25;
			}
			else {
				x += 1;
			}

			if (x != 0) {
				a.push([x, -1/x]);
				b.push([x, -3/x]);
				c.push([x, -5/x]);
				d.push([x, -7/x]);

			}
		}


		//存放临时数组
		var tmp = [];

        //显示变换
		if (a.length > 0) {
			a = transform.scale(transform.translate(a, 0, 0), scaleX/spaceX, scaleY/spaceY);
			//函数1
			tmp = [].concat(a);
			shape.pointDraw(tmp, 'red');
			tmp = [].concat(a);
			shape.multiLineDraw(tmp, 'pink');

			plot.setFillStyle('red');
			plot.fillText(f1, 200, -90, 200);
		}

		if (b.length > 0) {
			b = transform.scale(transform.translate(b, 0, 0), scaleX/spaceX, scaleY/spaceY);
			//函数2
			tmp = [].concat(b);
			shape.pointDraw(tmp, 'blue');
			tmp = [].concat(b);
			shape.multiLineDraw(tmp, '#22CCFF');

			plot.setFillStyle('blue');
			plot.fillText(f2, 200, -120, 200);

		}

		if (c.length > 0) {
			c = transform.scale(transform.translate(c, 0, 0), scaleX/spaceX, scaleY/spaceY);
			tmp = [].concat(c);
			shape.pointDraw(tmp, 'green');
			tmp = [].concat(c);
			shape.multiLineDraw(tmp, '#CCFF22');
			plot.setFillStyle('green');
			plot.fillText(f3, 200, -150, 200);
		}

		if (d.length > 0) {
			d = transform.scale(transform.translate(d, 0, 0), scaleX/spaceX, scaleY/spaceY);
			tmp = [].concat(d);
			shape.pointDraw(tmp, 'orange');
			tmp = [].concat(d);
			shape.multiLineDraw(tmp, '#CC8800');
			plot.setFillStyle('orange');
			plot.fillText(f4, 200, -180, 200);
		}


	}
	</span>
本节到此结束,欲知后事如何,请看下回分解。
以上是关于前端基础从头学——VsCode使用教程+html基础(入门篇)的主要内容,如果未能解决你的问题,请参考以下文章