YOLOv5的Tricks | Trick13YOLOv5的detect.py脚本的解析与简化
Posted Clichong
tags:
篇首语:本文由小常识网(cha138.com)小编为大家整理,主要介绍了YOLOv5的Tricks | Trick13YOLOv5的detect.py脚本的解析与简化相关的知识,希望对你有一定的参考价值。
如有错误,恳请指出。
在之前介绍了一堆yolov5的训练技巧,train.py脚本也介绍得差不多了。之后还有detect和val两个脚本文件,还想把它们总结完。
在之前测试yolov5训练好的模型时,用detect.py脚本简直不要太方便,觉得这个脚本集成了很多功能,今天就分析源码一探究竟。
关于如何使用yolov5来训练自己的数据集在之前已经写了一篇文章记录过:yolov5的使用 | 训练Pascal voc格式的数据集,所以在这篇文章中就主要分析源码,再稍微提及一下detect的可用参数。
文章目录
1. Detect脚本使用
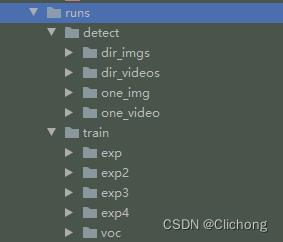
对于测试的都会存放在runs/detect文件目录下,使用例程只需要指定输入的数据,再指定训练好的权重即可
python detect.py --source 0  # webcam
                          img.jpg  # image    单个图像文件
                          vid.mp4  # video    单个视频文件
                          path/  # directory  目录文件
                          path/*.jpg  # glob  正则表达式表示
                          'https://youtu.be/Zgi9g1ksQHc'  # YouTube
                          'rtsp://example.com/media.mp4'  # RTSP, RTMP, HTTP stream
具体的配置文件可以通过输入:python detect.py -h(-help) 来查看。对于yolo跑出来的结构都会放在 ./run/detect 文件夹中,然后以exp依次命名,如下所示:
- 1)测试单张图片
python detect.py --source ./data/image/bus.jpg
- 2)测试图片目录
python detect.py --source ./data/image/
- 3)测试单个视频
python detect.py --source ./data/videos/test_movie
- 4)测试视频目录
python detect.py --source ./data/videos/
- 5)测试摄像头
python detect.py --source 0 # 其中0代表是本地摄像头,还有其他的摄像头
ps:摄像头捕捉的视频同样会保存在 ./run/detect 文件夹中。
详细见参考资料1.
2. Detect脚本解析
在detect.py脚本中,主体是run函数,然后对source的来源进行判断。如果是摄像头设置或者网页视频流则设置相关标志,构建 LoadStreams 数据集。如果是普通的目录文件,或者是视频文件图像文件,则构建 LoadImages 数据集。
构造了数据集,接下来就是迭代获取每一张图像 或者是 获取视频的每一帧进行处理,图像文件直接保存,帧图像着写入一个视频对象中。摄像头捕获的帧图像同样写入一个视频对象中。这里设置的视频文件是逐帧处理的,而摄像头捕获调用了一个额外线程不断捕获帧图像,所以只能是处理当前捕获到的帧,所以摄像头文件看起来会有点卡顿。
最后,代码为图像绘制边界框专门构造了一个绘图类 Annotator 来处理。无论是普通图像还是来着视频的帧图像,都是丢到模型获取预测结果然后进行nms处理获取最后的预测结果,然后对框进行重新缩放映射到原图上,然后画框保存文件,结束。
对于代码的解析我已经注释在相应位置了。
2.1 主体部分
- detect.py主要代码
@torch.no_grad()
def run(weights=ROOT / 'yolov5s.pt', # model.pt path(s)
source=ROOT / 'data/images', # file/dir/URL/glob, 0 for webcam
imgsz=640, # inference size (pixels)
conf_thres=0.25, # confidence threshold
iou_thres=0.45, # NMS IOU threshold
max_det=1000, # maximum detections per image
device='', # cuda device, i.e. 0 or 0,1,2,3 or cpu
view_img=False, # show results
save_txt=False, # save results to *.txt
save_conf=False, # save confidences in --save-txt labels
save_crop=False, # save cropped prediction boxes
nosave=False, # do not save images/videos
classes=None, # filter by class: --class 0, or --class 0 2 3
agnostic_nms=False, # class-agnostic NMS
augment=False, # augmented inference
visualize=False, # visualize features
update=False, # update all models
project=ROOT / 'runs/detect', # save results to project/name
name='exp', # save results to project/name
exist_ok=False, # existing project/name ok, do not increment
line_thickness=3, # bounding box thickness (pixels)
hide_labels=False, # hide labels
hide_conf=False, # hide confidences
half=False, # use FP16 half-precision inference
dnn=False, # use OpenCV DNN for ONNX inference
):
source = str(source)
save_img = not nosave and not source.endswith('.txt') # save inference images
webcam = source.isnumeric() or source.endswith('.txt') or source.lower().startswith(
('rtsp://', 'rtmp://', 'http://', 'https://'))
# Directories
save_dir = increment_path(Path(project) / name, exist_ok=exist_ok) # increment run
(save_dir / 'labels' if save_txt else save_dir).mkdir(parents=True, exist_ok=True) # make dir
# Initialize
set_logging()
device = select_device(device)
half &= device.type != 'cpu' # half precision only supported on CUDA
# Load model
w = str(weights[0] if isinstance(weights, list) else weights)
classify, suffix, suffixes = False, Path(w).suffix.lower(), ['.pt', '.onnx', '.tflite', '.pb', '']
check_suffix(w, suffixes) # check weights have acceptable suffix
pt, onnx, tflite, pb, saved_model = (suffix == x for x in suffixes) # backend booleans
stride, names = 64, [f'classi' for i in range(1000)] # assign defaults
if pt:
model = torch.jit.load(w) if 'torchscript' in w else attempt_load(weights, map_location=device)
stride = int(model.stride.max()) # model stride
names = model.module.names if hasattr(model, 'module') else model.names # get class names
if half:
model.half() # to FP16
if classify: # second-stage classifier
modelc = load_classifier(name='resnet50', n=2) # initialize
modelc.load_state_dict(torch.load('resnet50.pt', map_location=device)['model']).to(device).eval()
elif onnx:
if dnn:
# check_requirements(('opencv-python>=4.5.4',))
net = cv2.dnn.readNetFromONNX(w)
else:
check_requirements(('onnx', 'onnxruntime'))
import onnxruntime
session = onnxruntime.InferenceSession(w, None)
else: # TensorFlow models
check_requirements(('tensorflow>=2.4.1',))
import tensorflow as tf
if pb: # https://www.tensorflow.org/guide/migrate#a_graphpb_or_graphpbtxt
def wrap_frozen_graph(gd, inputs, outputs):
x = tf.compat.v1.wrap_function(lambda: tf.compat.v1.import_graph_def(gd, name=""), []) # wrapped import
return x.prune(tf.nest.map_structure(x.graph.as_graph_element, inputs),
tf.nest.map_structure(x.graph.as_graph_element, outputs))
graph_def = tf.Graph().as_graph_def()
graph_def.ParseFromString(open(w, 'rb').read())
frozen_func = wrap_frozen_graph(gd=graph_def, inputs="x:0", outputs="Identity:0")
elif saved_model:
model = tf.keras.models.load_model(w)
elif tflite:
interpreter = tf.lite.Interpreter(model_path=w) # load TFLite model
interpreter.allocate_tensors() # allocate
input_details = interpreter.get_input_details() # inputs
output_details = interpreter.get_output_details() # outputs
int8 = input_details[0]['dtype'] == np.uint8 # is TFLite quantized uint8 model
imgsz = check_img_size(imgsz, s=stride) # check image size
# Dataloader
if webcam:
view_img = check_imshow()
cudnn.benchmark = True # set True to speed up constant image size inference
dataset = LoadStreams(source, img_size=imgsz, stride=stride, auto=pt) # 摄像头或者网页视频的数据集构建
bs = len(dataset) # batch_size
else:
dataset = LoadImages(source, img_size=imgsz, stride=stride, auto=pt) # 图像文件与视频文件的数据集构建
bs = 1 # batch_size 单进程
vid_path, vid_writer = [None] * bs, [None] * bs
# Run inference
if pt and device.type != 'cpu':
model(torch.zeros(1, 3, *imgsz).to(device).type_as(next(model.parameters()))) # run once
dt, seen = [0.0, 0.0, 0.0], 0
# 首先执行__iter__函数构建一个迭代器,最后每执行迭代一次就执行一次__next__函数
# 返回是的文件路径,缩放图,原图,视频源属性(当读取图片时为None, 读取视频时为视频源)
for path, img, im0s, vid_cap in dataset:
t1 = time_sync()
if onnx:
img = img.astype('float32')
else:
# 格式转化+半精度设置
img = torch.from_numpy(img).to(device)
img = img.half() if half else img.float() # uint8 to fp16/32
img = img / 255.0 # 0 - 255 to 0.0 - 1.0
# [h w c] -> [1 h w c]
if len(img.shape) == 3:
img = img[None] # expand for batch dim
t2 = time_sync()
dt[0] += t2 - t1
# Inference
if pt: # 主要是下面两行,其他的都无关
visualize = increment_path(save_dir / Path(path).stem, mkdir=True) if visualize else False
# pred shape=[1, num_boxes, xywh+obj_conf+classes] = [1, 18900, 25]
pred = model(img, augment=augment, visualize=visualize)[0]
elif onnx:
if dnn:
net.setInput(img)
pred = torch.tensor(net.forward())
else:
pred = torch.tensor(session.run([session.get_outputs()[0].name], session.get_inputs()[0].name: img))
else: # tensorflow model (tflite, pb, saved_model)
imn = img.permute(0, 2, 3, 1).cpu().numpy() # image in numpy
if pb:
pred = frozen_func(x=tf.constant(imn)).numpy()
elif saved_model:
pred = model(imn, training=False).numpy()
elif tflite:
if int8:
scale, zero_point = input_details[0]['quantization']
imn = (imn / scale + zero_point).astype(np.uint8) # de-scale
interpreter.set_tensor(input_details[0]['index'], imn)
interpreter.invoke()
pred = interpreter.get_tensor(output_details[0]['index'])
if int8:
scale, zero_point = output_details[0]['quantization']
pred = (pred.astype(np.float32) - zero_point) * scale # re-scale
pred[..., 0] *= imgsz[1] # x
pred[..., 1] *= imgsz[0] # y
pred[..., 2] *= imgsz[1] # w
pred[..., 3] *= imgsz[0] # h
pred = torch.tensor(pred)
t3 = time_sync()
dt[1] += t3 - t2
# NMS 非极大值抑制处理
# pred是一个list,存储了每张图像的最后预测结果,由于这里的图像和视频都是一张,所以list里面只会有一个内容(det)
pred = non_max_suppression(pred, conf_thres, iou_thres, classes, agnostic_nms, max_det=max_det)
dt[2] += time_sync() - t3
# Second-stage classifier (optional)
if classify:
pred = apply_classifier(pred, modelc, img, im0s)
# Process predictions
# 对每张图像的预测结果的每个预测内容依次处理
for i, det in enumerate(pred): # per image
seen += 1
if webcam: # batch_size >= 1
p, s, im0, frame = path[i], f'i: ', im0s[i].copy(), dataset.count
else:
p, s, im0, frame = path, '', im0s.copy(), getattr(dataset, 'frame', 0)
# 当前图片路径 如 F:\\yolo_v5\\yolov5-U\\data\\images\\bus.jpg
p = Path(p) # to Path
# 图片/视频的保存路径save_path 如 runs\\\\detect\\\\exp8\\\\bus.jpg
save_path = str(save_dir / p.name) # img.jpg
# txt文件(保存预测框坐标)保存路径 如 runs\\\\detect\\\\exp8\\\\labels\\\\bus
txt_path = str(save_dir / 'labels' / p.stem) + ('' if dataset.mode == 'image' else f'_frame') # img.txt
s += '%gx%g ' % img.shape[2:] # print string: wxh
# gn = [w, h, w, h] 用于后面的归一化
gn = torch.tensor(im0.shape)[[1, 0, 1, 0]] # normalization gain whwh
imc = im0.copy() if save_crop else im0 # for save_crop
# 创建了一个类用来对图像画框与添加文本信息
annotator = Annotator(im0, line_width=line_thickness, example=str(names))
if len(det):
# Rescale boxes from img_size to im0 size
# 将预测信息(相对img_size 640)映射回原图 img0 size, det:xyxy + conf + cls
det[:, :4] = scale_coords(img.shape[2:], det[:, :4], im0.shape).round()
# Print results
# 输出信息s + 检测到的各个类别的目标个数 (每张图像都会有一个这样的信息,对视频来说是每帧)
for c in det[:, -1].unique():
n = (det[:, -1] == c).sum() # detections per class
s += f"n names[int(c)]'s' * (n > 1), " # add to string
# Write results
# 对每个预测对象依次绘制在原图中 + 保存在txt文件中
for *xyxy, conf, cls in reversed(det):
# 将每个图片的预测信息分别存入save_dir/labels下的xxx.txt中 每行: class_id+score+xywh
if save_txt: # Write to file
# 将xyxy(左上角 + 右下角)格式转换为xywh(中心的 + 宽高)格式 并除以gn(whwh)做归一化 转为list再保存
xywh = (xyxy2xywh(torch.tensor(xyxy).view(1, 4)) / gn).view(-1).tolist() # normalized xywh
line = (cls, *xywh, conf) if save_conf else (cls, *xywh) # label format
with open(txt_path + '.txt', 'a') as f:
f.write(('%g ' * len(line)).rstrip() % line + '\\n')
# 在原图上绘制边界框
if save_img or save_crop or view_img: # Add bbox to image
c = int(cls) # integer class
# 在name这个列表字典中获取label名称
label = None if hide_labels else (names[c] if hide_conf else f'names[c] conf:.2f')
# 根据缩放后的预测边界框信息xyxy在原图上画框
annotator.box_label(<目标检测算法——YOLOv5/YOLOv7改进之结合RepVGG(速度飙升)

关注“PandaCVer”公众号
>>>深度学习Tricks,第一时间送达<<<
目录
RepVGG——极简架构,SOTA性能!!!
3.配置yolov5/yolov7_RepVGG.yaml文件
RepVGG——极简架构,SOTA性能!!!
(一)前沿介绍
论文题目:RepVGG: Making VGG-style ConvNets Great Again
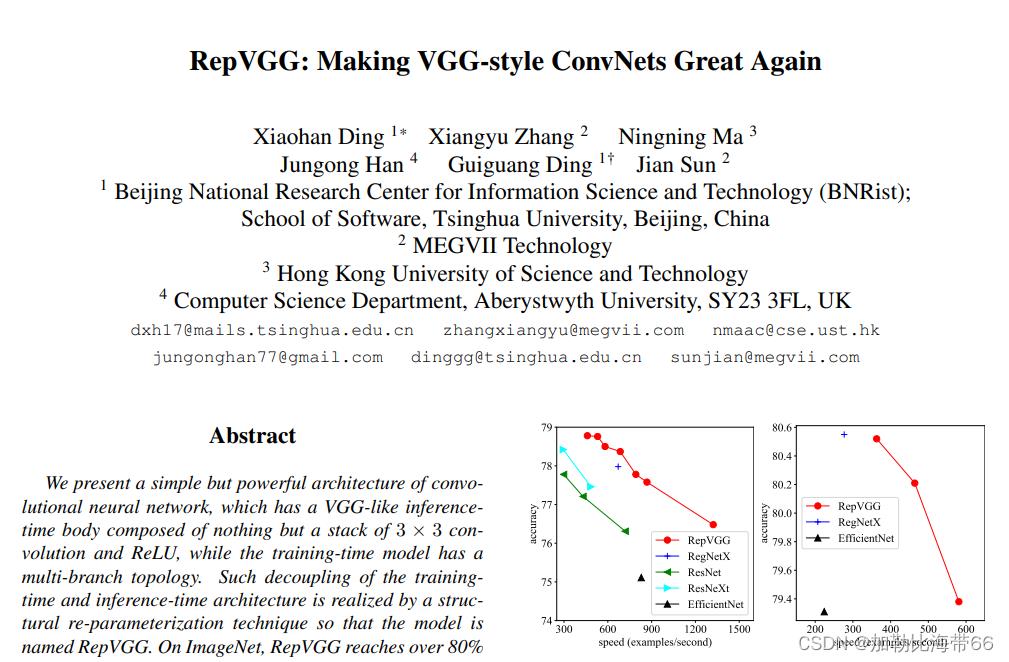
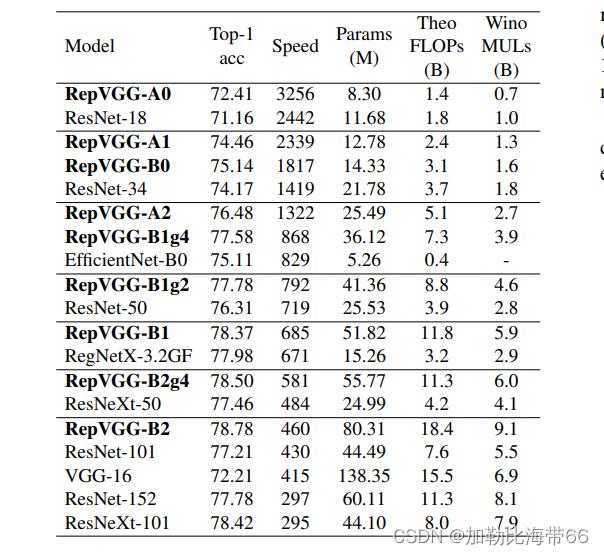
作者提出了一个简单但功能强大的卷积神经网络架构,该架构推理时候具有类似于VGG的骨干结构,该主体仅由3 x 3卷积和ReLU堆叠组成,而训练时候模型采用多分支拓扑结构。 训练和推理架构的这种解耦是通过结构重参数化技术实现的,因此该模型称为RepVGG。 在ImageNet上,据我们所知,RepVGG的top-1准确性达到80%以上,这是老模型首次实现该精度。 在NVIDIA 1080Ti GPU上,RepVGG模型的运行速度比ResNet-50快83%,比ResNet-101快101%,并且具有更高的精度,与诸如EfficientNet和RegNet的最新模型相比,RepVGG显示出良好的精度-速度权衡。效果对比如下图所示。
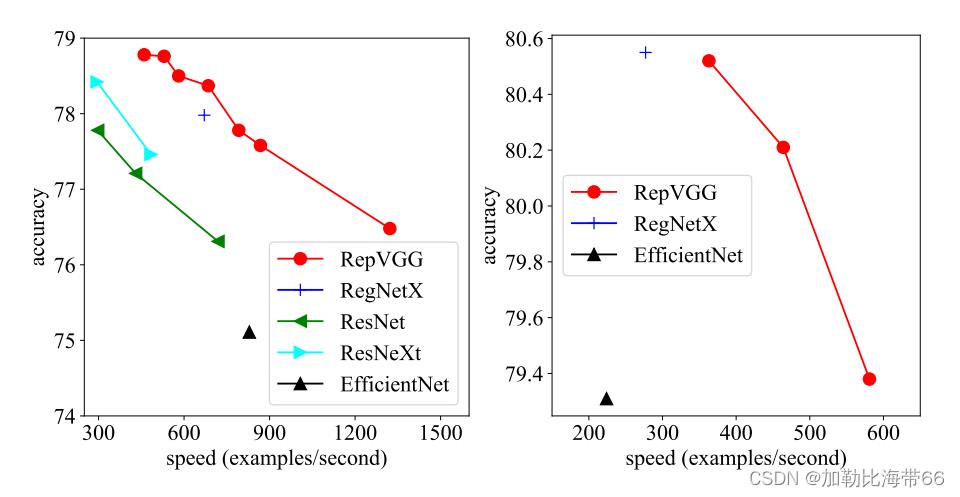
该论文主要有以下三点贡献:
1.更快
除了Winograd conv带来的加速之外,FLOPs和速度之间的差异可以归因于两个重要因素,它们对速度有很大影响,但FLOPs并未考虑这些因素:内存访问成本(MAC)和并行度。 另一方面,在相同的FLOPs下,具有高并行度的模型可能比具有低并行度的模型快得多。因此简单的推理结构可以避免多分支的零碎计算。
2.更省内存
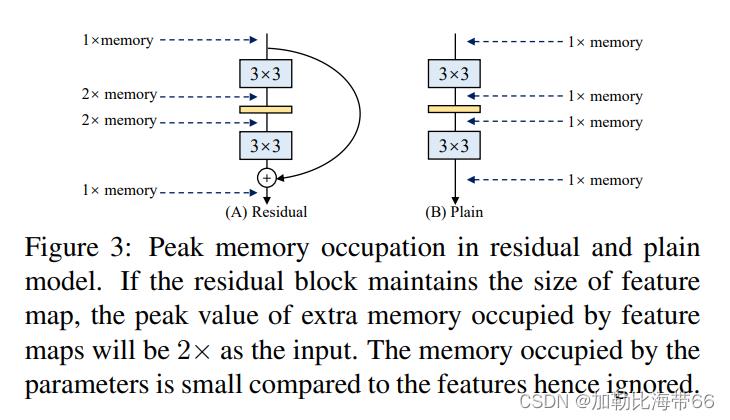
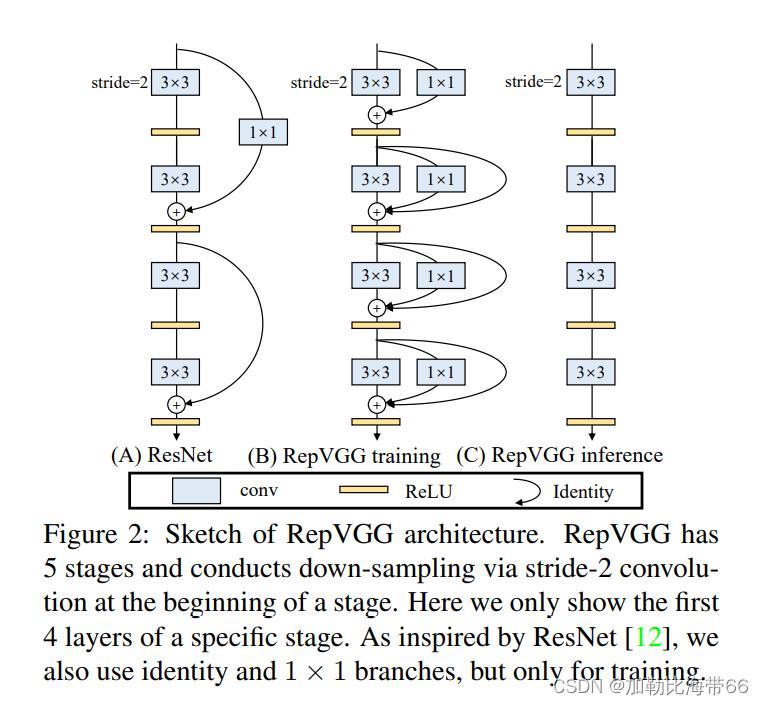
如图(A)所示的Residual模块,假设卷积层不改变channel的数量,那么在主分支和shortcut分支上都要保存各自的特征图或者称Activation,那么在add操作前占用的内存大概是输入Activation的两倍,而图(B)的Plain结构占用内存始终不变。
VGG是一个直筒性单路结构,由上述分析可知,单路结构会占有更少的内存,因为不需要保存其中间结果,同时,单路架构非常快,因为并行度高。同样的计算量,大而整的运算效率远超小而碎的运算。
3.更加灵活
作者在论文中提到了模型优化的剪枝问题,对于多分支的模型,结构限制较多剪枝很麻烦,而对于Plain结构的模型就相对灵活很多,剪枝也更加方便。
1.RepVGGBlock模块
2.相关实验结果
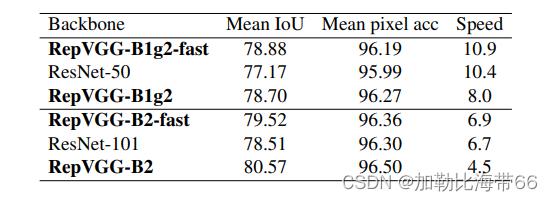
(二)YOLOv5/YOLOv7改进之结合RepVGG
改进方法和其他模块一样,分三步走:
1.配置common.py文件
#RepVGGBlock
class RepVGGBlock(nn.Module):
def __init__(self, in_channels, out_channels, kernel_size=3,
stride=1, padding=1, dilation=1, groups=1, padding_mode='zeros', deploy=False, use_se=False):
super(RepVGGBlock, self).__init__()
self.deploy = deploy
self.groups = groups
self.in_channels = in_channels
padding_11 = padding - kernel_size // 2
self.nonlinearity = nn.SiLU()
# self.nonlinearity = nn.ReLU()
if use_se:
self.se = SEBlock(out_channels, internal_neurons=out_channels // 16)
else:
self.se = nn.Identity()
if deploy:
self.rbr_reparam = nn.Conv2d(in_channels=in_channels, out_channels=out_channels, kernel_size=kernel_size,
stride=stride,
padding=padding, dilation=dilation, groups=groups, bias=True,
padding_mode=padding_mode)
else:
self.rbr_identity = nn.BatchNorm2d(
num_features=in_channels) if out_channels == in_channels and stride == 1 else None
self.rbr_dense = conv_bn(in_channels=in_channels, out_channels=out_channels, kernel_size=kernel_size,
stride=stride, padding=padding, groups=groups)
self.rbr_1x1 = conv_bn(in_channels=in_channels, out_channels=out_channels, kernel_size=1, stride=stride,
padding=padding_11, groups=groups)
# print('RepVGG Block, identity = ', self.rbr_identity)
def get_equivalent_kernel_bias(self):
kernel3x3, bias3x3 = self._fuse_bn_tensor(self.rbr_dense)
kernel1x1, bias1x1 = self._fuse_bn_tensor(self.rbr_1x1)
kernelid, biasid = self._fuse_bn_tensor(self.rbr_identity)
return kernel3x3 + self._pad_1x1_to_3x3_tensor(kernel1x1) + kernelid, bias3x3 + bias1x1 + biasid
def _pad_1x1_to_3x3_tensor(self, kernel1x1):
if kernel1x1 is None:
return 0
else:
return torch.nn.functional.pad(kernel1x1, [1, 1, 1, 1])
def _fuse_bn_tensor(self, branch):
if branch is None:
return 0, 0
if isinstance(branch, nn.Sequential):
kernel = branch.conv.weight
running_mean = branch.bn.running_mean
running_var = branch.bn.running_var
gamma = branch.bn.weight
beta = branch.bn.bias
eps = branch.bn.eps
else:
assert isinstance(branch, nn.BatchNorm2d)
if not hasattr(self, 'id_tensor'):
input_dim = self.in_channels // self.groups
kernel_value = np.zeros((self.in_channels, input_dim, 3, 3), dtype=np.float32)
for i in range(self.in_channels):
kernel_value[i, i % input_dim, 1, 1] = 1
self.id_tensor = torch.from_numpy(kernel_value).to(branch.weight.device)
kernel = self.id_tensor
running_mean = branch.running_mean
running_var = branch.running_var
gamma = branch.weight
beta = branch.bias
eps = branch.eps
std = (running_var + eps).sqrt()
t = (gamma / std).reshape(-1, 1, 1, 1)
return kernel * t, beta - running_mean * gamma / std
def forward(self, inputs):
if hasattr(self, 'rbr_reparam'):
return self.nonlinearity(self.se(self.rbr_reparam(inputs)))
if self.rbr_identity is None:
id_out = 0
else:
id_out = self.rbr_identity(inputs)
return self.nonlinearity(self.se(self.rbr_dense(inputs) + self.rbr_1x1(inputs) + id_out))
def fusevggforward(self, x):
return self.nonlinearity(self.rbr_dense(x))
2.配置yolo.py文件
加入RepVGGBlock模块。

3.配置yolov5/yolov7_RepVGG.yaml文件
# anchors
anchors:
- [10,13, 16,30, 33,23] # P3/8
- [30,61, 62,45, 59,119] # P4/16
- [116,90, 156,198, 373,326] # P5/32
# YOLOv5 backbone
backbone:
# [from, number, module, args]
[[-1, 1, RepVGGBlock, [64, 3, 2]], # 0-P1/2
[-1, 1, RepVGGBlock, [64, 3, 2]], # 1-P2/4
[-1, 1, RepVGGBlock, [64, 3, 1]], # 2-P2/4
[-1, 1, RepVGGBlock, [128, 3, 2]], # 3-P3/8
[-1, 3, RepVGGBlock, [128, 3, 1]],
[-1, 1, RepVGGBlock, [256, 3, 2]], # 5-P4/16
[-1, 13, RepVGGBlock, [256, 3, 1]],
[-1, 1, RepVGGBlock, [512, 3, 2]], # 7-P4/16
]
# YOLOv5 head
head:
[[-1, 1, Conv, [256, 1, 1]],
[-1, 1, nn.Upsample, [None, 2, 'nearest']],
[[-1, 6], 1, Concat, [1]], # cat backbone P4
[-1, 1, C3, [256, False]], # 11
[-1, 1, Conv, [128, 1, 1]],
[-1, 1, nn.Upsample, [None, 2, 'nearest']],
[[-1, 4], 1, Concat, [1]], # cat backbone P3
[-1, 1, C3, [128, False]], # 15 (P3/8-small)
[-1, 1, Conv, [128, 3, 2]],
[[-1, 12], 1, Concat, [1]], # cat head P4
[-1, 1, C3, [256, False]], # 18 (P4/16-medium)
[-1, 1, Conv, [256, 3, 2]],
[[-1, 8], 1, Concat, [1]], # cat head P5
[-1, 1, C3, [512, False]], # 21 (P5/32-large)
[[15, 18, 21], 1, Detect, [nc, anchors]], # Detect(P3, P4, P5)
]
关于YOLO算法改进及论文投稿可关注并留言博主的CSDN
>>>一起交流!互相学习!共同进步!<<<
以上是关于YOLOv5的Tricks | Trick13YOLOv5的detect.py脚本的解析与简化的主要内容,如果未能解决你的问题,请参考以下文章