el-cascader数据渲染及回显至页面(以及踩坑历程+解决)
Posted susu_1111
tags:
篇首语:本文由小常识网(cha138.com)小编为大家整理,主要介绍了el-cascader数据渲染及回显至页面(以及踩坑历程+解决)相关的知识,希望对你有一定的参考价值。
第一次使用el-cascader就把坑踩了个遍,写个记录,也希望能够帮助到同为小猿的你们。
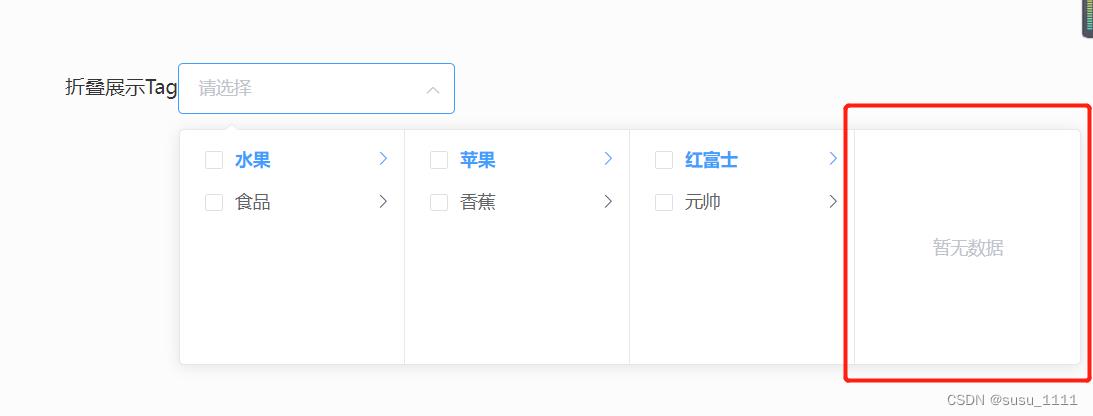
下面是我写的一个还原项目的例子
Bug1 首先是最小子集仍然有children,但是children为空数组,el-cascader渲染时,发现有children所以继续渲染了,只是没数据
  <el-cascader
          :props="defaultParams"
          :options="options"
          v-model="form.selectedOptions"
        >
        </el-cascader>


//option是要选择的数据

 options: [

          id: "1",
          name: "水果",
          level: "1",
          pid: "0",
          status: "1",
          sub: [

              id: "4",
              name: "苹果",
              level: "2",
              pid: "1",
              status: "1",
              sub: [

                  id: "41",
                  name: "红富士",
                  level: "2",
                  pid: "1",
                  status: "1",
                  sub: [],
                ,

                  id: "42",
                  name: "元帅",
                  level: "2",
                  pid: "1",
                  status: "1",
                  sub: [],
                ,
              ],
            ,

              id: "8",
              name: "香蕉",
              level: "2",
              pid: "1",
              status: "1",
              sub: [],
            ,
          ],
        ,

          id: "2",
          name: "食品",
          level: "1",
          pid: "0",
          status: "1",
          sub: [

              id: "5",
              name: "馒头",
              level: "2",
              pid: "2",
              status: "1",
              sub: [],
            ,

              id: "6",
              name: "大米",
              level: "2",
              pid: "2",
              status: "1",
              sub: [],
            ,
          ],
        ,
      ],
我这里的sub相当于children,可以看到我最小的子集,仍有sub:[ ] ,导致渲染空
解决:处理源数据(这里源数据☞ options),我看其他解决方式是将为空的children赋值为undefine,也有直接处理源数据,取出要用的数据,这里我把两种方式都写下来,可以择一使用,
第一种:
// 递归判断列表,把最后的sub设为undefined sub也就是源数据里的children
    getTreeData(data)
      for (var i = 0; i < data.length; i++)
        if (data[i].sub.length < 1)
          // sub若为空数组,则将sub设为undefined
          data[i].sub = undefined;
         else
          // sub若不为空数组,则继续 递归调用 本方法
          this.getTreeData(data[i].sub);


      return data;
    ,
第二种是将源数据过滤掉children,把主要数据取出来,放在一个新数组,这样就得到一个新的没有children的数组了,在使用时调用该方法就可以啦
getTreeData(datas)
let data = [];
datas.map((item) =>
if (item.sub.length > 0)
let dadax =
label: item.name, //这是需要展示的数据 我的数据是name,所以label对应的是name
value: item.id,
sub: this.getTreeData(item.sub),
;
data.push(dadax);
else
let dadax =
label: item.name,
value: item.id,
;
data.push(dadax);
return data;
);
return data;
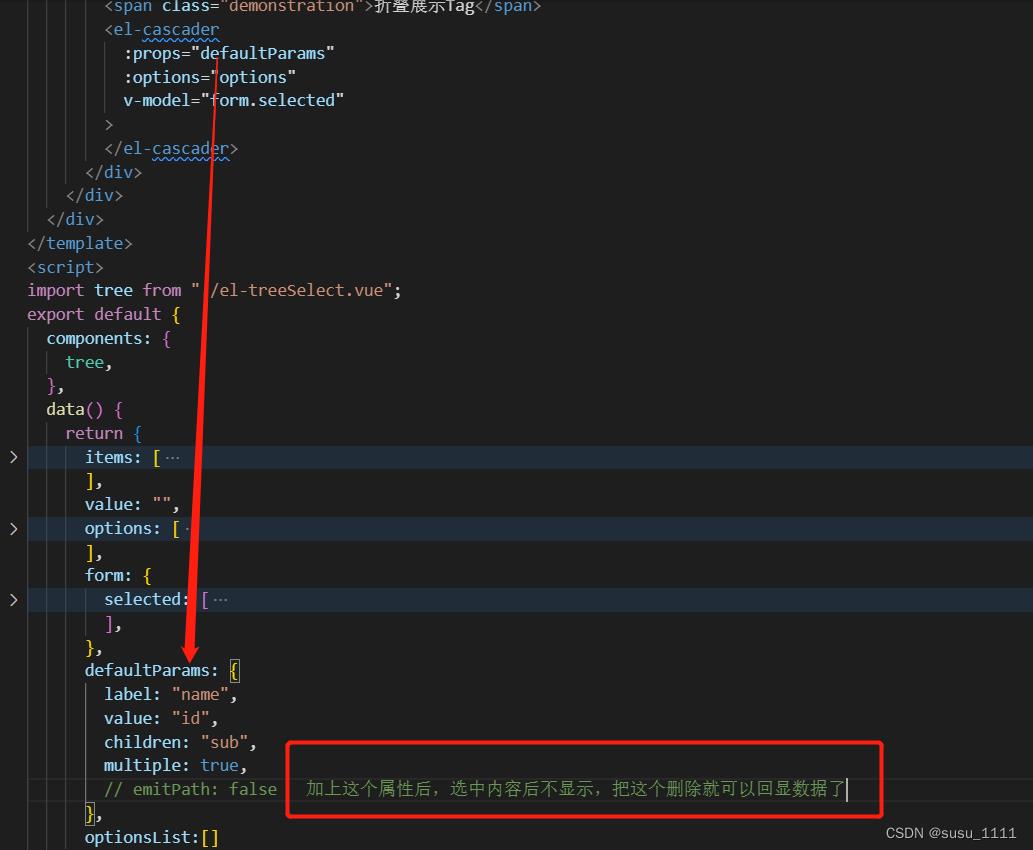
,Bug2 在做数据回显时,总是回显不出数据,找遍了各种方式还是没解决,到后来才发现在props里多加了个属性,导致不回显数据
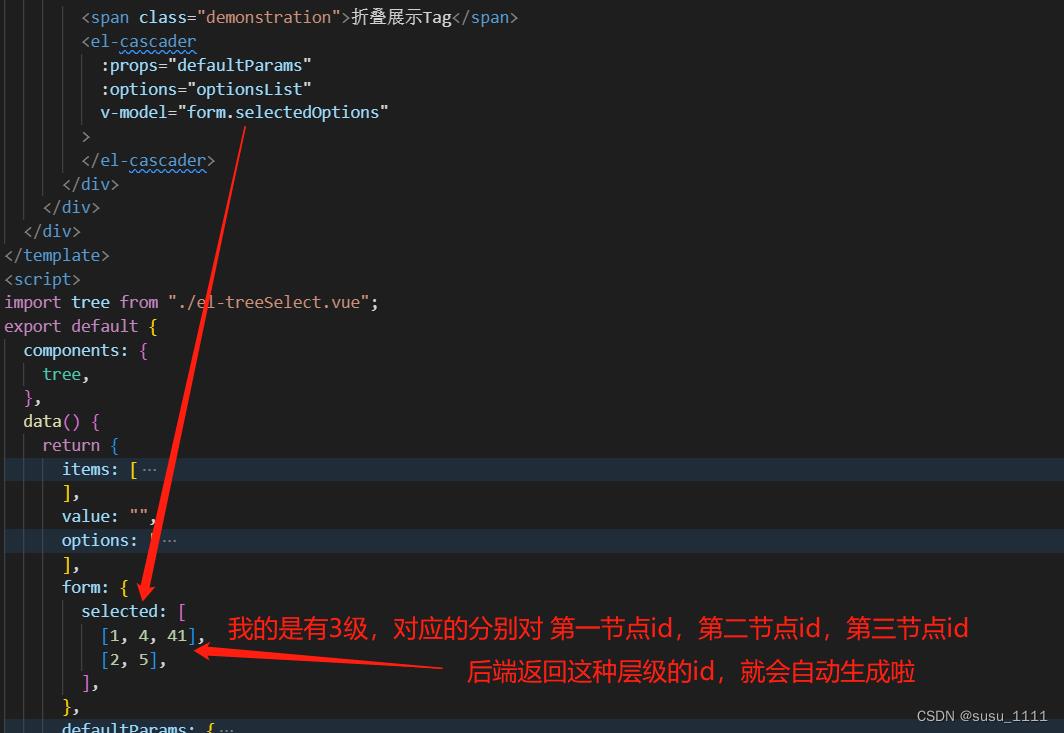
下面,先说数据是怎么回显的,其实很简单,只需要后端把对应的层级关系的节点id就可以啦
例如我的 尤其要特别注意 给后端大佬说清 需要的数据格式 是 一个大的数组 里面是一个一个的小数组,一个数组代表了一个回显的数据,我这里做的是多选的,所以回显的数据比较多,这里以两个为例,多个回显数据就很多几条数组就可以啦
tips:在找其他答案的时候偶然发现也可以通过官方文档的getCheckedNodes方法来拿到选择过的数据然后再用v-model来绑定,也可以回显数据,这个方法我没试,应该也是可以的
接下来,就要说说我踩得冤坑了,主要还是不熟悉el-casasder组件,乱加属性emitPath:false,这里是解决项目字段和组件字段不对应的方式,el-cascader默认显示的字段是label
如果想具体了解下emitPath的用法可以参考element-ui的官网
到此,算是对el-cascader的使用告一段落了,有缺失的地方,也希望多多补充,觉得可以的话,就给俺点个赞吧
使用Dropzone上传图片及回显演示样例
一、图片上传所涉及到的问题
1、HTML页面中引入这么一段代码
    <div class="row">

        <div class="col-md-12">

            <form dropzone2  class="dropzone" enctype="multipart/form-data" method="post"></form>

        </div>

    </div>
2、 在指令中发送POST请求
关键代码例如以下
 var manage = angular.module(‘hubBrowseManageDirectives‘, []);

    manage.directive(‘dropzone2‘, function () {
        return {
            restrict: ‘EA‘,
            controller: [‘$scope‘, ‘$element‘, ‘$attrs‘, ‘$timeout‘, function ($scope, $element, $attrs, $timeout) {
                $element.dropzone({
                    url : "rest/components/"+$scope.component.name+"/"+$scope.component.version+"/images",
                    autoDiscover : false,
                    autoProcessQueue: true,
                    addRemoveLinks: true,
                    addViewLinks: true,
                    acceptedFiles: ".jpg,.png",
                    dictDefaultMessage: "upload head picture",
                    maxFiles : "1",
                    dictMaxFilesExceeded: "Only can upload one picture, repeat upload will be deleted!",
                    init: function () {
                     var mockFile = { name: "Filename",
                                      size: 10000
                                     };
                     this.emit("addedfile", mockFile);
                     mockFile._viewLink.href = "rest/components/"+$scope.component.name+"/"+$scope.component.version +"/"+$scope.component.image;
                     mockFile._viewLink.name = $scope.component.image;
                     this.emit("thumbnail", mockFile, "rest/components/"+$scope.component.name+"/"+$scope.component.version +"/"+$scope.component.image);
                     this.emit("complete", mockFile);


                        $(".dz-view").colorbox({
                               rel:‘dz-view‘,
                               width:"70%",
                               height:"80%"
                        });

                        this.on("error", function (file, message) {
                            alert(message);
                            this.removeFile(file);
                        });
                        this.on("success", function(file,imageInfo) {

                          file._viewLink.href = imageInfo.newfile;
                          file._viewLink.name = imageInfo.newfile;

                           $scope.$apply(function() {
                                $scope.component.image="rest/components/"+$scope.component.name+"/"+$scope.component.version+"/"+imageInfo.newfile;
                           });

                        });
                        this.on("removedfile", function(file) {
                           var removeFileUrl = file._viewLink.name;

                                if($scope.component.image == removeFileUrl){
                                    this.removeFile(file);
                                }

                          });

                    }
                });

            }]
        };
    });
注意上述URL的请求方式,要在Angular模拟请求中放行。
格式例如以下:
var hubMock = angular.module(‘hubMock‘, [‘ngMockE2E‘]);

    hubMock.run([‘$httpBackend‘, ‘$http‘, function ($httpBackend, $http) {


        $httpBackend.whenGET(/\.html/).passThrough();
        $httpBackend.whenGET(/\.json/).passThrough();

        $httpBackend.whenPOST(/rest\/components\/.+\/.+\/images/).passThrough();

    }]);
$httpBackend.whenPOST(/rest\/components\/.+\/.+\/images/).passThrough(); 放行图片上传发送是POST 请求。
3、处理上传图片的请求将其存储在本地
 @POST
    @Path("/{componentName: \\w+}/{version: \\d\\.\\d\\.\\d}/images")
    @Produces(MediaType.APPLICATION_JSON)
    public Response uploadMyComponentImage(@Context HttpServletRequest request, @PathParam("componentName") String componentName,
            @PathParam("version") String version) {
        Map<String, String> infoMap = componentService.uploadMyComponentImage(request, componentName, version);

        return Response.ok(infoMap).build();
    }
4、通过接口及事实上现类来处理图片上传的位置
  @Override
    public Map<String, String> uploadMyComponentImage(HttpServletRequest request, String componentName, String version) {

        Map<String, String> infoMap = new HashMap<String, String>();
        String url = null;
        try {
            url = application.getStorageLocation(File.separator + componentName + File.separator + version).getAbsolutePath();
        } catch (IOException e1) {
            e1.printStackTrace();
        }

        DiskFileItemFactory factory = new DiskFileItemFactory();
        ServletFileUpload upload = new ServletFileUpload(factory);

        try {

            Map<String, List<FileItem>> items = upload.parseParameterMap(request);

            for (Entry<String, List<FileItem>> entry : items.entrySet()) {

                String key = entry.getKey();

                Iterator<FileItem> itr = items.get(key).iterator();

                while (itr.hasNext()) {

                    FileItem item = itr.next();
                    String newfileName = UUID.randomUUID().toString() + "-" + item.getName();

                    infoMap.put("newfile", "" + newfileName);

                    File file = new File(url);
                    if (!file.exists()) {
                        file.mkdirs();
                    }
                    file = new File(url + File.separator + "img" + File.separator + newfileName);
                    item.write(file);

                }
            }

        } catch (FileUploadException e) {
            e.printStackTrace();
        } catch (Exception e) {
            e.printStackTrace();
        }

        return infoMap;
    }
在这里返回的是一个map, key是newfile,value是”” + newfileName,因此在上传成功后就能够取得图片的信息。例如以下演示样例 imageInfo.newfile;:
 this.on("success", function(file,imageInfo) {

                          file._viewLink.href = imageInfo.newfile;
                          file._viewLink.name = imageInfo.newfile;

                           $scope.$apply(function() {
                                $scope.component.image="rest/components/"+$scope.component.name+"/"+$scope.component.version+"/"+imageInfo.newfile;
                           });

                        });
二、页面中的图片怎样进行回显?
1、现今的站点上图片上的获取方式主要是以Get请求的方式传回图片流到浏览器端,这里相同採用请求主动获取图片的方式。

页面回显时会主动发送请求:
“rest/components/”+
scope.component.name+"/"+ scope.component.version +”/”+$scope.component.image
真实请求路径是这种:
localhost:8080/xxxxxx/rest/components/2_component1/1.0.0/0c6684ad-84df-4e0e-8163-9e2d179814e6-Penguins.jpg
2、后台怎样接受请求,处理请求呢?
參见下面代码,返回到浏览器的实际上就是一个输出流。
关键代码演示样例
 /**
     * get pictures OutputStream
     *
     * @param componentName
     * @param version
     * @return
     */
    @GET
    @Path("/{componentName: \\w+}/{version: \\d\\.\\d\\.\\d}/{imagePath: .+}")
    @Produces(MediaType.APPLICATION_OCTET_STREAM)
    public Response findImages(@PathParam("componentName") final String componentName, @PathParam("version") final String version,
            @PathParam("imagePath") final String imagePath) {
        StreamingOutput output = new StreamingOutput() {

            private BufferedInputStream bfis = null;

            public void write(OutputStream output) throws IOException, WebApplicationException {

                try {
                    String filePath = "";
        //推断图片的请求路径是否长路径,这个依据需求而来的
                    if (imagePath.contains("/")) {
                    //取出图片
                        filePath = application.getStorageLocation(File.separator + componentName + File.separator + version) + File.separator + "img"
                                + File.separator + imagePath.split("/")[imagePath.split("/").length - 1];

                    } else {
                      //取出图片
                        filePath = application.getStorageLocation(File.separator + componentName + File.separator + version) + File.separator + "img"
                                + File.separator + imagePath;

                    }

                    bfis = new BufferedInputStream(new FileInputStream(filePath));
                    int read = 0;
                    byte[] bytes = new byte[1024];
                    while ((read = bfis.read(bytes)) != -1) {
                        output.write(bytes, 0, read);
                    }

                } catch (Exception e) {
                    e.printStackTrace();
                } finally {
                    try {
                        if (bfis != null) {
                            bfis.close();
                        }
                        output.flush();
                        output.close();
                    } catch (Exception e2) {
                        e2.printStackTrace();
                    }
                }

            }

        };
        //返回给浏览器
        return Response.ok(output, MediaType.APPLICATION_OCTET_STREAM).build();

    }
3、当点击view时。又会去请求后台返回预览大图图像,这里使用了colorbox插件来进行大图像的预览和轮播显示。感觉非常酷的样子。
效果例如以下所看到的:

以上是关于el-cascader数据渲染及回显至页面(以及踩坑历程+解决)的主要内容,如果未能解决你的问题,请参考以下文章