姿态分析开源工具箱MMPose安装及使用示例(2d face landmark detection)
Posted fengbingchun
tags:
篇首语:本文由小常识网(cha138.com)小编为大家整理,主要介绍了姿态分析开源工具箱MMPose安装及使用示例(2d face landmark detection)相关的知识,希望对你有一定的参考价值。
MMPose是一个基于PyTorch的姿态分析的开源工具箱,是OpenMMLab项目的一部分,源码在https://github.com/open-mmlab/mmpose,最新发布版本为v0.28.1,License为Apache-2.0。它支持在Windows、Linux和Mac上运行。
1.安装:使用conda安装
(1).创建openmmlab虚拟环境:
conda create -n openmmlab python=3.8
conda activate openmmlab
(2).安装PyTorch:这里PyTorch使用1.11.0版本,CUDA使用10.2版本,此CUDA版本对PyTorch各版本都支持
conda install pytorch==1.11.0 torchvision==0.12.0 torchaudio==0.11.0 cudatoolkit=10.2 -c pytorch (3).安装MMCV:MMCV有两个版本,这里安装带CUDA的mmcv-full
1).mmcv-full: 完整版,包含所有的特性以及丰富的开箱即用的CUDA算子,安装此版本需要较长时间。
2).mmcv:精简版,不包含CUDA算子但包含其余所有特性和功能,类似MMCV 1.0之前的版本。
不要在同一个环境中安装两个版本,否则可能会遇到类似ModuleNotFound的错误。在安装一个版本之前,需要先卸载另一个:
pip uninstall mmcv-full
pip uninstall mmcv
注意:这里mmcv-full使用1.5.3版本。CUDA版本和PyTorch版本与安装PyTorch时保持一致
pip install mmcv-full==1.5.3 -f https://download.openmmlab.com/mmcv/dist/cu102/torch1.11.0/index.html(4).安装MMPose:没有通过源码安装
pip install mmpose==0.28.1(5).安装MMDetection:MMPose中个别模块会需要
pip install mmdet==2.25.1(6).安装face_recognition:MMPose中个别模块会需要,face_recognition依赖dlib,因此安装face_recognition之前需要先安装dlib
conda install -c conda-forge dlib
pip3 install face_recognition
2.测试:论文:《Deep High-Resolution Representation Learning for Visual Recognition》,19点
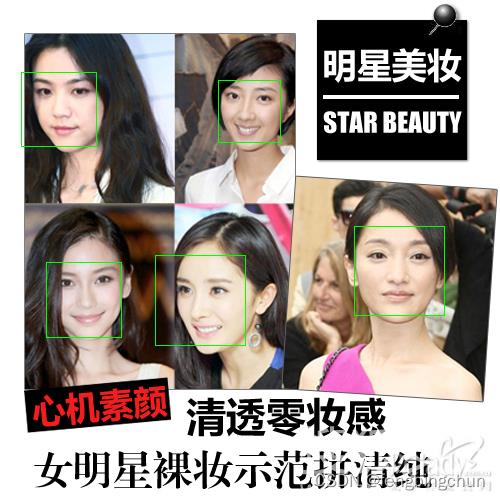
(1).准备测试图像:原始图像来自网络
image_path = "../../data/image/"
image_name = "2.jpg"
(2).通过开源模块face_recognition检测人脸框:
data = face_recognition.load_image_file(image)
face_det_results = face_recognition.face_locations(data) # a list of tuples of found face locations in css (top, right, bottom, left) order
print("face detect results:", face_det_results)

face_bbox_results = []

mat = cv2.imread(image)
for rect in face_det_results:
    cv2.rectangle(mat, (rect[3], rect[0]), (rect[1], rect[2]), (0, 255, 0), 1)
    person =
    person["bbox"] = [rect[3], rect[0], rect[1], rect[2]]
    face_bbox_results.append(person)

cv2.imwrite("../../data/result_mmpose_face_location.png", mat)
cv2.imshow("show", mat)
cv2.waitKey(0)

print("face bbox results:", face_bbox_results)
return face_bbox_results
(3).下载模型:
def download_checkpoint(path, name, url):
	if os.path.isfile(path+name) == False:
		print("checkpoint(model) file does not exist, now download ...")
		subprocess.run(["wget", "-P", path, url])

path = "../../data/model/"
checkpoint = "hrnetv2_w18_aflw_256x256-f2bbc62b_20210125.pth"
url = "https://download.openmmlab.com/mmpose/face/hrnetv2/hrnetv2_w18_aflw_256x256-f2bbc62b_20210125.pth"
download_checkpoint(path, checkpoint, url)
(4).根据配置文件和checkpoint文件构建模型:
config = "../../src/mmpose/configs/face/2d_kpt_sview_rgb_img/topdown_heatmap/aflw/hrnetv2_w18_aflw_256x256.py"
model = init_pose_model(config, path+checkpoint, device)
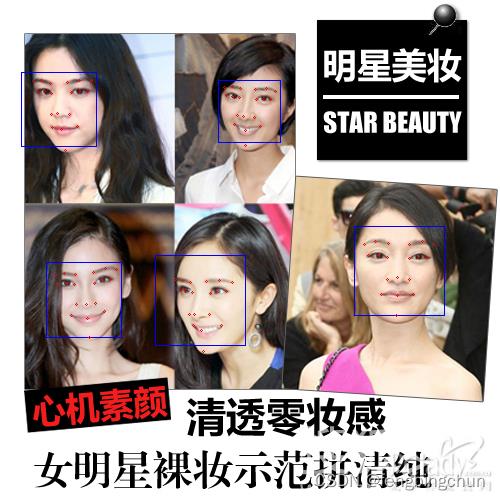
(5).进行推理,输入包括之前的人脸检测框结果:
pose_results, returned_outputs = inference_top_down_pose_model(model, image, face_bbox_results, bbox_thr=None, format='xyxy')
# print(pose_results)
(6).由推理输出画圆和框并保存结果图像:
# vis_pose_result(model, image, pose_results, radius=1, thickness=1, show=True, out_file="../../data/result_mmpose_2d_face_landmark.png")

mat = cv2.imread(image)
for result in pose_results:
    # print(f"bbox: result['bbox'], keypoints: result['keypoints']")
    cv2.rectangle(mat, (result['bbox'][0], result['bbox'][1]), (result['bbox'][2], result['bbox'][3]), (255, 0, 0), 1)

    for keypoints in result['keypoints']:
        cv2.circle(mat, (int(keypoints[0]), int(keypoints[1])), 1, (0, 0, 255), 1)

cv2.imwrite("../../data/result_mmpose_face_landmark.png", mat)
cv2.imshow("show", mat)
cv2.waitKey(0)
demo命令行输出结果如下:

GitHub: https://github.com/fengbingchun/PyTorch_Test
以上是关于姿态分析开源工具箱MMPose安装及使用示例(2d face landmark detection)的主要内容,如果未能解决你的问题,请参考以下文章