基于Qt和ffmpeg的抓屏rtsp服务
Posted 老张音视频开发进阶
tags:
篇首语:本文由小常识网(cha138.com)小编为大家整理,主要介绍了基于Qt和ffmpeg的抓屏rtsp服务相关的知识,希望对你有一定的参考价值。
章节目录
开发环境介绍
一、采集模块
二、编码模块
三、封装模块
四、传输模块
五、结束语
① 下载代码,先运行bin目录下的bat脚本,可以将release和debug都运行一次
② 然后在代码根目录下新建一个build64目录
③ 运行cmd窗口到当前目录下,运行 cmake .. -G "Visual Studio 16" -A x64
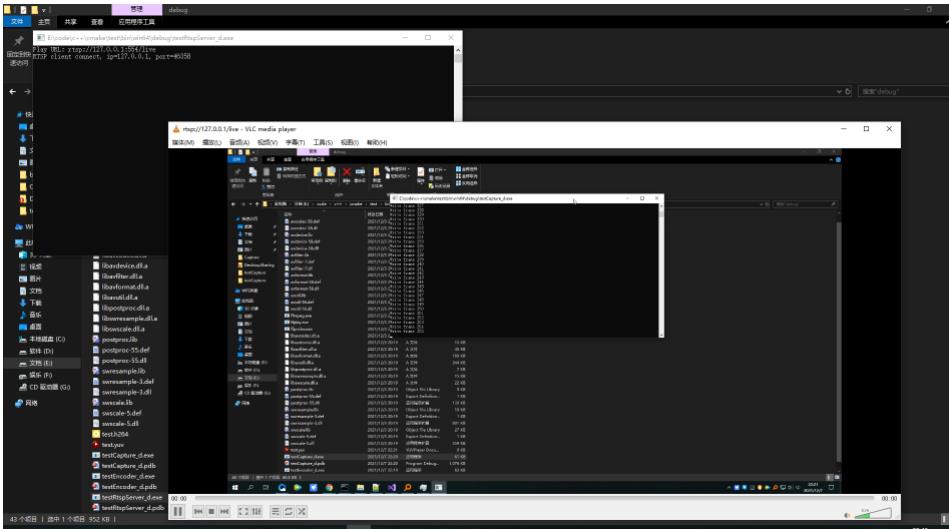
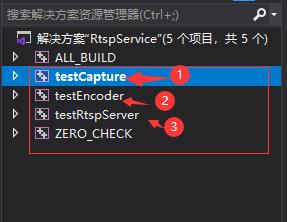
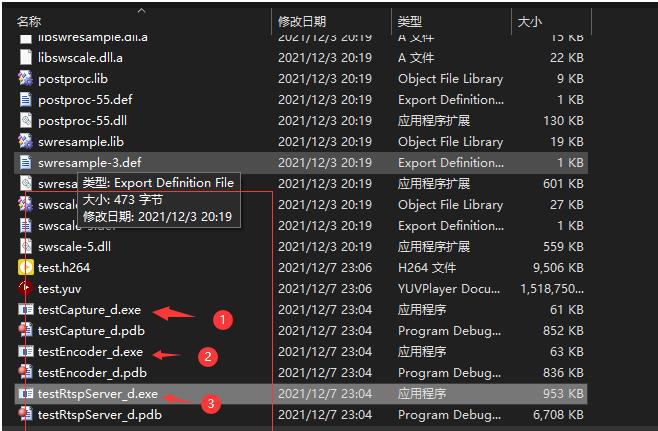
④ 图2中,依次运行,最总在bin/win64/debug或者bin/win64/release下按图3运行,可以使用vlc进行测试,rtsp://127.0.0.1:554/live
参考链接
接着上一章,这一章主要是单独实现各个模块
开发环境介绍
windows下,采用
cmake+vs+qt开发,媒体库采用最新的ffmpeg4.4,均采用win64,win32可以自行配置
cmake version 3.21.4
Visual Studio 2019
Qt5.15.2
CMakeLists.txt
CMAKE_MINIMUM_REQUIRED(VERSION 3.10)

SET(PRJ_NAME RtspService)
PROJECT($PRJ_NAME)

IF(WIN32)
	SET(CMAKE_DEBUG_POSTFIX "_d")
ENDIF(WIN32)

IF(NOT CMAKE_BUILD_TYPE)
	IF(WIN32)
	ELSE(WIN32)
		SET(CMAKE_BUILD_TYPE Debug)
	ENDIF(WIN32)

ENDIF()

IF(WIIN32)
	SET(CMAKE_SYSTEM_VERSION 10.0)
ENDIF(WIN32)

MESSAGE(STATUS $PROJECT_SOURCE_DIR)
MESSAGE(STATUS $PROJECT_BINARY_DIR)
MESSAGE(STATUS $CMAKE_BINARY_DIR)

IF(WIN32)
	IF(CMAKE_CL_64)
		SET(BASELIB_PATH $PROJECT_SOURCE_DIR/bin/win64)
	ELSE(CMAKE_CL_64)
		SET(BASELIB_PATH $PROJECT_SOURCE_DIR/bin/win32)
	ENDIF(CMAKE_CL_64)
ENDIF(WIN32)
LINK_DIRECTORIES($BASELIB_PATH)

IF(WIN32)
	SET(CMAKE_CXX_FLAGS "$CMAKE_CXX_FLAGS /EHsc")
ELSE(WIN32)
	SET(CMAKE_CXX_STANDARD 11)
	SET(CMAKE_CXX_FLAGS_DEBUG "$ENVCXXFLAGS" -O0 -Wall -g3 -ggdb -D_DEBUG -DDEBUG)
	SET(CMAKE_CXX_FLAGS_RELEASE "$ENVCXXFLAGS -O3 -Wall -DNDEBUG")
	ADD_COMPILE_OPTIONS(-std=c++11)
ENDIF(WIN32)

IF(WIN32)
	ADD_DEFINITIONS(-DUNICODE -D_UNICODE)
	SET(CMAKE_CXX_FLAGS_RELEASE "$CMAKE_CXX_FLAGS_RELEASE /Zi /Od")
	SET(CMAKE_SHARED_LINKER_FLAGS_RELEASE "$CMAKE_SHARED_LINKER_FLAGS_RELEASE /DEBUG /OPT:REF /OPT:ICF")
	SET(CMAKE_EXE_LINKER_FLAGS_RELEASE "$CMAKE_EXE_LINKER_FLAGS_RELEASE /DEBUG /OPT:REF /OPT:ICF")
	IF(CMAKE_CL_64)
		SET(CMAKE_ARCHIVE_OUTPUT_DIRECTORY_DEBUG $PROJECT_SOURCE_DIR/bin/win64/debug)
		SET(CMAKE_LIBRARY_OUTPUT_DIRECTORY_DEBUG $PROJECT_SOURCE_DIR/bin/win64/debug)
		SET(CMAKE_RUNTIME_OUTPUT_DIRECTORY_DEBUG $PROJECT_SOURCE_DIR/bin/win64/debug)
		SET(CMAKE_ARCHIVE_OUTPUT_DIRECTORY_RELEASE $PROJECT_SOURCE_DIR/bin/win64/release)
		SET(CMAKE_LIBRARY_OUTPUT_DIRECTORY_RELEASE $PROJECT_SOURCE_DIR/bin/win64/release)
		SET(CMAKE_RUNTIME_OUTPUT_DIRECTORY_RELEASE $PROJECT_SOURCE_DIR/bin/win64/release)
	ELSE(CMAKE_CL_64)
		SET(CMAKE_ARCHIVE_OUTPUT_DIRECTORY_DEBUG $PROJECT_SOURCE_DIR/bin/win32/debug)
		SET(CMAKE_LIBRARY_OUTPUT_DIRECTORY_DEBUG $PROJECT_SOURCE_DIR/bin/win32/debug)
		SET(CMAKE_RUNTIME_OUTPUT_DIRECTORY_DEBUG $PROJECT_SOURCE_DIR/bin/win32/debug)
		SET(CMAKE_ARCHIVE_OUTPUT_DIRECTORY_RELEASE $PROJECT_SOURCE_DIR/bin/win32/release)
		SET(CMAKE_LIBRARY_OUTPUT_DIRECTORY_RELEASE $PROJECT_SOURCE_DIR/bin/win32/release)
		SET(CMAKE_RUNTIME_OUTPUT_DIRECTORY_RELEASE $PROJECT_SOURCE_DIR/bin/win32/release)
	ENDIF(CMAKE_CL_64)
ENDIF(WIN32)

INCLUDE_DIRECTORIES($CMAKE_SOURCE_DIR/include)

IF(WIN32)
	IF(CMAKE_CL_64)
		SET(CMAKE_PREFIX_PATH "D:/Qt/5.15.2/msvc2019_64")
	ELSE(CMAKE_CL_64)
		SET(CMAKE_PREFIX_PATH "D:/Qt/5.15.2/msvc2019")
	ENDIF(CMAKE_CL_64)

ELSE(WIN32)
	SET(CMAKE_PREFIX_PATH $QTDIR/5.15.2)
ENDIF(WIN32)

ADD_SUBDIRECTORY(test/testCapture)
ADD_SUBDIRECTORY(test/testEncoder)
ADD_SUBDIRECTORY(test/testRtspServer)
分享一个音视频高级开发交流群,群文件有最新音视频学习文件和视频~点击788280672加入自取(或者联系管理员领取最新资料)。
一、采集模块
#ifdef __cplusplus

extern "C"

#endif // __cplusplus
#include "libavcodec/avcodec.h"
#include "libavformat/avformat.h"
#include "libswscale/swscale.h"
#include "libavdevice/avdevice.h"
#ifdef __cplusplus

#endif // __cplusplus

#include <stdio.h>

#define __STDC_CONSTANT_MACROS

//Output YUV420P
#define OUTPUT_YUV420P 1
//'1' Use Dshow
//'0' Use GDIgrab
#define USE_DSHOW 0

//Show Dshow Device
void show_dshow_device()
    AVFormatContext* pFormatCtx = avformat_alloc_context();
    AVDictionary* options = NULL;
    av_dict_set(&options, "list_devices", "true", 0);
    AVInputFormat* iformat = av_find_input_format("dshow");
    printf("========Device Info=============\\n");
    avformat_open_input(&pFormatCtx, "video=dummy", iformat, &options);
    printf("================================\\n");


//Show AVFoundation Device
void show_avfoundation_device()
    AVFormatContext* pFormatCtx = avformat_alloc_context();
    AVDictionary* options = NULL;
    av_dict_set(&options, "list_devices", "true", 0);
    AVInputFormat* iformat = av_find_input_format("avfoundation");
    printf("==AVFoundation Device Info===\\n");
    avformat_open_input(&pFormatCtx, "", iformat, &options);
    printf("=============================\\n");


int main(int argc, char* argv[])


    AVFormatContext* pFormatCtx;
    int				i, videoindex;
    AVCodecContext* pCodecCtx;
    AVCodec* pCodec;

    av_register_all();
    avformat_network_init();
    pFormatCtx = avformat_alloc_context();

    //Register Device
    avdevice_register_all();
    //Windows
#ifdef _WIN32
    //Use gdigrab
    AVDictionary* options = NULL;
    AVInputFormat* ifmt = av_find_input_format("gdigrab");
    if (avformat_open_input(&pFormatCtx, "desktop", ifmt, &options) != 0)
        printf("Couldn't open input stream.\\n");
        return -1;


#elif linux
    //Linux
    AVDictionary* options = NULL;
    AVInputFormat* ifmt = av_find_input_format("x11grab");
    //Grab at position 10,20
    if (avformat_open_input(&pFormatCtx, ":0.0+10,20", ifmt, &options) != 0)
        printf("Couldn't open input stream.\\n");
        return -1;

#else
    show_avfoundation_device();
    //Mac
    AVInputFormat* ifmt = av_find_input_format("avfoundation");
    //Avfoundation
    //[video]:[audio]
    if (avformat_open_input(&pFormatCtx, "1", ifmt, NULL) != 0)
        printf("Couldn't open input stream.\\n");
        return -1;

#endif

    if (avformat_find_stream_info(pFormatCtx, NULL) < 0)

        printf("Couldn't find stream information.\\n");
        return -1;

    videoindex = -1;
    for (i = 0; i < pFormatCtx->nb_streams; i++)
        if (pFormatCtx->streams[i]->codec->codec_type == AVMEDIA_TYPE_VIDEO)

            videoindex = i;
            break;

    if (videoindex == -1)

        printf("Didn't find a video stream.\\n");
        return -1;

    pCodecCtx = pFormatCtx->streams[videoindex]->codec;
    pCodec = avcodec_find_decoder(pCodecCtx->codec_id);
    if (pCodec == NULL)

        printf("Codec not found.\\n");
        return -1;

    if (avcodec_open2(pCodecCtx, pCodec, NULL) < 0)

        printf("Could not open codec.\\n");
        return -1;

    AVFrame* pFrame, * pFrameYUV;
    pFrame = av_frame_alloc();
    pFrameYUV = av_frame_alloc();
    int ret, got_picture;
    int buf_size;
    AVPacket* packet = (AVPacket*)av_malloc(sizeof(AVPacket));
    uint8_t* buffer = NULL;

#if OUTPUT_YUV420P
    FILE* fp_yuv = fopen("output.yuv", "wb+");
#endif

    struct SwsContext* img_convert_ctx;
    img_convert_ctx = sws_getContext(pCodecCtx->width, pCodecCtx->height,
        pCodecCtx->pix_fmt, pCodecCtx->width, pCodecCtx->height,
        AV_PIX_FMT_YUV420P, SWS_BICUBIC, NULL, NULL, NULL);

    pFrameYUV->format = AV_PIX_FMT_YUV420P;
    pFrameYUV->width = pCodecCtx->width;
    pFrameYUV->height = pCodecCtx->height;
    if (av_frame_get_buffer(pFrameYUV, 32) != 0)
        return -1;

    int index = 0;
    while (av_read_frame(pFormatCtx, packet) >= 0)
        if (++index > 500)

            break;

        if (packet->stream_index == videoindex)
            int ret = avcodec_send_packet(pCodecCtx, packet);
            if (ret < 0)
                printf("Decode Error.\\n");
                return -1;


            if (ret >= 0)
                ret = avcodec_receive_frame(pCodecCtx, pFrame);
                if (ret == AVERROR(EAGAIN) || ret == AVERROR_EOF)
                    printf("no frame Error.\\n");
                    return -1;


            sws_scale(img_convert_ctx, (const unsigned char* const*)pFrame->data, pFrame->linesize, 0, pCodecCtx->height, pFrameYUV->data, pFrameYUV->linesize);
#if OUTPUT_YUV420P
            int y_size = pCodecCtx->width * pCodecCtx->height;
            fwrite(pFrameYUV->data[0], 1, y_size, fp_yuv);    //Y
            fwrite(pFrameYUV->data[1], 1, y_size / 4, fp_yuv);  //U
            fwrite(pFrameYUV->data[2], 1, y_size / 4, fp_yuv);  //V
            printf("Write frame %d\\n", index);
#endif

        av_free_packet(packet);


    sws_freeContext(img_convert_ctx);
#if OUTPUT_YUV420P
    fclose(fp_yuv);
#endif
    av_free(pFrameYUV);
    avcodec_close(pCodecCtx);
    avformat_close_input(&pFormatCtx);

    return 0;
二、编码模块
#ifdef __cplusplus

extern "C"

#endif // __cplusplus
#include "libavcodec/avcodec.h"
#include "libavformat/avformat.h"
#include "libswscale/swscale.h"
#include "libavdevice/avdevice.h"
#include "libavutil/time.h"
#include "libavutil/opt.h"
#include "libavutil/imgutils.h"
#ifdef __cplusplus

#endif // __cplusplus

#include <stdio.h>

#include <stdio.h>
#include <stdlib.h>
#include <string.h>


int64_t get_time()
    return av_gettime_relative() / 1000;  // 换算成毫秒


static int encode(AVCodecContext* enc_ctx, AVFrame* frame, AVPacket* pkt,
    FILE* outfile)
    int ret;

    /* send the frame to the encoder */
    if (frame)
        printf("Send frame %lld\\n", frame->pts);
    /* 通过查阅代码,使用x264进行编码时,具体缓存帧是在x264源码进行,
     * 不会增加avframe对应buffer的reference*/
    ret = avcodec_send_frame(enc_ctx, frame);
    if (ret < 0)
        fprintf(stderr, "Error sending a frame for encoding\\n");
        return -1;


    while (ret >= 0)
        ret = avcodec_receive_packet(enc_ctx, pkt);
        if (ret == AVERROR(EAGAIN) || ret == AVERROR_EOF)
            return 0;

        else if (ret < 0)
            fprintf(stderr, "Error encoding audio frame\\n");
            return -1;


        if (pkt->flags & AV_PKT_FLAG_KEY)
            printf("Write packet flags:%d pts:%lld dts:%lld (size:%5d)\\n",
                pkt->flags, pkt->pts, pkt->dts, pkt->size);
        if (!pkt->flags)
            printf("Write packet flags:%d pts:%lld dts:%lld (size:%5d)\\n",
                pkt->flags, pkt->pts, pkt->dts, pkt->size);
        fwrite(pkt->data, 1, pkt->size, outfile);

    return 0;


int main(int argc, char** argv)
    char* in_yuv_file = NULL;
    char* out_h264_file = NULL;
    FILE* infile = NULL;
    FILE* outfile = NULL;

    const char* codec_name = NULL;
    const AVCodec* codec = NULL;
    AVCodecContext* codec_ctx = NULL;
    AVFrame* frame = NULL;
    AVPacket* pkt = NULL;
    int ret = 0;

    in_yuv_file = "test.yuv";      // 输入YUV文件
    out_h264_file = "test.h264";
    codec_name = "libx264";

    /* 查找指定的编码器 */
    codec = avcodec_find_encoder_by_name(codec_name);
    if (!codec)
        fprintf(stderr, "Codec '%s' not found\\n", codec_name);
        exit(1);


    codec_ctx = avcodec_alloc_context3(codec);
    if (!codec_ctx)
        fprintf(stderr, "Could not allocate video codec context\\n");
        exit(1);


    /* 设置分辨率*/
    codec_ctx->width = 1920;
    codec_ctx->height = 1080;
    /* 设置time base */
    codec_ctx->time_base = AVRational 1, 25 ;
    codec_ctx->framerate = AVRational 25, 1 ;
    /* 设置I帧间隔
     * 如果frame->pict_type设置为AV_PICTURE_TYPE_I, 则忽略gop_size的设置,一直当做I帧进行编码
     */
    codec_ctx->gop_size = 25;   // I帧间隔
    codec_ctx->max_b_frames = 2; // 如果不想包含B帧则设置为0
    codec_ctx->pix_fmt = AV_PIX_FMT_YUV420P;
    //
    if (codec->id == AV_CODEC_ID_H264)
        // 相关的参数可以参考libx264.c的 AVOption options
        ret = av_opt_set(codec_ctx->priv_data, "preset", "medium", 0);
        if (ret != 0)
            printf("av_opt_set preset failed\\n");

        ret = av_opt_set(codec_ctx->priv_data, "profile", "main", 0); // 默认是high
        if (ret != 0)
            printf("av_opt_set profile failed\\n");

        ret = av_opt_set(codec_ctx->priv_data, "tune", "zerolatency", 0); // 直播是才使用该设置
//        ret = av_opt_set(codec_ctx->priv_data, "tune","film",0); //  画质film
        if (ret != 0)
            printf("av_opt_set tune failed\\n");


    /*
     * 设置编码器参数
    */
    /* 设置bitrate */
    codec_ctx->bit_rate = 3000000;

    /* 将codec_ctx和codec进行绑定 */
    ret = avcodec_open2(codec_ctx, codec, NULL);
    if (ret < 0)
        fprintf(stderr, "Could not open codec!\\n");
        exit(1);

    printf("thread_count: %d, thread_type:%d\\n", codec_ctx->thread_count, codec_ctx->thread_type);
    // 打开输入和输出文件
    infile = fopen(in_yuv_file, "rb");
    if (!infile)
        fprintf(stderr, "Could not open %s\\n", in_yuv_file);
        exit(1);

    outfile = fopen(out_h264_file, "wb");
    if (!outfile)
        fprintf(stderr, "Could not open %s\\n", out_h264_file);
        exit(1);


    // 分配pkt和frame
    pkt = av_packet_alloc();
    if (!pkt)
        fprintf(stderr, "Could not allocate video frame\\n");
        exit(1);

    frame = av_frame_alloc();
    if (!frame)
        fprintf(stderr, "Could not allocate video frame\\n");
        exit(1);


    // 为frame分配buffer
    frame->format = codec_ctx->pix_fmt;
    frame->width = codec_ctx->width;
    frame->height = codec_ctx->height;
    ret = av_frame_get_buffer(frame, 0);
    if (ret < 0)
        fprintf(stderr, "Could not allocate the video frame data\\n");
        exit(1);

    // 计算出每一帧的数据 像素格式 * 宽 * 高
    // 1382400
    int frame_bytes = av_image_get_buffer_size((AVPixelFormat)frame->format, frame->width,
        frame->height, 1);
    printf("frame_bytes %d\\n", frame_bytes);
    uint8_t* yuv_buf = (uint8_t*)malloc(frame_bytes);
    if (!yuv_buf)
        printf("yuv_buf malloc failed\\n");
        return 1;

    int64_t begin_time = get_time();
    int64_t end_time = begin_time;
    int64_t all_begin_time = get_time();
    int64_t all_end_time = all_begin_time;
    int64_t pts = 0;
    printf("start enode\\n");
    for (;;)
        memset(yuv_buf, 0, frame_bytes);
        size_t read_bytes = fread(yuv_buf, 1, frame_bytes, infile);
        if (read_bytes <= 0)
            printf("read file finish\\n");
            break;

        /* 确保该frame可写, 如果编码器内部保持了内存参考计数,则需要重新拷贝一个备份
            目的是新写入的数据和编码器保存的数据不能产生冲突
        */
        int frame_is_writable = 1;
        if (av_frame_is_writable(frame) == 0)  // 这里只是用来测试
            printf("the frame can't write, buf:%p\\n", frame->buf[0]);
            if (frame->buf && frame->buf[0])        // 打印referenc-counted,必须保证传入的是有效指针
                printf("ref_count1(frame) = %d\\n", av_buffer_get_ref_count(frame->buf[0]));
            frame_is_writable = 0;

        ret = av_frame_make_writable(frame);
        if (frame_is_writable == 0)   // 这里只是用来测试
            printf("av_frame_make_writable, buf:%p\\n", frame->buf[0]);
            if (frame->buf && frame->buf[0])        // 打印referenc-counted,必须保证传入的是有效指针
                printf("ref_count2(frame) = %d\\n", av_buffer_get_ref_count(frame->buf[0]));

        if (ret != 0)
            printf("av_frame_make_writable failed, ret = %d\\n", ret);
            break;

        int need_size = av_image_fill_arrays(frame->data, frame->linesize, yuv_buf,
            (AVPixelFormat)frame->format,
            frame->width, frame->height, 1);
        if (need_size != frame_bytes)
            printf("av_image_fill_arrays failed, need_size:%d, frame_bytes:%d\\n",
                need_size, frame_bytes);
            break;

        pts += 40;
        // 设置pts
        frame->pts = pts;       // 使用采样率作为pts的单位,具体换算成秒 pts*1/采样率
        begin_time = get_time();
        ret = encode(codec_ctx, frame, pkt, outfile);
        end_time = get_time();
        printf("encode time:%lldms\\n", end_time - begin_time);
        if (ret < 0)
            printf("encode failed\\n");
            break;


    /* 冲刷编码器 */
    encode(codec_ctx, NULL, pkt, outfile);
    all_end_time = get_time();
    printf("all encode time:%lldms\\n", all_end_time - all_begin_time);
    // 关闭文件
    fclose(infile);
    fclose(outfile);

    // 释放内存
    if (yuv_buf)
        free(yuv_buf);


    av_frame_free(&frame);
    av_packet_free(&pkt);
    avcodec_free_context(&codec_ctx);

    printf("main finish, please enter Enter and exit\\n");
    getchar();
    return 0;
三、封装模块
本处直接使用ES裸流。暂时不写MP4
四、传输模块
#include <iostream>

// RTSP Server

#include "xop/RtspServer.h"
#include "net/Timer.h"
#include <thread>
#include <memory>
#include <iostream>
#include <string>

class H264File

public:
    H264File(int buf_size = 500000);
    ~H264File();

    bool Open(const char* path);
    void Close();

    bool IsOpened() const

        return (m_file != NULL);


    int ReadFrame(char* in_buf, int in_buf_size, bool* end);

private:
    FILE* m_file = NULL;
    char* m_buf = NULL;
    int  m_buf_size = 0;
    int  m_bytes_used = 0;
    int  m_count = 0;
;

void SendFrameThread(rtsp::RtspServer* rtsp_server, rtsp::MediaSessionId session_id, H264File* h264_file);

int main(int argc, char** argv)

    H264File h264_file;
    if (!h264_file.Open("test.h264"))
        printf("Open %s failed.\\n", argv[1]);
        return 0;


    std::string suffix = "live";
    std::string ip = "127.0.0.1";
    std::string port = "554";
    std::string rtsp_url = "rtsp://" + ip + ":" + port + "/" + suffix;

    std::shared_ptr<rtsp::EventLoop> event_loop(new rtsp::EventLoop());
    std::shared_ptr<rtsp::RtspServer> server = rtsp::RtspServer::Create(event_loop.get());

    if (!server->Start("0.0.0.0", atoi(port.c_str())))
        printf("RTSP Server listen on %s failed.\\n", port.c_str());
        return 0;


#ifdef AUTH_CONFIG
    server->SetAuthConfig("-_-", "admin", "12345");
#endif

    rtsp::MediaSession* session = rtsp::MediaSession::CreateNew("live");
    session->AddSource(rtsp::channel_0, rtsp::H264Source::CreateNew());
    //session->StartMulticast();
    session->AddNotifyConnectedCallback([](rtsp::MediaSessionId sessionId, std::string peer_ip, uint16_t peer_port)
        printf("RTSP client connect, ip=%s, port=%hu \\n", peer_ip.c_str(), peer_port);
        );

    session->AddNotifyDisconnectedCallback([](rtsp::MediaSessionId sessionId, std::string peer_ip, uint16_t peer_port)
        printf("RTSP client disconnect, ip=%s, port=%hu \\n", peer_ip.c_str(), peer_port);
        );

    rtsp::MediaSessionId session_id = server->AddSession(session);

    std::thread t1(SendFrameThread, server.get(), session_id, &h264_file);
    t1.detach();

    std::cout << "Play URL: " << rtsp_url << std::endl;

    while (1)
        rtsp::Timer::Sleep(100);


    getchar();
    return 0;


void SendFrameThread(rtsp::RtspServer* rtsp_server, rtsp::MediaSessionId session_id, H264File* h264_file)

    int buf_size = 2000000;
    std::unique_ptr<uint8_t> frame_buf(new uint8_t[buf_size]);

    while (1)
        bool end_of_frame = false;
        int frame_size = h264_file->ReadFrame((char*)frame_buf.get(), buf_size, &end_of_frame);
        if (frame_size > 0)
            rtsp::AVFrame videoFrame =  0 ;
            videoFrame.type = 0;
            videoFrame.size = frame_size;
            videoFrame.timestamp = rtsp::H264Source::GetTimestamp();
            videoFrame.buffer.reset(new uint8_t[videoFrame.size]);
            memcpy(videoFrame.buffer.get(), frame_buf.get(), videoFrame.size);
            rtsp_server->PushFrame(session_id, rtsp::channel_0, videoFrame);

        else
            break;


        rtsp::Timer::Sleep(40);
    ;


H264File::H264File(int buf_size)
    : m_buf_size(buf_size)

    m_buf = new char[m_buf_size];


H264File::~H264File()

    delete[] m_buf;


bool H264File::Open(const char* path)

    m_file = fopen(path, "rb");
    if (m_file == NULL)
        return false;


    return true;


void H264File::Close()

    if (m_file)
        fclose(m_file);
        m_file = NULL;
        m_count = 0;
        m_bytes_used = 0;


int H264File::ReadFrame(char* in_buf, int in_buf_size, bool* end)

    if (m_file == NULL)
        return -1;


    int bytes_read = (int)fread(m_buf, 1, m_buf_size, m_file);
    if (bytes_read == 0)
        fseek(m_file, 0, SEEK_SET);
        m_count = 0;
        m_bytes_used = 0;
        bytes_read = (int)fread(m_buf, 1, m_buf_size, m_file);
        if (bytes_read == 0)
            this->Close();
            return -1;


    bool is_find_start = false, is_find_end = false;
    int i = 0, start_code = 3;
    *end = false;

    for (i = 0; i < bytes_read - 5; i++)
        if (m_buf[i] == 0 && m_buf[i + 1] == 0 && m_buf[i + 2] == 1)
            start_code = 3;

        else if (m_buf[i] == 0 && m_buf[i + 1] == 0 && m_buf[i + 2] == 0 && m_buf[i + 3] == 1)
            start_code = 4;

        else
            continue;


        if (((m_buf[i + start_code] & 0x1F) == 0x5 || (m_buf[i + start_code] & 0x1F) == 0x1)
            && ((m_buf[i + start_code + 1] & 0x80) == 0x80))
            is_find_start = true;
            i += 4;
            break;


    for (; i < bytes_read - 5; i++)
        if (m_buf[i] == 0 && m_buf[i + 1] == 0 && m_buf[i + 2] == 1)

            start_code = 3;

        else if (m_buf[i] == 0 && m_buf[i + 1] == 0 && m_buf[i + 2] == 0 && m_buf[i + 3] == 1)
            start_code = 4;

        else
            continue;


        if (((m_buf[i + start_code] & 0x1F) == 0x7) || ((m_buf[i + start_code] & 0x1F) == 0x8)
            || ((m_buf[i + start_code] & 0x1F) == 0x6) || (((m_buf[i + start_code] & 0x1F) == 0x5
                || (m_buf[i + start_code] & 0x1F) == 0x1) && ((m_buf[i + start_code + 1] & 0x80) == 0x80)))
            is_find_end = true;
            break;


    bool flag = false;
    if (is_find_start && !is_find_end && m_count > 0)
        flag = is_find_end = true;
        i = bytes_read;
        *end = true;


    if (!is_find_start || !is_find_end)
        this->Close();
        return -1;


    int size = (i <= in_buf_size ? i : in_buf_size);
    memcpy(in_buf, m_buf, size);

    if (!flag)
        m_count += 1;
        m_bytes_used += i;

    else
        m_count = 0;
        m_bytes_used = 0;


    fseek(m_file, m_bytes_used, SEEK_SET);
    return size;
五、结束语
通过各个模块单独的列举出来,这样让我能够更加深入的去理解各个模块之间的作用。让我能够更好的去理解和学习。同时也能单独测试各个模块。
工程地址:gitee代码地址
① 下载代码,先运行bin目录下的bat脚本,可以将release和debug都运行一次
② 然后在代码根目录下新建一个build64目录
③ 运行cmd窗口到当前目录下,运行 cmake … -G “Visual Studio 16” -A x64
④ 图2中,依次运行,最总在bin/win64/debug或者bin/win64/release下按图3运行,可以使用vlc进行测试,rtsp://127.0.0.1:554/live
参考链接
技术视频参考: 音视频免费学习地址:FFmpeg/WebRTC/RTMP/NDK/Android音视频流媒体高级开发
屏幕采集: https://blog.csdn.net/leixiaohua1020/article/details/39706721.
YUV编码H264: https://www.jianshu.com/p/08516ff2923c.
RTSP服务 https://github.com/PHZ76/RtspServer.
13 rtsp视频服务 基于node+ffmpeg 转换为 flv 视频服务
前言
接上一篇文章 rtsp视频服务 转换为 rtmp服务 转换为前端可用的服务
继续讨论 前端播放 rtsp 视频服务
rtsp视频服务 转换为 rtmp服务 转换为前端可用的服务 会使用到 ffmpeg 来实现 rtsp 服务转换为 rtmp 服务, nginx-http-flv 来实现 rtmp 服务转换为 http-flv 服务, 因此 前端可以直接播放视频
这里使用 node 作为后台服务, 使用 ffmpeg 基于 websocket 协议将 rtsp 直接转换为 前端可用的 flv 视频数据
我们这里 参考的代码来自于 GitHub - LorinHan/flvjs_test: 采用flvjs实现摄像头直播
主要包含一个 node 作为代理服务器, 加上一个测试的前端项目
node 代理服务器
index.js 如下, 代码来自于 GitHub - LorinHan/flvjs_test: 采用flvjs实现摄像头直播 中的 index.js,并做了一定的调整
服务启动步骤如下
npm install
node index.js
其中的主要处理为, 启动一个 websocket 服务器, 代理 以 "/rtsp" 打头的 websocket 请求, 然后获取查询字符串中的 url, 基于 ffmpeg 将 rtsp 视频数据转换为 flv 视频数据, 然后 响应回去
ffmpeg -re -i $rtspUrl -rtsp_transport tcp -buffer_size 102400 -vcodec copy -an -f flv
// 然后将转换之后的结果响应给 客户端
var express = require("express");
var expressWebSocket = require("express-ws");
var ffmpeg = require("fluent-ffmpeg");
ffmpeg.setFfmpegPath("ffmpeg");
var webSocketStream = require("websocket-stream/stream");
var WebSocket = require("websocket-stream");
var http = require("http");
// config
let rtspServerPort = 9999
function localServer()
let app = express();
app.use(express.static(__dirname));
expressWebSocket(app, null,
perMessageDeflate: true
);
app.ws("/rtsp/:id/", rtspRequestHandle)
app.listen(rtspServerPort);
console.log("express listened on port : " + rtspServerPort)
function rtspRequestHandle(ws, req)
console.log("rtsp request handle");
const stream = webSocketStream(ws,
binary: true,
browserBufferTimeout: 1000000
,
browserBufferTimeout: 1000000
);
let url = req.query.url;
console.log("rtsp url:", url);
console.log("rtsp params:", req.params);
try
ffmpeg(url)
.addInputOption("-rtsp_transport", "tcp", "-buffer_size", "102400") // 这里可以添加一些 RTSP 优化的参数
.on("start", function ()
console.log(url, "Stream started.");
)
.on("codecData", function ()
console.log(url, "Stream codecData.")
// 摄像机在线处理
)
.on("error", function (err)
console.log(url, "An error occured: ", err.message);
)
.on("end", function ()
console.log(url, "Stream end!");
// 摄像机断线的处理
)
.outputFormat("flv").videoCodec("copy").noAudio().pipe(stream);
catch (error)
console.log(error);
localServer();
测试的 HelloWorld.vue
如下 rtsp 服务为 rtsp://localhost:8554/rtsp/test_rtsp
创建一个 flvPlayer, 视频输入为 ws://localhost:9999/rtsp/xxx/?url=rtsp://localhost:8554/rtsp/test_rtsp
然后 启动项目, 能够正常看到视频 即成功
<template>
    <div class="video-wrapper">
        <video class="demo-video" ref="player" muted autoplay></video>
    </div>
</template>
<script>
import flvjs from "flv.js";
export default
    data ()
        return
          id: "xxx",
          rtsp: "rtsp://localhost:8554/rtsp/test_rtsp",
          player: null

    ,
    mounted ()
        if (flvjs.isSupported())
            let video = this.$refs.player;
            if (video)
                this.player = flvjs.createPlayer(
                    type: "flv",
                    isLive: true,
                    url: `ws://localhost:9999/rtsp/$this.id/?url=$this.rtsp`
                );
                this.player.attachMediaElement(video);
                try
                    this.player.load();
                    this.player.play();
                 catch (error)
                    console.log(error);


    ,
    beforeDestroy ()
        this.player.destory();


</script>
<style>

	    .video-wrapper
	        max-width: 880px;
	        max-height: 660px;
			border:1px solid red;

    .demo-video
        max-width: 880px;
        max-height: 660px;

</style>
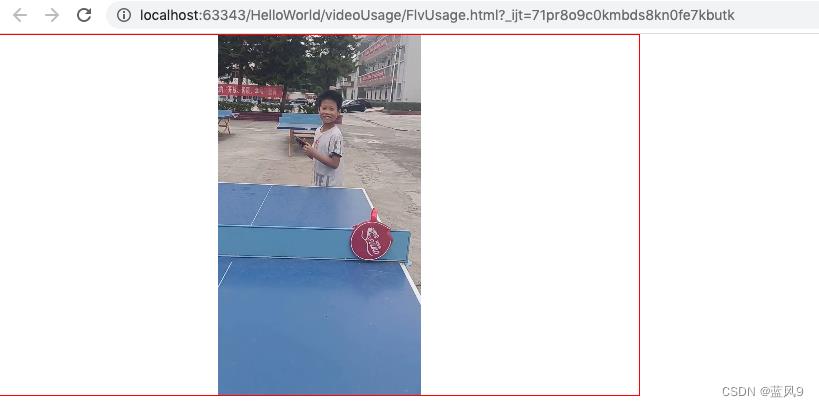
测试页面展示效果如下

FlvUsage.html
也可以使用一个普通的 html 来进行测试
<!DOCTYPE html>
<html>
<head>
  <meta http-equiv="Content-Type" content="text/html; charset=utf-8"/>
  <script src="https://cdn.bootcdn.net/ajax/libs/flv.js/1.6.2/flv.min.js"></script>
  <!--  <script src="./js/flv.min.js"></script>-->
  <style>
    body, center
      padding: 0;
      margin: 0;


    .v-container
      width: 640px;
      height: 360px;
      border: solid 1px red;


    video
      width: 100%;
      height: 100%;

  </style>

</head>
<body>
<div class="v-container">

  <video id="player1" muted autoplay="autoplay" preload="auto" controls="controls">
  </video>

</div>

<script>
  if (flvjs.isSupported())
    var videoElement = document.getElementById('player1');
    var flvPlayer = flvjs.createPlayer(
      type: 'flv',
      url: 'ws://localhost:9999/rtsp/xxx/?url=rtsp://localhost:8554/rtsp/test_rtsp'
    );
    flvPlayer.attachMediaElement(videoElement);
    flvPlayer.load();
  </script>

</body>
</html>
测试页面展示效果如下
完
以上是关于基于Qt和ffmpeg的抓屏rtsp服务的主要内容,如果未能解决你的问题,请参考以下文章