springboot整合webSocket(看完即入门)
Posted hmb↑
tags:
篇首语:本文由小常识网(cha138.com)小编为大家整理,主要介绍了springboot整合webSocket(看完即入门)相关的知识,希望对你有一定的参考价值。
webSocket
1、什么是webSocket?
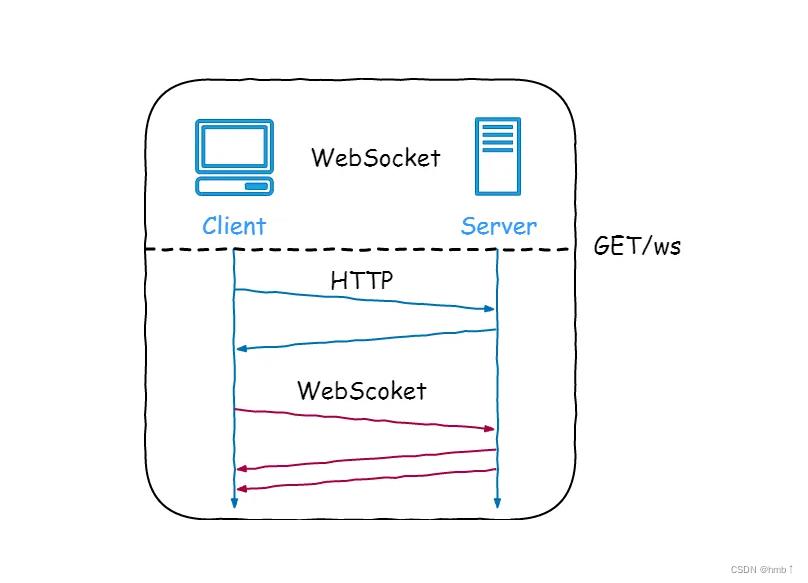
WebSocket是一种在单个TCP连接上进行全双工通信的协议。WebSocket使得客户端和服务器之间的数据交换变得更加简单,允许服务端主动向客户端推送数据。在WebSocket API中,浏览器和服务器只需要完成一次握手,两者之间就直接可以创建持久性的连接,并进行双向数据传输。
2、webSocket可以用来做什么?
利用双向数据传输的特点可以用来完成很多功能,不需要前端轮询,浪费资源。例如:
1、通告功能
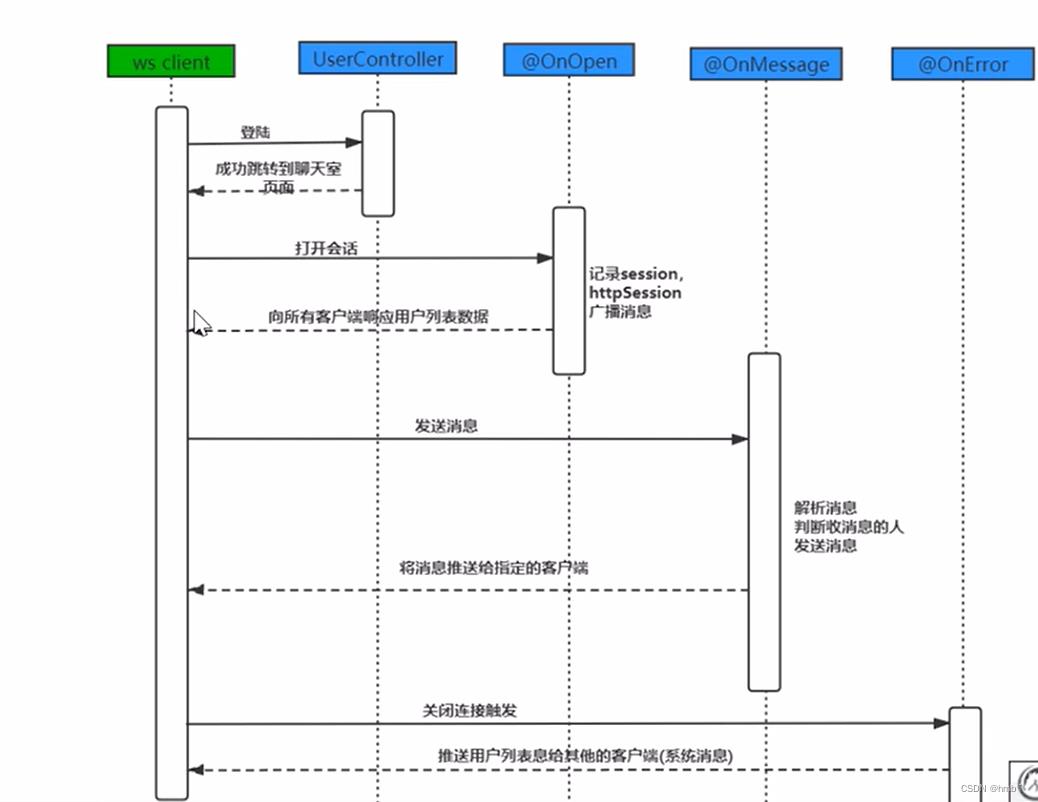
2、聊天功能 (如下是逻辑图)
3、实时更新数据功能
4、弹幕
等等。。。。。。
3、webSocket协议
本协议有两部分:握手和数据传输。
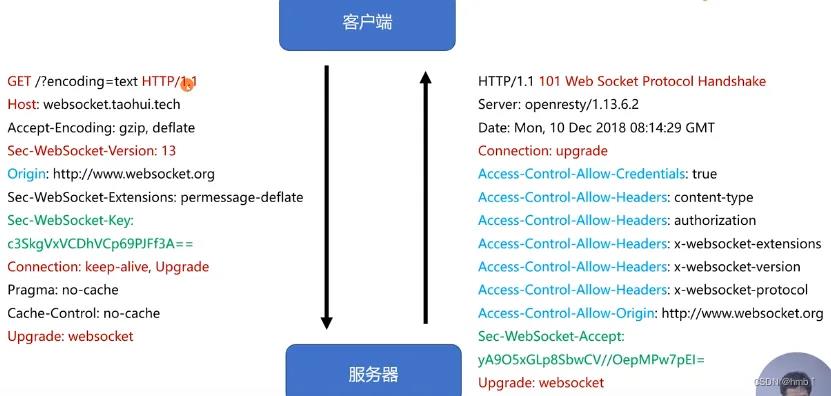
握手是基于http协议的。
来自客户端的握手看起来像如下形式:
GET ws://localhost/chat HTTP/1.1
Host: localhost
Upgrade: websocket
Connection: Upgrade
Sec-WebSocket-Key:dGhlIHNhbXBsZSBub25jZQ==
Sec-WebSocket-Protocol: chat,superchat
Sec-WebSocket-Version: 13
来自服务器的握手看起来像如下形式:
HTTP/1.1 101 Switching Protocols
Upgrade: websocket
Connection: Upgrade
Sec-WebSocket-Accept:s3pPLMBiTxaQ9kYGzzhZRbK+xOo=
Sec-WebSocket-Protocol: chat
4、服务端
maven依赖
   <dependency>
      <groupId>org.springframework.boot</groupId>
      <artifactId>spring-boot-starter-websocket</artifactId>
  </dependency>
WebSocket配置类
mport org.springframework.context.annotation.Bean;
import org.springframework.context.annotation.Configuration;
import org.springframework.web.socket.server.standard.ServerEndpointExporter;

@Configuration
public class WebSocketConfig
    /**
     * 	注入ServerEndpointExporter,
     * 	这个bean会自动注册使用了@ServerEndpoint注解声明的Websocket endpoint
     */
    @Bean
    public ServerEndpointExporter serverEndpointExporter()
        return new ServerEndpointExporter();
WebSocket操作类
通过该类WebSocket可以进行群推送以及单点推送
import java.util.HashMap;
import java.util.Map;
import java.util.concurrent.CopyOnWriteArraySet;

import javax.websocket.OnClose;
import javax.websocket.OnMessage;
import javax.websocket.OnOpen;
import javax.websocket.Session;
import javax.websocket.server.PathParam;
import javax.websocket.server.ServerEndpoint;

import org.springframework.stereotype.Component;

import lombok.extern.slf4j.Slf4j;

@Component
@Slf4j
@ServerEndpoint("/websocket/userId")  // 接口路径 ws://localhost:8087/webSocket/userId;

public class WebSocket

    //与某个客户端的连接会话,需要通过它来给客户端发送数据
    private Session session;
        /**
     * 用户ID
     */
    private String userId;

    //concurrent包的线程安全Set,用来存放每个客户端对应的MyWebSocket对象。
    //虽然@Component默认是单例模式的,但springboot还是会为每个websocket连接初始化一个bean,所以可以用一个静态set保存起来。
    //  注:底下WebSocket是当前类名
    private static CopyOnWriteArraySet<WebSocket> webSockets =new CopyOnWriteArraySet<>();
    // 用来存在线连接用户信息
    private static ConcurrentHashMap<String,Session> sessionPool = new ConcurrentHashMap<String,Session>();

    /**
     * 链接成功调用的方法
     */
    @OnOpen
    public void onOpen(Session session, @PathParam(value="userId")String userId)
        try
			this.session = session;
			this.userId = userId;
			webSockets.add(this);
			sessionPool.put(userId, session);
			log.info("【websocket消息】有新的连接,总数为:"+webSockets.size());
		 catch (Exception e)


    /**
     * 链接关闭调用的方法
     */
    @OnClose
    public void onClose()
        try
			webSockets.remove(this);
			sessionPool.remove(this.userId);
			log.info("【websocket消息】连接断开,总数为:"+webSockets.size());
		 catch (Exception e)


    /**
     * 收到客户端消息后调用的方法
     *
     * @param message
     * @param session
     */
    @OnMessage
    public void onMessage(String message)
    	log.info("【websocket消息】收到客户端消息:"+message);


	  /** 发送错误时的处理
     * @param session
     * @param error
     */
    @OnError
    public void onError(Session session, Throwable error)

        log.error("用户错误,原因:"+error.getMessage());
        error.printStackTrace();


    // 此为广播消息
    public void sendAllMessage(String message)
    	log.info("【websocket消息】广播消息:"+message);
        for(WebSocket webSocket : webSockets)
            try
            	if(webSocket.session.isOpen())
            		webSocket.session.getAsyncRemote().sendText(message);

             catch (Exception e)
                e.printStackTrace();


    // 此为单点消息
    public void sendOneMessage(String userId, String message)
        Session session = sessionPool.get(userId);
        if (session != null&&session.isOpen())
            try
            	log.info("【websocket消息】 单点消息:"+message);
                session.getAsyncRemote().sendText(message);
             catch (Exception e)
                e.printStackTrace();


    // 此为单点消息(多人)
    public void sendMoreMessage(String[] userIds, String message)
    	for(String userId:userIds)
    		Session session = sessionPool.get(userId);
            if (session != null&&session.isOpen())
                try
                	log.info("【websocket消息】 单点消息:"+message);
                    session.getAsyncRemote().sendText(message);
                 catch (Exception e)
                    e.printStackTrace();
方法调用示例
注入我们的操作类
@Resource
private WebSocket webSocket;
发送消息给前端
//创建业务消息信息
JSONObject obj = new JSONObject();
obj.put("cmd", "topic");//业务类型
obj.put("msgId", sysAnnouncement.getId());//消息id
obj.put("msgTxt", sysAnnouncement.getTitile());//消息内容
//全体发送
webSocket.sendAllMessage(obj.toJSONString());
//单个用户发送 (userId为用户id)
webSocket.sendOneMessage(userId, obj.toJSONString());
//多个用户发送 (userIds为多个用户id,逗号‘,’分隔)
webSocket.sendMoreMessage(userIds, obj.toJSONString());
5、客户端
前端中VUE使用WebSocket
<script>
    import store from '@/store/'

    export default
        data()
            return

        ,
        mounted()
              //初始化websocket
              this.initWebSocket()
        ,
        destroyed: function ()  // 离开页面生命周期函数
              this.websocketclose();
        ,
        methods:
            initWebSocket: function ()  // 建立连接
                // WebSocket与普通的请求所用协议有所不同,ws等同于http,wss等同于https
                var userId = store.getters.userInfo.id;
                var url = window._CONFIG['domianURL'].replace("https://","wss://").replace("http://","ws://")+"/websocket/"+userId;
                this.websock = new WebSocket(url);
                this.websock.onopen = this.websocketonopen;
                this.websock.send = this.websocketsend;
                this.websock.onerror = this.websocketonerror;
                this.websock.onmessage = this.websocketonmessage;
                this.websock.onclose = this.websocketclose;
              ,
              // 连接成功后调用
              websocketonopen: function ()
                console.log("WebSocket连接成功");
              ,
              // 发生错误时调用
              websocketonerror: function (e)
                console.log("WebSocket连接发生错误");
              ,
              // 给后端发消息时调用
              websocketsend: function (e)
                console.log("WebSocket连接发生错误");
              ,
							// 接收后端消息
              // vue 客户端根据返回的cmd类型处理不同的业务响应
              websocketonmessage: function (e)
                var data = eval("(" + e.data + ")");
                 //处理订阅信息
                if(data.cmd == "topic")
                   //TODO 系统通知

                else if(data.cmd == "user")
                   //TODO 用户消息


              ,
              // 关闭连接时调用
              websocketclose: function (e)
                console.log("connection closed (" + e.code + ")");


</script>

接口调用顺序,进来页面 : 先建立连接–》调用websocketonopen方法,链接成功调用的方法
websocketonmessage方法为接收后端时处理。
当我们要发送消息给后端时调用websocketsend。
当我们要关闭连接时调用websocketclose。
当发现错误时调用websocketonerror。
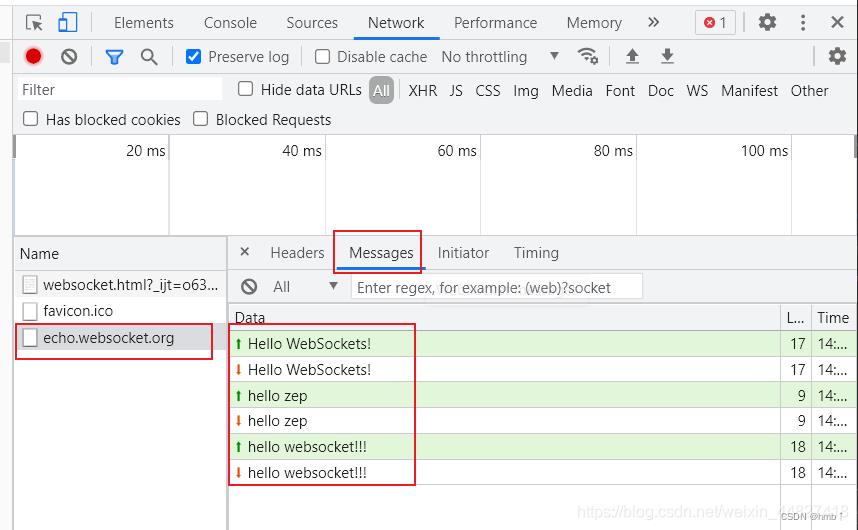
浏览器查看日志:
朝上的绿色箭头是发出去的消息
朝下的红色箭头是收到的消息
springboot整合websocket简单聊天室
springboot整合websocket(一)简单聊天室
springboot整合websocket(一)简单聊天室
springboot整合websocket(二)上传文件(引导篇)
springboot整合websocket(三)上传文件(终篇)
东西太多了,拆成几章来写(绝对不是骗流量^ w ^)
这一部分就简单做一个公共聊天室吧
1、引入相关依赖
springboot相关依赖就不写了,这里只写websocket的依赖
<!--websocket-->
<dependency>
    <groupId>org.springframework.boot</groupId>
    <artifactId>spring-boot-starter-websocket</artifactId>
</dependency>
2、写配置文件
这里注意不要漏了 @EnableWebSocket,用于开启websocket支持,同时 @Configuration将配置类注入spring容器
package com.websocket.config;

import org.springframework.context.annotation.Bean;
import org.springframework.context.annotation.Configuration;
import org.springframework.web.socket.config.annotation.EnableWebSocket;
import org.springframework.web.socket.server.standard.ServerEndpointExporter;
import org.springframework.web.socket.server.standard.ServletServerContainerFactoryBean;

@Configuration
//开启websocket支持
@EnableWebSocket
public class WebsocketConfig
{
    /**
     * 必须要有的
     *
     * @return
     */
    @Bean
    public ServerEndpointExporter serverEndpointExporter()
    {
        return new ServerEndpointExporter();
    }

    /**
     * websocket 配置信息
     *
     * @return
     */
    @Bean
    public ServletServerContainerFactoryBean createWebSocketContainer()
    {
        ServletServerContainerFactoryBean bean = new ServletServerContainerFactoryBean();
        //文本缓冲区大小
        bean.setMaxTextMessageBufferSize(8192);
        //字节缓冲区大小
        bean.setMaxBinaryMessageBufferSize(8192);
        return bean;
    }
}
3、开始愉快的使用啦
这里先介绍几个websocket的注解
| 注解 | 作用 | 备注 |
|---|---|---|
| @ServerEndpoint | 用于声明websocket响应类,有点像@RequestMapping | @ServerEndpoint("/websocket") |
| @OnOpen | websocket连接时触发 | 参数有:Session session, EndpointConfig config |
| @OnMessage | 有消息时触发 | 参数很多,一会再说 |
| @OnClose | 连接关闭时触发 | 参数有:Session session, CloseReason closeReason |
| @OnError | 有异常时触发 | 参数有:Session session, Throwable throwable |
3.1(重要) 将@ServerEndpoint标注在类上,然后依次创建4个方法,参数见上表,方法名随意
注意类上需要有 @Component 扫描哦,我这里用的时@Controller
@Log4j2
@Controller
@ServerEndpoint("/websocket")
public class BaseWebsocketController
{

	//使用 ConcurrentHashMap, 保证线程安全, static全局共享 session

	//这里之所以static,是因为这个类不是单例的!!
	//他虽然有@Controller注解,但是不适用Ioc容器中拿对象,每一次请求过来都是一个新的对象

    //存放 session
    private final static Map<String, Session> sessions = new ConcurrentHashMap<>();

    //onopen 在连接创建(用户进入聊天室)时触发
    @OnOpen
    public void openSession(Session session, EndpointConfig config)
    {

    }

	//响应字符串
    @OnMessage
    public void onMessage(Session session, String message)
    {

    }

	//响应字节流
    @OnMessage
    public void onMessage(Session session, byte[] message)
    {

    }

    //onclose 在连接断开(用户离开聊天室)时触发
    @OnClose
    public void closeSession(Session session, CloseReason closeReason)
    {

    }

    @OnError
    public void sessionError(Session session, Throwable throwable)
    {

    }
}
说明
细心的小伙伴可能发现,我有两个 @OnMessage, 这是因为websocket能发送三种请求(我知道的三种),一种是字符串,一种是字节流(用于上传文件),一种是ping-pong(乒乓机制),因为js不好发送ping请求,我这里就只有响应字符串和字节流两种方法。
接下来的篇幅将只演示字符串的,字节流咱再另一篇说,不然太多了看的头痛
3.2 往方法里面写点简单的东西
里面注释写个很清楚哦,慢慢瞅,咱就解释一下流程:
1、再OnOpen中将session存起来,并通知其他用户,有人来啦。
2、有消息来的时候,再OnMessage中,通知其他用户
3、OnClose中,通知其他用户,别人溜了
4、OnError中,有异常就关闭websocket
@Log4j2
@Controller
@ServerEndpoint("/websocket")
public class BaseWebsocketController
{

    //使用 ConcurrentHashMap, 保证线程安全, static全局共享 session

    //这里之所以static,是因为这个类不是单例的!!
    //他虽然有@Controller注解,但是不适用Ioc容器中拿对象,每一次请求过来都是一个新的对象

    //存放 session
    private final static Map<String, Session> sessions = new ConcurrentHashMap<>();

    //onopen 在连接创建(用户进入聊天室)时触发
    @OnOpen
    public void openSession(Session session, EndpointConfig config)
    {
        //将session存起来, 用于服务器向浏览器发送消息
        sessions.put(session.getId(), session);
        sendAll("[" + session.getId() + "]进入房间");
    }

    //响应字符串
    @OnMessage
    public void onMessage(Session session, String message)
    {
        sendAll("[" + session.getId() + "]" + message);
    }

    //响应字节流
    @OnMessage
    public void onMessage(Session session, byte[] message)
    {
        //这个咱以后再说
    }

    //onclose 在连接断开(用户离开聊天室)时触发
    @OnClose
    public void closeSession(Session session, CloseReason closeReason)
    {
        //记得移除相对应的session
        sessions.remove(session.getId());

        sendAll("[" + session.getId() + "]离开了房间");
    }

    @OnError
    public void sessionError(Session session, Throwable throwable)
    {
        //通常有异常会关闭session
        try {
            session.close();
        }
        catch (IOException e) {
            e.printStackTrace();
        }
    }

    private void sendAll(String message)
    {
        for (Session s : sessions.values()) {
            //获得session发送消息的对象
            //Basic是同步, 会阻塞
            //Async是异步, 这个会有多线程并发导致异常, 发送消息太快也会有并发异常, 需要有 消息队列 来辅助使用
            final RemoteEndpoint.Basic remote = s.getBasicRemote();
            try {
                //发送消息
                remote.sendText(message);
            }
            catch (IOException e) {
                e.printStackTrace();
            }
        }
    }
}
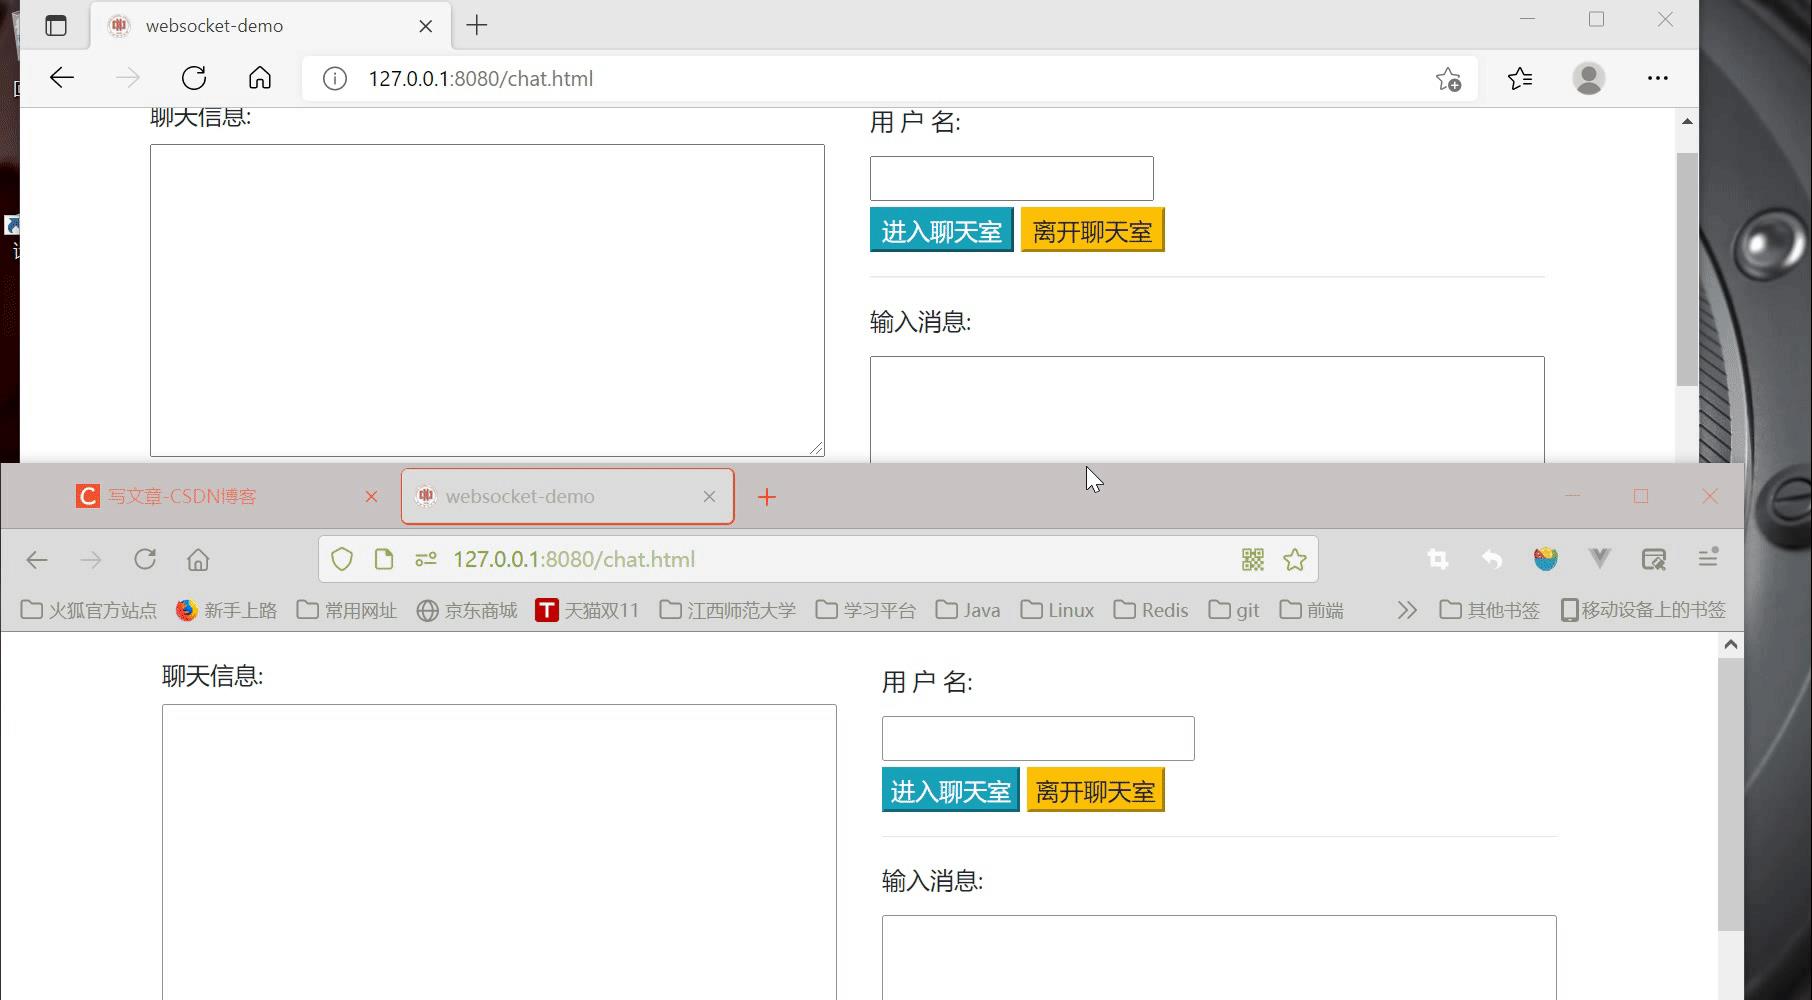
3.3 写个页面使用websocket
先上效果图
<!DOCTYPE html>
<html xmlns:th="http://www.thymeleaf.org" lang="en">
<head>
  <meta charset="UTF-8">
  <title>websocket-demo</title>

  <link rel="stylesheet" href="https://cdn.bootcdn.net/ajax/libs/twitter-bootstrap/4.2.1/css/bootstrap.min.css">
</head>
<body>
  <div class="container py-3">

    <div class="row">

      <div class="col-6">
        <div>
          <label for="messageArea">聊天信息:</label>
        </div>
        <div>
          <textarea id="messageArea" readonly class="w-100" style="height: 75vh;"></textarea>
        </div>
      </div>

      <div class="col">

        <div class="my-1">
          <label for="messageArea">用 户 名:</label>
        </div>

        <div class="my-1">
          <input type="text" id="username" autocomplete="off">
        </div>

        <div class="my-1">
          <button class="btn-info" id="joinRoomBtn">进入聊天室</button>
          <button class="btn-warning" id="leaveRoomBtn">离开聊天室</button>
        </div>

        <hr/>

        <div class="my-1">
          <label for="sendMessage">输入消息:</label>
        </div>
        <div>
          <textarea id="sendMessage" rows="5" class="w-100" style="max-height: 50vh"></textarea>
        </div>

        <div class="my-1">
          <button class="btn-primary" id="sendBtn">发送消息</button>
        </div>

      </div>

    </div>

  </div>

  <script src="https://s3.pstatp.com/cdn/expire-1-M/jquery/3.3.1/jquery.min.js"></script>

  <script>
    let webSocket;
    //ip和端口号用自己项目的
    //{websocket}: 其实是刚刚那个@ServerEndpoint("/websocket")中定义的
    let url = 'ws://127.0.0.1:8080/websocket';

    $('#username').keyup(function (e) {
      let keycode = e.which;
      if (keycode == 13) {
        $('#joinRoomBtn').click();
      }
    });

    //进入聊天室
    $('#joinRoomBtn').click(function () {
      let username = $('#username').val();
      webSocket = new WebSocket(url);
      webSocket.onopen = function () {
        console.log('webSocket连接创建。。。');
      }
      webSocket.onclose = function () {
        console.log('webSocket已断开。。。');
        $('#messageArea').append('websocket已断开\\n');
      }
      webSocket.onmessage = function (event) {
        $('#messageArea').append(event.data + '\\n');
      }
      webSocket.onerror = function (event) {
        console.log(event)
        console.log('webSocket连接异常。。。');
      }
    });

    //退出聊天室
    $('#leaveRoomBtn').click(function () {
      if (webSocket) {
        //关闭连接
        webSocket.close();
      }
    });

    //发送消息
    $('#sendBtn').click(function () {
      var msg = $('#sendMessage').val();
      if (msg.trim().length === 0) {
        alert('请输入内容');
        return;
      }
      webSocket.send($('#sendMessage').val());

      $('#sendMessage').val('');
    });

  </script>

</body>
</html>
4、最后填下坑
4.1@OnOpen、@OnMessage…那些参数是咋来滴?
当然是看注释啦!转到源码,再类的上边有一大串注释,百度翻译看下就行。
我上边的参数还有漏的哦~~太多了解释不过来。
4.2 里面有一段是这个
and Zero to n String or Java primitive parameters
annotated with the {@link javax.websocket.server.PathParam} annotation for server endpoints.
意思是可以再路径中加入参数,然后用 @PathParam注解获得该参数(是不是和web很像呢)
也就是说,可以这样
@ServerEndpoint("/websocket/{username}")
然后这样获得参数(所有方法都可以加),而且可以不止一个
//响应字符串
@OnMessage
public void onMessage(@PathParam("username") String username, Session session, String message)
{
    sendAll("[" + username + "]" + message);
}
再html连接时,url就这么写
let username = $('#username').val();
let url = 'ws://127.0.0.1:8080/websocket';
url = url+'/'+username;
所以啊,刚刚我们demo的用户名是可以显示出来的(这个就交给大家了,懒 >_<)。
End
springboot整合websocket(一)简单聊天室
springboot整合websocket(二)上传文件(引导篇)
springboot整合websocket(三)上传文件(终篇)
以上是关于springboot整合webSocket(看完即入门)的主要内容,如果未能解决你的问题,请参考以下文章