Spring Boot 拦截器
Posted catoop
tags:
篇首语:本文由小常识网(cha138.com)小编为大家整理,主要介绍了Spring Boot 拦截器相关的知识,希望对你有一定的参考价值。
上一篇对过滤器的定义做了说明,也比较简单。过滤器属于Servlet范畴的API,与Spring 没什么关系。
Web开发中,我们除了使用 Filter 来过滤请web求外,还可以使用Spring提供的HandlerInterceptor(拦截器)。
HandlerInterceptor 的功能跟过滤器类似,但是提供更精细的的控制能力:在request被响应之前、request被响应之后、视图渲染之前以及request全部结束之后。我们不能通过拦截器修改request内容,但是可以通过抛出异常(或者返回false)来暂停request的执行。
实现 UserRoleAuthorizationInterceptor 的拦截器有:
ConversionServiceExposingInterceptor
CorsInterceptor
LocaleChangeInterceptor
PathExposingHandlerInterceptor
ResourceUrlProviderExposingInterceptor
ThemeChangeInterceptor
UriTemplateVariablesHandlerInterceptor
UserRoleAuthorizationInterceptor
其中 LocaleChangeInterceptor 和 ThemeChangeInterceptor 比较常用。
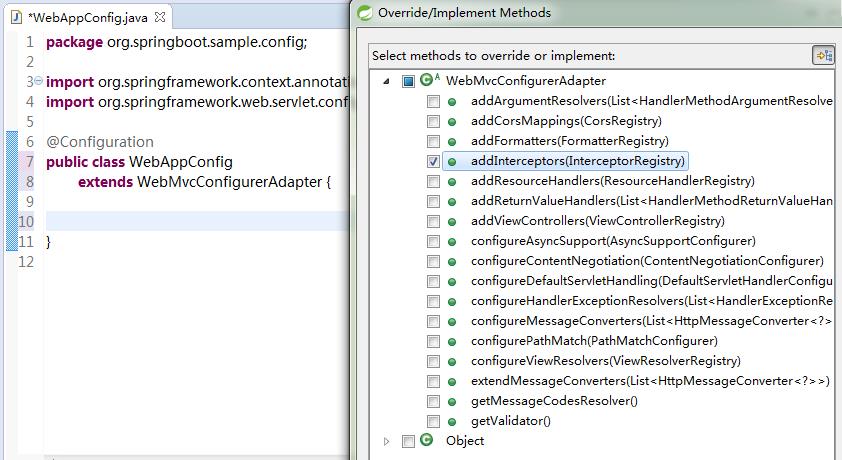
配置拦截器也很简单,Spring 为什么提供了基础类WebMvcConfigurerAdapter ,我们只需要重写 addInterceptors 方法添加注册拦截器。
实现自定义拦截器只需要3步:
1、创建我们自己的拦截器类并实现 HandlerInterceptor 接口。
2、创建一个Java类继承WebMvcConfigurerAdapter,并重写 addInterceptors 方法。
2、实例化我们自定义的拦截器,然后将对像手动添加到拦截器链中(在addInterceptors方法中添加)。
PS:本文重点在如何在Spring-Boot中使用拦截器,关于拦截器的原理请大家查阅资料了解。
代码示例:
MyInterceptor1.java
package org.springboot.sample.interceptor;

import javax.servlet.http.HttpServletRequest;
import javax.servlet.http.HttpServletResponse;

import org.springframework.web.servlet.HandlerInterceptor;
import org.springframework.web.servlet.ModelAndView;

/**
 * 自定义拦截器1
 *
 * @author   单红宇(365384722)
 * @myblog  http://blog.csdn.net/catoop/
 * @create    2016年1月7日
 */
public class MyInterceptor1 implements HandlerInterceptor

	@Override
	public boolean preHandle(HttpServletRequest request, HttpServletResponse response, Object handler)
			throws Exception
		System.out.println(">>>MyInterceptor1>>>>>>>在请求处理之前进行调用(Controller方法调用之前)");

		return true;// 只有返回true才会继续向下执行,返回false取消当前请求


	@Override
	public void postHandle(HttpServletRequest request, HttpServletResponse response, Object handler,
			ModelAndView modelAndView) throws Exception
		System.out.println(">>>MyInterceptor1>>>>>>>请求处理之后进行调用,但是在视图被渲染之前(Controller方法调用之后)");


	@Override
	public void afterCompletion(HttpServletRequest request, HttpServletResponse response, Object handler, Exception ex)
			throws Exception
		System.out.println(">>>MyInterceptor1>>>>>>>在整个请求结束之后被调用,也就是在DispatcherServlet 渲染了对应的视图之后执行(主要是用于进行资源清理工作)");
MyInterceptor2.java
package org.springboot.sample.interceptor;

import javax.servlet.http.HttpServletRequest;
import javax.servlet.http.HttpServletResponse;

import org.springframework.web.servlet.HandlerInterceptor;
import org.springframework.web.servlet.ModelAndView;

/**
 * 自定义拦截器2
 *
 * @author   单红宇(365384722)
 * @myblog  http://blog.csdn.net/catoop/
 * @create    2016年1月7日
 */
public class MyInterceptor2 implements HandlerInterceptor

	@Override
	public boolean preHandle(HttpServletRequest request, HttpServletResponse response, Object handler)
			throws Exception
		System.out.println(">>>MyInterceptor2>>>>>>>在请求处理之前进行调用(Controller方法调用之前)");

		return true;// 只有返回true才会继续向下执行,返回false取消当前请求


	@Override
	public void postHandle(HttpServletRequest request, HttpServletResponse response, Object handler,
			ModelAndView modelAndView) throws Exception
		System.out.println(">>>MyInterceptor2>>>>>>>请求处理之后进行调用,但是在视图被渲染之前(Controller方法调用之后)");


	@Override
	public void afterCompletion(HttpServletRequest request, HttpServletResponse response, Object handler, Exception ex)
			throws Exception
		System.out.println(">>>MyInterceptor2>>>>>>>在整个请求结束之后被调用,也就是在DispatcherServlet 渲染了对应的视图之后执行(主要是用于进行资源清理工作)");
MyWebAppConfigurer.java
package org.springboot.sample.config;

import org.springboot.sample.interceptor.MyInterceptor1;
import org.springboot.sample.interceptor.MyInterceptor2;
import org.springframework.context.annotation.Configuration;
import org.springframework.web.servlet.config.annotation.InterceptorRegistry;
import org.springframework.web.servlet.config.annotation.WebMvcConfigurerAdapter;

@Configuration
public class MyWebAppConfigurer
		extends WebMvcConfigurerAdapter  // 这里注意,在spring 5.0之后 WebMvcConfigurerAdapter 过时了,可以直接实现接口 implements WebMvcConfigurer(下面实现的方法是一样的)

	@Override
	public void addInterceptors(InterceptorRegistry registry)
		// 多个拦截器组成一个拦截器链
		// addPathPatterns 用于添加拦截规则
		// excludePathPatterns 用户排除拦截
		registry.addInterceptor(new MyInterceptor1()).addPathPatterns("/**");
		registry.addInterceptor(new MyInterceptor2()).addPathPatterns("/**");
		super.addInterceptors(registry);
然后在浏览器输入地址: http://localhost:8080/index 后,控制台的输出为:
>>>MyInterceptor1>>>>>>>在请求处理之前进行调用(Controller方法调用之前)
>>>MyInterceptor2>>>>>>>在请求处理之前进行调用(Controller方法调用之前)
>>>MyInterceptor2>>>>>>>请求处理之后进行调用,但是在视图被渲染之前(Controller方法调用之后)
>>>MyInterceptor1>>>>>>>请求处理之后进行调用,但是在视图被渲染之前(Controller方法调用之后)
>>>MyInterceptor2>>>>>>>在整个请求结束之后被调用,也就是在DispatcherServlet 渲染了对应的视图之后执行(主要是用于进行资源清理工作)
>>>MyInterceptor1>>>>>>>在整个请求结束之后被调用,也就是在DispatcherServlet 渲染了对应的视图之后执行(主要是用于进行资源清理工作)
根据输出可以了解拦截器链的执行顺序(具体原理介绍,大家找度娘一问便知)
最后强调一点:只有经过DispatcherServlet 的请求,才会走拦截器链,我们自定义的Servlet 请求是不会被拦截的,比如我们自定义的Servlet地址 http://localhost:8080/xs/myservlet 是不会被拦截器拦截的。并且不管是属于哪个Servlet 只要复合过滤器的过滤规则,过滤器都会拦截。
最后说明下,我们上面用到的 WebMvcConfigurerAdapter 并非只是注册添加拦截器使用,其顾名思义是做Web配置用的,它还可以有很多其他作用,通过下面截图便可以大概了解,具体每个方法都是干什么用的,留给大家自己研究(其实都大同小异也很简单)。

以上是关于Spring Boot 拦截器的主要内容,如果未能解决你的问题,请参考以下文章