Android Socket通讯 之 表情列表优化业务逻辑优化
Posted 初学者-Study
tags:
篇首语:本文由小常识网(cha138.com)小编为大家整理,主要介绍了Android Socket通讯 之 表情列表优化业务逻辑优化相关的知识,希望对你有一定的参考价值。
表情列表优化、业务逻辑优化
前言
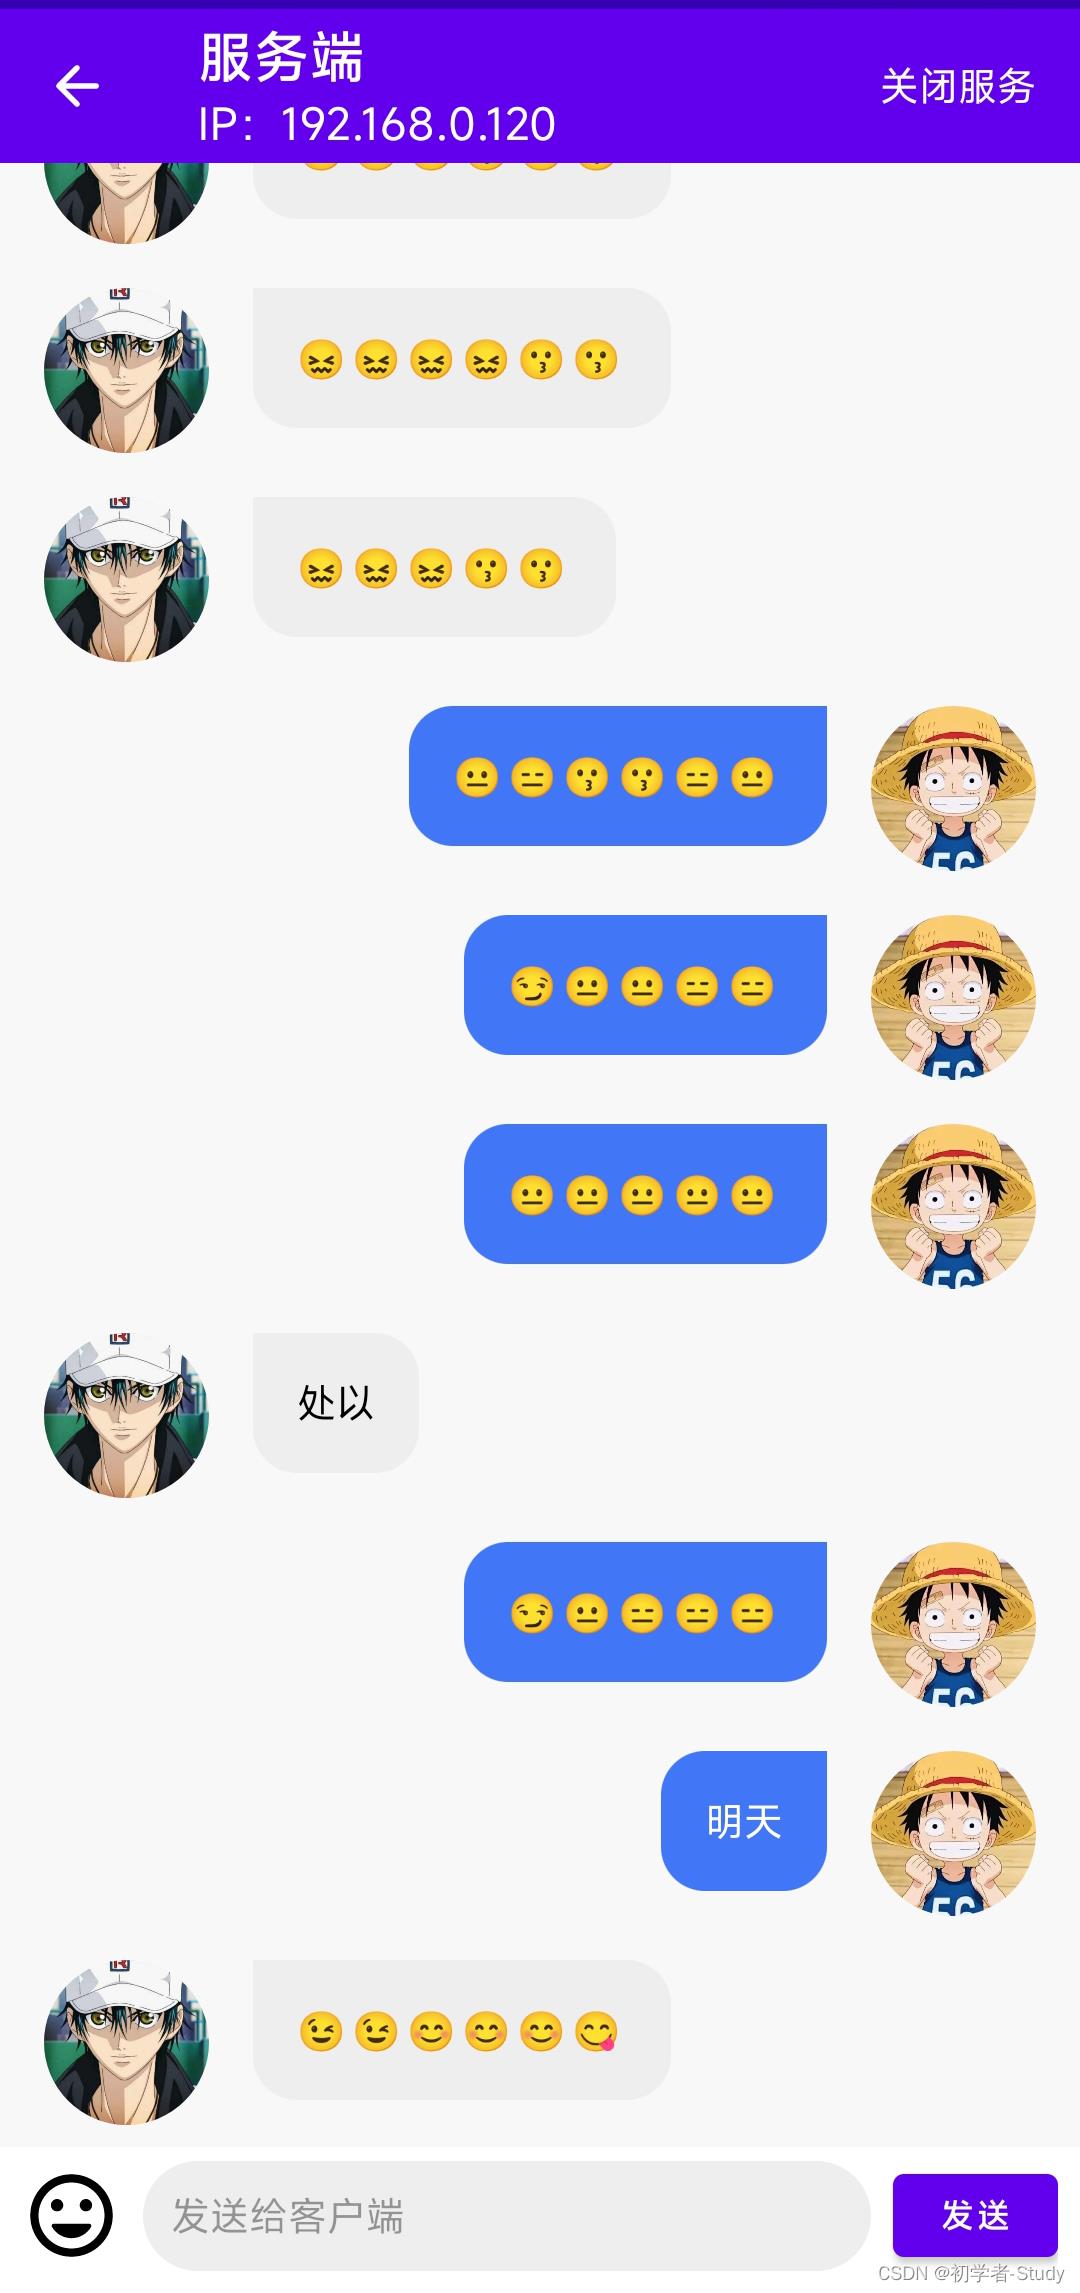
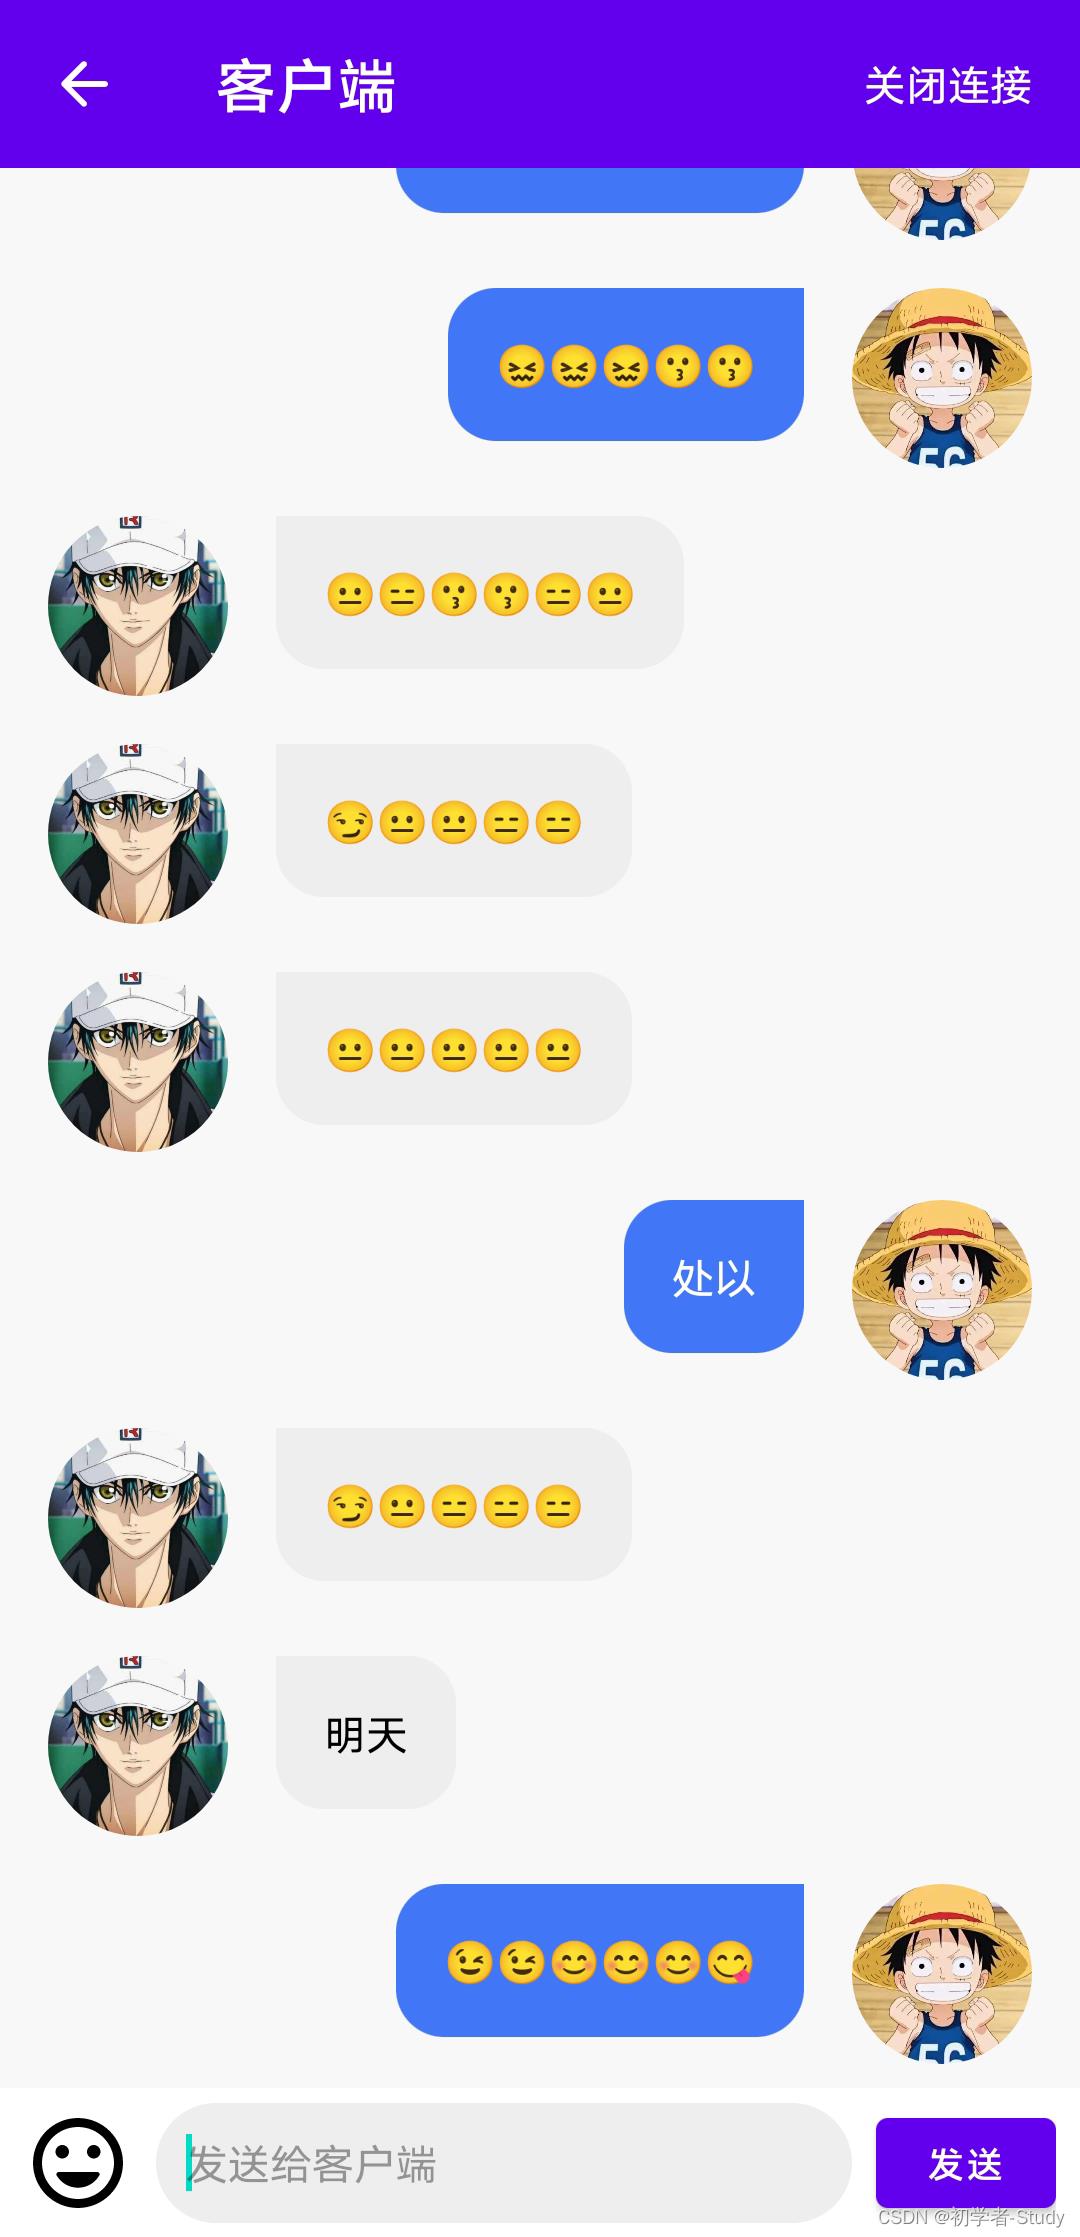
本文将对Socket通讯进行进一步的优化,并增加新的功能,具体改变了那些,一起来看。效果如下图所示:
正文
本文的优化,从逻辑、UI和功能三个方向上进行,之前的代码实际上是有一些逻辑问题。
一、增加线程池
之前在使用的过程中,每一次发送一条消息就会新建一个线程,这无疑是不可取的,而现在我们通过一个线程池来管理,对多个线程进行统一地管理,避免资源竞争中出现的问题,对线程进行复用,线程在执行完任务后不会立刻销毁,而会等待另外的任务,这样就不会频繁地创建、销毁线程和调用GC。
那么问题又来了,既然线程池有这么多的好处,为什么作者一开始不用呢?
emm… 我一开始没想那么多,没有想过这个Socket会去写系列文章,现在写也不晚嘛!嗯,就是这样!
① 增加服务端线程池
打开SocketServer,在里面声明线程池,代码如下:
private var serverThreadPool: ExecutorService? = null
在发送消息到客户端的时候对这个线程池进行初始化,并且执行子线程,修改sendToClient()函数,代码如下:
	fun sendToClient(msg: String)
        if (serverThreadPool == null)
            serverThreadPool = Executors.newCachedThreadPool()

        serverThreadPool?.execute
            if (socket == null)
                mCallback.otherMsg("客户端还未连接")
                return@execute

            if (socket!!.isClosed)
                mCallback.otherMsg("Socket已关闭")
                return@execute

            outputStream = socket!!.getOutputStream()
            try
                outputStream.write(msg.toByteArray())
                outputStream.flush()
             catch (e: IOException)
                e.printStackTrace()
                mCallback.otherMsg("向客户端发送消息: $msg 失败")
在发送消息之前,先检查socket 是否为null,因为有可能你在还没有客户端连接的时候就给客户端发送消息,不做处理的话,会导致空指针异常,程序闪退。同时将异常消息通过otherMsg()回调到页面上,页面上可以使用showMsg()函数告知用户。
而当我们停止服务的时候也需要关闭线程池,修改stopServer()函数,代码如下:
	fun stopServer()
        socket?.apply
            shutdownInput()
            shutdownOutput()
            close()

        serverSocket?.close()

        //关闭线程池
        serverThreadPool?.shutdownNow()
        serverThreadPool = null
② 增加客户端线程池
打开SocketClient,在里面声明线程池,代码如下:
private var clientThreadPool: ExecutorService? = null
在发送消息到服务端的时候对这个线程池进行初始化,并且执行子线程,修改sendToServer()函数,代码如下:
	fun sendToServer(msg: String)
        if (clientThreadPool == null)
            clientThreadPool = Executors.newSingleThreadExecutor()

        clientThreadPool?.execute
            if (socket == null)
                mCallback.otherMsg("客户端还未连接")
                return@execute

            if (socket!!.isClosed)
                mCallback.otherMsg("Socket已关闭")
                return@execute

            outputStream = socket?.getOutputStream()
            try
                outputStream?.write(msg.toByteArray())
                outputStream?.flush()
             catch (e: IOException)
                e.printStackTrace()
                mCallback.otherMsg("向服务端发送消息: $msg 失败")
在发送消息之前,先检查socket 是否为null,因为有可能你在客户端没连接到服务端的时候就给服务端发送消息,不做处理的话,会导致空指针异常,程序闪退。同时将异常消息通过otherMsg()回调到页面上,页面上可以使用showMsg()函数告知用户,这里和服务端的处理类似。
而当我们关闭客户端连接的时候也需要关闭线程池,修改closeConnect()函数,代码如下:
	fun closeConnect()
        inputStreamReader?.close()
        outputStream?.close()
        socket?.close()
        //关闭线程池
        clientThreadPool?.shutdownNow()
        clientThreadPool = null
写完这些,建议你运行一下,说不定就会报错,运行之后效果和之前是一样的,但是我们避免了一些问题的出现,虽然你感觉不到,但是这很有必要。
二、修改表情出现布局
在修改之前,我们先来看看之前的是什么效果,点击表情的时候出现了底部弹窗,弹窗覆盖了布局布局,同时页面上有阴影,如下图所示:
我们再来看看QQ的:
QQ的会将输入框布局顶上去,我们现在是覆盖了,那么我们怎么做到顶上去呢?
① BottomSheet使用
android中的布局可以实现这样的功能,因为底部是一样的,所以可以写在一起,目前我们先这么来写,后续可能会有改动。在layout下新建一个bottom_sheet_edit.xml,里面的代码如下:
<?xml version="1.0" encoding="utf-8"?>
<LinearLayout xmlns:android="http://schemas.android.com/apk/res/android"
    xmlns:app="http://schemas.android.com/apk/res-auto"
    android:id="@+id/bottom_sheet"
    android:layout_width="match_parent"
    android:layout_height="300dp"
    android:background="@color/white"
    android:orientation="vertical"
    app:behavior_hideable="true"
    app:behavior_peekHeight="50dp"
    app:layout_behavior="@string/bottom_sheet_behavior">

    <!--底部显示的内容-->
    <LinearLayout
        android:layout_width="match_parent"
        android:layout_height="50dp"
        android:gravity="center_vertical"
        android:paddingStart="8dp"
        android:paddingEnd="8dp">

        <androidx.appcompat.widget.AppCompatImageView
            android:id="@+id/iv_emoji"
            android:layout_width="36dp"
            android:layout_height="36dp"
            android:layout_marginEnd="8dp"
            android:src="@drawable/ic_emoji" />

        <androidx.appcompat.widget.AppCompatEditText
            android:id="@+id/et_msg"
            android:layout_width="0dp"
            android:layout_height="40dp"
            android:layout_weight="1"
            android:background="@drawable/shape_et_bg"
            android:gravity="center_vertical"
            android:hint="发送给客户端"
            android:padding="10dp"
            android:textSize="14sp" />

        <com.google.android.material.button.MaterialButton
            android:id="@+id/btn_send_msg"
            android:layout_width="80dp"
            android:layout_height="wrap_content"
            android:layout_marginStart="8dp"
            android:text="发送"
            app:cornerRadius="8dp" />
    </LinearLayout>

    <!--底部弹出的内容-->
    <androidx.recyclerview.widget.RecyclerView
        android:id="@+id/rv_emoji"
        android:overScrollMode="never"
        android:layout_width="match_parent"
        android:layout_height="match_parent" />

</LinearLayout>
这个布局是这样的效果。
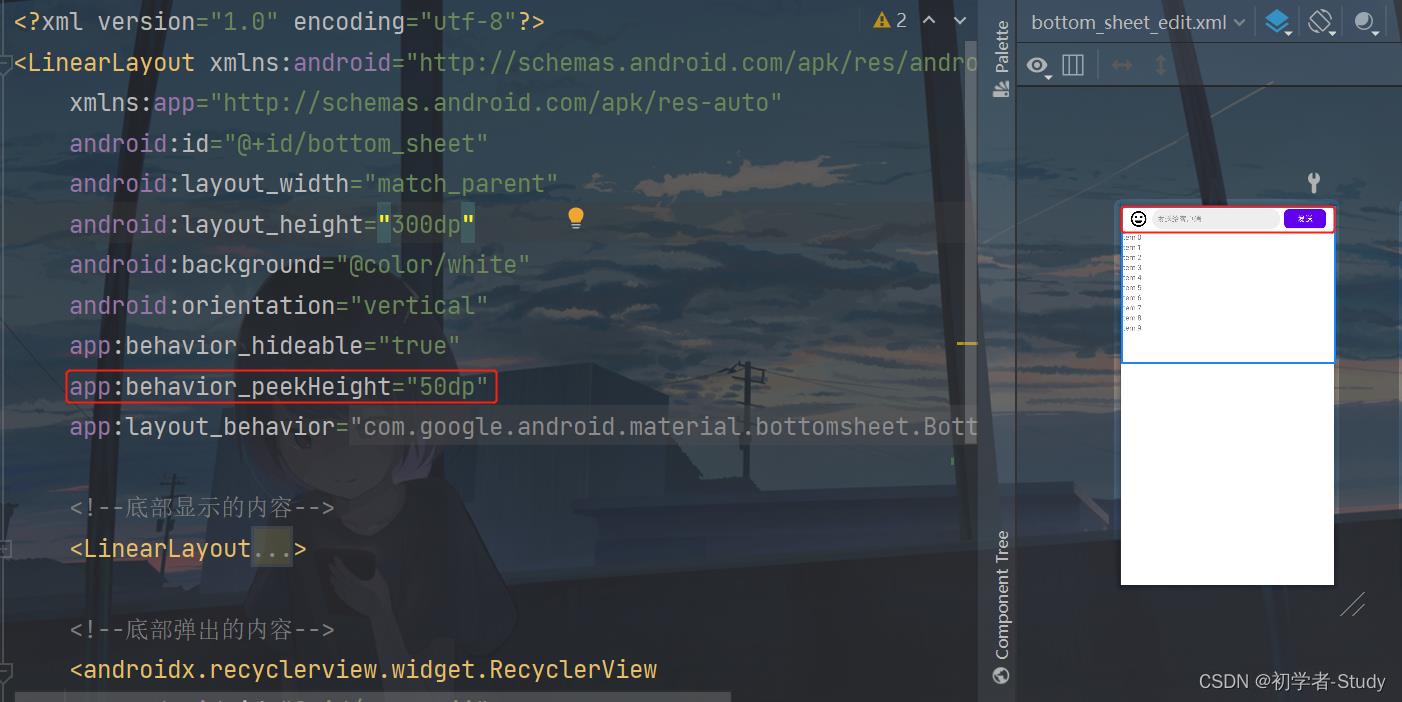
这里的50dp是指底部显示的高度,底部的列表就用来装载表情。然后我们需要使用CoordinatorLayout(协调布局)来进行配置。
② CoordinatorLayout使用
在修改之前,先在colors.xml中增加一个颜色,代码如下:
<color name="bg_color">#F8F8F8</color>
这个颜色作为页面的背景色,然后我们修改activity_server.xml布局,代码如下:
<?xml version="1.0" encoding="utf-8"?>
<androidx.coordinatorlayout.widget.CoordinatorLayout xmlns:android="http://schemas.android.com/apk/res/android"
    xmlns:app="http://schemas.android.com/apk/res-auto"
    xmlns:tools="http://schemas.android.com/tools"
    android:layout_width="match_parent"
    android:layout_height="match_parent"
    android:background="@color/bg_color"
    tools:context=".ui.ServerActivity">

    <LinearLayout
        android:layout_width="match_parent"
        android:layout_height="match_parent"
        android:layout_marginBottom="50dp"
        android:orientation="vertical">

        <com.google.android.material.appbar.MaterialToolbar
            android:id="@+id/toolbar"
            android:layout_width="match_parent"
            android:layout_height="?attr/actionBarSize"
            android:background="@color/purple_500"
            app:navigationIcon="@drawable/ic_back_black"
            app:navigationIconTint="@color/white"
            app:subtitleTextColor="@color/white"
            app:title="服务端"
            app:titleTextColor="@color/white">

            <TextView
                android:id="@+id/tv_start_service"
                android:layout_width="wrap_content"
                android:layout_height="wrap_content"
                android:layout_gravity="end"
                android:padding="16dp"
                android:text="开启服务"
                android:textColor="@color/white"
                android:textSize="14sp" />
        </com.google.android.material.appbar.MaterialToolbar>

        <androidx.recyclerview.widget.RecyclerView
            android:id="@+id/rv_msg"
            android:layout_width="match_parent"
            android:layout_height="match_parent" />
    </LinearLayout>

    <include
        android:id="@+id/lay_bottom_sheet_edit"
        layout="@layout/bottom_sheet_edit" />

</androidx.coordinatorlayout.widget.CoordinatorLayout>
再来修改activity_client.xml,代码如下:
<?xml version="1.0" encoding="utf-8"?>
<androidx.coordinatorlayout.widget.CoordinatorLayout xmlns:android="http://schemas.android.com/apk/res/android"
    xmlns:app="http://schemas.android.com/apk/res-auto"
    xmlns:tools="http://schemas.android.com/tools"
    android:layout_width="match_parent"
    android:layout_height="match_parent"
    android:background="@color/bg_color"
    tools:context=".ui.ClientActivity">

    <LinearLayout
        app:layout_behavior="@string/appbar_scrolling_view_behavior"
        android:layout_width="match_parent"
        android:layout_height="match_parent"
        android:layout_marginBottom="50dp"
        android:orientation="vertical">

        <com.google.android.material.appbar.MaterialToolbar
            android:id="@+id/toolbar"
            android:layout_width="match_parent"
            android:layout_height="?attr/actionBarSize"
            android:background="@color/purple_500"
            app:navigationIcon="@drawable/ic_back_black"
            app:navigationIconTint="@color/white"
            app:title="客户端"
            app:titleTextColor="@color/white">

            <TextView
                android:id="@+id/tv_connect_service"
                android:layout_width="wrap_content"
                android:layout_height="wrap_content"
                android:layout_gravity="end"
                android:padding="16dp"
                android:text="连接服务"
                android:textColor="@color/white"
                android:textSize="14sp" />
        </com.google.android.material.appbar.MaterialToolbar>

        <androidx.recyclerview.widget.RecyclerView
            android:id="@+id/rv_msg"
            android:layout_width="match_parent"
            android:layout_height="match_parent" />
    </LinearLayout>

    <include
        android:id="@+id/lay_bottom_sheet_edit"
        layout="@layout/bottom_sheet_edit" />

</androidx.coordinatorlayout.widget.CoordinatorLayout>
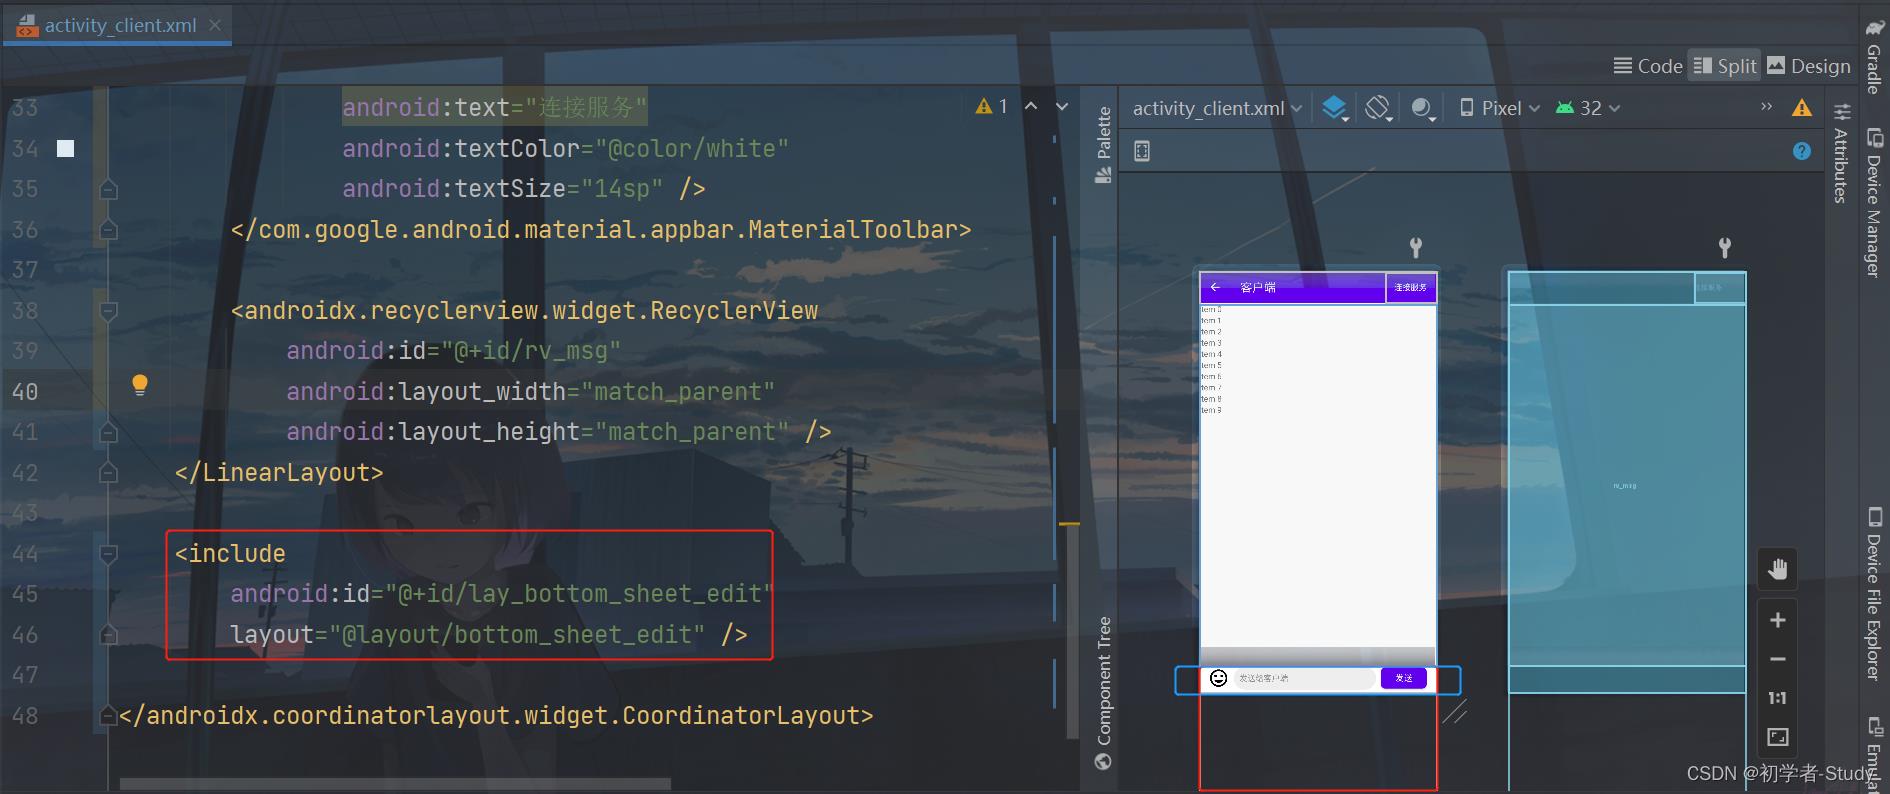
底部插入的这个布局就是我们刚才写的bottom_sheet_edit.xml,50dp此时可以在页面上显示出来。其余的部分我们需要在点击表情的使用再显示出来。
③ Activity中修改
因为布局有修改,那么对应的ServerActivity和ClientActivity也会有修改,下面这个函数在两个Activity中都需要调用,代码如下:
	//是否显示表情
    private var isShowEmoji = false

    private var bottomSheetBehavior: BottomSheetBehavior<LinearLayout>? = null

	private fun initBottomSheet()
        //Emoji布局
        bottomSheetBehavior =
            BottomSheetBehavior.from(binding.layBottomSheetEdit.bottomSheet).apply
                state = BottomSheetBehavior.STATE_HIDDEN
                isHideable = false
                isDraggable = false

        binding.layBottomSheetEdit.rvEmoji.apply
            layoutManager = GridLayoutManager(context, 6)
            adapter = EmojiAdapter(SocketApp.instance().emojiList).apply
                setOnItemClickListener(object : EmojiAdapter.OnClickListener
                    override fun onItemClick(position: Int)
                        val charSequence = SocketApp.instance().emojiList[position]
                        checkedEmoji(charSequence)

                )


        //显示emoji
        binding.layBottomSheetEdit.ivEmoji.setOnClickListener
            bottomSheetBehavior!!.state =
                if (isShowEmoji) BottomSheetBehavior.STATE_COLLAPSED else BottomSheetBehavior.STATE_EXPANDED


        bottomSheetBehavior!!.addBottomSheetCallback(object : BottomSheetBehavior.BottomSheetCallback()
            override fun onStateChanged(bottomSheet: View, newState: Int)
                when (newState)
                    BottomSheetBehavior.STATE_EXPANDED -> //显示
                        isShowEmoji = true
                        binding.layBottomSheetEdit.ivEmoji.setImageDrawable(
                            ContextCompat.getDrawable(
                                this@ServerActivity,
                                R.drawable.ic_emoji_checked
                            )
                        )

                    BottomSheetBehavior.STATE_COLLAPSED -> //隐藏
                        isShowEmoji = false
                        binding.layBottomSheetEdi以上是关于Android Socket通讯 之 表情列表优化业务逻辑优化的主要内容,如果未能解决你的问题,请参考以下文章