一文学会 express
Posted 卡列尼娜翠花
tags:
篇首语:本文由小常识网(cha138.com)小编为大家整理,主要介绍了一文学会 express相关的知识,希望对你有一定的参考价值。
文章目录
Express 安装
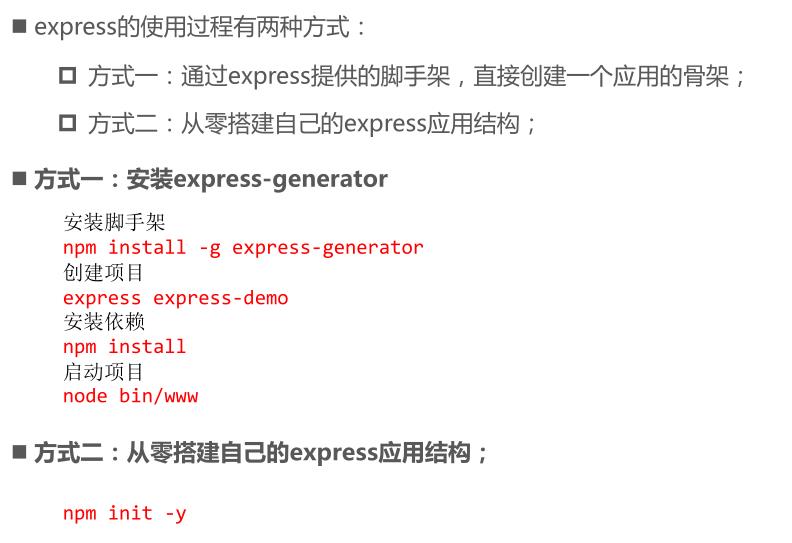
基本使用
// 1、导入 express 模块
const express = require('express')

// 2、创建 web 服务器实例
const app = express()

app.get('/user', (req, res, next) =>
    // 发送 json 对象给客户端
    res.send( name: 'ahcheng', age: 18 )
)

app.post('/user', (req, res, next) =>
    // 发送文本内容给客户端
    res.send('hhhh')
)

// 3、调用 app.listen( 端口号, 启动服务器后调用的回调函数 ),启动服务器,
app.listen(80, ()=>
    console.log("express server running at http://127.0.0.1:80")
)
中间件
Express是一个路由和中间件的Web框架,它本身的功能非常少:**Express应用程序本质上是一系列中间件函数的调用;**express 是一串中间件工具链。
中间件是什么呢?中间件的本质是传递给express的一个回调函数;
这个回调函数接受三个参数:
- 请求对象(request对象);
- 响应对象(response对象);
- next函数(在express中定义的用于执行下一个中间件的函数);
- 没有 next 则后续中间件没有执行权。只有上一个中间件有 next,则后续中间件路径匹配上了就会执行
中间件中可以执行哪些任务呢?
- 执行任何代码;
- 更改请求(request)和响应(response)对象;
- 结束请求-响应周期(返回数据);
- 调用栈中的下一个中间件;
res.end 在 next 之前执行,并不会报错。因为它只代表服务器响应结束了,后续无法再进行 http 相关的操作。但是中间件并没有结束,所以后续的中间件能继续执行。代码不报错。
如果当前中间件功能没有结束请求-响应周期,则必须调用 next() 将控制权传递给下一个中间件功能,否则,请求
将被挂起。
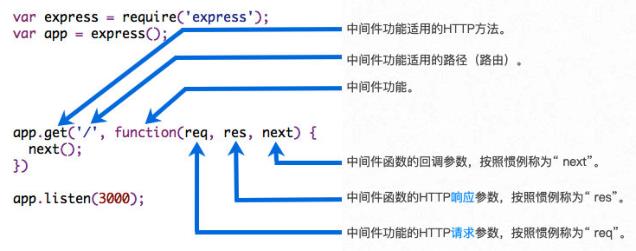
编写中间件
如何将一个中间件应用到我们的应用程序中呢?
- express主要提供了两种方式:
app/router.use和app/router.methods;- 可以是 app,也可以是router,router我们后续再学习:
- methods指的是常用的请求方式,比如: app.get或app.post等;
学习use的用法,因为methods的方式本质是use的特殊情况:
- use 和 methods 方法一样,也可以接收 url 进行匹配。如果没有传入 url 路径,则会匹配所有的 url。
- use 和 methods 都可以连续定义多个中间件,这些中间件的执行也是按定义顺序来的。
- 在 use 中定义的中间件也叫全局中间件;在 methods 中定义的为局部中间件。
const express = require('express');

const app = express();

app.use((req, res, next) =>
  console.log("common middleware 01");
  next();
);

app.get('/home', (req, res, next) =>
  console.log("home path and method middleware 01");
  next();
)

app.get("/home", (req, res, next) =>
  console.log("home path and method middleware 02");
  next();
, (req, res, next) =>
  console.log("home path and method middleware 03");
  next();
, (req, res, next) =>
  console.log("home path and method middleware 04");
  res.end("home page");
);

app.listen(8000, () =>
  console.log("express初体验服务器启动成功~");
);

// common middleware 01
// home path and method middleware 01
// home path and method middleware 02
// home path and method middleware 03
// home path and method middleware 04
客户端发送请求的方式
客户端传递到服务器参数的方法常见的是5种:
- 方式一:通过get请求中的URL的params;
- 方式二:通过get请求中的URL的query;
- 方式三:通过post请求中的body的json格式;
- 方式四:通过post请求中的body的x-www-form-urlencoded格式;
- 方式五:通过post请求中的form-data格式;
解析 body 数据
body 数据都是流,我们肯定不能直接使用,所以需要解析。而且 body 数据肯定是要被使用的,所以我们可以在前面定义两个通用中间件,先将 body 数据解析后,方便后续中间件直接使用。
解析 JSON 格式
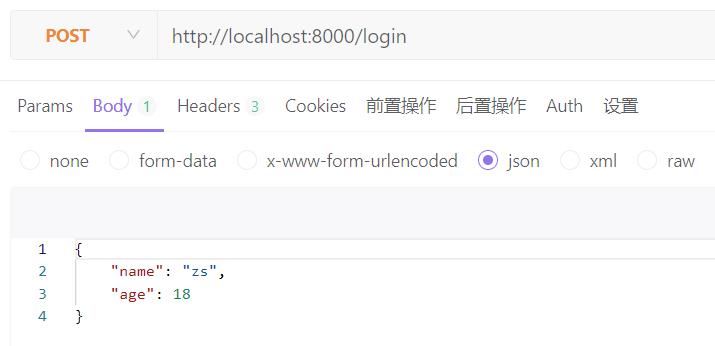
const express = require('express');

const app = express();

// 自己编写的json解析
app.use((req, res, next) =>
  // 判断请求头
  if (req.headers["content-type"] === 'application/json')
    req.on('data', (data) =>
      // 将请求体 body 中数据从流转换成 json 字符串,再解析 json 为对象
      const info = JSON.parse(data.toString());
      // 给 request 对象中添加一个 body 属性,填入转换好的数据对象,方便后续中间件直接使用
      req.body = info;
    )

    req.on('end', () =>
      next();
    )
   else
    next();

)

app.post("/login", (req, res, next) =>
  console.log(req.body); //  name: 'zs', age: 18
  res.end("请求成功")
)

app.listen(8000, () =>
  console.log("express初体验服务器启动成功~");
)
根据上面的例子,可见原生解析 json 是比较麻烦的,所以我们一般是使用库。
解析 json:使用库 body-parser。
- body-parser: express3.x 内置进了express框架
- body-parser: express4.x 又被分离出去
- body-parser 类似的功能被 express4.16.x 以后的版本内置成了函数
**express.json()**
app.use(express.json()) // 一句代码就行,简洁太多了
另外 express 解析后,会给请求对象 req 添加一个 body 属性,并且会将解析好的数据放入其中。
解析 urlencoded 格式
urlencoded 格式也就是请求体 body 中数据为 Content-Type: x-www-form-urlencoded。
什么是 x-www-form-urlencoded 格式?
x-www-form-urlencoded 纸面翻译即所谓 url 格式的编码,是 post 的默认 Content-Type。
get 请求的数据一般是拼接在 url 后面请求的,像这样 username=tom&pwd=123,这样的格式叫查询参数。
x-www-form-urlencoded 格式也长这样,所以说是 url 格式的编码。不同点在于,“查询参数”不是添加到 url 后面,而是添加在 post 请求的 body 里。
urlencoded 方法
解析 urlencoded 格式的数据,express 提供了 urlencoded方法,并且接收参数。
extended:
- true: 那么对urlencoded进行解析时, 它使用的是第三方库: qs
- false: 那么对urlencoded进行解析时, 它使用的是Node内置模块: querystring
app.use(express.urlencoded(extended: true));
解析 form-data 格式
form-data 格式可以传递一般数据,但是通常它是用来上传文件的。
手动解析它也是非常的麻烦,express 没有内置解析的方法,但是 express 官方提供了一个第三方库:multer
安装:npm i multer
解析非文件类型数据
multer 实例提供 any 方法可以解析非文件类型数据,它返回一个函数,可直接作为中间件使用。
- 注意:不要在全局中间件中使用 any,也就是 any 不要在 use 中使用,要在 methods 中使用。
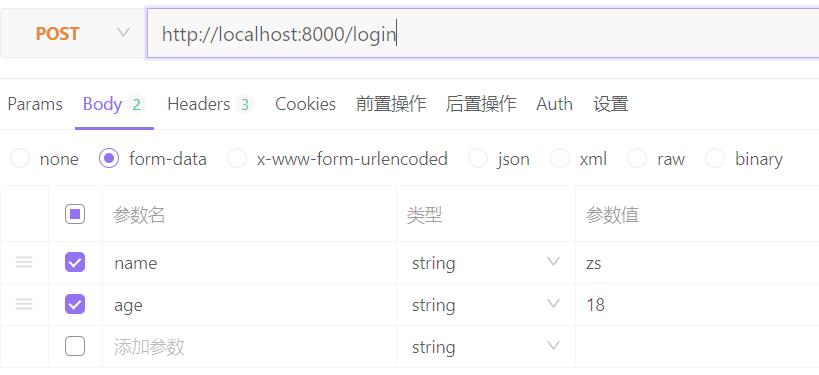
const express = require('express');
const multer = require("multer")

const app = express();

const uploader = multer()

app.post("/login", uploader.any(), (req, res, next) =>
  console.log(req.body); // [Object: null prototype]  name: 'zs', age: '18'
  res.end("请求成功")
)

app.listen(8000, () =>
  console.log("express初体验服务器启动成功~");
)
上传文件
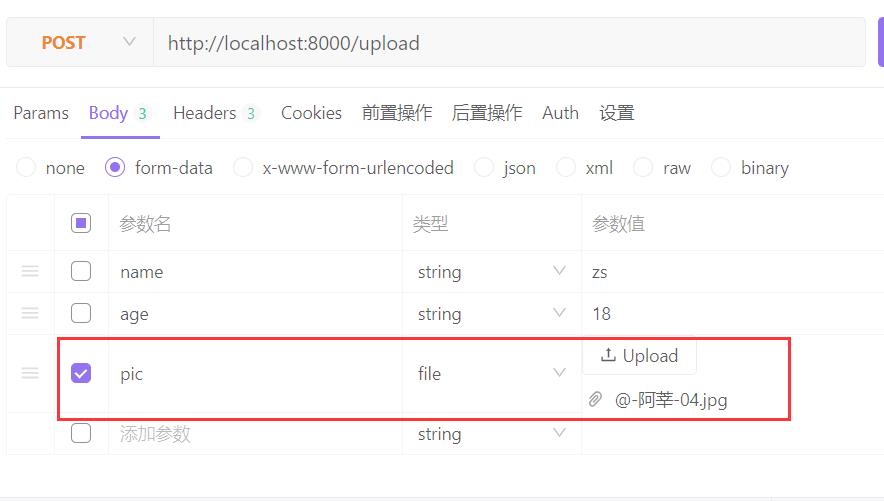
const path = require('path');

const express = require('express');
const multer = require('multer');

const app = express();

// 设置文件的存储信息,disk 表示存储到磁盘中
const storage = multer.diskStorage(
  destination: (req, file, cb) =>  // 指定存储目录
    cb(null, './uploads/');
  ,
  filename: (req, file, cb) =>  // 指定存储的文件名
    cb(null, Date.now() + path.extname(file.originalname)); // 时间戳+后缀

)

const upload = multer(
  // dest: './uploads/' // 不详细设置存储信息,直接存在指定目录
  storage
);

// 应用中间件,完成存储。
// 单个文件:upload.single( form-data中文件的 key )
// 多个文件:upload.array( key ) 注意:多个文件上传要求使用同一个key
app.post('/upload', upload.array('pic'), (req, res, next) =>
  // 单个文件信息保存在 file 中,上传多个文件的信息这是保存在 files 中
  console.log(req.files); // 查看文件存储信息
  res.end("文件上传成功~");
);

app.listen(8000, () =>
  console.log("form-data解析服务器启动成功~")
);

// [
//
//     fieldname: 'pic',
//     originalname: '@-阿莘-04.jpg',
//     encoding: '7bit',
//     mimetype: 'image/jpeg',
//     destination: './uploads/',
//     filename: '1664879117987.jpg',
//     path: 'uploads\\\\1664879117987.jpg',
//     size: 224435
//
// ]
日志处理
如果我们希望将请求日志记录下来,那么可以使用express官网开发的第三方库:morgan
安装:npm i morgan
const fs = require('fs');

const express = require('express');
const morgan = require('morgan');

const app = express();

const writerStream = fs.createWriteStream('./logs/access.log',
  flags: "a+"
)

// 指定日志输出格式,并且以流的形式输出
app.use(morgan("combined", stream: writerStream));

app.get('/home', (req, res, next) =>
  res.end("Hello World");
)

app.listen(8000, () =>
  console.log("express初体验服务器启动成功~");
);
解析 params 和 query
动态参数 params
什么是动态参数呢?
比如请求一个用户的个人信息/user/它的id,这个 id 就是动态参数 params。中间间在路径匹配的时候需要使用:key和动态路由一样的方式接收。
通过req.params对象,可以访问到 URL 中,通过:声明的动态参数:
- req.params 默认是一个空对象
// 访问: http://127.0.0.1/user/666

// : 标记 id 为动态参数
app.post('/user/:id', (req, res) =>
    res.send(req.params) //"id":"666"
)
查询参数 query
查询参数就是 url ? 后面的字符串。查询字符串的形式为:?参数名=参数值&参数名=参数值
通过 req.query对象,可以访问到客户端通过查询字符串的形式,发送到服务器的数据:
- req.query 默认是一个空对象
// 访问:httt://127.0.0.1?name=zs&age=20

app.get('/', (req, res) =>

	// 客户端使用 ?name=zs&age=20 这种查询字符串形式,发送到服务器的参数

  // 可以通过 req.query 对象访问到,例如:req.query.name   req.query.age

  console.log(req.query)   //"name": "zs", "age": "20"
)
服务器响应数据
- end方法:类似于 http 中的 response.end 方法,用法是一致的。它返回的数据没有指定 content-type。所以返回 json ,浏览器不知道是 json。
- json方法:json方法中可以传入很多的类型:object、array、string、boolean、number、null等,它们会被转换成 json 格式返回;
- status方法:用于设置状态码:
更多响应的方式:https://www.expressjs.com.cn/4x/api.html#res
路由
如果我们将所有的代码逻辑都写在app中,那么app会变得越来越复杂:
- 一方面完整的Web服务器包含非常多的处理逻辑;
- 另一方面有些处理逻辑其实是一个整体,我们应该将它们放在一起:比如对users相关的处理
- 获取用户列表;
- 获取某一个用户信息;
- 创建一个新的用户;
- 删除一个用户;
- 更新一个用户;
我们可以使用express.Router来创建一个路由处理程序:
一个 Router 实例拥有完整的中间件和路由系统;因此,路由可以看成一个迷你应用程序(mini-app);
基本使用
express.Router() 函数**创建路由实例。**在路由中设置中间件,然后在主路由中注册。主路由的 url 会和子路由的 url 拼接成完整的请求路径。
const express = require('express');

// 获取路由实例
const router = express.Router();

// 在路由中设置中间件
router.get('/', (req, res, next) =>
  res.json(["why", "kobe", "lilei"]);
);

router.get('/:id', (req, res, next) =>
  res.json(`$req.params.id用户的信息`);
);

router.post('/', (req, res, next) =>
  res.json("create user success~");
);

// 导出路由
module.exports = router;
const express = require('express');
const userRouter = require('./routers/users');

const app = express();

// 注册路由
app.use("/users", userRouter);

app.listen(8000, () =>
  console.log("路由服务器启动成功~");
);
作为静态资源服务器
部署静态资源我们可以选择很多方式:一般都是使用 nginx,其实 Node 也可以作为静态资源服务器,并且 express给我们提供了方便部署静态资源的方法;
express.static(资源目录)
const express = require('express');

const app = express();

app.use(express.static('./build'));

app.listen(8000, () =>
  console.log("静态资源服务器启动成功~");
);
服务端的错误处理
**next 中传了参数,它就会传递给一个错误处理的中间件。**错误处理中间件,第一个参数 err,能获取到错误信息。
(err, req, res, next) =>
const express = require('express');
const app = express();
// 错误信息定义成常量,统一管理
const USERNAME_DOES_NOT_EXISTS = "USERNAME_DOES_NOT_EXISTS";
const USERNAME_ALREADY_EXISTS = "USERNAME_ALREADY_EXISTS";
app.post('/login', (req, res, next) =>
// 加入在数据中查询用户名时, 发现不存在
const isLogin = false;
if (isLogin)
res.json("user login success~");
else
// 没有错误中间件的时候,手动处理
// res.type(400);
// res.json("username does not exists~")
// 传递给错误中间件处理
next(new Error(USERNAME_DOES_NOT_EXISTS));
)
app.post('/register', (req, res, next) =>
// 加入在数据中查询用户名时, 发现不存在
const isExists = true;
if (!isExists)
res.json("user register success~");
else
// res.type(400);
// res.json("username already exists~")
next(new Error(USERNAME_ALREADY_EXISTS));
);
app.use((err, req, res, next) =>
let status = 400;
let message = "";
// 统一管理了错误信息,使用时可以匹配响应错误信息
switch(err.message)
case USERNAME_DOES_NOT_EXISTS:
message = "username does not exists~";
break;
case USERNAME_ALREADY_EXISTS:
message = "USERNAME_ALREADY_EXISTS~"
break;
default:
message = "NOT FOUND~"
// 响应错误信息和状态码
res.status(status);
res.json(
errCode: status,
errMessage: message
)
)
app构建Web应用
这里使用IDEA构建Web应用
新建项目
选择Filsh
其自动生成的Web.XML文件如下
<?xml version="1.0" encoding="UTF-8"?>
<web-app xmlns="http://xmlns.jcp.org/xml/ns/javaee"
xmlns:xsi="http://www.w3.org/2001/XMLSchema-instance"
xsi:schemaLocation="http://xmlns.jcp.org/xml/ns/javaee http://xmlns.jcp.org/xml/ns/javaee/web-app_4_0.xsd"
version="4.0">
</web-app>
同时还生成了一个jsp文件,生成的jsp文件如下
<%--
Created by IntelliJ IDEA.
User: Administrator
Date: 2020/7/5
Time: 22:39
To change this template use File | Settings | File Templates.
--%>
<%@ page contentType="text/html;charset=UTF-8" language="java" %>
<html>
<head>
<title>$Title$</title>
</head>
<body>
$END$
</body>
</html>
配置应用首页
<?xml version="1.0" encoding="UTF-8"?>
<web-app xmlns="http://xmlns.jcp.org/xml/ns/javaee"
xmlns:xsi="http://www.w3.org/2001/XMLSchema-instance"
xsi:schemaLocation="http://xmlns.jcp.org/xml/ns/javaee http://xmlns.jcp.org/xml/ns/javaee/web-app_4_0.xsd"
version="4.0">
<welcome-file-list>
<welcome-file>index.jsp</welcome-file>
</welcome-file-list>
</web-app>
启动应用
启动相关的应用
jsp的基本语法
jsp的注释
jsp的基本注释如下
<%--
Created by IntelliJ IDEA.
User: Administrator
Date: 2020/7/5
Time: 22:39
To change this template use File | Settings | File Templates.
--%>
<%@ page contentType="text/html;charset=UTF-8" language="java" %>
<html>
<head>
<title>$Title$</title>
</head>
<body>
<%-- 注释内容 --%>
$END$
</body>
</html>
jsp 声明
对jsp的声明如下
<%--
Created by IntelliJ IDEA.
User: Administrator
Date: 2020/7/5
Time: 22:39
To change this template use File | Settings | File Templates.
--%>
<%@ page contentType="text/html;charset=UTF-8" language="java" %>
<html>
<head>
<title>$Title$</title>
</head>
<body>
<%!
// 声明一个整形变量
public int count;
// 声明一个方法
public String info(){
return "hello";
}
%>
$END$
<%
// 把count值输出后加1
out.println(count++);
%>
<%
// 输出info()方法后的返回值
out.println(info());
%>
</body>
</html>
访问的页面结果如下
jsp 输出表达式
jsp提供了一种简单的输出表达式
<%--
Created by IntelliJ IDEA.
User: Administrator
Date: 2020/7/5
Time: 22:39
To change this template use File | Settings | File Templates.
--%>
<%@ page contentType="text/html;charset=UTF-8" language="java" %>
<html>
<head>
<title>$Title$</title>
</head>
<body>
<%!
// 声明一个整形变量
public int count;
// 声明一个方法
public String info(){
return "hello";
}
%>
$END$
`<%=count++%>
<%=info()%>
</body>
</html>
jsp 三个编译指令
这里对jsp有三个编译的指令
page 指令
page指令位于jsp页面的顶端,一个jsp页面可以有多个page指令,page指令的语法为
<%@ page import="java.sql.*" %>
include指令
include指令可以将一个外部文件嵌入到当前jsp文件中,同时解析这个页面中的jsp语句。include命令既可以包含jsp页面也可以包含静态文本。编译指令语法如下:
<%@ include file="要导入的jsp页面或文本文件" %>
taglib指令
taglib指令用于引入一些特定的标签库,语法格式:
<%@ taglib prefix="tagPrefix" uri="tagLibraryURI" %>
如使用struts标签库:
<%@ taglib prefix="s" taglib="/struts-tags" %>
动作指令
forward
进行页面跳转的指令
如果转发的时候需要传递参数可以使用jsp:param</jsp:param>指令进行设置。
比如,访问index.jsp页面时自动转发至login.jsp,需要把username和password传递过去:
index.jsp:
<%@ page language="java" contentType="text/html; charset=UTF-8"
pageEncoding="UTF-8"%>
<jsp:forward page="login.jsp">
<jsp:param value="yaopan" name="username" />
<jsp:param value="123456" name="password" />
</jsp:forward>
<%--mac上按住comment键(windows下按住ctrl键),再点击login.jsp forword以下的代码不会被执行 --%>
在login.jsp中可以使用getParameter方法获取传入的参数值:
<%
String name=request.getParameter("username");
String pwd=request.getParameter("password");
out.println(name);
out.println("<br>");
out.println(pwd);
%>
执行forword指令时用户请求的地址没有发生变化,页面内容被forward目标替代。
include指令
include指令用于包含某个页面,但不会导入被include页面的编译指令。可以通过param指令传递参数:
新建一个index.jsp
<%@ page language="java" contentType="text/html; charset=UTF-8"
pageEncoding="UTF-8"%>
<!DOCTYPE html>
<html>
<jsp:include page="head.html"></jsp:include>
<jsp:include page="body.jsp">
<jsp:param value="#1d99f6" name="bgcolor"/>
</jsp:include>
</html>
body.jsp
<body bgcolor="<%=request.getParameter("bgcolor")%>">
</body>
以上是关于一文学会 express的主要内容,如果未能解决你的问题,请参考以下文章


