在uniapp中获取可视区域的高度(uni.getSystemInfo)
Posted 打工仔小白
tags:
篇首语:本文由小常识网(cha138.com)小编为大家整理,主要介绍了在uniapp中获取可视区域的高度(uni.getSystemInfo)相关的知识,希望对你有一定的参考价值。
前言
在实际开发中我们会遇到不确定高度的情况,那么在uniapp中我们如何获取区域的高度呐?一起来看看吧
使用到的:
uni-app提供了异步(uni.getSystemInfo)和同步(uni.getSystemInfoSync)的2个API获取系统信息
uni.getSystemInfo(OBJECT)
异步获取系统信息
OBJECT 参数说明:
参数名 | 类型 | 必填 | 说明 |
success | Function | 是 | 接口调用成功的回调 |
fail | Function | 否 | 接口调用失败的回调函数 |
complete | Function | 否 | 接口调用结束的回调函数(调用成功、失败都会执行) |
success 返回参数说明,目前需要使用到的:
参数 | 说明 |
windowHeight | 可使用窗口高度 |
statusBarHeight | 手机状态栏的高度 |
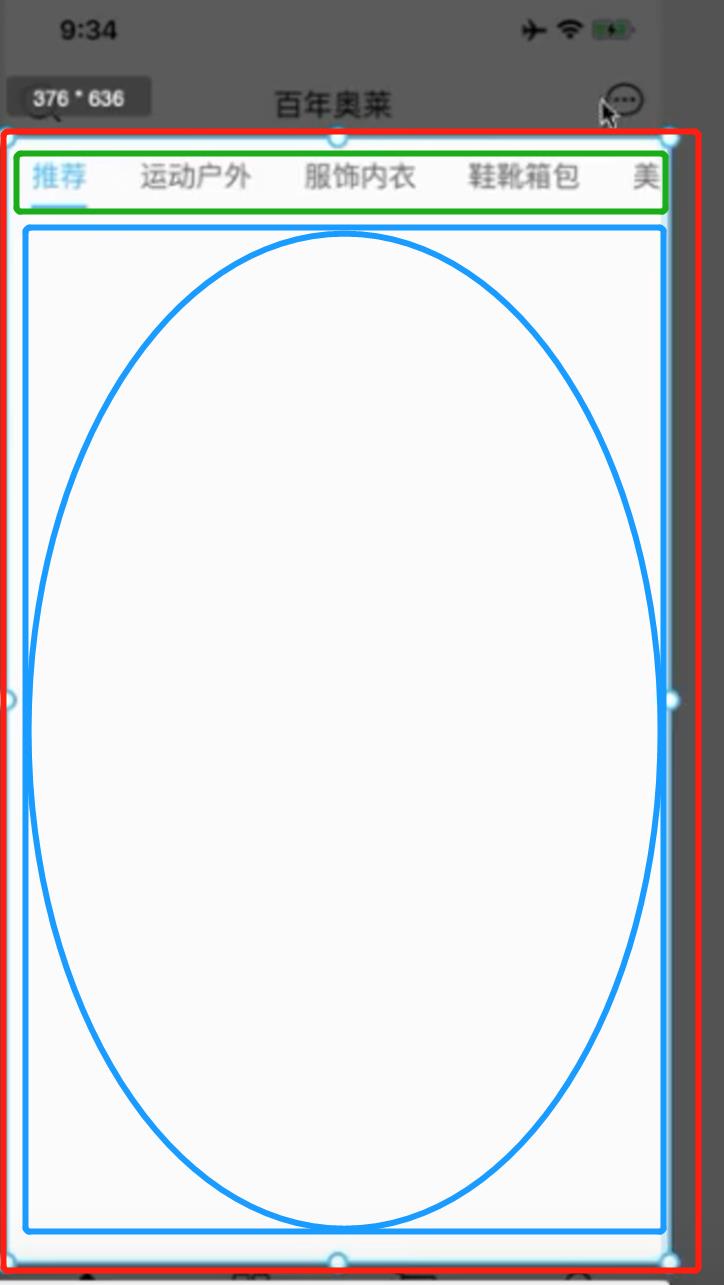
一、分析uniapp的可视区域
是哪块哪?其实和我们想的有些出入
其实就是蓝色区域=红色区域-绿色区域

代码:
 getClineHeight()
     const res = uni.getSystemInfo(
           success:(res=>
                  this.clientHeight = res.windowHeight-uni.upx2px(80)
            )
        );
     ,
tip:注意,在我们的微信小程序中是可以正确显示的,但是在ios中是有问题的
二、如何在小程序和ios中都能正确显示
我们只需要获取系统信息中的platform信息,判断是ios或者android或者其他
tip注意点:
注意这里的单位是pxname我们需要将代码中导航栏写的css的80rpx转换为40px,使用upx2px直接可以进行转换
2.ios本身有44的高度,Android是48
代码:
        getBarHeight()
                const res = uni.getSystemInfoSync()
                if(res.platform==='ios')
                    return 44+res.statusBarHeight
                else if(res.platform==='android')
                    return 48+res.statusBarHeight
                else
                    return 0;

            ,
            //获取可视区域高度
            getClineHeight()
                const res = uni.getSystemInfo(
                    success:(res=>
                        this.clientHeight = res.windowHeight-uni.upx2px(80)-this.getBarHeight();
                    )
                );
            ,
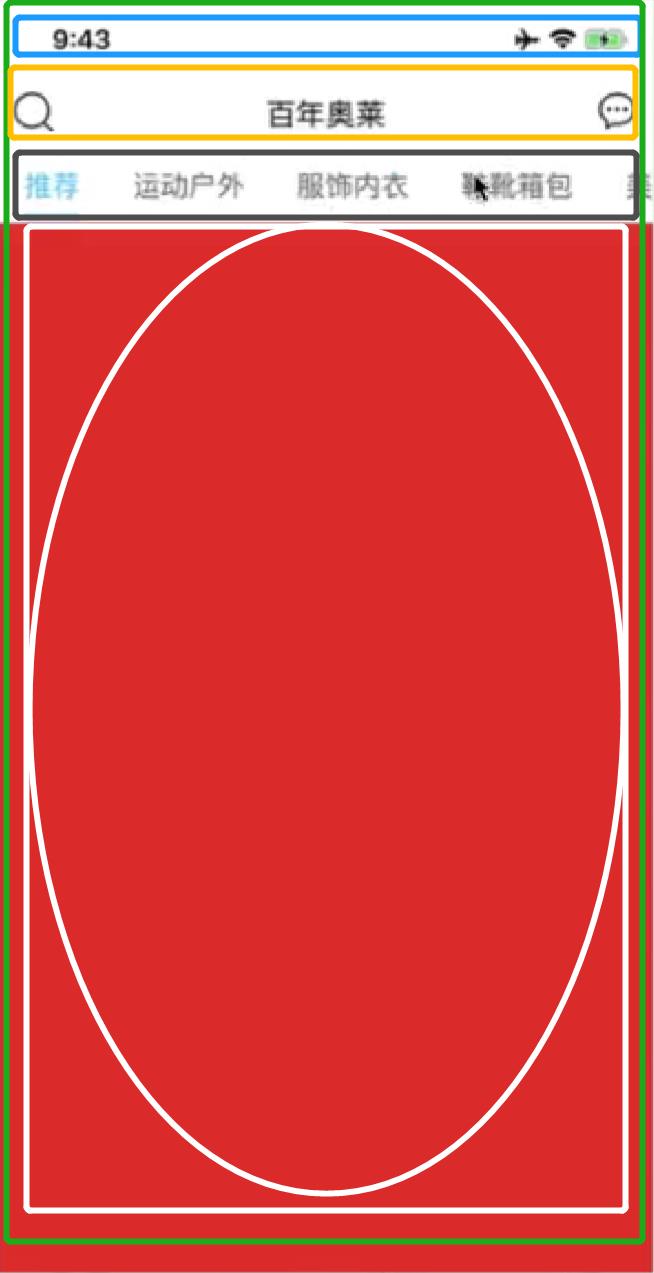
三、减掉的部分
白色部分=绿色部分(windowHeight)-蓝色部分(ios44,Android48)-橙色部分(getSystemInfoSync中的statusBarHeight)-黑色部分(你设置的高度或者使用组件的高度,注意单位是px)
windowHeight | 可使用窗口高度 |
statusBarHeight | 手机状态栏的高度 |
减去

代码:
        getBarHeight()
                const res = uni.getSystemInfoSync()
                if(res.platform==='ios')
                    return 44+res.statusBarHeight
                else if(res.platform==='android')
                    return 48+res.statusBarHeight
                else
                    return 0;

            ,
            //获取可视区域高度
            getClineHeight()
                const res = uni.getSystemInfo(
                    success:(res=>
                        this.clientHeight = res.windowHeight-uni.upx2px(80)-this.getBarHeight();
                    )
                );
            ,
JS获取浏览器可视区域的尺寸
一、
所谓可视区域是指能看得见的区域,即在浏览器中能看到页面的区域(高度与宽度)。刚刚使用 document.body.clientHeight 来获取可视区域的高度得到的却是整个文档的高度,然后在cnblogs.com的一篇文章中获知需要通过 document.documentElement.clientHeight 才能获取到浏览器的可视区域的高度,顺便将该文章摘下来,如下:
在没有声明DOCTYPE的IE中,浏览器显示窗口大小只能以下获取:
document.body.offsetWidth、document.body.clientWidthdocument.body.offsetHeight、document.body.clientHeightbody{margin:0; padding:0; font:12px/1.5 arial; height:2001px; width:2000px;}
//chrome测试,窗口手动改变大小,随随之改变的有:
//声明了DOCTYPE
document.documentElement.clientHeight

document.documentElement.offsetWidth
document.documentElement.clientWidth

//没有声明了DOCTYPE
document.body.clientHeight
document.body.clientWidth
document.documentElement.clientWidth
document.documentElement.offsetWidth
在声明了DOCTYPE的浏览器中,可以用以下来获取浏览器显示窗口大小:
document.documentElement.clientWidthdocument.documentElement.clientHeightIE,FF,Safari皆支持该方法,opera虽支持该属性,但是返回的是页面尺寸;
同时,除了IE以外的所有浏览器都将此信息保存在window对象中,可以用以下获取:
window.innerWidthwindow.innerHeight
网页可见区域宽: document.body.clientWidth;
网页可见区域高: document.body.clientHeight;
网页可见区域高: document.body.offsetWidth; //包括边线的宽
网页可见区域高: document.body.offsetHeight; //包括边线的宽
网页正文全文宽: document.body.scrollWidth;
网页正文全文高: document.body.scrollHeight;
网页被卷去的高: document.body.scrollTop;
网页被卷去的左: document.body.scrollLeft;
网页正文部分上: window.screenTop;
网页正文部分左: window.screenLeft;
屏幕分辨率的高: window.screen.height;
屏幕分辨率的宽: window.screen.width;
屏幕可用工作区高度: window.screen.availHeight;
屏幕可用工作区宽度: window.screen.availWidth;clientX 设置或获取鼠标指针位置相对于窗口客户区域的 x 坐标,其中客户区域不包括窗口自身的控件和滚动条。
clientY 设置或获取鼠标指针位置相对于窗口客户区域的 y 坐标,其中客户区域不包括窗口自身的控件和滚动条。offsetX 设置或获取鼠标指针位置相对于触发事件的对象的 x 坐标。offsetY 设置或获取鼠标指针位置相对于触发事件的对象的 y 坐标。screenX 设置或获取获取鼠标指针位置相对于用户屏幕的 x 坐标。screenY 设置或获取鼠标指针位置相对于用户屏幕的 y 坐标。x 设置或获取鼠标指针位置相对于父文档的 x 像素坐标。y 设置或获取鼠标指针位置相对于父文档的 y 像素坐标。页面向上向下滚动,分享到的模块随着滑动。
要点:
var scrtop =document.documentElement.scrollTop||document.body.scrollTop;
var height = document.documentElement.clientHeight||document.body.clientHeight;
var top = scrtop + (height - share.offsetHeight)/2;
top = parseInt(top);
获得页面垂直居中的位置
<!DOCTYPE html>
<html>
<head>
<meta charset="gb2312" />
<title>无标题文档</title>
<style>
body{margin:0; padding:0; font:12px/1.5 arial; height:2001px;width:2000px;}
#share{width:100px; height:200px; line-height:200px; text-align:center; border:1p solid #ccc; background:#f5f5f5; position:absolute; left:-100px; top:0;}
#share_tit{position:absolute; right:-20px; top:60px; width:20px; height:60px; padding:10px 0; background:#06c; text-align:center; line-height:18px; color:#fff;}
</style>
<script>
/*jingangel http://www.cnblogs.com/jingangel/ */
window.onload = function(){
  var share = document.getElementById("share");
    share.onmouseover = function(){
      startrun(share,0,"left")
    }
    share.onmouseout = function(){
      startrun(share,-100,"left")
    }
        window.onscroll = window.onresize = function(){
            var scrtop =document.documentElement.scrollTop||document.body.scrollTop;
            var height = document.documentElement.clientHeight||document.body.clientHeight;
            var top = scrtop + (height - share.offsetHeight)/2;
            top = parseInt(top);
            startrun(share,top,"top")
        }
}

var timer = null
function startrun(obj,target,direction){
    clearInterval(timer);
    timer = setInterval(function(){
      var speed = 0;

                if(direction == "left"){
                    speed = (target-obj.offsetLeft)/8;
                    speed = speed>0?Math.ceil(speed):Math.floor(speed);

                    if(obj.offsetLeft == target){
                        clearInterval(timer);
                    }else{
                        obj.style.left = obj.offsetLeft + speed + "px";
                    }
                }

                 if(direction == "top"){
                    speed = (target-obj.offsetTop)/8;
                    speed = speed>0?Math.ceil(speed):Math.floor(speed);

                    if(obj.offsetTop == target){
                        clearInterval(timer);
                    }else{
                        obj.style.top = obj.offsetTop + speed + "px";
                    }
                    document.title = obj.offsetTop + \',\' + target + \',\' +speed;
                }

    },30)
}
</script>
</head>

<body>

<div id="share">
  分享到内容
  <span id="share_tit">分享到</span>
</div>

</body>
</html>
以上是关于在uniapp中获取可视区域的高度(uni.getSystemInfo)的主要内容,如果未能解决你的问题,请参考以下文章