Tungsten Fabric SDN — within AWS EKS
Posted 范桂飓
tags:
篇首语:本文由小常识网(cha138.com)小编为大家整理,主要介绍了Tungsten Fabric SDN — within AWS EKS相关的知识,希望对你有一定的参考价值。
目录
文章目录
- 目录
- Contrail within AWS EKS
- AWS EKS Quick Start + Contrail SDN CNI
- Install Contrail Networking as the CNI for EKS
Contrail within AWS EKS
AWS EKS 原生使用的 CNI 是 Amazon VPC CNI(amazon-vpc-cni-k8s),支持原生的 Amazon VPC networking。可实现自动创建 elastic network interfaces(弹性网络接口),并将其连接到 Amazon EC2 节点。同时,还实现了从 VPC 为每个 Pod 和 Service 分配专用的 IPv4/IPv6 地址。
Contrail within AWS EKS 用于在 AWS EKS 环境中安装 Contrail Networking 作为 CNI。
软件版本:
- AWS CLI 1.16.156 及以上
- EKS 1.16 及以上
- Kubernetes 1.18 及以上
- Contrail 2008 及以上
官方文档:https://www.juniper.net/documentation/en_US/contrail20/topics/task/installation/how-to-install-contrail-aws-eks.html
视频教程:https://www.youtube.com/playlist?list=PLBO-FXA5nIK_Xi-FbfxLFDCUx4EvIy6_d
AWS EKS Quick Start + Contrail SDN CNI
- AWS EKS Quick Start
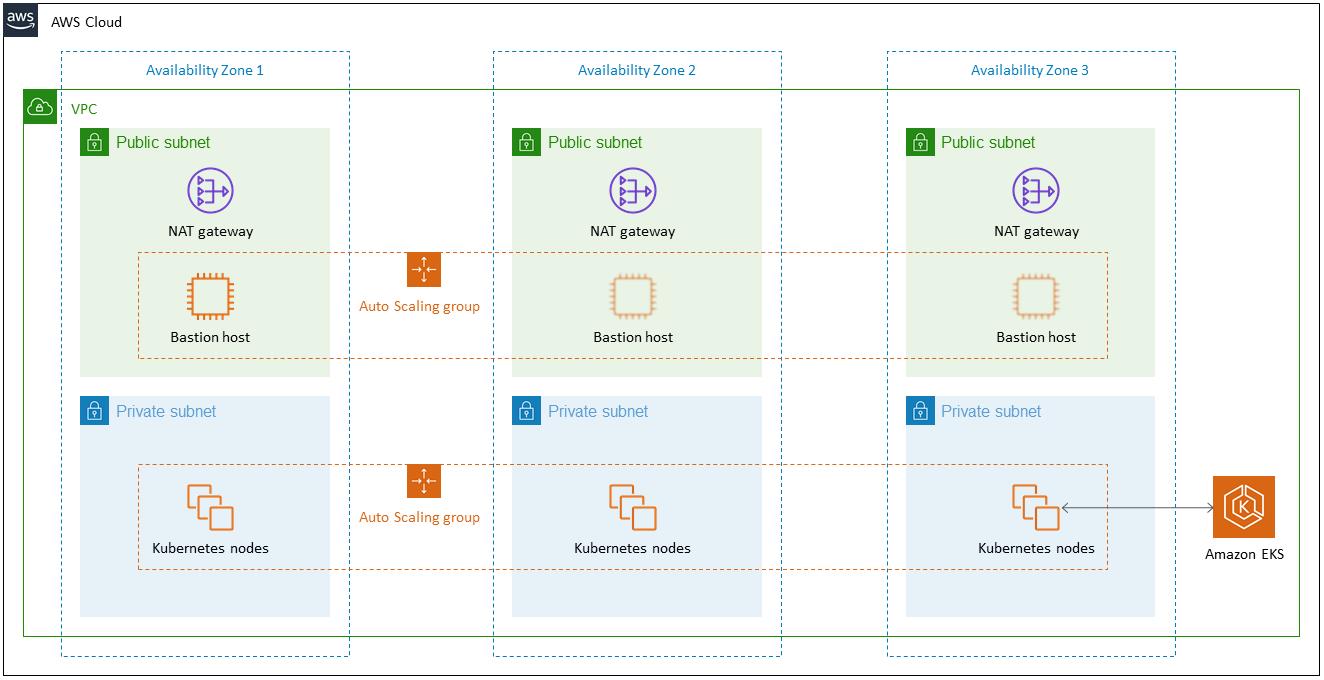
- AWS EKS Quick Start + Contrail SDN CNI
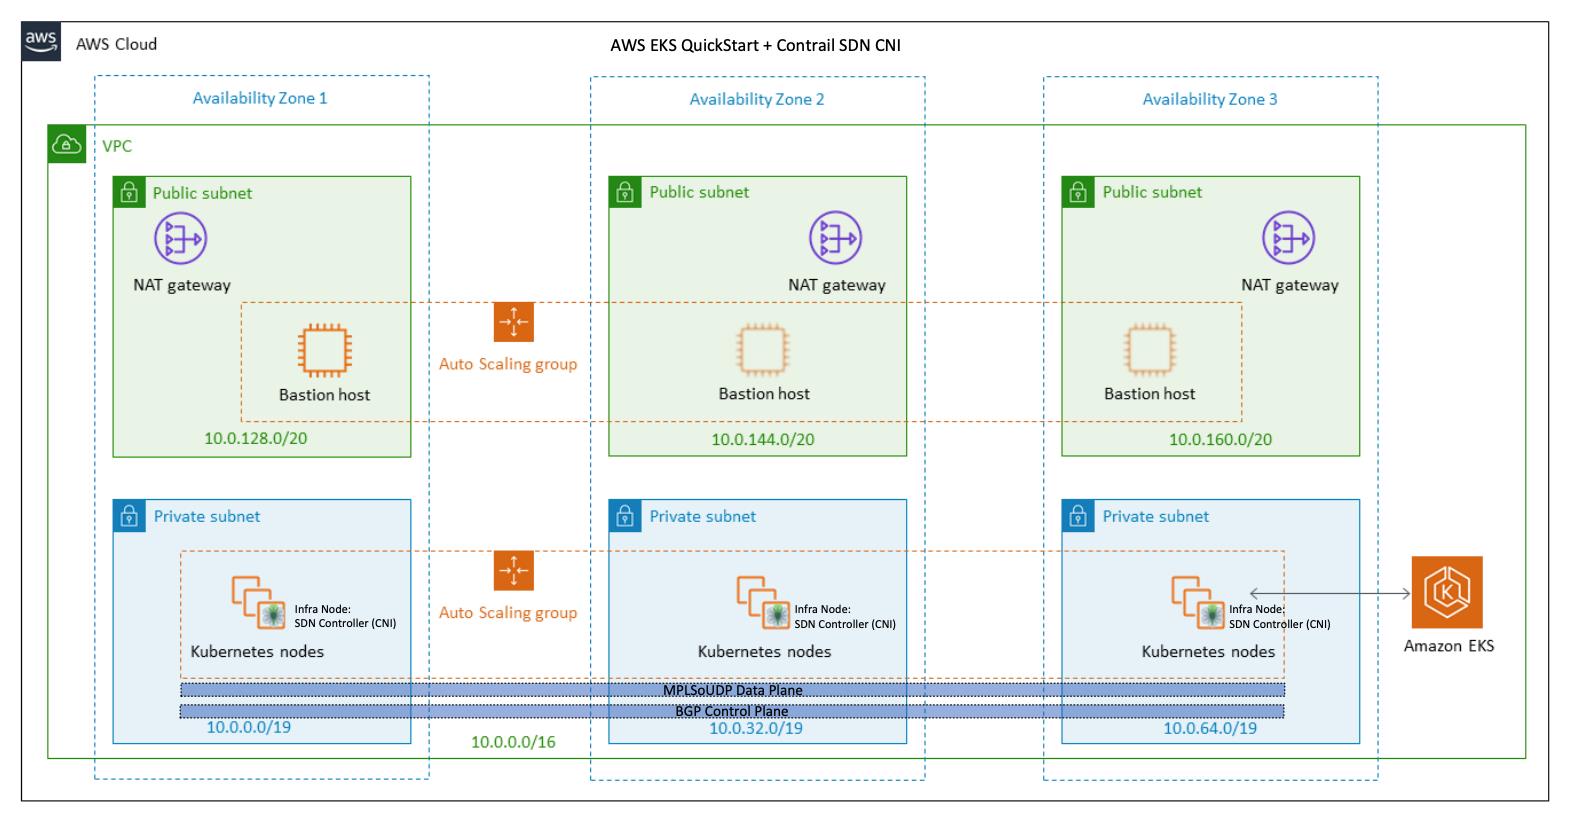
AWS EKS Quick Start + Contrail SDN CNI 部署包括下列内容:
- 一个跨 3 个 AZ 的高度可用的架构。
- 一个包含了 Public 和 Private Subnet 的 VPC。
- 在 Public Subnet 上托管 NAT Gateway,继而允许 Private Subnet 可以访问 Internet。
- 在一个 Public Subnet 内的 Auto Scaling Group 中托管 Bastion Host(Linux 堡垒机),继而允许对 Private Subnet 中的 EC2 instances 进行 SSH 访问。Bastion Host 还配置有 kubectl 命令行。
- 提供 Kubernetes Control Plane 的 Amazon EKS cluster。
- 在 Private Subnet 中托管一组 Kubernetes Worker nodes。
- 在 Kubernetes Worker nodes 中部署了 Contrail Networking SDN Controller & vRouter。
- 通过 Contrail SDN 支持 BGP Control Plane 和 MPLSoUDP Overlay Data Plane。
Install Contrail Networking as the CNI for EKS
- 安装 AWS CLI v2(文档:https://docs.aws.amazon.com/zh_cn/cli/latest/userguide/cli-chap-welcome.html)
$ curl "https://awscli.amazonaws.com/awscli-exe-linux-x86_64.zip" -o "awscliv2.zip"
$ unzip awscliv2.zip
$ sudo ./aws/install

$ aws --version
aws-cli/2.7.23 Python/3.9.11 Linux/3.10.0-1160.66.1.el7.x86_64 exe/x86_64.centos.7 prompt/off

$ aws configure
AWS Access Key ID [None]: XX
AWS Secret Access Key [None]: XX
Default region name [None]: us-east-1
Default output format [None]: json
这里选择使用 us-east-1 作为 Default Region。注意,根据个人账户的情况,可能无法使用 ap-east-1 Region。
- 安装 Kubectl v1.21(文档:https://docs.aws.amazon.com/zh_cn/eks/latest/userguide/install-kubectl.html)
# 检查是否已经安装 kubectl,如果安装了则需要先删除。
$ kubectl version | grep Client | cut -d : -f 5

# 安装指定版本的 kubectl。
$ curl -o kubectl https://s3.us-west-2.amazonaws.com/amazon-eks/1.21.2/2021-07-05/bin/linux/amd64/kubectl
$ chmod +x ./kubectl
$ mkdir -p $HOME/bin && cp ./kubectl $HOME/bin/kubectl && export PATH=$PATH:$HOME/bin
$ echo 'export PATH=$PATH:$HOME/bin' >> ~/.bashrc
$ kubectl version --short --client
Client Version: v1.21.2-13+d2965f0db10712
- 创建 EC2 密钥对(文档:https://docs.aws.amazon.com/zh_cn/AWSEC2/latest/UserGuide/ec2-key-pairs.html)
$ aws ec2 create-key-pair \\
    --key-name ContrailKey \\
    --key-type rsa \\
    --key-format pem \\
    --query "KeyMaterial" \\
    --output text > ./ContrailKey.pem

$ chmod 400 ContrailKey.pem

- Download the EKS deployer:
wget https://s3-eu-central-1.amazonaws.com/contrail-one-click-deployers/EKS-Scripts.zip -O EKS-Scripts.zip
unzip EKS-Scripts.zip
cd contrail-as-the-cni-for-aws-eks/
- 编辑 variables.sh 文件中的变量。
- CLOUDFORMATIONREGION:指定 CloudFormation 的 AWS Region,这里使用和 EC2 一致的 us-east-1。CloudFormation 会使用 Quickstart Tools 将 EKS 部署到该 Region。
- S3QUICKSTARTREGION:制定 S3 bucket 的 AWS Region,这里使用和 EC2 一致的 us-east-1。
- JUNIPERREPONAME:指定允许访问 Contrail image repository 的 Username。
- JUNIPERREPOPASS:指定允许访问 Contrail image repository 的 Password。
- RELEASE:指定 Contrail 的 Release Contrail container image tag。
- EC2KEYNAME:指定 AWS Region 中现有的 keyname。
- BASTIONSSHKEYPATH:指定本地存放 AWS EC2 SSH Key 的路径。
$ vi variables.sh

###############################################################################
#complete the below variables for your setup and run the script
###############################################################################
#this is the aws region you are connected to and want to deploy EKS and Contrail into
export CLOUDFORMATIONREGION="us-east-1"
#this is the region for my quickstart, only change if you plan to deploy your own quickstart
export S3QUICKSTARTREGION="us-east-1"
export LOGLEVEL="SYS_DEBUG"
#example Juniper docker login, change to yours
export JUNIPERREPONAME="XX"
export JUNIPERREPOPASS="XX"
export RELEASE="2008.121"
export K8SAPIPORT="443"
export PODSN="10.0.1.0/24"
export SERVICESN="10.0.2.0/24"
export FABRICSN="10.0.3.0/24"
export ASN="64513"
export MYEMAIL="example@mail.com"
#example key, change these two to your existing ec2 ssh key name and private key file for the region
#also don't forget to chmod 0400 [your private key]
export EC2KEYNAME="ContrailKey"
export BASTIONSSHKEYPATH="/root/aws/ContrailKey.pem"
- Deploy the cloudformation-resources.sh file:
$ vi cloudformation-resources.sh
...
if [ $(aws iam list-roles --query "Roles[].RoleName" | grep CloudFormation-Kubernetes-VPC | sed 's/"//g' | sed 's/,//g' | xargs) = "CloudFormation-Kubernetes-VPC" ]; then
    #export ADDROLE="false"
    export ADDROLE="Disabled"
else
    #export ADDROLE="true"
    export ADDROLE="Enabled"
fi
...


$ ./cloudformation-resources.sh
./cloudformation-resources.sh: 第 2 行:[: =: 期待一元表达式

    "StackId": "arn:aws:cloudformation:us-east-1:805369193666:stack/awsqs-eks-cluster-resource/8aedfea0-1d22-11ed-8904-0a73b9f64f57"


    "StackId": "arn:aws:cloudformation:us-east-1:805369193666:stack/awsqs-kubernetes-helm-resource/5e6503e0-1d24-11ed-90da-12f2079f0ffd"

waiting for cloudformation stack awsqs-kubernetes-helm-resource to complete
waiting for cloudformation stack awsqs-kubernetes-helm-resource to complete
waiting for cloudformation stack awsqs-kubernetes-helm-resource to complete
waiting for cloudformation stack awsqs-kubernetes-helm-resource to complete
waiting for cloudformation stack awsqs-kubernetes-helm-resource to complete
waiting for cloudformation stack awsqs-kubernetes-helm-resource to complete
waiting for cloudformation stack awsqs-kubernetes-helm-resource to complete
All Done

-
修改 contrail-as-the-cni-for-aws-eks/quickstart-amazon-eks/templates 下的 YAML 文件,使其支持较新的 K8s v1.21 版本。
-
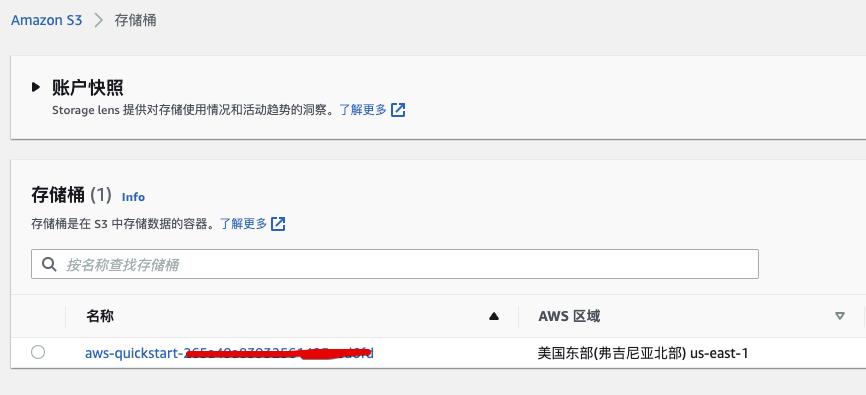
创建 Amazon-EKS-Contrail-CNI CloudFormation Template 的 S3 bucket。
$ vi mk-s3-bucket.sh
...
#S3REGION="eu-west-1"
S3REGION="us-east-1"

$ ./mk-s3-bucket.sh
************************************************************************************
This script is for the admins, you do not need to run it.
It creates a public s3 bucket if needed and pushed the quickstart git repo up to it
************************************************************************************
ok lets get started...
Are you an admin on the SRE aws account and want to push up the latest quickstart to S3? [y/n] y
ok then lets proceed...
Creating the s3 bucket
make_bucket: aws-quickstart-XX
...
...
********************************************

Your quickstart bucket name will be
********************************************
https://s3-us-east-1.amazonaws.com/aws-quickstart-XX
********************************************************************************************************************
**I recommend going to the console, highlighting your quickstart folder directory and clicking action->make public**
**otherwise you may see permissions errors when running from other accounts                                       **
********************************************************************************************************************
- From the AWS CLI, deploy the EKS quickstart stack.
$ ll quickstart-amazon-eks/
$ ll *.patch
-rw-r--r-- 1 root root  2163 10月  6 2020 patch1-amazon-eks-iam.patch
-rw-r--r-- 1 root root  1610 10月  6 2020 patch2-amazon-eks-master.patch
-rw-r--r-- 1 root root 12204 10月  6 2020 patch3-amazon-eks-nodegroup.patch
-rw-r--r-- 1 root root   381 10月  6 2020 patch4-amazon-eks.patch
-rw-r--r-- 1 root root  2427 10月  6 2020 patch5-functions.patch


$ vi eks-ubuntu.sh

source ./variables.sh
aws cloudformation create-stack \\
  --capabilities CAPABILITY_IAM \\
  --stack-name Amazon-EKS-Contrail-CNI \\
  --disable-rollback \\
  --template-url https://aws-quickstart-XX.s3.amazonaws.com/quickstart-amazon-eks/templates/amazon-eks-master.template.yaml \\
  --parameters \\
ParameterKey=AvailabilityZones,ParameterValue="$CLOUDFORMATIONREGIONa\\,$CLOUDFORMATIONREGIONb\\,$CLOUDFORMATIONREGIONc" \\
ParameterKey=KeyPairName,ParameterValue=$EC2KEYNAME \\
ParameterKey=RemoteAccessCIDR,ParameterValue="0.0.0.0/0" \\
ParameterKey=NodeInstanceType,ParameterValue="m5.2xlarge" \\
ParameterKey=NodeVolumeSize,ParameterValue="100" \\
ParameterKey=NodeAMios,ParameterValue="UBUNTU-EKS-HVM" \\
ParameterKey=QSS3BucketRegion,ParameterValue=$S3QUICKSTARTREGION \\
ParameterKey=QSS3BucketName,ParameterValue="aws-quickstart-XX" \\
ParameterKey=QSS3KeyPrefix,ParameterValue="quickstart-amazon-eks/" \\
ParameterKey=VPCCIDR,ParameterValue="100.72.0.0/16" \\
ParameterKey=PrivateSubnet1CIDR,ParameterValue="100.72.0.0/25" \\
ParameterKey=PrivateSubnet2CIDR,ParameterValue="100.72.0.128/25" \\
ParameterKey=PrivateSubnet3CIDR,ParameterValue="100.72.1.0/25" \\
ParameterKey=PublicSubnet1CIDR,ParameterValue="100.72.1.128/25" \\
ParameterKey=PublicSubnet2CIDR,ParameterValue="100.72.2.0/25" \\
ParameterKey=PublicSubnet3CIDR,ParameterValue="100.72.2.128/25" \\
ParameterKey=NumberOfNodes,ParameterValue="5" \\
ParameterKey=MaxNumberOfNodes,ParameterValue="5" \\
ParameterKey=EKSPrivateAccessEndpoint,ParameterValue="Enabled" \\
ParameterKey=EKSPublicAccessEndpoint,ParameterValue="Enabled"
while [[ $(aws cloudformation describe-stacks --stack-name Amazon-EKS-Contrail-CNI --query "Stacks[].StackStatus" --output text) != "CREATE_COMPLETE" ]];
do
     echo "waiting for cloudformation stack Amazon-EKS-Contrail-CNI to complete. This can take up to 45 minutes"
     sleep 60
done
echo "All Done"


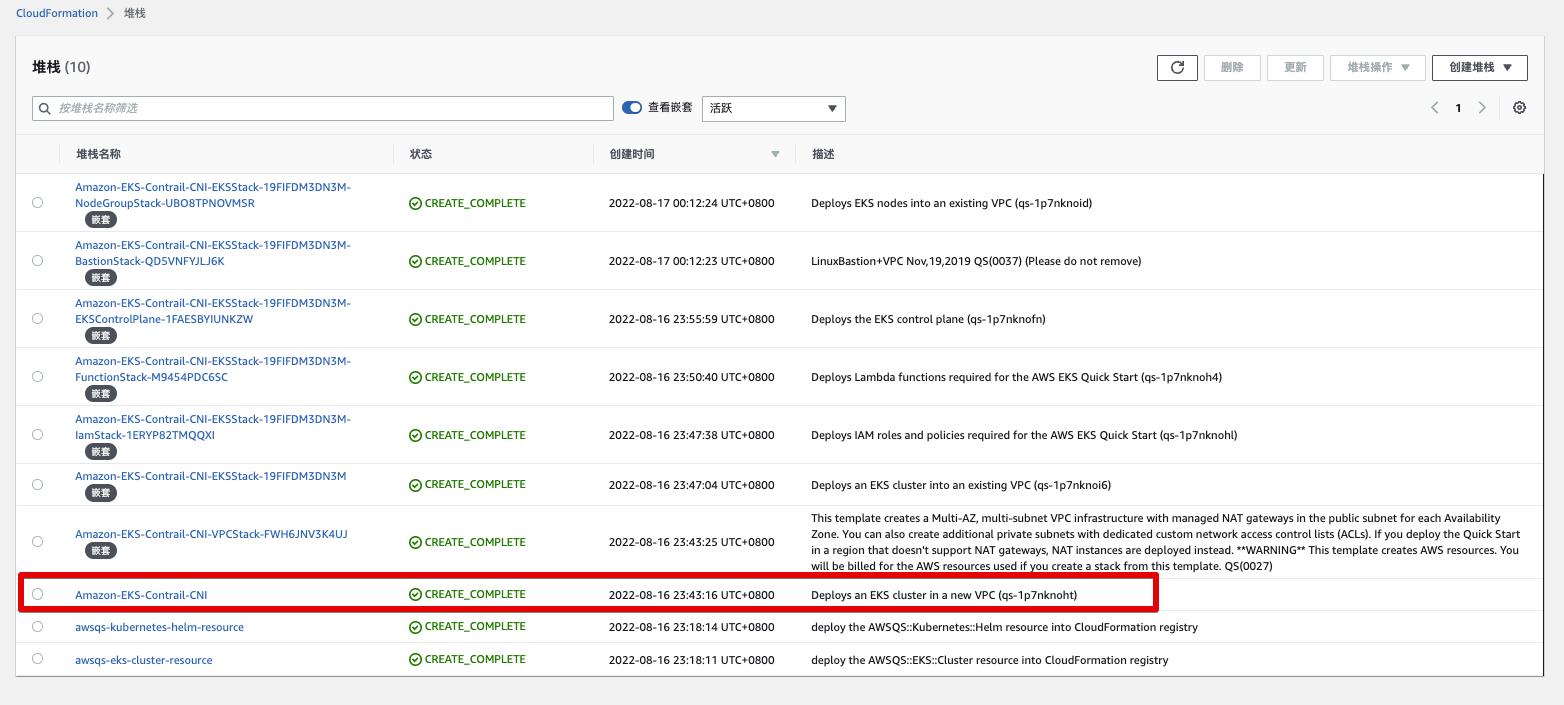
$ ./eks-ubuntu.sh

    "StackId": "arn:aws:cloudformation:us-east-1:805369193666:stack/Amazon-EKS-Contrail-CNI/3e6b2c80-1d25-11ed-9c50-0ae926948d21"

waiting for cloudformation stack Amazon-EKS-Contrail-CNI to complete. This can take up to 45 minutes
NOTE:contrail-as-the-cni-for-aws-eks 提供的 quickstart-amazon-eks(https://github.com/aws-quickstart/quickstart-amazon-eks)经过了 Contrail 二次开发的,有 5 个 patches 文件。
quickstart-amazon-eks 提供了大量的 CloudFormation EKS Template 文件,我们使用到的 amazon-eks-master.template.yaml。
-
CloudFormation Stack
-
EKS Cluster(Control Plane)

-
EC2 Worker Nodes(Data Plane)

-
VPC Network

-
VPC Subnet

-
VPC Route

-
VPC NAT Gateway

-
VPC Internet Gateway

-
VPC Network for EKS cluster
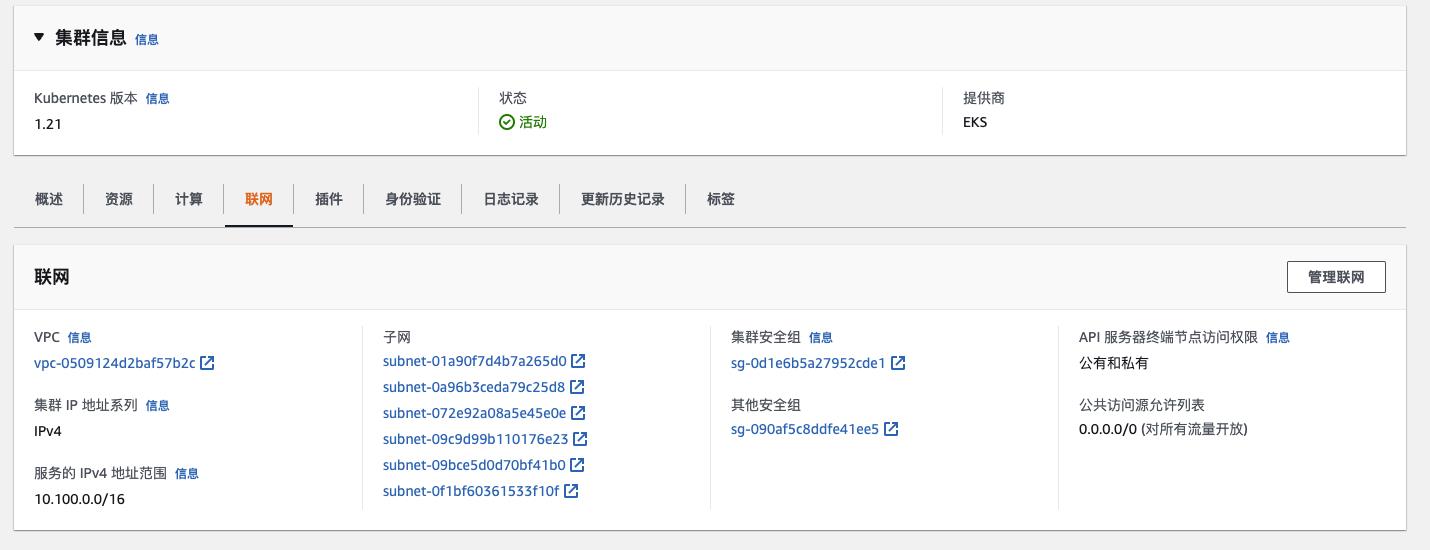
-
VPC Network for Worker Nodes

-
Worker Node ENIs

- 配置 kubeclt
$ aws eks get-token --cluster-name EKS-TPTKAJ8Z
$ aws eks update-kubeconfig --region us-east-1 --name EKS-TPTKAJ8Z

# 测试
$ kubectl get svc
NAME         TYPE        CLUSTER-IP   EXTERNAL-IP   PORT(S)   AGE
kubernetes   ClusterIP   10.100.0.1   <none>        443/TCP   43m
- From the Kubernetes CLI, verify your cluster parameters
$ kubectl get nodes
NAME                           STATUS   ROLES    AGE   VERSION
ip-100-72-0-121.ec2.internal   Ready    <none>   34m   v1.14.8
ip-100-72-0-145.ec2.internal   Ready    <none>   35m   v1.14.8
ip-100-72-1-73.ec2.internal    Ready    <none>   34m   v1.14.8

$ kubectl get pods -A -o wide
NAMESPACE     NAME                       READY   STATUS    RESTARTS   AGE   IP             NODE                           NOMINATED NODE   READINESS GATES
kube-system   aws-node-fttlp             1/1     Running   0          35m   100.72.0.121   ip-100-72-0-121.ec2.internal   <none>           <none>
kube-system   aws-node-h5qgk             1/1     Running   0          35m   100.72.0.145   ip-100-72-0-145.ec2.internal   <none>           <none>
kube-system   aws-node-xxspc             1/1     Running   0          35m   100.72.1.73    ip-100-72-1-73.ec2.internal    <none>           <none>
kube-system   coredns-66cb55d4f4-jw754   1/1     Running   0          44m   100.72.0.248   ip-100-72-0-145.ec2.internal   <none>           <none>
kube-system   coredns-66cb55d4f4-qxb92   1/1     Running   0          44m   100.72.0.52    ip-100-72-0-121.ec2.internal   <none>           <none>
kube-system   kube-proxy-7gb5m           1/1     Running   0          35m   100.72.1.73    ip-100-72-1-73.ec2.internal    <none>           <none>
kube-system   kube-proxy-88shx           1/1     Running   0          35m   100.72.0.145   ip-100-72-0-145.ec2.internal   <none>           <none>
kube-system   kube-proxy-kfb4w           1/1     Running   0          35m   100.72.0.121   ip-100-72-0-121.ec2.internal   <none>           <none>
- Upgrade the worker nodes to the latest EKS version:
$ kubectl apply -f upgrade-nodes.yaml

$ kubectl get nodes -A
NAME                           STATUS   ROLES    AGE   VERSION
ip-100-72-0-121.ec2.internal   Ready    <none>   46m   v1.16.15
ip-100-72-0-145.ec2.internal   Ready    <none>   46m   v1.16.15
ip-100-72-1-73.ec2.internal    Ready    <none>   46m   v1.16.15
- After confirming that the EKS version is updated on all nodes, delete the upgrade pods:
$ kubectl delete -f upgrade-nodes.yaml
- Apply the OS fixes for the EC2 worker nodes for Contrail Networking:
$ kubectl apply -f cni-patches.yaml
- Deploy Contrail Networking as the CNI for EKS
$ ./deploy-me.sh
The pod subnet assigned in eks is 10.0.1.0/24
The service subnet assigned in eks is 10.0.2.0/24
The fabric subnet assigned in eks is 10.0.3.0/24
the EKS cluster is EKS-TPTKAJ8Z
The EKS API is 7F1DBBFB9B553DCA211DBCF9FCCBD2CA.gr7.us-east-1.eks.amazonaws.com
EKS node pool, node 1 private ip 100.72.0.121
EKS node pool, node 2 private ip 100.72.0.145
EKS node pool, node 3 private ip 100.72.1.73
The Bastion public IP is
The contrail cluster ASN is 64513
building your cni configuration as file contrail-eks-out.yaml
replacing the AWS CNI with the Contrail SDN CNI
daemonset.apps "aws-node" deleted
node/ip-100-72-0-121.ec2.internal labeled
node/ip-100-72-0-145.ec2.internal labeled
node/ip-100-72-1-73.ec2.internal labeled
secret/contrail-registry created
configmap/cni-patches-config unchanged
daemonset.apps/cni-patches unchanged
configmap/env created
configmap/defaults-env created
configmap/configzookeeperenv created
configmap/nodemgr-config created
configmap/contrail-analyticsdb-config created
configmap/contrail-configdb-config created
configmap/rabbitmq-config created
configmap/kube-manager-config created
daemonset.apps/config-zookeeper created
daemonset.apps/contrail-analyticsdb created
daemonset.apps/contrail-configdb created
daemonset.apps/contrail-analytics created
daemonset.apps/contrail-analytics-snmp created
daemonset.apps/contrail-analytics-alarm created
daemonset.apps/contrail-controller-control created
daemonset.apps/contrail-controller-config created
daemonset.apps/contrail-controller-webui created
daemonset.apps/redis created
daemonset.apps/rabbitmq created
daemonset.apps/contrail-kube-manager created
daemonset.apps/contrail-agent created
clusterrole.rbac.authorization.k8s.io/contrail-kube-manager created
serviceaccount/contrail-kube-manager created
clusterrolebinding.rbac.authorization.k8s.io/contrail-kube-manager created
secret/contrail-kube-manager-token created
checking pods are up
waiting for pods to show up
...


$ kubectl get pods -A -o wide
NAMESPACE     NAME                                READY   STATUS    RESTARTS   AGE     IP             NODE                           NOMINATED NODE   READINESS GATES
kube-system   cni-patches-fgxwl                   1/1     Running   0          19m     100.72.1.73    ip-100-72-1-73.ec2.internal    <none>           <none>
kube-system   cni-patches-fjdl4                   1/1     Running   0          19m     100.72.0.121   ip-100-72-0-121.ec2.internal   <none>           <none>
kube-system   cni-patches-s5vl8                   1/1     Running   0          19m     100.72.0.145   ip-100-72-0-145.ec2.internal   <none>           <none>
kube-system   config-zookeeper-gkrcx              1/1     Running   0          7m45s   100.72.0.145   ip-100-72-0-145.ec2.internal   <none>           <none>
kube-system   config-zookeeper-gs2sj              1/1     Running   0          7m46s   100.72.0.121   ip-100-72-0-121.ec2.internal   <none>           <none>
kube-system   config-zookeeper-xm5wx              1/1     Running   0          7m46s   100.72.1.73    ip-100-72-1-73.ec2.internal    <none>           <none>
kube-system   contrail-agent-ctclp                3/3     Running   2          6m33s   100.72.0.121   ip-100-72-0-121.ec2.internal   <none>           <none>
kube-system   contrail-agent-hn5qq                3/3     Running   2          6m33s   100.72.0.145   ip-100-72-0-145.ec2.internal   <none>           <none>
kube-system   contrail-agent-vk5v4                3/3     Running   2          6m32s   100.72.1.73    ip-100-72-1-73.ec2.internal    <none>           <none>
kube-system   contrail-analytics-alarm-fx4s6      4/4     Running   2          5m29s   100.72.0.121   ip-100-72-0-121.ec2.internal   <none>           <none>
kube-system   contrail-analytics-alarm-rj6mk      4/4     Running   1          5m29s   100.72.0.145   ip-100-72-0-145.ec2.internal   <none>           <none>
kube-system   contrail-analytics-alarm-sxcm2      4/4     Running   1          5m29s   100.72.1.73    ip-100-72-1-73.ec2.internal    <none>           <none>
kube-system   contrail-analytics-hvnwd            4/4     Running   2          5m45s   100.72.1.73    ip-100-72-1-73.ec2.internal    <none>           <none>
kube-system   contrail-analytics-nfxjq            4/4     Running   2          5m48s   100.72.0.145   ip-100-72-0-145.ec2.internal   <none>           <none>
kube-system   contrail-analytics-rn98q            4/4     Running   2          5m47s   100.72.0.121   ip-100-72-0-121.ec2.internal   <none>           <none>
kube-system   contrail-analytics-snmp-hhs8d       4/4     Running   2          5m9s    100.72.0.145   ip-100-72-0-145.ec2.internal   <none>           <none>
kube-system   contrail-analytics-snmp-x2z8l       4/4     Running   2          5m13s   100.72.1.73    ip-100-72-1-73.ec2.internal    <none>           <none>
kube-system   contrail-analytics-snmp-xdcdw       4/4     Running   2          5m13s   100.72.0.121   ip-100-72-0-121.ec2.internal   <none>           <none>
kube-system   contrail-analyticsdb-5ztrc          4/4     Running   1          4m59s   100.72.0.121   ip-100-72-0-121.ec2.internal   <none>           <none>
kube-system   contrail-analyticsdb-f8nw8          4/4     Running   1          4m58s   100.72.1.73    ip-100-72-1-73.ec2.internal    <none>           <none>
kube-system   contrail-analyticsdb-ngr68          4/4     Running   1          4m59s   100.72.0.145   ip-100-72-0-145.ec2.internal   <none>           <none>
kube-system   contrail-configdb-49qtm             3/3     Running   1          4m38s   100.72.0.145   ip-100-72-0-145.ec2.internal   <none>           <none>
kube-system   contrail-configdb-bgkxk             3/3     Running   1          4m42s   100.72.0.121   ip-100-72-0-121.ec2.internal   <none>           <none>
kube-system   contrail-configdb-jjqzz             3/3     Running   1          4m34s   100.72.1.73    ip-100-72-1-73.ec2.internal    <none>           <none>
kube-system   contrail-controller-config-65tnk    6/6     Running   1          4m30s   100.72.0.145   ip-100-72-0-145.ec2.internal   <none>           <none>
kube-system   contrail-controller-config-9gf52    6/6     Running   1          4m23s   100.72.0.121   ip-100-72-0-121.ec2.internal   <none>           <none>
kube-system   contrail-controller-config-jb7zf    6/6     Running   1          4m30s   100.72.1.73    ip-100-72-1-73.ec2.internal    <none>           <none>
kube-system   contrail-controller-control-92csc   5/5     Running   0          4m19s   100.72.0.121   ip-100-72-0-121.ec2.internal   <none>           <none>
kube-system   contrail-controller-control-bsh6n   5/5     Running   0          4m17s   100.72.1.73    ip-100-72-1-73.ec2.internal    <none>           <none>
kube-system   contrail-controller-control-qbr6x   5/5     Running   0          4m18s   100.72.0.145   ip-100-72-0-145.ec2.internal   <none>           <none>
kube-system   contrail-controller-webui-9jzhv     2/2     Running   4          4m5s    100.72.0.145   ip-100-72-0-145.ec2.internal   <none>           <none>
kube-system   contrail-controller-webui-ldhww     2/2     Running   4          4m6s    100.72.0.121   ip-100-72-0-121.ec2.internal   <none>           <none>
kube-system   contrail-controller-webui-nd2zb     2/2     Running   4          4m6s    100.72.1.73    ip-100-72-1-73.ec2.internal    <none>           <none>
kube-system   contrail-kube-manager-d22v7         1/1     Running   0          3m52s   100.72.0.145   ip-100-72-0-145.ec2.internal   <none>           <none>
kube-system   contrail-kube-manager-fcm9t         1/1     Running   0          3m53s   100.72.0.121   ip-100-72-0-121.ec2.internal   <none>           <none>
kube-system   contrail-kube-manager-tcwj7         1/1     Running   0          3m52s   100.72.1.73    ip-100-72-1-73.ec2.internal    <none>           <none>
kube-system   coredns-66cb55d4f4-jw754            1/1     Running   1          76m     100.72.0.248   ip-100-72-0-145.ec2.internal   <none>           <none>
kube-system   coredns-66cb55d4f4-qxb92            1/1     Running   1          76m     100.72.0.52    ip-100-72-0-121.ec2.internal   <none>           <none>
kube-system   kube-proxy-7gb5m                    1/1     Running   1          67m     100.72.1.73    ip-100-72-1-73.ec2.internal    <none>           <none>
kube-system   kube-proxy-88shx                    1/1     Running   1          67m     100.72.0.145   ip-100-72-0-145.ec2.internal   <none>           <none>
kube-system   kube-proxy-kfb4w                    1/1     Running   1          67m     100.72.0.121   ip-100-72-0-121.ec2.internal   <none>           <none>
kube-system   rabbitmq-2x5k8                      1/1     Running   0          2m42s   100.72.0.121   ip-100-72-0-121.ec2.internal   <none>           <none>
kube-system   rabbitmq-9kl4m                      1/1     Running   0          2m42s   100.72.1.73    ip-100-72-1-73.ec2.internal    <none>           <none>
kube-system   rabbitmq-knlrm                      1/1     Running   0          2m41s   100.72.0.145   ip-100-72-0-145.ec2.internal   <none>           <none>
kube-system   redis-d88zw                         1/1     Running   0          2m29s   100.72.0.121   ip-100-72-0-121.ec2.internal   <none>           <none>
kube-system   redis-x9v7c                         1/1     Running   0          2m24s   100.72.1.73    ip-100-72-1-73.ec2.internal    <none>           <none>
kube-system   redis-ztz45                         1/1     Running   0          2m30s   100.72.0.145   ip-100-72-0-145.ec2.internal   <none>           <none>
- Deploy the setup bastion to provide SSH access for worker nodes
$ ./setup-bastion.sh

$ kubectl get nodes -A -owide
NAME                           STATUS   ROLES   AGE   VERSION    INTERNAL-IP    EXTERNAL-IP   OS-IMAGE             KERNEL-VERSION    CONTAINER-RUNTIME
ip-100-72-0-121.ec2.internal   Ready    infra   89m   v1.16.15   100.72.0.121   <none>        Ubuntu 18.04.3 LTS   4.15.0-1054-aws   docker://17.3.2
ip-100-72-0-145.ec2.internal   Ready    infra   89m   v1.16.15   100.72.0.145   <none>        Ubuntu 18.04.3 LTS   4.15.0-1054-aws   docker://17.3.2
ip-100-72-1-73.ec2.internal    Ready    infra   89m   v1.16.15   100.72.1.73    <none>        Ubuntu 18.04.3 LTS   4.15.0-1054-aws   docker://17.3.2

$ ssh -i ContrailKey.pem ec2-user@EKSBastion_Public_IPaddress

###############################################################################
#     ___        ______     ___        _      _      ____  _             _    #
#    / \\ \\      / / ___|   / _ \\ _   _(_) ___| | __ / ___|| |_ __ _ _ __| |_  #
#   / _ \\ \\ /\\ / /\\___ \\  | | | | | | | |/ __| |/ / \\___ \\| __/ _` | '__| __| #
#  / ___ \\ V  V /  ___) | | |_| | |_| | | (__|   <   ___) | || (_| | |  | |_  #
# /_/   \\_\\_/\\_/  |____/   \\__\\_\\\\__,_|_|\\___|_|\\_\\ |____/ \\__\\__,_|_|   \\__| #
#-----------------------------------------------------------------------------#
#                      Amazon EKS Quick Start bastion host                    #
#    https://docs.aws.amazon.com/quickstart/latest/amazon-eks-architecture/   #
###############################################################################

       __|  __|_  )
       _|  (     /   Amazon Linux 2 AMI
      ___|\\___|___|

https://aws.amazon.com/amazon-linux-2/
No packages needed for security; 2 packages available
Run "sudo yum update" to apply all updates.

# 从 Bastion 访问 K8s worker nodes。
$ ssh ubuntu@100.72.0.121
$ ssh ubuntu@100.72.0.145
$ ssh ubuntu@100.72.1.73
- Run the Contrail setup file to provide a base Contrail Networking configuration:
$ ./setup-contrail.sh
checking pods are up
setting variables
node1 name ip-100-72-0-121.ec2.internal
node2 name ip-100-72-0-145.ec2.internal
node3 name ip-100-72-1-73.ec2.internal
node1 ip 100.72.0.121
set global config
Updated."global-vrouter-config": "href": "http://100.72.0.121:8082/global-vrouter-config/d5cca8bb-e594-4b0c-8a0c-874fa970ec6e", "uuid": "d5cca8bb-e594-4b0c-8a0c-874fa970ec6e"
GlobalVrouterConfig Exists Already!
Updated."global-vrouter-config": "href": "http://100.72.0.121:8082/global-vrouter-config/d5cca8bb-e594-4b0c-8a0c-874fa970ec6e", "uuid": "d5cca8bb-e594-4b0c-8a0c-874fa970ec6e"
Add route target to the default NS
Traceback (most recent call last):
File "/opt/contrail/utils/add_route_target.py", line 112, in <module>
main()
File "/opt/contrail/utils/add_route_target.py", line 108, in main
MxProvisioner(args_str)
File "/opt/contrail/utils/add_route_target.py", line 31, in __init__
self._args.route_target_number)
File "/opt/contrail/utils/provision_bgp.py", line 180, in add_route_target
net_obj = vnc_lib.virtual_network_read(fq_name=rt_inst_fq_name[:-1])
File "/usr/lib/python2.7/site-packages/vnc_api/vnc_api.py", line 58, in wrapper
return func(self, *args, **kwargs)
File "/usr/lib/python2.7/site-packages/vnc_api/vnc_api.py", line 704, in _object_read
res_type, fq_name, fq_name_str, id, ifmap_id)
File "/usr/lib/python2.7/site-packages/vnc_api/vnc_api.py", line 1080, in _read_args_to_id
return (True, self.fq_name_to_id(res_type, fq_name))
File "/usr/lib/python2.7/site-packages/vnc_api/vnc_api.py", line Tungsten Fabric SDN — 系统架构