SpringBoot整合Elasticsearch-Rest-Client测试保存复杂检索
Posted Mr.Aholic
tags:
篇首语:本文由小常识网(cha138.com)小编为大家整理,主要介绍了SpringBoot整合Elasticsearch-Rest-Client测试保存复杂检索相关的知识,希望对你有一定的参考价值。

前言
1、9300:TCP
- spring-data-elasticsearch:transport-api.jar;
- springboot 版本不同, transport-api.jar 不同,不能适配 es 版本
- 7.x 已经不建议使用,8 以后就要废弃
2、9200:HTTP
- JestClient:非官方,更新慢
- RestTemplate:模拟发 HTTP 请求,ES 很多操作需要自己封装,麻烦
- HttpClient:同上
- Elasticsearch-Rest-Client:官方 RestClient,封装了 ES 操作,API 层次分明,上手简单最终选择
Elasticsearch-Rest-Client(elasticsearch-rest-high-level-client)
https://www.elastic.co/guide/en/elasticsearch/client/java-rest/current/java-rest-high.html
1、SpringBoot 整合
1.1 pom文件
<dependency>
    <groupId>org.elasticsearch.client</groupId>
    <artifactId>elasticsearch-rest-high-level-client</artifactId>
    <version>7.4.2</version>
</dependency>
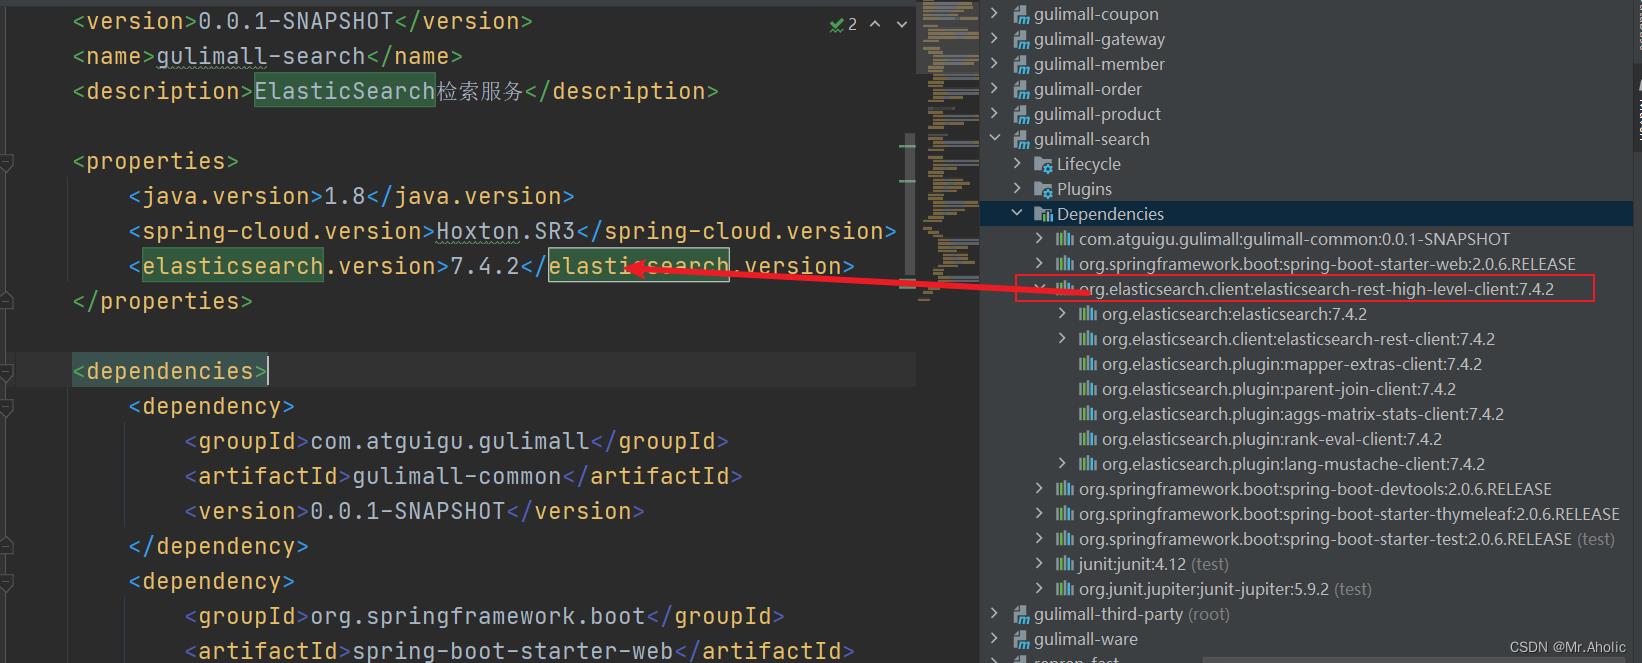
这里进行了版本管理、主动设置版本号
<properties>
    <java.version>1.8</java.version>
    <spring-cloud.version>Hoxton.SR3</spring-cloud.version>
    <elasticsearch.version>7.4.2</elasticsearch.version>
</properties>
查看导入的依赖
1.2 配置类
/**
 * @author zyz
 * @version 1.0
 * @data 2023/3/14 22:02
 * @Description:
 */

@Configuration
public class GulimallElasticSearchConfig

    public static final RequestOptions COMMON_OPTIONS;

    static
        RequestOptions.Builder builder = RequestOptions.DEFAULT.toBuilder();
        COMMON_OPTIONS = builder.build();


    @Bean
    public RestHighLevelClient esRestClient()
        RestClientBuilder builder = null;
        builder = RestClient.builder(new HttpHost("192.168.202.211", 9200, "http"));
        RestHighLevelClient client = new RestHighLevelClient(builder);
        return client;
1.3 测试类
@RunWith(SpringRunner.class)
@SpringBootTest
public class GulimallSearchApplicationTests

    @Autowired
    private RestHighLevelClient client;

    @Test
    public void contextLoads()
        System.out.println(client);
测试结果

2、测试保存
1.1 保存数据到es
1.1.1 代码逻辑
@RunWith(SpringRunner.class)
@SpringBootTest
public class GulimallSearchApplicationTests

    @Autowired
    private RestHighLevelClient client;

    /**
     * 测试存储数据到es
     * @throws IOException
     */
    @Test
    public void indexData() throws IOException
        IndexRequest indexRequest = new IndexRequest("users");
        indexRequest.id("1");
        User user = new User();
        user.setUserName("lisi");
        user.setAge(18);
        user.setGender("男");
        String jsonString = JSON.toJSONString(user);
        indexRequest.source(jsonString, XContentType.JSON);

        //执行
        IndexResponse index = client.index(indexRequest, GulimallElasticSearchConfig.COMMON_OPTIONS);

        //提取
        System.out.println(index);


    @Data
    class User
        private String userName;
        private String gender;
        private Integer age;
1.1.2 测试结果

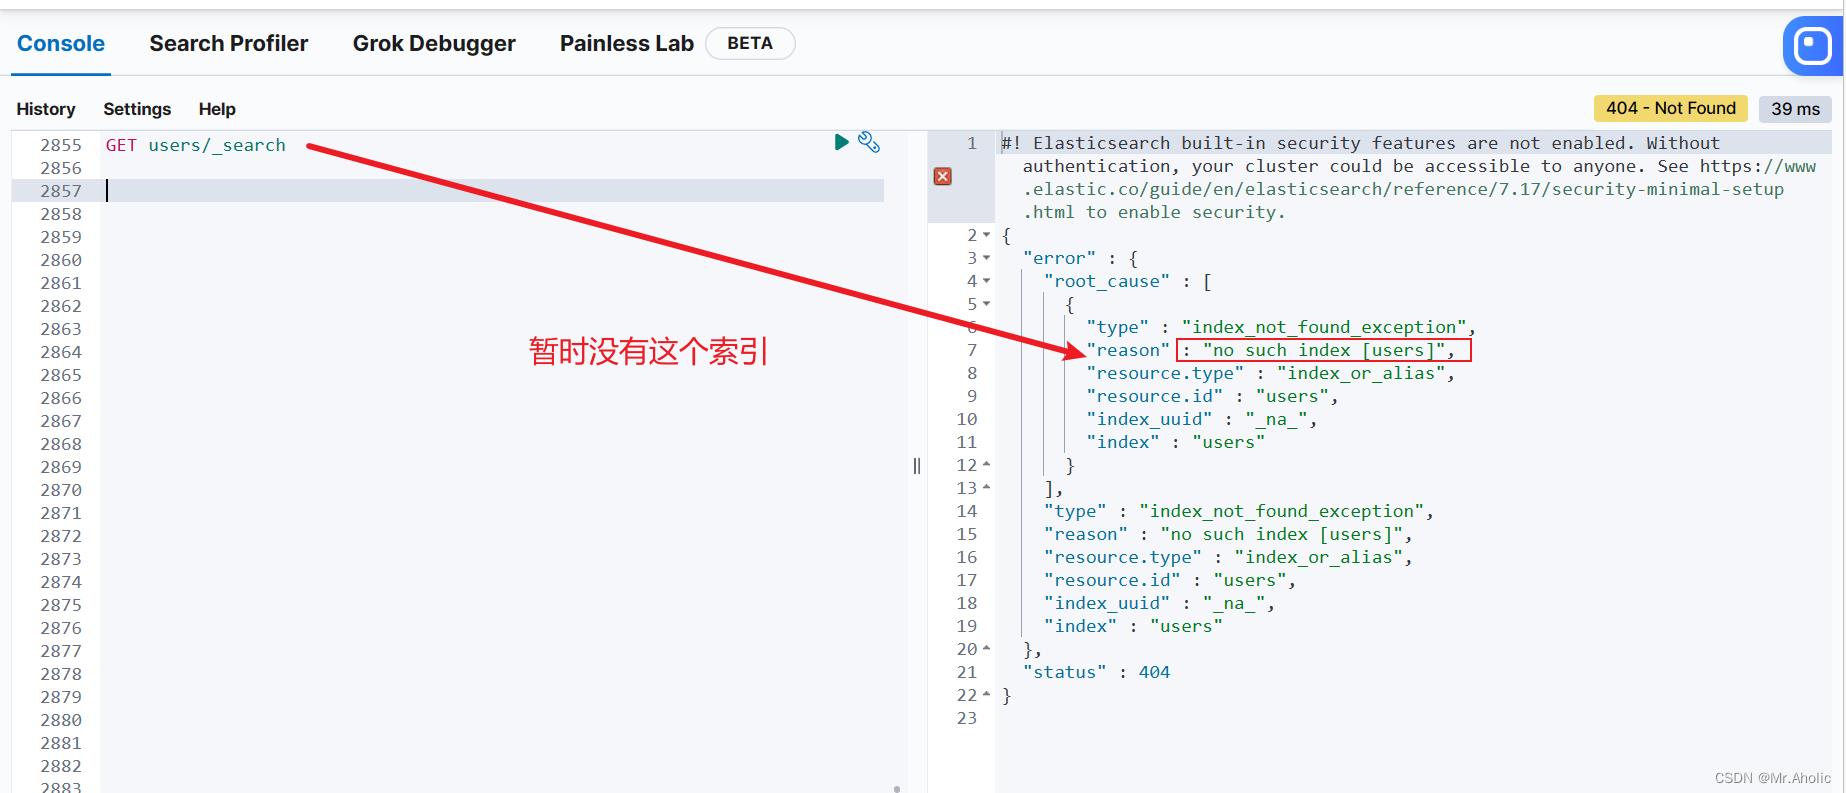
未执行代码前、查看索引下的值。此时并未对应索引
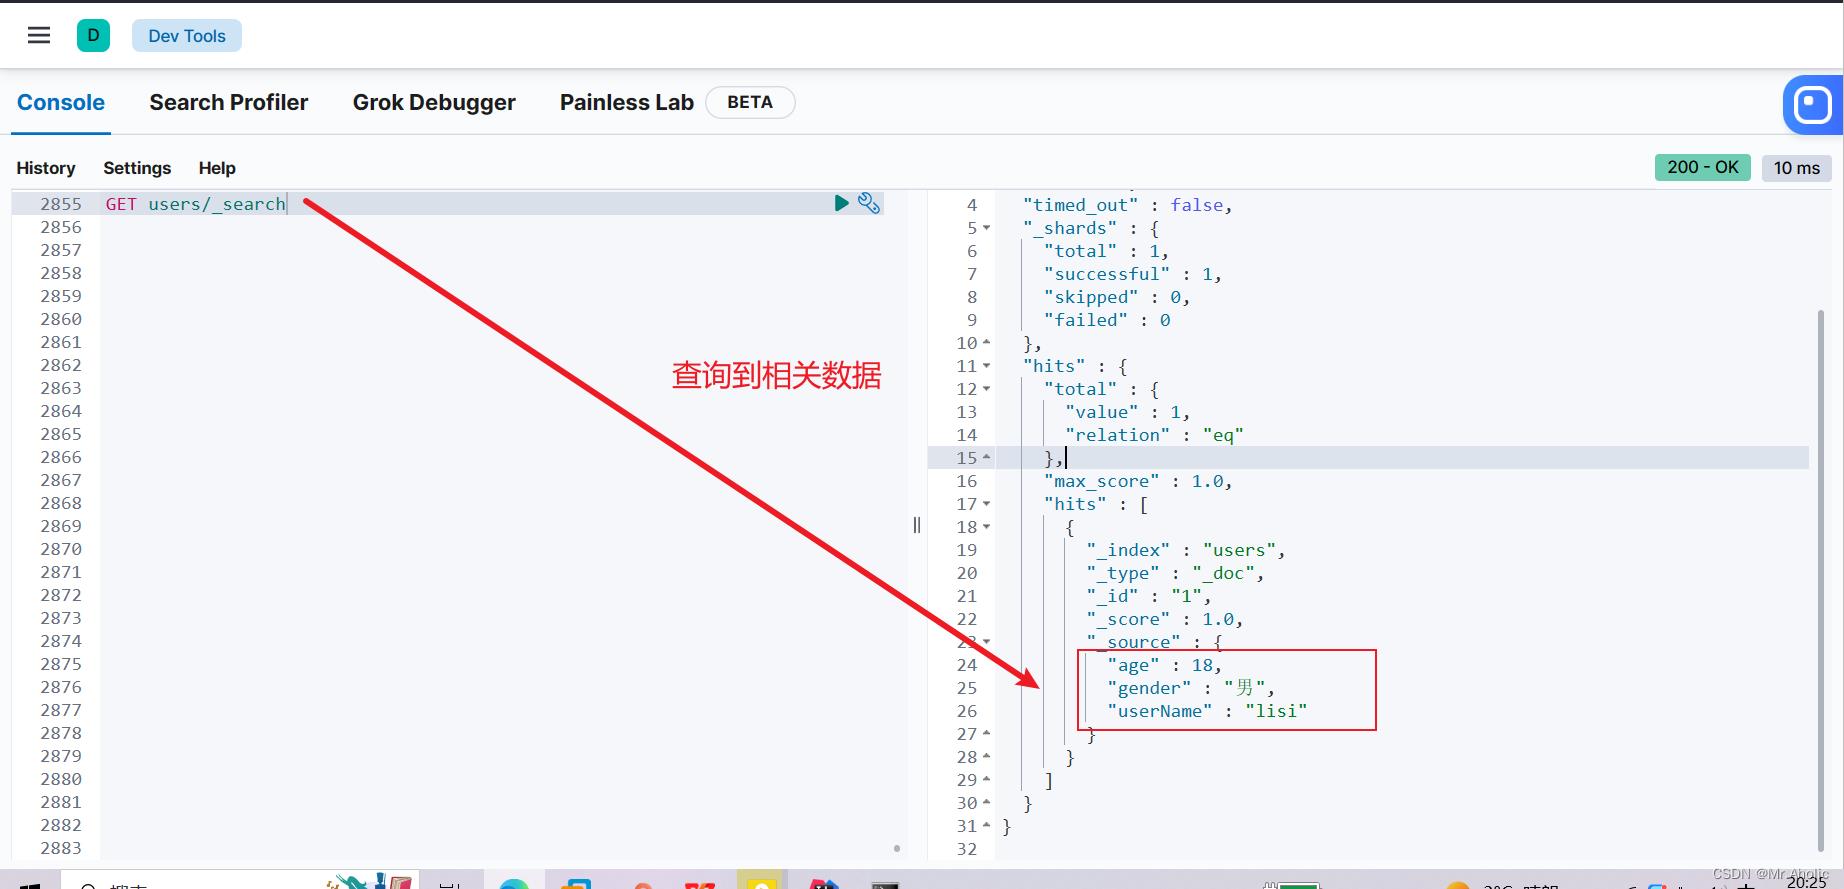
执行代码后、再次查询:
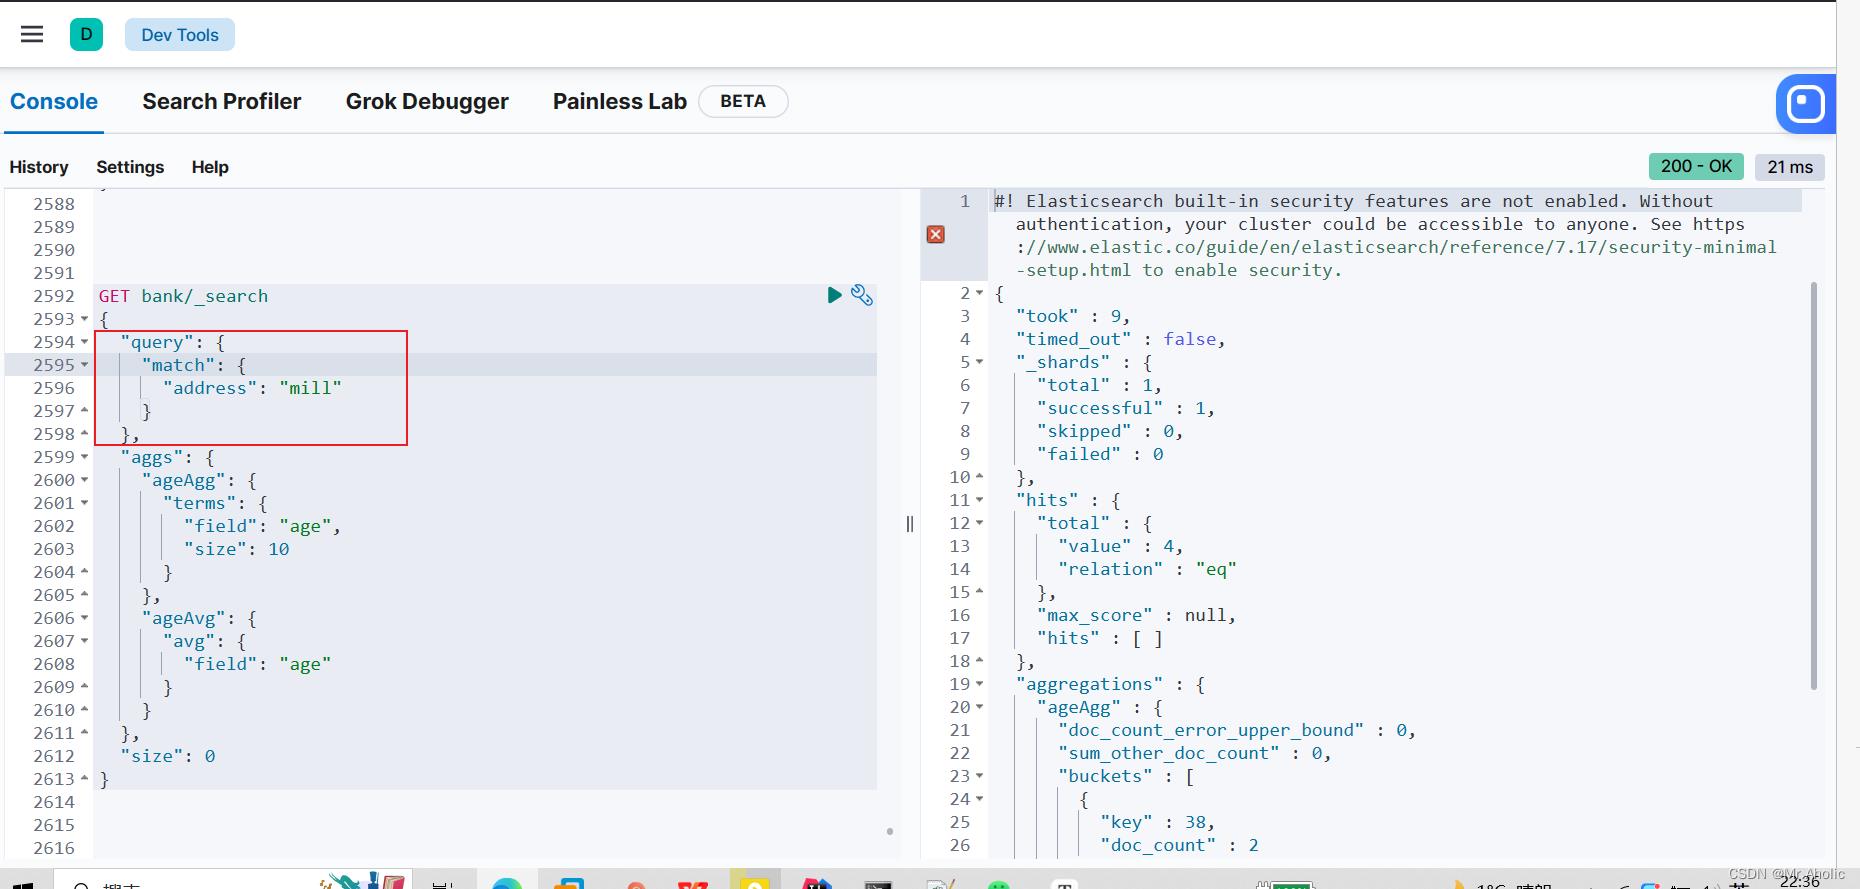
1.2 复杂检索(查询address中包含mill的)
这里构建的代码检索条件以及如何构建其中的参数,参数对标哪些数据,根据如下图检索条件进行配置。
1.2.1 代码逻辑
    @Test
    public void searchData() throws IOException

        //1. 创建检索请求
        SearchRequest searchRequest = new SearchRequest();

        //1.1)指定索引
        searchRequest.indices("bank");
        //1.2)构造检索条件
        SearchSourceBuilder sourceBuilder = new SearchSourceBuilder();
        sourceBuilder.query(QueryBuilders.matchQuery("address", "Mill"));
        System.out.println("执行条件:"+sourceBuilder.toString());

        searchRequest.source(sourceBuilder);

        //2、执行检索
        SearchResponse searchResponse = client.search(searchRequest,GulimallElasticSearchConfig.COMMON_OPTIONS);
        //3、分析结果
        System.out.println("检索结果:" + searchResponse.toString());
1.2.2 测试结果

格式化查询条件
执行条件:

	"query":
		"match":
			"address":
				"query": "Mill",
				"operator": "OR",
				"prefix_length": 0,
				"max_expansions": 50,
				"fuzzy_transpositions": true,
				"lenient": false,
				"zero_terms_query": "NONE",
				"auto_generate_synonyms_phrase_query": true,
				"boost": 1.0
格式化查询结果
检索结果:和用工具查出来的效果是一样的


	"took": 5,
	"timed_out": false,
	"_shards":
		"total": 1,
		"successful": 1,
		"skipped": 0,
		"failed": 0
	,
	"hits":
		"total":
			"value": 4,
			"relation": "eq"
		,
		"max_score": 5.4032025,
		"hits": [

				"_index": "bank",
				"_type": "account",
				"_id": "970",
				"_score": 5.4032025,
				"_source":
					"account_number": 970,
					"balance": 19648,
					"firstname": "Forbes",
					"lastname": "Wallace",
					"age": 28,
					"gender": "M",
					"address": "990 Mill Road",
					"employer": "Pheast",
					"email": "forbeswallace@pheast.com",
					"city": "Lopezo",
					"state": "AK"

			,

				"_index": "bank",
				"_type": "account",
				"_id": "136",
				"_score": 5.4032025,
				"_source":
					"account_number": 136,
					"balance": 45801,
					"firstname": "Winnie",
					"lastname": "Holland",
					"age": 38,
					"gender": "M",
					"address": "198 Mill Lane",
					"employer": "Neteria",
					"email": "winnieholland@neteria.com",
					"city": "Urie",
					"state": "IL"

			,

				"_index": "bank",
				"_type": "account",
				"_id": "345",
				"_score": 5.4032025,
				"_source":
					"account_number": 345,
					"balance": 9812,
					"firstname": "Parker",
					"lastname": "Hines",
					"age": 38,
					"gender": "M",
					"address": "715 Mill Avenue",
					"employer": "Baluba",
					"email": "parkerhines@baluba.com",
					"city": "Blackgum",
					"state": "KY"

			,

				"_index": "bank",
				"_type": "account",
				"_id": "472",
				"_score": 5.4032025,
				"_source":
					"account_number": 472,
					"balance": 25571,
					"firstname": "Lee",
					"lastname": "Long",
					"age": 32,
					"gender": "F",
					"address": "288 Mill Street",
					"employer": "Comverges",
					"email": "leelong@comverges.com",
					"city": "Movico",
					"state": "MT"


		]
1.3 复杂检索(聚合,薪资平均值)
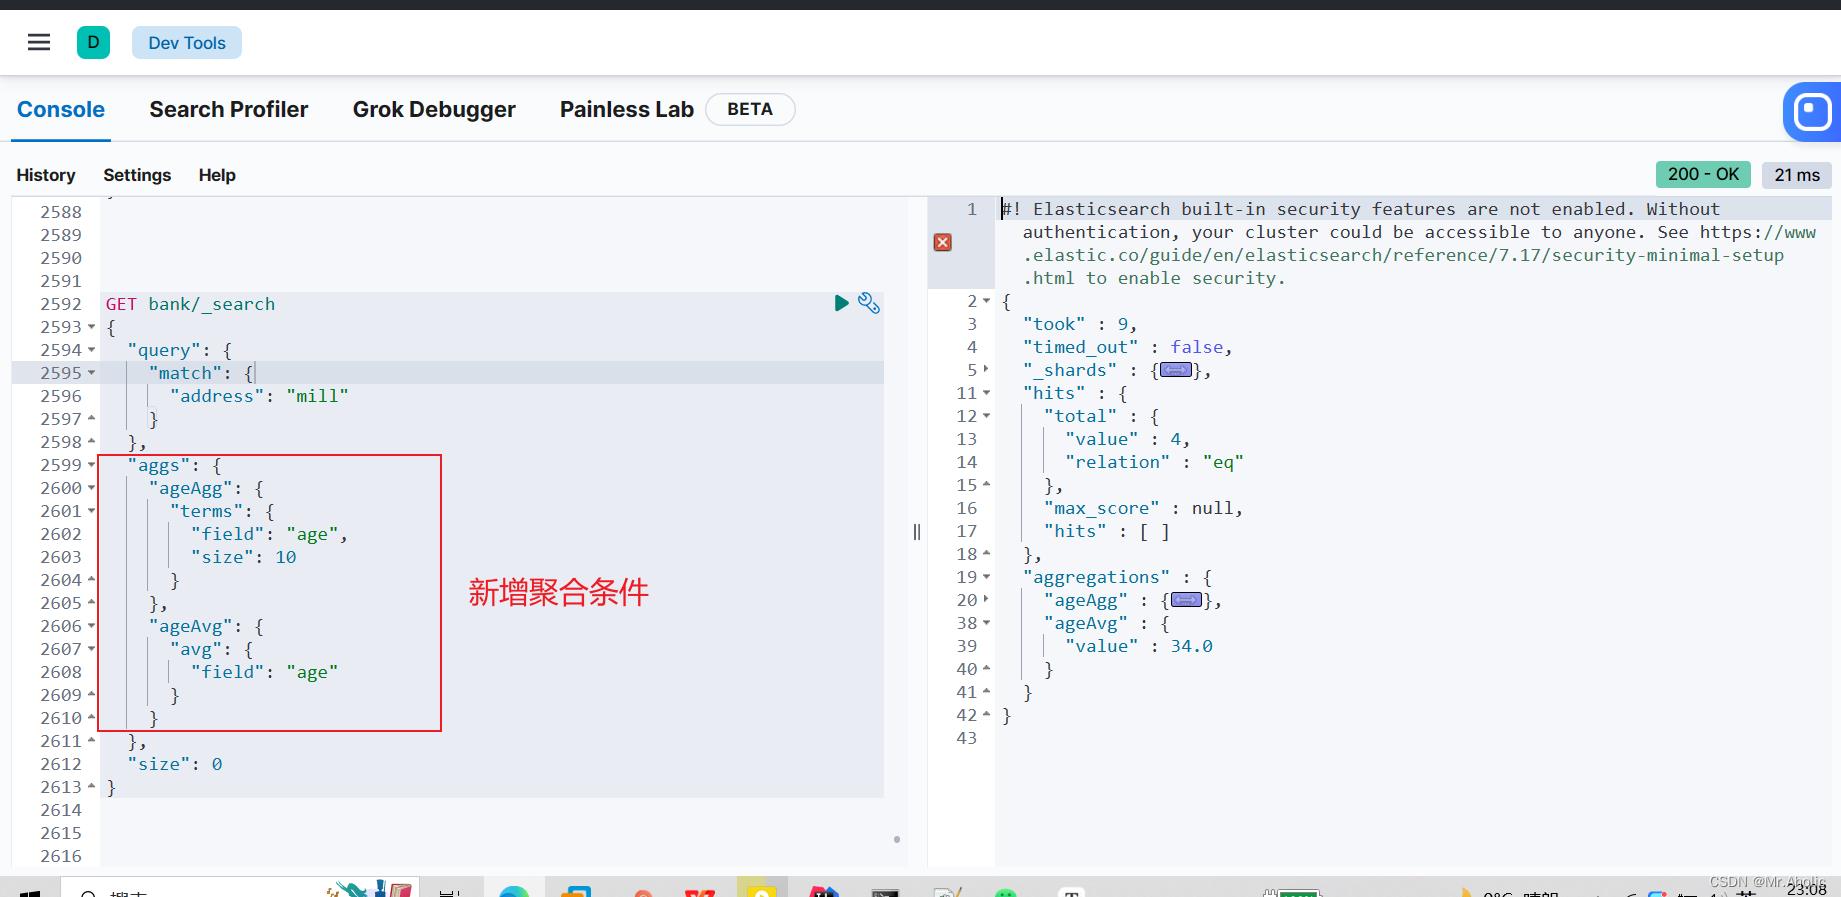
1.3.1 代码逻辑
    @Test
    public void searchData() throws IOException

        //1. 创建检索请求
        SearchRequest searchRequest = new SearchRequest();

        //1.1)指定索引
        searchRequest.indices("bank");
        //1.2)构造检索条件
        SearchSourceBuilder sourceBuilder = new SearchSourceBuilder();
        sourceBuilder.query(QueryBuilders.matchQuery("address", "Mill"));

        //1.2.1)按照年龄分布进行聚合
        TermsAggregationBuilder ageAgg = AggregationBuilders.terms("ageAgg").field("age").size(10);
        sourceBuilder.aggregation(ageAgg);

        //1.2.2)计算平均年龄
        AvgAggregationBuilder ageAvg = AggregationBuilders.avg("ageAvg").field("age");
        sourceBuilder.aggregation(ageAvg);

        //1.2.3)计算平均薪资
        AvgAggregationBuilder balanceAvg = AggregationBuilders.avg("balanceAvg").field("balance");
        sourceBuilder.aggregation(balanceAvg);

        System.out.println("执行条件:"+sourceBuilder.toString());

        searchRequest.source(sourceBuilder);

        //2、执行检索
        SearchResponse searchResponse = client.search(searchRequest,GulimallElasticSearchConfig.COMMON_OPTIONS);
        //3、分析结果
        System.out.println("检索结果:" + searchResponse.toString());
1.3.2 检测结果
控制台效果:

格式化检索条件
执行条件:


	"query":
		"match":
			"address":
				"query": "Mill",
				"operator": "OR",
				"prefix_length": 0,
				"max_expansions": 50,
				"fuzzy_transpositions": true,
				"lenient": false,
				"zero_terms_query": "NONE",
				"auto_generate_synonyms_phrase_query": true,
				"boost": 1.0


	,
	"aggregations":
		"ageAgg":
			"terms":
				"field": "age",
				"size": 10,
				"min_doc_count": 1,
				"shard_min_doc_count": 0,
				"show_term_doc_count_error": false,
				"order": [

						"_count": "desc"
					,

						"_key": "asc"

				]

		,
		"ageAvg":
			"avg":
				"field": "age"

		,
		"balanceAvg":
			"avg":
				"field": "balance"
格式化查询结果
检索结果:
"took": 2,
"timed_out": false,
"_shards":
"total": 1,
"successful": 1,
"skipped": 0,
"failed": 0
,
"hits":
"total":
"value": 4,
"relation": "eq"
,
"max_score": 5.4032025,
"hits": [
"_index": "bank",
"_type": "account",
"_id": "970",
"_score": 5.4032025,
"_source":
"account_number": 970,
"balance": 19648,
"firstname": "Forbes",
"lastname": "Wallace",
"age": 28,
"gender": "M",
"address": "990 Mill Road",
"employer": "Pheast",
"email": "forbeswallace@pheast.com",
"city": "Lopezo",
"state": "AK"
,
"_index": "bank",
"_type": "account",
"_id": "136",
"_score": 5.4032025,
"_source":
"account_number": 136,
"balance": 45801,
"firstname": "Winnie",
"lastname": "Holland",
"age": 38,
"gender": "M",
"address": "198 Mill Lane",
"employer": "Neteria",
"email": "winnieholland@neteria.com",
"city": "Urie",
"state": "IL"
,
"_index": "bank",
"_type": "account",
"_id": "345",
"_score": 5.4032025,
"_source":
"account_number": 345,
"balance": 9812,
"firstname": "Parker",
"lastname": "Hines",
"age": 38,
"gender": "M",
"address": "715 Mill Avenue",
"employer": "Baluba",
"email": "parkerhines@baluba.com",
"city": "Blackgum",
"state": "KY"
,
"_index": "bank",
"_type": "account",
"_id": "472",
"_score": 5.4032025,
"_source":
"account_number": 472,
"balance": 25571,
"firstname": "Lee",
"lastname": "Long",
"age": 32,
"gender": "F",
"address": "288 Mill Street",
"employer": "Comverges",
"email": "leelong@comverges.com",
"city": "Movico",
"state": "MT"
]
,
"aggregations":
"lterms#ageAgg":
elasticsearch整合springboot
es官网: https://www.elastic.co/guide/index.html
安装es
# 若启动不了,则需要加上下面的参数
# -e ES_JAVA_OPTS="-Xms512m -Xmx512m" #指定默认内存大小
docker run -d --rm --name elasticsearch elasticsearch:6.8.12
docker cp elasticsearch:/usr/share/elasticsearch/config/ /usr/local/es/
docker cp elasticsearch:/usr/share/elasticsearch/data/ /usr/local/es/
docker stop elasticsearch
docker run -d --name elasticsearch \\
-p 9200:9200 -p 9300:9300 \\
-v /usr/local/es/data:/usr/share/elasticsearch/data \\
-v /usr/local/es/config:/usr/share/elasticsearch/config \\
-e "discovery.type=single-node" \\
elasticsearch:6.8.12
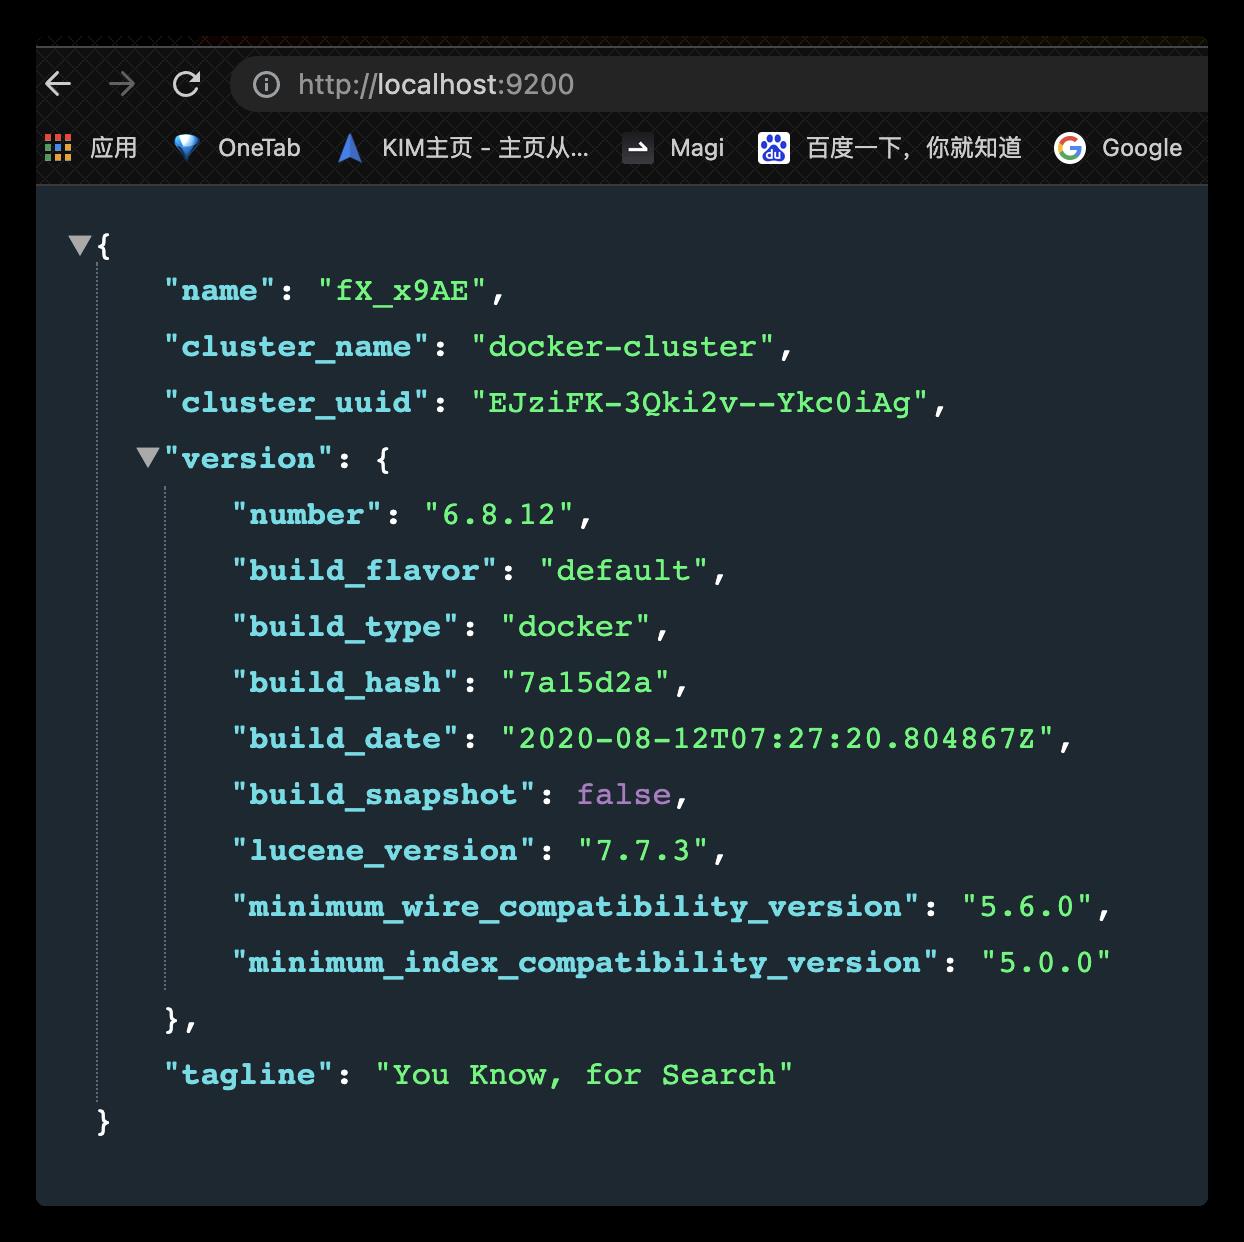
访问 http://localhost:9200 安装成功则显示
安装图形化界面–Dejavu
cat >>/usr/local/es/config/elasticsearch.yml <<EOF
http.port: 9200
http.cors.allow-origin: 'http://localhost:1358'
http.cors.enabled: true
http.cors.allow-headers: X-Requested-With,X-Auth-Token,Content-Type,Content-Length,Authorization
http.cors.allow-credentials: true
EOF
# Dejavu es图形化界面
docker run -d -p 1358:1358 -d --name dejavu appbaseio/dejavu
# open http://localhost:1358/
整合springboot
spring官方工具包 - Spring Data Elasticsearch: https://docs.spring.io/spring-data/elasticsearch/docs/current/reference/html/
版本说明
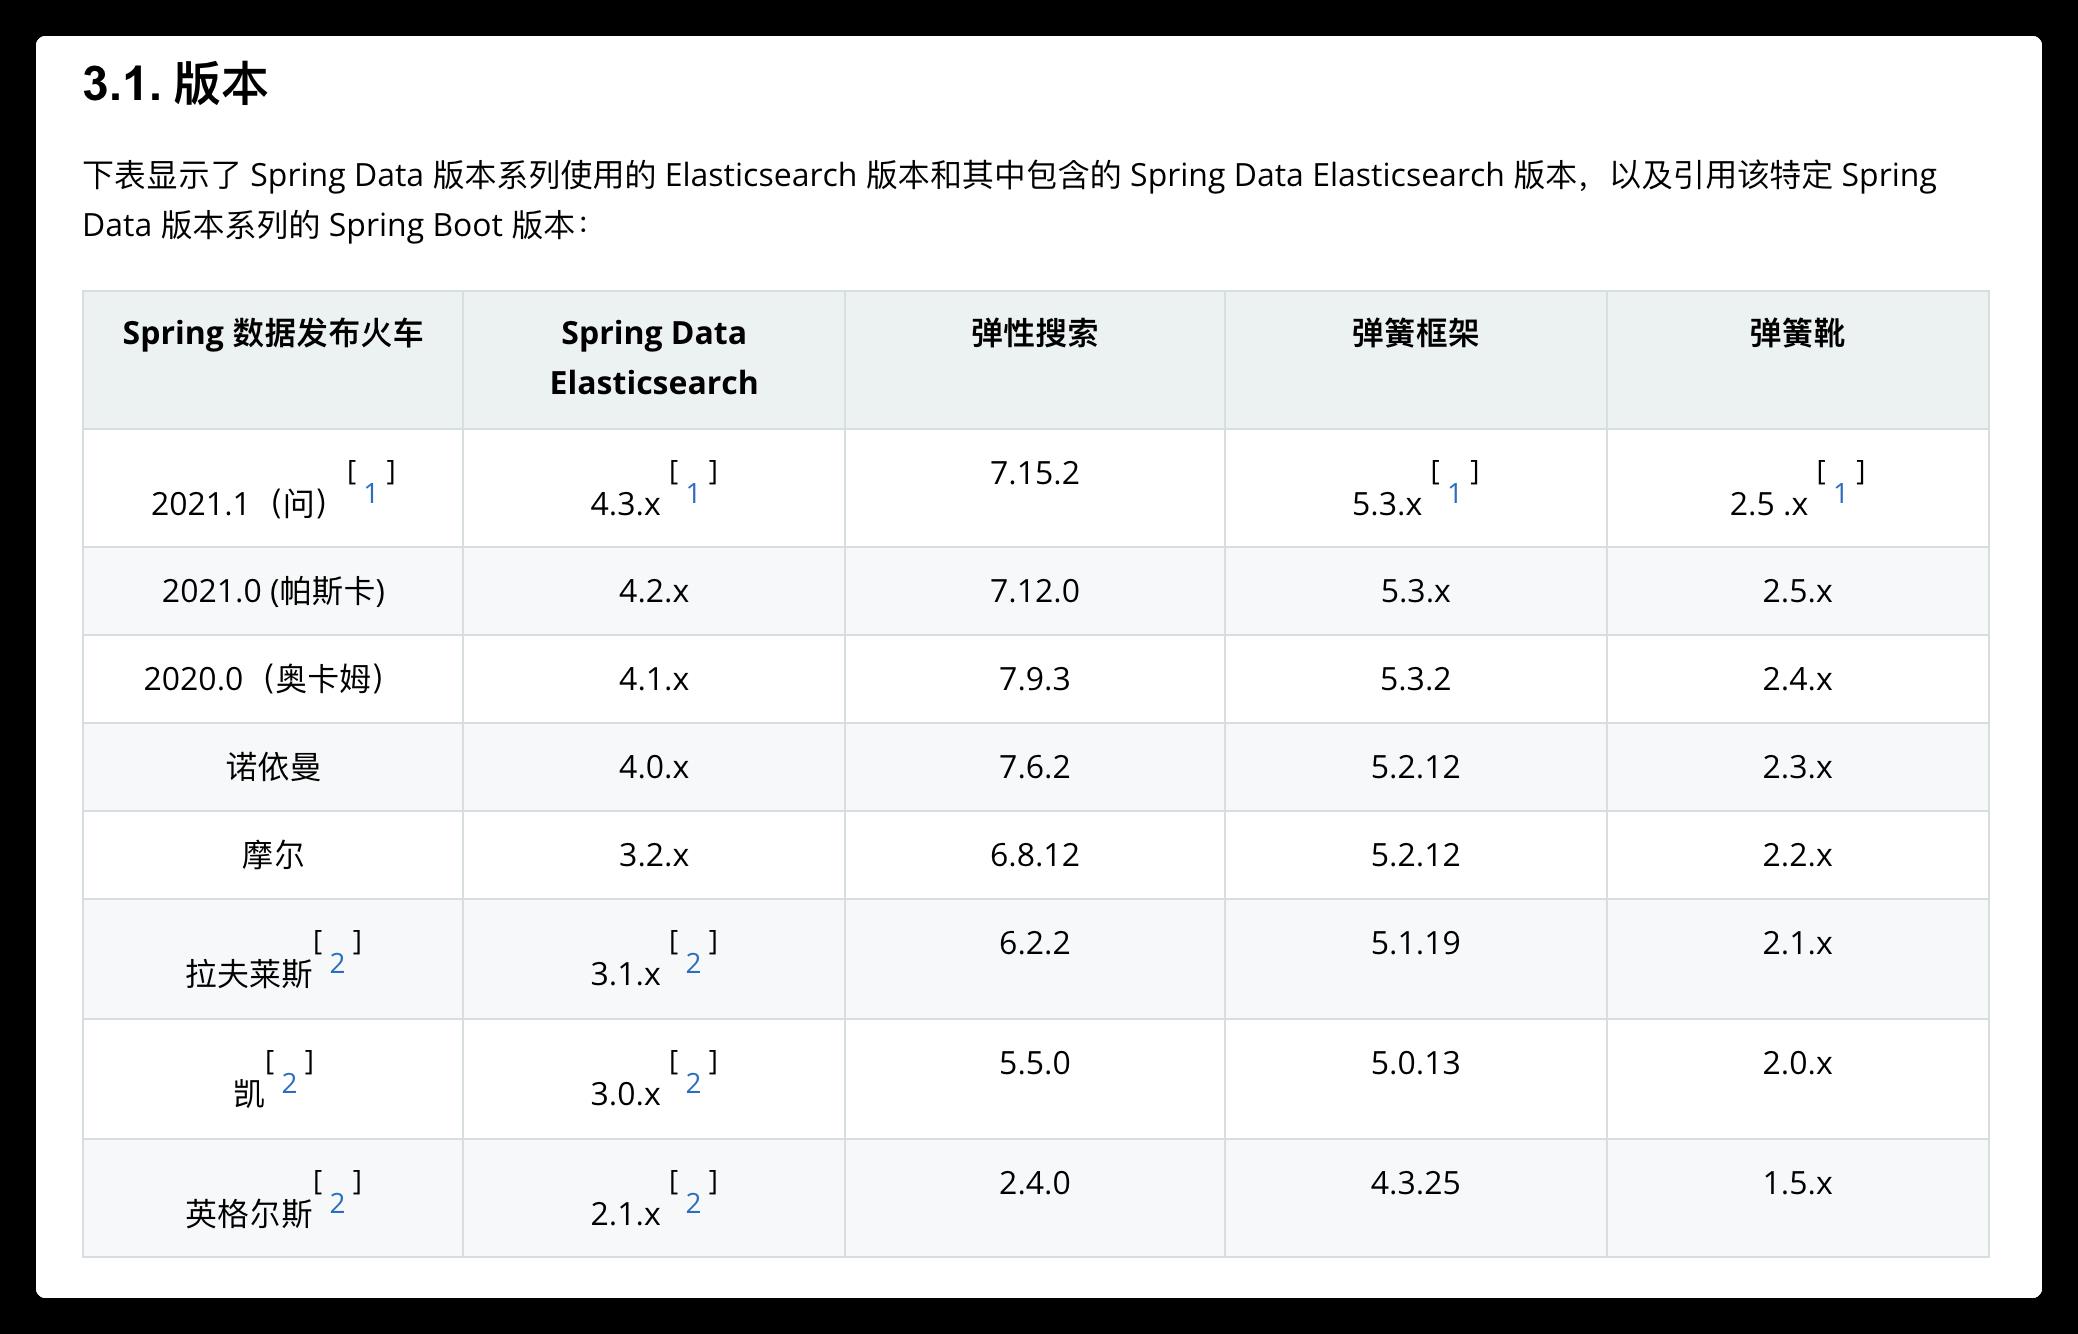
示例
可参考简单示例代码
- 当前springboot版本
2.2.13.RELEASE - 依赖导入
<dependency>
<groupId>org.springframework.data</groupId>
<artifactId>spring-data-elasticsearch</artifactId>
<version>3.2.13.RELEASE</version>
</dependency>
- es配置文件
spring:
data:
elasticsearch:
repositories:
enabled: true
# 集群名称
# 如果不配会导致cluster-nodes的节点找不到
cluster-name: docker-cluster
# 集群节点
cluster-nodes: 127.0.0.1:9300
项目整合方式
采用无入侵的方式,通过切面编程以注解方式实现数据的同步
- 增删改:注意根据数据库返回结果来同步操作es数据,例如:新增、删除根据结果同步数据,修改根据id同步
注解参数:操作类型、实体类型
- 查询:分为
单索引查询、多索引聚合查询 - 单索引查询:数据与实体类关联,直接查询
- 聚合查询:定义好返回的通用数据结构
