Android 一分钟快速使用极光推送
Posted BandaYung
tags:
篇首语:本文由小常识网(cha138.com)小编为大家整理,主要介绍了Android 一分钟快速使用极光推送相关的知识,希望对你有一定的参考价值。
之前一直都是在项目中,直接把jpush下载的资源直接放在主module,每次感觉需要配置的东西很多,有时候会担心缺少什么导致最后跑不通。
如果你是老手,每个人都各有各的风格习惯,相互学习的可以了解下
如果你是新手,个人觉得以下的集成方式应该会帮到你避免很多坑
集成方式
1、jcenter 自动集成
2、手动集成
虽然现在支持了jcenter,相比手动少了很多,还是需要在gradle和androidManifest.xml中配置很多东西,有些时候可能会少写一些配置,导致最后失败
个人集成思路
既然需要集成这么多,为啥不写成一个module,把必要的lib、res、AndroidManifest.xml等等配置好,这样复用性也很强。如果开启一个新项目只需gradle引用一下就ok了。可能是习惯性,个人喜欢用手动集成的方式把他们写到module
jpush版本更新,你也只需替换对应的文件即可,轻轻松松解决
资源下载
1、官方Demo
2、应用快速集成Demo
获取方式:
可以新建应用,然后在“应用设置”——>“应用信息”——>“推送设置”,配置一下Android应用包名,这里也可以下载快速集成的Demo
jpush版本更新,可以直接下载官方Demo,进行资源替换,方便快捷
定义module(Jpush)
目录结构

这里就不一一说明了,这些大都是官方存在的,但是JPushSetUtil还是有必要说一下
JPushSetUtil
自定义的极光推送工具类,代码如下
/**
 * Description : JPush工具
 *
 * @author WSoban
 * @date 2019/8/23
 */
public class JPushSetUtil

    private static JPushSetUtil sInstance;
    private int sequence = 1;
    private Context mContext;

    public static synchronized JPushSetUtil getInstance()
        if (sInstance == null)
            sInstance = new JPushSetUtil();

        return sInstance;


    /**
     * 在项目Application中做初始化
     *
     * @param context
     */
    public void init(Context context)
        this.mContext = context;
        JPushInterface.setDebugMode(true);    // 设置开启日志,发布时请关闭日志
        JPushInterface.init(context);            // 初始化 JPush


    /**
     * 获取RegistrationID
     *
     * @return
     */
    public String getRegistrationID()
        return JPushInterface.getRegistrationID(mContext);


    /**
     * 设置设备别名
     *
     * @param alias
     */
    public void setAlias(String alias)
        onTagAliasAction(alias, true, TagAliasOperatorHelper.ACTION_SET);


    /**
     * 设置设备标签
     *
     * @param tags
     */
    public void setTags(String tags)
        onTagAliasAction(tags, false, TagAliasOperatorHelper.ACTION_SET);


    /**
     * 删除别名
     *
     * @param alias
     */
    public void deleteAlias(String alias)
        onTagAliasAction(alias, true, TagAliasOperatorHelper.ACTION_DELETE);


    /**
     * 删除标签
     *
     * @param tags
     */
    public void deleteTags(String tags)
        onTagAliasAction(tags, false, TagAliasOperatorHelper.ACTION_DELETE);


    /**
     * 执行设置事件
     *
     * @param aliasOrTags
     * @param isAliasAction
     * @param action
     */
    private void onTagAliasAction(String aliasOrTags, boolean isAliasAction, int action)
        TagAliasOperatorHelper.TagAliasBean tagAliasBean = new TagAliasOperatorHelper.TagAliasBean();
        if (isAliasAction)
            tagAliasBean.alias = getAlias(aliasOrTags);
         else
            tagAliasBean.tags = getTags(aliasOrTags);

        tagAliasBean.isAliasAction = isAliasAction;
        tagAliasBean.action = action;
        sequence++;
        TagAliasOperatorHelper.getInstance().handleAction(mContext, sequence, tagAliasBean);


    /**
     * 检查别名格式
     *
     * @param alias
     * @return
     */
    private String getAlias(String alias)
        if (TextUtils.isEmpty(alias))
            return null;

        if (!ExampleUtil.isValidTagAndAlias(alias))
            return null;

        return alias;


    /**
     * 检查标签格式
     *
     * @param tags
     * @return
     */
    private Set<String> getTags(String tags)
        if (TextUtils.isEmpty(tags))
            return null;

        // "|"隔开的多个转换成 Set
        String[] sArray = tags.split("\\\\|");
        Set<String> tagSet = new LinkedHashSet<String>();
        for (String sTagItme : sArray)
            if (!ExampleUtil.isValidTagAndAlias(sTagItme))
                return null;

            tagSet.add(sTagItme);

        if (tagSet.isEmpty())
            return null;

        return tagSet;


    /**
     * 设置推送服务开关
     *
     * @param isOpenPush 是否开启推送
     */
    public void setPushMessage(boolean isOpenPush)
        if (isOpenPush)
            //恢复推送服务
            JPushInterface.resumePush(mContext);
         else
            //停止推送服务
            JPushInterface.stopPush(mContext);


    /**
     * 用来检查推送服务是否已经被停止
     */
    public boolean isPushStopped()
        return JPushInterface.isPushStopped(mContext);
AndroidManifest.xml
这里写了一些不会变的权限、service、provider、receiver,这样避免在主module中可能会遗漏
集成与使用
这里可以说是一分钟直接集成并使用,真不吹
gradle引用
dependencies
    ......
    api project(':jpush')
AndroidManifest.xml
只需替换JPUSH_APPKEY的value即可
 <!-- 推送发布KEY -->
        <meta-data
            android:name="JPUSH_CHANNEL"
            android:value="developer-default" />
        <meta-data
            android:name="JPUSH_APPKEY"
            android:value="16b8215611e87e9cad95748d" />

        <receiver
            android:name=".JPushReceiver"
            android:enabled="true"
            android:exported="false">
            <intent-filter>
                <action android:name="cn.jpush.android.intent.REGISTRATION" /> <!-- Required  用户注册SDK的intent -->
                <action android:name="cn.jpush.android.intent.MESSAGE_RECEIVED" /> <!-- Required  用户接收SDK消息的intent -->
                <action android:name="cn.jpush.android.intent.NOTIFICATION_RECEIVED" /> <!-- Required  用户接收SDK通知栏信息的intent -->
                <action android:name="cn.jpush.android.intent.NOTIFICATION_OPENED" /> <!-- Required  用户打开自定义通知栏的intent -->
                <action android:name="cn.jpush.android.intent.CONNECTION" /> <!-- 接收网络变化 连接/断开 since 1.6.3 -->
                <category android:name="$applicationId" />
            </intent-filter>
        </receiver>
自定义Application
public class App extends Application

    public static App mInstance;

    public App()


    public static App getInstance()
        return mInstance;


    @Override
    public void onCreate()
        super.onCreate();
        mInstance = this;
        JPushSetUtil.getInstance().init(this);
自定义接收器
/**
 * 自定义接收器
 * <p>
 * 如果不定义这个 Receiver,则:
 * 1) 默认用户会打开主界面
 * 2) 接收不到自定义消息
 */
public class JPushReceiver extends BroadcastReceiver
    private static final String TAG = "JIGUANG-Example";

    // 打印所有的 intent extra 数据
    private static String printBundle(Bundle bundle)
        StringBuilder sb = new StringBuilder();
        for (String key : bundle.keySet())
            if (key.equals(JPushInterface.EXTRA_NOTIFICATION_ID))
                sb.append("\\nkey:" + key + ", value:" + bundle.getInt(key));
             else if (key.equals(JPushInterface.EXTRA_CONNECTION_CHANGE))
                sb.append("\\nkey:" + key + ", value:" + bundle.getBoolean(key));
             else if (key.equals(JPushInterface.EXTRA_EXTRA))
                if (TextUtils.isEmpty(bundle.getString(JPushInterface.EXTRA_EXTRA)))
                    Logger.i(TAG, "This message has no Extra data");
                    continue;


                try
                    JSONObject json = new JSONObject(bundle.getString(JPushInterface.EXTRA_EXTRA));
                    Iterator<String> it = json.keys();

                    while (it.hasNext())
                        String myKey = it.next();
                        sb.append("\\nkey:" + key + ", value: [" +
                                myKey + " - " + json.optString(myKey) + "]");

                 catch (JSONException e)
                    Logger.e(TAG, "Get message extra JSON error!");


             else
                sb.append("\\nkey:" + key + ", value:" + bundle.getString(key));


        return sb.toString();


    @Override
    public void onReceive(Context context, Intent intent)
        try
            Bundle bundle = intent.getExtras();
            Logger.d(TAG, "[JPushReceiver] onReceive - " + intent.getAction() + ", extras: " + printBundle(bundle));

            if (JPushInterface.ACTION_REGISTRATION_ID.equals(intent.getAction()))
                String regId = bundle.getString(JPushInterface.EXTRA_REGISTRATION_ID);
                Logger.d(TAG, "[JPushReceiver] 接收Registration Id : " + regId);
                //send the Registration Id to your server...

             else if (JPushInterface.ACTION_MESSAGE_RECEIVED.equals(intent.getAction()))
                Logger.d(TAG, "[JPushReceiver] 接收到推送下来的自定义消息: " + bundle.getString(JPushInterface.EXTRA_MESSAGE));
                processCustomMessage(context, bundle);

             else if (JPushInterface.ACTION_NOTIFICATION_RECEIVED.equals(intent.getAction()))
                Logger.d(TAG, "[JPushReceiver] 接收到推送下来的通知");
                int notifactionId = bundle.getInt(JPushInterface.EXTRA_NOTIFICATION_ID);
                Logger.d(TAG, "[JPushReceiver] 接收到推送下来的通知的ID: " + notifactionId);

             else if (JPushInterface.ACTION_NOTIFICATION_OPENED.equals(intent.getAction()))
                Logger.d(TAG, "[JPushReceiver] 用户点击打开了通知");
                openNotification(context, bundle, Constant.SEND_NOTICE);

             else if (JPushInterface.ACTION_RICHPUSH_CALLBACK.equals(intent.getAction()))
                Logger.d(TAG, "[JPushReceiver] 用户收到到RICH PUSH CALLBACK: " + bundle.getString(JPushInterface.EXTRA_EXTRA));
                //在这里根据 JPushInterface.EXTRA_EXTRA 的内容处理代码,比如打开新的Activity, 打开一个网页等..

             else if (JPushInterface.ACTION_CONNECTION_CHANGE.equals(intent.getAction()))
                boolean connected = intent.getBooleanExtra(JPushInterface.EXTRA_CONNECTION_CHANGE, false);
                Logger.w(TAG, "[JPushReceiver]" + intent.getAction() + " connected state change to " + connected);
             else
                Logger.d(TAG, "[JPushReceiver] Unhandled intent - " + intent.getAction());

         catch (Exception e)


    //send msg to MainActivity
    private void processCustomMessage(Context context, Bundle bundle)
        /*if (MainActivity.isForeground)
            String message = bundle.getString(JPushInterface.EXTRA_MESSAGE);
			String extras = bundle.getString(JPushInterface.EXTRA_EXTRA);
			Intent msgIntent = new Intent(MainActivity.MESSAGE_RECEIVED_ACTION);
			msgIntent.putExtra(MainActivity.KEY_MESSAGE, message);
			if (!ExampleUtil.isEmpty(extras))
				try
					JSONObject extraJson = new JSONObject(extras);
					if (extraJson.length() > 0)
						msgIntent.putExtra(MainActivity.KEY_EXTRAS, extras);

				 catch (JSONException e)


			LocalBroadcastManager.getInstance(context).sendBroadcast(msgIntent);
		*/
        openNotification(context, bundle, Constant.SEND_MESSAGE);


    /**
     * 点击通知,进行内部跳转
     *
     * @param context
     * @param bundle
     */
    private void openNotification(Context context, Bundle bundle, String notice)
        Intent i = new Intent(context, MainActivity.class);
        i.setFlags(Intent.FLAG_ACTIVITY_NEW_TASK | Intent.FLAG_ACTIVITY_CLEAR_TOP);
        i.putExtra(Constant.KEY_TYPE, notice);
        i.putExtra(Constant.KEY_JPUSH, bundle);
        context.startActivity(i);
获取RegistrationID
JPushSetUtil.getInstance().getRegistrationID()
一般app获取RegistrationID的会与后台的useid进行绑定,然后通过后台推送数据给移动端
开关推送服务
JPushSetUtil.getInstance().setPushMessage(boolean isOpenPush)
public void setPushMessage(boolean isOpenPush)
        if (isOpenPush)
            //恢复推送服务
            JPushInterface.resumePush(mContext);
         else
            //停止推送服务
            JPushInterface.stopPush(mContext);
如果接通推送之后,如果你停止推送服务,那么jpush是不会发送给你消息
平台上离线保留时长默认(1天),所以在时间范围内再恢复推送服务,它还是会把之前的通知或者信息发给你
示例
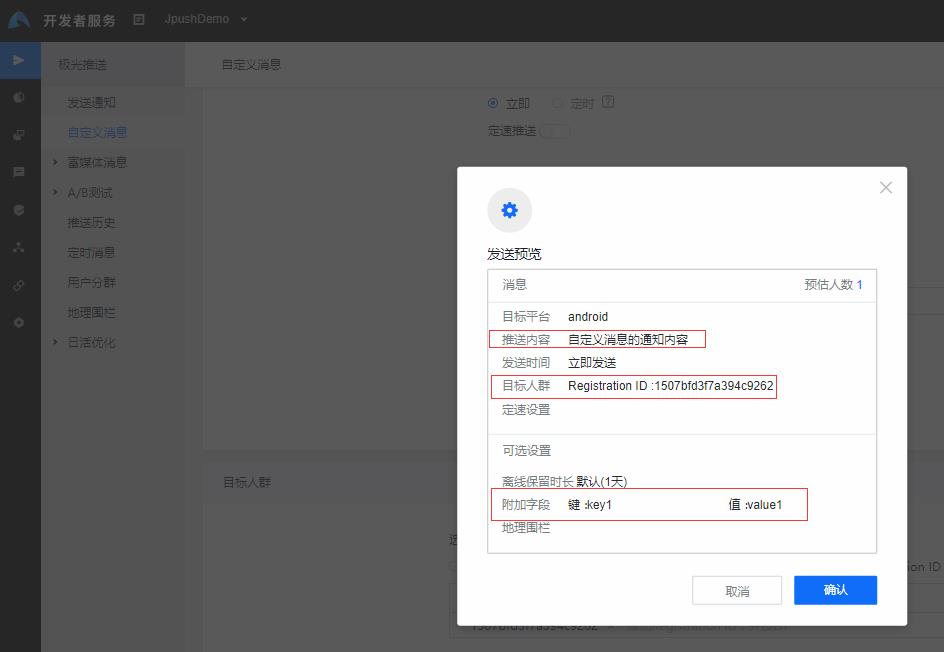
1、发送消息

2、发送通知

3、接收数据过程
step 1.在平台上发送信息在app上显示发送的数据
step 2.在平台上发送通知,点击通知,在app上显示发送的数据
step 3.停止推送服务,app没有收到通知
step 4.恢复推送服务,app重新收到刚刚没接收的通知

以上是关于Android 一分钟快速使用极光推送的主要内容,如果未能解决你的问题,请参考以下文章