一个实际使用SwiftUI 4.0中ViewThatFits自适应视图的例子
Posted 大熊猫侯佩
tags:
篇首语:本文由小常识网(cha138.com)小编为大家整理,主要介绍了一个实际使用SwiftUI 4.0中ViewThatFits自适应视图的例子相关的知识,希望对你有一定的参考价值。

概述
在App图表显示中,我们需要在图表附近画出图表对应的图例。
我们知道,图例的尺寸是和实际占位宽度相匹配的。
如果实际空间比较小,我们就纵向显示图例,否则我们可以利用更大的空间横向显示图例。
一般来说,如何实现上述功能呢?
之前的解决方案
我们可以使用GeometryReader来确定实际宽度,然后据此来改变每个图例的布局:
struct LegendsView: View
    // 判断使用横向或是纵向显示布局
    private func layoutByVStack(_ width: CGFloat? = nil) -> Bool
        var layoutByVStack = false
        if let width = width, width <= 256
            layoutByVStack = true

        return layoutByVStack


    var body: some View
        GeometryReader  reader in
            HStack
                Text("Hives Count:")
                    .frame(width: 100, alignment: .leading)

                if layoutByVStack(reader.size.width)
                    VStack
                        Rectangle()
                            .fill(Color.blue)
                            .frame(width: 15, height: 7)
                        Text("成功")

                else
                    HStack
                        Rectangle()
                            .fill(Color.blue)
                            .frame(width: 15, height: 7)
                        Text("成功")


                if layoutByVStack(reader.size.width)
                    VStack
                        Rectangle()
                            .fill(Color.orange)
                            .frame(width: 15, height: 7)
                        Text("失败")

                else
                    HStack
                        Rectangle()
                            .fill(Color.orange)
                            .frame(width: 15, height: 7)
                        Text("失败")


                if layoutByVStack(reader.size.width)
                    VStack
                        Rectangle()
                            .fill(Color.gray.opacity(0.5))
                            .frame(width: 15, height: 7)
                        Text("未定义")

                else
                    HStack
                        Rectangle()
                            .fill(Color.gray.opacity(0.5))
                            .frame(width: 15, height: 7)
                        Text("未定义")


                Spacer()
但这样做的话,那个阙值 256 需要多次实验才能最终确定。
SwiftUI 4.0中更灵活的ViewThatFits
SwiftUI 4.0为我们带来了新的ViewThatFits自适应视图,使用它我们不但可以二选一,甚至可以根据布局的紧凑程度从多个备选方案中选择一个最适合的布局:
struct LegendsView2: View

    var body: some View
        HStack
            Text("Hives Count:")
                .frame(width: 100, alignment: .leading)

            ViewThatFits
                HStack
                    HStack
                        Rectangle()
                            .fill(Color.blue)
                            .frame(width: 15, height: 7)
                        Text("成功")


                    HStack
                        Rectangle()
                            .fill(Color.orange)
                            .frame(width: 15, height: 7)
                        Text("失败")


                    HStack
                        Rectangle()
                            .fill(Color.gray.opacity(0.5))
                            .frame(width: 15, height: 7)
                        Text("未定义")


                HStack
                    VStack
                        Rectangle()
                            .fill(Color.blue)
                            .frame(width: 15, height: 7)
                        Text("成功")


                    VStack
                        Rectangle()
                            .fill(Color.orange)
                            .frame(width: 15, height: 7)
                        Text("失败")


                    VStack
                        Rectangle()
                            .fill(Color.gray.opacity(0.5))
                            .frame(width: 15, height: 7)
                        Text("未定义")


                VStack
                    Rectangle()
                        .fill(Color.blue)
                        .frame(width: 15, height: 7)

                    Rectangle()
                        .fill(Color.orange)
                        .frame(width: 15, height: 7)

                    Rectangle()
                        .fill(Color.gray.opacity(0.5))
                        .frame(width: 15, height: 7)


            // 我们还可以用多个ViewThatFits视图,为每个图例实现独立的推荐布局
            /*
            ViewThatFits

                HStack
                    Rectangle()
                        .fill(Color.blue)
                        .frame(width: 15, height: 7)
                    Text("成功")


                VStack
                    Rectangle()
                        .fill(Color.blue)
                        .frame(width: 15, height: 7)
                    Text("成功")


            ViewThatFits

                HStack
                    Rectangle()
                        .fill(Color.orange)
                        .frame(width: 15, height: 7)
                    Text("失败")


                VStack
                    Rectangle()
                        .fill(Color.orange)
                        .frame(width: 15, height: 7)
                    Text("失败")


            ViewThatFits

                HStack
                    Rectangle()
                        .fill(Color.gray.opacity(0.5))
                        .frame(width: 15, height: 7)
                    Text("未定义")


                VStack
                    Rectangle()
                        .fill(Color.gray.opacity(0.5))
                        .frame(width: 15, height: 7)
                    Text("未定义")


            */
            Spacer()
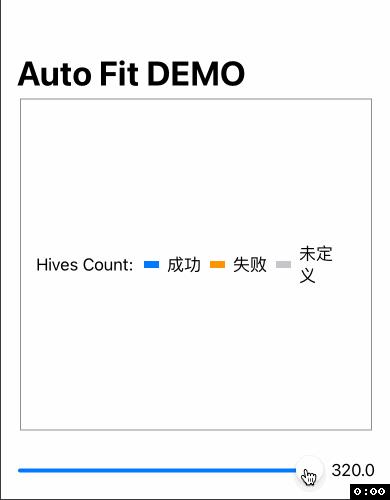
这样一来,我们可以完全省去GeometryReader和阙值的“烦心事”,非常方便:

总结
在本篇博文中,我们用一个实际的例子介绍了SwiftUI 4.0中ViewThatFits自适应视图的使用,更多内容可以移步以下链接观赏:
SwiftUI 4.0 (iOS 16) 新ViewThatFits视图使用简介
那么,下次再会啦!😉
以上是关于一个实际使用SwiftUI 4.0中ViewThatFits自适应视图的例子的主要内容,如果未能解决你的问题,请参考以下文章