DGL库中一些函数或者方法的介绍
Posted Icy Hunter
tags:
篇首语:本文由小常识网(cha138.com)小编为大家整理,主要介绍了DGL库中一些函数或者方法的介绍相关的知识,希望对你有一定的参考价值。
文章目录
前言
DGL库中有许多内置函数和方法,还是需要记录一下,以便更好的掌握DGL。
AddReverse()
对于同构图和异构图都能够创建图反向的边(以下以异构图为例)。
dgl.transforms.AddReverse(copy_edata=False, sym_new_etype=False)
copy_edata=True则复制边的特征
sym_new_etype=True对于异构图来说,相同类型的节点也会创建反向边
import dgl
import torch as th
g = dgl.heterograph(
    ('user', 'follows', 'user') : ([0, 1], [1, 2]),
    ('user', 'plays', 'game') : ([0], [1]),
    ('store', 'sells', 'game')  :([0], [2]))
g.edges["follows"].data["w"] = th.ones(2, 2)
g.edges["plays"].data["w"] = th.ones(1, 2) + 1
g.edges["sells"].data["w"] = th.ones(1, 2) + 2
print(g)
print(g.edges["sells"].data["w"])
gg = dgl.AddReverse(copy_edata=True, sym_new_etype=True)(g)
print("="*10)
print(gg)
print(gg.edges["rev_sells"].data["w"])
输出如下:

可见user之间的节点也出现了rev_follows关系,sym_new_etype=False就不会出现了
update_all()
用于消息的更新。
对于同构图:
import dgl
import dgl.function as fn
import torch
g = dgl.graph(([0, 1, 2, 3], [1, 2, 3, 4]))
g.ndata['x'] = torch.ones(5, 2)
g.update_all(fn.copy_u('x', 'm'), fn.mean('m', 'h'))
print(g.ndata['h'])
g.update_all(fn.u_add_v('x', 'x', 'm'), fn.sum('m', 'h'))
print(g.ndata['h'])
输出:
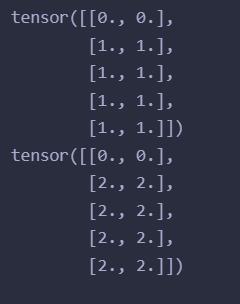
g.update_all(fn.copy_u('x', 'm'), fn.mean('m', 'h'))
这个是copy节点的x特征到m然后对m取均值得到节点特征h,由于这个图是0->1->2->3->4,因此0节点是没有消息传过来的
g.update_all(fn.u_add_v('x', 'x', 'm'), fn.sum('m', 'h'))
这个u_add_v是将源节点和目标节点的x特征相加得到m然后对所有m求和得到h,同样0节点没有消息传来。
对于异构图:
当希望对某些特定关系进行更新时:
import dgl
import torch as th
g = dgl.heterograph(
    ('user', 'follows', 'user') : ([0, 1], [1, 2]),
    ('user', 'plays', 'game') : ([0], [1]),
    ('store', 'sells', 'game')  :([0], [2]))
g.nodes["user"].data["w"] = th.ones(3, 2)
g.nodes["game"].data["w"] = th.ones(3, 2) + 1
g.nodes["store"].data["w"] = th.ones(1, 2) + 2
print(g.nodes["user"].data["w"])
print(g["follows"]) # follows关系的子图
g['follows'].update_all(fn.copy_src('w', 'm'), fn.sum('m', 'h'), etype="follows")
print(g.nodes["user"].data["h"])
print(g.nodes["user"].data["w"])
# print(g.nodes["store"].data["h"]) # 只更新了follows关系的节点
输出:
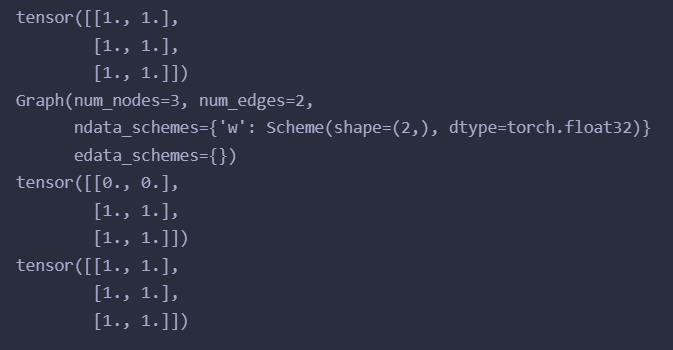
由于user是0->1->2,因此0没有消息传递过来
异构图对所有关系进行消息传递:
import dgl
import torch as th
g = dgl.heterograph(
    ('user', 'follows', 'user'): ([0, 1], [1, 1]),
    ('game', 'attracts', 'user'): ([0], [1])
)
g.nodes['user'].data['h'] = torch.tensor([[1.], [2.]])
g.nodes['game'].data['h'] = torch.tensor([[1.]])
g.update_all(fn.copy_src('h', 'm'), fn.sum('m', 'h'))
print(g.nodes['user'].data['h'])
输出:
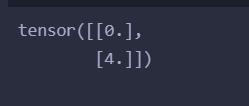
由于user0 -> user1, user1->user1, game0 ->user1,那么说明user1将汇聚user0、1和game0的h特征
1+2+1 = 4得到user1的h特征为4符合预期,由于user1没有消息传递过来,因此是0
apply_edges()
用于更新边的特征
对于同构图:
g = dgl.graph(([0, 1, 2, 3], [1, 2, 3, 4]))
g.ndata['h'] = torch.ones(5, 2)
g.apply_edges(lambda edges: 'x' : edges.src['h'] + edges.dst['h'])
print(g.edata['x'])
这里的操作就是将每条边的源节点和目标节点的h相加得到边的特征x
输出:
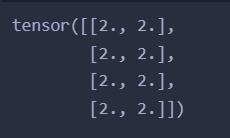
import dgl.function as fn
g.apply_edges(fn.u_add_v('h', 'h', 'x'))
g.edata['x']
这样的写法和上面一样的意思
对于异构图:
import dgl
import torch as th
g = dgl.heterograph(
    ('user', 'follows', 'user'): ([0, 1], [1, 1]),
    ('game', 'attracts', 'user'): ([0], [1])
)
g.nodes['user'].data['h'] = torch.tensor([[1.], [2.]])
g.nodes['game'].data['h'] = torch.tensor([[1.]])
g.update_all(fn.copy_src('h', 'm'), fn.sum('m', 'h'))
g.apply_edges(lambda edges: 'h': edges.src['h'] * 2, etype="follows")
print(g.edges["follows"].data['h'])
当边不止一条时,需要指定etype
输出:

follows关系中,user0->user1, user1->user1,由于user0的特征h为0,user1的特征h为4因此结果为0,8符合预期。
apply_nodes()
只用于变换节点的特征
对于同构图:
import dgl
import dgl.function as fn
import torch
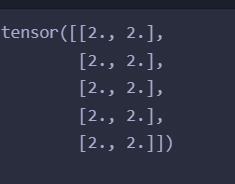
g = dgl.graph(([0, 1, 2, 3], [1, 2, 3, 4]))
g.ndata['h'] = torch.ones(5, 2)
g.apply_nodes(lambda nodes: 'x' : nodes.data['h'] * 2)
print(g.ndata['x'])
对节点赋予x特征为节点h特征值*2
输出:
对于异构图:
import dgl
import torch as th
g = dgl.heterograph(
    ('user', 'follows', 'user'): ([0, 1], [1, 1]),
    ('game', 'attracts', 'user'): ([0], [1])
)
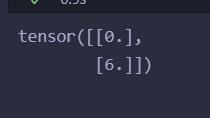
g.nodes['user'].data['h'] = torch.tensor([[1.], [2.]])
g.nodes['game'].data['h'] = torch.tensor([[1.]])
g.update_all(fn.copy_src('h', 'm'), fn.sum('m', 'h'))
g.apply_nodes(lambda nodes: 'h': nodes.data['h'] * 1.5, ntype='user')
print(g.nodes['user'].data['h'])
对user节点特征h*1.5
输出:
apply_each()
能够将一些特殊格式的数据如字典类型的数据等进行对应特征变换
import dgl
import torch as th
import torch
from dgl import apply_each
h = k: torch.randn(3) for k in ['A', 'B', 'C']
print(h)
h = apply_each(h, torch.nn.functional.relu)
assert all((v >= 0).all() for v in h.values())
print(h)
这里将字典h中对应特征进行relu激活
得到结果:

正数保留,负数为0,符合预期。
HeteroLinear
异构线性层,适合异构图的处理
import dgl
import torch
from dgl.nn import HeteroLinear
layer = HeteroLinear('user': 1, ('user', 'follows', 'user'): 2, 3)
in_feats = 'user': torch.randn(2, 1), ('user', 'follows', 'user'): torch.randn(3, 2)
out_feats = layer(in_feats)
print(out_feats['user'].shape)
print(out_feats[('user', 'follows', 'user')].shape)
定义需要字典(特征1:输入的维度,特征2:输入的维度,输出的维度)
即可完成维度的对齐输出。
代码输出:

参考
https://docs.dgl.ai/en/0.9.x/generated/dgl.transforms.AddReverse.html?highlight=dgl%20addreverse#dgl.transforms.AddReverse
https://docs.dgl.ai/en/0.9.x/generated/dgl.DGLGraph.update_all.html?highlight=update_all
https://docs.dgl.ai/en/0.9.x/generated/dgl.DGLGraph.apply_edges.html?highlight=apply_edges
https://docs.dgl.ai/en/0.9.x/generated/dgl.nn.pytorch.HeteroLinear.html?highlight=heterolinear
以上是关于DGL库中一些函数或者方法的介绍的主要内容,如果未能解决你的问题,请参考以下文章