Mysql高可用—5.7 gtid 主从 + orchestrator 配置及简单测试
Posted 翔之天空
tags:
篇首语:本文由小常识网(cha138.com)小编为大家整理,主要介绍了Mysql高可用—5.7 gtid 主从 + orchestrator 配置及简单测试相关的知识,希望对你有一定的参考价值。
参考:https://github.com/openark/orchestrator/tree/master/docs
下载地址:https://github.com/openark/orchestrator/releases
目录
--2、安装orchestrator (三台服务器 都要安装)
--3、配置orchestrator及被管理数据库(三台服务器 都要配置)
--4、启动(三台服务器 都要启动orchestrator,让其orchestrator通过raft一致性算法来保障自身高可用)
--5、orchestrator-client 后台命令管理orchestrator
--7-5、从库1(192.168.56.60:3306) 宕机
--1、环境信息:
--1-1、版本:
系统版本:CentOS7
mysql版本:Mysql5.7
orch版本: orchestrator-3.1.4    下载地址:https://github.com/openark/orchestrator/releases


--1-2、目前已配置环境:
--Mysql一主两从: 是属于被管理的三个mysql数据库
主库: 主机名:hostmysql80  IP:192.168.56.80  端口:3306  server_id:1113306  读写
从库1:主机名:hostmysql61  IP:192.168.56.61  端口:3306  server_id:2223306  只读
从库2:主机名:hostmysql60  IP:192.168.56.60  端口:3306  server_id:3333306  只读
--必要参数my.cnf设置如下:GTID复制、ROw模式、log_slave_updates开启、slave_net_timeout实际情况设置 但默认60s才重连主库时间过长
gtid_mode = ON
enforce_gtid_consistency = ON
binlog_format = ROW
log_slave_updates = 1
slave_net_timeout = 4


--Orchestrator的后端mysql库 用于存储orch的配置信息 这里三个节点是做raft高可用(复用服务器 在原有mysql服务器上的第二个实例 3307端口 来配置Orchestrator的后端mysql)
--存储orch的信息 可以选择mysql库 也可以选择sqlite库。 这里选择了mysql库 所有的参数配置也是按照mysql库的来配置
192.168.56.80  3307        server_id:1113307
192.168.56.61  3307        server_id:2223307
192.168.56.60  3307        server_id:3333307


--1-3、三台服务器 都要 配置/etc/hosts 如下:
[root@hostmysql80 mysql_setup]# vi /etc/hosts
192.168.56.80  hostmysql80
192.168.56.61  hostmysql61
192.168.56.60  hostmysql60
--2、安装orchestrator (三台服务器 都要安装)
--2-1、安装orchestrator的依赖包
[root@hostmysql80 mysql_setup]# rpm -ivh oniguruma-5.9.5-3.el7.x86_64.rpm

[root@hostmysql80 mysql_setup]# rpm -ivh jq-1.6-1.el7.x86_64.rpm

--2-2、安装orchestrator
[root@hostmysql80 mysql_setup]# rpm -ivh orchestrator-3.1.4-1.x86_64.rpm

--查看安装包
[root@hostmysql80 ~]# cd /usr/local/orchestrator
[root@hostmysql80 orchestrator]# ll
total 19480
-rwxr-xr-x. 1 root root 19927832 Jan 26 22:05 orchestrator                                //程序
-rw-rw-r--. 1 root root     5436 Jan 26 22:04 orchestrator-sample.conf.json               //参数配置sample模板,正式参数文件为orchestrator.conf.json
-rw-rw-r--. 1 root root     5060 Jan 26 22:04 orchestrator-sample-sqlite.conf.json        //后端为sqlite数据库的参数模板
drwxr-xr-x. 7 root root       82 Apr  2 16:07 resources                                   //orchestrator相关的文件
--3、配置orchestrator及被管理数据库(三台服务器 都要配置)
--3-1、配置 /usr/local/orchestrator/orchestrator.conf.json 参数配置文件 , 参考官网https://github.com/openark/orchestrator/blob/master/docs/configuration.md


--3-2、orch 后端数据库 3307 需要建立orchestrator库 及 管理用户
--(建立orchestrator_srv管理用户  host指定127.0.0.1 本机访问即可)
--参照参数  MySQLOrchestratorHost、MySQLOrchestratorPort、MySQLOrchestratorDatabase、MySQLOrchestratorUser、MySQLOrchestratorPassword、MySQLOrchestratorCredentialsConfigFile
[root@hostmysql80 orchestrator]# mysql -uroot -pRoot123$ -h127.0.0.1  -P3307
CREATE DATABASE IF NOT EXISTS orchestrator;
CREATE USER 'orchestrator_srv'@'127.0.0.1' IDENTIFIED BY 'orc_server_password';
GRANT ALL PRIVILEGES ON orchestrator.* TO 'orchestrator_srv'@'127.0.0.1';


--3-3、被管理的一主两从 mysql库 3306 需要新增orchestrator用来连接的用户
--(建立orch_topology_user被管理用户  host指定orchestrator管理的IP即可 192.168.56.% ,在orchestrator连接被管理库时 用'orch_topology_user'@'hostname' 形式连接 /etc/hosts之前已配置过)
--参照参数  MySQLTopologyUser、MySQLTopologyPassword
[root@hostmysql80 orchestrator]# mysql -uroot -pRoot123$ -h127.0.0.1  -P3306
CREATE USER 'orch_topology_user'@'192.168.56.%' IDENTIFIED BY 'orch_topology_password';
GRANT SUPER, PROCESS, REPLICATION SLAVE, RELOAD ON *.* TO 'orch_topology_user'@'192.168.56.%';
GRANT SELECT ON mysql.slave_master_info TO 'orch_topology_user'@'192.168.56.%';
GRANT SELECT ON perconadb.* TO 'orch_topology_user'@'192.168.56.%';                       //用户赋权一些监控信息的表权限
--GRANT SELECT ON ndbinfo.processes TO 'orch_topology_user'@'192.168.56.%';               //Only for NDB Cluster 只在NDB环境设置


--3-4、被管理的一主两从 mysql库 3306  需要修改从库的复制参数
--slave_net_timeout是等待主库发送数据过来的时间(单位 秒),超过这个时间就会重连主库,5.7.7之后默认60秒。
--MASTER_CONNECT_RETRY是尝试连接主库的间隔时间(单位 秒),默认60秒。
--MASTER_RETRY_COUNT是尝试连接主库的次数 默认86400次。
--master_heartbeat_period 是主库主动发送给从库的心跳包间隔时间,默认是slave_net_timeout的1/2时间(30秒)。
--默认参数情况下 如果从库等待了slave_net_timeout(60)秒还没有接收到主库的数据(包括每30秒一次的心跳包),就会发起重连主库 会每隔MASTER_CONNECT_RETRY(60)秒重连一次,直到重新连接上或者尝试了MASTER_RETRY_COUNT(86400)次后依然没连接上 放弃了。
--这样等待重连主库的时间会很长 60秒才重试一次,所以修改参数 如下: 从库如果等待4秒没有接收到主库数据(包括每2秒一次的心跳包) 就每隔1秒 重连主库 直到连接上或者尝试86400次之后放弃。

set global slave_net_timeout = 4;                                                               // /etc/my.cnf参数文件也需要修改
CHANGE MASTER TO MASTER_CONNECT_RETRY=1, MASTER_RETRY_COUNT=86400, master_heartbeat_period=2;   //需要stop slave
--4、启动(三台服务器 都要启动orchestrator,让其orchestrator通过raft一致性算法来保障自身高可用)
--4-1、debug启动orchestrator
[root@hostmysql80 ~]# cd /usr/local/orchestrator

[root@hostmysql80 orchestrator]# ./orchestrator --debug --config=/usr/local/orchestrator/orchestrator.conf.json http
--4-2、登录web管理orchestrator:
http://192.168.56.60:3000 三个orchestrator 节点任意一个就可以
--添加 被管理的数据库(任意一个库就可以)

--查看被管理数据库的主从复制状态
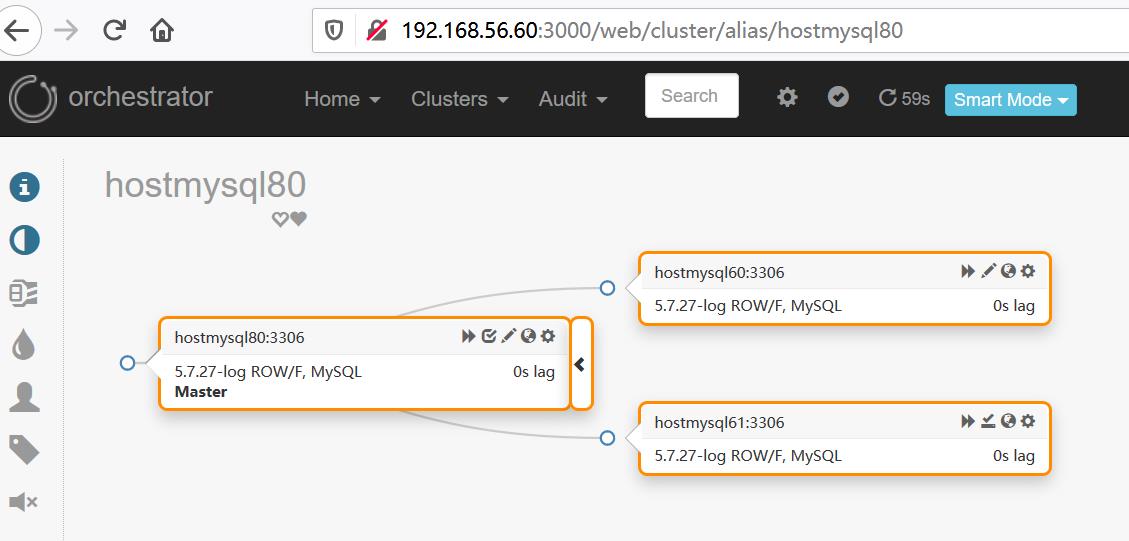
--查看orchestrator 三节点的状态
--5、orchestrator-client 后台命令管理orchestrator
--5-1、安装orchestrator-client (任意一台服务器安装即可,可以不在orchestrator或者被管理mysql的服务器上安装)
[root@hostmysql80 mysql_setup]# rpm -ivh orchestrator-client-3.1.4-1.x86_64.rpm
Preparing...                          ################################# [100%]
Updating / installing...
   1:orchestrator-client-1:3.1.4-1    ################################# [100%]


--5-2、设置环境变量
[root@hostmysql80 ~]# vi /etc/profile.d/orchestrator-client.sh
export ORCHESTRATOR_API="hostmysql80:3000/api hostmysql61:3000/api hostmysql60:3000/api"

--5-3、查看帮助
[root@hostmysql80 ~]# orchestrator-client --help
Usage: orchestrator-client -c <command> [flags...]
Example: orchestrator-client -c which-master -i some.replica
Options:

  -h, --help
    print this help
  -c <command>, --command <command>
    indicate the operation to perform (see listing below)
  -a <alias>, --alias <alias>
    cluster alias
......


--5-4、基本命令
--列出 所有集群  clusters
[root@hostmysql80 ~]# orchestrator-client -c clusters
hostmysql80:3306
--列出 指定集群下 所有实例 which-cluster-instances
[root@hostmysql80 orchestrator]# orchestrator-client -c which-cluster-instances -i  hostmysql80:3306
hostmysql60:3306
hostmysql61:3306
hostmysql80:3306

--指定复制集群的拓扑
[root@hostmysql80 orchestrator]# orchestrator-client -c topology-tabulated -i  hostmysql80:3306
hostmysql80:3306  |0s|ok|5.7.27-log|rw|ROW|>>,GTID
+ hostmysql60:3306|0s|ok|5.7.27-log|ro|ROW|>>,GTID
+ hostmysql61:3306|0s|ok|5.7.27-log|ro|ROW|>>,GTID

--搜索实例 search
[root@hostmysql80 orchestrator]# orchestrator-client -c search -i  host
hostmysql61:3306
hostmysql80:3306
hostmysql60:3306


--遗忘一个指定实例 forget   (forget-cluster 是遗忘集群)
[root@hostmysql80 ~]# orchestrator-client -c forget -i hostmysql60:3306

--发现一个指定实例 discover  (async-discover 异步发现)
[root@hostmysql80 ~]# orchestrator-client -c discover -i hostmysql60:3306
hostmysql60:3306
--6、orchestrator的自身高可用
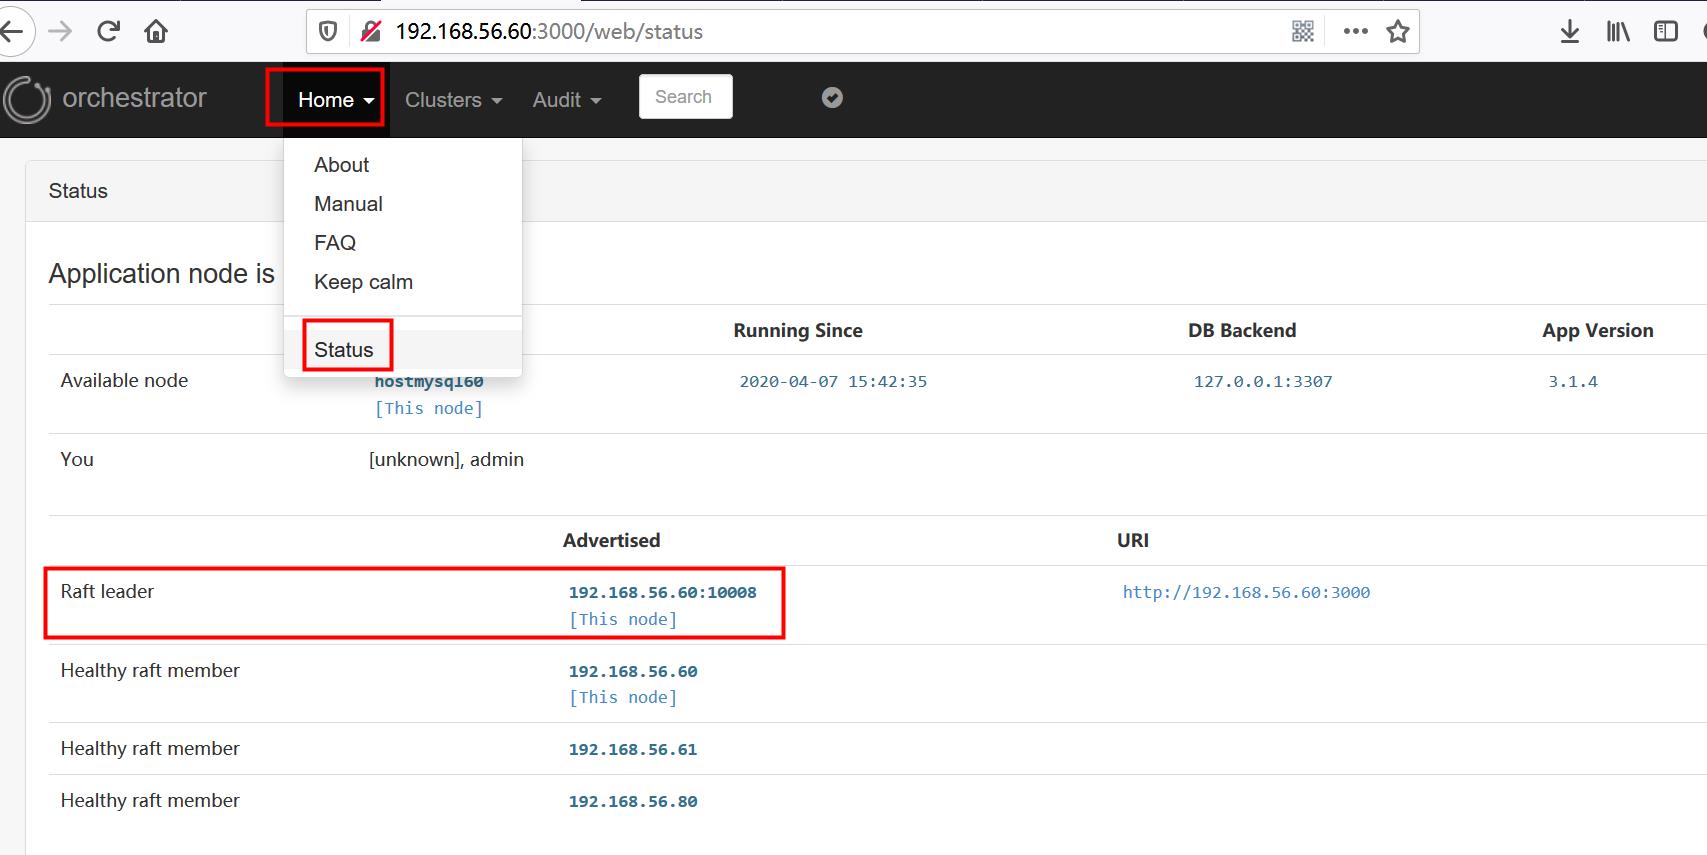
-- orchestr ator 通过raft分布式一致性协议来保证自身的高可用 , 3 节点时 最多1节点失败可保障 orchestrator正常使用,5节点时 最多2节点失败 可保障 orchestrator正常使用。 --下面演示 3节点 有1个节点失败 和 2个节点失败的场景--6-1、查看当前raft的情况是健康的 ,leader节点 是192.168.56.60:10008
[root@hostmysql80 ~]# orchestrator-client -c raft-leader
192.168.56.60:10008
[root@hostmysql80 ~]# orchestrator-client -c raft-health
healthy
--6-2、干掉当前leader(192.168.56.60:10008)节点的orchestrator
[root@hostmysql60 ~]# ps -ef|grep orch
root 5981 5776 2 15:42 pts/1 00:03:29 ./orchestrator --config=/usr/local/orchestrator/orchestrator.conf.json http
root 7867 6138 0 18:27 pts/2 00:00:00 grep --color=auto orch
[root@hostmysql60 ~]# kill -9 5981
--6-3、再次查看当前raft的情况是健康的(3节点 失败1节点 无问题) ,leader节点 变成了192.168.56.80:10008
[root@hostmysql80 ~]# orchestrator-client -c raft-leader
192.168.56.80:10008
[root@hostmysql80 ~]# orchestrator-client -c raft-health
healthy
--6-4、干掉当前leader(192.168.56.80:10008)节点的orchestrator
[root@hostmysql80 ~]# ps -ef|grep orch
root 7402 7310 1 15:31 pts/2 00:03:17 ./orchestrator --debug --config=/usr/local/orchestrator/orchestrator.conf.json http
root 9722 7687 0 18:29 pts/1 00:00:00 grep --color=auto orch
[root@hostmysql80 ~]# kill -9 7402
--6-5、再次查看当前raft的情况是非健康的(3节点 失败2节点 orchestrator挂了) ,如下图 查看web界面一样 变灰 orchestrator 不可用了
[root@hostmysql80 ~]# orchestrator-client -c raft-leader
orchestrator-client[9738]: Cannot determine leader from hostmysql80:3000/api hostmysql61:3000/api hostmysql60:3000/api
[root@hostmysql80 ~]# orchestrator-client -c raft-health
orchestrator-client[9770]: Cannot determine leader from hostmysql80:3000/api hostmysql61:3000/api hostmysql60:3000/api
--7、被管理的mysql服务 高可用
--参考官网: https://github.com/openark/orchestrator/blob/master/docs/topology-recovery.md#automated-recovery --高可用方式:1:主库宕机 自动恢复、2:优雅的提升主库(主从切换)、3:手工恢复、4:手工强制恢复--7-1、主库宕机 自动恢复
--主库宕机了, 根据从库优先提升主库规则 自动的把该从库提升为新主库(此时 旧主库独立 可以手工设置 read_only=1 然后拉回复制集群中 ) 。 如果参数 "ApplyMySQLPromotionAfterMasterFailover": true, 那么自动的对新主库执行 reset slave all 和 set read_only=0 (但要注意 /etc/my.cnf参数文件并没有更改)。--需要在orchestrator.conf.json 参数配置文件 设置如下参数:
"FailureDetectionPeriodBlockMinutes": 60, //在该时间内再次出现故障,不会在次被监控
"RecoveryPeriodBlockSeconds": 3600, //在该时间内再次出现故障,不会进行迁移,避免出现恢复冲突
"RecoveryIgnoreHostnameFilters": [], //恢复将忽略匹配的主机
"RecoverMasterClusterFilters": ["*"], //设置自动failover 切换主库。只对匹配的集群进行主恢复("*"模式匹配所有)
"RecoverIntermediateMasterClusterFilters":["*"], //设置自动failover 切换主库。只对匹配的集群进行恢复("*"模式匹配所有内容)
--设置 提升 主库的规则,优先提升hostmysql61:3306为主库
[root@hostmysql80 ~]# orchestrator-client -c register-candidate -i hostmysql61:3306 --promotion-rule prefer
hostmysql61:3306
--查看集群
[root@hostmysql80 orchestrator]# orchestrator-client -c clusters
hostmysql80:3306
--查看集群的复制拓补状态 都正常的
[root@hostmysql80 orchestrator]# orchestrator-client -c topology-tabulated -i hostmysql80:3306
hostmysql80:3306 |0s|ok|5.7.27-log|rw|ROW|>>,GTID
+ hostmysql60:3306|0s|ok|5.7.27-log|ro|ROW|>>,GTID
+ hostmysql61:3306|0s|ok|5.7.27-log|ro|ROW|>>,GTID
--主库(hostmysql80:3306)宕机
[root@hostmysql80 ~]# systemctl stop mysqld.service
--查看集群的复制拓补状态 主库(hostmysql80:3306) 显示不可用, 但从库ok
[root@hostmysql80 orchestrator]# orchestrator-client -c topology-tabulated -i hostmysql80:3306
hostmysql80:3306 |unknown|invalid|5.7.27-log|rw|ROW|>>,GTID
+ hostmysql60:3306| 0s|ok |5.7.27-log|ro|ROW|>>,GTID
+ hostmysql61:3306| 0s|ok |5.7.27-log|ro|ROW|>>,GTID
--主库已变成downtimed状态(维护状态)
[root@hostmysql80 orchestrator]# orchestrator-client -c topology-tabulated -i hostmysql80:3306
hostmysql80:3306|unknown|invalid|5.7.27-log|rw|ROW|>>,GTID,downtimed
--显示downtimed状态(维护状态)的情况
[root@hostmysql80 orchestrator]# orchestrator-client -c downtimed
hostmysql80:3306
--分析复制拓补中存在的问题 主库(hostmysql80:3306) 死掉了 而且没有所属从库
[root@hostmysql80 orchestrator]# orchestrator-client -c replication-analysis
hostmysql80:3306 (cluster hostmysql80:3306): DeadMasterWithoutSlaves
--通过任一从库 查看集群的复制拓补状态,发现hostmysql61:3306已变成新主库
[root@hostmysql80 orchestrator]# orchestrator-client -c topology-tabulated -i hostmysql60:3306
hostmysql61:3306 |0s|ok|5.7.27-log|rw|ROW|>>,GTID
+ hostmysql60:3306|0s|ok|5.7.27-log|ro|ROW|>>,GTID
--查看新主库的状态(hostmysql61:3306),因为参数设置是 "ApplyMySQLPromotionAfterMasterFailover": true, 所以对新主库执行了 reset slave all 和 set read_only=0 。
mysql> show slave status\\G
Empty set (0.00 sec)
mysql> show variables like 'read_only';
+---------------+-------+
| Variable_name | Value |
+---------------+-------+
| read_only | OFF |
+---------------+-------+
1 row in set (0.00 sec)
--以上的自动恢复流程 查看/tmp/recovery.log日志, 参考《Mysql主从复制08_高可用+orchestrator_2_参数配置文件》章节中的参数
OnFailureDetectionProcesses
OnFailureDetectionProcesses
PreFailoverProcesses #在执行恢复操作之前立即执行
PostMasterFailoverProcesses #在主恢复成功结束时执行
PostFailoverProcesses #在任何成功恢复结束时执行
[root@hostmysql61 ~]# more /tmp/recovery.log
Detected UnreachableMaster on hostmysql80:3306. Affected replicas: 2
Detected DeadMaster on hostmysql80:3306. Affected replicas: 2
Will recover from DeadMaster on hostmysql80:3306
Recovered from DeadMaster on hostmysql80:3306. Failed: hostmysql80:3306; Promoted: hostmysql61:3306
(for all types) Recovered from DeadMaster on hostmysql80:3306. Failed: hostmysql80:3306; Successor: hostmysql61:3306
--恢复主库(192.168.56.80:3306)
[root@hostmysql80 ~]# systemctl start mysqld.service
--再次分析复制拓补已无问题,但hostmysql80:3306成为了独立的库
[root@hostmysql80 orchestrator]# orchestrator-client -c replication-analysis
[root@hostmysql80 orchestrator]# orchestrator-client -c topology-tabulated -i hostmysql60:3306
hostmysql61:3306 |0s|ok|5.7.27-log|rw|ROW|>>,GTID
+ hostmysql60:3306|0s|ok|5.7.27-log|ro|ROW|>>,GTID
[root@hostmysql80 orchestrator]# orchestrator-client -c topology-tabulated -i hostmysql80:3306
hostmysql80:3306|0s|ok|5.7.27-log|rw|ROW|>>,GTID
--把hostmysql80:3306库加入到复制集群中 作为hostmysql61:3306的从库 ,显示太复杂 需要手工加入集群
[root@hostmysql80 orchestrator]# orchestrator-client -c relocate -i hostmysql80:3306 -d hostmysql61:3306
2020-04-08 18:11:33 ERROR Relocating hostmysql80:3306 below hostmysql61:3306 turns to be too complex; please do it manually
--根据复制规则检查hostmysql80:3306是否可以从hostmysql61:3306复制
[root@hostmysql80 orchestrator]# orchestrator-client -c can-replicate-from -i hostmysql80:3306 -d hostmysql61:3306
hostmysql61:3306
--手动把hostmysql80:3306库加入到复制集群中 作为hostmysql61:3306的从库
--进入hostmysql80:3306 库,设置read_only = 1;(包括/etc/my.cnf参数文件) 和 reset slave all
mysql> set global read_only = 1;
mysql> stop slave;
mysql> reset slave all;
mysql> CHANGE MASTER TO MASTER_HOST='hostmysql61',
MASTER_PORT=3306,
MASTER_USER='repl',
MASTER_PASSWORD='replPwd8!',
MASTER_AUTO_POSITION=1,
MASTER_CONNECT_RETRY=1,
MASTER_RETRY_COUNT=86400,
MASTER_HEARTBEAT_PERIOD=2;
mysql> start slave;
--查看集群的复制拓补状态,hostmysql80加入了复制集群中
[root@hostmysql80 orchestrator]# orchestrator-client -c topology-tabulated -i hostmysql80:3306
hostmysql61:3306 |0s|ok|5.7.27-log|ro|ROW|>>,GTID
+ hostmysql60:3306|0s|ok|5.7.27-log|ro|ROW|>>,GTID
+ hostmysql80:3306|0s|ok|5.7.27-log|ro|ROW|>>,GTID
--7-2、优雅的提升主库(主从切换)
--优雅的提升一个从库为新主库,在提升新主库之前 会自动把旧主库设置 read_only=1,然后把旧主库变为新主库的从库(维护状态 需要手工start slave拉起)。如果参数"ApplyMySQLPromotionAfterMasterFailover": true, 那么对新主库执行 reset slave all 和 set read_only=0(但要注意 /etc/my.cnf参数文件并没有更改) 。
--查看集群的复制拓补状态 都正常的。 hostmysql61:3306为主库
[root@hostmysql80 ~]# orchestrator-client -c topology-tabulated -i  hostmysql61:3306
hostmysql61:3306  |0s|ok|5.7.27-log|ro|ROW|>>,GTID
+ hostmysql60:3306|0s|ok|5.7.27-log|ro|ROW|>>,GTID
+ hostmysql80:3306|0s|ok|5.7.27-log|ro|ROW|>>,GTID


--优雅的提升hostmysql80:3306为主库,hostmysql61:3306为其从库
[root@hostmysql80 ~]# orchestrator-client -c graceful-master-takeover -a hostmysql61:3306 -d hostmysql80:3306
hostmysql80:3306


--查看集群的复制拓补状态 hostmysql80:3306已提升为主库,  hostmysql61:3306变成了从库(downtimed 维护状态)
[root@hostmysql80 ~]# orchestrator-client -c topology-tabulated -i  hostmysql61:3306
hostmysql80:3306  |  0s|ok            |5.7.27-log|rw|ROW|>>,GTID
+ hostmysql60:3306|  0s|ok            |5.7.27-log|ro|ROW|>>,GTID
- hostmysql61:3306|null|nonreplicating|5.7.27-log|ro|ROW|>>,GTID,downtimed


--以上优雅提升主库的流程 查看/tmp/recovery.log日志, 参考《Mysql主从复制08_高可用+orchestrator_2_参数配置文件》章节中的参数
PreGracefulTakeoverProcesses
OnFailureDetectionProcesses
PreFailoverProcesses
PostMasterFailoverProcesses
PostFailoverProcesses
PostGracefulTakeoverProcesses

[root@hostmysql80 ~]# more /tmp/recovery.log
Planned takeover about to take place on hostmysql61:3306. Master will switch to read_only
Detected DeadMaster on hostmysql61:3306. Affected replicas: 1
Will recover from DeadMaster on hostmysql61:3306
Recovered from DeadMaster on hostmysql61:3306. Failed: hostmysql61:3306; Promoted: hostmysql80:3306
(for all types) Recovered from DeadMaster on hostmysql61:3306. Failed: hostmysql61:3306; Successor: hostmysql80:3306
Planned takeover complete


--手工拉起hostmysql61库的复制
mysql> start slave;


--查看集群的复制拓补状态,hostmysql61的复制已正常
[root@hostmysql80 ~]# orchestrator-client -c topology-tabulated -i  hostmysql80:3306
hostmysql80:3306  |0s|ok|5.7.27-log|rw|ROW|>>,GTID
+ hostmysql60:3306|0s|ok|5.7.27-log|ro|ROW|>>,GTID
+ hostmysql61:3306|0s|ok|5.7.27-log|ro|ROW|>>,GTID
--7-3、手工恢复
--在自动恢复禁止或者阻塞时,可以手工恢复复制集群。 流程大体和自动恢复一致 只多了一个手动恢复。
--设置自动恢复禁止,需要在orchestrator.conf.json 参数配置文件 设置如下参数:
  "FailureDetectionPeriodBlockMinutes": 60,
  "RecoveryPeriodBlockSeconds": 3600,
  "RecoveryIgnoreHostnameFilters": [],
  "RecoverMasterClusterFilters": ["_auto_failure_"],                    //匹配不上即可
  "RecoverIntermediateMasterClusterFilters": ["_auto_failure_"],        //匹配不上即可


--主库宕机
[root@hostmysql80 orchestrator]# systemctl stop mysqld.service

--查看集群的复制拓补状态,集群挂了(因为没有自动恢复 所以会一直挂起)
[root@hostmysql80 orchestrator]# orchestrator-client -c topology-tabulated -i  hostmysql60:3306
hostmysql80:3306  |unknown|invalid       |5.7.27-log|rw|ROW|>>,GTID
- hostmysql60:3306|   null|nonreplicating|5.7.27-log|ro|ROW|>>,GTID
- hostmysql61:3306|   null|nonreplicating|5.7.27-log|ro|ROW|>>,GTID


--对失败的实例 执行手动恢复
[root@hostmysql80 orchestrator]# orchestrator-client -c recover -i hostmysql80:3306
hostmysql61:3306

--查看集群的复制拓补状态,已把失败的实例(主库)剔除集群,提升hostmysql61:3306为主库,复制集群恢复正常
[root@hostmysql80 orchestrator]# orchestrator-client -c topology-tabulated -i  hostmysql60:3306
hostmysql61:3306  |0s|ok|5.7.27-log|rw|ROW|>>,GTID
+ hostmysql60:3306|0s|ok|5.7.27-log|ro|ROW|>>,GTID

--以上的手动恢复流程 查看/tmp/recovery.log日志, 参考《Mysql主从复制08_高可用+orchestrator_2_参数配置文件》章节中的参数
OnFailureDetectionProcesses
OnFailureDetectionProcesses
PreFailoverProcesses                      #在执行恢复操作之前立即执行
PostMasterFailoverProcesses               #在主恢复成功结束时执行
PostFailoverProcesses                     #在任何成功恢复结束时执行

[root@hostmysql80 orchestrator]# more /tmp/recovery.log
Detected UnreachableMaster on hostmysql80:3306. Affected replicas: 2
Detected DeadMasterAndSomeSlaves on hostmysql80:3306. Affected replicas: 2
Will recover from DeadMasterAndSomeSlaves on hostmysql80:3306
Recovered from DeadMasterAndSomeSlaves on hostmysql80:3306. Failed: hostmysql80:3306; Promoted: hostmysql60:3306
(for all types) Recovered from DeadMasterAndSomeSlaves on hostmysql80:3306. Failed: hostmysql80:3306; Successor: hostmysql60:3306


--恢复主库(192.168.56.80:3306)
[root@hostmysql80 ~]# systemctl start mysqld.service

--再次分析复制拓补已无问题,但hostmysql80:3306成为了独立的库
[root@hostmysql80 orchestrator]# orchestrator-client -c replication-analysis
[root@hostmysql80 orchestrator]# orchestrator-client -c topology-tabulated -i  hostmysql60:3306
hostmysql61:3306  |0s|ok|5.7.27-log|rw|ROW|>>,GTID
+ hostmysql60:3306|0s|ok|5.7.27-log|ro|ROW|>>,GTID
[root@hostmysql80 orchestrator]# orchestrator-client -c topology-tabulated -i  hostmysql80:3306
hostmysql80:3306|0s|ok|5.7.27-log|rw|ROW|>>,GTID

--把hostmysql80:3306库加入到复制集群中 作为hostmysql61:3306的从库 ,显示太复杂 需要手工加入集群
[root@hostmysql80 orchestrator]# orchestrator-client -c relocate -i hostmysql80:3306 -d hostmysql61:3306
2020-04-08 18:11:33 ERROR Relocating hostmysql80:3306 below hostmysql61:3306 turns to be too complex; please do it manually

--根据复制规则检查hostmysql80:3306是否可以从hostmysql61:3306复制
[root@hostmysql80 orchestrator]# orchestrator-client -c can-replicate-from -i hostmysql80:3306 -d hostmysql61:3306
hostmysql61:3306

--手动把hostmysql80:3306库加入到复制集群中 作为hostmysql61:3306的从库
--进入hostmysql80:3306 库,设置read_only = 1;(包括/etc/my.cnf参数文件) 和 reset slave all
mysql> set global read_only = 1;

mysql> stop slave;

mysql> reset slave all;

mysql> CHANGE MASTER TO MASTER_HOST='hostmysql61',
              MASTER_PORT=3306,
              MASTER_USER='repl',
              MASTER_PASSWORD='replPwd8!',
              MASTER_AUTO_POSITION=1,
              MASTER_CONNECT_RETRY=1,
              MASTER_RETRY_COUNT=86400,
              MASTER_HEARTBEAT_PERIOD=2;

mysql> start slave;


--查看集群的复制拓补状态,hostmysql80加入了复制集群中
[root@hostmysql80 orchestrator]# orchestrator-client -c topology-tabulated -i  hostmysql80:3306
hostmysql61:3306  |0s|ok|5.7.27-log|ro|ROW|>>,GTID
+ hostmysql60:3306|0s|ok|5.7.27-log|ro|ROW|>>,GTID
+ hostmysql80:3306|0s|ok|5.7.27-log|ro|ROW|>>,GTID
--7-4、手工强制恢复
--不管orchestrator的任何想法,强制进行故障转移
--查看集群的复制拓补状态,hostmysql80是复制集群的主库
[root@hostmysql80 ~]# orchestrator-client -c topology-tabulated -i  hostmysql80:3306
hostmysql80:3306  |0s|ok|5.7.27-log|ro|ROW|>>,GTID
+ hostmysql60:3306|0s|ok|5.7.27-log|ro|ROW|>>,GTID
+ hostmysql61:3306|0s|ok|5.7.27-log|ro|ROW|>>,GTID


--手工强制让hostmysql61:3306变成主库,忽略orchestrator的想法
[root@hostmysql80 ~]# orchestrator-client -c force-master-failover -i hostmysql61:3306
hostmysql61:3306

--查看之前的旧主库hostmysql80:3306  变成了独立的库。
[root@hostmysql80 ~]# orchestrator-client -c topology-tabulated -i  hostmysql80:3306
hostmysql80:3306|0s|ok|5.7.27-log|ro|ROW|>>,GTID
--新主库hostmysql61:3306 是集群复制的主库
[root@hostmysql80 ~]# orchestrator-client -c topology-tabulated -i  hostmysql61:3306
hostmysql61:3306  |0s|ok|5.7.27-log|rw|ROW|>>,GTID
+ hostmysql60:3306|0s|ok|5.7.27-log|ro|ROW|>>,GTID


--以上的手动恢复流程 查看/tmp/recovery.log日志, 参考《Mysql主从复制08_高可用+orchestrator_2_参数配置文件》章节中的参数

OnFailureDetectionProcesses
PreFailoverProcesses
PostMasterFailoverProcesses
PostFailoverProcesses

[root@hostmysql60 ~]# more /tmp/recovery.log
Detected DeadMaster on hostmysql80:3306. Affected replicas: 2
Will recover from DeadMaster on hostmysql80:3306
Recovered from DeadMaster on hostmysql80:3306. Failed: hostmysql80:3306; Promoted: hostmysql61:3306
(for all types) Recovered from DeadMaster on hostmysql80:3306. Failed: hostmysql80:3306; Successor: hostmysql61:3306


--把hostmysql80:3306库加入到复制集群中 作为hostmysql61:3306的从库 ,显示太复杂 需要手工加入集群
[root@hostmysql80 orchestrator]# orchestrator-client -c relocate -i hostmysql80:3306 -d hostmysql61:3306
2020-04-08 18:11:33 ERROR Relocating hostmysql80:3306 below hostmysql61:3306 turns to be too complex; please do it manually

--根据复制规则检查hostmysql80:3306是否可以从hostmysql61:3306复制
[root@hostmysql80 orchestrator]# orchestrator-client -c can-replicate-from -i hostmysql80:3306 -d hostmysql61:3306
hostmysql61:3306

--手动把hostmysql80:3306库加入到复制集群中 作为hostmysql61:3306的从库
--进入hostmysql80:3306 库,设置read_only = 1;(包括/etc/my.cnf参数文件) 和 reset slave all
mysql> set global read_only = 1;

mysql> stop slave;

mysql> reset slave all;

mysql> CHANGE MASTER TO MASTER_HOST='hostmysql61',
              MASTER_PORT=3306,
              MASTER_USER='repl',
              MASTER_PASSWORD='replPwd8!',
              MASTER_AUTO_POSITION=1,
              MASTER_CONNECT_RETRY=1,
              MASTER_RETRY_COUNT=86400,
              MASTER_HEARTBEAT_PERIOD=2;

mysql> start slave;


--查看集群的复制拓补状态,hostmysql80加入了复制集群中
[root@hostmysql80 orchestrator]# orchestrator-client -c topology-tabulated -i  hostmysql80:3306
hostmysql61:3306  |0s|ok|5.7.27-log|ro|ROW|>>,GTID
+ hostmysql60:3306|0s|ok|5.7.27-log|ro|ROW|>>,GTID
+ hostmysql80:3306|0s|ok|5.7.27-log|ro|ROW|>>,GTID
--7-5、从库1(192.168.56.60:3306) 宕机
--从库1(192.168.56.60:3306) 宕掉
[root@hostmysql61 system]# systemctl stop mysqld.service

--查看集群的复制拓补状态 从库1(192.168.56.60:3306) 显示不可用
[root@hostmysql80 ~]# orchestrator-client -c topology-tabulated -i  hostmysql61:3306
hostmysql61:3306  |     0s|ok     |5.7.27-log|rw|ROW|>>,GTID
- hostmysql60:3306|unknown|invalid|5.7.27-log|ro|ROW|>>,GTID
+ hostmysql80:3306|     0s|ok     |5.7.27-log|ro|ROW|>>,GTID

--恢复从库1(192.168.56.60:3306)
[root@hostmysql61 ~]# systemctl start mysqld.service

--从库会自动加入orchestrator监控中
[root@hostmysql80 ~]# orchestrator-client -c topology-tabulated -i  hostmysql61:3306
hostmysql61:3306  |0s|ok|5.7.27-log|rw|ROW|>>,GTID
+ hostmysql60:3306|0s|ok|5.7.27-log|ro|ROW|>>,GTID
+ hostmysql80:3306|0s|ok|5.7.27-log|ro|ROW|>>,GTID
附:启动orchestrator时 报错 及 解决
问题1:2020-04-07 10:01:11 ERROR ReadTopologyInstance(192.168.56.80:3306) show variables like 'maxscale%': QueryRowsMap unexpected error: runtime error: invalid memory address or nil pointer dereference
解决1:配置文件设置 "SkipMaxScaleCheck": true,


问题2:2020-04-07 10:12:42 ERROR ReadTopologyInstance(192.168.56.80:3306) show global status like 'Uptime': TLS requested but server does not support TLS
解决2:配置文件设置 "MySQLTopologyUseMixedTLS": false,


问题3:2020-04-08 09:45:34 ERROR ReadTopologyInstance(hostmysql80:3306) show slave hosts: ReadTopologyInstance(hostmysql80:3306) 'show slave hosts' returned row with <host,port>: <,3306>
解决3:配置文件设置 "DiscoverByShowSlaveHosts": true,   从库添加 report_host


--主库查看 无host
mysql> show slave hosts;
+-----------+------+------+-----------+--------------------------------------+
| Server_id | Host | Port | Master_id | Slave_UUID                           |
+-----------+------+------+-----------+--------------------------------------+
|   2223306 |      | 3306 |   1113306 | c959bdb9-f94c-11e9-b3b8-0800277143f5 |
|   3333306 |      | 3306 |   1113306 | 78a79555-758e-11ea-a2cc-080027c2dbc3 |
+-----------+------+------+-----------+--------------------------------------+
2 rows in set (0.00 sec)

--两个从库分别添加
report_host=192.168.56.61  /60
report_port=3306

--主库再次查看有host信息,无报错
mysql> show slave hosts;
+-----------+---------------+------+-----------+--------------------------------------+
| Server_id | Host          | Port | Master_id | Slave_UUID                           |
+-----------+---------------+------+-----------+--------------------------------------+
|   2223306 | 192.168.56.61 | 3306 |   1113306 | c959bdb9-f94c-11e9-b3b8-0800277143f5 |
|   3333306 | 192.168.56.60 | 3306 |   1113306 | 78a79555-758e-11ea-a2cc-080027c2dbc3 |
+-----------+---------------+------+-----------+--------------------------------------+
2 rows in set (0.00 sec)
以上是关于Mysql高可用—5.7 gtid 主从 + orchestrator 配置及简单测试的主要内容,如果未能解决你的问题,请参考以下文章