从Timer到Quartz实现动态管理定时任务
Posted _瞳孔
tags:
篇首语:本文由小常识网(cha138.com)小编为大家整理,主要介绍了从Timer到Quartz实现动态管理定时任务相关的知识,希望对你有一定的参考价值。
一:前置知识
在学习定时任务前,需要先了解小顶堆结构,因为Timer和定时任务线程池底层的数据结构都是基于小顶堆,而quartz是基于时间轮算法。
1.1:小顶堆
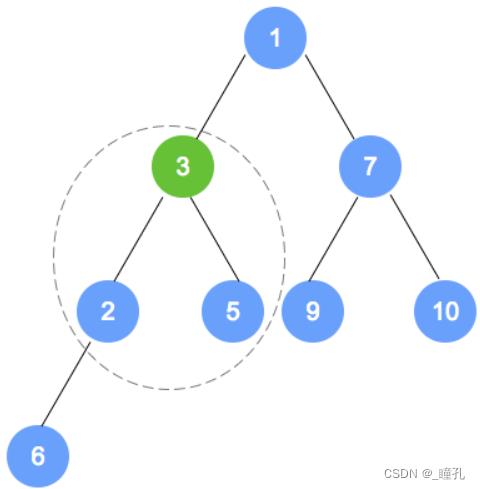
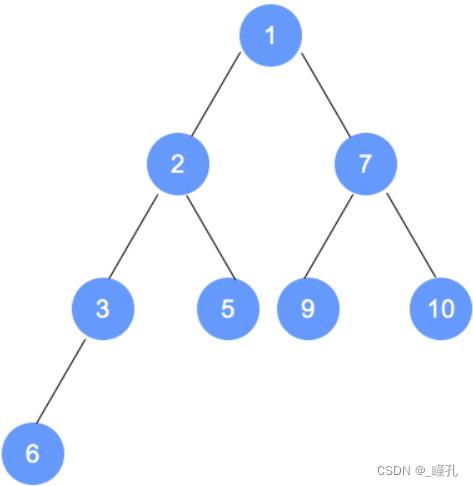
小顶堆实际上是一个完全二叉树,并且满足:Key[i]<=key[2i+1]&&Key[i]<=key[2i+2]规则,即非叶子结点的值不大于左孩子和右孩子的值。下图就是一个小顶堆:
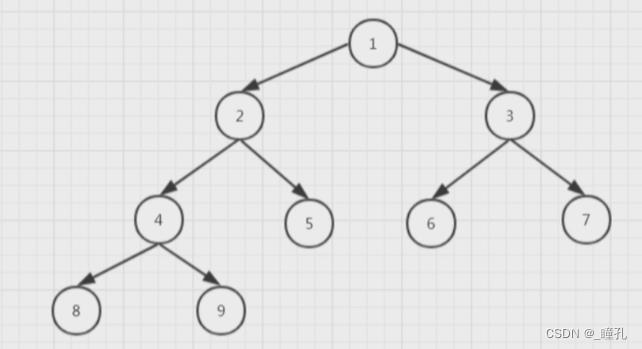
完全二叉树很适合用数组做存储,因为它的节点都是紧凑的,且只有最后一层节点数不满:

而小顶堆在定时任务中的应用,每一个节点就代表一个定时任务,而节点的值就对应着定时任务的到期时间
1.1.1:小顶堆的构建
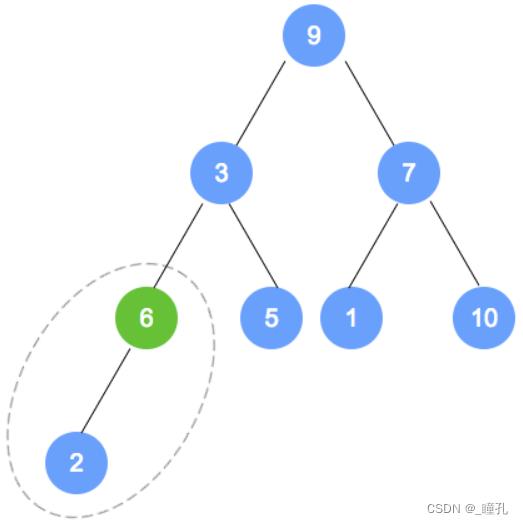
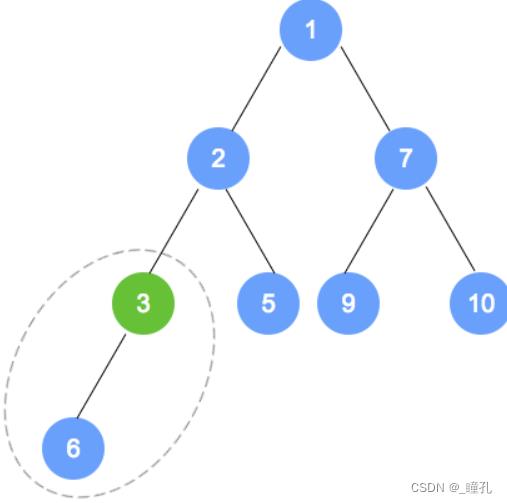
初始数组为:9,3,7,6,5,1,10,2。按照完全二叉树,将数字依次填入。填入完成后,从最后一个非叶子结点(本示例为数字6的节点)开始调整。根据性质,小的数字往上移动;至此,第1次调整完成。注意,被调整的节点,还有子节点的情况,需要递归进行调整。
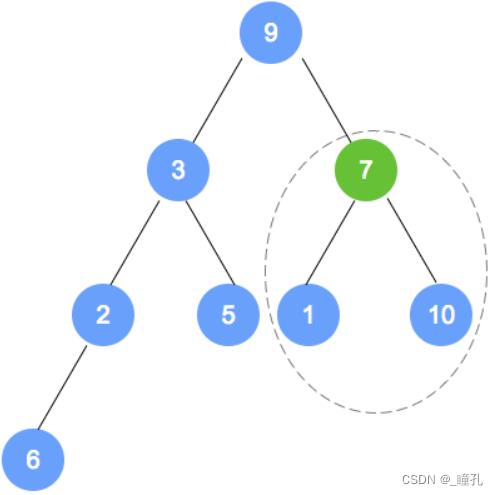
第二次调整,是数字6的节点数组下标小1的节点(比数字6的下标小1的节点是数字7的节点)
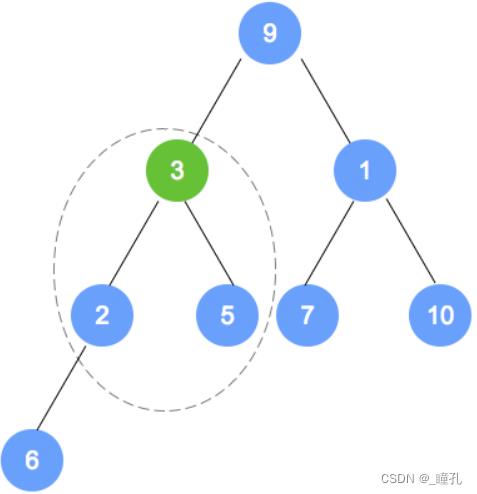
注意:数字9的节点 将和 数字1的节点 发生对调,对调后,需要递归进行调整
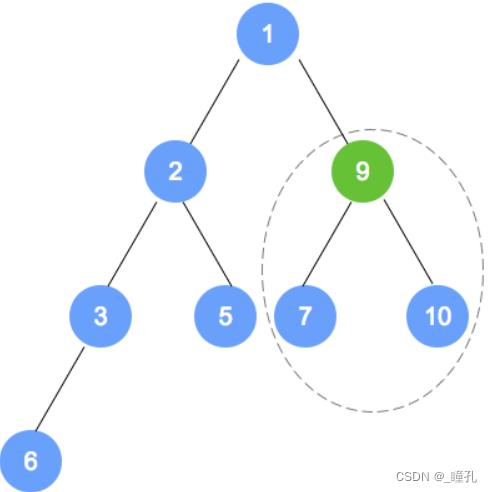
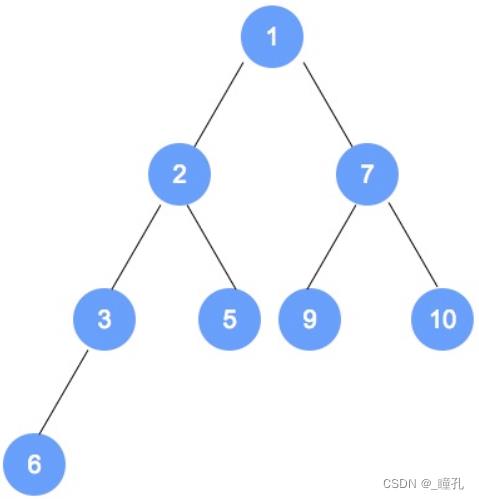
1.1.2:小顶堆的插入
以上个小顶堆为例,插入数字0。数字0的节点首先加入到该二叉树最后的一个节点,依据小顶堆的定义,自底向上,递归调整。以下是插入操作的图解:
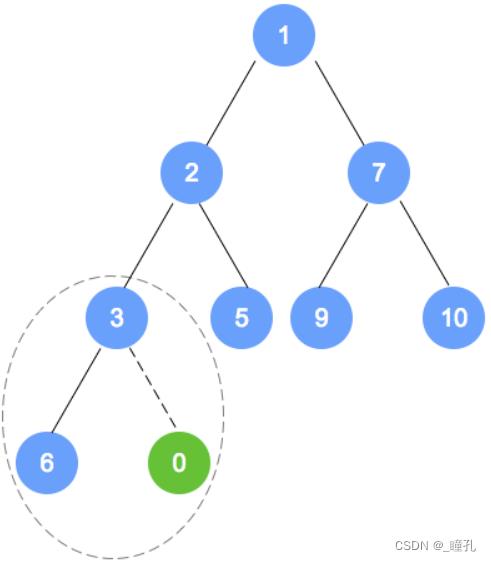
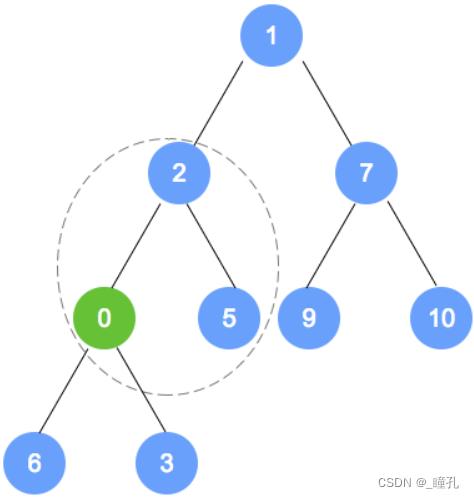
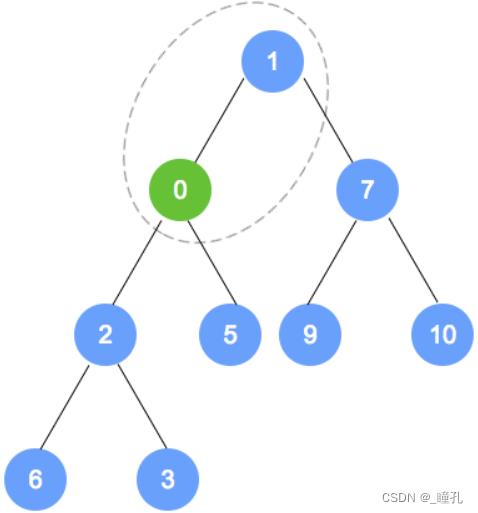
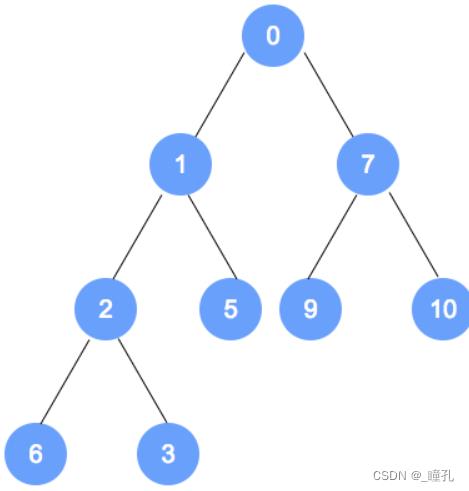
1.1.2:小顶堆的删除
对于小顶堆和大顶堆而言,删除是针对于根节点而言。对于删除操作,将二叉树的最后一个节点替换到根节点,然后自顶向下,递归调整。
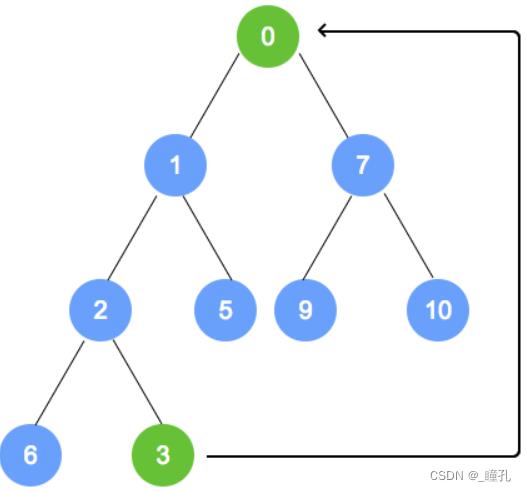
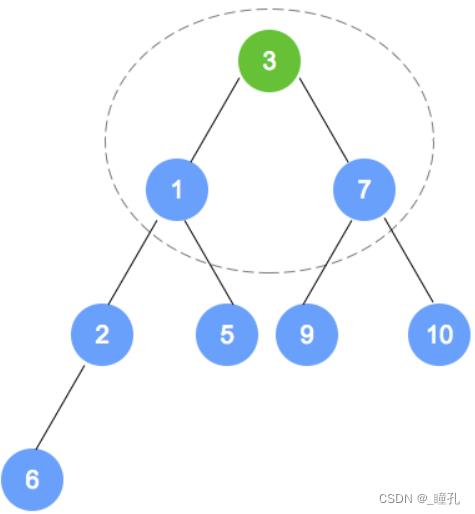
1.2:时间轮算法
小顶堆结构其实是有一个问题的,那就是在删除堆顶元素的时候需要把尾部最大元素放到堆顶,然后下沉调整,如果堆很大的话,那么删除操作的性能就会很低
时间轮 是一种实现延迟功能(定时器)的巧妙算法。如果一个系统存在大量的任务调度,时间轮可以高效的利用线程资源来进行批量化调度。把大批量的调度任务全部都绑定时间轮上,通过时间轮进行所有任务的管理,触发以及运行。能够高效地管理各种延时任务,周期任务,通知任务等。
相比于 JDK 自带的 Timer、DelayQueue + ScheduledThreadPool 来说,时间轮算法是一种非常高效的调度模型。不过,时间轮调度器的时间精度可能不是很高,对于精度要求特别高的调度任务可能不太适合,因为时间轮算法的精度取决于时间段“指针”单元的最小粒度大小。比如时间轮的格子是一秒跳一次,那么调度精度小于一秒的任务就无法被时间轮所调度。
时间轮(TimingWheel)算法应用范围非常广泛,各种操作系统的定时任务调度都有用到,我们熟悉的 Linux Crontab,以及 Java 开发过程中常用的 Dubbo、Netty、Akka、Quartz、ZooKeeper 、Kafka 等,几乎所有和 时间任务调度 都采用了时间轮的思想。
时间轮通常有如下三种形式:
- 链表或数组实现时间轮(while-true-sleep):遍历数组,每个下标放置一个链表,链表节点放置任务,遍历到了就取出执行
- round型时间轮:任务上记录一个round,遍历到了就将round减一,为0时取出执行,缺点是需要遍历所有的任务,效率较低
- 分层时间轮:使用多个不同的时间维度的轮,比如天轮是记录几点执行,月轮记录几号执行,月轮遍历到了,就把任务取出放到天轮里面,即可实现几号几点执行
时间轮的具体了解可见这篇博客:时间轮(TimingWheel)高性能定时任务原理解密
二:Timer
在开发过程中,经常性需要一些定时或者周期性的操作。而在Java中则使用Timer对象完成定时计划任务功能。
定时计划任务功能在Java中主要使用的就是Timer对象,它在内部使用多线程的方式进行处理,所以Timer对象一般又和多线程技术结合紧密。
由于Timer是Java提供的原生Scheduler(任务调度)工具类,不需要导入其他jar包,使用起来方便高效,非常快捷。
下面代码是timer的一个简单示例
public class TimerTest
    public static void main(String[] args)
        Timer timer = new Timer();  // 任务启动
        for (int i = 0; i < 2; i++)
            TimerTask task = new FooTimerTask("foo" + i);
            /*
             * 添加定时任务
             * @param task              添加的具体定时任务
             * @param firstTime         任务第一次执行的时间,new Date()代表立即执行
             * @param period            任务执行间隔,如果间隔为0,则只执行一次
             */
            System.out.println("i :" + i + " 时间" + System.currentTimeMillis());
            timer.schedule(task, new Date(), 2000);


class FooTimerTask extends TimerTask
    private String name;
    public FooTimerTask(String name)  this.name = name;

    @Override
    public void run()
        try
            System.out.println("name = " + name + " startTime = " + new Date());
            Thread.sleep(3000);  // 任务执行3s
            System.out.println("name = " + name + " endTime = " + new Date());
         catch (InterruptedException e)
            e.printStackTrace();
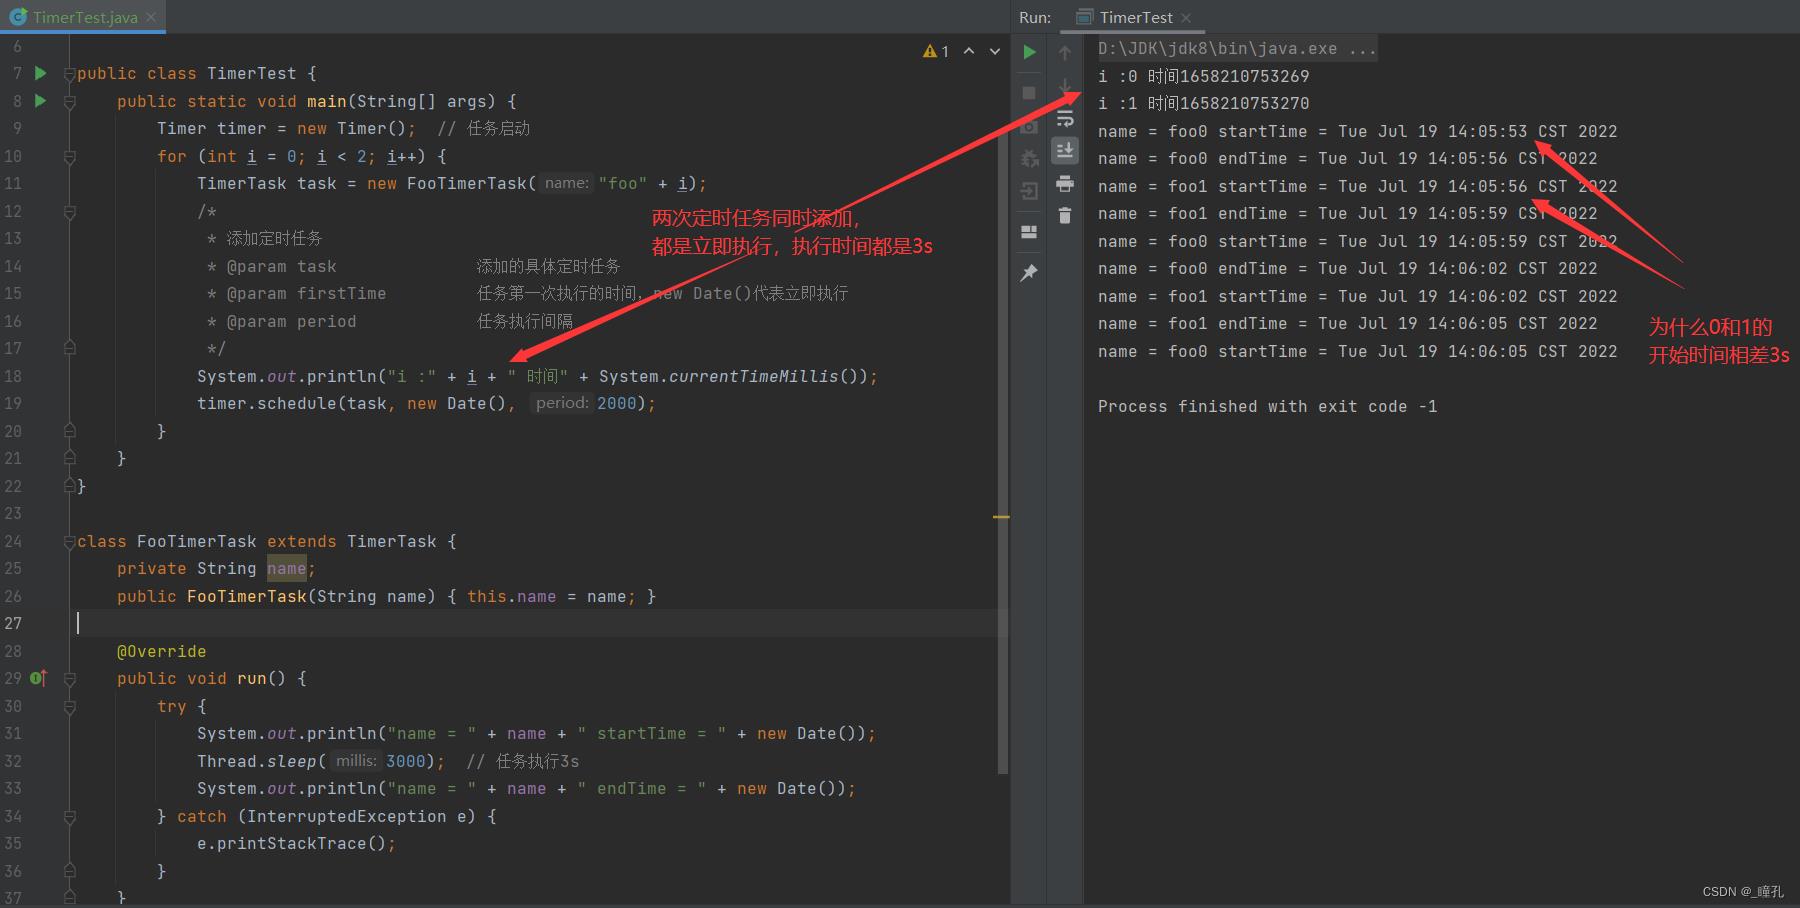
但是执行后,我们可以看到上面的结果,同时也发出疑问,为什么foo0和foo1同时添加进timer,而foo1是添加的3s后才执行。
我们可以翻看Timer类源码:
    /**
     * Creates a new timer.  The associated thread does <i>not</i>
     * @linkplain Thread#setDaemon run as a daemon.
     */
    public Timer()
        this("Timer-" + serialNumber());


    /**
     * Creates a new timer whose associated thread has the specified name.
     * The associated thread does <i>not</i>
     * @linkplain Thread#setDaemon run as a daemon.
     *
     * @param name the name of the associated thread
     * @throws NullPointerException if @code name is null
     * @since 1.5
     */
    public Timer(String name)
        thread.setName(name);
        thread.start();
可见我们在new Timer()的时候就已经启动了子线程,而thread.start()表示的是以多线程的方式运行
    /**
     * The timer thread.
     */
    private final TimerThread thread = new TimerThread(queue);

	// 以下是TimerThread类的源码截取

    /**
     * Our Timer's queue.  We store this reference in preference to
     * a reference to the Timer so the reference graph remains acyclic.
     * Otherwise, the Timer would never be garbage-collected and this
     * thread would never go away.
     */
    private TaskQueue queue;

    TimerThread(TaskQueue queue)
        this.queue = queue;


    public void run()
        try
            mainLoop();
         finally
            // Someone killed this Thread, behave as if Timer cancelled
            synchronized(queue)
                newTasksMayBeScheduled = false;
                queue.clear();  // Eliminate obsolete references
此时run方法已经以子线程的方式执行,而run方法并不是业务逻辑,可以看到,mainLoop()才是业务逻辑,mainLoop()源码如下,值得注意的是,TaskQueue queue就是小顶堆。
 /**
     * The main timer loop.  (See class comment.)
     */
    private void mainLoop()
        while (true)
            try
                TimerTask task;
                boolean taskFired;
                synchronized(queue)
                    // Wait for queue to become non-empty
                    while (queue.isEmpty() && newTasksMayBeScheduled)
                        queue.wait();
                    if (queue.isEmpty())
                        break; // Queue is empty and will forever remain; die

                    // Queue nonempty; look at first evt and do the right thing
                    long currentTime, executionTime;
                    task = queue.getMin();
                    synchronized(task.lock)
                        if (task.state == TimerTask.CANCELLED)
                            queue.removeMin();
                            continue;  // No action required, poll queue again

                        currentTime = System.currentTimeMillis();
                        executionTime = task.nextExecutionTime;
                        if (taskFired = (executionTime<=currentTime))
                            if (task.period == 0)  // Non-repeating, remove
                                queue.removeMin();
                                task.state = TimerTask.EXECUTED;
                             else  // Repeating task, reschedule
                                queue.rescheduleMin(
                                  task.period<0 ? currentTime   - task.period
                                                : executionTime + task.period);


                    if (!taskFired) // Task hasn't yet fired; wait
                        queue.wait(executionTime - currentTime);

                if (taskFired)  // Task fired; run it, holding no locks
                    task.run();
             catch(InterruptedException e)
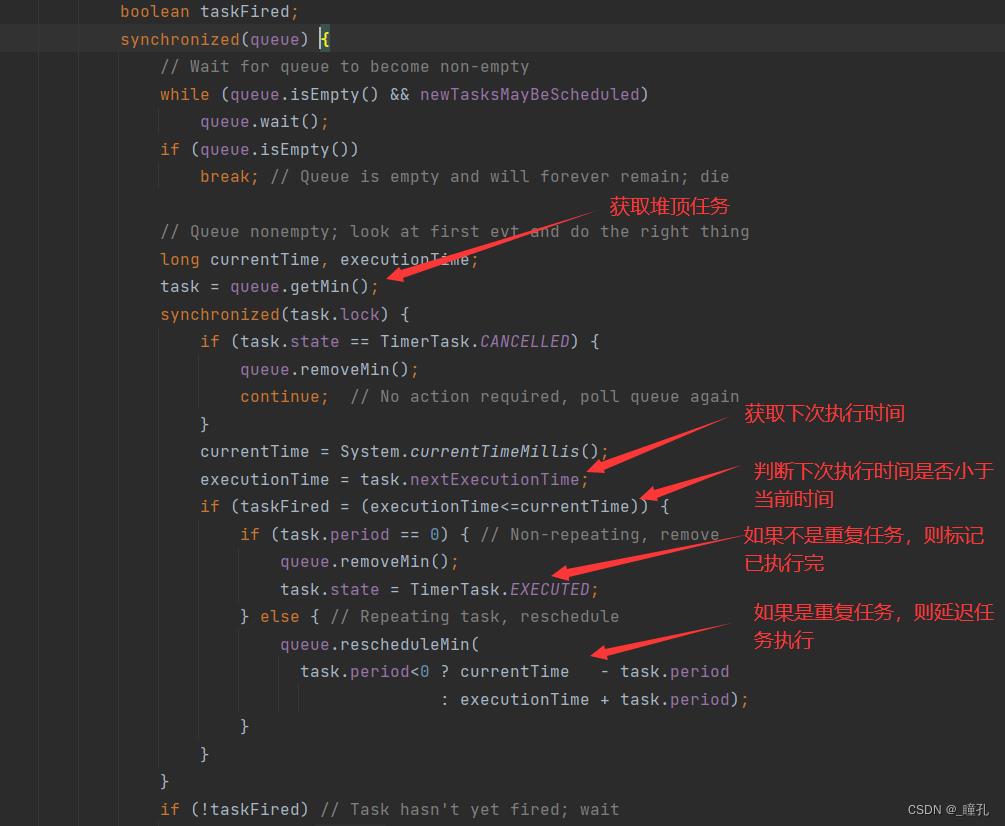
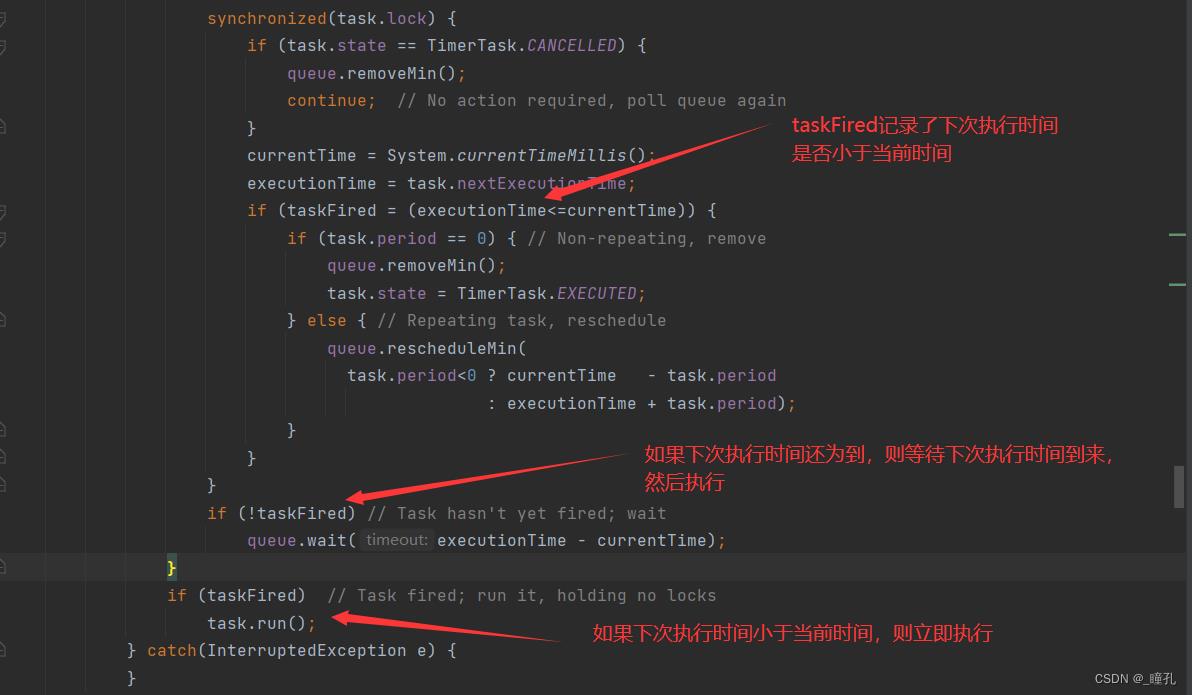
总结来说,Timer内的任务执行是由子线程执行的,但Timer内的不同任务由同一线程执行,因此回到开始的案例,foo1虽然是设置了立即执行,但此时foo0还在执行,等foo0执行完后,从小顶堆取出foo1,此时当前时间已经大于了下次执行时间,因此foo0推迟周期,以第三秒为初始执行时间。
而如果不希望发生这种事情,希望严格按照预设时间执行,可以使用scheduleAtFixedRate()方法
    /**
     * @param task   task to be scheduled.
     * @param delay  delay in milliseconds before task is to be executed.
     * @param period time in milliseconds between successive task executions.
     */
    public void scheduleAtFixedRate(TimerTask task, long delay, long period)
        if (delay < 0)
            throw new IllegalArgumentException("Negative delay.");
        if (period <= 0)
            throw new IllegalArgumentException("Non-positive period.");
        sched(task, System.currentTimeMillis()+delay, period);
然这个方法也有问题,可能导致任务提前执行,如下图所示
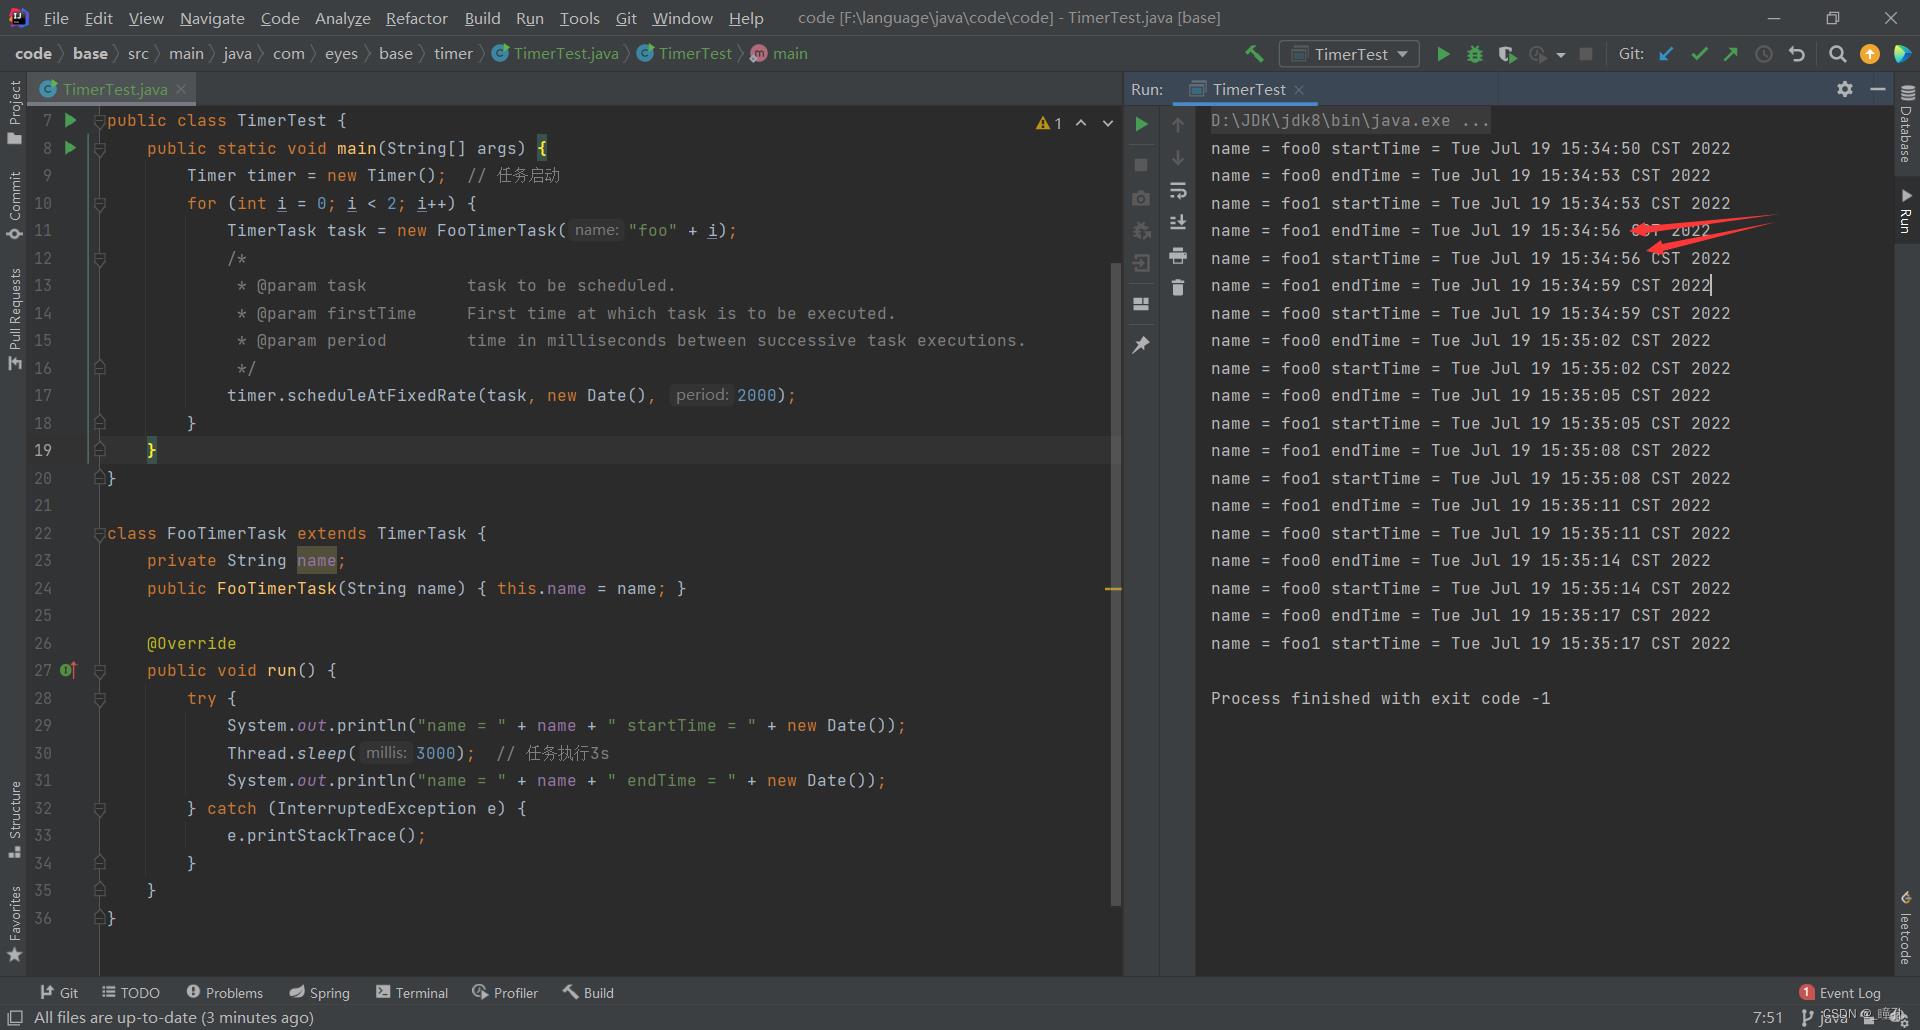
其实主要还是因为mainLoop在执行任务的时候直接调用run方法,即任务是由单线程执行,导致任务超时阻塞。
三:定时任务线程池
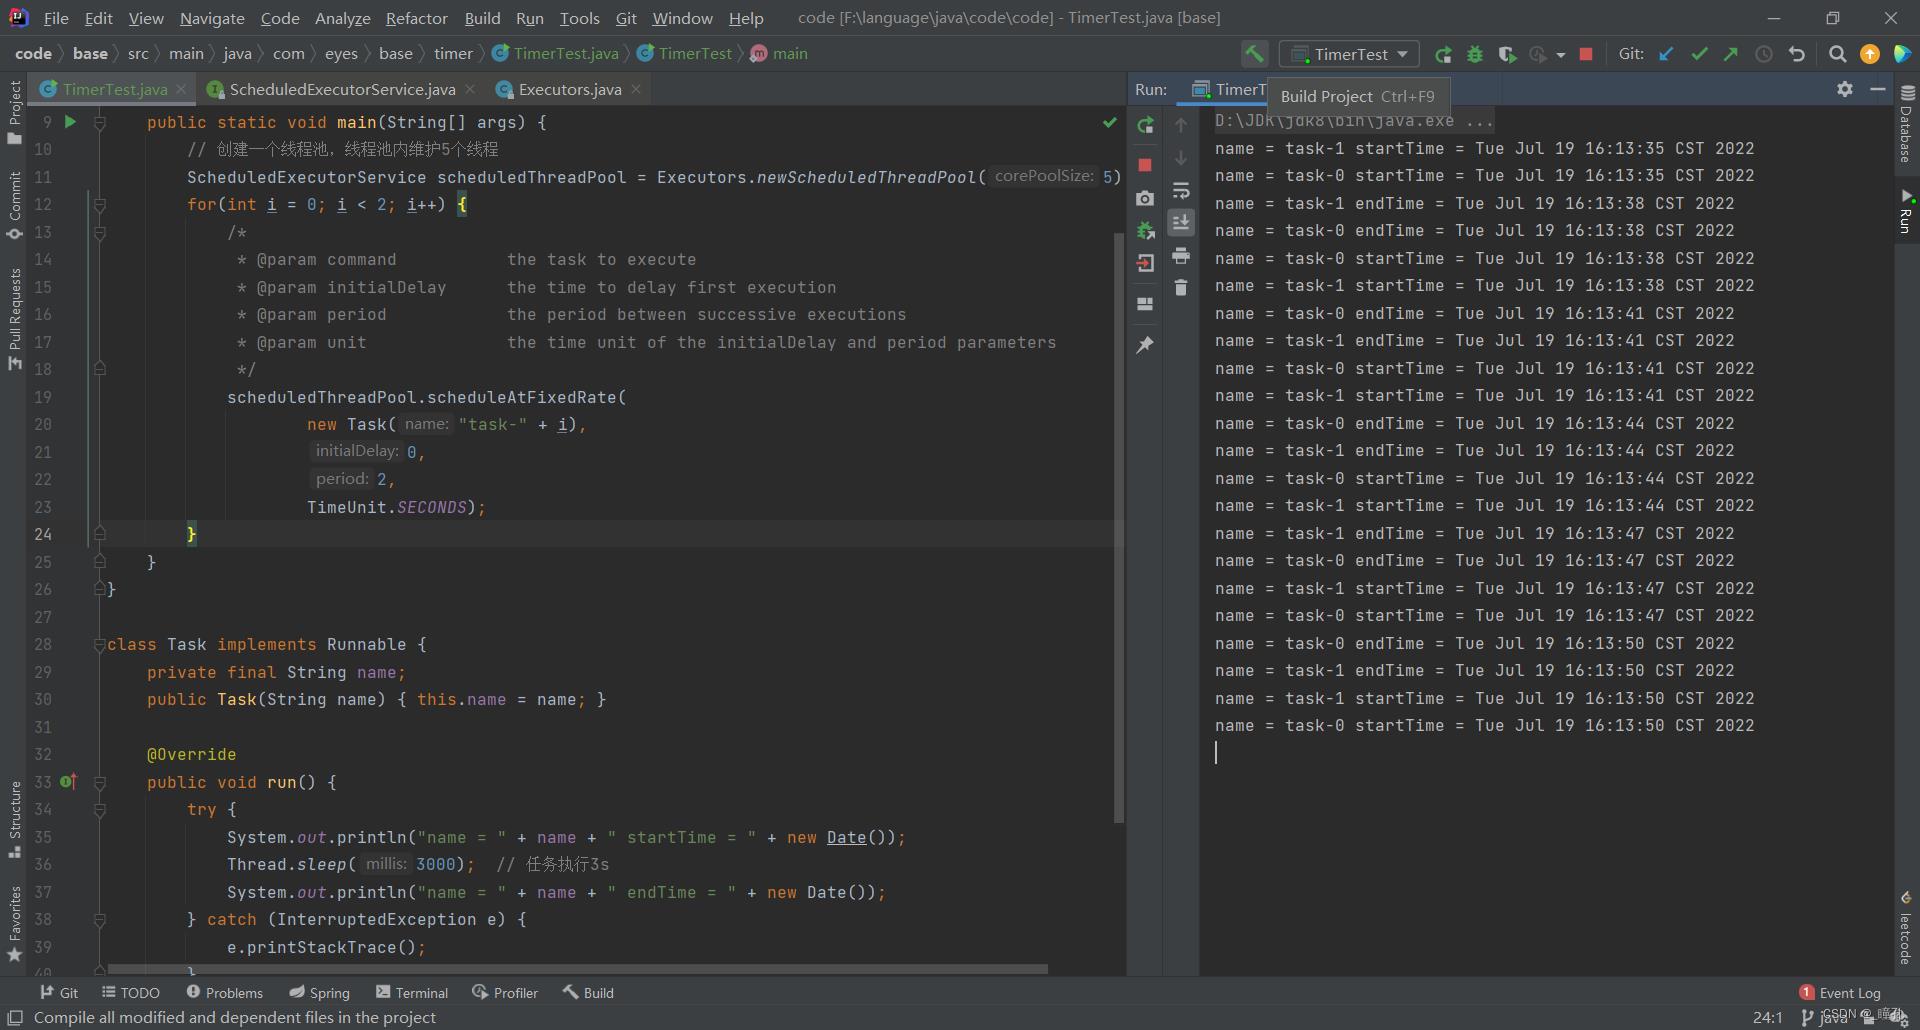
可以看出,上面问题的出现都是因为无论多少定时任务,都是由一条线程执行,因此,为了避免这些问题,我们应该创建一个线程池去执行定时任务:
public class TimerTest
    public static void main(String[] args)
        // 创建一个线程池,线程池内维护5个线程
        ScheduledExecutorService scheduledThreadPool = Executors.newScheduledThreadPool(5);
        for(int i = 0; i < 2; i++)
            /*
             * @param command           the task to execute
             * @param initialDelay      the time to delay first execution
             * @param period            the period between successive executions
             * @param unit              the time unit of the initialDelay and period parameters
             */
            scheduledThreadPool.scheduleAtFixedRate(new Task("task-" + i), 0, 2,TimeUnit.SECONDS);


class Task implements Runnable
    private final String name;
    public Task(String name)  this.name = name;

    @Override
    public void run()
        try
            System.out.println("name = " + name + " startTime = " + new Date());
            Thread.sleep(3000);  // 任务执行3s
            System.out.println("name = " + name + " endTime = " + new Date());
         catch (InterruptedException e)
            e.printStackTrace();
从下图结果可见,定时任务执行很完美
对于定时任务线程池需要了解的如下所示

Leader-Follower模式详细说明:假如说现在有一堆等待执行的任务 (一般是存放在一个队列中排好序) ,而所有的工作线程中只会有一个是leader线程, 其他的线程都是follower线程。只有leader线程能执行任务,而剩下的follower线程则不会执行任务,它们会处在休眠中的状态。当leader线程拿到任务后执行任务前,自己会变成follower线程,同时会选出一个新的leader线程,然后才去执行任务。如果此时有下一个任务,就是这个新的leader线程来执行了,并以此往复这个过程。当之前那个执行任务的线程执行完毕再回来时,会判断如果此时已经没任务了,又或者有任务但是有其他的线程作为leader线程,那么自己就休眠了;如果此时有任务但是没有leader线程,那么自己就会重新成为leader线程来执行任务,避免没必要的唤醒和阻塞的操作,这样会更加有效,且节省资源。
值得注意的是,从源码可以看出,newSingleThreadExecutor其实就是ThreadPoolExecutor维护线程池中线程数为1时的状态
    public static ExecutorService newSingleThreadExecutor()
        return new FinalizableDelegatedExecutorService
            (new ThreadPoolExecutor(1, 1,
                                    0L, TimeUnit.MILLISECONDS,
                                    new LinkedBlockingQueue<Runnable>()));
源码对其的解释如下:
Creates an Executor that uses a single worker thread operating off an unbounded queue. (Note however that if this single thread terminates due to a failure during execution prior to shutdown, a new one will take its place if needed to execute subsequent tasks.) Tasks are guaranteed to execute sequentially, and no more than one task will be active at any given time. Unlike the otherwise equivalent @code newFixedThreadPool(1) the returned executor is guaranteed not to be reconfigurable to use additional threads.
百度翻译结果:
创建一个执行器,该执行器使用在无界队列上运行的单个工作线程。(但是,请注意,如果此单个线程在关机之前的执行过程中由于故障而终止,则在需要执行后续任务时,将替换一个新线程。)任务保证按顺序执行,并且在任何给定时间都不会有多个任务处于活动状态。与其他等价的@code newFixedThreadPool(1)不同,返回的执行器保证不可重新配置以使用其他线程。
四:Quartz
Quartz是OpenSymphony开源组织在Job scheduling领域又一个开源项目。可以与 J2EE 与 J2SE 应用程序相结合也可以单独使用。
Quartz是完全由 Java 编写的开源且具有丰富特性的"任务调度库”,能够集成于任何的java应用,小到独立的应用,大至电子商业系统。Quartz能够创建亦简单亦复杂的调度,以执行上十、上百,甚至上万的任务。任务job被定义为标准的java组件,能够执行任何你想要实现的功能。Quartz调度框架包含许多企业级的特性,如TA事务、集群的支持。
简而言之, Quartz就是基于java实现的任务调度框架,也是 Spring 默认的调度框架,用于执行你想要执行的任何任务。
Quartz的运行环境:
- Quartz可以运行嵌入在另一个独立式应用程序
- Quartz可以在应用程序服务器(或servlet容器)内被实例化,并且参与事务
- Quartz可以作为一个独立的程序运行(其自己的Java虚拟机内) ,可以通过RMI使用
- Quartz可以被实例化,作为独立的项目集群(负载平衡和故障转移功能) ,用于作业的执行
Quartz 核心概念有四个核心概念:
- Job 表示一个工作,要执行的具体内容。此接口中只有一个方法,如下:
void execute(JobExecutionContext context) - JobDetail 表示一个具体的可执行的调度程序,Job 是这个可执行程调度程序所要执行的内容,另外 JobDetail 还包含了这个任务调度的方案和策略。
- Trigger 是执行任务的触发器,比如想定时每天3点发送一份统计邮件 ,Trigger将会设置3点进行执行该任务。Trigger主要包含两种SimpleTrigger和CronTrigger两种。
- Scheduler 代表一个调度容器,一个调度容器中可以注册多个 JobDetail 和 Trigger。当 Trigger 与 JobDetail 组合,就可以被 Scheduler 容器调度了。
Quartz 体系结构:
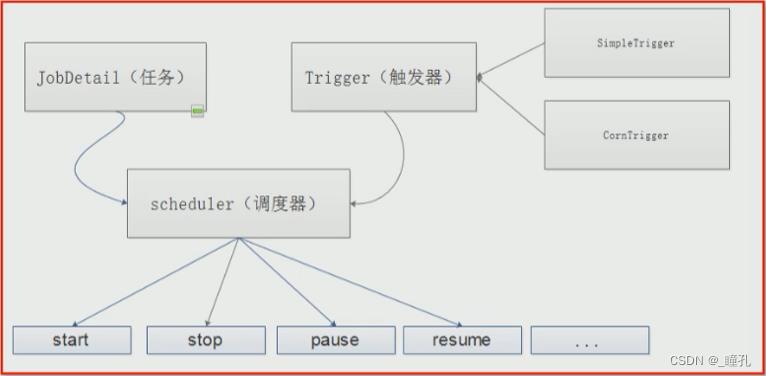
下面是Quartz编程API的几个关键接口,也是Quartz的重要组件:
- Scheduler: 与调度程序交互的主要API。Scheduler调度程序任务执行计划表,只有安排进执行计划的任务Job (通过scheduler.scheduleJob方法安排进执行计划) , 且当它预先定义的执行时间到了的时候(任务触发trigger) , 该任务才会执行。
- Job:你想要调度器执行的任务组件需要实现的接口,我们可以自定义
- JobDetail: 用于定义作业的实例。是通过JobBuild类创建的
- JobDataMap:可以包含不限量的(列化的)数据对象,在job实例执行的时候,可以使用其中的数据;JobDataMap是Java Map接口的一个实现,额外增加了一些便于存取基本类型的数据的方法。
- JobBuilder: 用于定义/构建 JobDetail 实例,用于定义作业的实例。
- Trigger(即触发器):Trigger对象是用来触发执行Job的。当调度一个job时 ,我们实例一个触发器然后调整它的属性来满足job执行的条件。表明任务在什么时候会执行。定义了一个已经被安排的任务将会在什么时候执行的时间条件,比如每2秒就执行一次。
- TriggerBuilder: 用于定义/构建触发器实例。
4.1:Quartz的入门案例
我这里是使用了springboot项目运行代码,所以我引入的包是starter包,因为quartz是springboot默认的调度框架,因此springboot提供了最佳版本,所以我们无需自己指定包版本。
        <dependency>
            <groupId>org.springframework.boot</groupId>
            <artifactId>spring-boot-starter-quartz</artifactId>
        </dependency>
设置定时任务:
public class MyJob implements Job
    @Override
    public void execute(JobExecutionContext jobExecutionContext) throws JobExecutionException
        System.out.println("MyJob execute:" + new Date());
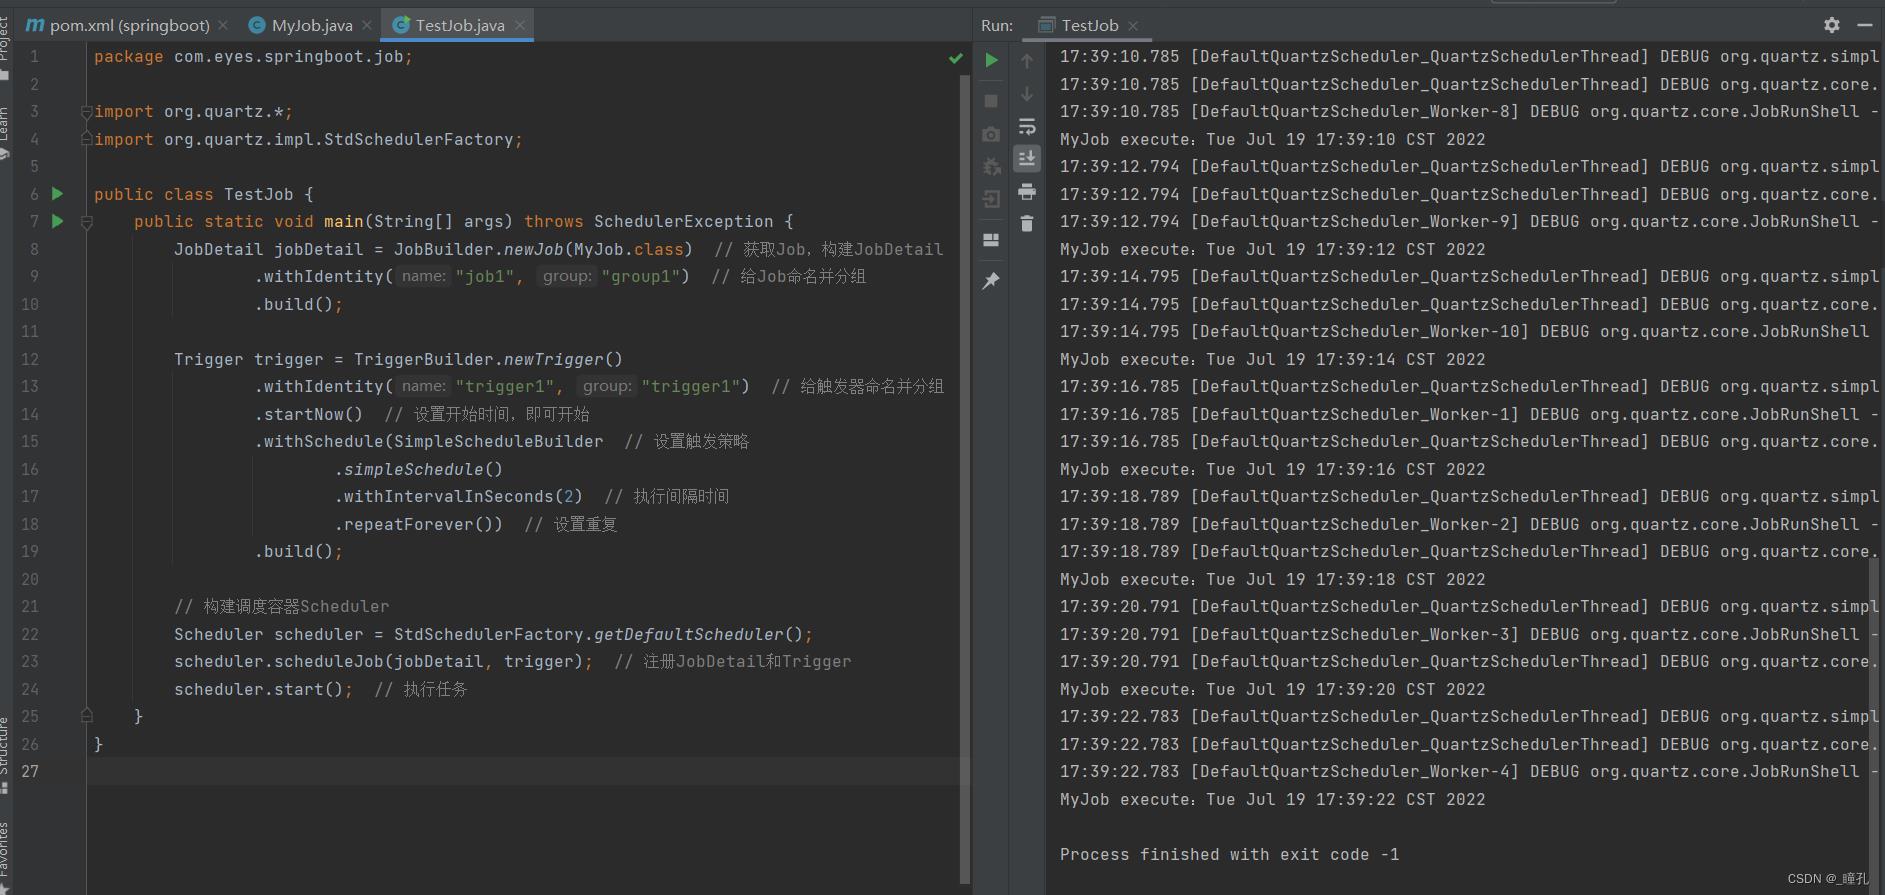
启动任务:
public class TestJob
    public static void main(String[] args) throws SchedulerException
        JobDetail jobDetail = JobBuilder.newJob(MyJob.class)  // 获取Job,构建JobDetail
                .withIdentity("job1", "group1")  // 给Job命名并分组
                .build();

        Trigger trigger = TriggerBuilder.newTrigger()
                .withIdentity("trigger1", "trigger1")  // 给触发器命名并分组
                .startNow()  // 设置开始时间,即可开始
                .withSchedule(SimpleScheduleBuilder  // 设置触发策略
                        .simpleSchedule()
                        .withIntervalInSeconds(2)  // 执行间隔时间
                        .repeatForever())  // 设置重复
                .build();

        // 构建调度容器Scheduler
        Scheduler scheduler = StdSchedulerFactory.getDefaultScheduler();
        scheduler.scheduleJob(jobDetail, trigger);  // 注册JobDetail和Trigger
        scheduler.start();  // 执行任务
4.2:jobDataMap的使用
TestJob.java代码:
public class TestJob
    public static void main(String[] args) throws SchedulerException
        JobDetail jobDetail = JobBuilder.newJob(MyJob.class)
                .withIdentity("job1", "group1")
                .usingJobData("job", "jobDetail")  // 其实就是map,两个参数,分别是键和值
                .build();

        Trigger trigger = TriggerBuilder.newTrigger()
                .withIdentity("trigger1", "trigger1")
                .usingJobData("trigger", "trigger")  // 同理
                .startNow()
                .withSchedule(SimpleScheduleBuilder
                        .simpleSchedule()
                        .withIntervalInSeconds(2)
                        .repeatForever())
                .build();

        Scheduler scheduler = StdSchedulerFactory.getDefaultScheduler();
        scheduler.scheduleJob(jobDetail, trigger);
        scheduler.start();
MyJob.java文件代码:
public class MyJob implements Job
@Override
public void execute(JobExecutionContext jobExecutionContext)
JobDataMap jobDetailMap = jobExecutionContext.getJobDetail().getJobDataMap();
JobDataMap triggerMap = jobExecutionContext.getTrigger().getJobDataMap();
// mergedJobDataMap是上面两个的合并,但如果有重名key,则会被覆盖
JobDataMap mergedJobDataMap = jobExecutionContext.getMergedJobDataMap();
System.out.println("jobDetailMap: " + jobDetailMap.getString("job"));
System.out.println("triggerMap: " + triggerMap.getString("trigger"));
System.out.println("mergedMap jobDetailMap: " + mergedJobDataMap