SpringCloud微服务应用-config配置中心(介绍搭建动态刷新测试)
Posted 前卫的架构师小D
tags:
篇首语:本文由小常识网(cha138.com)小编为大家整理,主要介绍了SpringCloud微服务应用-config配置中心(介绍搭建动态刷新测试)相关的知识,希望对你有一定的参考价值。
文章目录
前言
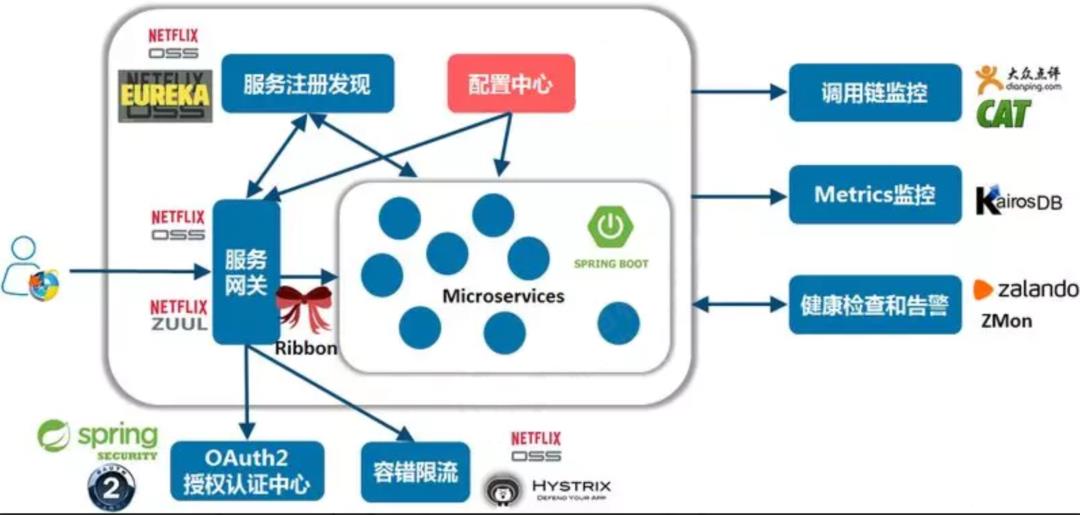
在系统架构中,和安全、日志、监控等非功能需求同样,配置管理也是一种非功能需求。配置中心是整个微服务基础架构体系中的一个组件,如下图,它的功能看上去并不起眼,无非就是简单配置的管理和存取,但它是整个微服务架构中不可或缺的一环。另外,配置中心若是真得用好了,它还能推进技术组织持续交付和DevOps转型。
一、传统应用配置痛点
配置散乱格式不标准
有的用 properties 格式,有的用 xml 格式,还有的存 DB,团队倾向自造轮子,作法五花八门。主要采用本地静态配置,配置修改麻烦
配置修改通常须要通过一个较长的测试发布周期。在分布式微服务环境下,当服务实例不少时,修改配置费时费力。易引起生产事故
团队在发布的时候将测试环境的配置带到生产上,引起资损事故。配置缺少安全审计和版本控制功能
二、Config 配置中心介绍
配置中心实际上就是分布式系统中集中统一管理线上应用程序配置项的管理平台。
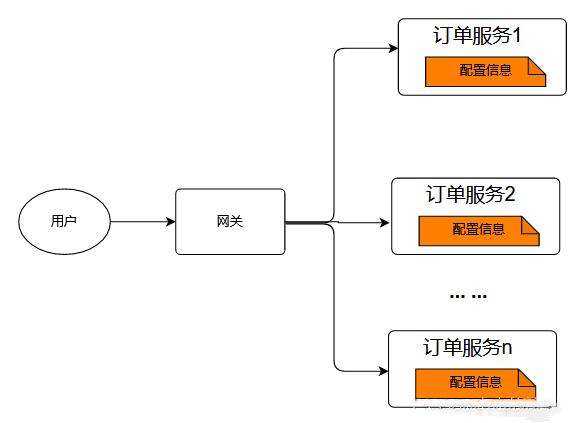
在微服务架构中,当系统从一个单体应用,被拆分成分布式系统上一个个服务节点后,配置文件也必须跟着迁移(分割),这样配置就分散了。不仅如此,分散中还伴随着冗余,如下图所示:
创建配置中心,将配置从各个应用中剥离出来,对配置进行统一管理,应用自身不需要自己去管理配置。如下图所示:
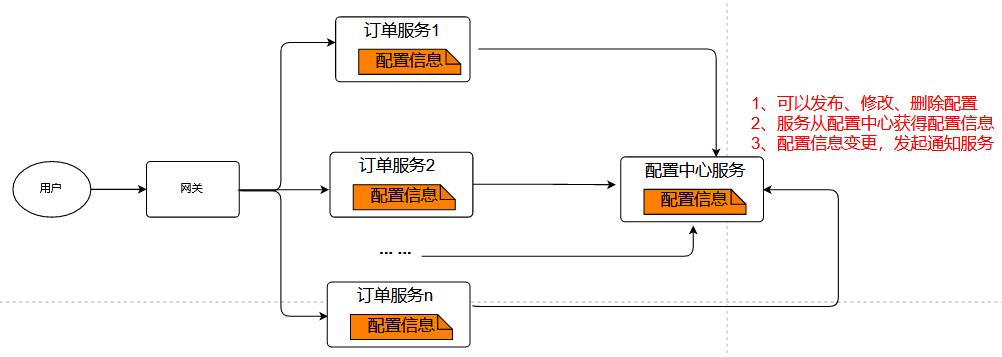
总结起来最主要包括以下三方面核心功能:
-
配置统一管理
配置项的修改编辑统一在配置中心页面进行,还包括统一的配置版本管理、环境隔离、灰度发布以及热发布,在不重启应用的情况下使得修改的配置可以生效起作用。 -
权限统一控制
主要控制其配置的读取权限以及修改权限,通过统一的权限管理提升运维效率。 -
操作统一审计
记录用户操作修改配置的历史信息,这样在出现问题的时候可以进行复盘回查,同时进行操作审计。
三、服务端Config Server搭建
1.pom依赖
		<dependency>
			<groupId>org.springframework.cloud</groupId>
			<artifactId>spring-cloud-starter-netflix-eureka-client</artifactId>
		</dependency>
		<dependency>
			<groupId>org.springframework.cloud</groupId>
			<artifactId>spring-cloud-config-server</artifactId>
		</dependency>
		<!-- 动态刷新使用 -->
		<dependency>
			<groupId>org.springframework.boot</groupId>
			<artifactId>spring-boot-starter-actuator</artifactId>
		</dependency>
2.application启动类配置
@SpringBootApplication
@EnableConfigServer
@EnableEurekaClient
public class ConfigServerApplication
	public static void main(String[] args)
		SpringApplication.run(ConfigServerApplication.class, args);
3.application.yml配置
spring:
  application:
    name: config-server
    # 使用本地文件,也可配置成从git获取配置文件
  profiles:
    active:
      - native
  cloud:
    config:
      server:
        native:
          search-locations: classpath:/config
      allow-override: true
      override-none: true
      override-system-properties: false
      discovery:
        enabled: true
      fail-fast: true
# 注册eureka地址,提供客户端eureka访问
eureka:
  client:
    serviceUrl:
      defaultZone: http://ip:port/eureka/
server:
  port: 8889
4.test-dev.xml(客户端应读取的配置)
profile:
  dev
spring:
  rabbitmq:
    host: 10.10.10.10
    port: 5672
    username: admin
    password: 123456

test:
  override: client-server
  refresh: re3
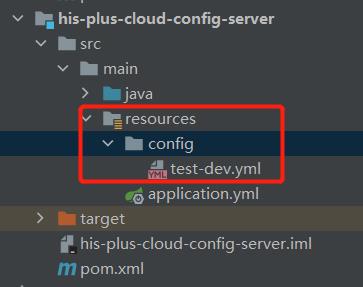
5.项目结构
四、客户端Config Client搭建
1.pom依赖
        <dependency>
            <groupId>org.springframework.boot</groupId>
            <artifactId>spring-boot-starter-web</artifactId>
        </dependency>
        <dependency>
            <groupId>org.springframework.cloud</groupId>
            <artifactId>spring-cloud-starter-netflix-eureka-client</artifactId>
        </dependency>
        <dependency>
            <groupId>org.springframework.cloud</groupId>
            <artifactId>spring-cloud-config-client</artifactId>
        </dependency>
        <dependency>
            <groupId>org.springframework.cloud</groupId>
            <artifactId>spring-cloud-starter-bootstrap</artifactId>
        </dependency>
		<!-- 动态刷新使用 -->
		<dependency>
			<groupId>org.springframework.boot</groupId>
			<artifactId>spring-boot-starter-actuator</artifactId>
		</dependency>
2.application启动类配置
@SpringBootApplication
@EnableEurekaClient
public class ConfigClientApplication

	public static void main(String[] args)
		SpringApplication.run(ConfigClientApplication.class, args);
3.bootstrap.yml配置
创建bootstrap.yml配置,因为启动服务会优先采用这个文件的配置,然后是application.yml的配置,服务器启动核心配置可能在配置中心,所以必须创建bootstrap.yml,优先连接配置中心
spring:
  cloud:
    config:
      # 采用的是test-dev.yml,name是前缀,profile是后缀,label是git存放的分支节点(本次未使用)
      name: test
      profile: dev
      label: dev
      # 通过service-id(eureka服务名)连接配置中心
      discovery:
        enabled: true
        service-id: config-server

eureka:
  client:
    serviceUrl:
      defaultZone: http://ip:port/eureka/
4.application.yml配置
server:
  port: 8888
spring:
  application:
    name: config-client
eureka:
  client:
    serviceUrl:
      defaultZone: http://ip:port/eureka/

# 动态刷新使用
management:
  endpoints:
    web:
      exposure:
        # 暴露监控接口,*为全部接口
        include: '*'
5.测试controller
@RestController
@RefreshScope
public class TestController
    @Value("$spring.rabbitmq.host")
    String host;
    @Value("$test.override")
    String override;
    @Value("$test.refresh")
    String refresh;

    @RequestMapping("/config")
    public String getConfig()
        return host;


    @RequestMapping("/override")
    public String getOverride()
        return override;


    @RequestMapping("/refresh")
    public String getRefresh()
        return refresh;
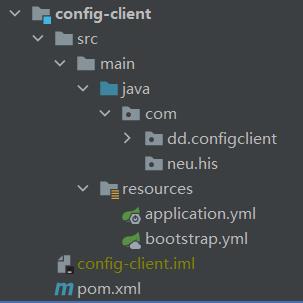
6.项目结构
五.动态刷新
上述配置中已经包含了动态刷新配置,让我们一起看一下,是哪些配置起到的作用呢
1.客户端Config client,添加spring-boot-starter-actuator依赖
		<!-- 动态刷新使用 -->
		<dependency>
			<groupId>org.springframework.boot</groupId>
			<artifactId>spring-boot-starter-actuator</artifactId>
		</dependency>
2.Controller层添加注解@RefreshScope
@RestController
@RefreshScope
public class TestController
3.客户端application.yml增加配置
# 动态刷新使用
management:
  endpoints:
    web:
      exposure:
        # 暴露监控接口,*为全部接口
        include: '*'
4.客户端手动调用动态刷新接口
http://localhost:8888/actuator/refresh
六.测试
开启eureka,gateway,config server,config client服务,注意开启顺序
1.调用TestController中config接口


返回了server中mq的ip,正确
2.调用TestController中override接口


返回了server中test.override的配置,覆盖了client的test.override
3.调用TestController中refresh接口(动态刷新)


现在,我们修改server中test.refresh配置,由re2改为re3
重启client server(因为配置中心的配置文件采用的服务端管理,如果放置git可以不用重启)
重启完成后再起请求refresh接口

仍然返回re2,现在我们调用刷新接口

注意设置Post的header属性Content-Type=application/json

刷新成功,并返回了属性名称,再次请求refresh接口,得到最新的配置:re3

结尾
- 感谢大家的耐心阅读,如有建议请私信或评论留言。
- 如有收获,劳烦支持,关注、点赞、评论、收藏均可,博主会经常更新,与大家共同进步
以上是关于SpringCloud微服务应用-config配置中心(介绍搭建动态刷新测试)的主要内容,如果未能解决你的问题,请参考以下文章