云原生之Docker实战使用Dockerfile构建docker镜像
Posted 江湖有缘
tags:
篇首语:本文由小常识网(cha138.com)小编为大家整理,主要介绍了云原生之Docker实战使用Dockerfile构建docker镜像相关的知识,希望对你有一定的参考价值。
【云原生之Docker学习】使用Dockerfile构建docker镜像
- 一、Docker镜像的分层架构
- 二、镜像与容器的关系
- 三、定义docker镜像流程
- 四、Dockerfile介绍
- 五、Dockerfile指令
- 六、build构建器的安装
- 七、实战1——创建一个web测试网页
- 八、实战2——创建一个可以显示IP地址的工具型容器
一、Docker镜像的分层架构
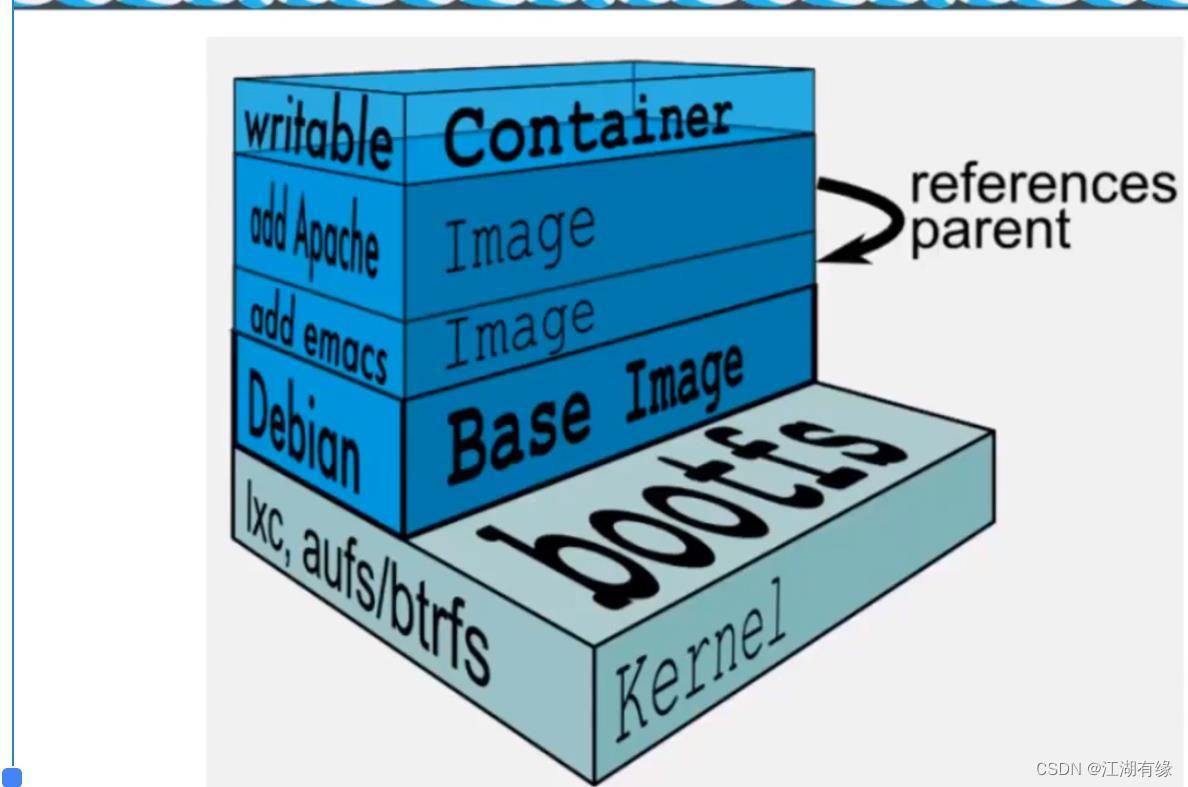
1.镜像的分层示意图

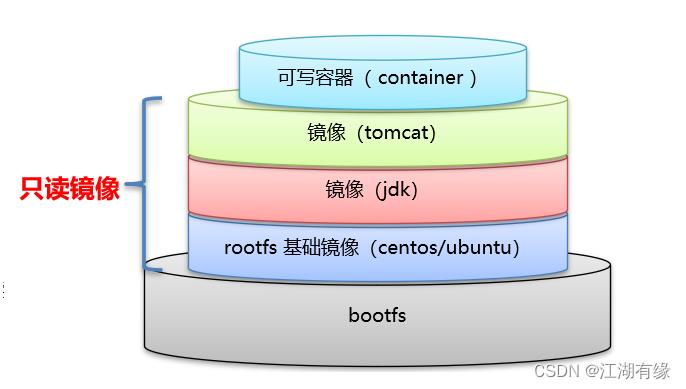
2.镜像的组成
①.union file system
docker通过联合文件系统,将docker的不同层级,整合为一个文件系统,为用户隐藏了多层的视角。
②.镜像层——bootfs
bootfs(boot-file system)——》 Linux内核:
bootfs主要包含bootloader和kernel,BootLoader主要作用引导宿主机内核。
作用:宿主机提供内核
③.镜像层——rootfs
rootfs(root-file system)——》发行版
rootfs就是不同的操作系统的发行版,例如suse,Ubuntu,centos等。
作用:docker获取基础镜像
④.镜像层——依赖环境
使用发行版提供的软件安装管理,例如yum install -y mysql
作用:依赖环境
⑤.容器层
可以写入的容器,想运行的代码程序。
作用:具体的程序运行
备注:只有容器层可以修改写入,其余层级为只读层。
3.镜像的分层图示

二、镜像与容器的关系
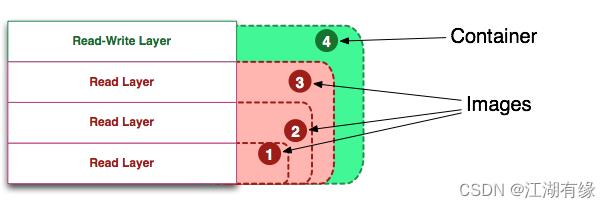
1.容器的启动
当下载镜像,使用镜像启动容器时,docker会在该image的顶层,添加一个可读写的文件系统作为容器,然后运行该容器。
2.docker镜像总结
1.docker镜像的本质为unionFS管理的分层文件系统。
2.因为docker镜像共享宿主机内核,所以镜像文件一般很小。
3.dockerfile作用:自定义docker镜像的每一层作用。
4.overlayfs:在每次分层的时候,下层的所有文件做硬链接到上层,逻辑上其实只有两层。
3.dokcer容器组成

三、定义docker镜像流程
定义一个容器镜像步骤:
1.获取基础镜像,选择一个发行版平台(例如centos/ubuntu等)
2.例如在centos镜像中再进行安装redis软件。
3.导出镜像,可以命名redis的镜像文件。
4.docker的层级概念:底层是centos镜像,上层是redis镜像,centos镜像属于父镜像
四、Dockerfile介绍
1.Dockerfile 是一个用来构建镜像的文本文件,可以部署运行一个你所需要的容器环境。
2.可以理解为一个脚本,通过dockerfile自己的指令,来构建软件依赖、文件依赖、网络、存储等环境。
五、Dockerfile指令
# 常用指令
FROM 制定基础镜像
MAINTAINER 制定维护者信息,可以不写
RUN 在命令前加上RUN,在容器内进行操作
ADD 添加宿主机的文件到容器内,有自动解压的功能
COPY 作用和ADD一样的,都是拷贝宿主机的文件到容器内,COPY只是拷贝
WORKDIR 设置当前工作目录
VOLUME 设置卷,挂载主机目录
EXPOSE 指定对外的端口
CMD 指定容器启动后要干的事情

# 其他指令
COPY 复制文件
ENV 环境变量
ENTRYPOINT 容器启动后执行的命令
六、build构建器的安装
1.不同容器运行时的build安装
1.在docker作为容器运行时的时候,build可以不用安装直接使用
2.在containerd作为容器运行时的时候,build需要单独安装
2.下载bulid构建器
wget 'https://oss-public.obs.cn-south-1.myhuaweicloud.com:443/docker/buildkit-v0.10.3.linux-amd64.tar.gz?AccessKeyId=8QZQXILP1SCWCCLMSGIH&Expires=1688442777&Signature=s4XXaKOJu84xzxE0dfZaRgu4ndE%3D'
3.解压下载软件包
tar -xzf buildkit-v0.10.3.linux-amd64.tar.gz -C /usr/local
4.配置service服务
#vim /etc/systemd/system/buildkit.service

[Unit]
Description=BuildKit
Requires=buildkit.socket
After=buildkit.socket
Documentation=https://github.com/moby/buildkit

[Service]
Type=notify
ExecStart=/usr/local/bin/buildkitd --addr fd://

[Install]
WantedBy=multi-user.target
5.配置socket文件
#vim /etc/systemd/system/buildkit.socket
[Unit]
Description=BuildKit
Documentation=https://github.com/moby/buildkit

[Socket]
ListenStream=%t/buildkit/buildkitd.sock
SocketMode=0660
[Install]
WantedBy=sockets.target
6.启动服务
[root@compute-node1 image]#  systemctl daemon-reload
[root@compute-node1 image]# systemctl start buildkit
[root@compute-node1 image]# systemctl enable buildkit
Created symlink from /etc/systemd/system/multi-user.target.wants/buildkit.service to /etc/systemd/system/buildkit.service.
七、实战1——创建一个web测试网页
1.配置yum源
wget -O /etc/yum.repos.d/CentOS-Base.repo https://mirrors.aliyun.com/repo/Centos-7.repo
wget -O /etc/yum.repos.d/epel.repo http://mirrors.aliyun.com/repo/epel-7.repo
2.将repo文件拷贝到/docker/dockerfile/nginx/目录
[root@compute-node1 nginx]# cp /etc/yum.repos.d/Centos-7.repo ./
[root@compute-node1 nginx]# cp /etc/yum.repos.d/epel.repo  ./
[root@compute-node1 nginx]#
3.编写dockerfile文件
vim /dokcer/dockerfile/nginx/cDockerfile
#添加引用的基础镜像
FROM centos:7
#添加注解
LABEL Author natasha<natasha@example.com> \\
      Time 20220709 \\
      functione nginx-demo
#镜像构建

RUN rm -rf /etc/yum.repos.d/*
ADD CentOS-7.repo /etc/yum.repos.d/centos.repo
ADD  epel.repo /etc/yum.repos.d/epel.repo
RUN yum install -y nginx
RUN rm -rf  /usr/share/nginx/html/*
RUN echo "hello world" > /usr/share/nginx/html/index.html
#容器启动时执行的操作
CMD ["nginx","-g","daemon off;"]
4.构建镜像
[root@compute-node1 nginx]# docker build -t nginx:v1.0 .
Sending build context to Docker daemon  6.656kB
Step 1/9 : FROM centos:7
 ---> eeb6ee3f44bd
Step 2/9 : LABEL Author natasha<natasha@example.com>       Time 20220709       functione nginx-demo
 ---> Using cache
 ---> bff89bcb2716
Step 3/9 : RUN rm -rf /etc/yum.repos.d/*
 ---> Using cache
 ---> 54975b5b035a
Step 4/9 : ADD CentOS-7.repo /etc/yum.repos.d/centos.repo
ADD failed: file not found in build context or excluded by .dockerignore: stat CentOS-7.repo: file does not exist
[root@compute-node1 nginx]# ls
Centos-7.repo  Dockerfile  epel.repo
[root@compute-node1 nginx]#
[root@compute-node1 nginx]# vim Dockerfile
[root@compute-node1 nginx]# docker build -t nginx:v1.0 .
Sending build context to Docker daemon  6.656kB
Step 1/9 : FROM centos:7
 ---> eeb6ee3f44bd
Step 2/9 : LABEL Author natasha<natasha@example.com>       Time 20220709       functione nginx-demo
 ---> Using cache
 ---> bff89bcb2716
Step 3/9 : RUN rm -rf /etc/yum.repos.d/*
 ---> Using cache
 ---> 54975b5b035a
Step 4/9 : ADD Centos-7.repo  /etc/yum.repos.d/centos.repo
 ---> d313dfc6e9c9
Step 5/9 : ADD  epel.repo /etc/yum.repos.d/epel.repo
 ---> 7b9f61b49e4a
Step 6/9 : RUN yum install -y nginx
 ---> Running in 9408803d1a98
Loaded plugins: fastestmirror, ovl
Determining fastest mirrors
 * base: mirrors.aliyun.com
 * extras: mirrors.aliyun.com
 * updates: mirrors.aliyun.com
http://mirrors.aliyuncs.com/centos/7/os/x86_64/repodata/6d0c3a488c282fe537794b5946b01e28c7f44db79097bb06826e1c0c88bad5ef-primary.sqlite.bz2: [Errno 12] Timeout on http://mirrors.aliyuncs.com/centos/7/os/x86_64/repodata/6d0c3a488c282fe537794b5946b01e28c7f44db79097bb06826e1c0c88bad5ef-primary.sqlite.bz2: (28, 'Connection timed out after 30005 milliseconds')
Trying other mirror.
http://mirrors.cloud.aliyuncs.com/centos/7/os/x86_64/repodata/6d0c3a488c282fe537794b5946b01e28c7f44db79097bb06826e1c0c88bad5ef-primary.sqlite.bz2: [Errno 14] curl#6 - "Could not resolve host: mirrors.cloud.aliyuncs.com; Unknown error"
Trying other mirror.
Resolving Dependencies
--> Running transaction check
---> Package nginx.x86_64 1:1.20.1-9.el7 will be installed
--> Processing Dependency: nginx-filesystem = 1:1.20.1-9.el7 for package: 1:nginx-1.20.1-9.el7.x86_64
--> Processing Dependency: libcrypto.so.1.1(OPENSSL_1_1_0)(64bit) for package: 1:nginx-1.20.1-9.el7.x86_64
--> Processing Dependency: libssl.so.1.1(OPENSSL_1_1_0)(64bit) for package: 1:nginx-1.20.1-9.el7.x86_64
--> Processing Dependency: libssl.so.1.1(OPENSSL_1_1_1)(64bit) for package: 1:nginx-1.20.1-9.el7.x86_64
--> Processing Dependency: nginx-filesystem for package: 1:nginx-1.20.1-9.el7.x86_64
--> Processing Dependency: openssl for package: 1:nginx-1.20.1-9.el7.x86_64
--> Processing Dependency: redhat-indexhtml for package: 1:nginx-1.20.1-9.el7.x86_64
--> Processing Dependency: system-logos for package: 1:nginx-1.20.1-9.el7.x86_64
--> Processing Dependency: libcrypto.so.1.1()(64bit) for package: 1:nginx-1.20.1-9.el7.x86_64
--> Processing Dependency: libprofiler.so.0()(64bit) for package: 1:nginx-1.20.1-9.el7.x86_64
--> Processing Dependency: libssl.so.1.1()(64bit) for package: 1:nginx-1.20.1-9.el7.x86_64
--> Running transaction check
---> Package centos-indexhtml.noarch 0:7-9.el7.centos will be installed
---> Package centos-logos.noarch 0:70.0.6-3.el7.centos will be installed
---> Package gperftools-libs.x86_64 0:2.6.1-1.el7 will be installed
---> Package nginx-filesystem.noarch 1:1.20.1-9.el7 will be installed
---> Package openssl.x86_64 1:1.0.2k-25.el7_9 will be installed
--> Processing Dependency: openssl-libs(x86-64) = 1:1.0.2k-25.el7_9 for package: 1:openssl-1.0.2k-25.el7_9.x86_64
--> Processing Dependency: make for package: 1:openssl-1.0.2k-25.el7_9.x86_64
---> Package openssl11-libs.x86_64 1:1.1.1k-3.el7 will be installed
--> Running transaction check
---> Package make.x86_64 1:3.82-24.el7 will be installed
---> Package openssl-libs.x86_64 1:1.0.2k-19.el7 will be updated
---> Package openssl-libs.x86_64 1:1.0.2k-25.el7_9 will be an update
--> Finished Dependency Resolution

Dependencies Resolved

================================================================================
 Package               Arch        Version                   Repository    Size
================================================================================
Installing:
 nginx                 x86_64      1:1.20.1-9.el7            epel         587 k
Installing for dependencies:
 centos-indexhtml      noarch      7-9.el7.centos            base          92 k
 centos-logos          noarch      70.0.6-3.el7.centos       base          21 M
 gperftools-libs       x86_64      2.6.1-1.el7               base         272 k
 make                  x86_64      1:3.82-24.el7             base         421 k
 nginx-filesystem      noarch      1:1.20.1-9.el7            epel          24 k
 openssl               x86_64      1:1.0.2k-25.el7_9         updates      494 k
 openssl11-libs        x86_64      1:1.1.1k-3.el7            epel         1.5 M
Updating for dependencies:
 openssl-libs          x86_64      1:1.0.2k-25.el7_9         updates      1.2 M

Transaction Summary
================================================================================
Install  1 Package  (+7 Dependent packages)
Upgrade             ( 1 Dependent package)

Total download size: 26 M
Downloading packages:
Delta RPMs disabled because /usr/bin/applydeltarpm not installed.
warning: /var/cache/yum/x86_64/7/base/packages/centos-indexhtml-7-9.el7.centos.noarch.rpm: Header V3 RSA/SHA256 Signature, key ID f4a80eb5: NOKEY
Public key for centos-indexhtml-7-9.el7.centos.noarch.rpm is not installed
Public key for openssl-1.0.2k-25.el7_9.x86_64.rpm is not installed
--------------------------------------------------------------------------------
Total                                              960 kB/s |  26 MB  00:27
Retrieving key from http://mirrors.aliyun.com/centos/RPM-GPG-KEY-CentOS-7
Importing GPG key 0xF4A80EB5:
 Userid     : "CentOS-7 Key (CentOS 7 Official Signing Key) <security@centos.org>"
 Fingerprint: 6341 ab27 53d7 8a78 a7c2 7bb1 24c6 a8a7 f4a8 0eb5
 From       : http://mirrors.aliyun.com/centos/RPM-GPG-KEY-CentOS-7
Running transaction check
Running transaction test
Transaction test succeeded
Running transaction
  Installing : centos-logos-70.0.6-3.el7.centos.noarch                     1/10
  Installing : centos-indexhtml-7-9.el7.centos.noarch                      2/10
  Installing : 1:openssl11-libs-1.1.1k-3.el7.x86_64                        3/10
  Installing : 1:make-3.82-24.el7.x86_64                                   4/10
  Installing : gperftools-libs-2.6.1-1.el7.x86_64                          5/10
  Updating   : 1:openssl-libs-1.0.2k-25.el7_9.x86_64                       6/10
  Installing : 1:openssl-1.0.2k-25.el7_9.x86_64                            7/10
  Installing : 1:nginx-filesystem-1.20.1-9.el7.noarch                      8/10
  Installing : 1:nginx-1.20.1-9.el7.x86_64                                 9/10
  Cleanup    : 1:openssl-libs-1.0.2k-19.el7.x86_64                        10/10
  Verifying  : 1:nginx-filesystem-1.20.1-9.el7.noarch                      1/10
  Verifying  : 1:nginx-1.20.1-9.el7.x86_64                                 2/10
  Verifying  : 1:openssl-libs-1.0.2k-25.el7_9.x86_64                       3/10
  Verifying  : 1:openssl-1.0.2k-25.el7_9.x86_64                            4/10
  Verifying  : gperftools-libs-2.6.1-1.el7.x86_64                          5/10
  Verifying  : 1:make-3.82-24.el7.x86_64                                   6/10
  Verifying  : 1:openssl11-libs-1.1.1k-3.el7.x86_64                        7/10
  Verifying  : centos-indexhtml-7-9.el7.centos.noarch                      8/10
  Verifying  : centos-logos-70.0.6-3.el7.centos.noarch                     9/10
  Verifying  : 1:openssl-libs-1.0.2k-19.el7.x86_64                        10/10

Installed:
  nginx.x86_64 1:1.20.1-9.el7

Dependency Installed:
  centos-indexhtml.noarch 0:7-9.el7.centos
  centos-logos.noarch 0:70.0.6-3.el7.centos
  gperftools-libs.x86_64 0:2.6.1-1.el7
  make.x86_64 1:3.82-24.el7
  nginx-filesystem.noarch 1:1.20.1-9.el7
  openssl.x86_64 1:1.0.2k-25.el7_9
  openssl11-libs.x86_64 1:1.1.1k-3.el7

Dependency Updated:
  openssl-libs.x86_64 1:1.0.2k-25.el7_9

Complete!
Removing intermediate container 9408803d1a98
 ---> 678685cc0e71
Step 7/9 : RUN rm -rf  /usr/share/nginx/html/*
 ---> Running in ecc29cbfaf40
Removing intermediate container ecc29cbfaf40
 ---> 225c791cdca2
Step 8/9 : RUN echo "hello world" > /usr/share/nginx/html/index.html
 ---> Running in 33d90e8081f3
Removing intermediate container 33d90e8081f3
 ---> 700054697617
Step 9/9 : CMD ["nginx","-g","daemon off;"]
 ---> Running in 5582e9d1233c
Removing intermediate container 5582e9d1233c
 ---> 285a4712d7ed
Successfully built 285a4712d7ed
Successfully tagged nginx:v1.0
5.查看生成镜像
[root@compute-node1 nginx]# docker images
REPOSITORY                                           TAG       IMAGE ID       CREATED         SIZE
nginx                                                v1.0      285a4712d7ed   2 minutes ago   453MB
rancher/rancher                                      v2.6.5    f944ac578a0e   8 weeks ago     1.47GB
nginx                                                latest    605c77e624dd   6 months ago    141MB
rancher/rancher                                      latest    f9e320b7e19c   6 months ago    1.16GB
rancher/rancher                                      stable    f9e320b7e19c   6 months ago    1.16GB
centos                                               7         eeb6ee3f44bd   9 months ago    204MB
registry.cn-hangzhou.aliyuncs.com/jeson/controller   v1.0.0    ef43679c2cae   10 months ago   283MB
rancher/server                                       stable    98d8bb571885   2 years ago     1.08GB
6.使用自制镜像生成容器
[root@compute-node1 nginx]# docker run --name myweb -d -p 8740:80 nginx:v1.0
11dd3cd44151093dca3c2ff798a86acd3189df6383e2f1ddbb2650bfc76af2a6
[root@compute-node1 nginx]# docker ps
CONTAINER ID   IMAGE        COMMAND                  CREATED         STATUS         PORTS                                   NAMES
11dd3cd44151   nginx:v1.0   "nginx -g 'daemon of…"   2 seconds ago   Up 2 seconds   0.0.0.0:8740->80/tcp, :::8740->80/tcp   myweb
7.访问web

八、实战2——创建一个可以显示IP地址的工具型容器
1.enterponit简介
1.在容器启动时执行指令,根CMD不一样的是,ENTERPONIT执行的指令是无法被覆盖的;
2.如果同时定义了CMD和ENTERPOINT,则CMD会作为enterponit的参数;
3.enterponit通常是脚本,用于容器启动时执行的初始化操作。
2.编写dockerfile
vim /dokcer/dockerfile/ip_check/cDockerfile
[root@compute-node1 ip_check]# cat Dockerfile
FROM centos:7.8.2003
RUN rpm --rebuilddb && yum install epel-release -y
RUN rpm --rebuilddb && yum install curl -y
CMD ["curl","-s","cip.cc"]
3.构建镜像
docker build -t ipcheck:v1.0 .
4.使用镜像
[root@compute-node1 ip_check]# docker run ipcheck:v1.0
IP	: xx.xx.xx.195
地址	: 中国  湖北  鄂州
运营商	: 联通

数据二	: 湖北省襄阳市 | 联通

数据三	: 中国湖北鄂州 | 联通

URL	: http://www.cip.cc/xx.xx.xxx.195
5.修改dockerfile
FROM centos:7.8.2003
RUN rpm --rebuilddb && yum install epel-release -y
RUN rpm --rebuilddb && yum install curl -y
CMD ["curl","-s","cip.cc"]
ENTRYPOINT ["curl","-s","cip.cc"]
6.创建镜像及运行容器
[root@compute-node1 ip_check]# docker  run   --rm  ipcheck:v2.0
IP	: xx.xx.xx.195
地址	: 中国  湖北  鄂州
运营商	: 联通

数据二	: 湖北省 | 联通

数据三	: 中国湖北鄂州 | 联通

URL	: http://www.cip.cc/xx.xx.xx.195
IP	: xx.xx.xx.195
地址	: 中国  湖北  鄂州
运营商	: 联通

数据二	: 湖北省 | 联通

数据三	: 中国湖北鄂州 | 联通

URL	: http://www.cip.cc/xx.xx.xx.195
7.给容器正常传入参数
[root@compute-node1 ip_check]# docker  run   --rm  ipcheck:v2.0 -I
HTTP/1.1 200 OK
Server: openresty
Date: Sat, 09 Jul 2022 05:28:30 GMT
Content-Type: text/html; charset=UTF-8
Connection: keep-alive
Vary: Accept-Encoding
X-cip-c: H
以上是关于云原生之Docker实战使用Dockerfile构建docker镜像的主要内容,如果未能解决你的问题,请参考以下文章
Docker小白到实战之Dockerfile解析及实战演示,果然顺手
云原生之使用Docker部署Rockylinux容器应用服务