Istio1.12:安装和快速入门
Posted 琦彦
tags:
篇首语:本文由小常识网(cha138.com)小编为大家整理,主要介绍了Istio1.12:安装和快速入门相关的知识,希望对你有一定的参考价值。
前言
Istio 使用功能强大的 Envoy 服务代理扩展了 Kubernetes,以建立一个可编程的、可感知的应用程序网络。Istio 与 Kubernetes 和传统工作负载一起使用,为复杂的部署带来了标准的通用流量管理、遥测和安全性。
[外链图片转存失败,源站可能有防盗链机制,建议将图片保存下来直接上传(img-pNqBrfTt-1656680343352)(https://istio.io/latest/img/service-mesh.svg)]
下载 Istio
0. Istio 版本的支持状态
| Version | Currently Supported | Release Date | End of Life | Supported Kubernetes Versions | Tested, but not supported |
|---|---|---|---|---|---|
| master | No, development only | ||||
| 1.14 | Yes | May 24, 2022 | ~January 2023 (Expected) | 1.21, 1.22, 1.23, 1.24 | 1.16, 1.17, 1.18, 1.19, 1.20 |
| 1.13 | Yes | February 11, 2022 | ~October 2022 (Expected) | 1.20, 1.21, 1.22, 1.23 | 1.16, 1.17, 1.18, 1.19 |
| 1.12 | Yes | November 18, 2021 | Jul 12, 2022 | 1.19, 1.20, 1.21, 1.22 | 1.16, 1.17, 1.18 |
| 1.11 | No | August 12, 2021 | Mar 25, 2022 | 1.18, 1.19, 1.20, 1.21, 1.22 | 1.16, 1.17 |
| 1.10 | No | May 18, 2021 | Jan 7, 2022 | 1.18, 1.19, 1.20, 1.21 | 1.16, 1.17, 1.22 |
| 1.9 | No | February 9, 2021 | Oct 8, 2021 | 1.17, 1.18, 1.19, 1.20 | 1.15, 1.16 |
| 1.8 | No | November 10, 2020 | May 12, 2021 | 1.16, 1.17, 1.18, 1.19 | 1.15 |
| 1.7 | No | August 21, 2020 | Feb 25, 2021 | 1.16, 1.17, 1.18 | 1.15 |
| 1.6 and earlier | No |
注意:Kubernetes 1.22 删除了一些已弃用的 API,因此 1.10.0 之前的 Istio 版本将不再工作。如果您要升级 Kubernetes 版本,请确保您的 Istio 版本仍受支持。
1. 下载Istio安装包
到 Istio 发布 页面,下载针对你操作系统的安装文件, 或用自动化工具下载并提取最新版本(Linux 或 macOS):
$ curl -L https://istio.io/downloadIstio | sh -
上面的命令下载最新版本(用数值表示)的 Istio。 你可以给命令行传递变量,用来下载指定的、不同处理器体系的版本。 例如,下载 x86_64 架构的、1.6.8 版本的 Istio ,运行:
curl -L https://istio.io/downloadIstio | ISTIO_VERSION=1.12.0 TARGET_ARCH=x86_64 sh -

# 或者

wget https://github.com/istio/istio/releases/download/1.14.1/istio-1.14.1-linux-amd64.tar.gz
tar zxvf istio-1.14.1-linux-amd64.tar.gz -C /usr/local/
2. 进入Istio安装目录
转到 Istio 包目录。例如,如果包是 istio-1.14.1:
$ cd istio-1.14.1
安装目录包含:
samples/目录下的示例应用程序bin/目录下的istioctl客户端二进制文件 .
3. 添加环境变量 PATH
将 istioctl 客户端加入搜索路径(Linux or macOS):
$ export PATH=$PWD/bin:$PATH

#或者设置环境变量
echo 'export ISTIO_HOME=/usr/local/istio-1.14.1' >> /etc/profile
echo 'export PATH=$PATH:$ISTIO_HOME/bin' >> /etc/profile
#加载变量
source /etc/profile
4. 验证效果(查看版本)
istioctl version

➜  istio-1.12.0 istioctl version
no running Istio pods in "istio-system"
1.12.0
You have new mail.
安装 Istio
-
对于本次安装,我们采用
demo配置组合。 选择它是因为它包含了一组专为测试准备的功能集合,另外还有用于生产或性能测试的配置组合。如果你的平台有供应商提供的配置组合,比如:Openshift,则在下面命令中替换掉
demo配置项。更多细节请参阅你的 平台说明$ istioctl install --set profile=demo -y ✔ Istio core installed ✔ Istiod installed ✔ Egress gateways installed ✔ Ingress gateways installed ✔ Installation complete istioctl install --set profile=demo -y ✔ Istio core installed ✔ Istiod installed ✔ Egress gateways installed ✔ Ingress gateways installed ✔ Installation complete Making this installation the default for injection and validation. Thank you for installing Istio 1.12. Please take a few minutes to tell us about your install/upgrade experience! https://forms.gle/FegQbc9UvePd4Z9z7 You have new mail. -
给命名空间添加标签,指示 Istio 在部署应用的时候,自动注入 Envoy 边车代理:
$ kubectl label namespace default istio-injection=enabled
namespace/default labeled
部署示例应用
-
部署
Bookinfo示例应用:$ kubectl apply -f samples/bookinfo/platform/kube/bookinfo.yaml service/details created serviceaccount/bookinfo-details created deployment.apps/details-v1 created service/ratings created serviceaccount/bookinfo-ratings created deployment.apps/ratings-v1 created service/reviews created serviceaccount/bookinfo-reviews created deployment.apps/reviews-v1 created deployment.apps/reviews-v2 created deployment.apps/reviews-v3 created service/productpage created serviceaccount/bookinfo-productpage created deployment.apps/productpage-v1 created -
应用很快会启动起来。当每个 Pod 准备就绪时,Istio 边车代理将伴随它们一起部署。
$ kubectl get services
NAME          TYPE        CLUSTER-IP      EXTERNAL-IP   PORT(S)    AGE
details       ClusterIP   10.0.0.212      <none>        9080/TCP   29s
kubernetes    ClusterIP   10.0.0.1        <none>        443/TCP    25m
productpage   ClusterIP   10.0.0.57       <none>        9080/TCP   28s
ratings       ClusterIP   10.0.0.33       <none>        9080/TCP   29s
reviews       ClusterIP   10.0.0.28       <none>        9080/TCP   29s
和
$ kubectl get pods
NAME READY STATUS RESTARTS AGE
details-v1-558b8b4b76-2llld 2/2 Running 0 2m41s
productpage-v1-6987489c74-lpkgl 2/2 Running 0 2m40s
ratings-v1-7dc98c7588-vzftc 2/2 Running 0 2m41s
reviews-v1-7f99cc4496-gdxfn 2/2 Running 0 2m41s
reviews-v2-7d79d5bd5d-8zzqd 2/2 Running 0 2m41s
reviews-v3-7dbcdcbc56-m8dph 2/2 Running 0 2m41s
重新运行前面的命令,在执行下面步骤之前,要等待并确保所有的 Pod 达到此状态: 就绪状态(READY)的值为 `2/2` 、状态(STATUS)的值为 `Running` 。 基于你平台的不同,这个操作过程可能会花费几分钟的时间。

3. 验证方方面面均工作无误。运行下面命令,通过检查返回的页面标题,来验证应用是否已在集群中运行,并已提供网页服务:
$ kubectl exec “$(kubectl get pod -l app=ratings -o jsonpath=‘.items[0].metadata.name’)” -c ratings – curl -s productpage:9080/productpage | grep -o “
对外开放应用程序
此时,BookInfo 应用已经部署,但还不能被外界访问。 要开放访问,你需要创建 Istio 入站网关(Ingress Gateway), 它会在网格边缘把一个路径映射到路由。
-
把应用关联到 Istio 网关:
$ kubectl apply -f samples/bookinfo/networking/bookinfo-gateway.yaml gateway.networking.istio.io/bookinfo-gateway created virtualservice.networking.istio.io/bookinfo created -
确保配置文件没有问题:
$ istioctl analyze
✔ No validation issues found when analyzing namespace: default.
确定入站 IP 和端口
按照说明,为访问网关设置两个变量:INGRESS_HOST 和 INGRESS_PORT。 使用标签页,切换到你选用平台的说明:
Minikube其他平台
设置入站端口:
$ export INGRESS_PORT=$(kubectl -n istio-system get service istio-ingressgateway -o jsonpath='.spec.ports[?(@.name=="http2")].nodePort')
$ export SECURE_INGRESS_PORT=$(kubectl -n istio-system get service istio-ingressgateway -o jsonpath='.spec.ports[?(@.name=="https")].nodePort')
确认端口被成功的赋值给了每一个环境变量:
$ echo "$INGRESS_PORT"
32194
$ echo "$SECURE_INGRESS_PORT"
31632
设置入站 IP:
$ export INGRESS_HOST=$(minikube ip)
确认 IP 地址被成功的赋值给了环境变量:
$ echo "$INGRESS_HOST"
192.168.4.102
在一个新的终端窗口中执行此命令,启动一个 Minikube 隧道,它将把流量发送到你的 Istio 入站网关:
$ minikube tunnel
-
设置环境变量
GATEWAY_URL:$ export GATEWAY_URL=$INGRESS_HOST:$INGRESS_PORT -
确保 IP 地址和端口均成功的赋值给了环境变量:
$ echo "$GATEWAY_URL"
192.168.99.100:32194
验证外部访问
用浏览器查看 Bookinfo 应用的产品页面,验证 Bookinfo 已经实现了外部访问。
-
运行下面命令,获取 Bookinfo 应用的外部访问地址。
$ echo "http://$GATEWAY_URL/productpage" -
把上面命令的输出地址复制粘贴到浏览器并访问,确认 Bookinfo 应用的产品页面是否可以打开。
查看仪表板
Istio 和几个遥测应用做了集成。 遥测能帮你了解服务网格的结构、展示网络的拓扑结构、分析网格的健康状态。
使用下面说明部署 Kiali 仪表板、 以及 Prometheus、 Grafana、 还有 Jaeger
-
安装 Kiali 和其他插件,等待部署完成。
$ kubectl apply -f samples/addons
$ kubectl rollout status deployment/kiali -n istio-system
Waiting for deployment "kiali" rollout to finish: 0 of 1 updated replicas are available...
deployment "kiali" successfully rolled out
如果在安装插件时出错,再运行一次命令。 有一些和时间相关的问题,再运行就能解决。
-
访问 Kiali 仪表板。
$ istioctl dashboard kiali -
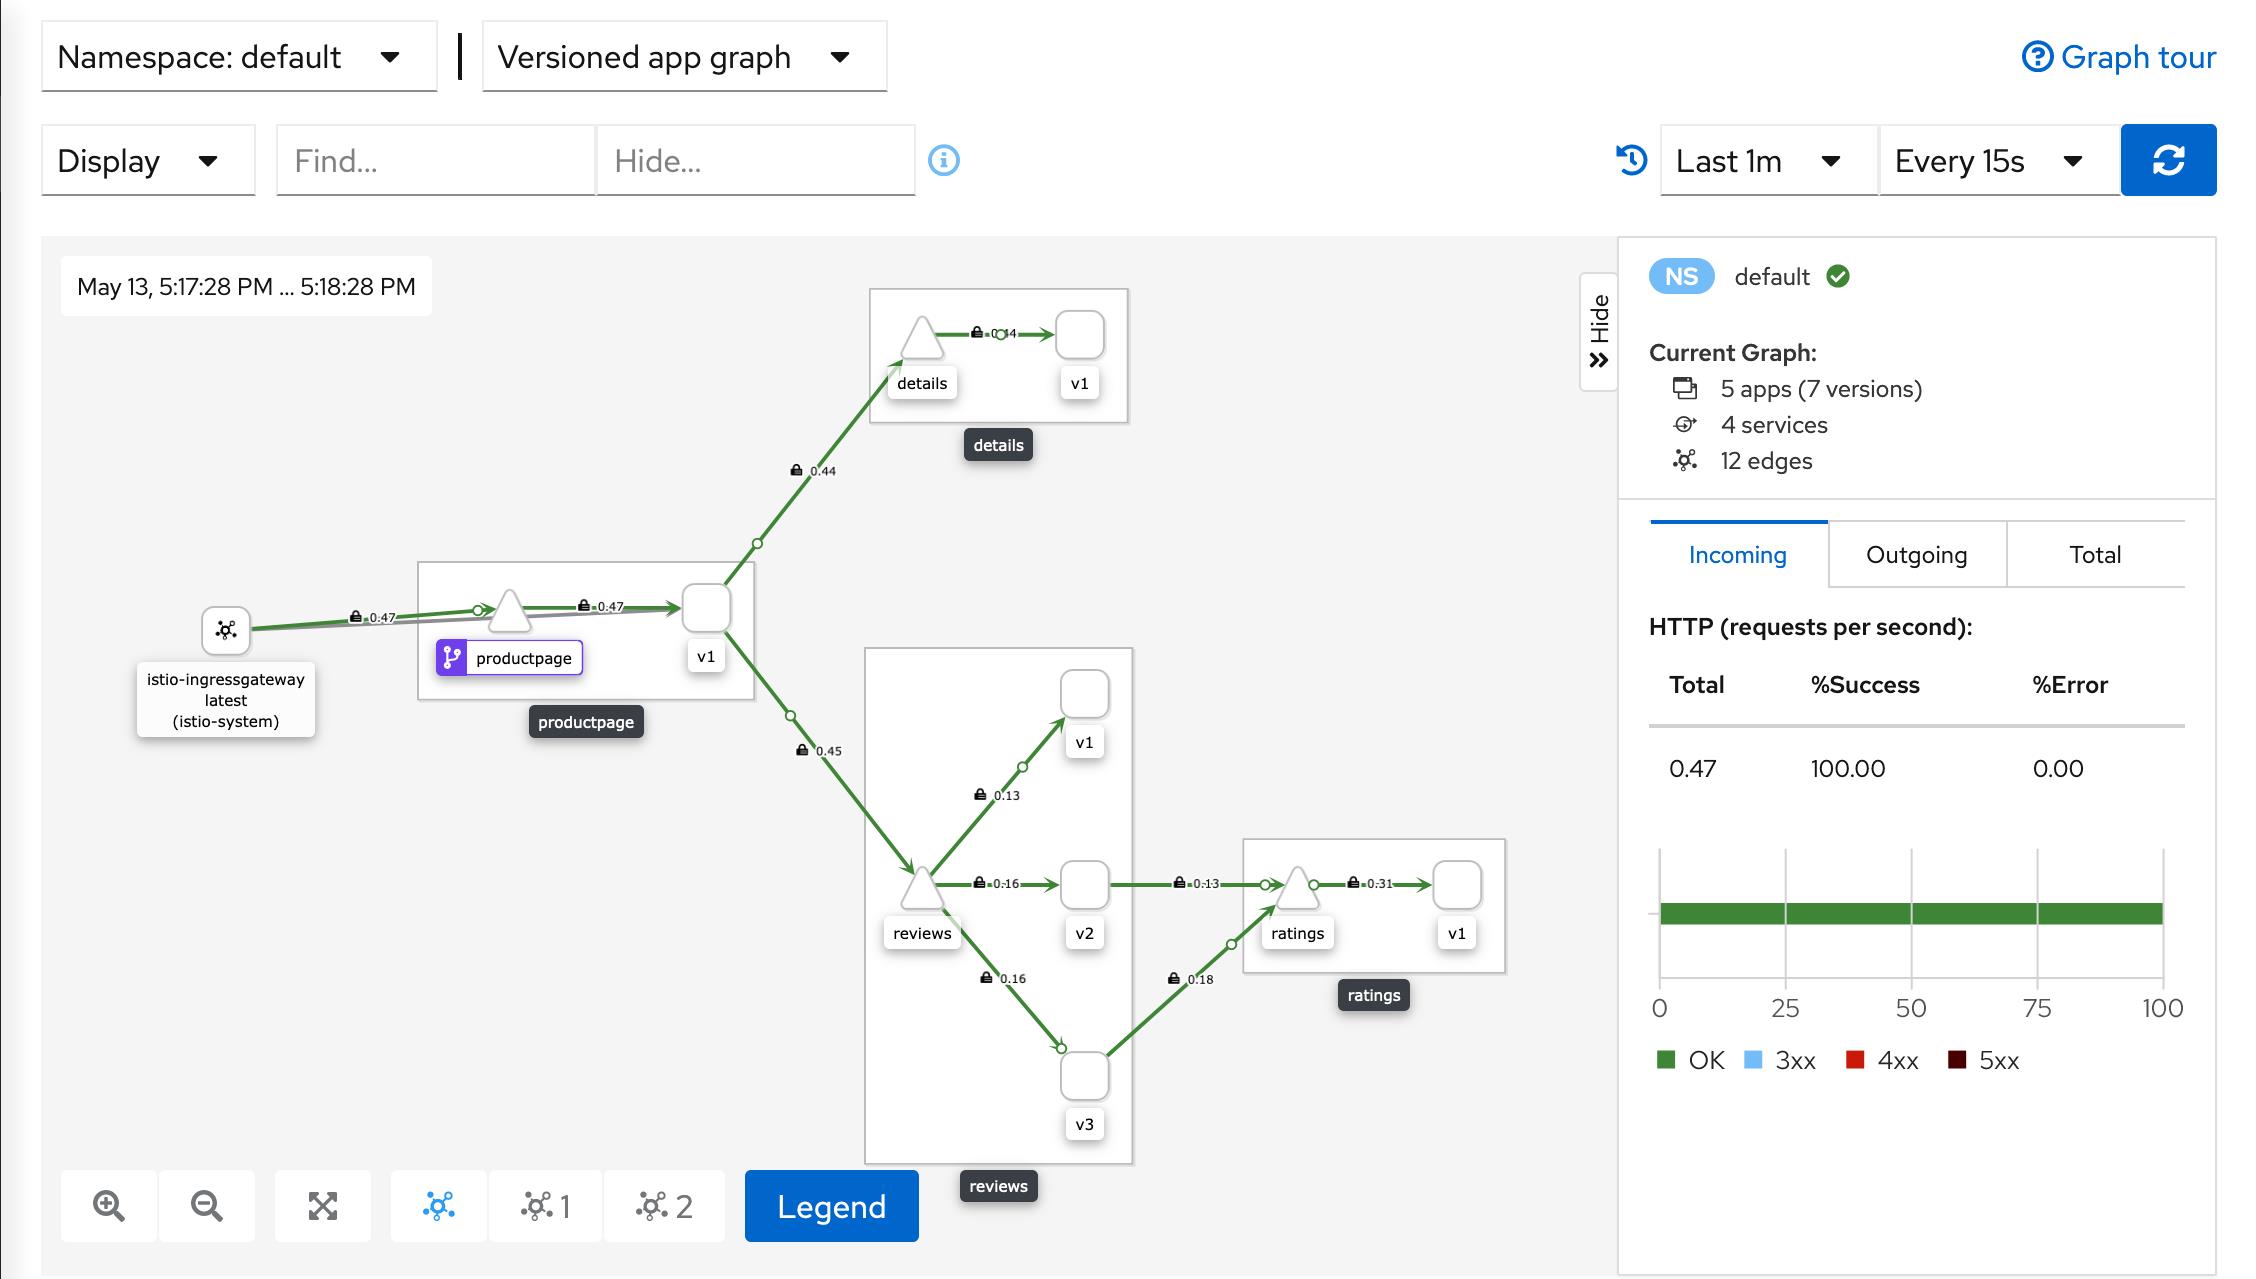
在左侧的导航菜单,选择 Graph ,然后在 Namespace 下拉列表中,选择 default 。
Kiali 仪表板展示了网格的概览、以及
Bookinfo示例应用的各个服务之间的关系。 它还提供过滤器来可视化流量的流动。Kiali Dashboard
卸载 Istio
要从集群中完整卸载 Istio,运行下面命令:
$ istioctl x uninstall --purge
可选的 --purge 参数将删除所有 Istio 资源,包括可能被其他 Istio 控制平面共享的、集群范围的资源。
或者,只删除指定的 Istio 控制平面,运行以下命令:
$ istioctl x uninstall <your original installation options>
或
$ istioctl manifest generate <your original installation options> | kubectl delete -f -
控制平面的命名空间(例如:istio-system)默认不会删除, 如果确认不再需要,用下面命令删除它:
$ kubectl delete namespace istio-system
参考链接
https://istio.io/latest/zh/docs/setup/getting-started/#download
options> | kubectl delete -f -
控制平面的命名空间(例如:`istio-system`)默认不会删除, 如果确认不再需要,用下面命令删除它:
$ kubectl delete namespace istio-system
## 参考链接

[Istio中文网站](https://istio.io/latest/zh/)

[Istio架构](https://istio.io/latest/zh/docs/ops/deployment/architecture/)

https://istio.io/latest/zh/docs/setup/getting-started/#download

https://github.com/istio/istio/releases/tag/1.12.0
以上是关于Istio1.12:安装和快速入门的主要内容,如果未能解决你的问题,请参考以下文章
