MobileNetV3MobileNetV3网络结构详解
Posted 寻找永不遗憾
tags:
篇首语:本文由小常识网(cha138.com)小编为大家整理,主要介绍了MobileNetV3MobileNetV3网络结构详解相关的知识,希望对你有一定的参考价值。
文章目录
在看本文前,强烈建议先看一下之前写的 MobilenetV2。
1 MobileNetV3创新点
- bottleneck结构变了
- 让网络更宽、更深,宽多少?深多少?采用NAS(Neural Architecture Search)搜索得到
- 重新设计耗时层结构(针对NAS搜索的结构进行设计,咱可以不管)
2 block变成了什么样
2.1 总体介绍
参考大佬的图片进行解读,Mobilenetv2中的block如下图所示
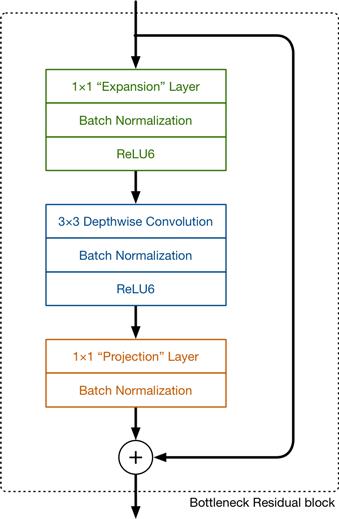
Mobilenetv3中的block如下图所示
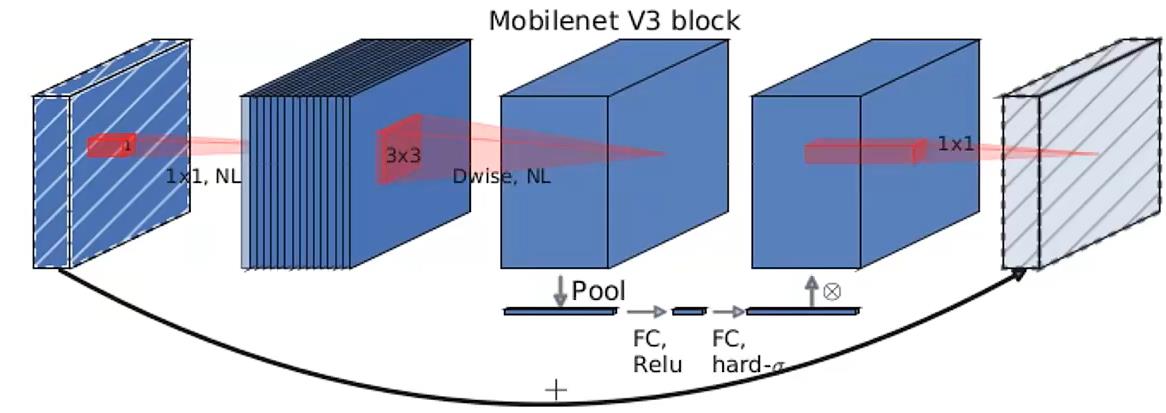
可以发现,Mobilenetv3的block中加入了SE模块,更换了激活函数 。
SE模块下一节讲。
此处更新的激活函数在图中用NL(非线性)统一表示,因为用到的激活函数不一样,主要有hardswish、relu两种。
最后那个1x1降维投影层用的是线性激活(f(x)=x),也可以理解为没用激活。
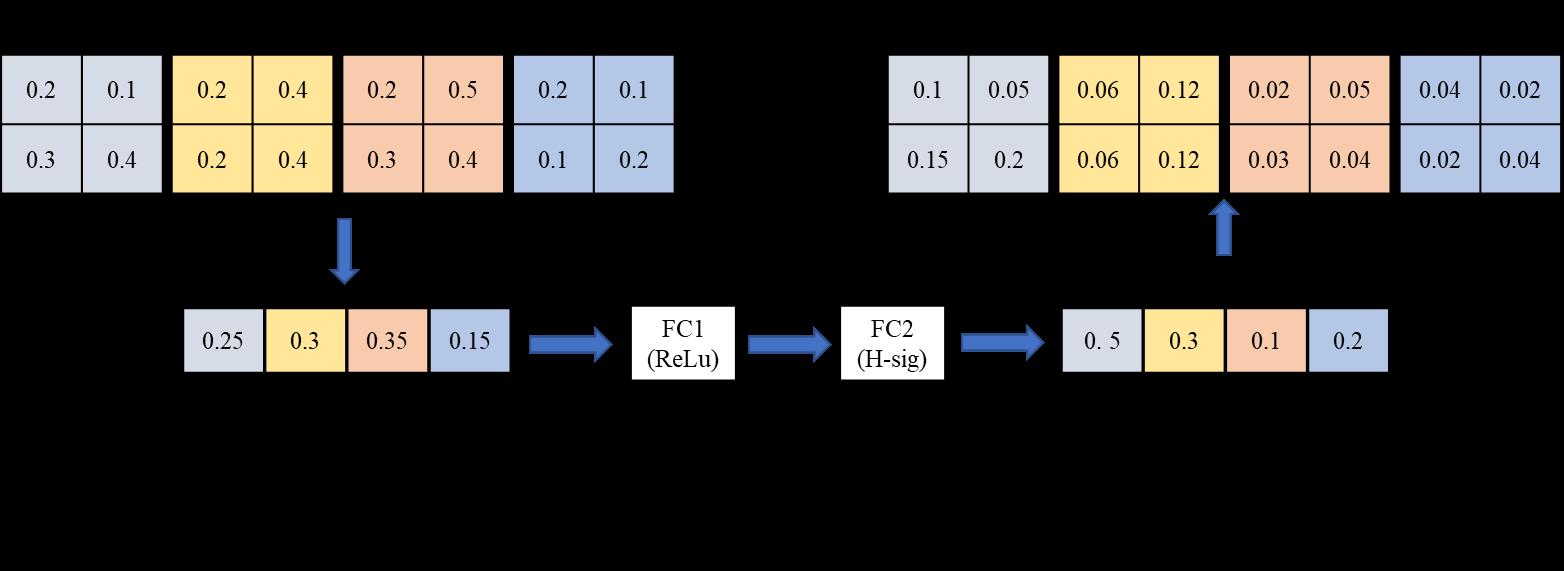
2.2 SE模块理解
SE(Squeeze-and-Excitation) 模块类似于一个注意力模块,以在Mobilenetv3中的应用为例进行理解,如下图所示。
2.3 ReLu6和hardswish激活函数理解
ReLu6激活函数如下图所示,相当于加了个最大值6进行限制。

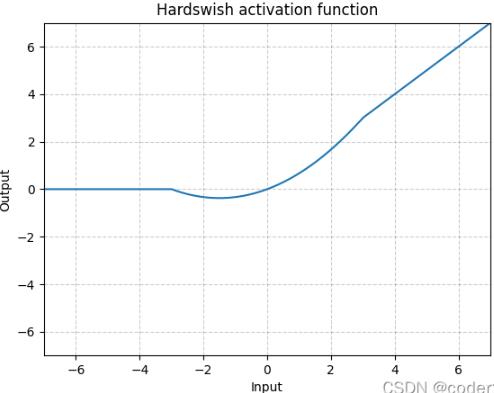
hardswish激活函数如下图所示,相当于分成3段进行限制。
采用hardswish,计算速度相对较快,对量化过程友好

3 网络总体结构
作者针对不同需求,通过NAS得到两种结构,一个是MobilenetV3-Large,结构如下图:

图中部分参数解释:
- Input表示输入尺寸
- Operator中的NBN表示不使用BN,最后的conv2d 1x1相当于全连接层的作用
- exp size表示bottleneck中的第一层1x1卷积升维,维度升到多少(第一个bottleneck没有1x1卷积升维操作)
- out表示bottleneck输出的channel个数
- SE表示是否使用SE模块
- NL表示使用何种激活函数,HS表示HardSwish,RE表示ReLu
- s表示步长(s=2,长宽变为原来一半)
另一个是MobilenetV3-Small,结构如下图:

4 代码解读
直接看代码注释即可,可运行
from typing import Callable, List, Optional
import torch
from torch import nn, Tensor
from torch.nn import functional as F
from functools import partial
# ------------------------------------------------------#
# 这个函数的目的是确保Channel个数能被8整除。
# 离它最近的8的倍数
# 很多嵌入式设备做优化时都采用这个准则
# ------------------------------------------------------#
def _make_divisible(ch, divisor=8, min_ch=None):
if min_ch is None:
min_ch = divisor
# int(v + divisor / 2) // divisor * divisor:四舍五入到8
new_ch = max(min_ch, int(ch + divisor / 2) // divisor * divisor)
# Make sure that round down does not go down by more than 10%.
if new_ch < 0.9 * ch:
new_ch += divisor
return new_ch
# -------------------------------------------------------------#
# Conv+BN+Acti经常会用到,组在一起
# -------------------------------------------------------------#
class ConvBNActivation(nn.Sequential):
def __init__(self,
in_planes: int,
out_planes: int,
kernel_size: int = 3,
stride: int = 1,
groups: int = 1,
norm_layer: Optional[Callable[..., nn.Module]] = None, # 卷积后的BN层
activation_layer: Optional[Callable[..., nn.Module]] = None): # 激活函数
padding = (kernel_size - 1) // 2
if norm_layer is None: # 没有传入,就默认使用BN
norm_layer = nn.BatchNorm2d
if activation_layer is None:
activation_layer = nn.ReLU6
super(ConvBNActivation, self).__init__(nn.Conv2d(in_channels=in_planes,
out_channels=out_planes,
kernel_size=kernel_size,
stride=stride,
padding=padding,
groups=groups,
bias=False), # 后面会用到BN层,故不使用bias
norm_layer(out_planes),
activation_layer(inplace=True))
# ------------------------------------------------------#
# 注意力模块:SE模块
# 就是两个FC层,节点个数、激活函数要注意要注意
# ------------------------------------------------------#
class SqueezeExcitation(nn.Module):
# squeeze_factor: int = 4:第一个FC层节点个数是输入特征矩阵的1/4
def __init__(self, input_c: int, squeeze_factor: int = 4):
super(SqueezeExcitation, self).__init__()
# 第一个FC层节点个数,也要是8的整数倍
squeeze_c = _make_divisible(input_c // squeeze_factor, 8)
# 通过卷积核大小为1x1的卷积替代FC层,作用相同
self.fc1 = nn.Conv2d(input_c, squeeze_c, 1)
self.fc2 = nn.Conv2d(squeeze_c, input_c, 1)
def forward(self, x: Tensor) -> Tensor:
# x有很多channel,通过output_size=(1, 1)实现每个channel变成1个数字
scale = F.adaptive_avg_pool2d(x, output_size=(1, 1))
scale = self.fc1(scale)
scale = F.relu(scale, inplace=True)
scale = self.fc2(scale)
# 此处的scale就是第二个FC层输出的数据
scale = F.hardsigmoid(scale, inplace=True)
return scale * x # 和原输入相乘,得到SE模块的输出
# ------------------------------------------------------#
# InvertedResidualConfig是参数配置文件
# ------------------------------------------------------#
class InvertedResidualConfig:
def __init__(self,
input_c: int,
kernel: int,
expanded_c: int, # bottleneck中的第一层1x1卷积升维,维度升到多少
out_c: int,
use_se: bool,
activation: str,
stride: int,
width_multi: float): # 和mobilenetv2中倍率因子相同,通过它得到每一层channels个数和基线的区别
self.input_c = self.adjust_channels(input_c, width_multi) # 倍率因子用在这儿了
self.kernel = kernel
self.expanded_c = self.adjust_channels(expanded_c, width_multi)
self.out_c = self.adjust_channels(out_c, width_multi)
self.use_se = use_se
# activation == "HS",则self.use_hs==True
self.use_hs = activation == "HS" # whether using h-swish activation
self.stride = stride
# 静态方法
@staticmethod
def adjust_channels(channels: int, width_multi: float):
return _make_divisible(channels * width_multi, 8)
class InvertedResidual(nn.Module):
def __init__(self,
cnf: InvertedResidualConfig, # cnf是个config文件,对应的格式就是上面介绍的InvertedResidualConfig类
norm_layer: Callable[..., nn.Module]):
super(InvertedResidual, self).__init__()
if cnf.stride not in [1, 2]:
raise ValueError("illegal stride value.")
# 是否使用shortcut连接
self.use_res_connect = (cnf.stride == 1 and cnf.input_c == cnf.out_c)
layers: List[nn.Module] = [] # 定义一个空列表,里面元素类型为nn.module
activation_layer = nn.Hardswish if cnf.use_hs else nn.ReLU
# expand
if cnf.expanded_c != cnf.input_c: # 第一个bottleneck没有这个1x1卷积,故有这个if哦安短
layers.append(ConvBNActivation(cnf.input_c,
cnf.expanded_c,
kernel_size=1,
norm_layer=norm_layer,
activation_layer=activation_layer))
# depthwise
layers.append(ConvBNActivation(cnf.expanded_c, # 上一层1x1输出通道数为cnf.expanded_c
cnf.expanded_c,
kernel_size=cnf.kernel,
stride=cnf.stride,
groups=cnf.expanded_c, # DW卷积
norm_layer=norm_layer,
activation_layer=activation_layer))
if cnf.use_se: # 是否使用se模块,只需要传入个input_channel
layers.append(SqueezeExcitation(cnf.expanded_c))
# project 降维1x1卷积层
layers.append(ConvBNActivation(cnf.expanded_c,
cnf.out_c,
kernel_size=1,
norm_layer=norm_layer,
# nn.Identity是一个线性激活,没进行任何处理
# 内部实现:直接return input
activation_layer=nn.Identity))
self.block = nn.Sequential(*layers)
self.out_channels = cnf.out_c
self.is_strided = cnf.stride > 1
def forward(self, x: Tensor) -> Tensor:
result = self.block(x)
if self.use_res_connect:
result += x
return result
# 继承来自nn.module类
class MobileNetV3(nn.Module):
def __init__(self,
inverted_residual_setting: List[InvertedResidualConfig], # 参数设置列表,列表里面每个元素类型是上面定义的那个类的形式
last_channel: int, # 倒数第二层channel个数
num_classes: int = 1000, # 需要分类的类别数
block: Optional[Callable[..., nn.Module]] = None,
norm_layer: Optional[Callable[..., nn.Module]] = None):
super(MobileNetV3, self).__init__()
if not inverted_residual_setting:
raise ValueError("The inverted_residual_setting should not be empty.")
elif not (isinstance(inverted_residual_setting, List) and
all([isinstance(s, InvertedResidualConfig) for s in inverted_residual_setting])):
raise TypeError("The inverted_residual_setting should be List[InvertedResidualConfig]")
if block is None:
block = InvertedResidual
# 将norm_layer设置为BN
# partial()给输入函数BN指定默认参数,简化之后的函数参数量
if norm_layer is None:
norm_layer = partial(nn.BatchNorm2d, eps=0.001, momentum=0.01)
layers: List[nn.Module] = []
# building first layer 就是普通的conv
firstconv_output_c = inverted_residual_setting[0].input_c
layers.append(ConvBNActivation(3,
firstconv_output_c,
kernel_size=3,
stride=2,
norm_layer=norm_layer,
activation_layer=nn.Hardswish))
# building inverted residual blocks
for cnf in inverted_residual_setting:
layers.append(block(cnf, norm_layer))
# building last several layers
lastconv_input_c = inverted_residual_setting[-1].out_c
lastconv_output_c = 6 * lastconv_input_c # small:96->576; Large:160->960
layers.append(ConvBNActivation(lastconv_input_c,
lastconv_output_c,
kernel_size=1,
norm_layer=norm_layer,
activation_layer=nn.Hardswish))
self.features = nn.Sequential(*layers)
self.avgpool = nn.AdaptiveAvgPool2d(1)
self.classifier = nn.Sequential(nn.Linear(lastconv_output_c, last_channel),
nn.Hardswish(inplace=True),
nn.Dropout(p=0.2, inplace=True),
nn.Linear(last_channel, num_classes))
# initial weights
for m in self.modules():
if isinstance(m, nn.Conv2d):
nn.init.kaiming_normal_(m.weight, mode="fan_out")
if m.bias is not None:
nn.init.zeros_(m.bias)
elif isinstance(m, (nn.BatchNorm2d, nn.GroupNorm)):
nn.init.ones_(m.weight)
nn.init.zeros_(m.bias)
elif isinstance(m, nn.Linear):
nn.init.normal_(m.weight, 0, 0.01)
nn.init.zeros_(m.bias)
def _forward_impl(self, x: Tensor) -> Tensor:
x = self.features(x)
x = self.avgpool(x) # 到这后面不再需要高和宽的维度了
x = torch.flatten(x, 1) # 故进行展平处理
x = self.classifier(x)
return x
def forward(self, x: Tensor) -> Tensor:
return self._forward_impl(x)
def mobilenet_v3_large(num_classes: int = 1000,
reduced_tail: bool = False) -> MobileNetV3:
"""
Constructs a large MobileNetV3 architecture from
"Searching for MobileNetV3" <https://arxiv.org/abs/1905.02244>.
weights_link:
https://download.pytorch.org/models/mobilenet_v3_large-8738ca79.pth
Args:
num_classes (int): number of classes
reduced_tail (bool): 需要的话, 设为True, 可以进一步减小网络
If True, reduces the channel counts of all feature layers
between C4 and C5 by 2. It is used to reduce the channel redundancy in the
backbone for Detection and Segmentation.
"""
width_multi = 1.0 # 调整channel个数,默认1.0
bneck_conf = partial(InvertedResidualConfig, width_multi=width_multi) # partial()给输入函数指定默认参数
# 给类里的方法传入参数 有了上面一行,这行有必要吗?
adjust_channels = partial(InvertedResidualConfig.adjust_channels, width_multi=width_multi)
reduce_divider = 2 if reduced_tail else 1
inverted_residual_setting = [
# input_c, kernel, expanded_c, out_c, use_se, activation, stride
bneck_conf(16, 3, 16, 16, False, "RE", 1),
bneck_conf(16, 3, 64, 24, False, "RE", 2), # C1
bneck_conf(24, 3, 72, 24, False, "RE", 1),
bneck_conf(24, 5, 72, 40, True, "RE", 2), # C2
bneck_conf(40, 5, 120, 40, True, "RE", 1),
bneck_conf(40, 5, 120, 40, True, "RE", 1),
bneck_conf(40, 3, 240, 80, False, "HS", 2), # C3
bneck_conf(80, 3, 200, 80, False, "HS", 1),
bneck_conf(80, 3, 184, 80, False, "HS", 1),
bneck_conf(80, 3, 184, 80, False, "HS", 1),
bneck_conf(80, 3, 480, 112, True, "HS", 1),
bneck_conf(112, 3, 672, 112, True, "HS", 1),
bneck_conf(112, 5, 672, 160 // reduce_divider, True, "HS", 2), # C4
bneck_conf(160 // reduce_divider, 5, 960 // reduce_divider, 160 // reduce_divider, True, "HS", 1),
bneck_conf(160 // reduce_divider, 5, 960 // reduce_divider, 160 // reduce_divider, True, "HS", 1),
]
last_channel = adjust_channels(1280 // reduce_divider) # C5 # 倒数第二个全连接层节点个数
return MobileNetV3(inverted_residual_setting=inverted_residual_setting,
last_channel=last_channel,
num_classes=num_classes)
def mobilenet_v3_small(num_classes: int = 1000,
reduced_tail: bool = False) -> MobileNetV3:
"""
Constructs a large MobileNetV3 architecture from
"Searching for MobileNetV3" <https://arxiv.org/abs/1905.02244>.
weights_link:
https://download.pytorch.org/models/mobilenet_v3_small-047dcff4.pth
Args:
num_classes (int): number of classes
reduced_tail (bool): If True, reduces the channel counts of all feature layers
between C4 and C5 by 2. It is used to reduce the channel redundancy in the
backbone for Detection and Segmentation.
"""
width_multi = 1.0
bneck_conf = partial(InvertedResidualConfig, width_multi=width_multi)
adjust_channels = partialJava学习网络编程全总结——TCPUdp多线程IO流Socket简易在线咨询聊天室Java爬虫
目录
网络编程
1.1、概述
信件:
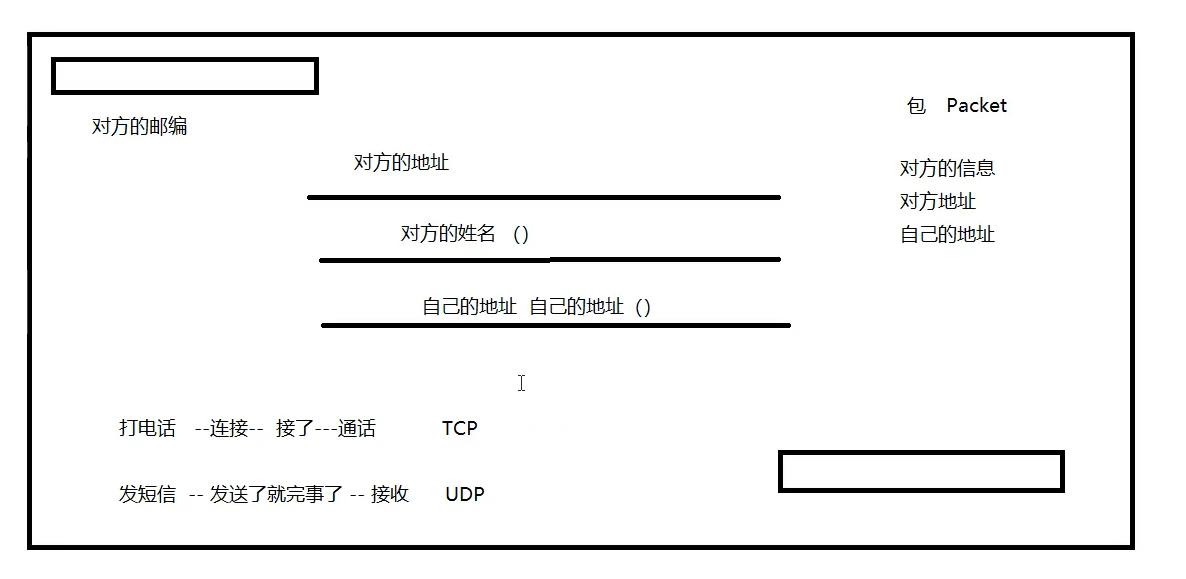
打电话:—连接—接了—通话 TCP
发短信:—发送了就完事了—接收 UDP
计算机网络:
计算机网络是指将地理位置不同的具有独立功能的多台计算机及其外部设备,通过通信线路连接起来,在网络操作系统,网络管理软件及网络通信协议的管理和协调下,实现资源共享和信息传递的计算机系统。
网络编程的目的:
传播交流信息,数据交换,通信。
想要达到这个效果需要什么:
1、如何准确地定位网络上的一台主机:(端口),定位到这个计算机的某个资源。
2、找到了这个主机,如何传输数据呢?
javaweb:网页编程 B/S
网络编程:TCP/IP C/S
1.2、网络通信的要素
如何实现网络上的通信?
通信双方地址:
(192.168.1.1):局域网。。
- ip:
- 端口号
规则:网络通信的协议:
TCP/IP参考模型:
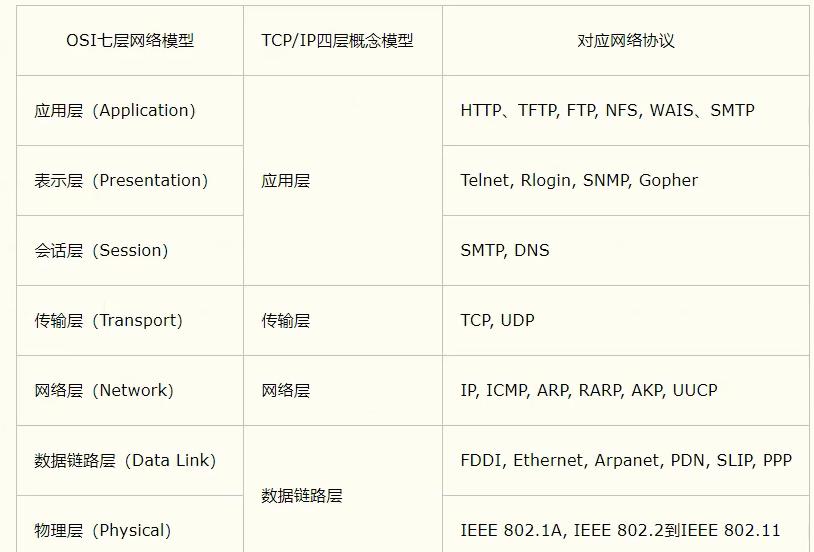
HTTP:超文本传输协议
FTP:文件上传协议

小结:
1、网络编程中有两个主要的问题:
- 如何准确的定位到网络上的一台或者多台主机
- 找到主机之后如何进行通信
2、网络编程中的要素
- IP和端口号 IP
- 网络通信协议 UDP,TCP
3、万物皆对象
1.3、IP
ip地址:inetAddress
- 唯一定位一台网络上计算机
- 127.0.0.1:本机loaclhost
- Ip地址的分类
- Ipv4/Ipv6
- IPv4 127.00.1,四个字节组成,0-255,42亿(4,228,250,625);30亿都在北美,亚洲四亿,2011年就用尽;
- IPV6:128位,8个无符号整数!
- 公网(互联网)-私网(局域网)
- ABCD类地址
- 192.168.xx.xx专门给组织内部使用的
- 域名:记忆IP问题!
- IP:
package com.mao.lesson01;
import java.net.InetAddress;
import java.net.UnknownHostException;
// 测试IP
public class TestInetAddress {
public static void main(String[] args) throws UnknownHostException {
// 查询本机地址
// getByName(String host) 确定主机名称的IP地址。
final InetAddress byName = InetAddress.getByName("127.0.0.1");
System.out.println(byName); // /127.0.0.1
final InetAddress localhost = InetAddress.getByName("localhost");
System.out.println(localhost); // localhost/127.0.0.1
// getHostAddress() 返回文本显示中的IP地址字符串。
final InetAddress localHost = InetAddress.getLocalHost();
System.out.println(localHost); // DESKTOP-JDIH9D6/10.102.211.250
System.out.println("========================");
// 查询网站ip地址
final InetAddress byName1 = InetAddress.getByName("www.huchao.vip");
System.out.println(byName1); // www.huchao.vip/47.93.20.204
System.out.println("======================");
// 常用方法
//
System.out.println(byName1.getCanonicalHostName()); // 规范的名字 获取此IP地址的完全限定域名。 47.93.20.204
System.out.println(byName1.getHostAddress()); // ip 返回文本显示中的IP地址字符串。 47.93.20.204
System.out.println(byName1.getHostName()); // 域名,或者自己电脑的名字 获取此IP地址的主机名。 www.huchao.vip
}
}
1.4、端口(port)
端口表示计算机上的一个程序的进程
-
不同的进程有不同的端口号!用来区分软件!
-
被规定0-65535
-
TCP,UDP:65536*2 tcp:80,udp:80? 单个协议下,端口不能冲突、
-
端口分类:
-
公有端口0~1023
- HTTP:80
- https:443
- FTP:21
- Telent:23
-
程序注册端口:1024~49151
- Tomcat: 8080
- MySQL: 3306
- Oracle: 1521
-
动态/私有:49152~65535
1、netstat -ano #查看所有的端口
2、netstat -ano|findstr "9640" # 查看指定的窗口 其中|是指先干后面的再在前面中找
3、tasklist|findstr "8696" #查看指定端口的进程
package com.mao.lesson01;
import java.net.InetSocketAddress;
public class TestInetSocketAddres {
public static void main(String[] args) {
final InetSocketAddress inetSocketAddress = new InetSocketAddress("47.93.20.204", 8080);
System.out.println(inetSocketAddress); // /47.93.20.204:8080
final InetSocketAddress localhost = new InetSocketAddress("localhost", 8080);
System.out.println(localhost); // localhost/127.0.0.1:8080
final InetSocketAddress inetSocketAddress1 = new InetSocketAddress("127.0.0.1", 8080);
System.out.println(inetSocketAddress1); // /127.0.0.1:8080
System.out.println("===================");
System.out.println(localhost.getAddress()); // localhost/127.0.0.1
System.out.println(localhost.getHostName()); // localhost
System.out.println(localhost.getPort()); // 8080
System.out.println("==================");
System.out.println(inetSocketAddress.getAddress()); // /47.93.20.204
System.out.println(inetSocketAddress.getHostName()); // 47.93.20.204
System.out.println(inetSocketAddress.getPort()); // 8080
}
}

1.5、通信协议
协议:约定,就好比我们现在说的是普通话。
网络通信协议:速率,传输码率,代码结构,传输控制。。。。。。
问题:非常的复杂
大事化小:分层!
TCP/IP协议簇:实际上是一层协议
重要:
- TCP:用户传输协议
- UDP:用户数据报协议
出名的协议:
- TCP:
- IP:网络互联协议
ps:应用层:QQ、微信;传输层:通信;网络层:分包;数据链路层:具体的传输:如光纤,海底电缆。。。。。。;
TCP UDP对比:
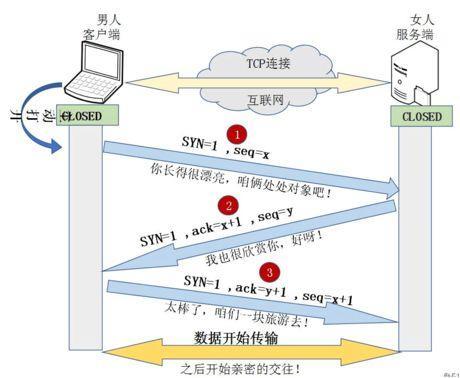
详解 TCP 连接的“ 三次握手 ”与“ 四次挥手 ”
https://baijiahao.baidu.com/s?id=1654225744653405133&wfr=spider&for=pc
TCP:打电话
-
连接,稳定
-
三次握手、四次挥手
-
三次握手
-

-
三次握手通俗理解
-
三次握手
最少需要三次,才能保证稳定连接!
A;你愁啥?
B:瞅你咋地?
A:干一场!
四次挥手 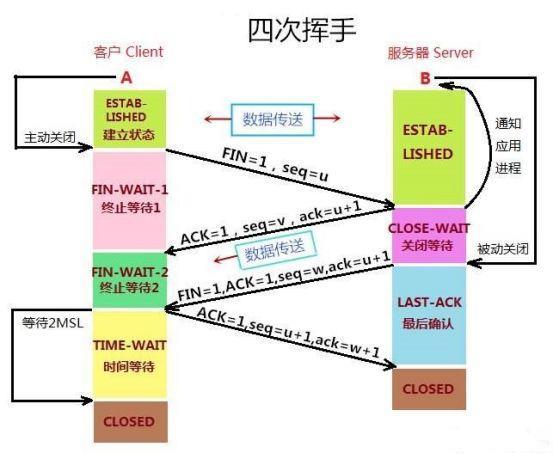
四次挥手通俗理解
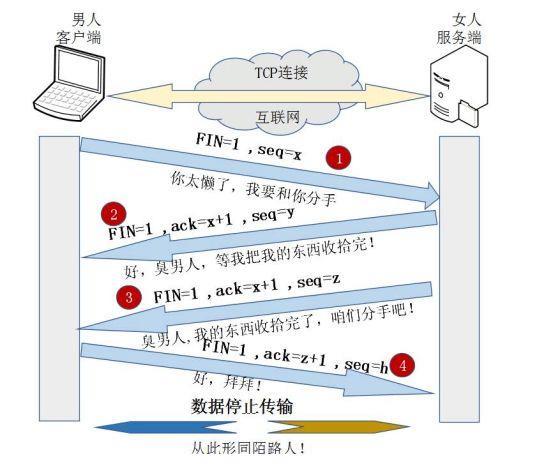
四次挥手
A:我要走了
B:你真的要走了吗?
B:你真的真的要走了吗?
A:我真的要走了!
-
客户端、服务端
-
传输完成,释放连接,效率低
UDP:发短信
- 不连接,不稳定
- 客户端、服务端:没有明确的界限
- 不管有没有准备好,都可以发给你。。。
- 导弹攻击
- DDOS:洪水攻击!(饱和攻击)
1.6、TCP
有关socket的知识分享:https://www.cnblogs.com/dolphinx/p/3460545.html
API
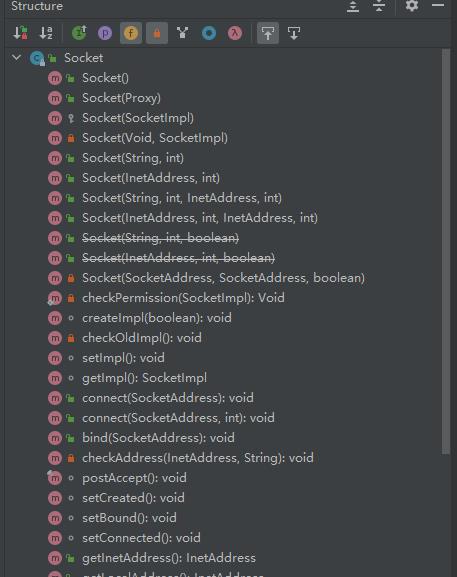
public class Socket
extends Object
implements Closeable
该类实现客户端套接字(也称为“套接字”)。套接字是两台机器之间通讯的端点。
套接字的实际工作由SocketImpl类的实例执行。 应用程序通过更改创建套接字实现的套接字工厂,可以配置自己创建适合本地防火墙的套接字。
-
从以下版本开始:
JDK1.0
SeverSocket:
API
public class ServerSocket
extends Object
implements Closeable
这个类实现了服务器套接字。 服务器套接字等待通过网络进入的请求。 它根据该请求执行一些操作,然后可能将结果返回给请求者。
服务器套接字的实际工作由SocketImpl类的实例执行。 应用程序可以更改创建套接字实现的套接字工厂,以配置自己创建适合本地防火墙的套接字。
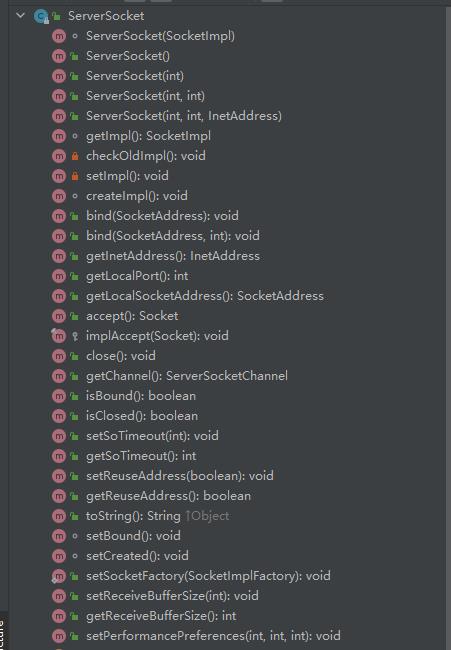
为了使客户能成功地连接到服务器,服务器必须建立一个ServerSocket 对象,该对象通过将客户端地套接字对象和服务器端地一个套接字对象连接起来,从而达到连接的目的。
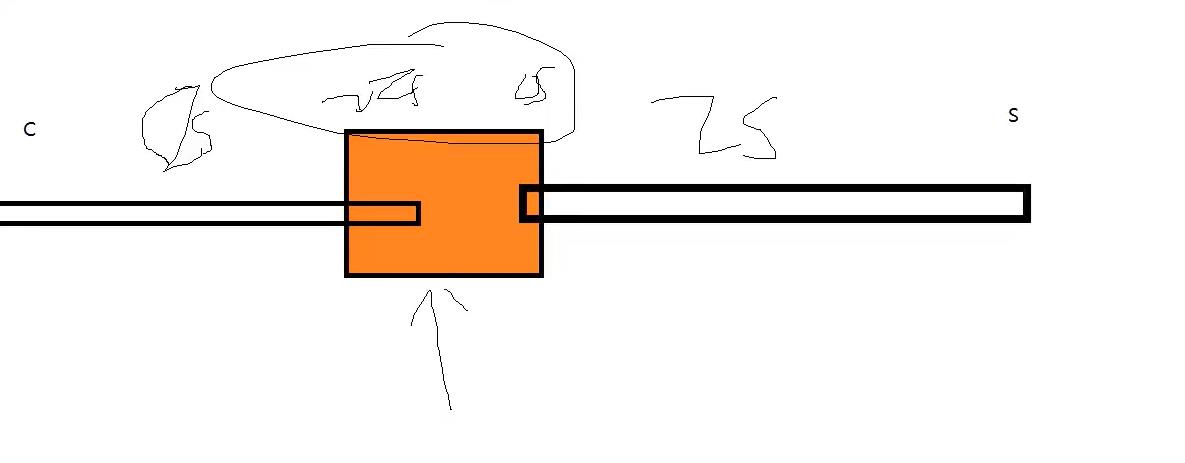
客户端:(socket对象)socket(IP地址,端口)
服务器:(ServerSocket对象)serversocket(端口 )用ServerSocket.accept()来建立一个和客户端的Socket对象相连接的Socket对象。
服务器端的输出流/输入流的目的地和客户端的输入流/输出流的源刚好相同。
服务端代码:
package com.mao.lesson02;
import java.io.ByteArrayOutputStream;
import java.io.IOException;
import java.io.InputStream;
import java.net.ServerSocket;
import java.net.Socket;
// 服务端
public class TestServerDemo01 {
public static void main(String[] args) {
ServerSocket serverSocket = null;
Socket accept = null;
InputStream inputStream = null;
ByteArrayOutputStream byteArrayOutputStream = null;
try {
// 1.我得有一个地址
serverSocket= new ServerSocket(9999);
while (true){
//2. 等待客户端连接过来
accept = serverSocket.accept();
//3. 读取客户端的消息
inputStream = accept.getInputStream();
// 管道流
byteArrayOutputStream = new ByteArrayOutputStream();
byte[] bytes = new byte[1024];
int length;
while ((length=inputStream.read(bytes))!=-1){
byteArrayOutputStream.write(bytes,0,length);
}
System.out.println(byteArrayOutputStream.toString());
}
} catch (IOException ioException) {
ioException.printStackTrace();
}finally {
if (byteArrayOutputStream!=null){
try {
byteArrayOutputStream.close();
} catch (IOException e) {
e.printStackTrace();
}
}
if (inputStream!=null){
try {
inputStream.close();
} catch (IOException e) {
e.printStackTrace();
}
}
if (accept!=null){
try {
accept.close();
} catch (IOException e) {
e.printStackTrace();
}
}
if (serverSocket!=null){
try {
serverSocket.close();
} catch (IOException e) {
e.printStackTrace();
}
}
}
}
}
客户端代码
package com.mao.lesson02;
import java.io.IOException;
import java.io.OutputStream;
import java.net.InetAddress;
import java.net.Socket;
import java.net.UnknownHostException;
//客户端
public class TcpClientDemo01 {
public static void main(String[] args) {
InetAddress byName =null;
Socket socket=null;
OutputStream outputStream=null;
try {
//1.要知道服务器的地址,端口号
byName = InetAddress.getByName("127.0.0.01");
int port =9999;
//2.创建一个socket连接
socket = new Socket(byName,port);
//3.发送消息 io 流
outputStream = socket.getOutputStream();
outputStream.write("你好,我是胡超,欢迎和我一起学习Java网络编程".getBytes());
} catch (Exception e) {
e.printStackTrace();
}finally {
if (socket!=null){
try {
socket.close();
} catch (IOException e) {
e.printStackTrace();
}
}
if (outputStream!=null){
try {
outputStream.close();
} catch (IOException e) {
e.printStackTrace();
}
}
}
}
}
每执行一次客户端代码,都会在服务端显示一次

进程堵塞
提升作用域
文件上传
服务器端:
package com.mao.lesson02;
import com.sun.org.apache.bcel.internal.generic.NEW;
import java.io.*;
import java.net.ServerSocket;
import java.net.Socket;
/**
* @Author HuChao
* @Description //TODO Hasee
* @Date 17:28 2021/11/2
* @Param
* @return
**/
public class TcpServerDemo02 {
public static void main(String[] args) throws Exception {
// 1.创建服务
final ServerSocket serverSocket = new ServerSocket(9000);
// 2.监听客户端连接
final Socket socket = serverSocket.accept(); //阻塞式监听,会一直等待客户端的到来
// 3.获取输入流
final InputStream inputStream = socket.getInputStream();
// 4.文件输出
final FileOutputStream fileOutputStream = new FileOutputStream(new File("recevie.png"));
//创立缓冲区和写
final byte[] bytes = new byte[1024];
int length;
while ((length=inputStream.read(bytes))!=-1){
fileOutputStream.write(bytes,0,length);
}
// 通知客户端接受完毕
final OutputStream outputStream = socket.getOutputStream();
outputStream.write("客户端,服务都端接受完毕了,你可以断开了".getBytes());
// 关闭资源
outputStream.close();
fileOutputStream.close();
inputStream.close();
socket.close();
serverSocket.close();
}
}
/*
1、接收要read,所以要用inputStream
2、要把文件写给大家看,所以要fileoutputstream
*/
客户端:
package com.mao.lesson02;
import java.io.*;
import java.net.InetAddress;
import java.net.Socket;
import java.net.UnknownHostException;
/**
* @Author HuChao
* @Description //TODO Huchao
* @Date 17:28 2021/11/2
* @Param
* @return
**/
public class TcpClientDemo02 {
public static void main(String[] args) throws Exception {
// 1.创建一个socket连接
final Socket socket = new Socket(InetAddress.getByName("127.0.0.1"), 9000);
// 2.创建一个输出流
final OutputStream outputStream = socket.getOutputStream();
// 3.读取文件
final FileInputStream fileInputStream = new FileInputStream(new File("双湖拍.png"));
// 4.写出文件
final byte[] bytes = new byte[1024];
int length;
while ((length=fileInputStream.read(bytes))!=-1){
outputStream.write