深度剖析 VS Code JavaScript Debugger 功能及实现原理
Posted 阿里巴巴淘系技术团队官网博客
tags:
篇首语:本文由小常识网(cha138.com)小编为大家整理,主要介绍了深度剖析 VS Code JavaScript Debugger 功能及实现原理相关的知识,希望对你有一定的参考价值。

本文将从 VSCode javascript Debugger 的功能入手,从源码角度分析其实现对应功能所使用的技术手段及优秀的代码设计,让大家对其中的功能及实现原理有大致理解。
前言
调试(Debugging)作为软件开发环境中无法缺少的部分,长期以来都作为评价一款 IDE 产品优劣的重要指标,VS Code 在 1.47 版本「1」中废弃了旧版本的 Node Debug「2」、Debugger For Chrome 「3」等插件集,正式采用了全新的 JavaScript Debugger 插件,用于满足所有 JavaScript 场景下的调试需求,不仅提供了丰富的调试能力,还为我们带了了崭新的 JavaScript Debug Terminal , Profiling 以及更好的断点和源文件映射等能力。
本文将从 VSCode JavaScript Debugger 的功能入手,从源码角度分析其实现对应功能所使用的技术手段及优秀的代码设计,让大家对其中的功能及实现原理有大致理解。
同时,在 2.18 版本的 OpenSumi 「4」框架中,我们也适配了最新的 JavaScript Debugger 1.67.2 版本插件,大部分功能已经可以正常使用,欢迎大家升级体验。
「1」https://code.visualstudio.com/updates/v1_47
「2」https://marketplace.visualstudio.com/items?itemName=ms-vscode.node-debug2
「3」https://marketplace.visualstudio.com/items?itemName=msjsdiag.debugger-for-chrome
「4」https://opensumi.com/zh
简介
VS Code JavaScript Debugger 依旧是基于 DAP 「1」实现的一款 JavaScript 调试器。其支持了 Node.js, Chrome, Edge, WebView2, VS Code Extension 等研发场景调试。
「1」https://microsoft.github.io/debug-adapter-protocol/
DAP是什么?
了解调试相关功能的实现,不得不提的就是 VS Code 早期建设的 DAP (Debug Adapter Protocol)方案,其摒弃了 IDE 直接与调试器对接的方案,通过实现 DAP 的方式,将于调试器适配的逻辑,承接在 Adapter(调试适配器) 之中,从而达到多个实现了同一套 DAP 协议的工具可以复用彼此调试适配器的效果,如下图所示:
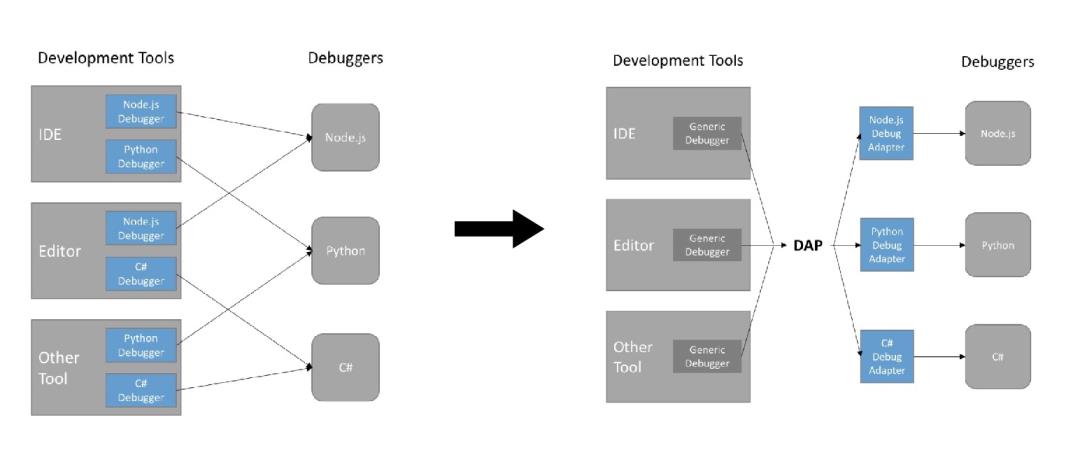
而上面图示的适配器部分,一般组成了 VS Code 中调试插件中调试能力实现的核心。
目前支持 DAP 协议的开发工具列表见:Implementations Tools supporting the DAP 「1」(OpenSumi 也在列表之中 ~)
「1」https://microsoft.github.io/debug-adapter-protocol/implementors/tools/
多种调试能力
如上面介绍的,VS Code 中,调试相关的能力都是基于 DAP 去实现的,忽略建立链接的部分,在 JavaScript Debugger 中,所有的调试请求入口都在 debugAdapter.ts#L78 「1」中处理,部分代码如下所示:
// 初始化 Debugger
this.dap.on('initialize', params => this._onInitialize(params));
// 设置断点
this.dap.on('setBreakpoints', params => this._onSetBreakpoints(params));
// 设置异常断点
this.dap.on('setExceptionBreakpoints', params => this.setExceptionBreakpoints(params));
// 配置初始化完成事件
this.dap.on('configurationDone', () => this.configurationDone());
// 请求资源
this.dap.on('loadedSources', () => this._onLoadedSources());
通过对 DAP 的实现,使得 JavaScript Debugger 可以先暂时忽略 Debug Adaptor 与不同调试器的适配逻辑,将调试抽象为一个个具体的请求及函数方法。
以设置断点的 setBreakpoints 为例,JavaScript Debugger 将具体设置断点的能力抽象与 breakpoints.ts 「2」文件中,如下:
public async setBreakpoints(
    params: Dap.SetBreakpointsParams,
    ids: number[],
  ): Promise<Dap.SetBreakpointsResult>
    // 安装代码 SourceMap 文件
    if (!this._sourceMapHandlerInstalled && this._thread && params.breakpoints?.length)
      await this._installSourceMapHandler(this._thread);


    // ... 省略部分参数订正及等待相关进程初始化的过程
    // ... 省略合并已有的断点逻辑,同时移除未与调试进程绑定的断点

    if (thread && result.new.length)
      // 为调试器添加断点
      this.ensureModuleEntryBreakpoint(thread, params.source);


      // 这里的 Promise.all 结构是为了确保设置断点过程中不会因为用户的某次 disabled 操作而丢失准确性
      // 相当于取了当前时刻有效的一份断点列表
      const currentList = getCurrent();
      const promise = Promise.all(
        result.new
          .filter(this._enabledFilter)
          .filter(bp => currentList?.includes(bp))
          // 实际断点设置逻辑
          .map(b => b.enable(thread)),
      );
      // 添加断点设置 promise 至 this._launchBlocker, 后续调试器依赖对 `launchBlocker` 方法来确保断点已经处理完毕
      this.addLaunchBlocker(Promise.race([delay(breakpointSetTimeout), promise]));
      await promise;


    // 返回断点设置的 DAP 消息
    const dapBreakpoints = await Promise.all(result.list.map(b => b.toDap()));
    this._breakpointsStatisticsCalculator.registerBreakpoints(dapBreakpoints);


    // 更新当前断点状态
    delay(0).then(() => result.new.forEach(bp => bp.markSetCompleted()));
    return  breakpoints: dapBreakpoints ;
接下来可以看到 breakpointBase.ts#L162 「3」中实现的 enable 方法,如下:
public async enable(thread: Thread): Promise<void>
    if (this.isEnabled)
      return;


    this.isEnabled = true;
    const promises: Promise<void>[] = [this._setPredicted(thread)];
    const source = this._manager._sourceContainer.source(this.source);
    if (!source || !(source instanceof SourceFromMap))
      promises.push(
        // 当不存在资源或非 SourceMap 资源时
        // 根据断点位置、代码偏移量计算最终断点位置后在调试器文件路径下断点
        this._setByPath(thread, uiToRawOffset(this.originalPosition, source?.runtimeScriptOffset)),
      );


    await Promise.all(promises);
    ...
根据资源类型进一步处理断点资源路径,核心代码如下(详细代码可见:breakpointBase.ts#L429「4」):
protected async _setByPath(thread: Thread, lineColumn: LineColumn): Promise<void>
    const sourceByPath = this._manager._sourceContainer.source( path: this.source.path );


    // ... 忽略对已经映射到本地的资源的处理


    if (this.source.path)
      const urlRegexp =
        await this._manager._sourceContainer.sourcePathResolver.absolutePathToUrlRegexp(
          this.source.path,
        );
      if (!urlRegexp)
        return;

      // 通过正则表达式设置断点
      await this._setByUrlRegexp(thread, urlRegexp, lineColumn);
     else
      const source = this._manager._sourceContainer.source(this.source);
      const url = source?.url;


      if (!url)
        return;

      // 直接通过路径设置断点
      await this._setByUrl(thread, url, lineColumn);
      if (this.source.path !== url && this.source.path !== undefined)
        await this._setByUrl(thread, absolutePathToFileUrl(this.source.path), lineColumn);
最终在进程中设置断点信息,部分核心代码如下(详细代码可见:breakpointBase.ts#L513 「5」):
protected async _setByUrlRegexp(
    thread: Thread,
    urlRegex: string,
    lineColumn: LineColumn,
  ): Promise<void>
    lineColumn = base1To0(lineColumn);


    const previous = this.hasSetOnLocationByRegexp(urlRegex, lineColumn);
    if (previous)
      if (previous.state === CdpReferenceState.Pending)
        await previous.done;


      return;

    // 设置断点
    return this._setAny(thread,
      urlRegex,
      condition: this.getBreakCondition(),
      ...lineColumn,
    );
在 node-debug/node-debug2 等插件的以往实现中,到这一步一般是通过向调试器发送具体 “设置断点指令” 的消息,执行相应命令,如 nodeV8Protocol.ts#L463 「6」中下面的代码:
private send(typ: NodeV8MessageType, message: NodeV8Message) : void
    message.type = typ;
    message.seq = this._sequence++;
    const json = JSON.stringify(message);
    const data = 'Content-Length: ' + Buffer.byteLength(json, 'utf8') + '\\r\\n\\r\\n' + json;
    if (this._writableStream)
      this._writableStream.write(data);
而在 JavaScript Debugger 中,会将所有这类消息都抽象为统一的 CDP (Chrome Devtools Protocol) 「7」, 通过这种方式,抹平所有 JS 调试场景下的差异性,让其拥有对接所有 JavaScript 场景调试场景的能力,继续以 “设置断点” 这一流程为例,此时 JavaScript Debugger 不再是发送具体命令,而是通过 CDP 链接,发送一条设置断点的消息,部分核心代码如下(详细代码可见:breakpointBase.ts#L581 「8」):
const result = isSetByLocation(args)
 ? await thread.cdp().Debugger.setBreakpoint(args)
 : await thread.cdp().Debugger.setBreakpointByUrl(args);
通过这层巧妙的 CDP 链接,可以将所有用户操作指令统一为一层抽象的结构处理,后面只需要根据不同的调试器类型,选择性处理 CDP 消息即可,如图所示:
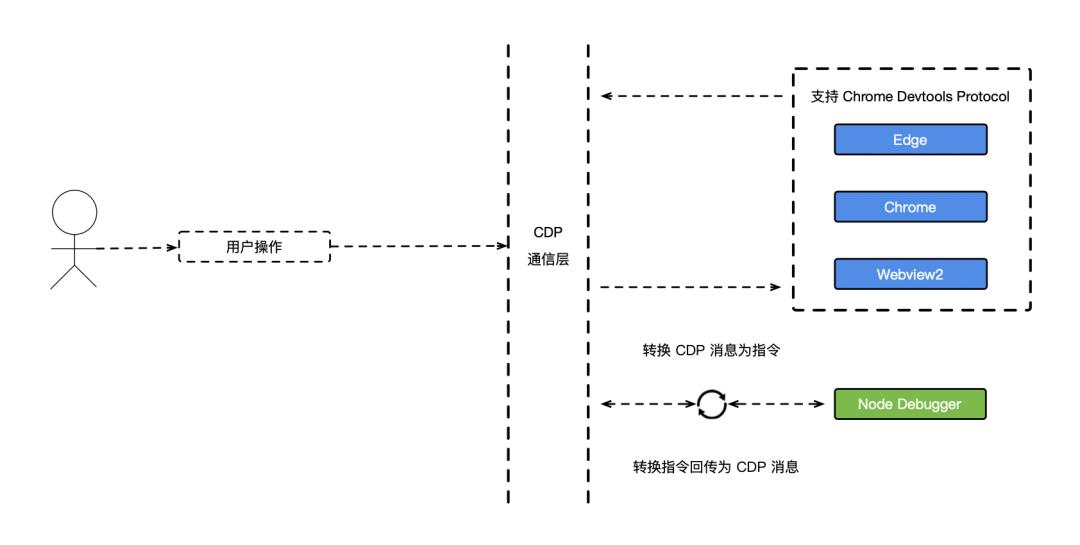
通过这层结构设计,能让 JavaScript Debugger 轻松兼容三种模式调试 Node Launch, Node Attach, Chrome Devtools Attach, 从而实现对全 JavaScript 场景的调试能力。
了解详细的 CDP 协议,可以查看文档 CDP (Chrome Devtools Protocol) 「9」 ,在调试领域,Chrome Devtools 拥有更加全面的场景及能力支持,部分能力,如 DOMSnapshot 「10」并不能在 Node 场景下使用,因此在实现过程中也需要选择性处理。
同时,通过这样的改造,也让运行于 VS Code 中的调试进程可以通过 Chrome Devtools 或其他支持 CDP 协议的调试工具进行链接调试,如运行 extension.js-debug.requestCDPProxy 命令获取调试信息,如下图所示:

在 Chrome Devtools 中可以拼接为 chrome-devtools://devtools/custom/inspector.html?ws=ws://127.0.0.1:53591/273c30144bc597afcbefa2058bfacc4b0160647e 的路径直接进行调试。
「1」https://github.com/microsoft/vscode-js-debug/blob/e7904bd1bfb7f24ba3ccf8703f158054fcbc20a7/src/adapter/debugAdapter.ts#L78
「2」https://github.com/microsoft/vscode-js-debug/blob/aed1287598f581c7d8ae24ef8cabeff74761a3a2/src/adapter/breakpoints.ts
「3」https://github.com/microsoft/vscode-js-debug/blob/0958def8c65017b41e7a22e9e461a027ce7558d8/src/adapter/breakpoints/breakpointBase.ts#L162
「4」https://github.com/microsoft/vscode-js-debug/blob/0958def8c65017b41e7a22e9e461a027ce7558d8/src/adapter/breakpoints/breakpointBase.ts#L429
「5」https://github.com/microsoft/vscode-js-debug/blob/0958def8c65017b41e7a22e9e461a027ce7558d8/src/adapter/breakpoints/breakpointBase.ts#L513
「6」https://github.com/microsoft/vscode-node-debug/blob/d656565dd9a4a621335e239be2f2134827ae0fc4/src/node/nodeV8Protocol.ts#L463
「7」https://chromedevtools.github.io/devtools-protocol/
「8」https://github.com/microsoft/vscode-js-debug/blob/0958def8c65017b41e7a22e9e461a027ce7558d8/src/adapter/breakpoints/breakpointBase.ts#L581
「9」https://chromedevtools.github.io/devtools-protocol/
「10」https://chromedevtools.github.io/devtools-protocol/tot/DOMSnapshot/
JavaScript Debug Terminal
如果要评选 JavaScript Debugger 中最好用的功能,那么我一定投票给 JavaScript Debug Terminal 这一功能。
JavaScript Debug Terminal 为用户提供了一种无需关注调试配置,只需在终端运行脚本即可快速进行调试的能力,如下所示(OpenSumi 中的运行效果):
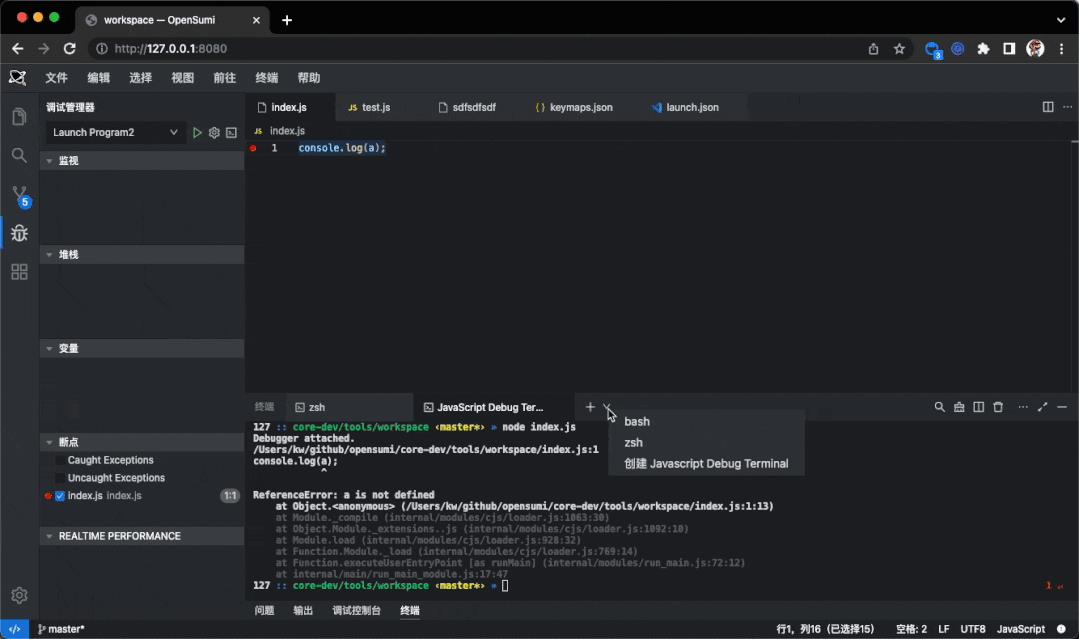
众所周知,Node.js 在调试模式下提供了两种 flag 选项,一个是 --inspect , 另一个则是 --inspect-brk ,两者都可以让 Node.js 程序以调试模式启动,唯一区别即是 --inspect-brk 会在调试器未被 attach 前阻塞 Node.js 脚本的执行,这个特性在老版本的 Node Debug 插件中被广泛使用,用于保障在调试执行前设置断点等。
而在 JavaScript Debugger 中,采用了一个全新的脚本运行模式,让 Node.js 的调试可以不再依赖 --inspect-brk , 其原理即是向在 JavaScript Debug Terminal 中运行的脚本注入 NODE_OPTIONS 选项,如下所示:
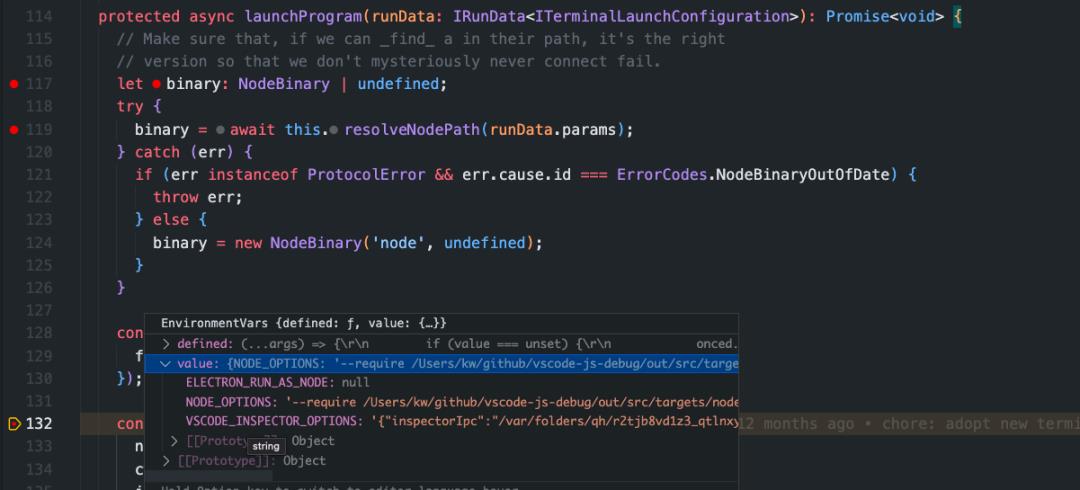
在传入 NODE_OPTIONS:'--require .../vscode-js-debug/out/src/targets/node/bootloader.bundle.js' 的环境变量后,Node.js 在脚本执行前便会提前先去加载 bootloader.bundle.js 内的文件内容,而后再执行脚本,这中间就提供了大量可操作性。
进一步看这个 bootloader.ts#L31 「1」文件,里面写了一段自执行代码,在全局创建一个 $jsDebugIsRegistered 对象, 通过程序内部构造的VSCODE_INSPECTOR_OPTIONS 对象直接与调试进程进行 IPC 通信,配置格式如下所示:
  // 调试进程 IPC 通信地址
  "inspectorIpc":"/var/folders/qh/r2tjb8vd1z3_qtlnxy47b4vh0000gn/T/node-cdp.33805-2.sock",
  // 一些配置
  "deferredMode":false,
  "waitForDebugger":"",
  "execPath":".../node",
  "onlyEntrypoint":false,
  "autoAttachMode":"always",
  // 文件回调地址,如果存在,在调试进程中的打印的日志将会写入到该文件中
  "fileCallback":"/var/folders/qh/r2tjb8vd1z3_qtlnxy47b4vh0000gn/T/node-debug-callback-d2db3d91a6f5ae91"
在获取到 inspectorIpc 等配置后,即会尝试通过读文件的方式确认 inspector 进程 的连通性,伪代码如下(详细代码可见:bootloader.ts#L246「2」):
fs.readdirSync(path.dirname(inspectorIpc)).includes(path.basename(inspectorIpc));在确定inspector 进程的连通性后,接下来就可以使用inspector「3」库, 获取inspector.url()后进行链接操作,部分代码如下(详细代码见:bootloader.ts#L111「4」):
(() =>
  ...
  // 当进程执行时传入了 `--inspect` 时,inspector.url() 可以获取到当前的调试地址,命令行情况需要额外处理
  const info: IAutoAttachInfo =
    ipcAddress: env.inspectorIpc || '',
    pid: String(process.pid),
    telemetry,
    scriptName: process.argv[1],
    inspectorURL: inspector.url() as string,
    waitForDebugger: true,
    ownId,
    openerId: env.openerId,
  ;


  // 当需要立即启动调试时,执行 watchdog 程序监听进程创建
  if (mode === Mode.Immediate)
    // 代码见:https://github.com/microsoft/vscode-js-debug/blob/b056fbb86ef2e2e5aa99663ff18411c80bdac3c5/src/targets/node/bootloader.ts#L276
    spawnWatchdog(env.execPath || process.execPath, info);

  ...
)();


function spawnWatchdog(execPath: string, watchdogInfo: IWatchdogInfo)
  const p = spawn(execPath, [watchdogPath],
    env:
      NODE_INSPECTOR_INFO: JSON.stringify(watchdogInfo),
      NODE_SKIP_PLATFORM_CHECK: process.env.NODE_SKIP_PLATFORM_CHECK,
    ,
    stdio: 'ignore',
    detached: true,
  );
  p.unref();


  return p;
接下来就是执行下面的代码 watchdog.ts「5」, 部分代码如下:
const info: IWatchdogInfo = JSON.parse(process.env.NODE_INSPECTOR_INFO!);


(async () =>
  process.on('exit', () =>
    logger.info(LogTag.Runtime, 'Process exiting');
    logger.dispose();


    if (info.pid && !info.dynamicAttach && (!wd || wd.isTargetAlive))
      process.kill(Number(info.pid));

  );


  const wd = await WatchDog.attach(info);
  wd.onEnd(() => process.exit());
)();
实际上这里又用了一个子进程去处理 CDP 通信的链接,最终执行到如下位置代码 watchdogSpawn.ts#L122「6」,部分代码如下:
class WatchDog
  ...
  // 链接本地 IPC 通信地址,即前面从环境变量中获取的 inspectorIpc
  public static async attach(info: IWatchdogInfo)
    const pipe: net.Socket = await new Promise((resolve, reject) =>
      const cnx: net.Socket = net.createConnection(info.ipcAddress, () => resolve(cnx));
      cnx.on('error', reject);
    );


    const server = new RawPipeTransport(Logger.null, pipe);
    return new WatchDog(info, server);


  constructor(private readonly info: IWatchdogInfo, private readonly server: ITransport)
    this.listenToServer();


  // 链接 Server 后,发送第一条 `Target.targetCreated` 通知调试进程已经可以开始调试
  private listenToServer()
    const  server, targetInfo  = this;
    server.send(JSON.stringify( method: 'Target.targetCreated', params:  targetInfo  ));
    server.onMessage(async ([data]) =>
      // Fast-path to check if we might need to parse it:
      if (
        this.target &&
        !data.includes(Method.AttachToTarget) &&
        !data.includes(Method.DetachFromTarget)
      )
        // 向 inspectorUrl 建立的链接发送消息
        this.target.send(data);
        return;

      // 解析消息体
      const result = await this.execute(data);
      if (result)
        // 向调试进程发送消息
        server.send(JSON.stringify(result));

    );


    server.onEnd(() =>
      this.disposeTarget();
      this.onEndEmitter.fire( killed: this.gracefulExit, code: this.gracefulExit ? 0 : 1 );
    );

  ...
可以看到,在 Node.js 脚本被真正执行前,JavaScript Debug Terminal 为了让 CDP 链接能够正常初始化以及通信做了一系列工作,也正是这里的初始化操作,让即使是在终端被执行的脚本依旧可以与我们的调试进程进行 CDP 通信。
这里忽略掉了部分终端创建的逻辑,实际上在创建终端的过程中,JavaScript Debugger 也采用了一些特殊的处理,如不直接通过插件进程创建终端的逻辑,而是通过 vscode.window.onDidOpenTerminal 去接收新终端的创建,见 debugTerminalUI.ts#L197 「7」。这些操作对于 Terminal 实例在插件进程的唯一性有一定要求,这也是前期插件适配工作的成本之一。
「1」https://github.com/microsoft/vscode-js-debug/blob/b056fbb86ef2e2e5aa99663ff18411c80bdac3c5/src/targets/node/bootloader.ts#L31
「2」https://github.com/microsoft/vscode-js-debug/blob/b056fbb86ef2e2e5aa99663ff18411c80bdac3c5/src/targets/node/bootloader.ts#L246
「3」https://www.npmjs.com/package/inspector
「4」https://github.com/microsoft/vscode-js-debug/blob/b056fbb86ef2e2e5aa99663ff18411c80bdac3c5/src/targets/node/bootloader.ts#L111
「5」https://github.com/microsoft/vscode-js-debug/blob/94ffcfb97525503bcd52e29112c5d7aa765bb1f5/src/targets/node/watchdog.ts
「6」https://github.com/microsoft/vscode-js-debug/blob/7f6b0dc8b9a3257bfd875aa1c27fc4d526ef7bf3/src/targets/node/watchdogSpawn.ts#L122
「7」https://github.com/microsoft/vscode-js-debug/blob/766b04bcbb737ad711b50970055eb9782f838c07/src/ui/debugTerminalUI.ts#L197
Automatic Browser Debugging
看完 JavaScript Debug Terminal 的实现原理,我们再来看一下另外一个重要特性的实现:Automatic browser debugging ,想要使用该功能,你需要在 JavaScript Debug Terminal 中使用,或手动配置debug.javascript.debugByLinkOptions 为 on 或 always ,开启了该功能后,所有你在终端以调试模式打开的网址将都可以自动 Attach 上响应的调试进程。
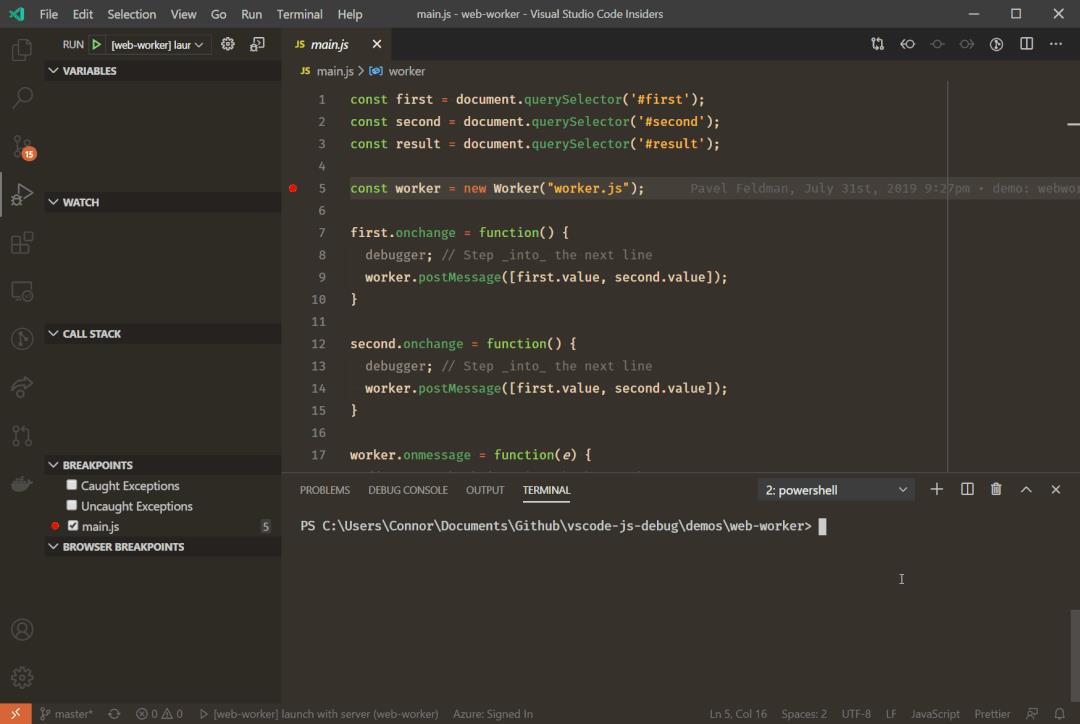
其核心原理即是通过 terminalLinkHandler.ts 「1」往 Terminal 中注册链接点击处理逻辑,实现 vscode.TerminalLinkProvider 「2」的结构。
export class TerminalLinkHandler implements vscode.TerminalLinkProvider<ITerminalLink>, IDisposable
  // 根据给定的 Terminal 获取其内容中可被点击的 Link 数组,配置其基础信息
  public provideTerminalLinks(context: vscode.TerminalLinkContext): ITerminalLink[]
    switch (this.baseConfiguration.enabled)
      case 'off':
        return [];
      case 'always':
        break;
      case 'on':
      default:
        if (!this.enabledTerminals.has(context.terminal))
          return [];


    const links: ITerminalLink[] = [];


    for (const link of findLink(context.line, 'url'))
      let start = -1;
      while ((start = context.line.indexOf(link.value, start + 1)) !== -1)
        let uri: URL;
        try
          uri = new URL(link.href);
         catch
          continue;


        // hack for https://github.com/Soapbox/linkifyjs/issues/317
        if (
          uri.protocol === Protocol.Http &&
          !link.value.startsWith(Protocol.Http) &&
          !isLoopbackIp(uri.hostname)
        )
          uri.protocol = Protocol.Https;


        if (uri.protocol !== Protocol.Http && uri.protocol !== Protocol.Https)
          continue;


        links.push(
          startIndex: start,
          length: link.value.length,
          tooltip: localize('terminalLinkHover.debug', 'Debug URL'),
          target: uri,
          workspaceFolder: getCwd()?.index,
        );


    return links;


  /**
   * 处理具体点击链接后的操作
   */
  public async handleTerminalLink(terminal: ITerminalLink): Promise<void>
    if (!(await this.handleTerminalLinkInner(terminal)))
      vscode.env.openExternal(vscode.Uri.parse(terminal.target.toString()));
在链接被打开前,会进入 handleTerminalLinkInner 的逻辑进行调试进程的链接处理,如下:

向上检索默认的浏览器信息,是否为 Edge,否则使用 pwa-chrome 调试类型启动调试。
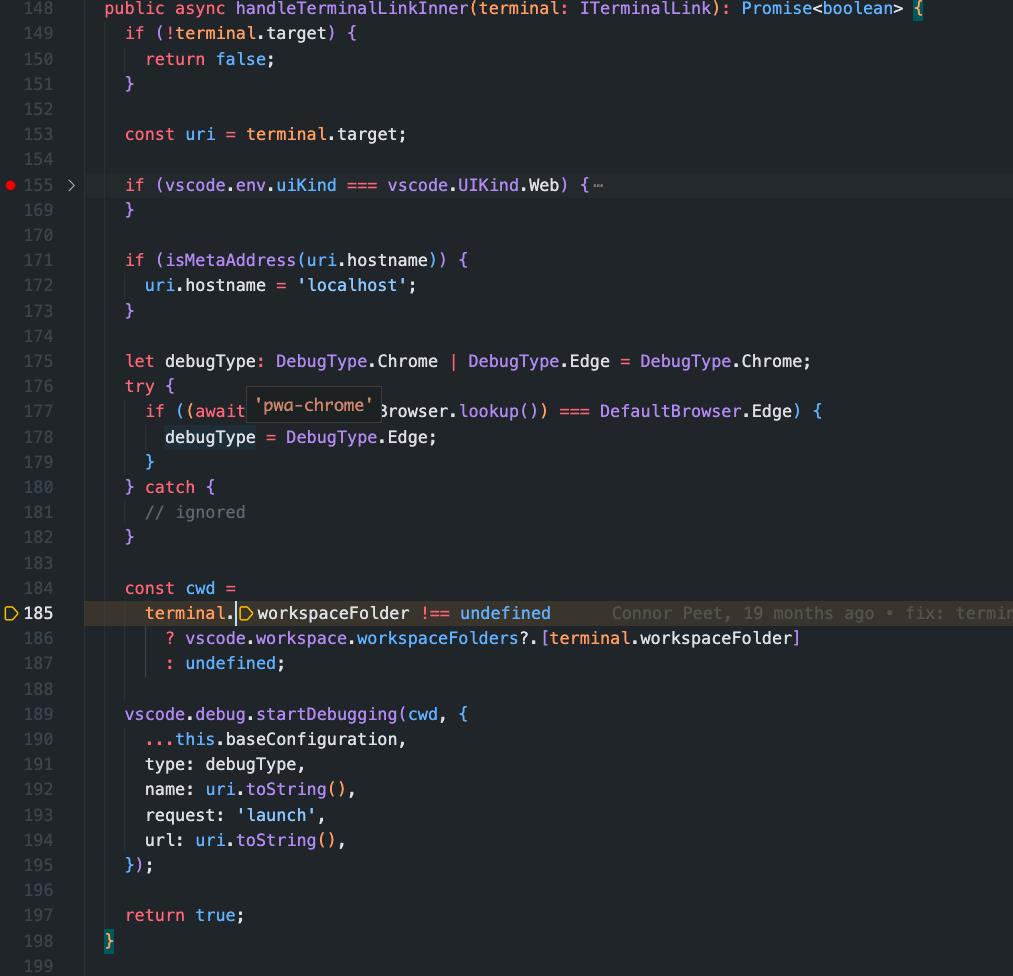
在找不到对应调试信息(即 DAP 消息)的情况下,输出 Using the "preview" debug extension , 结束调试。
「1」https://github.com/microsoft/vscode-js-debug/blob/1ea758e0b8936b3b6cf5ff55414146574dfae7c7/src/ui/terminalLinkHandler.ts
「2」https://code.visualstudio.com/api/references/vscode-api#TerminalLinkProvider
Profile
Profile 主要为开发者提供对进程性能及堆栈信息的分析能力,在 JavaScript Debugger 中,由于所有的通信均通过 CDP 协议处理,生成的报告文件也自然的能通过 Chrome Devtools 中查看,VS Code 中默认仅支持基础的报告查看,你也可以通过安装 ms-vscode.vscode-js-profile-flame 「1」插件查看。
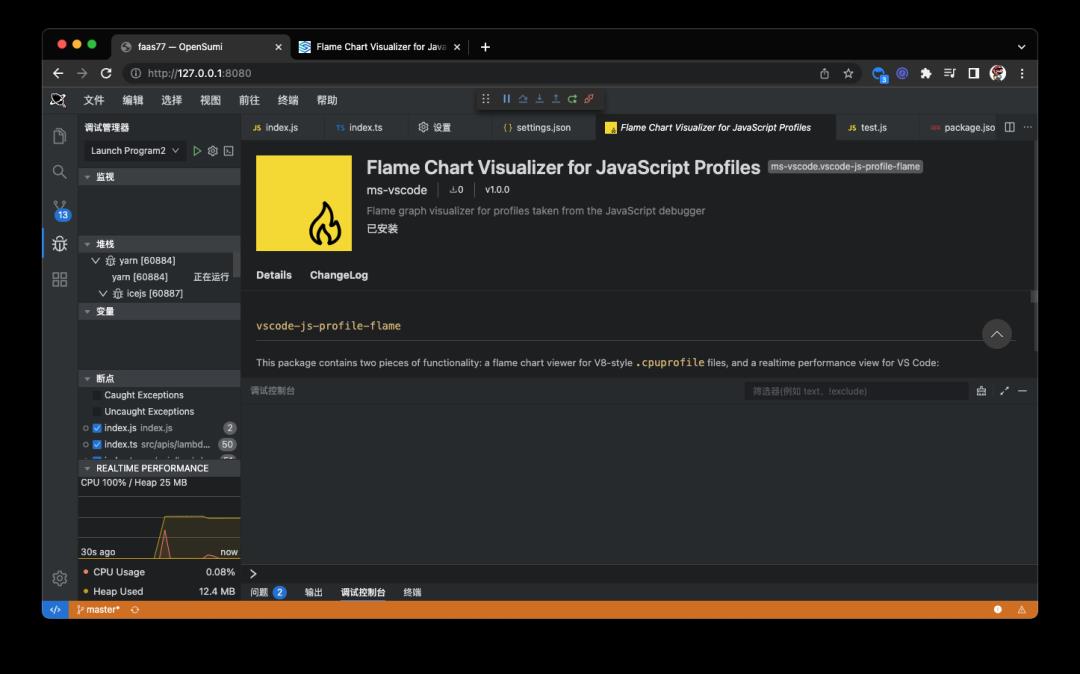
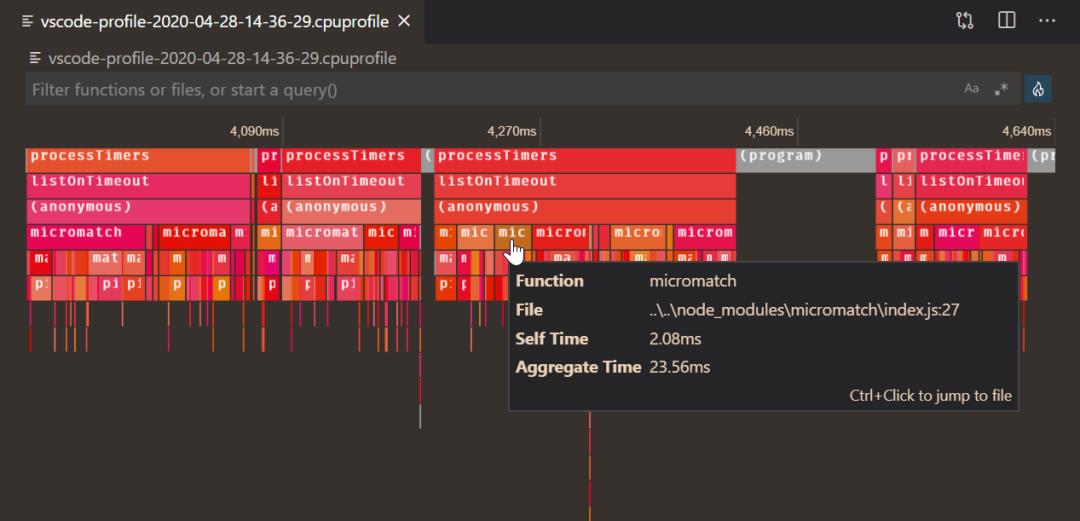
实现该功能依旧是通过 DAP 消息进行通信处理,与上面提到的 设置断点 案例实际类似,DAP 通信中收到 startSefProfile 时开始向 CDP 链接发送 Profiler.enable ,Profiler.start 指令,进而在不同的调试器中处理该指令,在 DAP 通信中收到 stopSelfProfile 指令时,向 CDP 链接发送 Profiler.stop 指令,收集 profile 信息后写入对应文件,详细代码可见:selfProfile.ts「2」
「1」https://marketplace.smartide.cn/extension/ms-vscode/vscode-js-profile-flame
「2」https://github.com/microsoft/vscode-js-debug/blob/ab61a4476b64a4c629eef5aaf372ac54123d0365/src/adapter/selfProfile.ts
Debug Console
JavaScript Debugger 在发布日志中着重标注了对于 Top-Level await 的支持,原有的 DebugConsole 对于变量执行的逻辑依旧是依赖 DAP 中接收 evaluate 指令(代码见:debugAdapter.ts#L99「1」) ,继而转化为 CDP 的 Runtime.evaluate 指令执行。由于不同调试器运行环境的差异性,变量或表达式最终的执行指令需要根据环境进行区分处理(详细代码可见:threads.ts#L394「2」)。以在调试控制台执行如下代码为例:
const res = await fetch('http://api.github.com/orgs/microsoft');
console.log(await res.json());
当表达式为 Top-Level await 时,需要将表达式进行重写

从上面的表达式转化为可执行的闭包结构(解析逻辑可见:sourceUtils.ts#L67「3」)同时在参数中标记awaitPromise=true, 在部分调试器执行Runtime.evalute时,当参数中存在awaitPromise=true时,会将闭包执行的返回结果作为输出值进行返回,转化后的结果如下所示:
(async () =>
  (res = await fetch('http://api.github.com/orgs/microsoft'));
  return console.log(await res.json());
)();
最终执行结果就能够正常输出:
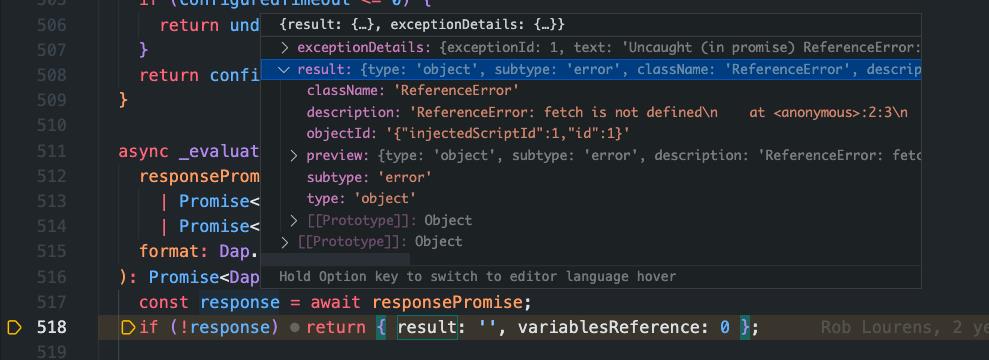
这样便实现了对 Top-Level await 的支持。
「1」https://github.com/microsoft/vscode-js-debug/blob/e7904bd1bfb7f24ba3ccf8703f158054fcbc20a7/src/adapter/debugAdapter.ts#L99
「2」https://github.com/microsoft/vscode-js-debug/blob/877e0ae1957172d905b892d898e52b5322853899/src/adapter/threads.ts#L394
「3」https://github.com/microsoft/vscode-js-debug/blob/536f96bae61a3d87546b61bc7916097904c81429/src/common/sourceUtils.ts#L67
总结
以上整体上是针对部分功能实现的解析,部分功能的优化也依赖 DAP 及代码逻辑的优化实现,如更好的代码映射及 Return value interception 等,希望看完本文能让你对 VS Code 的 JavaScript Debugger 有大致的理解,OpenSumi 「1」近期也在 2.18.0 版本完成了对于 VS Code JavaScript Debugger 的初步适配,大部分功能都可以正常使用,也欢迎使用 OpenSumi 来搭建自己的 IDE 产品。
「1」https://github.com/opensumi/core
团队介绍
我们是大淘宝前端技术工程团队,负责大淘宝及集团的前端工程研发全链路解决方案的建设,同时也承接着阿里集团内 IDE 研发场景能力建设工作,如果你也对前端工程及 IDE 研发感兴趣,欢迎你的加入 ~
✿ 拓展阅读
作者|魁武
编辑|橙子君

以上是关于深度剖析 VS Code JavaScript Debugger 功能及实现原理的主要内容,如果未能解决你的问题,请参考以下文章

