微信小程序超详细知识点总结
Posted Me-Wow!
tags:
篇首语:本文由小常识网(cha138.com)小编为大家整理,主要介绍了微信小程序超详细知识点总结相关的知识,希望对你有一定的参考价值。
一、微信小程序特点
- 小程序依赖微信
- 快,因为免去下载和安装
- 小,一个包不能超过2M
- 强,微信有什么能力它也拥有
- 广,传播微信圈子近10亿用户
QQ 微信 支付宝 字节跳动 美团 鸿蒙 都有类似小程序
二、使用准备
1.注册开发者帐号
注册小程序帐号 https://mp.weixin.qq.com/
2.下载微信开发者工具
稳定版 Stable Build | 微信开放文档 https://developers.weixin.qq.com/miniprogram/dev/devtools/download.html
3.微信开发文档
微信开放文档 https://developers.weixin.qq.com/miniprogram/dev/framework/
三、项目结构
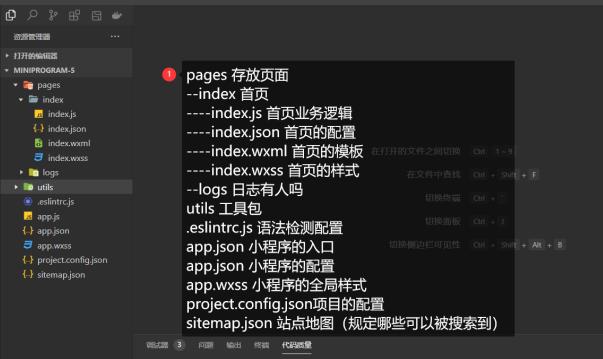
四、配置文件
1、app.json
pages 存放项目的页面
哪个页面在最前面,哪个页面是默认页面
window 项目的窗口
"backgroundTextStyle": "light", 背景文字:light|dark
"navigationBarBackgroundColor": "#000", 导航栏背景颜色
"navigationBarTitleText": "BLACK", 导航栏标题
"navigationBarTextStyle": "white" 导航栏文字颜色:white|black
tabBar 底部栏的配置
  "tabBar":
    "color": "#484848",
    "selectedColor": "#109fef",
    "list": [
      "pagePath": "pages/base/base",
      "text": "语法",
      "iconPath": "/images/home.png",
      "selectedIconPath": "/images/home-h.png"
    ]
  ,
color 文字默认颜色
selectedColor 文字选中颜色
list 页面列表:
pagePath 页面地址
text 文本
iconPath 图标地址
selectedIconPath 选中图标地址
2、页面.json
"usingComponents": 使用组件
"navigationBarTitleText": "基础语法" 标题
"enablePullDownRefresh": true 允许下拉刷新
"backgroundColor": "#eee" 背景颜色
"backgroundTextStyle": "dark" 背景文字颜色
五、小程序内置组件
<view> 逻辑视觉分区(div)
<text> 文本(span)
user-select="true" 用户长按可选择
<image> 图片组件
src 图片地址
mode 模式:
- scaleToFill:不保持宽高比,缩放
- aspectFit:保持宽高比,长边优先
- aspectFill:保持宽高比,短边优先
- widthFix:宽不变,高自动
- heightFix:高不变,宽自动
- left right top bottom center:显示局部
<input>
value 值
placeholder 提示文本
password="true" 密码框
type 弹出不同键盘:
- text 文本输入键盘
- number 数字输入键盘
- idcard 身份证输入键盘
- digit 带小数点的数字键盘
- safe-password 密码安全输入键盘 指引
- nickname 昵称输入键盘
confirm-type 键盘右下角案例
- send 右下角按钮为“发送”
- search 右下角按钮为“搜索”
- next 右下角按钮为“下一个”
- go 右下角按钮为“前往”
- done 右下角按钮为“完成”
<button> 按钮
type 颜色类型
- primary 绿色
- default 白色
- warn 红色
size="mini" 行内小按钮
<switch> 切换
color 颜色
type="checkbox" 选择框
<picker> 选择
header-text 标题文本
mode:
- times 事件
- date 日期
- region 省市区
<icon> 图标
type:success, success_no_circle, info, warn, waiting, cancel, download, search, clear
size="100" 单位为px
<scroll-view> 滚动区域
scroll-x 水平
scroll-y 垂直
<swiper> <swiper-item> 幻灯片
indicator-dots="true" 是否显示提示点
autoplay="true" 自动播放
circular="true" 衔接滑动
六、模板语法
条件渲染
wx:if="条件"
多重条件渲染
wx:elif="多重条件"
wx:else
文本渲染
placeholder="msg" 属性的渲染
列表渲染
<view wx:for="list" wx:key="index">index.item</view>自定义列表渲染
多层for循环 定义名称
<view wx:for="list"
        wx:for-item="myitem" wx:for-index="myindex"
        wx:key="myindex"
>
myindex.myitem
</view>注意:key值自动解构。eg:若想使用item.docid做为key,wx:key="docid"即可
<template> 模板
定义:
<template name="user">
<view>用户名:name</view>
</template>导入:只能导入template
<import src="..."></import>使用:
<template is="user" data="name:'mewow'"></template><include> 引入
<include src="..."></include>相当于把src的内容拷贝一份放在当前位置,不能导入template
七、事件
事件方法
bindTap 点击
bindconfim 确认
bindchange 表单值发生变化
bindinput 表单输入
普通事件
调用方法:
<button bindTap="showMsg">事件</button>自定义方法:
showMsg()事件传参
定义参数:
<button bindtap="showMsg" data-msg="小程序">小程序</button>在方法中获取参数:
showMsg(e)
  let msg=e.currentTarget.dataset.msg;
  wx.showToast(
    title: 'hello '+msg,
    icon:"loading"
  )
八、表单双向绑定
表单:
<input type="text" value="msg" bindinput="changeHd"/>定义方法更新视图和data:
changeHd(e)
  let msg=e.detail.value;
  this.setData(msg)
九、data与更新
js方法里data数据:this.data.msg
在wxml使用:msg
更新data与视图:this.setData(key1:value1,key2:value2)
注意:this指向,在wx.xxx api里面this的wx这个对象不是当前页面
十、微信api
Page参数
data 存储数据
onload() 当页面加载中
onPullDownRefresh 下拉刷新回调函数
onReachBottom 触底回调函数
wx.xxx
wx.stopPullDownRefresh(); 停止下拉刷新
wx.showToast() 轻提示
wx.request(url,method,success()) 网络请求:
- 默认请求地址需要在后端配置
- 默认请求地址要求https
总结-微信小程序自定义顶部导航(超详细)附加效果图
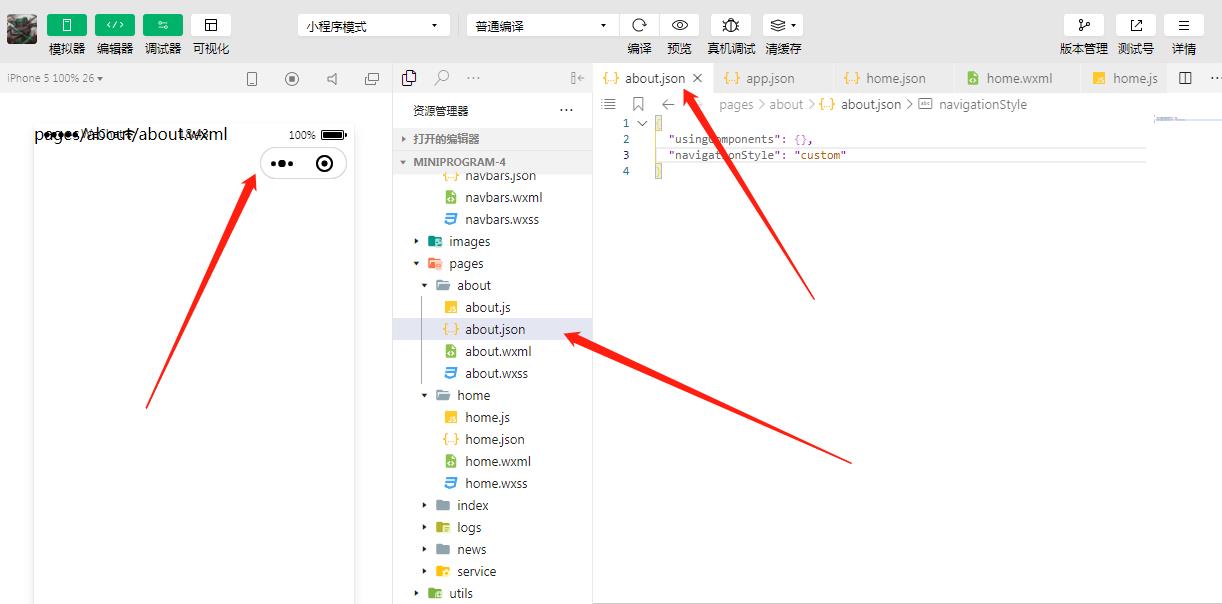
一、在需要设置头部导航栏的页面中通过json配置 "navigationStyle": "custom" ,自定义导航栏,只保留胶囊按钮,效果如下:
二、做完上面的步骤,基本上就可以自定义导航栏了,当然,这还没完,从页面上可以看出,页面里的内容被挡住了,可以通过页面样式加上内边距内容就出来了:

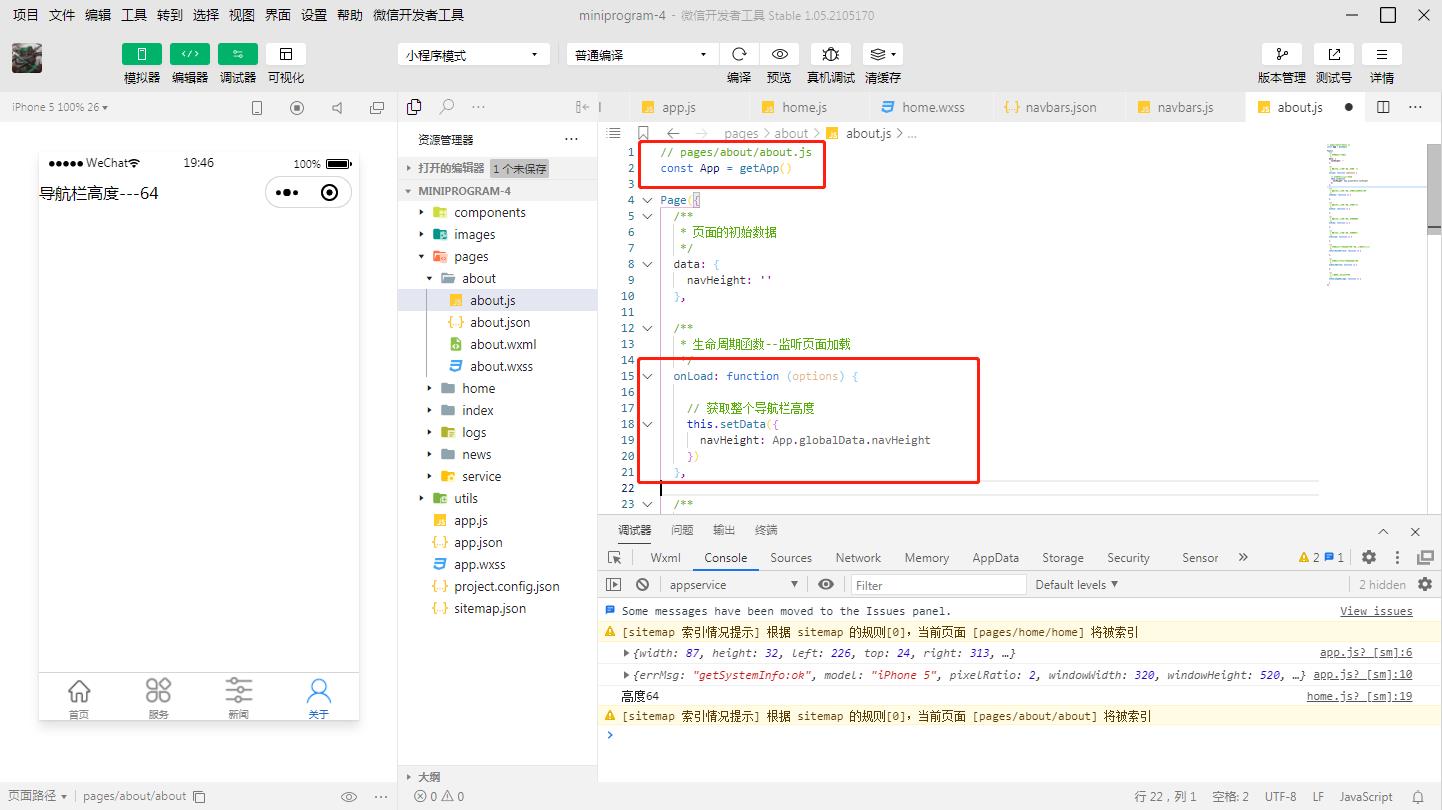
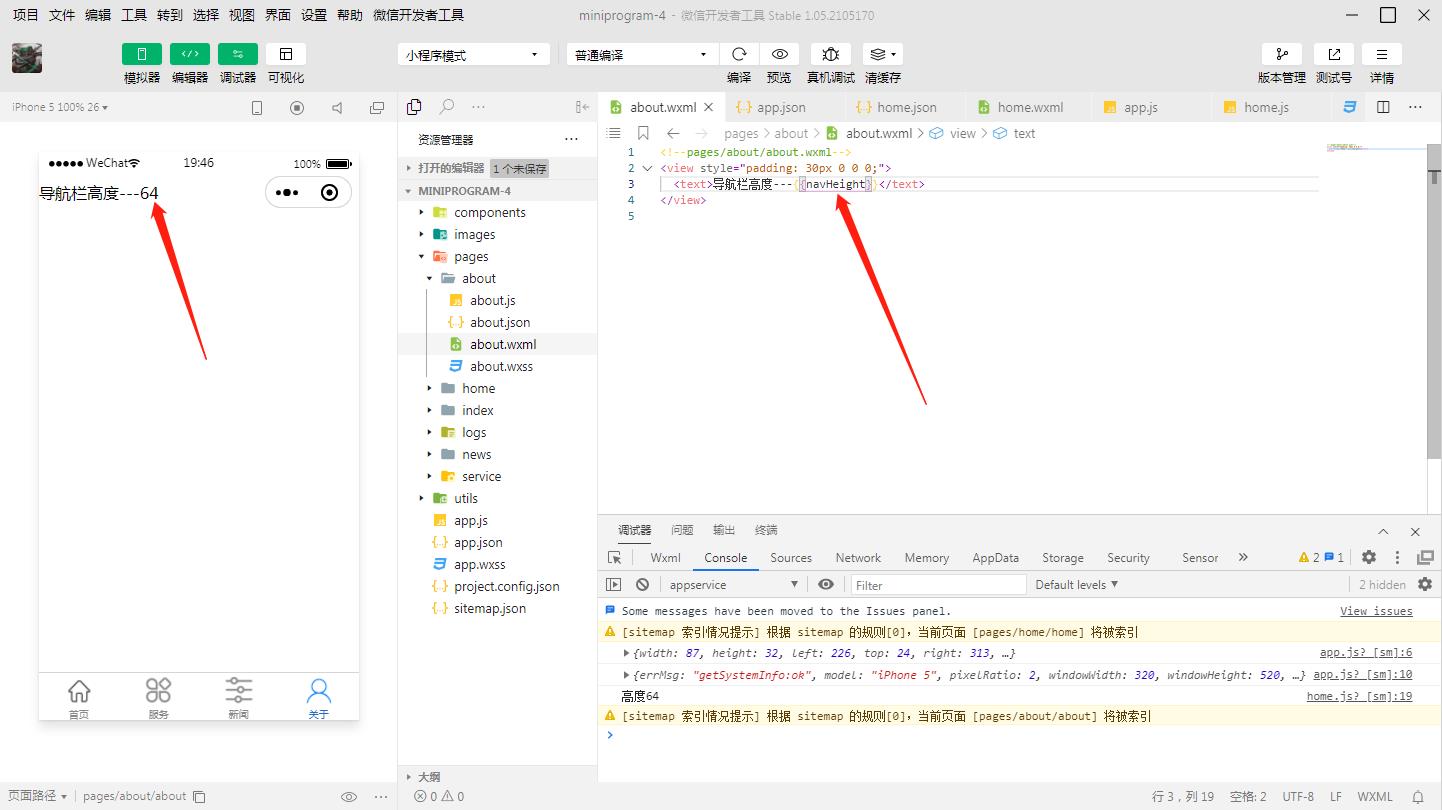
三、可以看出这个内边距是固定死了的,不同的手机型号头部那条栏目高度可能不一致,所以为了我们适配更多型号,我们需要计算3个值:

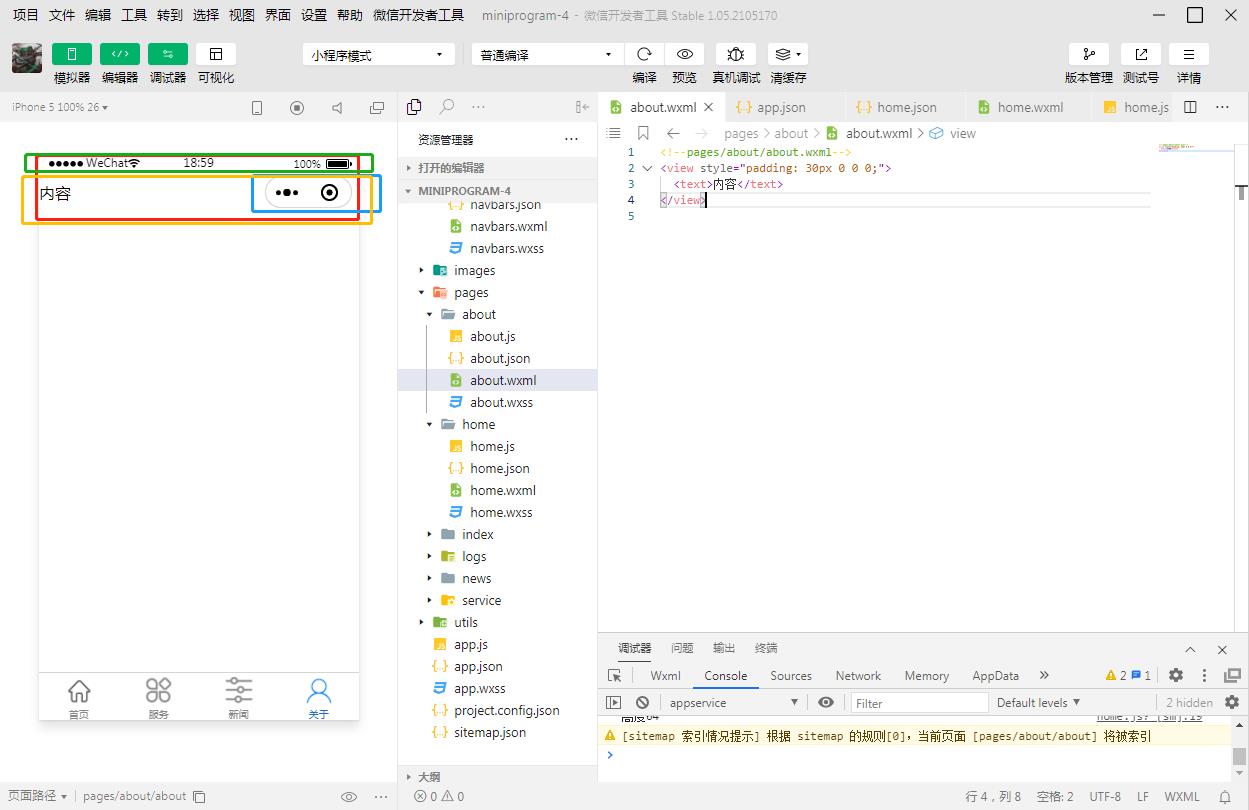
1. 整个导航栏的高度;
2. 胶囊按钮与顶部的距离;
3. 胶囊按钮与右侧的距离。
小程序可以通过 wx.getMenuButtonBoundingClientRect() 获取胶囊按钮的信息 和 wx.getSystemInfo() 获取设备信息:
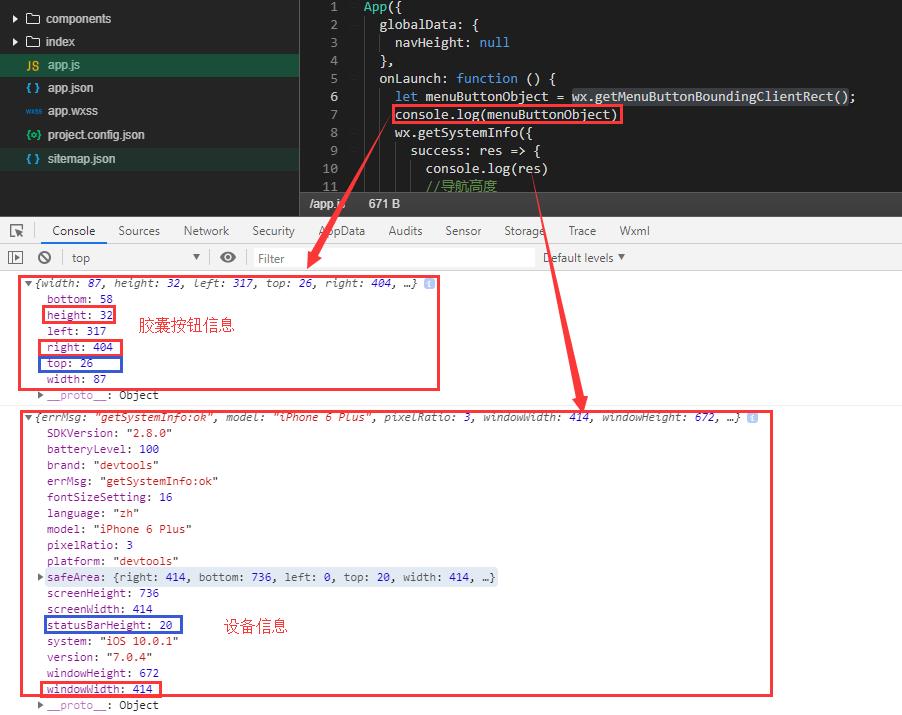
通过这些信息我们可以计算出上面说的3个值:
1. 整个导航栏高度 = statausBarHeight + height + (top-statausBarHeight )*2;
2. 胶囊按钮与顶部的距离 = top;
3.胶囊按钮与右侧的距离 = windowWidth - right
四、App.js 添加代码如下:
// app.js
App(
  // 定义一个全区对象用于保存一些设备及胶囊的数据, 在其他页面onLoad之后可以通过
  // const App = getApp(), App.globalData. 的方式访问到
  globalData: ,
  onLaunch()
    // 获取胶囊信息
    let menuButtonObject = wx.getMenuButtonBoundingClientRect()
    console.log(menuButtonObject)
    // 获取设备信息
    wx.getSystemInfo(
      success: res =>
        console.log(res)
        // 整个导航栏的高度
        let navHeight = menuButtonObject.top + menuButtonObject.height + (menuButtonObject.top - res.statusBarHeight)*2
        // 导航栏的高度
        let nav = navHeight - res.statusBarHeight

        // 挂载到全区变量 globalData 上
        this.globalData.navHeight = navHeight
        this.globalData.nav = nav

        // 胶囊与左边的距离
        this.globalData.menuLeft = menuButtonObject.left
        // 胶囊的高度
        this.globalData.menuHeight = menuButtonObject.height
        // 胶囊距离顶部的高度
        this.globalData.menuBot = menuButtonObject.top - res.statusBarHeight
        // 整个设备的宽度
        this.globalData.windowWidth = res.windowWidth
      ,
      fail: err =>
        console.log(err)

    )


    // 展示本地存储能力
    const logs = wx.getStorageSync('logs') || []
    logs.unshift(Date.now())
    wx.setStorageSync('logs', logs)

    // 登录
    wx.login(
      success: res =>
        // 发送 res.code 到后台换取 openId, sessionKey, unionId

    )
  ,
  globalData:
    userInfo: null

)
五、可以自定义导航栏样式了:
以上是关于微信小程序超详细知识点总结的主要内容,如果未能解决你的问题,请参考以下文章