pytorch搭建ResNet50实现鸟类识别
Posted 老师我作业忘带了
tags:
篇首语:本文由小常识网(cha138.com)小编为大家整理,主要介绍了pytorch搭建ResNet50实现鸟类识别相关的知识,希望对你有一定的参考价值。
-
🍨 本文为🔗365天深度学习训练营 中的学习记录博客
-
🍦 参考文章地址: 365天深度学习训练营-第J1周:ResNet-50算法实战与解析
-
🍖 作者:K同学啊
理论知识储备
深度残差网络ResNet(deep residual network)在2015年由何凯明等提出,因为它简单与实用并存,随后很多研究都是建立在ResNet-50或者ResNet-101基础上完成的。
ResNet主要解决深度卷积网络在深度加深时候的“退化”问题。 在一般的卷积神经网络中,增大网络深度后带来的第一个问题就是梯度消失、爆炸,这个问题在Szegedy提出BN后被顺利解决。BN层能对各层的输出做归一化,这样梯度在反向层层传递后仍能保持大小稳定,不会出现过小或过大的情况。但是作者发现加了BN后,再加大深度仍然不容易收敛,其提到了第二个问题——准确率下降问题:层级大到一定程度时,准确率就会饱和,然后迅速下降。这种下降既不是梯度消失引起的,也不是过拟合造成的,而是由于网络过于复杂,以至于光靠不加约束的放养式的训练很难达到理想的错误率。准确率下降问题不是网络结构本身的问题,而是现有的训练方式不够理想造成的。当前广泛使用的训练方法,无论是SGD,还是RMSProp,或是Adam,都无法在网络深度变大后达到理论上最优的收敛结果。还可以证明只要有理想的训练方式,更深的网络肯定会比较浅的网络效果要好。证明过程也很简单:假设在一种网络A的后面添加几层形成新的网络B,如果增加的层级只是对A的输出做了个恒等映射(identity mapping),即A的输出经过新增的层级变成B的输出后没有发生变化,这样网络A和网络B的错误率就是相等的,也就证明了加深后的网络不会比加深前的网络效果差。
一、前期准备
1.设置GPU
import torch
from torch import nn
import torchvision
from torchvision import transforms,datasets,models
import matplotlib.pyplot as plt
import os,PIL,pathlib
device = torch.device("cuda" if torch.cuda.is_available() else "cpu")
devicedevice(type='cuda')
2.导入数据
data_dir = './J1/'
data_dir = pathlib.Path(data_dir)

image_count = len(list(data_dir.glob('*/*/*.jpg')))
print("图片总数为:",image_count)
图片总数为: 565
classNames = [str(path).split('\\\\')[2] for path in data_dir.glob('bird_photos/*/')]
classNames
['Bananaquit', 'Black Skimmer', 'Black Throated Bushtiti', 'Cockatoo']
train_transforms = transforms.Compose([
        transforms.Resize([224, 224]),
       transforms.RandomRotation(45),#随机旋转,-45到45度之间随机选
#       transforms.CenterCrop(224),#从中心开始裁剪
        transforms.RandomHorizontalFlip(p=0.5),#随机水平翻转 选择一个概率概率
#         transforms.RandomVerticalFlip(p=0.5),#随机垂直翻转
#         transforms.ColorJitter(brightness=0.2, contrast=0.1, saturation=0.1, hue=0.1),#参数1为亮度,参数2为对比度,参数3为饱和度,参数4为色相
#         transforms.RandomGrayscale(p=0.025),#概率转换成灰度率,3通道就是R=G=B
        transforms.ToTensor(),
        transforms.Normalize([0.485, 0.456, 0.406], [0.229, 0.224, 0.225])#均值,标准差
    ])

# test_transforms = transforms.Compose([
#         transforms.Resize([224, 224]),
#         transforms.ToTensor(),
#         transforms.Normalize([0.485, 0.456, 0.406], [0.229, 0.224, 0.225])
#     ])
total_data = datasets.ImageFolder('./J1/bird_photos/',transform=train_transforms)
total_dataDataset ImageFolder
Number of datapoints: 565
Root location: ./J1/bird_photos/
StandardTransform
Transform: Compose(
Resize(size=[224, 224], interpolation=PIL.Image.BILINEAR)
RandomRotation(degrees=[-45.0, 45.0], resample=False, expand=False)
RandomHorizontalFlip(p=0.5)
ToTensor()
Normalize(mean=[0.485, 0.456, 0.406], std=[0.229, 0.224, 0.225])
)
classNames = total_data.classes
classNames
['Bananaquit', 'Black Skimmer', 'Black Throated Bushtiti', 'Cockatoo']
total_data.class_to_idx'Bananaquit': 0, 'Black Skimmer': 1, 'Black Throated Bushtiti': 2, 'Cockatoo': 3
3.数据集划分
train_size = int(0.8*len(total_data))
test_size = len(total_data) - train_size
train_dataset, test_dataset = torch.utils.data.random_split(total_data,[train_size,test_size])
train_dataset,test_dataset
(<torch.utils.data.dataset.Subset at 0x1a6883fe310>, <torch.utils.data.dataset.Subset at 0x1a6883fe370>)
train_size,test_size(452, 113)
batch_size = 32
train_dl = torch.utils.data.DataLoader(train_dataset,
                                       batch_size=batch_size,
                                       shuffle=True,
                                       num_workers=1)
test_dl = torch.utils.data.DataLoader(test_dataset,
                                       batch_size=batch_size,
                                       shuffle=True,
                                       num_workers=1)
imgs, labels = next(iter(train_dl))
imgs.shapetorch.Size([32, 3, 224, 224])
4. 数据可视化
import numpy as np

 # 指定图片大小,图像大小为20宽、5高的绘图(单位为英寸inch)
plt.figure(figsize=(20, 5))
for i, imgs in enumerate(imgs[:20]):
    npimg = imgs.numpy().transpose((1,2,0))
    npimg = npimg * np.array((0.229, 0.224, 0.225)) + np.array((0.485, 0.456, 0.406))
    npimg = npimg.clip(0, 1)
    # 将整个figure分成2行10列,绘制第i+1个子图。
    plt.subplot(2, 10, i+1)
    plt.imshow(npimg)
    plt.axis('off')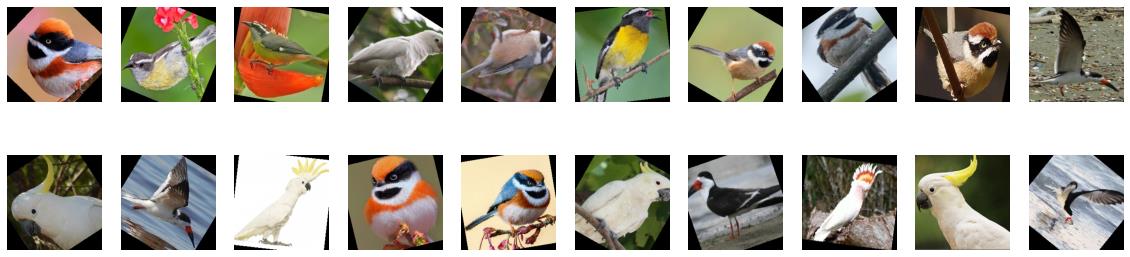
for X,y in test_dl:
    print('Shape of X [N, C, H, W]:', X.shape)
    print('Shape of y:', y.shape)
    break
Shape of X [N, C, H, W]: torch.Size([32, 3, 224, 224]) Shape of y: torch.Size([32])
二、构建ResNet50网络
n_class = 4
''' Same Padding '''
def autopad(k, p=None):  # kernel, padding
    # Pad to 'same'
    if p is None:
        p = k // 2 if isinstance(k, int) else [x // 2 for x in k]  # auto-pad
    return p


''' Identity Block '''
class IdentityBlock(nn.Module):
    def __init__(self, in_channel, kernel_size, filters):
        super(IdentityBlock, self).__init__()
        filters1, filters2, filters3 = filters
        self.conv1 = nn.Sequential(
            nn.Conv2d(in_channel, filters1, 1, stride=1, padding=0, bias=False),
            nn.BatchNorm2d(filters1),
            nn.ReLU(True)
        )
        self.conv2 = nn.Sequential(
            nn.Conv2d(filters1, filters2, kernel_size, stride=1, padding=autopad(kernel_size), bias=False),
            nn.BatchNorm2d(filters2),
            nn.ReLU(True)
        )
        self.conv3 = nn.Sequential(
            nn.Conv2d(filters2, filters3, 1, stride=1, padding=0, bias=False),
            nn.BatchNorm2d(filters3)
        )
        self.relu = nn.ReLU(True)

    def forward(self, x):
        x1 = self.conv1(x)
        x1 = self.conv2(x1)
        x1 = self.conv3(x1)
        x = x1 + x
        self.relu(x)
        return x


''' Conv Block '''
class ConvBlock(nn.Module):
    def __init__(self, in_channel, kernel_size, filters, stride=2):
        super(ConvBlock, self).__init__()
        filters1, filters2, filters3 = filters
        self.conv1 = nn.Sequential(
            nn.Conv2d(in_channel, filters1, 1, stride=stride, padding=0, bias=False),
            nn.BatchNorm2d(filters1),
            nn.ReLU(True)
        )
        self.conv2 = nn.Sequential(
            nn.Conv2d(filters1, filters2, kernel_size, stride=1, padding=autopad(kernel_size), bias=False),
            nn.BatchNorm2d(filters2),
            nn.ReLU(True)
        )
        self.conv3 = nn.Sequential(
            nn.Conv2d(filters2, filters3, 1, stride=1, padding=0, bias=False),
            nn.BatchNorm2d(filters3)
        )
        self.conv4 = nn.Sequential(
            nn.Conv2d(in_channel, filters3, 1, stride=stride, padding=0, bias=False),
            nn.BatchNorm2d(filters3)
        )
        self.relu = nn.ReLU(True)

    def forward(self, x):
        x1 = self.conv1(x)
        x1 = self.conv2(x1)
        x1 = self.conv3(x1)
        x2 = self.conv4(x)
        x = x1 + x2
        self.relu(x)
        return x


''' 构建ResNet-50 '''
class ResNet50(nn.Module):
    def __init__(self, classes=1000):
        super(ResNet50, self).__init__()
        self.conv1 = nn.Sequential(
            nn.Conv2d(3, 64, 7, stride=2, padding=3, bias=False, padding_mode='zeros'),
            nn.BatchNorm2d(64),
            nn.ReLU(),
            nn.MaxPool2d(kernel_size=3, stride=2, padding=0)
        )
        self.conv2 = nn.Sequential(
            ConvBlock(64, 3, [64, 64, 256], stride=1),
            IdentityBlock(256, 3, [64, 64, 256]),
            IdentityBlock(256, 3, [64, 64, 256])
        )
        self.conv3 = nn.Sequential(
            ConvBlock(256, 3, [128, 128, 512]),
            IdentityBlock(512, 3, [128, 128, 512]),
            IdentityBlock(512, 3, [128, 128, 512]),
            IdentityBlock(512, 3, [128, 128, 512])
        )
        self.conv4 = nn.Sequential(
            ConvBlock(512, 3, [256, 256, 1024]),
            IdentityBlock(1024, 3, [256, 256, 1024]),
            IdentityBlock(1024, 3, [256, 256, 1024]),
            IdentityBlock(1024, 3, [256, 256, 1024]),
            IdentityBlock(1024, 3, [256, 256, 1024]),
            IdentityBlock(1024, 3, [256, 256, 1024])
        )
        self.conv5 = nn.Sequential(
            ConvBlock(1024, 3, [512, 512, 2048]),
            IdentityBlock(2048, 3, [512, 512, 2048]),
            IdentityBlock(2048, 3, [512, 512, 2048])
        )
        self.pool = nn.AvgPool2d(kernel_size=7, stride=7, padding=0)
        self.fc = nn.Linear(2048, n_class)

    def forward(self, x):
        x = self.conv1(x)
        x = self.conv2(x)
        x = self.conv3(x)
        x = self.conv4(x)
        x = self.conv5(x)
        x = self.pool(x)
        x = torch.flatten(x, start_dim=1)
        x = self.fc(x)
        return x

model = ResNet50().to(device)
# 查看网络结构
import torchsummary
torchsummary.summary(model, (3, 224, 224))
print(model)三、训练模型
1.优化器设置
# 优化器设置
optimizer = torch.optim.Adam(model.parameters(), lr=1e-4)#要训练什么参数/
scheduler = torch.optim.lr_scheduler.StepLR(optimizer, step_size=5, gamma=0.92)#学习率每5个epoch衰减成原来的1/10
loss_fn = nn.CrossEntropyLoss()
2.编写训练函数
# 训练循环
def train(dataloader, model, loss_fn, optimizer):
    size = len(dataloader.dataset)  # 训练集的大小,
    num_batches = len(dataloader)   # 批次数目,

    train_loss, train_acc = 0, 0  # 初始化训练损失和正确率

    for X, y in dataloader:  # 获取图片及其标签
        X, y = X.to(device), y.to(device)

        # 计算预测误差
        pred = model(X)          # 网络输出
        loss = loss_fn(pred, y)  # 计算网络输出和真实值之间的差距,targets为真实值,计算二者差值即为损失

        # 反向传播
        optimizer.zero_grad()  # grad属性归零
        loss.backward()        # 反向传播
        optimizer.step()       # 每一步自动更新

        # 记录acc与loss
        train_acc  += (pred.argmax(1) == y).type(torch.float).sum().item()
        train_loss += loss.item()

    train_acc  /= size
    train_loss /= num_batches

    return train_acc, train_loss
3.编写测试函数
def test (dataloader, model, loss_fn):
    size        = len(dataloader.dataset)  # 测试集的大小,一共10000张图片
    num_batches = len(dataloader)          # 批次数目,8(255/32=8,向上取整)
    test_loss, test_acc = 0, 0

    # 当不进行训练时,停止梯度更新,节省计算内存消耗
    with torch.no_grad():
        for imgs, target in dataloader:
            imgs, target = imgs.to(device), target.to(device)

            # 计算loss
            target_pred = model(imgs)
            loss        = loss_fn(target_pred, target)

            test_loss += loss.item()
            test_acc  += (target_pred.argmax(1) == target).type(torch.float).sum().item()

    test_acc  /= size
    test_loss /= num_batches

    return test_acc, test_loss
4、正式训练
epochs     = 20
train_loss = []
train_acc  = []
test_loss  = []
test_acc   = []
best_acc = 0

for epoch in range(epochs):
    model.train()
    epoch_train_acc, epoch_train_loss = train(train_dl, model, loss_fn, optimizer)

    scheduler.step()#学习率衰减

    model.eval()
    epoch_test_acc, epoch_test_loss = test(test_dl, model, loss_fn)

    # 保存最优模型
    if epoch_test_acc > best_acc:
        best_acc = epoch_train_acc
        state =
            'state_dict': model.state_dict(),#字典里key就是各层的名字,值就是训练好的权重
            'best_acc': best_acc,
            'optimizer' : optimizer.state_dict(),


    train_acc.append(epoch_train_acc)
    train_loss.append(epoch_train_loss)
    test_acc.append(epoch_test_acc)
    test_loss.append(epoch_test_loss)

    template = ('Epoch::2d, Train_acc::.1f%, Train_loss::.3f, Test_acc::.1f%,Test_loss::.3f')
    print(template.format(epoch+1, epoch_train_acc*100, epoch_train_loss, epoch_test_acc*100, epoch_test_loss))
print('Done')
print('best_acc:',best_acc)
Epoch:19, Train_acc:88.9%, Train_loss:0.264, Test_acc:87.6%,Test_loss:0.347 Epoch:20, Train_acc:86.1%, Train_loss:0.481, Test_acc:87.6%,Test_loss:0.319 Done best_acc: 0.911504424778761
四、结果可视化
1.Loss与Accuracy图
import matplotlib.pyplot as plt
#隐藏警告
import warnings
warnings.filterwarnings("ignore")               #忽略警告信息
plt.rcParams['font.sans-serif']    = ['SimHei'] # 用来正常显示中文标签
plt.rcParams['axes.unicode_minus'] = False      # 用来正常显示负号
plt.rcParams['figure.dpi']         = 100        #分辨率

epochs_range = range(epochs)

plt.figure(figsize=(12, 3))
plt.subplot(1, 2, 1)

plt.plot(epochs_range, train_acc, label='Training Accuracy')
plt.plot(epochs_range, test_acc, label='Test Accuracy')
plt.legend(loc='lower right')
plt.title('Training and Validation Accuracy')

plt.subplot(1, 2, 2)
plt.plot(epochs_range, train_loss, label='Training Loss')
plt.plot(epochs_range, test_loss, label='Test Loss')
plt.legend(loc='upper right')
plt.title('Training and Validation Loss')
plt.show()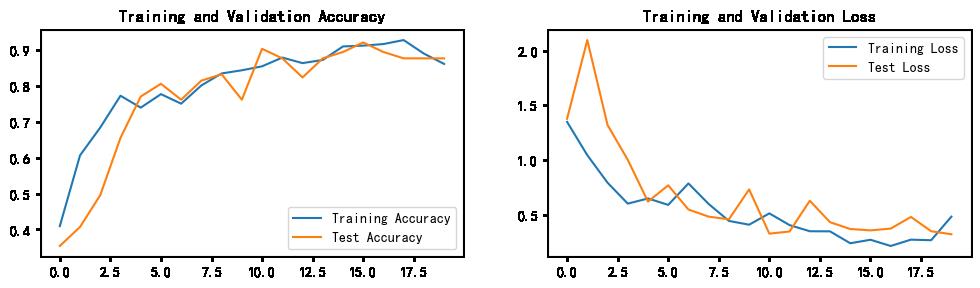
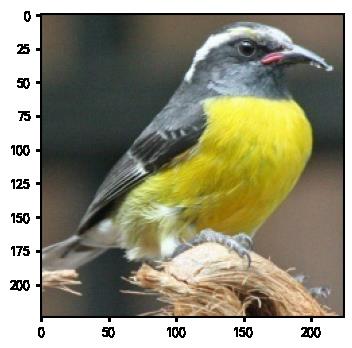
2.指定图片进行预测
from PIL import Image

classes = list(total_data.class_to_idx)

def predict_one_img(image_path,model,transform,classes):
    test_img = Image.open(image_path).convert('RGB')
    plt.imshow(test_img)
    test_img = transform(test_img)
    img = test_img.to(device).unsqueeze(0)
    model.eval()
    output = model(img)

    _,pred = torch.max(output,1)
    pred_class = classes[pred]
    print(f'预测结果是:pred_class')
predict_one_img('./J1/bird_photos/Bananaquit/047.jpg', model, train_transforms, classNames)预测结果是:Bananaquit
pytorch--resnet 精准迁移学习 花朵识别
以上是关于pytorch搭建ResNet50实现鸟类识别的主要内容,如果未能解决你的问题,请参考以下文章