如何部署一个自己的AI绘图
Posted 穿越时间长河的未知生物
tags:
篇首语:本文由小常识网(cha138.com)小编为大家整理,主要介绍了如何部署一个自己的AI绘图相关的知识,希望对你有一定的参考价值。
目前AI绘图只支持N卡,显存最少4G,部署的时候一定要注意设备的配置**
1.在windows上部署
可以观看b站up:独立研究员-星空的教程
AI绘画 【Stable Diffusion】 NovelAI 整合包 解压即用
AI绘画 【Stable Diffusion】NovelAI整合包 WebUI更新与最新设置
一定要完整做完两个教程,否则有电脑被入侵的风险**
⚠️警惕!你的NovelAI模型,极有可能被恶意攻击! 藏在AI绘画泄露模型背后的,巨大安全隐患!
2.在linux/GPU服务器(ubuntu)上部署
参考:官方文档
官方文档中的自动安装会有各种各样的问题,这里建议手动安装
2.1用anaconda管理环境
2.1.1 安装anaconda
wget https://repo.anaconda.com/archive/Anaconda3-2022.05-Linux-x86_64.sh
bash Anaconda3-2022.05-Linux-x86_64.sh
2.1.2 创建虚拟环境
conda create --name NovelAI python=3.9.12 # NovelAI为环境名,3.8为python的版本号
2.1.3 激活环境
conda activate NovelAI
2.2安装stable-diffusion-webui
依次运行一下代码,如果出现Permission denied,在相应命令前加上sudo
# install torch with CUDA support. See https://pytorch.org/get-started/locally/ for more instructions if this fails.
pip install torch --extra-index-url https://download.pytorch.org/whl/cu113

# check if torch supports GPU; this must output "True". You need CUDA 11. installed for this. You might be able to use
# a different version, but this is what I tested.
python -c "import torch; print(torch.cuda.is_available())"

# clone web ui and go into its directory
git clone https://github.com/AUTOMATIC1111/stable-diffusion-webui.git
cd stable-diffusion-webui

# clone repositories for Stable Diffusion and (optionally) CodeFormer
mkdir repositories
git clone https://github.com/CompVis/stable-diffusion.git repositories/stable-diffusion
git clone https://github.com/CompVis/taming-transformers.git repositories/taming-transformers
git clone https://github.com/sczhou/CodeFormer.git repositories/CodeFormer
git clone https://github.com/salesforce/BLIP.git repositories/BLIP

# install requirements of Stable Diffusion
pip install transformers==4.19.2 diffusers invisible-watermark --prefer-binary

# install k-diffusion
pip install git+https://github.com/crowsonkb/k-diffusion.git --prefer-binary

# (optional) install GFPGAN (face restoration)
pip install git+https://github.com/TencentARC/GFPGAN.git --prefer-binary

# (optional) install requirements for CodeFormer (face restoration)
pip install -r repositories/CodeFormer/requirements.txt --prefer-binary

# install requirements of web ui
pip install -r requirements.txt  --prefer-binary

# update numpy to latest version
pip install -U numpy  --prefer-binary
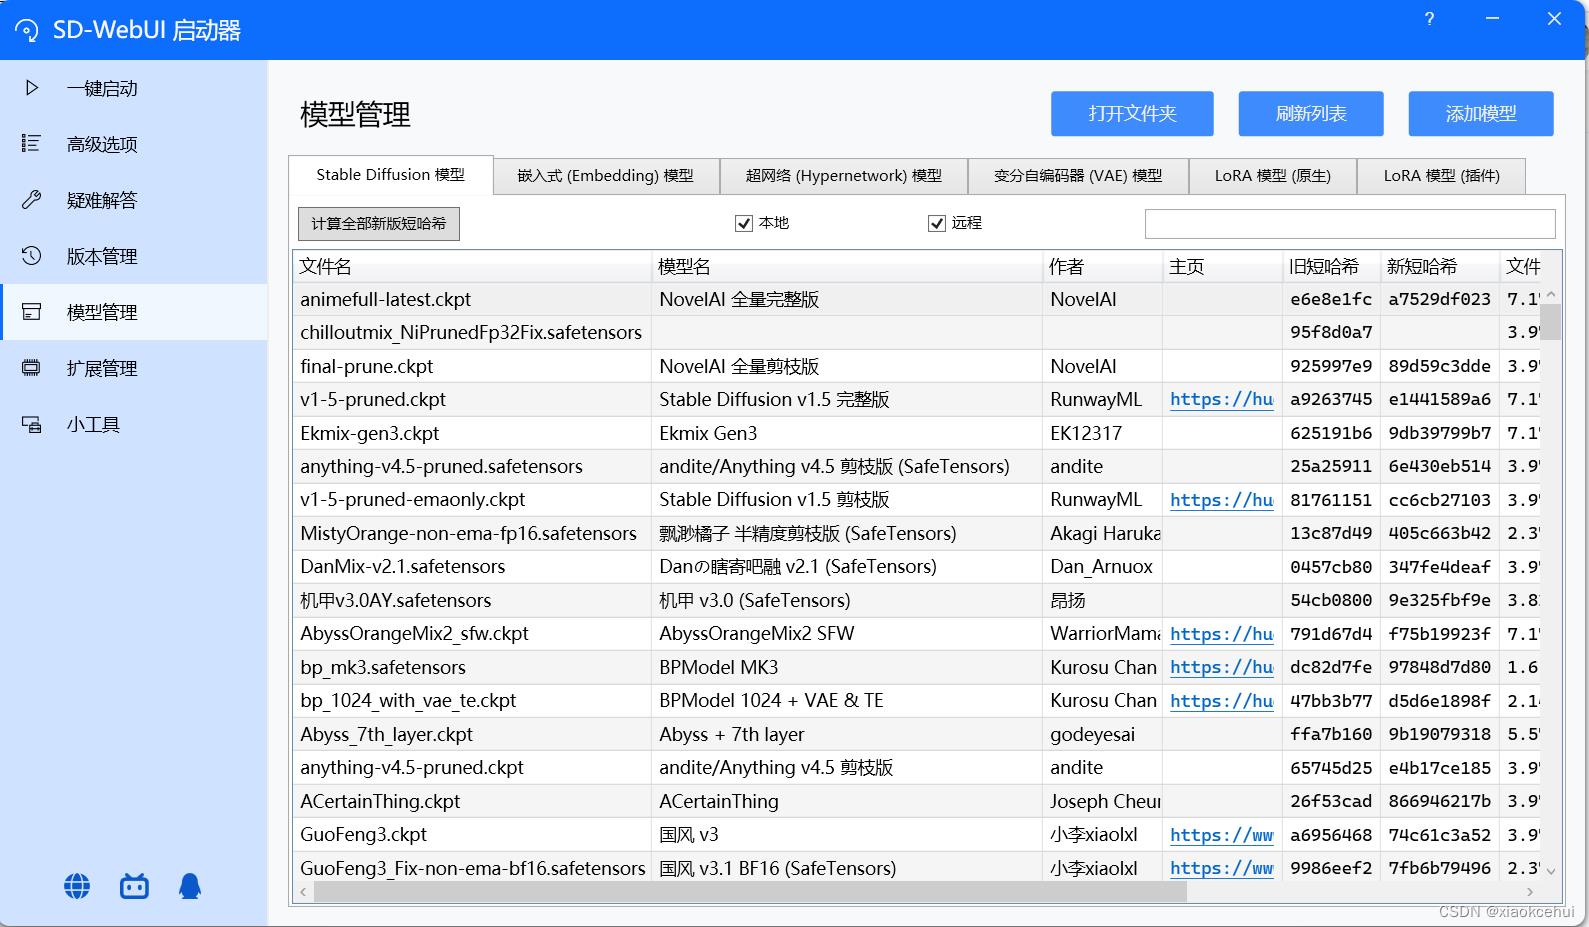
2.3 模型
刚安装完是没有模型的,需要下载模型
2.3.1 模型目录
所以模型都放在这个目录下,可以通过sftp上传到该目录下
stable-diffusion-webui\\models\\Stable-diffusion
2.3.2 各种各样的模型下载
https://rentry.org/sdmodels
2.3.3最近泄露的NovelAI模型
链接:https://pan.baidu.com/s/1Mu_ynhBkkWi1Nr1nWl_Xyw?pwd=rs47
提取码:rs47
2.4运行
2.4.1 本地运行
python webui.py
2.4.2 服务器运行本地远程访问
python webui.py --listen
然后即可通过服务器7860端口访问(记得服务器控制台放行端口)
http://<服务器公网ip>:7860/
2.4.3 后台运行
nohup python webui.py --listen 2>&1 &
3.在colab上部署
如果自己电脑显存不够,又没有GPU服务器的话可以在colab部署,可以免费使用一块T4,只需要一个谷歌账号,而且没有安全风险,缺点就是不稳定,需要魔法
代码:colab一键部署
教程:NovelAI 4chan colab tutorial教學:目前最接近NovelAI官方且免費的版本(需要魔法 )
AI绘图软件Stable Diffusion 安装和使用
Stable Diffusion2是目前最流行开源AI绘图软件,它有两种使用方式:线上使用和本地部署。
线上使用有4种方式:(1) Stable Diffusion官网,(2) Huggingface,(3) 百度飞桨AI实训平台,(4)Google的Colab。线上使用可能会有时间限制、参数限制、网络限制等,所以更多人使用本地部署方式。
但是本地部署有个难点就是要下载的东西实在太多了,经常出现由于网络限制问题而造成下载中断和报错问题。这些莫名奇妙的情况会让人抓狂的,在反复安装过程中,人容易精疲力竭,从而失去使用Stable Diffusion的热情。
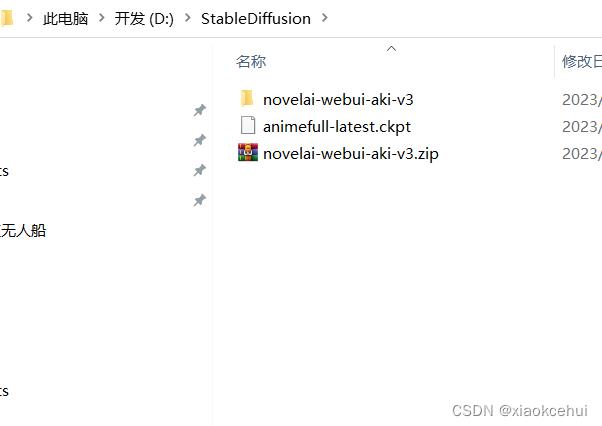
有需求就有解决方案,B站大佬司马懿和秋葉aaaki分别给出了一健整合包,博主下载了秋葉aaaki的整合包,整合包总共约17G,1个压缩文件和1个模型文件。
使用步骤如下:
1、解压压缩文件novelai-webui-aki-v3.zip,将模型文件animefull-latest.ckpt拷贝至解压文件夹\\models\\Stable-diffusion\\
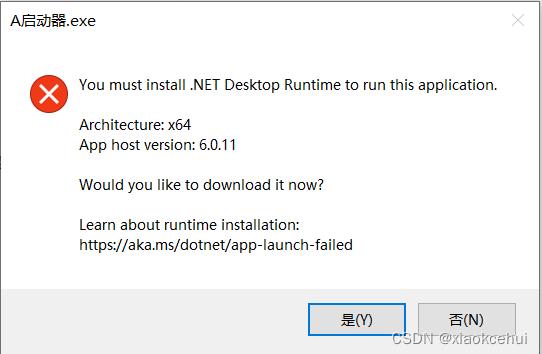
2、点击解压文件夹根目录下的A启动器.exe,提示安装.net6.0.11
3、再次点击A启动器.exe
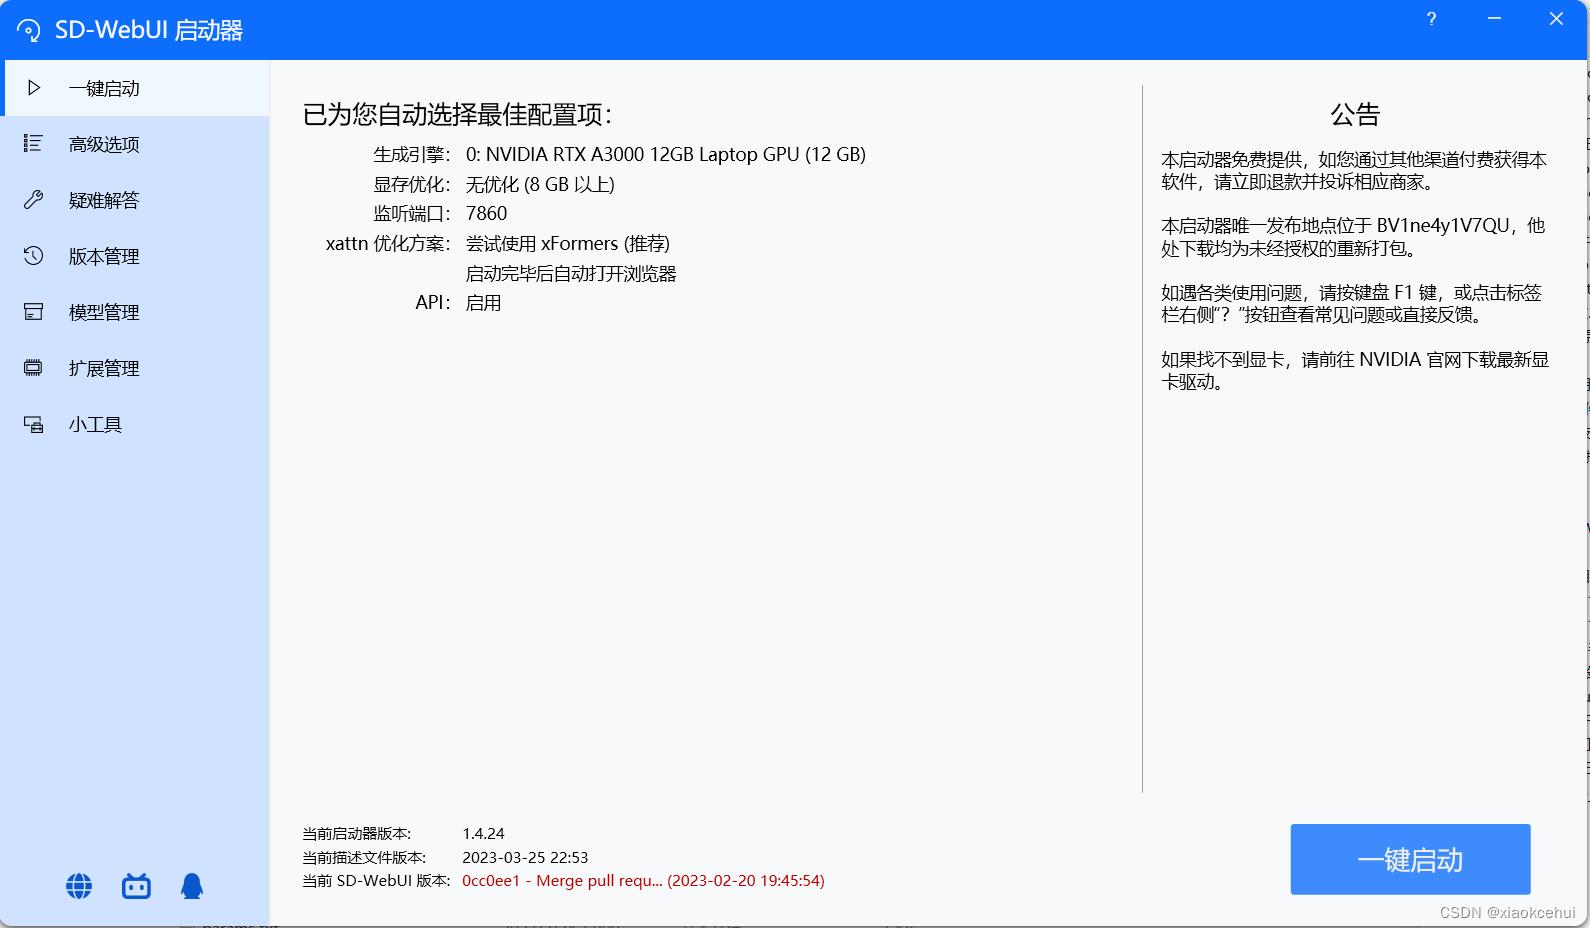
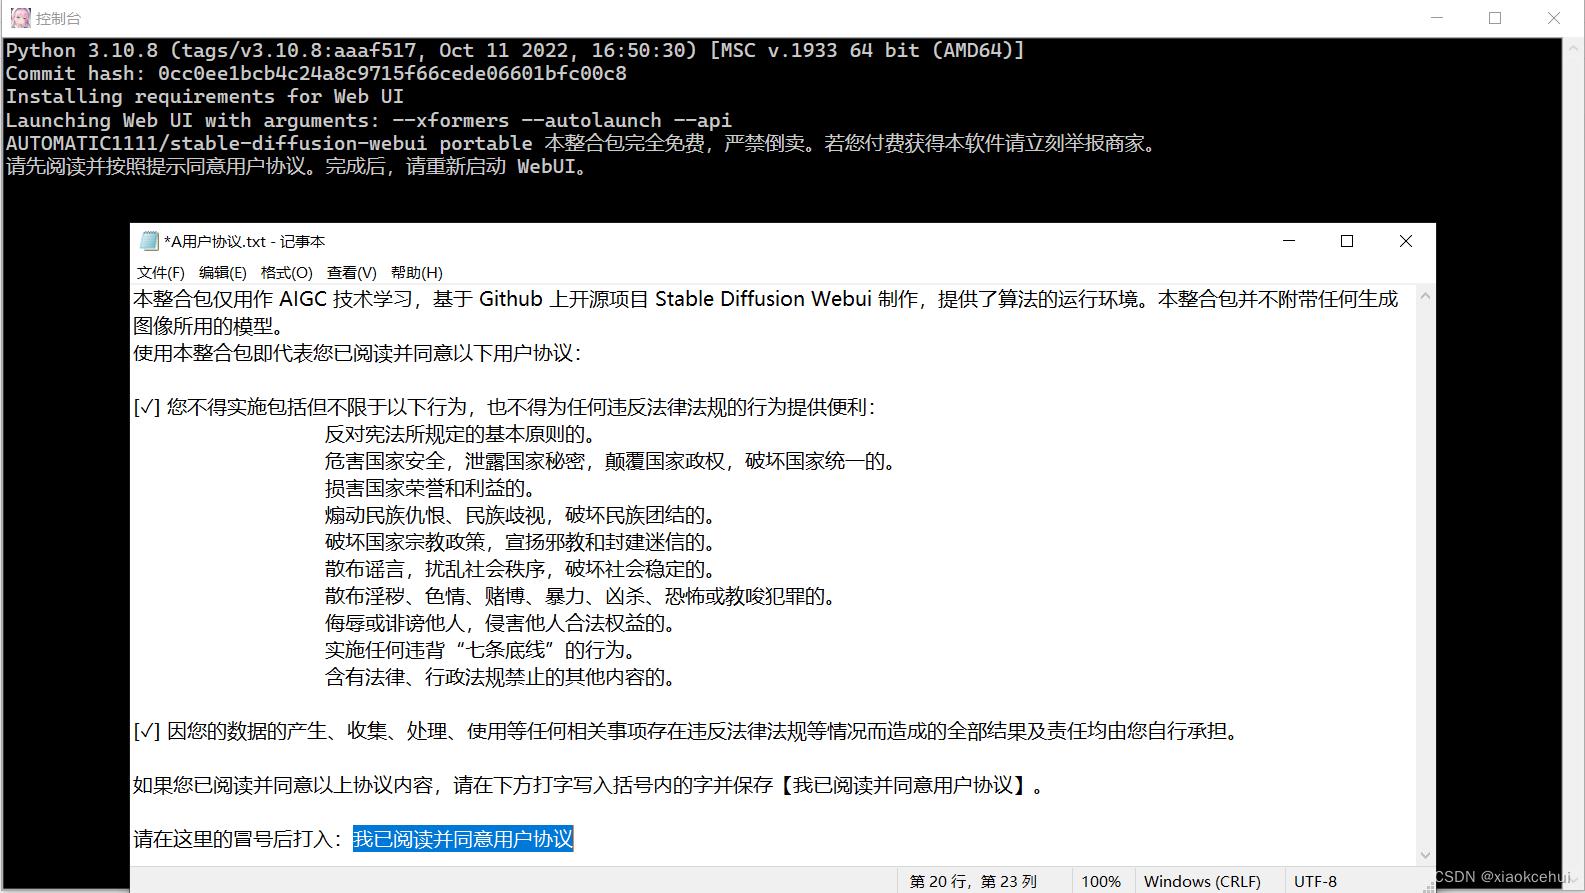
4、点击右下角的一键启动,键入:我已阅读并同意用户协议,并保存。
5、重新启动A启动器.exe
默认打开的浏览器是IE浏览器,关闭,选择Google浏览器,输入地址:127.0.0.1:7860

6、使用文生图功能
仅使用正向关键词(Prompt)
a woman in a short skirt and white shirt posing on a beach with palm trees in the background and a blue sky,Du Qiong,sakimi chan, a stock photo,private press
迭代了100次,耗时约1分钟
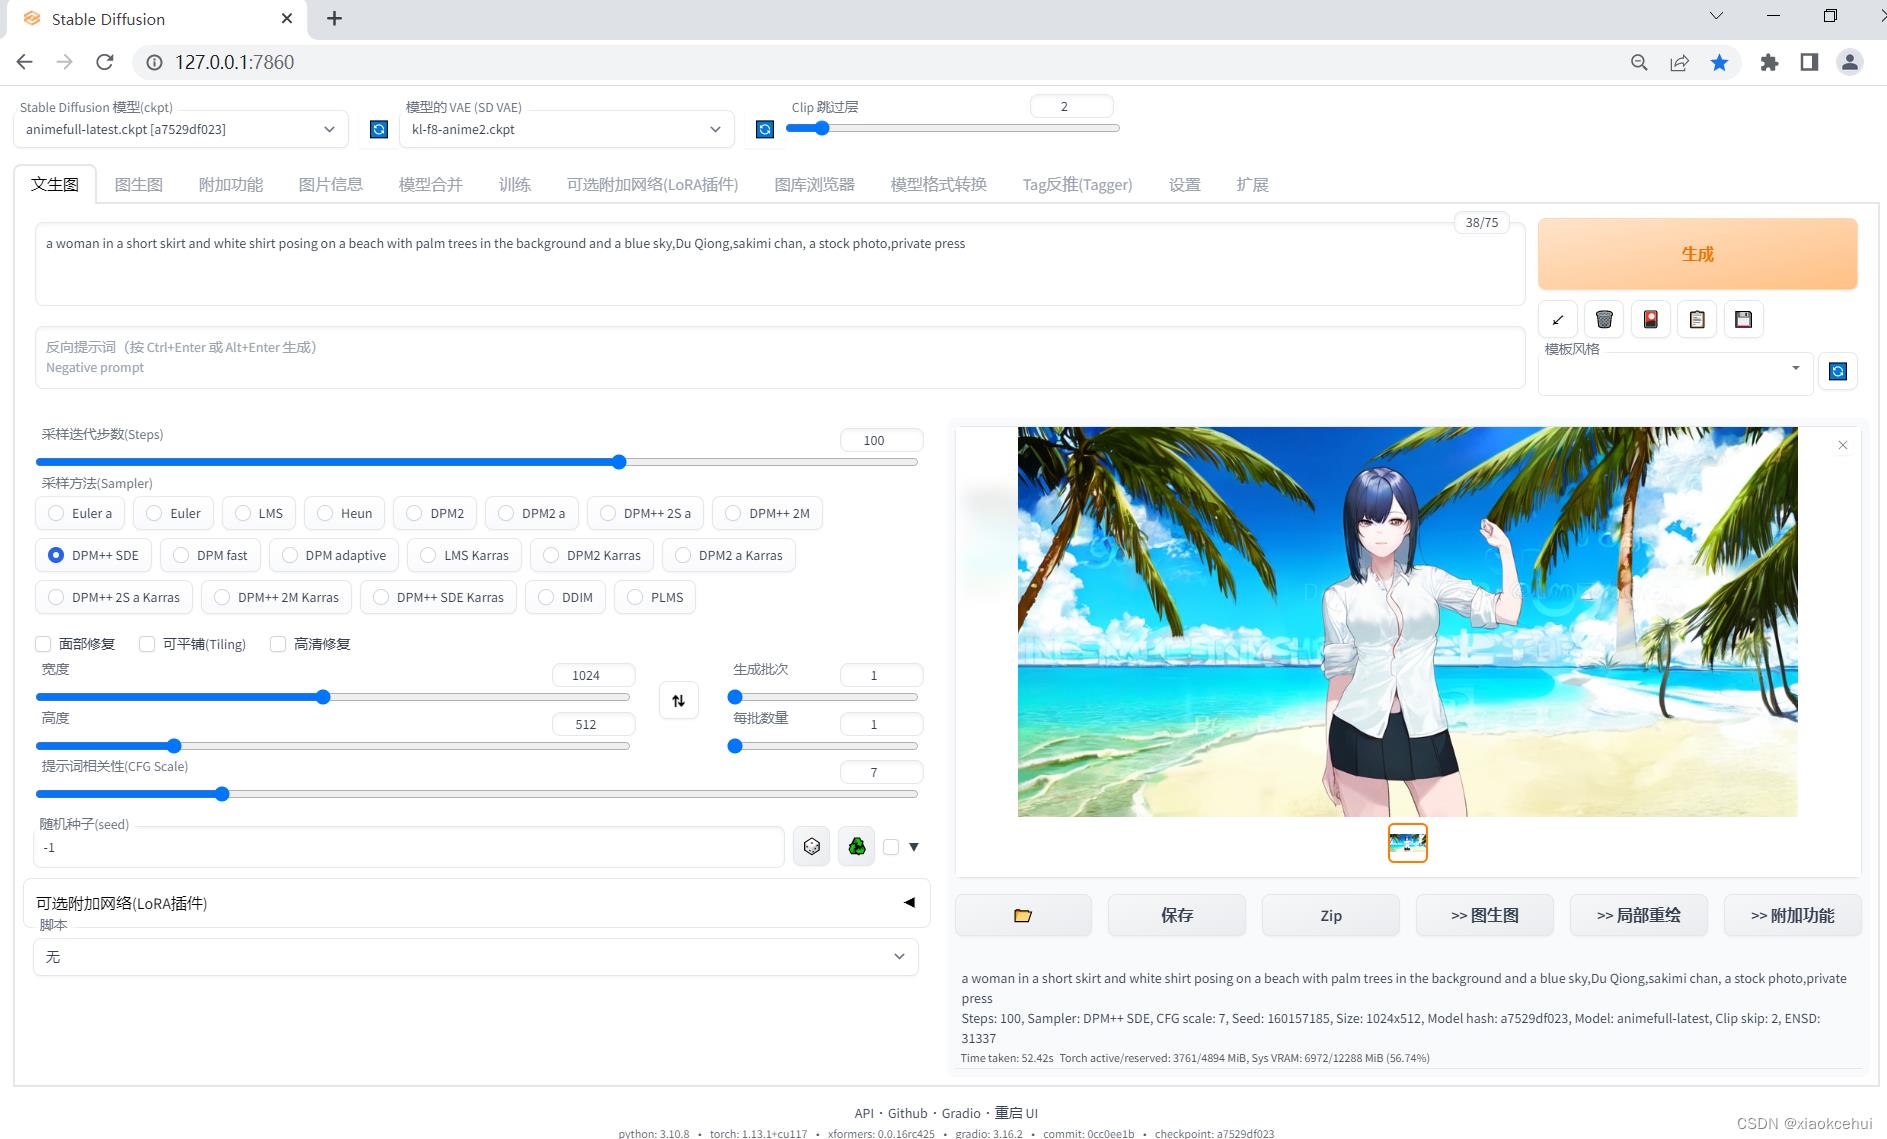
效果一般,手根本就没法看。
7、使用正向和反向关键词,并用卡通人物Yuuki Asuna作为关键词
prompt:one girl(Yuuki Asuna) in a midi skirt and white shirt posing on a beach with palm trees in the background and a blue sky,long hair,focus eyes,slim
negative prompt: lowres, bad anatomy, bad hands, text, error, missing fingers, extra digit, fewer digits, cropped, worst quality, low quality, normal quality, jpeg artifacts, signature, watermark, username, blurry
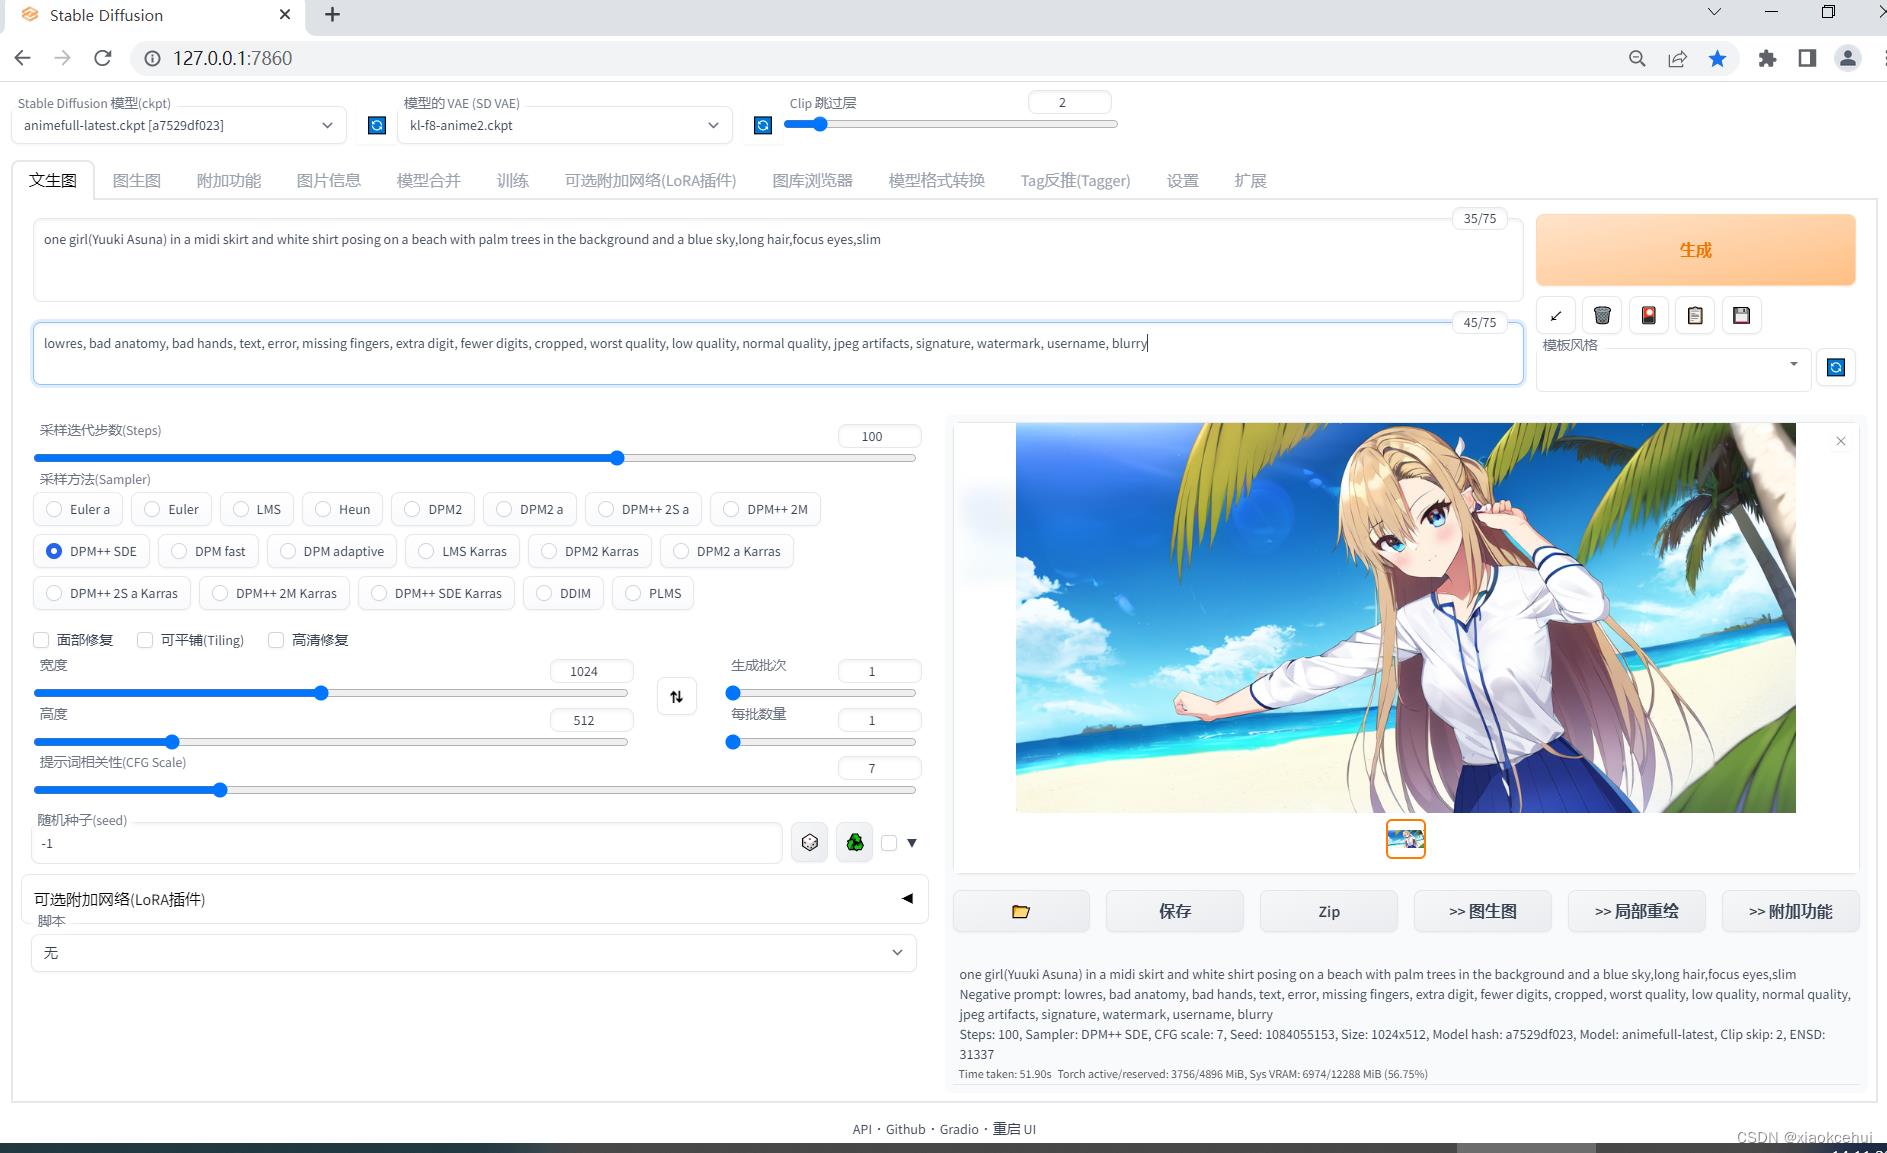
比上面那幅图要好看一些,但是手的效果仍然不行。
8、把手藏起来,在正向Prompt增加arm behind back,反向Prompt增加silhouette(侧面)
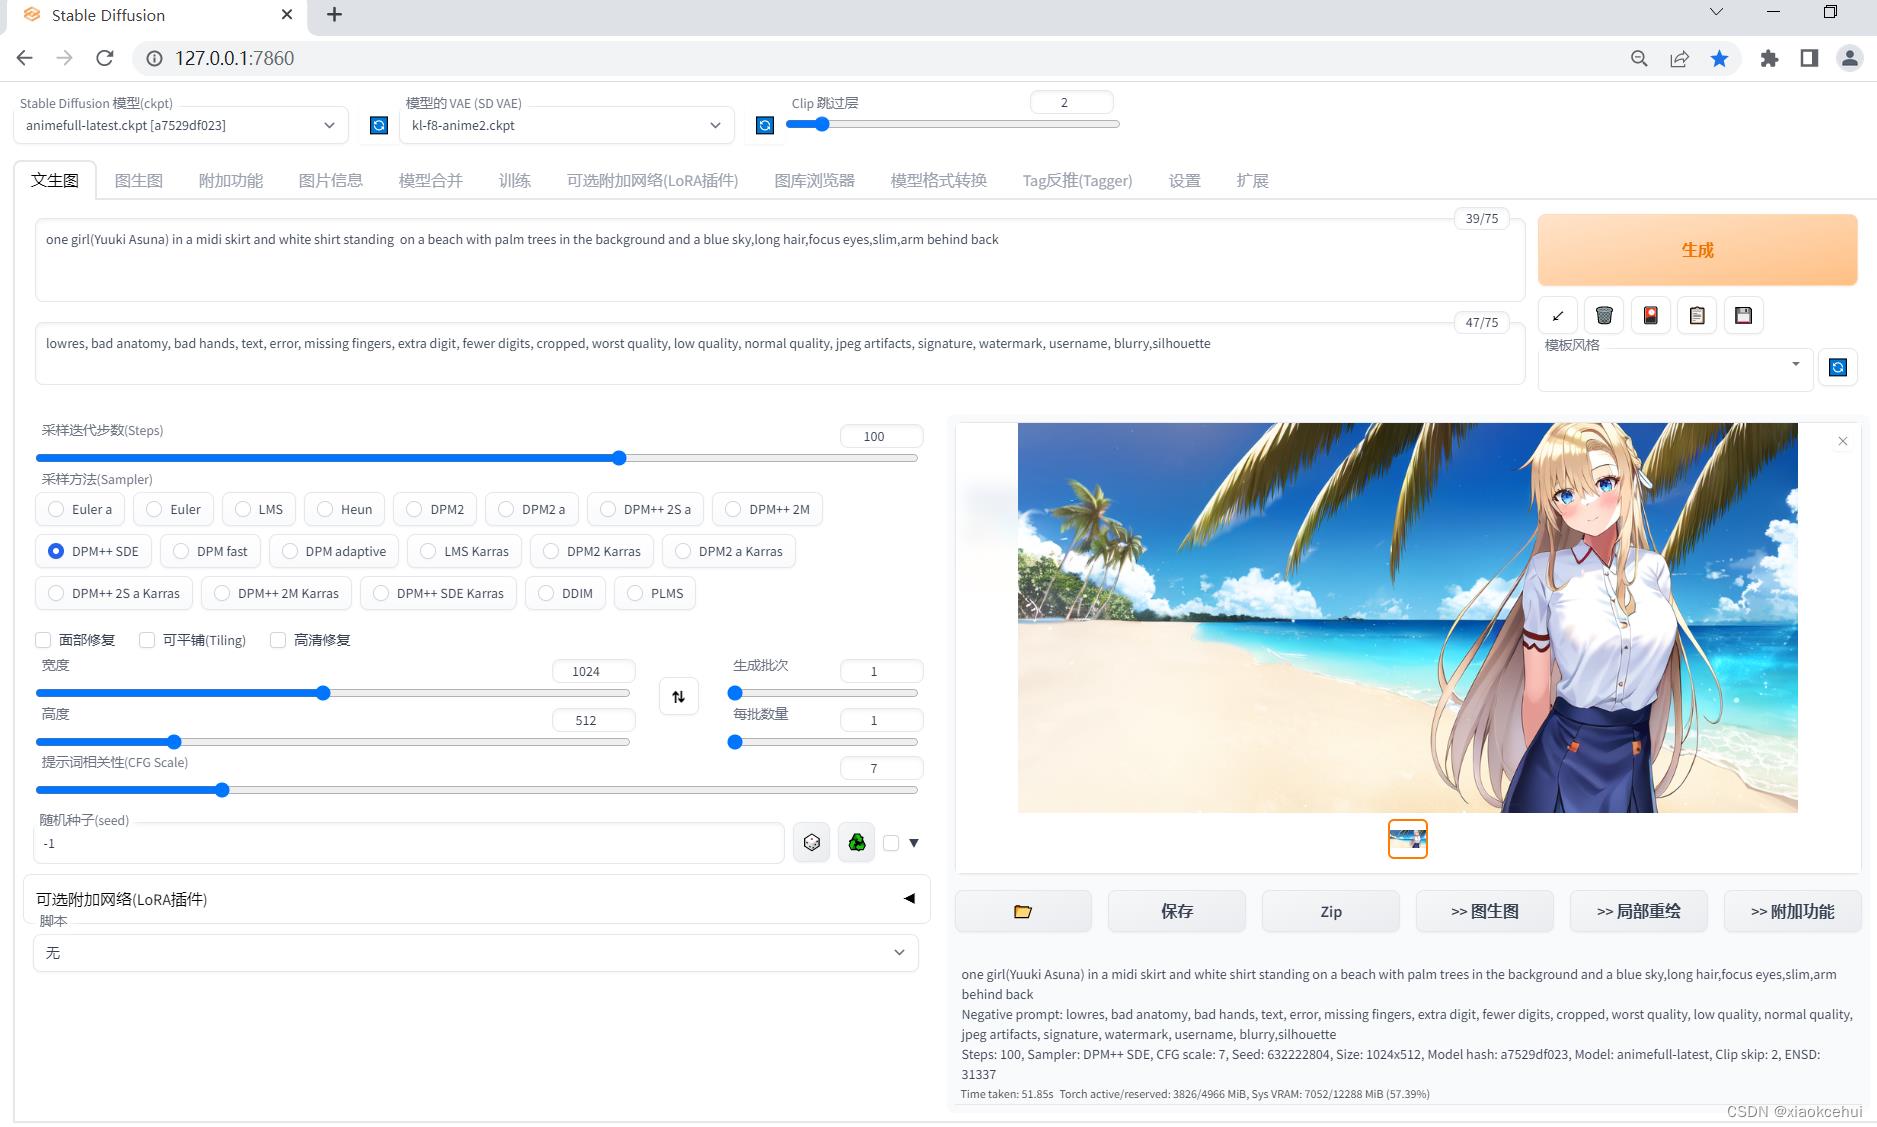

这张勉强还凑合。
如果将卡通人员换成洛天依,英文名字为Lo Tiene Yai,并加上正向Prompt:long leg

中间多了一个莫名其妙的小人,局部重绘,将重绘部分涂黑。

左下角的植物和左手重新绘制一下,最后的效果如下:

9、下载chilloutmix模型和Lora模型koreanDollLikenes ,并增加模型。
10、用chilloutmix和koreanDollLikenes模型生成新图
正向Prompt:
best quality, ultra high res, (photorealistic:1.4), 1woman, sleeveless white button shirt, black skirt, black choker, cute, (Kpop idol), (aegyo sal:1), (platinum blonde hair:1), ((puffy eyes)), looking at viewer, full body, facing front ,hands on hips, <lora:koreanDollLikeness_v10:1>
反向Prompt:
paintings.sketches.(worst quality:2).(low quality:2).(normal quality:2),lowres,normal quality.((monochrome)).((grayscale)).skin spots,acnes,skin blemishes,age spot,glan


参考文献
Stable Diffusion2.1+WebUI的安装与使用(极详细) - 哔哩哔哩
stable diffusion 2.0本地部署和微调 - 知乎
Stable Diffusion 2.0 Release — Stability AI
Stable Diffusion搭建全过程记录,生成自己的专属艺术照_submarineas的博客-CSDN博客
把 AI 作画引擎搬进家用电脑:Stable Diffusion 配置与使用指南 - 少数派
玩转Stable Diffusion 之 4种方式线上免费玩 - 知乎
AUTOMATIC1111版本 stable diffusion系列 (教程翻译搬运+个人使用注解)01 环境部署 - 哔哩哔哩
最近很火的AI绘画NovelAI,WebUI搭建(windows+nvidia) - 知乎
【2023年2月】最新版AI绘画教程,基于秋葉aaaki整合版,基础操作与参数原理。AI绘画从入门到出COS。 - 知乎 【AI绘画】Stable Diffusion 最终版 无需额外下载安装!可更新✓ 训练✓ 汉化✓ 提供7G模型 NovelAI_哔哩哔哩_bilibili
以上是关于如何部署一个自己的AI绘图的主要内容,如果未能解决你的问题,请参考以下文章
零基础如何入门到精通人工智能Pytorch, 深度学习,如何跟进AI领域的最新算法,如何读论文找代码
零基础如何入门到精通人工智能Pytorch, 深度学习,如何跟进AI领域的最新算法,如何读论文找代码
零基础如何入门到精通人工智能Pytorch, 深度学习,如何跟进AI领域的最新算法,如何读论文找代码
手把手教你如何免费Midjourney Adobe FireFly AI绘图—Window本地快速部署stable diffusion AI绘图及使用指南(小白也能学会)