已解决python setup.py bdist_wheel did not run successfully.
Posted 袁袁袁袁满
tags:
篇首语:本文由小常识网(cha138.com)小编为大家整理,主要介绍了已解决python setup.py bdist_wheel did not run successfully.相关的知识,希望对你有一定的参考价值。
已解决(pip安装第三方模块lxml模块报错)Building wheels for collected packages: lxml
Building wheel for lxml (setup.py) … error
error: subprocess-exited-with-error
python setup.py bdist_wheel did not run successfully.
note: This error originates from a subprocess,and is likely not a problem with pip.
ERROR: Failed building wheel for lxml
note: This error originates from a subprocess, and is likely not a problem with pip.
error: legacy - install - failure
Encountered error while trying to install package.> lxml
note: This is an issue with the package mentioned above, not pip.
hint: See above for output from the failure
文章目录
报错问题
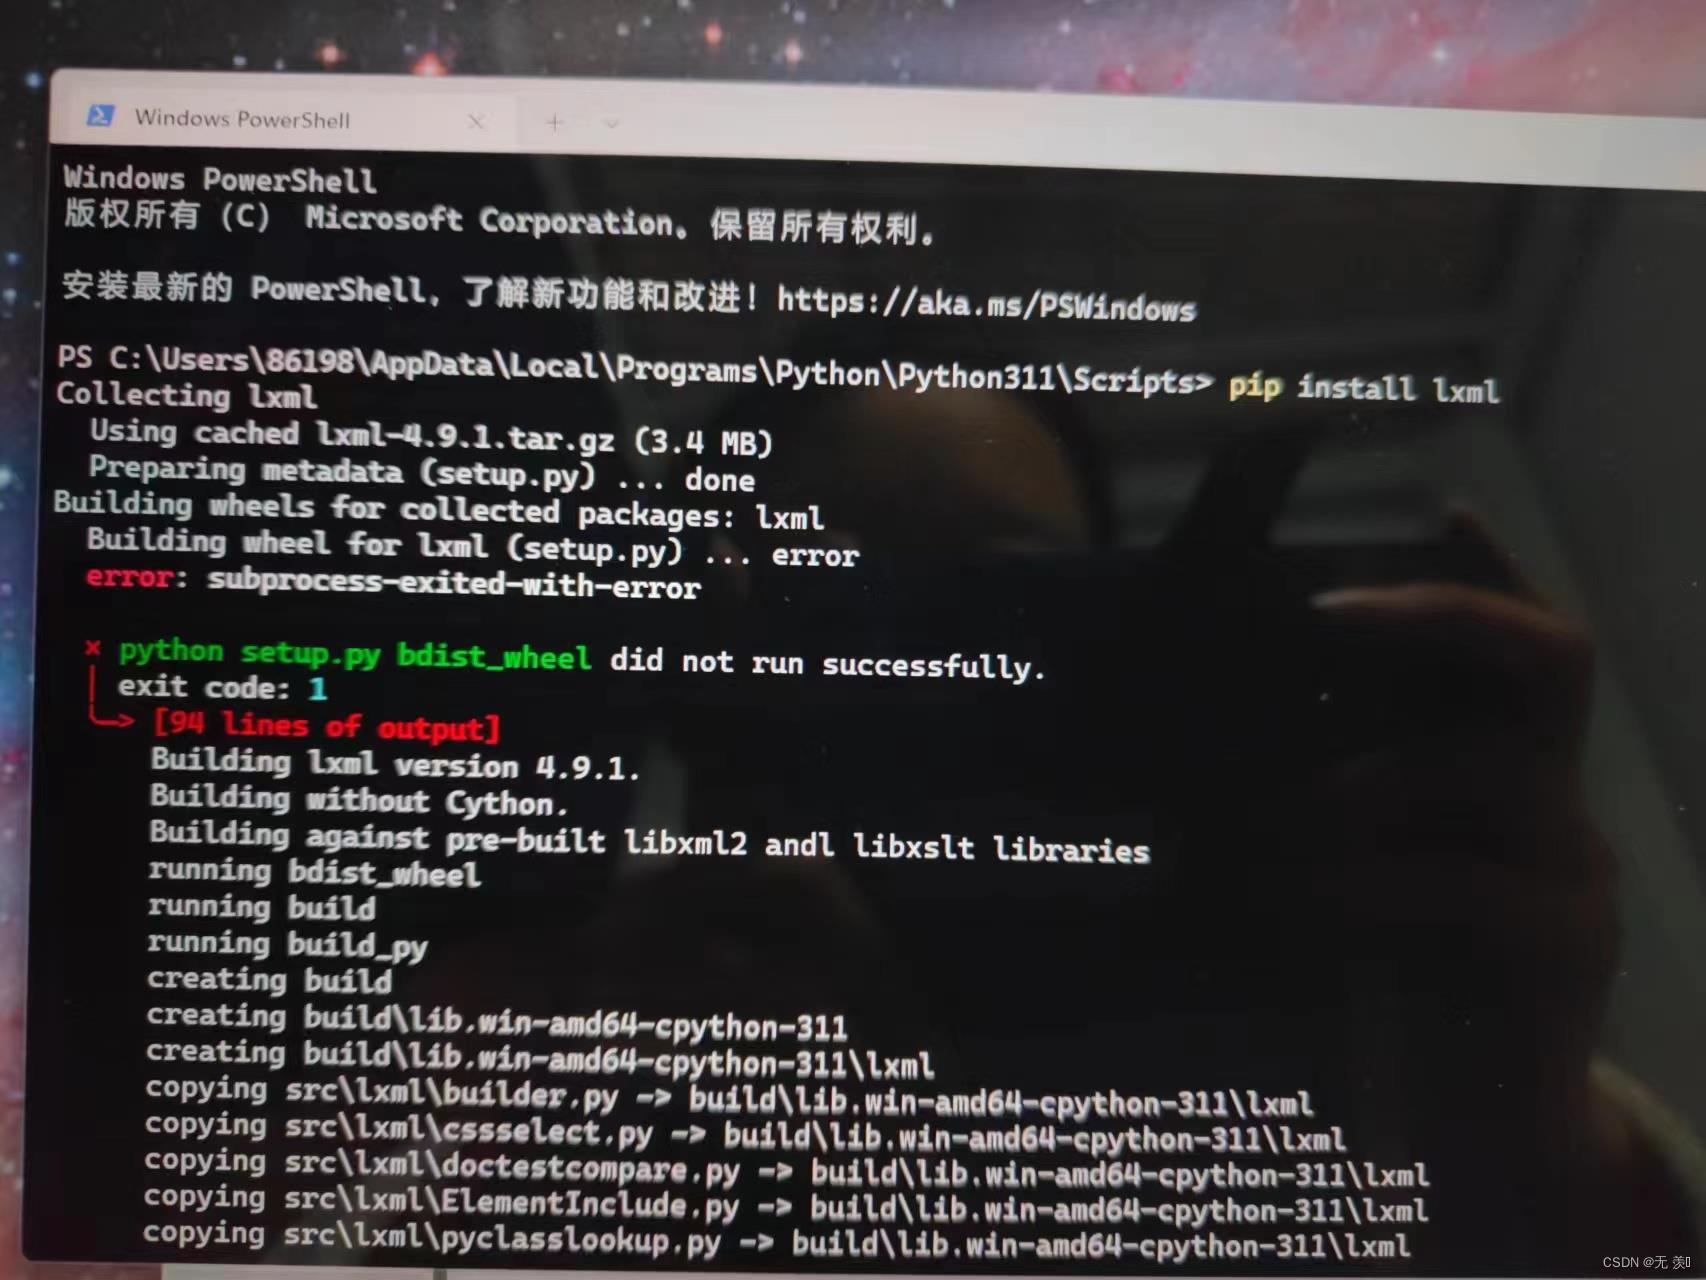
粉丝群一个小伙伴,想用pip安装lxml模块,但是发生了报错(当时他心里瞬间凉了一大截,跑来找我求助,然后顺利帮助他解决了,顺便记录一下希望可以帮助到更多遇到这个bug不会解决的小伙伴),报错代码如下所示:
pip install lxml
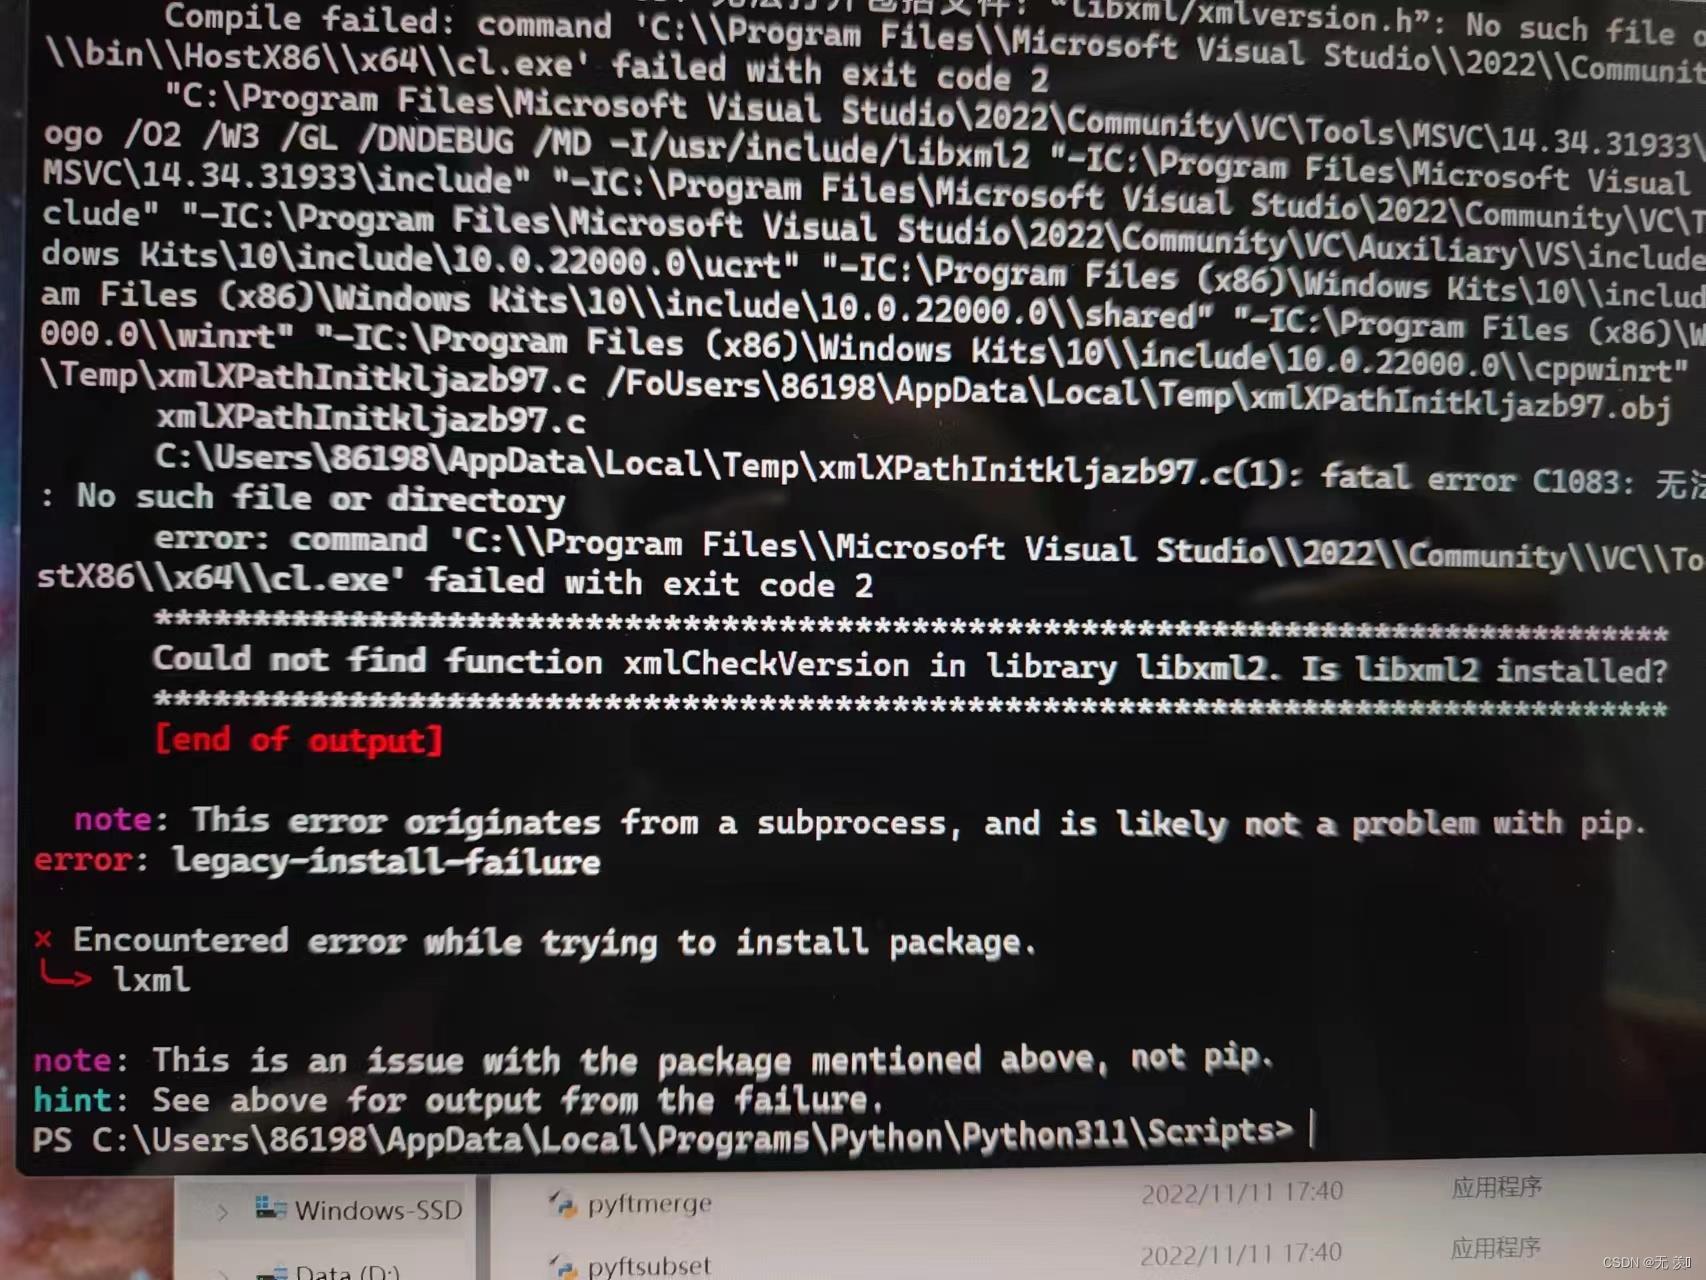
报错信息截图如下所示:
报错翻译
报错信息翻译如下:
为收集的包构建轮子:lxml
为lxml构建轮子(setup.py…错误
错误:子进程退出,出现错误
python setup.py bdist_wheel未成功运行。
注意:此错误源自子流程,可能不是pip的问题。
错误:为lxml生成轮子失败
注意:此错误源自子流程,可能不是pip的问题。
错误:旧式-安装-失败
尝试安装程序包时遇到错误。>lxml文件
注意:这是上面提到的包的问题,而不是pip。
提示:有关失败的输出,请参见上文
报错原因
报错原因:
缺失了某些依赖模块,所以安装报错。安装其他第三方模块报错的小伙伴们也可以用下面解决方法任选其一即可!!!
解决方法1
- distutils:distutils 是标准库中负责建立 Python 第三方库的安装器,使用它能够进行 Python 模块的安装和发布。distutils 对于简单的分发很有用,但功能缺少。
- setuptools:setuptools 是 distutils 增强版,不包括在标准库中。其扩展了很多功能,能够帮助开发者更好的创建和分发 Python 包。大部分 Python 用户都会使用更先进的 setuptools 模块。
(1)安装setuptools:
pip install --upgrade setuptools
(2)安装微软的VS Install,把你的操作系统包和改装的库装上:
pip install nes-py --no-cache-dir
pip install --upgrade pip setuptools wheel
(3)然后再次安装lxml模块试试:
pip install lxml
解决方法2(适用于所有模块安装)
注意:此方法适用于所有第三方模块的安装,小伙伴们修改包名即可!!!
报错“ERROR: Failed building wheel for xxx(某个库),这个报错信息表明缺少了相应的 .whl 文件:

(1)下python版本对应.whl文件,下载地址:https://pypi.org/
(2)搜索包名(想安装什么模块就搜自己需要的):

(3)找到对应版本然后点击:

(4) 点击下载:
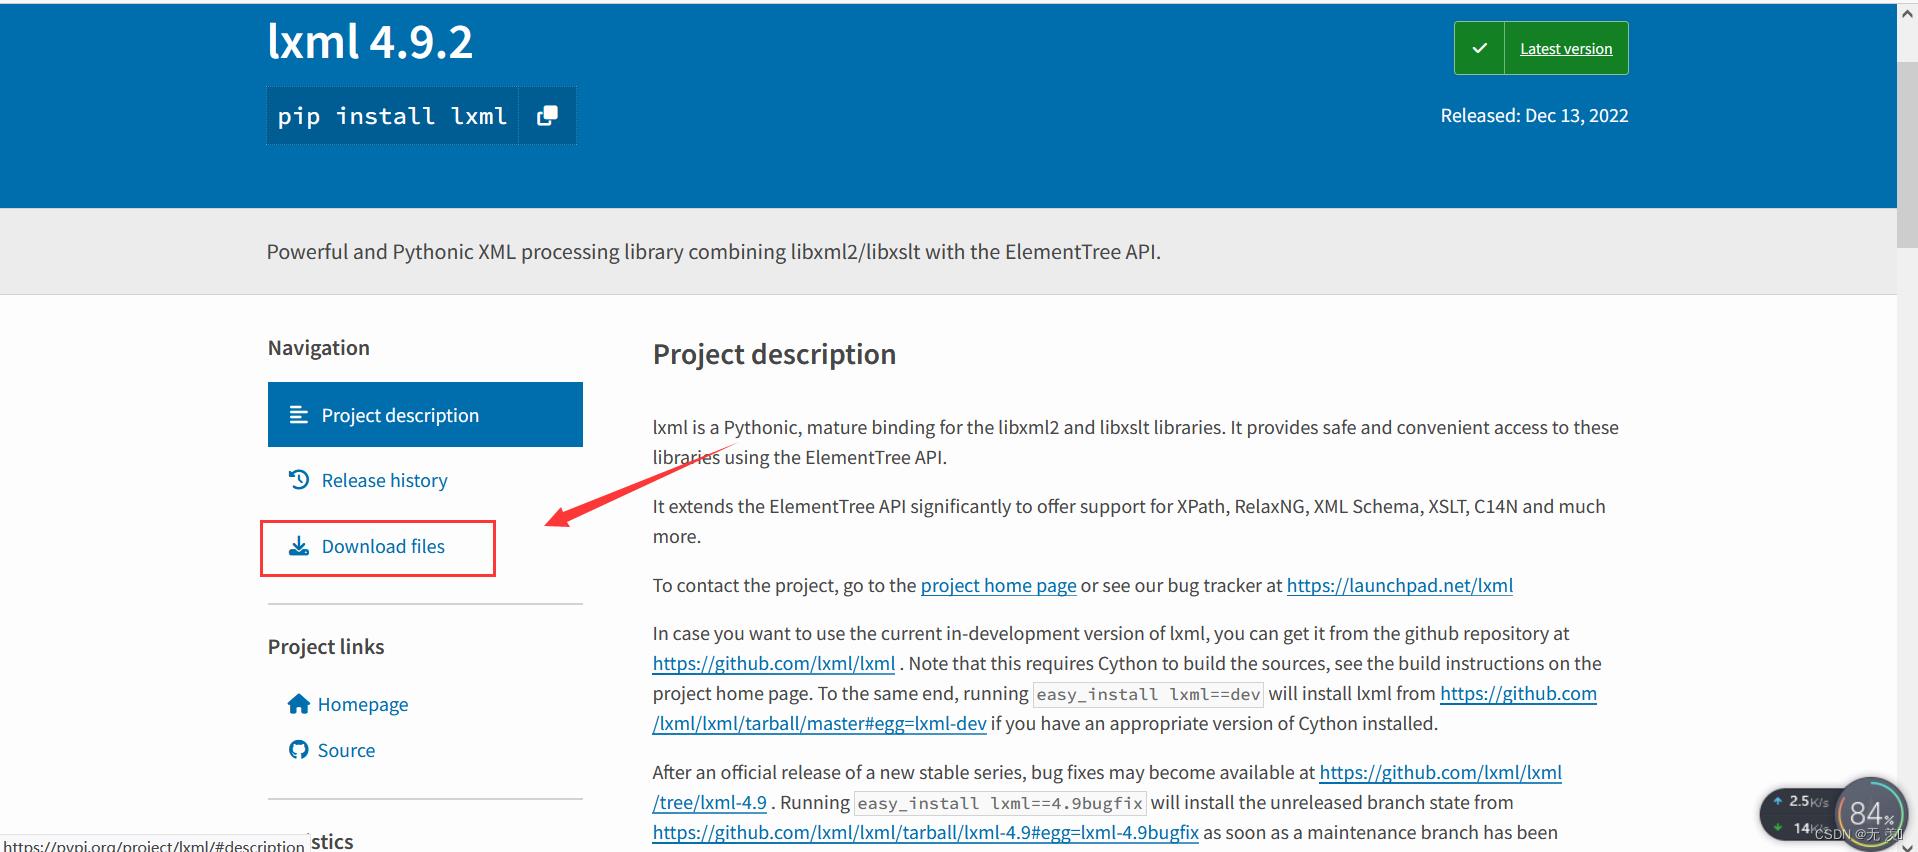
(5)下载对应whl文件(cp38:python版本是3.8,amd64:电脑window64位,注意:一定要下载自己电脑和Python的对应版本!)

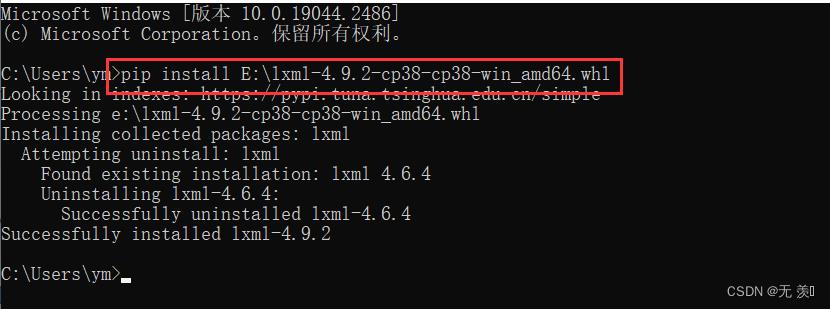
(6)找到文件下面的路径,执行安装命令(我的whl文件放在E盘下,后面是包所在路径和包名):
pip install E:\\lxml-4.9.2-cp38-cp38-win_amd64.whl
(7)安装成功:
以上是此问题报错原因的解决方法,欢迎评论区留言讨论是否能解决,如果有用欢迎点赞收藏文章谢谢支持,博主才有动力持续记录遇到的问题!!!
千人全栈VIP答疑群联系博主帮忙解决报错
由于博主时间精力有限,每天私信人数太多,没办法每个粉丝都及时回复,所以优先回复VIP粉丝,可以通过订阅限时9.9付费专栏《100天精通Python从入门到就业》进入千人全栈VIP答疑群,获得优先解答机会(代码指导、远程服务),白嫖80G学习资料大礼包,专栏订阅地址:https://blog.csdn.net/yuan2019035055/category_11466020.html
-
优点:作者优先解答机会(代码指导、远程服务),群里大佬众多可以抱团取暖(大厂内推机会),此专栏文章是专门针对零基础和需要进阶提升的同学所准备的一套完整教学,从0到100的不断进阶深入,后续还有实战项目,轻松应对面试!
-
专栏福利:简历指导、招聘内推、每周送实体书、80G全栈学习视频、300本IT电子书:Python、Java、前端、大数据、数据库、算法、爬虫、数据分析、机器学习、面试题库等等
-
注意:如果希望得到及时回复,和大佬们交流学习,订阅专栏后私信博主进千人VIP答疑群

环境变量`no_proxy`对`setup.py upload`无效
我正在尝试将python工件上传到位于我公司网络上的自定义nexus存储库,但它不起作用:
$ python2 setup.py bdist_wheel --universal upload -r nexus
running bdist_wheel
running build
running build_py
running build_scripts
installing to build/bdist.linux-x86_64/wheel
running install
running install_lib
creating build/bdist.linux-x86_64/wheel
. . .
. . .
. . .
running upload
Submitting /home/<user>/dist/processing_catalog-0.1.1-py2.py3-none-any.whl to http://nexus3.mycompany.net/repository/pip/
Upload failed (503): Service Unavailable
error: Upload failed (503): Service Unavailable
我是企业HTTP代理(10.200.1.1:3128)的幕后推手。但是,nexus存储库位于同一网络中,因此我对公司本地域“无代理”。这是我的代理环境变量:
$ env | grep -Fi proxy
NO_PROXY=localhost,127.0.0.0/8,::1,.mycompany.net
http_proxy=http://10.200.1.1:3128
https_proxy=http://10.200.1.1:3128
HTTPS_PROXY=http://http://10.200.1.1:3128/
no_proxy=localhost,127.0.0.1,.mycompany.net
HTTP_PROXY=http://http://10.200.1.1:3128/
执行upload命令时tcpdump显示流程发送到代理:
$ sudo tcpdump -Q out -i eth0 -nn dst host 10.200.1.1 and dst port 3128
tcpdump: verbose output suppressed, use -v or -vv for full protocol decode
listening on eth0, link-type EN10MB (Ethernet), capture size 262144 bytes
11:36:58.537988 IP 10.100.59.19.38048 > 10.200.1.1.3128: Flags [S], seq 3601157597, win 29200, options [mss 1460,sackOK,TS val 1913260691 ecr 0,nop,wscale 7], length 0
11:36:58.539684 IP 10.100.59.19.38048 > 10.200.1.1.3128: Flags [.], ack 3499932568, win 229, options [nop,nop,TS val 1913260692 ecr 2310337451], length 0
11:36:58.539746 IP 10.100.59.19.38048 > 10.200.1.1.3128: Flags [.], seq 0:7240, ack 1, win 229, options [nop,nop,TS val 1913260692 ecr 2310337451], length 7240
11:36:58.539753 IP 10.100.59.19.38048 > 10.200.1.1.3128: Flags [.], seq 7240:14480, ack 1, win 229, options [nop,nop,TS val 1913260692 ecr 2310337451], length 7240
11:36:58.542743 IP 10.100.59.19.38048 > 10.200.1.1.3128: Flags [P.], seq 14480:16847, ack 1, win 229, options [nop,nop,TS val 1913260695 ecr 2310337454], length 2367
11:36:58.567501 IP 10.100.59.19.38048 > 10.200.1.1.3128: Flags [.], ack 4009, win 291, options [nop,nop,TS val 1913260720 ecr 2310337476], length 0
11:36:58.567866 IP 10.100.59.19.38048 > 10.200.1.1.3128: Flags [F.], seq 16847, ack 4010, win 291, options [nop,nop,TS val 1913260721 ecr 2310337476], length 0
^C
7 packets captured
7 packets received by filter
0 packets dropped by kernel
这很好地说明了在执行上传时nexus服务器端没有收到日志这一事实。
我的上传配置:
$ cat ~/.pypirc
[distutils]
index-servers =
    nexus

[nexus]
repository: http://nexus3.mycompany.net/repository/pip/
username:
password:

$ sudo cat /etc/pip.conf
[global]
timeout = 60
trusted-host = pypi.python.org
               nexus3.mycompany.net
index-url = https://pypi.python.org/simple
extra-index-url = http://nexus3.mycompany.net/repository/pip/simple
另一方面,一个点子下载工作正常:
$ pip download processing-catalog
Collecting processing-catalog
  Downloading http://nexus3.mycompany.net/repository/pip/packages/processing-catalog/0.1.2/processing_catalog-0.1.2-py2.py3-none-any.whl
. . .
. . .
. . .
Successfully downloaded processing-catalog . . .
同样适用于简单的卷曲:
$ curl -sv -u <username>:<password> http://nexus3.mycompany.net/repository/pip/packages/processing-catalog/0.1.1/processing_catalog-0.1.1-py2.py3-none-any.whl -o processing_catalog-0.1.1-py2.py3-none-any.whl
*   Trying 10.100.58.110...
* Connected to nexus3.mycompany.net (10.100.58.110) port 80 (#0)
* Server auth using Basic with user '<username>'
> GET /repository/pip/packages/processing-catalog/0.1.1/processing_catalog-0.1.1-py2.py3-none-any.whl HTTP/1.1
> Host: nexus3.mycompany.net
> Authorization: Basic <token>
> User-Agent: curl/7.47.0
> Accept: */*
>
< HTTP/1.1 200 OK
< Date: Tue, 27 Feb 2018 10:51:47 GMT
< Server: Nexus/3.6.2-01 (OSS)
< X-Frame-Options: SAMEORIGIN
< X-Content-Type-Options: nosniff
< Last-Modified: Tue, 27 Feb 2018 10:11:01 GMT
< Content-Type: application/zip
< Content-Length: 14229
<
{ [4096 bytes data]
* Connection #0 to host nexus3.mycompany.net left intact
那么,为什么setup.py upload会在代理上出去?
回答我自己的问题
我认为,与curl或pip不同,setup.py upload无法在no_proxy环境变量中读取域格式,并在开头使用.。看到:
在.变量的域开头没有no_proxy:它有效
$ no_proxy=mycompany.net python2 setup.py bdist_wheel --universal upload -r nexus
running bdist_wheel
running build
running build_py
running build_scripts
installing to build/bdist.linux-x86_64/wheel
running install
running install_lib
creating build/bdist.linux-x86_64/wheel
creating build/bdist.linux-x86_64/wheel/processing_catalog
. . .
. . .
. . .
running upload
Submitting /home/<user>/dist/processing_catalog-0.1.1-py2.py3-none-any.whl to http://nexus3.mycompany.net/repository/pip/
Server response (200): OK
.在no_proxy变量域的开头:它不起作用
$ no_proxy=.mycompany.net python2 setup.py bdist_wheel --universal upload -r nexus
running bdist_wheel
running build
running build_py
running build_scripts
installing to build/bdist.linux-x86_64/wheel
running install
running install_lib
creating build/bdist.linux-x86_64/wheel
creating build/bdist.linux-x86_64/wheel/processing_catalog
. . .
. . .
. . .
running upload
Submitting /home/<user>/dist/processing_catalog-0.1.1-py2.py3-none-any.whl to http://nexus3.mycompany.net/repository/pip/
Upload failed (503): Service Unavailable
error: Upload failed (503): Service Unavailable
以上是关于已解决python setup.py bdist_wheel did not run successfully.的主要内容,如果未能解决你的问题,请参考以下文章