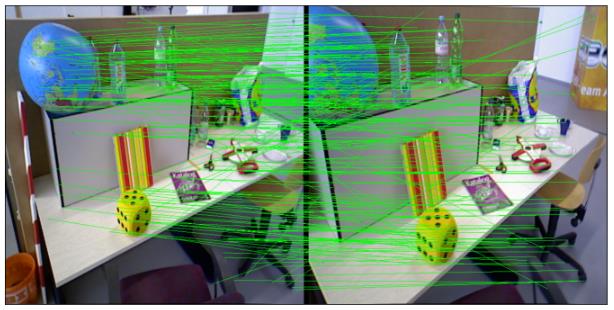
基于SuperPoint与SuperGlue实现图像配准
Posted 万里鹏程转瞬至
tags:
篇首语:本文由小常识网(cha138.com)小编为大家整理,主要介绍了基于SuperPoint与SuperGlue实现图像配准相关的知识,希望对你有一定的参考价值。
基于SuperPoint与SuperGlue实现图像配准,项目地址https://github.com/magicleap/SuperGluePretrainedNetwork,使用到了特殊算子grid_sample,在转onnx时要求opset_version为16及以上(即pytorch版本为1.9以上)。SuperPoint模型用于提取图像的特征点和特征点描述符(在进行图像配准时需要运行两个,实现对两个图片特征点的提取),SuperGlue模型用于对SuperPoint模型所提取的特征点和特征描述符进行匹配。
使用SuperPoint与SuperGlue训练自己的数据库,可以查看该文库资料https://download.csdn.net/download/a486259/87471980,该文档详细记录了使用pytorch-superpoint与pytorch-superglue项目实现训练自己的数据集的过程。
1、前置操作
为实现模型可以onnx部署,对项目中部分代码进行修改。主要是删除代码中对dict对象的使用,因为onnx不支持。
1.1 superpoint修改
代码在models/superpoint.py中,主要修改 SuperPoint模型的forward函数(代码在145行开始),不使用字典对象做参数(输入值和输出值),避免在onnx算子中不支持。同时对keypoints的实现函数进行多种尝试。其中,SuperPoint模型在训练时是只输出坐标点置信度(scores1)和坐标点的描述符(descriptors1),这里的坐标其实就是指特征点。但是,坐标信息仅体现在网格数据中且在进行点匹配时需要xy格式的坐标,为此将scores中置信度值大于阈值的点的坐标进行提取,故此得到了keypoints1(坐标点)。
    def forward(self, data):
        """ Compute keypoints, scores, descriptors for image """
        # Shared Encoder
        x = self.relu(self.conv1a(data))
        x = self.relu(self.conv1b(x))
        x = self.pool(x)
        x = self.relu(self.conv2a(x))
        x = self.relu(self.conv2b(x))
        x = self.pool(x)
        x = self.relu(self.conv3a(x))
        x = self.relu(self.conv3b(x))
        x = self.pool(x)
        x = self.relu(self.conv4a(x))
        x = self.relu(self.conv4b(x))

        # Compute the dense keypoint scores
        cPa = self.relu(self.convPa(x))
        scores = self.convPb(cPa)
        scores = torch.nn.functional.softmax(scores, 1)[:, :-1]
        b, _, h, w = scores.shape
        scores = scores.permute(0, 2, 3, 1).reshape(b, h, w, 8, 8)
        scores = scores.permute(0, 1, 3, 2, 4).reshape(b, h*8, w*8)
        scores = simple_nms(scores, self.config['nms_radius'])

        # Extract keypoints
        #keypoints = [ torch.nonzero(s > self.config['keypoint_threshold']) for s in scores]## nonzero->tensorRT not support
        #keypoints = [torch.vstack(torch.where(s > self.config['keypoint_threshold'])).T for s in scores]## vstack->onnx not support
        #keypoints = [torch.cat(torch.where(s > self.config['keypoint_threshold']),0).reshape(len(s.shape),-1).T for s in scores]# tensor.T->onnx not support
        #keypoints = [none_zero_index(s,self.config['keypoint_threshold']) for s in scores]# where->nonzero ->tensorRT not support
        keypoints = [torch.transpose(torch.cat(torch.where(s>self.config['keypoint_threshold']),0).reshape(len(s.shape),-1),1,0) for s in scores]# transpose->tensorRT not support
        scores = [s[tuple(k.t())] for s, k in zip(scores, keypoints)]

        # Discard keypoints near the image borders
        keypoints, scores = list(zip(*[
            remove_borders(k, s, self.config['remove_borders'], h*8, w*8)
            for k, s in zip(keypoints, scores)]))

        # Keep the k keypoints with highest score
        if self.config['max_keypoints'] >= 0:
            keypoints, scores = list(zip(*[
                top_k_keypoints(k, s, self.config['max_keypoints'])
                for k, s in zip(keypoints, scores)]))

        # Convert (h, w) to (x, y)
        keypoints = [torch.flip(k, [1]).float() for k in keypoints]

        # Compute the dense descriptors
        cDa = self.relu(self.convDa(x))
        descriptors = self.convDb(cDa)
        descriptors = torch.nn.functional.normalize(descriptors, p=2, dim=1)

        # Extract descriptors
        descriptors = [sample_descriptors(k[None], d[None], 8)[0]
                       for k, d in zip(keypoints, descriptors)]

        # return
        #     'keypoints': keypoints,
        #     'scores': scores,
        #     'descriptors': descriptors,
        #
        return  keypoints[0].unsqueeze(0),scores[0].unsqueeze(0),descriptors[0].unsqueeze(0)
1.2 SuperGlue修改
代码中models/superglue.py中,主要修正由于字典对象在superpoint中被删除后的的影像。
1.2.1 normalize_keypoints函数调整
将原函数的参数image_shape替换为height和width
def normalize_keypoints(kpts,  height, width):
    """ Normalize keypoints locations based on image image_shape"""
    one = kpts.new_tensor(1)
    size = torch.stack([one*width, one*height])[None]
    center = size / 2
    scaling = size.max(1, keepdim=True).values * 0.7
    return (kpts - center[:, None, :]) / scaling[:, None, :]
1.2.2 forword函数修改
将代码中SuperGlue的forward函数使用以下代码替换。主要是修改了传入参数,将先前的字典进行了解包,让一个参数变成了6个;并对函数的返回值进行了修改,同时固定死了图像的size为640*640。
SuperGlue模型是根据输入的两组keypoints、scores、descriptors数据,输出两组match_indices, match_mscores信息。第一组用于描述A->B的对应关系,第二组用于描述B->A的对应关系。
    def forward(self, data_descriptors0, data_descriptors1, data_keypoints0, data_keypoints1, data_scores0, data_scores1):
        """Run SuperGlue on a pair of keypoints and descriptors"""
        #, height:int, width:int
        height, width=640,640
        desc0, desc1 = data_descriptors0, data_descriptors1
        kpts0, kpts1 = data_keypoints0, data_keypoints1

        if kpts0.shape[1] == 0 or kpts1.shape[1] == 0:  # no keypoints
            shape0, shape1 = kpts0.shape[:-1], kpts1.shape[:-1]
            return kpts0.new_full(shape0, -1, dtype=torch.int),kpts1.new_full(shape1, -1, dtype=torch.int),kpts0.new_zeros(shape0),kpts1.new_zeros(shape1)

        # Keypoint normalization.
        kpts0 = normalize_keypoints(kpts0, height, width)
        kpts1 = normalize_keypoints(kpts1, height, width)

        # Keypoint MLP encoder.
        desc0 = desc0 + self.kenc(kpts0, data_scores0)
        desc1 = desc1 + self.kenc(kpts1, data_scores1)

        # Multi-layer Transformer network.
        desc0, desc1 = self.gnn(desc0, desc1)

        # Final MLP projection.
        mdesc0, mdesc1 = self.final_proj(desc0), self.final_proj(desc1)

        # Compute matching descriptor distance.
        scores = torch.einsum('bdn,bdm->bnm', mdesc0, mdesc1)
        scores = scores / self.config['descriptor_dim']**.5

        # Run the optimal transport.
        scores = log_optimal_transport(
            scores, self.bin_score,
            iters=self.config['sinkhorn_iterations'])

        # Get the matches with score above "match_threshold".
        max0, max1 = scores[:, :-1, :-1].max(2), scores[:, :-1, :-1].max(1)
        indices0, indices1 = max0.indices, max1.indices
        mutual0 = arange_like(indices0, 1)[None] == indices1.gather(1, indices0)
        mutual1 = arange_like(indices1, 1)[None] == indices0.gather(1, indices1)
        zero = scores.new_tensor(0)
        mscores0 = torch.where(mutual0, max0.values.exp(), zero)
        mscores1 = torch.where(mutual1, mscores0.gather(1, indices1), zero)
        valid0 = mutual0 & (mscores0 > self.config['match_threshold'])
        valid1 = mutual1 & valid0.gather(1, indices1)
        indices0 = torch.where(valid0, indices0, indices0.new_tensor(-1))
        indices1 = torch.where(valid1, indices1, indices1.new_tensor(-1))
        # return
        #     'matches0': indices0, # use -1 for invalid match
        #     'matches1': indices1, # use -1 for invalid match
        #     'matching_scores0': mscores0,
        #     'matching_scores1': mscores1,
        #
        return indices0,  indices1,  mscores0,  mscores1
1.3 集成调用
在进行图像配准时,使用superpoint模型和superglue模型的数据处理流程都是固定,为简化代码,故此将其封装为一个模型,代码保存为SPSP.py。
import torch
from superglue import SuperGlue
from superpoint import SuperPoint
import torch
import torch.nn as nn
import torch.nn.functional as F
class SPSG(nn.Module):#
    def __init__(self):
        super(SPSG, self).__init__()
        self.sp_model = SuperPoint('max_keypoints':700)
        self.sg_model = SuperGlue('weights': 'outdoor')
    def forward(self,x1,x2):
        keypoints1,scores1,descriptors1=self.sp_model(x1)
        keypoints2,scores2,descriptors2=self.sp_model(x2)
        #print(scores1.shape,keypoints1.shape,descriptors1.shape)
        #example=(descriptors1.unsqueeze(0),descriptors2.unsqueeze(0),keypoints1.unsqueeze(0),keypoints2.unsqueeze(0),scores1.unsqueeze(0),scores2.unsqueeze(0))
        example=(descriptors1,descriptors2,keypoints1,keypoints2,scores1,scores2)
        indices0,  indices1,  mscores0,  mscores1=self.sg_model(*example)
        #return indices0,  indices1,  mscores0,  mscores1
        matches = indices0[0]

        valid = torch.nonzero(matches > -1).squeeze().detach()
        mkpts0 = keypoints1[0].index_select(0, valid);
        mkpts1 = keypoints2[0].index_select(0, matches.index_select(0, valid));
        confidence = mscores0[0].index_select(0, valid);
        return mkpts0, mkpts1, confidence
1.4 图像处理库
进行图像读取、图像显示操作的代码被封装为imgutils库,具体可以查阅https://hpg123.blog.csdn.net/article/details/124824892
2、实现图像配准
2.1 获取匹配点
通过以下步骤,即可获取两个图像的特征点,及特征点匹配度
from imgutils import *
import torch
from SPSG import SPSG
model=SPSG()#.to('cuda')
tensor2a,img2a=read_img_as_tensor("b1.jpg",(640,640),device='cpu')
tensor2b,img2b=read_img_as_tensor("b4.jpg",(640,640),device='cpu')
mkpts0, mkpts1, confidence=model(tensor2a,tensor2b)
myimshows( [img2a,img2b],size=12)
代码执行输出如下所示:

2.2 匹配点绘图
以下代码可以将两个图像中匹配度高于阈值的点进行绘制连接
import cv2 as cv
pt_num = mkpts0.shape[0]
im_dst,im_res=img2a,img2b
img = np.zeros((max(im_dst.shape[0], im_res.shape[0]), im_dst.shape[1]+im_res.shape[1]+10,3))
img[:,:im_res.shape[0],]=im_dst
img[:,-im_res.shape[0]:]=im_res
img=img.astype(np.uint8)
match_threshold=0.6
for i in range(0, pt_num):
    if (confidence[i] > match_threshold):
        pt0 = mkpts0[i].to('cpu').numpy().astype(np.int)
        pt1 = mkpts1[i].to('cpu').numpy().astype(np.int)
        #cv.circle(img, (pt0[0], pt0[1]), 1, (0, 0, 255), 2)
        #cv.circle(img, (pt1[0], pt1[1]+650), (0, 0, 255), 2)
        cv.line(img, pt0, (pt1[0]+im_res.shape[0], pt1[1]), (0, 255, 0), 1)
myimshow( img,size=12)

2.3 截取重叠区
先调用getGoodMatchPoint函数根据阈值筛选匹配度高的特征点,然后计算和透视变化矩阵H,最后提取重叠区域
import cv2
def getGoodMatchPoint(mkpts0, mkpts1, confidence,  match_threshold:float=0.5):
    n = min(mkpts0.size(0), mkpts1.size(0))
    srcImage1_matchedKPs, srcImage2_matchedKPs=[],[]

    if (match_threshold > 1 or match_threshold < 0):
        print("match_threshold error!")

    for i in range(n):
        kp0 = mkpts0[i]
        kp1 = mkpts1[i]

        pt0=(kp0[0].item(),kp0[1].item());
        pt1=(kp1[0].item(),kp1[1].item());
        c = confidence[i].item();
        if (c > match_threshold):
            srcImage1_matchedKPs.append(pt0);
            srcImage2_matchedKPs.append(pt1);

    return np.array(srcImage1_matchedKPs),np.array(srcImage2_matchedKPs)
pts_src, pts_dst=getGoodMatchPoint(mkpts0, mkpts1, confidence)

h1, status = cv2.findHomography(pts_src, pts_dst, cv.RANSAC, 8)
im_out1 = cv2.warpPerspective(im_dst, h1, (im_dst.shape[1],im_dst.shape[0]))
im_out2 = cv2.warpPerspective(im_res, h1, (im_dst.shape[1],im_dst.shape[0]),16)
#这里 im_dst和im_out1是严格配准的状态
myimshowsCL([im_dst,im_out1,im_res,im_out2],rows=2,cols=2, size=6)

2.4 模型导出
使用以下代码即可实现模型导出
input_names = ["input1","input2"]
output_names = ['mkpts0', 'mkpts1', 'confidence']
dummy_input=(tensor2a,tensor2b)
example_outputs=model(tensor2a,tensor2b)
ONNX_name="model.onnx"
torch.onnx.export(model.eval(), dummy_input, ONNX_name, verbose=True, input_names=input_names,opset_version=16,
dynamic_axes=
'confidence': 0: 'point_num',,
'mkpts0': 0: 图像匹配天花板:SuperPoint+SuperGlue复现
最近工作原因接触到图像匹配,经过调研发现SuperPoint+SuperGlue方法简直是图像匹配届的天花板,各种精度比较以及运行时间真令人惊讶,如下:


后来图像匹配(也可以做视频匹配,我这里做的是图像匹配)复现也特别简单,代码写得真好,环境配置好了也不怎么报错。下面直接来复现步骤,本人小白,如有不对,还请指出,互相交流,共同进步。
代码地址: https://github.com/magicleap/SuperGluePretrainedNetwork
- 下载以后解压,可以新建一个文件夹存储图像数据。

- 打开requirements文档查看并安装以下模块
方法一:
matplotlib>=3.1.3
torch>=1.1.0
opencv-python==4.1.2.30
numpy>=1.18.1
查看以后按需安装,适用于仅缺少个别的模块,或网速慢的情况下。
方法二:
cmd命令行,cd到该文件包路径下,激活要用的python虚拟环境,安装:
pip install -r requirements.txt
- 运行demo_superglue.py
有两种方式。
一是在cmd命令行输入:
python demo_superglue.py --input = D:\\SuperGlue\\data --output_dir = D:\\SuperGlue\\data\\result
–input是图像文件路径,必须输入,–output_dir是存储结果路径,如果不传入参数,则默认不进行保存。
其他还有很多参数,可以按需传入,打开demo_superglue.py可以查看。

第二种方式,我称之为野路子,适合我这种小白。
打开demo_superglue.py,直接改default值,

结束查看结果


以上是关于基于SuperPoint与SuperGlue实现图像配准的主要内容,如果未能解决你的问题,请参考以下文章