Android之AppWidgetProvider使用详解
Posted Jason_Lee155
tags:
篇首语:本文由小常识网(cha138.com)小编为大家整理,主要介绍了Android之AppWidgetProvider使用详解相关的知识,希望对你有一定的参考价值。

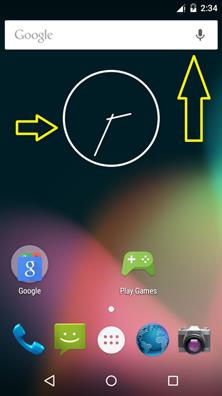
AppWidget 即桌面小部件,也叫桌面控件,就是能直接显示在android系统桌面上的小程序。图中用黄色箭头指示的即为AppWidget,一些用户使用比较频繁的程序,可以做成AppWidget,这样能方便地使用。典型的程序有时钟、天气、音乐播放器等。AppWidget 是Android 系统应用开发层面的一部分,有着特殊用途,使用得当的话,的确会为app 增色不少,它的工作原理是把一个进程的控件嵌入到别外一个进程的窗口里。需要说明的是,AppWidgetProvider本质是一个广播,即BroadcastReceiver,在实际的使用中,把AppWidgetProvider当成一个BroadcastReceiver即可。这里就简单的介绍一下开发一个AppWidget的流程吧。
想要在应用中创建一个AppWidget,至少需要以下几样东西:
- 需要创建一个AppWidgetProviderInfo,来描述AppWidget的元数据。
- 需要实现一个自己的AppWidgetProvider对AppWidget进行更新等操作。
- 需要布局文件来描述AppWidget的布局。
1. 为AppWidget提供一个文件,定义小控件的基本配置信息
在资源文件夹res目录下新建xml文件夹,假设名字为flash_light_widget_info.xml,文件内容为:
<?xml version="1.0" encoding="utf-8"?
  <!--小控件宽高--
  <!--android:minWidth="40dp"--
  <!--android:minHeight="40dp"--
  <!--更新时间--
  <!--android:updatePeriodMillis="86400000"--
  <!--用于指定预览图片。即搜索到widget时,查看到的图片。若没有设置的话,系统为指定一张默认图片。--
  <!--android:previewImage="@drawable/widget_flashlight"--
  <!--widget 添加到手机主屏幕中的layout--
  <!--android:initialLayout="@layout/flash_light_widget"--
  <!--android:resizeMode : widget可以被拉伸的方向。horizontal表示可以水平拉伸,vertical表示可以竖直拉伸--
  <!--android:resizeMode="horizontal|vertical"--

<appwidget-provider xmlns:android="http://schemas.android.com/apk/res/android"
  android:minWidth="40dp"
  android:minHeight="40dp"
  android:updatePeriodMillis="86400000"
  android:previewImage="@drawable/ic_launcher"
  android:initialLayout="@layout/widget_layout"
  android:resizeMode="horizontal|vertical"
</appwidget-provider
2. 创建一个WidgetProvider继承自AppWidgetProvider;
public class MyAppWidgetProvider extends AppWidgetProvider
  //没接收一次广播消息就调用一次,使用频繁
  public void onReceive(Context context, Intent intent)
    super.onReceive(context, intent);


  //每次更新都调用一次该方法,使用频繁
  public void onUpdate(Context context, AppWidgetManager appWidgetManager,
             int[] appWidgetIds)
    super.onUpdate(context, appWidgetManager, appWidgetIds);


  //没删除一个就调用一次
  public void onDeleted(Context context, int[] appWidgetIds)
    super.onDeleted(context, appWidgetIds);


  //当该Widget第一次添加到桌面是调用该方法,可添加多次但只第一次调用
  public void onEnabled(Context context)
    super.onEnabled(context);


  //当最后一个该Widget删除是调用该方法,注意是最后一个
  public void onDisabled(Context context)
    super.onDisabled(context);
3. 为 WidgetProvider创建一个布局文件
布局就是正常布局,假设名字为widget_layout.xml:
<RelativeLayout xmlns:android="http://schemas.android.com/apk/res/android"
  android:layout_width="64dp"
  android:layout_height="64dp"

  <ImageButton
    android:id="@+id/widget_led"
    android:layout_margin="2dp"
    android:background="@drawable/widget_led"
    android:src="@drawable/ic_launcher"
    android:scaleType="center"
    android:layout_width="64.0dip"
    android:layout_height="64.0dip" /

</RelativeLayout
4. 注册Manifest.xml
配置基本和广播一样,使用receiver 节点,meta-data 节点的name 为固定格式,resource为第一步定义的配置信息,intent-filter节点第三个action必须提供:
<receiver android:name=".jf.jfclean.widget.FlashLightWidget"
      <intent-filter
        <action android:name="action_led_on" /
        <action android:name="action_led_off" /
        <action android:name="android.appwidget.action.APPWIDGET_UPDATE" /
      </intent-filter

      <meta-data
        android:name="android.appwidget.provider"
        android:resource="@xml/flash_light_widget_info" /
    </receiver
5. 使用PendingIntent和RemoteViews对AppWidget进行更新
 static void updateAppWidget(Context context, AppWidgetManager appWidgetManager,
    int appWidgetId)

    CharSequence widgetText = context.getString(R.string.appwidget_text);
    // Construct the RemoteViews object
    RemoteViews views = new RemoteViews(context.getPackageName(),
        // 这个layout就是我们之前定义的initiallayout
        R.layout.my_app_widget_provider);
    // 更新里面某一个子view值
    views.setTextViewText(R.id.appwidget_text, widgetText);
    // Instruct the widget manager to update the widget
    appWidgetManager.updateAppWidget(appWidgetId, views);


 @Override
 public void onUpdate(Context context, AppWidgetManager appWidgetManager, int[] appWidgetIds)
    // There may be multiple widgets active, so update all of them
     for (int appWidgetId : appWidgetIds)
          updateAppWidget(context, appWidgetManager, appWidgetId);

 // 或者点击widget跳转逻辑
     mRemoteViews = new RemoteViews(context.getPackageName(), R.layout.mul_app_widget_provider);
     mRemoteViews.setImageViewResource(R.id.iv_test, R.mipmap.ic_launcher);
     mRemoteViews.setTextViewText(R.id.btn_test, "点击跳转到Activity");
     Intent skipIntent = new Intent(context, MainActivity.class);
     PendingIntent pi = PendingIntent.getActivity(context, 200, skipIntent, PendingIntent.FLAG_CANCEL_CURRENT);
     mRemoteViews.setOnClickPendingIntent(R.id.btn_test, pi);
这里,简单介绍下RemoteViews:
RemoteViews
RemoteViews,从字面意思理解为它是一个远程视图。是一种远程的 View,它在其它进程中显示,却可以在另一个进程中更新。RemoteViews 在Android中的使用场景主要有:自定义通知栏和桌面小部件。
在RemoteViews 的构造函数中,第二个参数接收一个 layout 文件来确定 RemoteViews 的视图;然后,我们调用RemoteViews 中的 set 方法对 layout 中的各个组件进行设置,例如,可以调用 setTextViewText() 来设置 TextView 组件的文本。
widget小部件布局文件可以添加的组件是有限制的,它可以支持的 View 类型包括四种布局:FrameLayout、LinearLayout、RelativeLayout、GridLayout 和 13 种View: AnalogClock、Button、Chronometer、ImageButton、ImageView、ProgressBar、TextView、ViewFlipper、ListView、GridView、StackView、AdapterViewFlipper、ViewSub。注意:RemoteViews 也并不支持上述 View 的子类。
RemoteViews 提供了一系列 setXXX() 方法来为小部件的子视图设置属性。具体可以参考 API 文档。
RemoteViewsService
RemoteViewsService,是管理RemoteViews的服务。一般,当AppWidget 中包含 GridView、ListView、StackView 等集合视图时,才需要使用RemoteViewsService来进行更新、管理。RemoteViewsService 更新集合视图的一般步骤是:
- 通过 setRemoteAdapter() 方法来设置 RemoteViews 对应 RemoteViewsService 。
- 之后在 RemoteViewsService 中,实现 RemoteViewsFactory 接口。然后,在 RemoteViewsFactory 接口中对集合视图的各个子项进行设置,例如 ListView 中的每一Item。
RemoteViewsFactory
通过RemoteViewsService中的介绍,我们知道RemoteViewsService是通过 RemoteViewsFactory来具体管理layout中集合视图的,RemoteViewsFactory是RemoteViewsService中的一个内部接口。RemoteViewsFactory提供了一系列的方法管理集合视图中的每一项。例如:
- RemoteViews getViewAt(int position)
通过getViewAt()来获取“集合视图”中的第position项的视图,视图是以RemoteViews的对象返回的。
- int getCount()
通过getCount()来获取“集合视图”中所有子项的总数。
简单回顾发现,AppWidget常见就是放在Launcher上的一块控件,实际上是有其他进程(比如音乐)提供数据的,xml定义的循环时间通过AppManager更新。点击widget点击事件也是在AppWidgetProvider里提供。
以上是关于Android之AppWidgetProvider使用详解的主要内容,如果未能解决你的问题,请参考以下文章