SSD训练数据集流程(学习记录)
Posted 道人兄
tags:
篇首语:本文由小常识网(cha138.com)小编为大家整理,主要介绍了SSD训练数据集流程(学习记录)相关的知识,希望对你有一定的参考价值。
关于理论部分我看的是b站“霹雳吧啦Wz”的SSD理论讲解,作为入门小白表示能听懂,需要的同学可以自行观看
目录
1.训练环境
我的环境是win11+anaconda+python3.6.13+pytorch1.10.2+cuda11.6
2.训练步骤
(1)下载SSD源码
可到github进行下载
GitHub - amdegroot/ssd.pytorch: A PyTorch Implementation of Single Shot MultiBox Detector
(2)下载模型文件
VGG16_reducedfc.pth预训练模型下载地址:https://s3.amazonaws.com/amdegroot-models/vgg16_reducedfc.pth
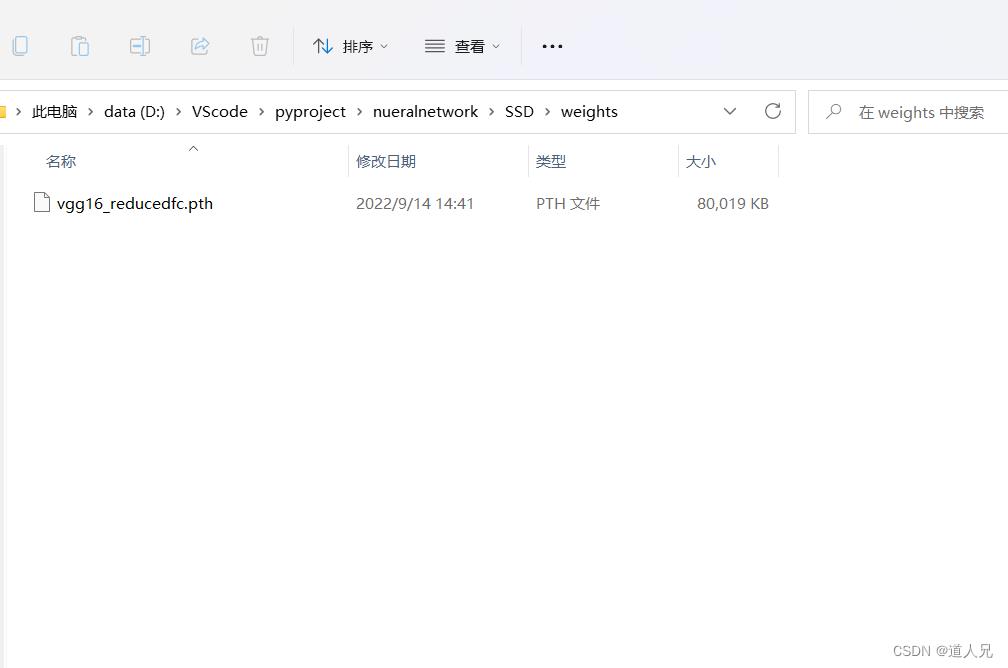
将下载的模型文件放置于ssd源码目录中 wights/vgg16_reducedfc.pth

(3)数据集准备
与大多数训练模型一样,ssd支持的训练格式为VOC和coco,这里采用voc2007作为演示,制作自己的数据集以及labimg的使用可自行观看yolo数据集标注软件安装+使用流程_道人兄的博客-CSDN博客_yolo数据集标注工具
voc2007的具体下载方式我也不多赘述,网络上百度也有,或者直接看我之前写的也有提到使用Faster—RCNN训练数据集流程(学习记录)_道人兄的博客-CSDN博客
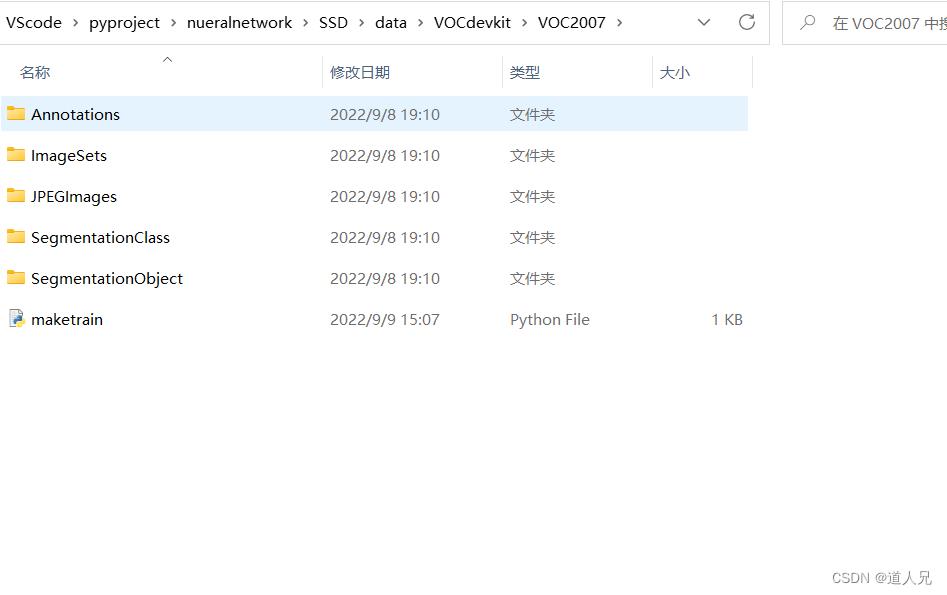
将下载后的voc2007数据集放置于./data/VOCdevkit/中

然后到ssd.pytorch-master/data/中的voc0712.py进行修改其中的VOC_ROOT = osp.join(HOME, "data/VOCdevkit/"),他这里的HOME老是读取我的C盘位置,所以一直报错,我直接把数据集的绝对路径写上去了就没报错

将 voc0712.py文件中VOCDetection类的__init__函数,将image_sets修改为[('2007', 'train'), ('2007', 'val'),('2007','test')],修改后的结果如下。
def __init__(self, root,
             image_sets=[('2007', 'train'), ('2007', 'val'),('2007','test')],
             transform=None, target_transform=VOCAnnotationTransform(),
dataset_name='VOC0712'):其中如果是训练自己的数据集,记得修改voc0712.py文件中的VOC_CLASSES 变量。例如,将VOC_CLASSES修改为person类,注意如果只有一类则需要加方括号,修改后的结果如下。
VOC_CLASSES = [('person')
如果训练自己的数据集,还需要修改config.py文件中的voc字典变量。将其中的num_classes修改为2(以person为例)(背景类+你训练集的种类个数),第一次调试时可以将max_iter调小至1000,修改后的结果如下。
voc =
    'num_classes': 2,
    'lr_steps': (80000, 100000, 120000),
    'max_iter': 1000,
    'feature_maps': [38, 19, 10, 5, 3, 1],
    'min_dim': 300,
    'steps': [8, 16, 32, 64, 100, 300],
    'min_sizes': [30, 60, 111, 162, 213, 264],
    'max_sizes': [60, 111, 162, 213, 264, 315],
    'aspect_ratios': [[2], [2, 3], [2, 3], [2, 3], [2], [2]],
    'variance': [0.1, 0.2],
    'clip': True,
    'name': 'VOC',
最后一步,把coco_labels.txt放在ssd.pytorch-master/data/coco/目录下,也可以通过修改coco.py文件中的COCO_ROOT = osp.join(HOME, 'data/coco/')来指定存放路径。
(4)修改源码
①修改ssd.py文件中SSD类的__init__函数和forward函数,修改后的结果如下。
if phase == 'test':
	self.softmax = nn.Softmax(dim=-1)
    self.detect = Detect(num_classes, 0, 200, 0.01, 0.45)
修改为:
if phase == 'test':
	self.softmax = nn.Softmax()
	self.detect = Detect()
if self.phase == "test":
	output = self.detect(
    	loc.view(loc.size(0), -1, 4),                   # loc preds
        self.softmax(conf.view(conf.size(0), -1,
        			 self.num_classes)),                # conf preds
        self.priors.type(type(x.data))                  # default boxes
    )
修改为:
if self.phase == "test":
	output = self.detect.apply(21, 0, 200, 0.01, 0.45,
   		loc.view(loc.size(0), -1, 4),                   # loc preds
        self.softmax(conf.view(-1,21)),                 # conf preds
		self.priors.type(type(x.data))                  # default boxes
	)
②修改train.py中187至189行代码,原因是.data[0]写法适用于低版本Pytorch,否则会出现IndexError:invalid index of a 0-dim tensor...错误,修改后的结果如下。
loc_loss += loss_l.item()
conf_loss += loss_c.item()

if iteration % 10 == 0:
    print('timer: %.4f sec.' % (t1 - t0))
	print('iter ' + repr(iteration) + ' || Loss: %.4f ||' % (loss.item()), end=' ')
③交换layers/modules/multibox_loss.py中97行和98代码位置,否则会出现IndexError: The shape of the mask [14, 8732] at index 0does...错误,修改后的结果如下。
loss_c = loss_c.view(num, -1)
loss_c[pos] = 0  # filter out pos boxes for now
④根据自己的需要对train.py中预训练模型、batch_size、学习率、模型名字和模型保存的次数等参数进行修改。建议学习率修改为1e-4(原因是原版使用1e-3可能会出现loss为nan情况),第一次调试时可以修改为每迭代100次保存,方便调试。
# 加载模型初始参数
parser = argparse.ArgumentParser(
    description='Single Shot MultiBox Detector Training With Pytorch')
train_set = parser.add_mutually_exclusive_group()
# 默认加载VOC数据集
parser.add_argument('--dataset', default='VOC', choices=['VOC', 'COCO'],
                    type=str, help='VOC or COCO')
# 设置VOC数据集根路径
parser.add_argument('--dataset_root', default=VOC_ROOT,
                    help='Dataset root directory path')
# 设置预训练模型vgg16_reducedfc.pth
parser.add_argument('--basenet', default='vgg16_reducedfc.pth',
                    help='Pretrained base model')
# 设置批大小,根据自己显卡能力设置,默认为32,此处我改为16
parser.add_argument('--batch_size', default=16, type=int,
                    help='Batch size for training')
# 是否恢复中断的训练,默认不恢复
parser.add_argument('--resume', default=None, type=str,
                    help='Checkpoint state_dict file to resume training from')
# 恢复训练iter数,默认从第0次迭代开始
parser.add_argument('--start_iter', default=0, type=int,
                    help='Resume training at this iter')
# 数据加载线程数,根据自己CPU个数设置,默认为4
parser.add_argument('--num_workers', default=4, type=int,
                    help='Number of workers used in dataloading')
# 是否使用CUDA加速训练,默认开启,如果没有GPU,可改成False直接用CPU训练
parser.add_argument('--cuda', default=True, type=str2bool,
                    help='Use CUDA to train model')
# 学习率,默认0.001
parser.add_argument('--lr', '--learning-rate', default=1e-3, type=float,
                    help='initial learning rate')
# 最佳动量值,默认0.9(动量是梯度下降法中一种常用的加速技术,用于加速梯度下降,减少收敛耗时)
parser.add_argument('--momentum', default=0.9, type=float,
                    help='Momentum value for optim')
# 权重衰减,即正则化项前面的系数,用于防止过拟合;SGD,即mini-batch梯度下降
parser.add_argument('--weight_decay', default=1e-4, type=float,
                    help='Weight decay for SGD')
# gamma更新,默认值0.1
parser.add_argument('--gamma', default=0.1, type=float,
                    help='Gamma update for SGD')
# 使用visdom将训练过程loss图像可视化
parser.add_argument('--visdom', default=False, type=str2bool,
                    help='Use visdom for loss visualization')
# 权重保存位置,默认存在weights/下
parser.add_argument('--save_folder', default='weights/',
                    help='Directory for saving checkpoint models')
args = parser.parse_args()
if iteration != 0 and iteration % 100 == 0:
	print('Saving state, iter:', iteration)
	torch.save(ssd_net.state_dict(), 'weights/ssd300_VOC_' + repr(iteration) + '.pth')
⑤因为pytorch1.9以上版本在这份源代码中并不适用,一旦运行cuda方面会报错如下:
RuntimeError: Expected a ‘cuda‘ device type for generator but found ‘cpu‘参考github上的解决方法,有两种方法可成功运行:
第一种是重装pytorch1.8版本,就可以正常运行,但我觉得太麻烦了
第二种是修改源码:
在位于 anaconda 或任何地方的文件“site-packages/torch/utils/data/sampler.py”中。
[修改第 116 行]:generator = torch.Generator()
改成generator = torch.Generator(device='cuda')
[修改第 126 行]:yield from torch.randperm(n, generator=generator).tolist()
改成yield from torch.randperm(n, generator=generator, device='cuda').tolist()
在train.py文件中,data.DataLoader处进行添加generator
data_loader = data.DataLoader(dataset, args.batch_size,
                                  num_workers=args.num_workers,
                                  shuffle=True, collate_fn=detection_collate,
                                  pin_memory=True, generator=torch.Generator(device='cuda'))
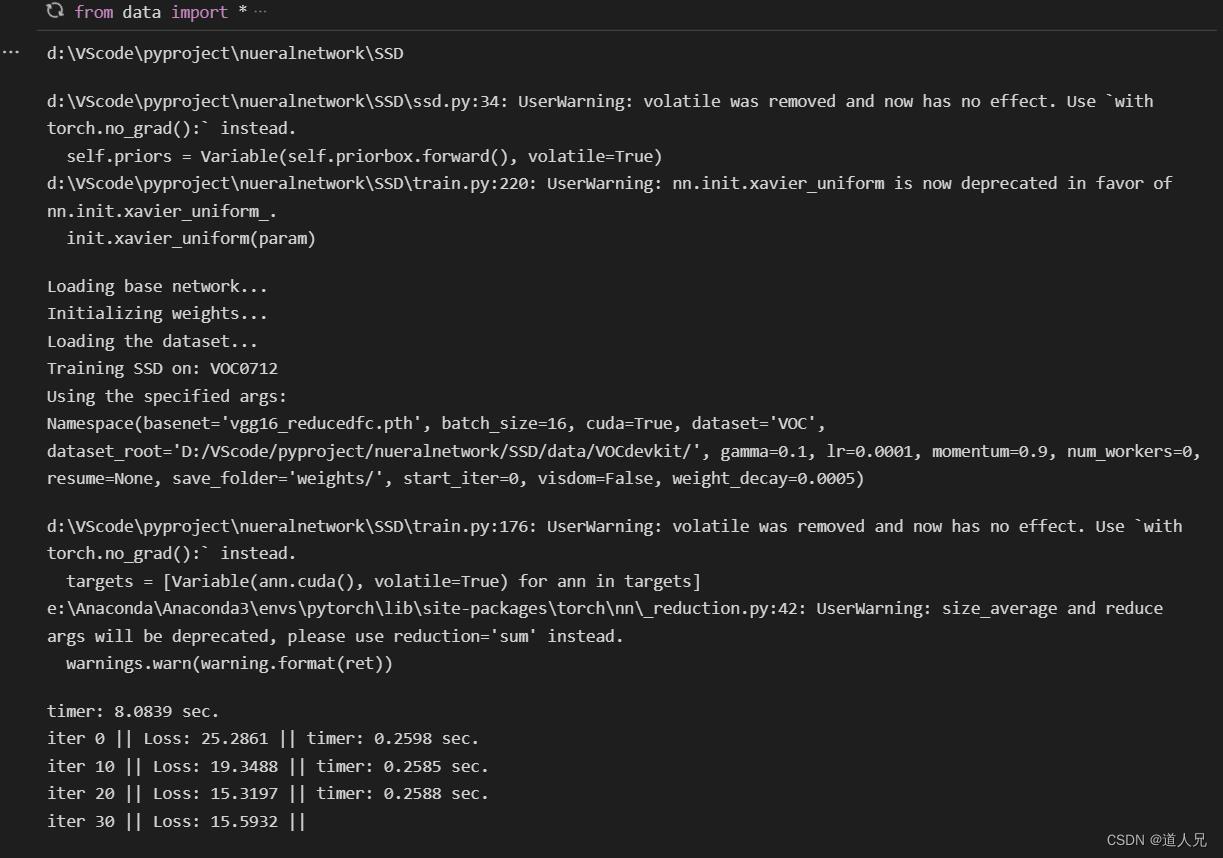
(5)运行train.py,如下图

参考资料:
SSD训练自己的数据集(pytorch版)_Kellenn的博客-CSDN博客_ssd训练自己的数据集pytorch
【目标检测实战】Pytorch—SSD模型训练(VOC数据集) - 知乎 (zhihu.com)
训练 SSD-Tensorflow 遇到的若干问题
根据开源代码SSD-Tensorflow,训练数据的时候遇到若干问题,记录如下。
遇到的第一个问题
这个bug 无关SSD-Tensorflow本身。
首先制作tfrecords格式的数据,使用教程上指令:
DATASET_DIR=./VOC2007/test/
OUTPUT_DIR=./tfrecords
python tf_convert_data.py     --dataset_name=pascalvoc     --dataset_dir=${DATASET_DIR}     --output_name=voc_2007_train     --output_dir=${OUTPUT_DIR}
按照教程上的,写了一个change.sh脚本文件,然后运行sh change.sh。报错如下:
[email protected]:~/SSD-Tensorflow$ sh change.sh
Traceback (most recent call last):
  File "tf_convert_data.py", line 59, in <module>
    tf.app.run()
  File "/home/matthew/tensorflow_5/lib/python3.5/site-packages/tensorflow/python/platform/app.py", line 48, in run
    _sys.exit(main(_sys.argv[:1] + flags_passthrough))
  File "tf_convert_data.py", line 49, in main
    raise ValueError('You must supply the dataset directory with --dataset_dir')
ValueError: You must supply the dataset directory with --dataset_dir
change.sh: 4: change.sh: --dataset_name=pascalvoc: not found
: not found5: change.sh: --dataset_dir=./VOC2007/test/
change.sh: 6: change.sh: --output_name=voc_2007_train: not found
: not found7: change.sh: --output_dir=./tfrecords
这个不是脚本代码本身的错误,而是因为操作系统缘故。我本地电脑的无GPU (穷啊唉~),用的是windows系统,然后将代码上传到服务器的ubuntu系统上执行。
windows的默认换行是
,而linux的换行是
。linux命令的续行符号后面是不允许添加除换行以外符号的,空格都不允许。
所以上面的报错主要原因是换行符号。解决方法如下:
sed -i 's/
$//g' change.sh使用sed流编辑命令,将change.sh每个行末的
替换成为空。
遇到的第二个问题
在完成数据文件tfrecords制作之后,按照指令运行train_ssd_network.py。成功运行代码几秒后,报错如下:
INFO:tensorflow:Error reported to Coordinator: <class 'tensorflow.python.framework.errors_impl.InvalidArgumentError'>, All bounding box coordinates must be in [0.0, 1.0]: 1.002
     [[Node: ssd_preprocessing_train/distorted_bounding_box_crop/sample_distorted_bounding_box/SampleDistortedBoundingBoxV2 = SampleDistortedBoundingBoxV2[T=DT_INT32, area_range=[0.1, 1], aspect_ratio_range=[0.6, 1.67], max_attempts=200, seed=0, seed2=0, use_image_if_no_bounding_boxes=true, _device="/job:localhost/replica:0/task:0/device:CPU:0"](ssd_preprocessing_train/distorted_bounding_box_crop/Shape, ssd_preprocessing_train/distorted_bounding_box_crop/ExpandDims, ssd_preprocessing_train/distorted_bounding_box_crop/sample_distorted_bounding_box/SampleDistortedBoundingBoxV2/min_object_covered)]]
INFO:tensorflow:Finished training! Saving model to disk.
Traceback (most recent call last):
  File "train_ssd_network.py", line 390, in <module>
    tf.app.run()
  File "/home/matthew/tensorflow_5/lib/python3.5/site-packages/tensorflow/python/platform/app.py", line 48, in run
    _sys.exit(main(_sys.argv[:1] + flags_passthrough))
  File "train_ssd_network.py", line 386, in main
    sync_optimizer=None)
  File "/home/matthew/tensorflow_5/lib/python3.5/site-packages/tensorflow/contrib/slim/python/slim/learning.py", line 775, in train
    sv.stop(threads, close_summary_writer=True)
  File "/home/matthew/tensorflow_5/lib/python3.5/site-packages/tensorflow/python/training/supervisor.py", line 792, in stop
    stop_grace_period_secs=self._stop_grace_secs)
  File "/home/matthew/tensorflow_5/lib/python3.5/site-packages/tensorflow/python/training/coordinator.py", line 389, in join
    six.reraise(*self._exc_info_to_raise)
  File "/usr/lib/python3/dist-packages/six.py", line 686, in reraise
    raise value
  File "/home/matthew/tensorflow_5/lib/python3.5/site-packages/tensorflow/python/training/queue_runner_impl.py", line 238, in _run
    enqueue_callable()
  File "/home/matthew/tensorflow_5/lib/python3.5/site-packages/tensorflow/python/client/session.py", line 1231, in _single_operation_run
    target_list_as_strings, status, None)
  File "/home/matthew/tensorflow_5/lib/python3.5/site-packages/tensorflow/python/framework/errors_impl.py", line 473, in __exit__
    c_api.TF_GetCode(self.status.status))
tensorflow.python.framework.errors_impl.InvalidArgumentError: All bounding box coordinates must be in [0.0, 1.0]: 1.002
     [[Node: ssd_preprocessing_train/distorted_bounding_box_crop/sample_distorted_bounding_box/SampleDistortedBoundingBoxV2 = SampleDistortedBoundingBoxV2[T=DT_INT32, area_range=[0.1, 1], aspect_ratio_range=[0.6, 1.67], max_attempts=200, seed=0, seed2=0, use_image_if_no_bounding_boxes=true, _device="/job:localhost/replica:0/task:0/device:CPU:0"](ssd_preprocessing_train/distorted_bounding_box_crop/Shape, ssd_preprocessing_train/distorted_bounding_box_crop/ExpandDims, ssd_preprocessing_train/distorted_bounding_box_crop/sample_distorted_bounding_box/SampleDistortedBoundingBoxV2/min_object_covered)]]
问题的主要原因是:
数据集中的数据标记不规范,出现了bbox四个坐标值落到到图像外的情况。
提供两条解决思路:
- 写脚本,判断出有哪些图片标记出错了。然后,删除这些标记不规范的图片,重新制作数据集。
- 修改
tfrecords制作过程。
首先,第一个方法是可行的,就是比较麻烦,要找到原来的图片,删除,重新制作成tfrecord格式。我写了一个简单的脚本,检查之后发现,我使用的数据集(1W张图片)中有200+图片标记有问题,都是xmax或ymax超出了边界几个像素。
一些原因(嗯嗯嗯,主要是懒,2333),我不想再制作一遍数据集。决定找个相对优雅的方法解决这个问题。于是就有了第二个方案:
追踪tf_convert_data.py,发现主要使用datasets/pascalvoc_to_tfrecords.py执行数据格式转化工作。找到114-119行:
bboxes.append((float(bbox.find('ymin').text) / shape[0],
                       float(bbox.find('xmin').text) / shape[1],
                       float(bbox.find('ymax').text) / shape[0],
                       float(bbox.find('xmax').text) / shape[1]
                       ))
修改为:
bboxes.append((max(float(bbox.find('ymin').text) / shape[0], 0.0),
                       max(float(bbox.find('xmin').text) / shape[1], 0.0),
                       min(float(bbox.find('ymax').text) / shape[0], 1.0),
                       min(float(bbox.find('xmax').text) / shape[1], 1.0)
))然后使用命令,重新将数据集制作成tfrecords格式,问题便解决了。
这样做是合理的,理由如下:
标记员将坐标标记错误,跳出了图像范围,这时候识别目标应该就在图像边缘,所以选取图像边界作为目标的边界是合理的。
主要参考链接
https://github.com/balancap/SSD-Tensorflow/issues/37
https://blog.csdn.net/lin_bingfeng/article/details/53750516
写作不易,尊重原创,喜欢请点赞,评论,打赏~
以上是关于SSD训练数据集流程(学习记录)的主要内容,如果未能解决你的问题,请参考以下文章