数据治理(十四):Ranger同步Linux用户
Posted Lansonli
tags:
篇首语:本文由小常识网(cha138.com)小编为大家整理,主要介绍了数据治理(十四):Ranger同步Linux用户相关的知识,希望对你有一定的参考价值。

目录
1)发送Ranger编译好的“RangerUsersync”安装包到node1节点,并解压
3)执行“setup.sh”脚本进行安装 usersync 模块
Ranger同步Linux用户
同步Linux中的用户需要用到RangerUsersync模块,这个模块需要单独安装,主要可以将Linux机器上的用户和组信息同步到Ranger中管理。
一、安装RangerUsersync模块
RangerUsersync安装步骤如下:
1)发送Ranger编译好的“RangerUsersync”安装包到node1节点,并解压
#远程发送“ranger-2.1.0-usersync.tar.gz”安装包到“/software”下
[root@node3 ~]# scp /software/apache-ranger-2.1.0/target/ranger-2.1.0-usersync.tar.gz node1:/software/

#进入node1节点操作1
[root@node1 ~]# cd /software/
[root@node1 software]# tar -zxvf ./ranger-2.1.0-usersync.tar.gz
2)配置“install.properties”
进入到解压好的目录“ranger-2.1.0-usersync”下,配置“install.properties”文件:
[root@node1 ranger-2.1.0-usersync]# vim install.properties
#配置 Ranger-Admin的访问地址
POLICY_MGR_URL = http://node1:6080

#配置同步用户的周期(分钟)
SYNC_INTERVAL = 1

#配置usersync进程的操作用户及组
unix_user=root
unix_group=root

#设置Usersync用户的密码,之前安装Ranager-Admin配置过
rangerUsersync_password=ranger123456

#配置Hadoop路径
hadoop_conf=/software/hadoop-3.1.4/etc/hadoop/
3)执行“setup.sh”脚本进行安装 usersync 模块
进入到解压好的目录“ranger-2.1.0-usersync”下,执行脚本“setup.sh”
[root@node1 ~]# cd /software/ranger-2.1.0-usersync
[root@node1 ranger-2.1.0-usersync]# ./setup.sh
... ...
Provider jceks://file/etc/ranger/usersync/conf/rangerusersync.jceks was updated.
[I] Successfully updated password of rangerusersync user
4)配置“ranger-ugsync-site.xml”
进入到目录“/software/ranger-2.1.0-usersync/conf”下配置“ranger-ugsync-site.xml”设置开启自动同步用户
<property>
      <name>ranger.usersync.enabled</name>
      <value>true</value>
</property>
5)启动usersync 模块
#任意目录下执行以下命令,启动usersync模块
[root@node1 software]# ranger-usersync start
注意:如果启动过程中有错误,可以在“/software/ranger-2.1.0-usersync/logs”目录下查看日志。
6)停止usersync模块
[root@node1 software]# ranger-usersync stop二、同步用户查看
1)登录Ranger查看同步用户
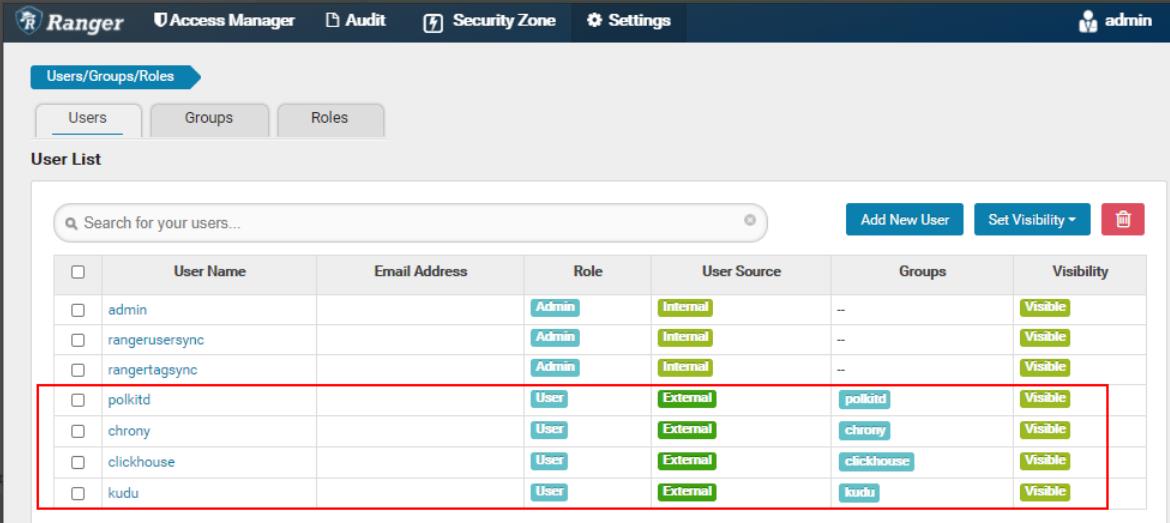
当启动usersync模块之后,会自动同步当前Linux系统中的用户,注意:这里只会同步除了root和虚拟用户外的用户(UID和GID号小的不同步):

2)同步用户
执行如下命令,在linux中添加新的用户:
[root@node1 ~]# useradd zhangsan
[root@node1 ~]# passwd zhangsan
输入密码:zhangsan
等待1分钟,查看Ranger中同步的用户如下:

- 📢博客主页:https://lansonli.blog.csdn.net
- 📢欢迎点赞 👍 收藏 ⭐留言 📝 如有错误敬请指正!
- 📢本文由 Lansonli 原创,首发于 CSDN博客🙉
- 📢大数据系列文章会每天更新,停下休息的时候不要忘了别人还在奔跑,希望大家抓紧时间学习,全力奔赴更美好的生活✨
以上是关于数据治理(十四):Ranger同步Linux用户的主要内容,如果未能解决你的问题,请参考以下文章