通过自定义View了解MeasureSpecMode
Posted hymKing
tags:
篇首语:本文由小常识网(cha138.com)小编为大家整理,主要介绍了通过自定义View了解MeasureSpecMode相关的知识,希望对你有一定的参考价值。
一、自定义View的基本步骤
本篇文章的核心知识点,并不是自定义View的全部讲解,主要是通过一个简单的demo了解自定义View的MeasureSpecMode模式。
自定义View基本分为自定义View和自定义ViewGroup。
自定义View的步骤:
- 继承View重写构造方法(有四个构造方法,不同的使用场景可以了解下)
- 自定义属性,在构造方法中初始化属性
- 重写onMeasure方法测量宽高
- 重写onDraw方法绘制控件
关于View的绘制流程中,三个核心的回调方法onMeasure、onLayout、onDraw,在自定义View的时候,onLayout方法基本不用,onLayout方法是在ViewGroup自定的时候需要重写的方法,这个也比较好解释,就不多做介绍。
下面看一个简单的自定义TextView的代码编写:
CTextView1.java
public class CTextView1 extends View

    private  Paint mPaint;
    //计算字体所需要的范围
    private  Rect mTextBounds;
    private int color;
    private String text;

    //一般纯代码创建View的时候,可以使用这个构造函数
    public CTextView1(Context context)
        this(context,null);


    //加载布局文件的时候会调用
    public CTextView1(Context context, @Nullable AttributeSet attrs)
        this(context, attrs,0);


    public CTextView1(Context context, @Nullable AttributeSet attrs, int defStyleAttr)
        super(context, attrs, 0);
        //自定义属性
        TypedArray typedArray = context.obtainStyledAttributes(attrs,R.styleable.MNView);
        color = typedArray.getInteger(R.styleable.MNView_mn_color,R.color.colorAccent);
        text = typedArray.getString(R.styleable.MNView_mn_text);
        typedArray.recycle();
        //初始化画笔
        mPaint= new Paint();
        mTextBounds = new Rect();
        mPaint.setColor(color);
        mPaint.setTextSize(50);
        //确定paint的绘制范围
        mPaint.getTextBounds(text,0,text.length(),mTextBounds);


    @Override
    protected void onMeasure(int widthMeasureSpec, int heightMeasureSpec)
        super.onMeasure(widthMeasureSpec, heightMeasureSpec);


    @Override
    protected void onDraw(Canvas canvas)
        super.onDraw(canvas);
        //这个函数简单理解下:文字实际内容的绘制源点;
        //text:文本内容,x、y是源点坐标,x:绘制文本的起始x坐标;y:实际上是展示文本的基线上起点的y坐标
        canvas.drawText(text,0,getPaddingTop()+mTextBounds.height(),mPaint);
布局文件:
<?xml version="1.0" encoding="utf-8"?>
<LinearLayout xmlns:android="http://schemas.android.com/apk/res/android"
    xmlns:app="http://schemas.android.com/apk/res-auto"
    xmlns:tools="http://schemas.android.com/tools"
    android:layout_width="match_parent"
    android:layout_height="match_parent"
    android:background="#AB7CEF"
    tools:context=".MainActivity">

        <com.hym.view.CTextView1
            android:layout_width="wrap_content"
            android:layout_height="wrap_content"
            app:mn_text="自定义View"
            android:padding="10dp"
            android:background="@color/colorAccent"/>

</LinearLayout>
运行看一下效果:
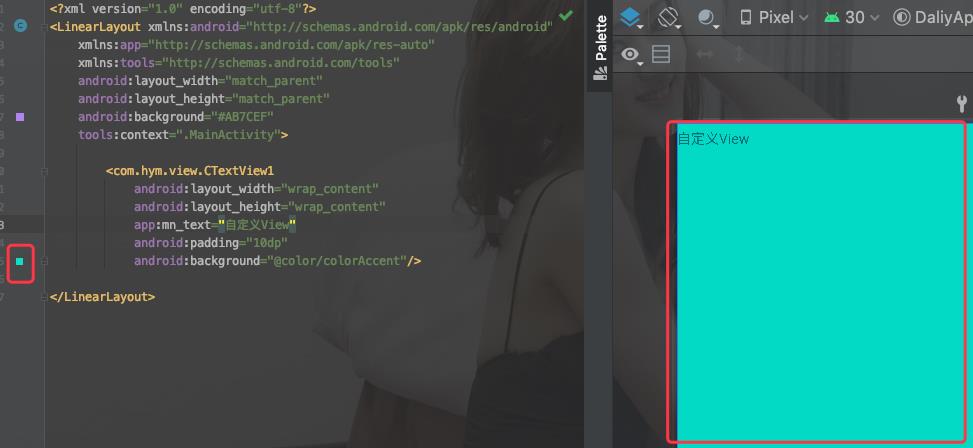
这里是截图,运行出来的效果也是一致的。这里面很显然wrap_content是失效的。那么这里面为什么wrap_content会失效呢,就是接下来我们今天核心要回顾和学习的知识点。
二、View的MeasureSpec模式
View的MeasureSpec是由父容器的MeasureSpec以及自身的layoutParams决定的。
| parentSpecMode\\childLayoutParams | Exactly | AT_MOST | UNSPECIFIED |
|---|---|---|---|
| 固定值:dp/px | Exactly:固定大小,即子View实际定义大小 | Exactly:固定大小,即子View实际定义大小 | Exactly:固定大小,即子View实际定义大小 |
| match_parent | Exactly:父View的大小 | AT_MOST:父View的大小 | UNSPECIFIED:0 |
| wrap_content | AT_MOST:父View的大小 | AT_MOST:父View的大小 | UNSPECIFIED:0 |
1:父容器为Exactly模式:(设定了具体数值宽高)
如果子View是Exactly模式(当用户指定了具体的数值(宽/高)),那么这个子View的resultSize就是你赋值的具体值。
如果子View指定的是match_parent,那么子View的resultSize依然是父容器给予的最大值,模式还是Exactly。
如果子View指定的是wrap_content,那么子View的resultSize也是父容器给予的最大值,但是模式变成了At_most。(这也是经常被提问到在自定义View的过程中,wrap_content失效的问题)
2:父容器为At_most模式:(对应父容器设置了wrap_content)
如果子View是Exactly模式(当用户指定了具体的数值(宽/高)),那么子View的resultSize就是具体制定的大小。
如果子View指定的是match_parent,那么子View的resultSize是父容器给予的最大值,模式还是At_most。
如果子View指定的wrap_content,子view的resultSize就是父控件的size,模式是at_most。
3:父容器为Unspecified模式:(这个模式基本用不到,大部分都是在系统内部使用)
如果子View是Exactly模式(当用户指定了具体的数值(宽/高)),那么子View的resultSize就是赋值的具体的值。
如果子View指定的match_parent,子View的大小为0,模式也为Unspecified。
如果子View指定的wrap_content,子View的大小为0,模式为Unspecified。
Unspecified模式,就总结一句话,父View对子View不做限制,子View有大小,就是子View设置的大小,其它均为0,不多研究。
上面的内容,可能有些拗口,对1、2种情况再做一下解释,来帮助理解:
如何确定一个View的MeasureSpecMode?
layoutParams设置的三种情况+父View的MeasureSpecMode来确定一个View当前的MeasureSpecMode。
View为固定大小,父View无论为什么模式,均为Exactly模式;
View为match_parent,父View为固定大小,子View就能确定为固定大小(即父View的大小),故为Exactly模式;
View为match_parent,父View为非固定大小,子View的大小跟随父View(但也不确定具体大小),故为At_most模式;
View为wrap_content,父View是固定大小或是非固定大小(只要非UnSpecified模式),子View都是父亲View的大小,故为At_most;
从View的MeasureSpec的模式确定角度,归纳上述描述为如下表格
| View的MeasureSpec 模式 | 条件 |
|---|---|
| Exactly | View为设置的固定宽高||View为match_parent,父View为确定宽高(Exactly模式) |
| At_most | View为wrap_content||View为match_parent,父View为非确定宽高(Exactly模式) |
通过上面的多方解释,应该算是到理解状态,具体MeasureSpec的精确确认过程,需要通过源码的解析,深度确认,但是上述结论是没有问题的。
通过上面的内容,我们也能看到,如果我们没有做任何特殊处理的情况,即使我的自定义View在布局中使用,使用了wrap_content,其实也不能达到我们所理解的当前View的高度即是子View的高度和,而是父View的大小。
于是,我们重新改造上面的onMeasure方法:
public class CTextView extends View

    private  Paint mPaint;
    //计算字体所需要的范围
    private  Rect mTextBounds;
    private int color;
    private String text;
    private int mWidth;
    private int mHeight;

    //一般纯代码创建View的时候,可以使用这个构造函数
    public CTextView(Context context)
        this(context,null);


    //加载布局文件的时候会调用
    public CTextView(Context context, @Nullable AttributeSet attrs)
        this(context, attrs,0);


    public CTextView(Context context, @Nullable AttributeSet attrs, int defStyleAttr)
        super(context, attrs, 0);
        //自定义属性
        TypedArray typedArray = context.obtainStyledAttributes(attrs,R.styleable.MNView);
        color = typedArray.getInteger(R.styleable.MNView_mn_color,R.color.colorAccent);
        text = typedArray.getString(R.styleable.MNView_mn_text);
        typedArray.recycle();
        //初始化画笔
        mPaint= new Paint();
        mTextBounds = new Rect();
        mPaint.setColor(color);
        mPaint.setTextSize(50);
        //确定paint的绘制范围
        mPaint.getTextBounds(text,0,text.length(),mTextBounds);


    @Override
    protected void onMeasure(int widthMeasureSpec, int heightMeasureSpec)
        super.onMeasure(widthMeasureSpec, heightMeasureSpec);
        //获取宽度的测量规范模式
        int specMode = MeasureSpec.getMode(widthMeasureSpec);
        int specWidth = MeasureSpec.getSize(widthMeasureSpec);
        Log.i("onMeasure 模式和宽度","specMode:"+specMode+"|specWidth:"+specWidth);
        if(specMode == MeasureSpec.EXACTLY)
            //当前view指定的match_parent或者指定固定值大小
            mWidth=specWidth;

        else
            //At_most 模式,当前View的layoutParams设置的是wrap_content
            //At_most 模式,子View的宽高是父View的宽高(无论父View是Exactly模式还是At_most模式)
            mWidth=getPaddingLeft()+mTextBounds.width()+getPaddingRight();


        specMode = MeasureSpec.getMode(widthMeasureSpec);
        int specHeight = MeasureSpec.getSize(widthMeasureSpec);
        Log.i("onMeasure 模式和宽度","specMode:"+specMode+"|specHeight:"+specHeight);
        if(specMode == MeasureSpec.EXACTLY)
            //当前view指定的match_parent或者指定固定值大小
            mHeight=specHeight;

        else
            //At_most 模式,当前View的layoutParams设置的是wrap_content
            //At_most 模式,子View的宽高是父View的宽高(无论父View是Exactly模式还是At_most模式)
            mHeight=getPaddingTop()+mTextBounds.height()+getPaddingBottom();

        //要不测量出来的宽高,进行设置
        Log.i("测量后的结果","mWidth:"+mWidth+"|mHeight:"+mHeight);
        setMeasuredDimension(mWidth,mHeight);


    @Override
    protected void onDraw(Canvas canvas)
        super.onDraw(canvas);
        //这个函数简单理解下:文字实际内容的绘制源点;
        //text:文本内容,x、y是源点坐标,x:绘制文本的起始x坐标;y:实际上是展示文本的基线上起点的y坐标
        canvas.drawText(text,0,getPaddingTop()+mTextBounds.height(),mPaint);
再看下图,我们的效果就正常了。

关于自定义ViewGroup,针对于我们自己设计的ViewGroup的特性,正常情况下,我们重写onMeasure方法的时候,也是结合measureSpec测量模式,对我们的实际子View进行测量,同时要处理onLayout方法。
及时获得更多更新,关注gongzhonghao:Hym4Android

以上是关于通过自定义View了解MeasureSpecMode的主要内容,如果未能解决你的问题,请参考以下文章