基于卷积神经网络VGG实现水果分类识别
Posted 非鱼子焉
tags:
篇首语:本文由小常识网(cha138.com)小编为大家整理,主要介绍了基于卷积神经网络VGG实现水果分类识别相关的知识,希望对你有一定的参考价值。
基于卷积神经网络VGG实现水果分类识别
百度飞桨系列文章:
关注专栏:百度飞桨

一. 前言
随着人们生活质量的提高,世界各地的水果逐渐进入到大家的生活中,相较于人们日常的大众水果,可能会出现一些人们不认识的新品种,这个时候就需要对这一部分水果进行识别分类。


二. 模型介绍
本案例中我们使用VGG网络进行水果识别,首先我们来了解一下VGG模型。
VGG是当前最流行的CNN模型之一,2014年由Simonyan和Zisserman发表在ICLR 2015会议上的论文《Very Deep Convolutional Networks For Large-scale Image Recognition》提出,其命名来源于论文作者所在的实验室Visual Geometry Group。VGG设计了一种大小为3x3的小尺寸卷积核和池化层组成的基础模块,通过堆叠上述基础模块构造出深度卷积神经网络,该网络在图像分类领域取得了不错的效果,在大型分类数据集ILSVRC上,VGG模型仅有6.8% 的top-5 test error 。VGG模型一经推出就很受研究者们的欢迎,因为其网络结构的设计合理,总体结构简明,且可以适用于多个领域。VGG的设计为后续研究者设计模型结构提供了思路。
下图是VGG-16的网络结构示意图,一共包含13层卷积和3层全连接层。VGG网络使用3×3的卷积层和池化层组成的基础模块来提取特征,三层全连接层放在网络的最后组成分类器,最后一层全连接层的输出即为分类的预测。 在VGG中每层卷积将使用ReLU作为激活函数,在全连接层之后添加dropout来抑制过拟合。使用小的卷积核能够有效地减少参数的个数,使得训练和测试变得更加有效。比如如果我们想要得到感受野为5的特征图,最直接的方法是使用5×5的卷积层,但是我们也可以使用两层3×3卷积层达到同样的效果,并且只需要更少的参数。另外由于卷积核比较小,我们可以堆叠更多的卷积层,提取到更多的图片信息,来提高图像分类的准确率。VGG模型的成功证明了增加网络的深度,可以更好的学习图像中的特征模式,达到更高的分类准确率。

想了解更多关于VGG的知识可以点击了解详细

三. 数据处理
代码基于飞桨的 BML CodeLab 编写
# ! unzip -oq data/data137852/fruits.zip
import os
import random
import json
import paddle
import sys
import numpy as np
from PIL import Image
import matplotlib.pyplot as plt


# 定义公共变量
name_dict = "apple": 0, "banana": 1, "grape": 2,
             "orange": 3, "pear": 4
data_root_path = "fruits/" # 数据集目录
test_file_path = data_root_path + "test.txt" # 测试集文件路径
train_file_path = data_root_path + "train.txt" # 测试集文件
name_data_list =  # 记录每个类别图片 key:名称  value:路径列表

def save_train_test_file(path, name): # 将图片添加到字典
    if name not in name_data_list: # 该类别水果不在字典中
        img_list = []
        img_list.append(path) # 路径存入列表
        name_data_list[name] = img_list # 列表存入字典
    else:
        name_data_list[name].append(path) # 直接添加到列表

# 遍历每个子目录,将图片路径存入字典
dirs = os.listdir(data_root_path) # 列出数据集下的子目录
for d in dirs:
    full_path = data_root_path + d # 子目录完整路径
    if os.path.isdir(full_path): # 如果是目录
        imgs = os.listdir(full_path) # 列出子目录下的图片
        for img in imgs:
            img_full_path = full_path + "/" + img # 图片路径
            save_train_test_file(img_full_path, d) # 添加到字典
    else: # 文件
        pass

# 划分训练集、测试集
with open(test_file_path, "w") as f:
    pass
with open(train_file_path, "w") as f:
    pass

# 遍历字典
for name, img_list in name_data_list.items():
    i = 0
    num = len(img_list) # 取出样本数量
    print("%s: %d张图像" % (name, num))

    for img in img_list:
        # 拼接一行
        line = "%s\\t%d\\n" % (img, name_dict[name])
        if i % 10 == 0: # 写入测试集
            with open(test_file_path, "a") as f:
                f.write(line) # 存入文件
        else: # 写入训练集
            with open(train_file_path, "a") as f:
                f.write(line) # 存入文件
        i += 1
print("数据预处理完成.")
# 定义数据读取器
class dataset(Dataset):
    def __init__(self, data_path, mode='train'):
        """
        数据读取器
        :param data_path: 数据集所在路径
        :param mode: train or eval
        """
        super().__init__()
        self.data_path = data_path
        self.img_paths = []
        self.labels = []

        if mode == 'train':
            with open(os.path.join(self.data_path, "train.txt"), "r", encoding="utf-8") as f:
                self.info = f.readlines()
            for img_info in self.info:
                img_path, label = img_info.strip().split('\\t')
                self.img_paths.append(img_path)
                self.labels.append(int(label))

        else:
            with open(os.path.join(self.data_path, "test.txt"), "r", encoding="utf-8") as f:
                self.info = f.readlines()
            for img_info in self.info:
                img_path, label = img_info.strip().split('\\t')
                self.img_paths.append(img_path)
                self.labels.append(int(label))


    def __getitem__(self, index):
        """
        获取一组数据
        :param index: 文件索引号
        :return:
        """
        # 第一步打开图像文件并获取label值
        img_path = self.img_paths[index]
        img = Image.open(img_path)
        if img.mode != 'RGB':
            img = img.convert('RGB')
        img = img.resize((224, 224), Image.BILINEAR)
        #img = rand_flip_image(img)
        img = np.array(img).astype('float32')
        img = img.transpose((2, 0, 1)) / 255
        label = self.labels[index]
        label = np.array([label], dtype="int64")
        return img, label

    def print_sample(self, index: int = 0):
        print("文件名", self.img_paths[index], "\\t标签值", self.labels[index])

    def __len__(self):
        return len(self.img_paths)
#训练数据加载
train_dataset = dataset('fruits',mode='train')
train_loader = paddle.io.DataLoader(train_dataset, batch_size=32, shuffle=True)
#评估数据加载
eval_dataset = dataset('fruits',mode='eval')
eval_loader = paddle.io.DataLoader(eval_dataset, batch_size = 8, shuffle=False)

print("数据的预处理和加载完成!")

四. 模型搭建
4.1 定义卷积池化网络
# 定义卷积池化网络
class ConvPool(paddle.nn.Layer):
    def __init__(self,
                 num_channels,
                 num_filters,
                 filter_size,
                 pool_size,
                 pool_stride,
                 groups,
                 conv_stride=1,
                 conv_padding=1,
                 ):
        super(ConvPool, self).__init__()

        # groups代表卷积层的数量
        for i in range(groups):
            self.add_sublayer(   #添加子层实例
                'bb_%d' % i,
                paddle.nn.Conv2D(         # layer
                in_channels=num_channels, #通道数
                out_channels=num_filters,   #卷积核个数
                kernel_size=filter_size,   #卷积核大小
                stride=conv_stride,        #步长
                padding = conv_padding,    #padding
                )
            )
            self.add_sublayer(
                'relu%d' % i,
                paddle.nn.ReLU()
            )
            num_channels = num_filters


        self.add_sublayer(
            'Maxpool',
            paddle.nn.MaxPool2D(
            kernel_size=pool_size,           #池化核大小
            stride=pool_stride               #池化步长
            )
        )

    def forward(self, inputs):
        x = inputs
        for prefix, sub_layer in self.named_children():
            # print(prefix,sub_layer)
            x = sub_layer(x)
        return x
4.2 搭建VGG网络
# VGG网络
class VGGNet(paddle.nn.Layer):
    def __init__(self):
        super(VGGNet, self).__init__()
        # 5个卷积池化操作
        self.convpool01 = ConvPool(
            3, 64, 3, 2, 2, 2)  #3:通道数,64:卷积核个数,3:卷积核大小,2:池化核大小,2:池化步长,2:连续卷积个数
        self.convpool02 = ConvPool(
            64, 128, 3, 2, 2, 2)
        self.convpool03 = ConvPool(
            128, 256, 3, 2, 2, 3)
        self.convpool04 = ConvPool(
            256, 512, 3, 2, 2, 3)
        self.convpool05 = ConvPool(
            512, 512, 3, 2, 2, 3)
        self.pool_5_shape = 512 * 7* 7
        # 三个全连接层
        self.fc01 = paddle.nn.Linear(self.pool_5_shape, 4096)
        self.drop1 = paddle.nn.Dropout(p=0.5)
        self.fc02 = paddle.nn.Linear(4096, 4096)
        self.drop2 = paddle.nn.Dropout(p=0.5)
        self.fc03 = paddle.nn.Linear(4096, train_parameters['class_dim'])

    def forward(self, inputs, label=None):
        # print('input_shape:', inputs.shape) #[8, 3, 224, 224]
        """前向计算"""
        out = self.convpool01(inputs)
        # print('convpool01_shape:', out.shape)           #[8, 64, 112, 112]
        out = self.convpool02(out)
        # print('convpool02_shape:', out.shape)           #[8, 128, 56, 56]
        out = self.convpool03(out)
        # print('convpool03_shape:', out.shape)           #[8, 256, 28, 28]
        out = self.convpool04(out)
        # print('convpool04_shape:', out.shape)           #[8, 512, 14, 14]
        out = self.convpool05(out)
        # print('convpool05_shape:', out.shape)           #[8, 512, 7, 7]

        out = paddle.reshape(out, shape=[-1, 512*7*7])
        out = self.fc01(out)
        out = self.drop1(out)
        out = self.fc02(out)
        out = self.drop2(out)
        out = self.fc03(out)

        if label is not None:
            acc = paddle.metric.accuracy(input=out, label=label)
            return out, acc
        else:
            return out
4.3 参数配置
train_parameters =
    "train_list_path": "fruits/train.txt",       #train.txt路径
    "eval_list_path": "fruits/test.txt",         #eval.txt路径
    "class_dim": 5,                              #分类数

# 参数配置,要保留之前数据集准备阶段配置的参数,所以使用update更新字典
train_parameters.update(
    "input_size": [3, 224, 224],                              #输入图片的shape
    "num_epochs": 35,                                         #训练轮数
    "skip_steps": 10,                                         #训练时输出日志的间隔
    "save_steps": 100,                                         #训练时保存模型参数的间隔
    "learning_strategy":                                     #优化函数相关的配置
        "lr": 0.0001                                          #超参数学习率
    ,
    "checkpoints": "/home/aistudio/work/checkpoints"          #保存的路径
)
4.4 模型训练
model = VGGNet()
model.train()
# 配置loss函数
cross_entropy = paddle.nn.CrossEntropyLoss()
# 配置参数优化器
optimizer = paddle.optimizer.Adam(learning_rate=train_parameters['learning_strategy']['lr'],
                                  parameters=model.parameters())

steps = 0
Iters, total_loss, total_acc = [], [], []

for epo in range(train_parameters['num_epochs']):
    for _, data in enumerate(train_loader()):
        steps += 1
        x_data = data[0]
        y_data = data[1]
        predicts, acc = model(x_data, y_data)
        loss = cross_entropy(predicts, y_data)
        loss.backward()
        optimizer.step()
        optimizer.clear_grad()
        if steps % train_parameters["skip_steps"] == 0:
            Iters.append(steps)
            total_loss.append(loss.numpy()[0])
            total_acc.append(acc.numpy()[0])
            #打印中间过程
            print('epo: , step: , loss is: , acc is: '\\
                  .format(epo, steps, loss.numpy(), acc.numpy()))
        #保存模型参数
        if steps % train_parameters["save_steps"] == 0:
            save_path = train_parameters["checkpoints"]+"/"+"save_dir_" + str(steps) + '.pdparams'
            print('save model to: ' + save_path)
            paddle.save(model.state_dict(),save_path)
paddle.save(model.state_dict(),train_parameters["checkpoints"]+"/"+"save_dir_final.pdparams")
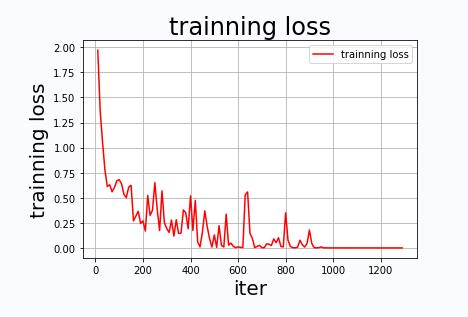
4.5 绘制loss和acc图像
def draw_process(title,color,iters,data,label):
    plt.title(title, fontsize=24)
    plt.xlabel("iter", fontsize=20)
    plt.ylabel(label, fontsize=20)
    plt.plot(iters, data,color=color,label=label)
    plt.legend()
    plt.grid()
    plt.show()
draw_process("trainning loss","red",Iters,total_loss,"trainning loss")
draw_process("trainning acc","green",Iters,total_acc,"trainning acc")


五. 模型评估
model__state_dict = paddle.load('work/checkpoints/save_dir_final.pdparams') # 使用保存的最后一个模型
model_eval = VGGNet()
model_eval.set_state_dict(model__state_dict)
model_eval.eval()
accs = []
# 开始评估
for _, data in enumerate(eval_loader()):
    x_data = data[0]
    y_data = data[1]
    predicts = model_eval(x_data)
    acc = paddle.metric.accuracy(predicts, y_data)
    accs.append(acc.numpy()[0])
print('模型的准确率为:',np.mean(accs))
模型的准确率为: 0.9558824

六. 模
以上是关于基于卷积神经网络VGG实现水果分类识别的主要内容,如果未能解决你的问题,请参考以下文章