dolphinscheduler 2.0.6 资源中心改造(使用本地文件系统,不再依赖HDFS)
Posted 韧小钊
tags:
篇首语:本文由小常识网(cha138.com)小编为大家整理,主要介绍了dolphinscheduler 2.0.6 资源中心改造(使用本地文件系统,不再依赖HDFS)相关的知识,希望对你有一定的参考价值。
目录
背景
使用调度过程中,并未涉及Hadoop生态圈,但是使用资源中心功能,必须搭建Hadoop或者AWS相关环境,耗时耗力耗费资源,因此对其进行改造,将文件上传到某一台服务器,其它服务器(worker)需要该资源时通过SFTP下载到本地使用
现状
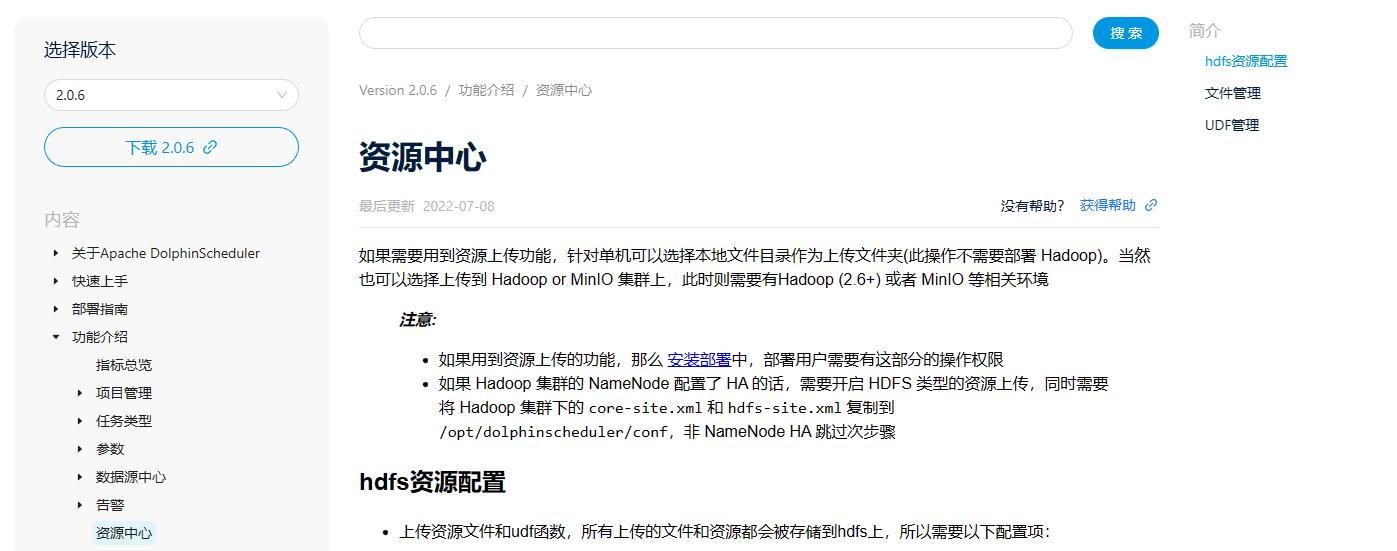
- 目前单机是支持文件上传到本地的,单机如何配置,2.0.6资源中心配置详情貌似没有说明

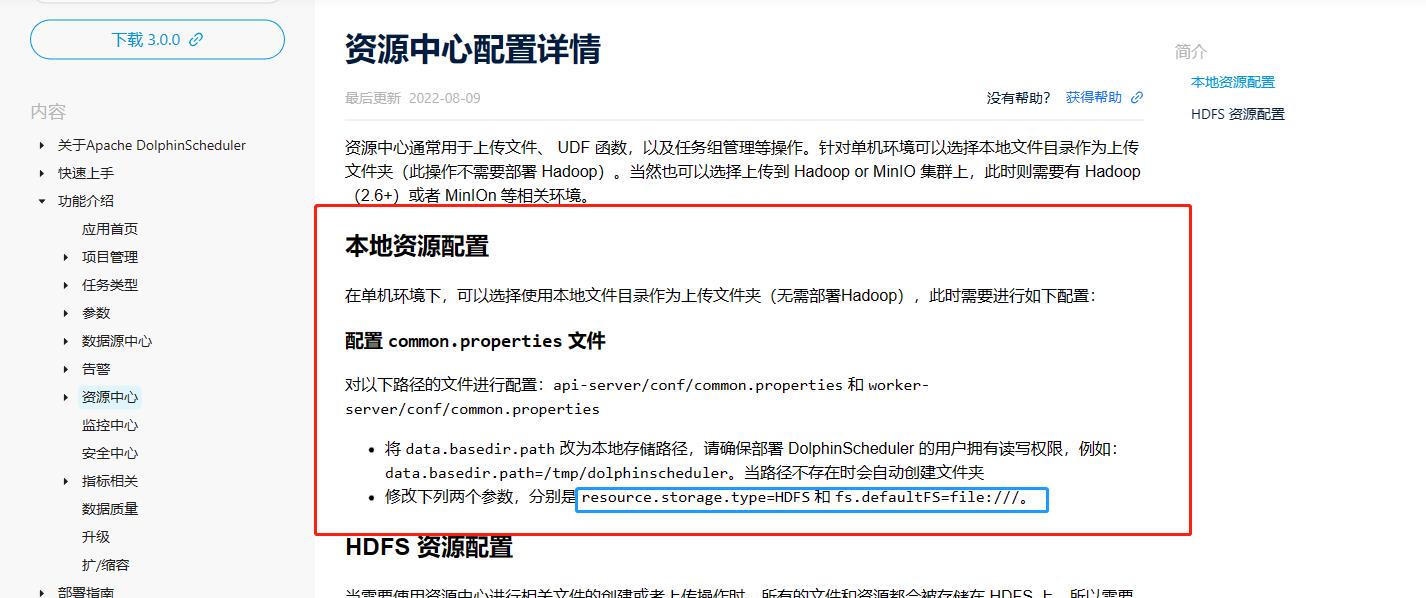
- 至于2.0版本可以参照3.0.0资源中心配置详情
代码改造详情
借助现有的单机模式,当本机存在文件时,直接读取;不存在时,则通过sftp/ftp方式从存储服务器下载,其实和现有的hdfs原理是一样的,都是先下载再执行
common.properties
- 修改相关配置
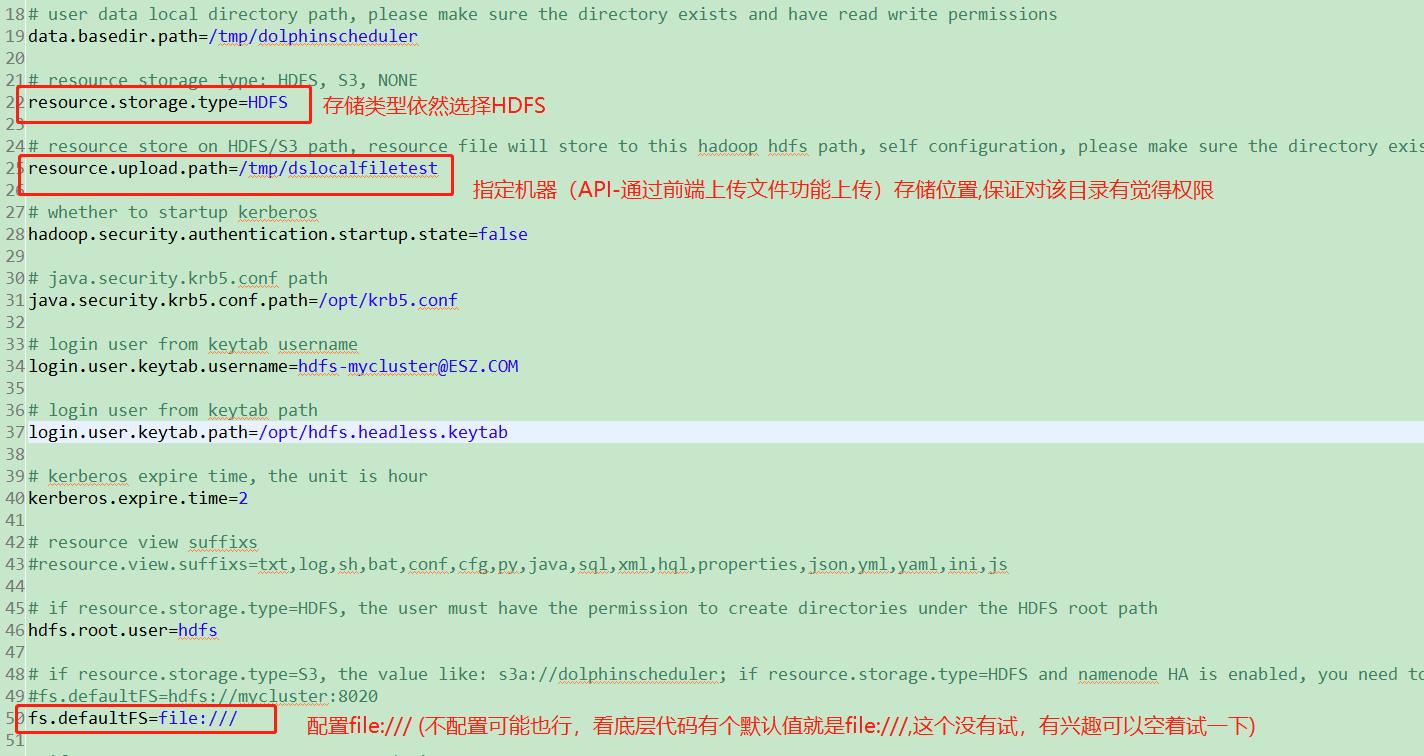
- 增加服务器配置信息(SFTP连接下载使用)
transfer.enable=true
transfer.ip=192.168.38.5
transfer.port=22 #如果使用FTP,默认端口应该是21
transfer.username=dolphinscheduler
transfer.password=dob7@ZvT
- 源码
#
# Licensed to the Apache Software Foundation (ASF) under one or more
# contributor license agreements.  See the NOTICE file distributed with
# this work for additional information regarding copyright ownership.
# The ASF licenses this file to You under the Apache License, Version 2.0
# (the "License"); you may not use this file except in compliance with
# the License.  You may obtain a copy of the License at
#
#     http://www.apache.org/licenses/LICENSE-2.0
#
# Unless required by applicable law or agreed to in writing, software
# distributed under the License is distributed on an "AS IS" BASIS,
# WITHOUT WARRANTIES OR CONDITIONS OF ANY KIND, either express or implied.
# See the License for the specific language governing permissions and
# limitations under the License.
#

# user data local directory path, please make sure the directory exists and have read write permissions
data.basedir.path=/tmp/dolphinscheduler

# resource storage type: HDFS, S3, NONE
resource.storage.type=HDFS

# resource store on HDFS/S3 path, resource file will store to this hadoop hdfs path, self configuration, please make sure the directory exists on hdfs and have read write permissions. "/dolphinscheduler" is recommended
resource.upload.path=/tmp/dslocalfiletest

# whether to startup kerberos
hadoop.security.authentication.startup.state=false

# java.security.krb5.conf path
java.security.krb5.conf.path=/opt/krb5.conf

# login user from keytab username
login.user.keytab.username=hdfs-mycluster@ESZ.COM

# login user from keytab path
login.user.keytab.path=/opt/hdfs.headless.keytab

# kerberos expire time, the unit is hour
kerberos.expire.time=2

# resource view suffixs
#resource.view.suffixs=txt,log,sh,bat,conf,cfg,py,java,sql,xml,hql,properties,json,yml,yaml,ini,js

# if resource.storage.type=HDFS, the user must have the permission to create directories under the HDFS root path
hdfs.root.user=hdfs

# if resource.storage.type=S3, the value like: s3a://dolphinscheduler; if resource.storage.type=HDFS and namenode HA is enabled, you need to copy core-site.xml and hdfs-site.xml to conf dir
#fs.defaultFS=hdfs://mycluster:8020
fs.defaultFS=file:///

# if resource.storage.type=S3, s3 endpoint
fs.s3a.endpoint=http://192.168.xx.xx:9010

# if resource.storage.type=S3, s3 access key
fs.s3a.access.key=A3DXS30FO22544RE

# if resource.storage.type=S3, s3 secret key
fs.s3a.secret.key=OloCLq3n+8+sdPHUhJ21XrSxTC+JK

# resourcemanager port, the default value is 8088 if not specified
resource.manager.httpaddress.port=8088

# if resourcemanager HA is enabled, please set the HA IPs; if resourcemanager is single, keep this value empty
yarn.resourcemanager.ha.rm.ids=192.168.xx.xx,192.168.xx.xx

# if resourcemanager HA is enabled or not use resourcemanager, please keep the default value; If resourcemanager is single, you only need to replace ds1 to actual resourcemanager hostname
yarn.application.status.address=http://ds1:%s/ws/v1/cluster/apps/%s

# job history status url when application number threshold is reached(default 10000, maybe it was set to 1000)
yarn.job.history.status.address=http://ds1:19888/ws/v1/history/mapreduce/jobs/%s

# datasource encryption enable
datasource.encryption.enable=false

# datasource encryption salt
datasource.encryption.salt=!@#$%^&*

# Whether hive SQL is executed in the same session
support.hive.oneSession=false

# use sudo or not, if set true, executing user is tenant user and deploy user needs sudo permissions; if set false, executing user is the deploy user and doesn't need sudo permissions
sudo.enable=true

# network interface preferred like eth0, default: empty
#dolphin.scheduler.network.interface.preferred=

# network IP gets priority, default: inner outer
#dolphin.scheduler.network.priority.strategy=default

# system env path
#dolphinscheduler.env.path=env/dolphinscheduler_env.sh

# development state
development.state=false

#datasource.plugin.dir config
datasource.plugin.dir=lib/plugin/datasource

transfer.enable=true
transfer.ip=221.221.221.5
transfer.port=22
transfer.username=dolphinscheduler
transfer.password=dob7@ZvT
Constants.java
- 增加服务器信息常量(为了规范,调用时候直接引用常量)
    public static final String TRANSFER_ENABLE = "transfer.enable";
    public static final String TRANSFER_IP = "transfer.ip";
    public static final String TRANSFER_PORT = "transfer.port";
    public static final String TRANSFER_USERNAME = "transfer.username";
    public static final String TRANSFER_PASSWORD = "transfer.password";
- 源码
/*
* Licensed to the Apache Software Foundation (ASF) under one or more
* contributor license agreements. See the NOTICE file distributed with
* this work for additional information regarding copyright ownership.
* The ASF licenses this file to You under the Apache License, Version 2.0
* (the "License"); you may not use this file except in compliance with
* the License. You may obtain a copy of the License at
*
* http://www.apache.org/licenses/LICENSE-2.0
*
* Unless required by applicable law or agreed to in writing, software
* distributed under the License is distributed on an "AS IS" BASIS,
* WITHOUT WARRANTIES OR CONDITIONS OF ANY KIND, either express or implied.
* See the License for the specific language governing permissions and
* limitations under the License.
*/
package org.apache.dolphinscheduler.common;
import org.apache.dolphinscheduler.common.enums.ExecutionStatus;
import org.apache.commons.lang.StringUtils;
import org.apache.commons.lang.SystemUtils;
import java.util.regex.Pattern;
/**
* Constants
*/
public final class Constants
private Constants()
throw new UnsupportedOperationException("Construct Constants");
/**
* quartz config
*/
public static final String ORG_QUARTZ_JOBSTORE_DRIVERDELEGATECLASS = "org.quartz.jobStore.driverDelegateClass";
public static final String ORG_QUARTZ_SCHEDULER_INSTANCENAME = "org.quartz.scheduler.instanceName";
public static final String ORG_QUARTZ_SCHEDULER_INSTANCEID = "org.quartz.scheduler.instanceId";
public static final String ORG_QUARTZ_SCHEDULER_MAKESCHEDULERTHREADDAEMON = "org.quartz.scheduler.makeSchedulerThreadDaemon";
public static final String ORG_QUARTZ_JOBSTORE_USEPROPERTIES = "org.quartz.jobStore.useProperties";
public static final String ORG_QUARTZ_THREADPOOL_CLASS = "org.quartz.threadPool.class";
public static final String ORG_QUARTZ_THREADPOOL_THREADCOUNT = "org.quartz.threadPool.threadCount";
public static final String ORG_QUARTZ_THREADPOOL_MAKETHREADSDAEMONS = "org.quartz.threadPool.makeThreadsDaemons";
public static final String ORG_QUARTZ_THREADPOOL_THREADPRIORITY = "org.quartz.threadPool.threadPriority";
public static final String ORG_QUARTZ_JOBSTORE_CLASS = "org.quartz.jobStore.class";
public static final String ORG_QUARTZ_JOBSTORE_TABLEPREFIX = "org.quartz.jobStore.tablePrefix";
public static final String ORG_QUARTZ_JOBSTORE_ISCLUSTERED = "org.quartz.jobStore.isClustered";
public static final String ORG_QUARTZ_JOBSTORE_MISFIRETHRESHOLD = "org.quartz.jobStore.misfireThreshold";
public static final String ORG_QUARTZ_JOBSTORE_CLUSTERCHECKININTERVAL = "org.quartz.jobStore.clusterCheckinInterval";
public static final String ORG_QUARTZ_JOBSTORE_ACQUIRETRIGGERSWITHINLOCK = "org.quartz.jobStore.acquireTriggersWithinLock";
public static final String ORG_QUARTZ_JOBSTORE_DATASOURCE = "org.quartz.jobStore.dataSource";
public static final String ORG_QUARTZ_DATASOURCE_MYDS_CONNECTIONPROVIDER_CLASS = "org.quartz.dataSource.myDs.connectionProvider.class";
public static final String ORG_QUARTZ_SCHEDULER_BATCHTRIGGERACQUISTITIONMAXCOUNT = "org.quartz.scheduler.batchTriggerAcquisitionMaxCount";
/**
* quartz config default value
*/
public static final String QUARTZ_TABLE_PREFIX = "QRTZ_";
public static final String QUARTZ_MISFIRETHRESHOLD = "60000";
public static final String QUARTZ_CLUSTERCHECKININTERVAL = "5000";
public static final String QUARTZ_DATASOURCE = "myDs";
public static final String QUARTZ_THREADCOUNT = "25";
public static final String QUARTZ_THREADPRIORITY = "5";
public static final String QUARTZ_INSTANCENAME = "DolphinScheduler";
public static final String QUARTZ_INSTANCEID = "AUTO";
public static final String QUARTZ_ACQUIRETRIGGERSWITHINLOCK = "true";
public static final String QUARTZ_BATCHTRIGGERACQUISTITIONMAXCOUNT = "100";
/**
* common properties path
*/
public static final String COMMON_PROPERTIES_PATH = "/common.properties";
/**
* alter properties
*/
public static final String ALERT_PLUGIN_BINDING = "alert.plugin.binding";
public static final String ALERT_PLUGIN_DIR = "alert.plugin.dir";
public static final int ALERT_RPC_PORT = 50052;
/**
* registry properties
*/
public static final String REGISTRY_DOLPHINSCHEDULER_MASTERS = "/nodes/master";
public static final String REGISTRY_DOLPHINSCHEDULER_WORKERS = "/nodes/worker";
public static final String REGISTRY_DOLPHINSCHEDULER_DEAD_SERVERS = "/dead-servers";
public static final String REGISTRY_DOLPHINSCHEDULER_NODE = "/nodes";
public static final String REGISTRY_DOLPHINSCHEDULER_LOCK_MASTERS = "/lock/masters";
public static final String REGISTRY_DOLPHINSCHEDULER_LOCK_FAILOVER_MASTERS = "/lock/failover/masters";
public static final String REGISTRY_DOLPHINSCHEDULER_LOCK_FAILOVER_WORKERS = "/lock/failover/workers";
public static final String REGISTRY_DOLPHINSCHEDULER_LOCK_FAILOVER_STARTUP_MASTERS = "/lock/failover/startup-masters";
public static final String REGISTRY_SERVERS = "registry.servers";
public static final String FOLDER_SEPARATOR = "/";
/**
* fs.defaultFS
*/
public static final String FS_DEFAULTFS = "fs.defaultFS";
/**
* fs s3a endpoint
*/
public static final String FS_S3A_ENDPOINT = "fs.s3a.endpoint";
/**
* fs s3a access key
*/
public static final String FS_S3A_ACCESS_KEY = "fs.s3a.access.key";
/**
* fs s3a secret key
*/
public static final String FS_S3A_SECRET_KEY = "fs.s3a.secret.key";
/**
* hadoop configuration
*/
public static final String HADOOP_RM_STATE_ACTIVE = "ACTIVE";
public static final String HADOOP_RM_STATE_STANDBY = "STANDBY";
public static final String HADOOP_RESOURCE_MANAGER_HTTPADDRESS_PORT = "resource.manager.httpaddress.port";
/**
* yarn.resourcemanager.ha.rm.ids
*/
public static final String YARN_RESOURCEMANAGER_HA_RM_IDS = "yarn.resourcemanager.ha.rm.ids";
/**
* yarn.application.status.address
*/
public static final String YARN_APPLICATION_STATUS_ADDRESS = "yarn.application.status.address";
/**
* yarn.job.history.status.address
*/
public static final String YARN_JOB_HISTORY_STATUS_ADDRESS = "yarn.job.history.status.address";
/**
* hdfs configuration
* hdfs.root.user
*/
public static final String HDFS_ROOT_USER = "hdfs.root.user";
/**
* hdfs/s3 configuration
* resource.upload.path
*/
public static final String RESOURCE_UPLOAD_PATH = "resource.upload.path";
/**
* data basedir path
*/
public static final String DATA_BASEDIR_PATH = "data.basedir.path";
/**
* dolphinscheduler.env.path
*/
public static final String DOLPHINSCHEDULER_ENV_PATH = "dolphinscheduler.env.path";
/**
* environment properties default path
*/
public static final String ENV_PATH = "env/dolphinscheduler_env.sh";
/**
* python home
*/
public static final String PYTHON_HOME = "PYTHON_HOME";
/**
* resource.view.suffixs
*/
public static final String RESOURCE_VIEW_SUFFIXS = "resource.view.suffixs";
public static final String RESOURCE_VIEW_SUFFIXS_DEFAULT_VALUE = "txt,log,sh,bat,conf,cfg,py,java,sql,xml,hql,properties,json,yml,yaml,ini,js";
/**
* development.state
*/
public static final String DEVELOPMENT_STATE = "development.state";
/**
* sudo enable
*/
public static final String SUDO_ENABLE = "sudo.enable";
public static final String TRANSFER_ENABLE = "transfer.enable";
public static final String TRANSFER_IP = "transfer.ip";
public static final String TRANSFER_PORT = "transfer.port";
public static final String TRANSFER_USERNAME = "transfer.username";
public static final String TRANSFER_PASSWORD = "transfer.password";
/**
* string true
*/
public static final String STRING_TRUE = "true";
/**
* string false
*/
public static final String STRING_FALSE = "false";
/**
* resource storage type
*/
public static final String RESOURCE_STORAGE_TYPE = "resource.storage.type";
/**
* comma ,
*/
public static final String COMMA = ",";
/**
* COLON :
*/
public static final String COLON = ":";
/**
* SPACE " "
*/
public static final String SPACE = " ";
/**
* SINGLE_SLASH /
*/
public static final String SINGLE_SLASH = "/";
/**
* DOUBLE_SLASH //
*/
public static final String DOUBLE_SLASH = "//";
/**
* SINGLE_QUOTES "'"
*/
public static final String SINGLE_QUOTES = "'";
/**
* DOUBLE_QUOTES "\\""
*/
public static final String DOUBLE_QUOTES = "\\"";
/**
* SEMICOLON ;
*/
public static final String SEMICOLON = ";";
/**
* EQUAL SIGN
*/
public static final String EQUAL_SIGN = "=";
/**
* AT SIGN
*/
public static final String AT_SIGN = "@";
/**
* date format of yyyy-MM-dd HH:mm:ss
*/
public static final String YYYY_MM_DD_HH_MM_SS = "yyyy-MM-dd HH:mm:ss";
/**
* date format of yyyyMMddHHmmss
*/
public static final String YYYYMMDDHHMMSS = "yyyyMMddHHmmss";
/**
* date format of yyyyMMddHHmmssSSS
*/
public static final String YYYYMMDDHHMMSSSSS = "yyyyMMddHHmmssSSS";
/**
* http connect time out
*/
public static final int HTTP_CONNECT_TIMEOUT = 60 * 1000;
/**
* http connect request time out
*/
public static final int HTTP_CONNECTION_REQUEST_TIMEOUT = 60 * 1000;
/**
* httpclient soceket time out
*/
public static final int SOCKET_TIMEOUT = 60 * 1000;
/**
* http header
*/
public static final String HTTP_HEADER_UNKNOWN = "unKnown";
/**
* http X-Forwarded-For
*/
public static final String HTTP_X_FORWARDED_FOR = "X-Forwarded-For";
/**
* http X-Real-IP
*/
public static final String HTTP_X_REAL_IP = "X-Real-IP";
/**
* UTF-8
*/
public static final String UTF_8 = "UTF-8";
/**
* user name regex
*/
public static final Pattern REGEX_USER_NAME = Pattern.compile("^[a-zA-Z0-9._-]3,39$");
/**
* default display rows
*/
public static final int DEFAULT_DISPLAY_ROWS = 10;
/**
* read permission
*/
public static final int READ_PERMISSION = 2 * 1;
/**
* write permission
*/
public static final int WRITE_PERMISSION = 2 * 2;
/**
* execute permission
*/
public static final int EXECUTE_PERMISSION = 1;
/**
* default admin permission
*/
public static final int DEFAULT_ADMIN_PERMISSION = 7;
/**
* default hash map size
*/
public static final int DEFAULT_HASH_MAP_SIZE = 16;
/**
* all permissions
*/
public static final int ALL_PERMISSIONS = READ_PERMISSION | WRITE_PERMISSION | EXECUTE_PERMISSION;
/**
* max task timeout
*/
public static final int MAX_TASK_TIMEOUT = 24 * 3600;
/**
* master cpu load
*/
public static final int DEFAULT_MASTER_CPU_LOAD = Runtime.getRuntime().availableProcessors() * 2;
/**
* worker cpu load
*/
public static final int DEFAULT_WORKER_CPU_LOAD = Runtime.getRuntime().availableProcessors() * 2;
/**
* worker host weight
*/
public static final int DEFAULT_WORKER_HOST_WEIGHT = 100;
/**
* default log cache rows num,output when reach the number
*/
public static final int DEFAULT_LOG_ROWS_NUM = 4 * 16;
/**
* log flush interval?output when reach the interval
*/
public static final int DEFAULT_LOG_FLUSH_INTERVAL = 1000;
/**
* time unit secong to minutes
*/
public static final int SEC_2_MINUTES_TIME_UNIT = 60;
/***
*
* rpc port
*/
public static final int RPC_PORT = 50051;
/**
* forbid running task
*/
public static final String FLOWNODE_RUN_FLAG_FORBIDDEN = "FORBIDDEN";
/**
* normal running task
*/
public static final String FLOWNODE_RUN_FLAG_NORMAL = "NORMAL";
/**
* datasource configuration path
*/
public static final String COMMON_TASK_TYPE = "common";
public static final String DEFAULT = "default";
public static final String USER = "user";
public static final String PASSWORD = "password";
public static final String XXXXXX = "******";
public static final String NULL = "NULL";
public static final String THREAD_NAME_MASTER_SERVER = "Master-Server";
public static final String THREAD_NAME_WORKER_SERVER = "Worker-Server";
/**
* command parameter keys
*/
public static final String CMD_PARAM_RECOVER_PROCESS_ID_STRING = "ProcessInstanceId";
public static final String CMD_PARAM_RECOVERY_START_NODE_STRING = "StartNodeIdList";
public static final String CMD_PARAM_RECOVERY_WAITING_THREAD = "WaitingThreadInstanceId";
public static final String CMD_PARAM_SUB_PROCESS = "processInstanceId";
public static final String CMD_PARAM_EMPTY_SUB_PROCESS = "0";
public static final String CMD_PARAM_SUB_PROCESS_PARENT_INSTANCE_ID = "parentProcessInstanceId";
public static final String CMD_PARAM_SUB_PROCESS_DEFINE_CODE = "processDefinitionCode";
public static final String CMD_PARAM_START_NODE_NAMES = "StartNodeNameList";
public static final String CMD_PARAM_START_NODES = "StartNodeList";
public static final String CMD_PARAM_START_PARAMS = "StartParams";
public static final String CMD_PARAM_FATHER_PARAMS = "fatherParams";
/**
* complement data start date
*/
public static final String CMDPARAM_COMPLEMENT_DATA_START_DATE = "complementStartDate";
/**
* complement data end date
*/
public static final String CMDPARAM_COMPLEMENT_DATA_END_DATE = "complementEndDate";
/**
* complement date default cron string
*/
public static final String DEFAULT_CRON_STRING = "0 0 0 * * ? *";
public static final String SPRING_DATASOURCE_DRIVER_CLASS_NAME = "spring.datasource.driver-class-name";
public static final String SPRING_DATASOURCE_URL = "spring.datasource.url";
public static final String SPRING_DATASOURCE_USERNAME = "spring.datasource.username";
public static final String SPRING_DATASOURCE_PASSWORD = "spring.datasource.password";
public static final String SPRING_DATASOURCE_CONNECTION_TIMEOUT = "spring.datasource.connectionTimeout";
public static final String SPRING_DATASOURCE_MIN_IDLE = "spring.datasource.minIdle";
public static final String SPRING_DATASOURCE_MAX_ACTIVE = "spring.datasource.maxActive";
public static final String SPRING_DATASOURCE_IDLE_TIMEOUT = "spring.datasource.idleTimeout";
public static final String SPRING_DATASOURCE_MAX_LIFE_TIME = "spring.datasource.maxLifetime";
public static final String SPRING_DATASOURCE_VALIDATION_TIMEOUT = "spring.datasource.validationTimeout";
public static final String SPRING_DATASOURCE_VALIDATION_QUERY = "spring.datasource.validationQuery";
public static final String SPRING_DATASOURCE_LEAK_DETECTION_THRESHOLD = "spring.datasource.leakDetectionThreshold";
public static final String SPRING_DATASOURCE_INITIALIZATION_FAIL_TIMEOUT = "spring.datasource.initializationFailTimeout";
public static final String SPRING_DATASOURCE_IS_AUTOCOMMIT = "spring.datasource.isAutoCommit";
public static final String SPRING_DATASOURCE_CACHE_PREP_STMTS = "spring.datasource.cachePrepStmts";
public static final String SPRING_DATASOURCE_PREP_STMT_CACHE_SIZE = "spring.datasource.p数仓工具——DolphinScheduler任务调度工具
数仓学习——DolphinScheduler任务调度工具
- 前言
- 一、DolphinScheduler简介
-
- 二、DolphinScheduler部署说明
-
- 三、DolphinScheduler集群模式部署
-
- 四、DolphinScheduler入门
-
- 五、DolphinScheduler进阶
-
前言
在数仓项目中,掌握一种任务调度工具是十分重要的,常用的调度工具有Azkaban和oozie,这里学习一种国产的调度工具,DolphinScheduler,综合了两种调度工具的特点而产生的。
一、DolphinScheduler简介
1.DolphinScheduler概述
DolphinScheduler是一个分布式、易扩展的可视化DAG工作流调度平台,致力于解决数据处理流程中错综复杂的依赖关系,使调度系统在数据处理流程中开箱即用。
2.DolphinScheduler组件
DolphinScheduler主要包含以下几个部分:
1)MasterServer:
采用分布式无中心设计理念。
MasterServer主要负责DAG(工作流)任务切分、任务提交(提交给WorkerServer并分配任务给WorkerServer)、任务监控,并同时监听其它的MasterServer和WorkerServer的健康状态(为了做高可用,容错机制。假如有一个WorkerServer挂掉了,要把它的工作分配给别的WorkerServer;假如有一个MasterServer挂掉了,那么这个MasterServer负责的工作就要交给别的MasterServer去负责,哪个MasterServer抢到它就负责)。
2)WorkerServer:
也采用分布式无中心设计理念。
WorkerServer主要负责任务的执行和提供日志服务。
3)Zookeeeper:
系统中的MasterServer和WorkerServer节点都通过Zookeeper来进行集群管理和容错,zookeeper负责协调整个集群。
4)Alert:
Alert服务,提供告警相关服务(电话、邮件等等)。
5)API接口:
API接口层,主要负责处理前端UI的请求,比如前端要看有哪些任务再执行,执行的进度如何,都要通过API接口调用。
6)UI:
UI是整个系统的前端页面,提供系统的各种可视化操作界面。
3.DolphinScheduler核心架构
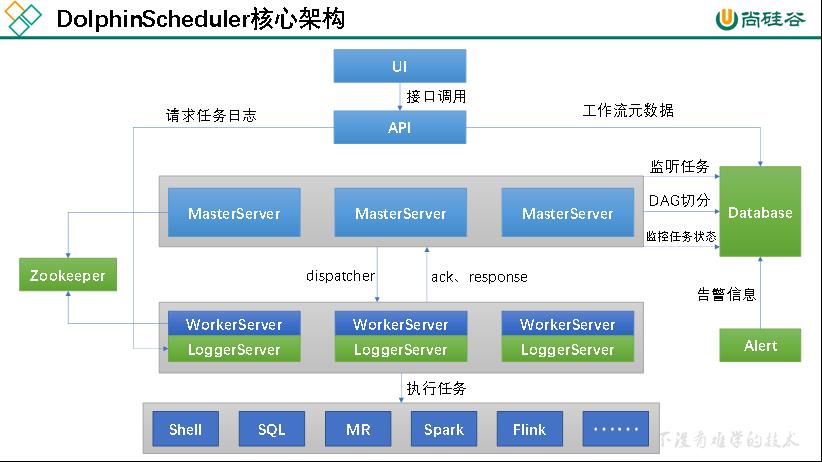
整个流程如下:
1)定义工作流:用户访问UI界面,定义工作流。
2)保存工作流到数据库:定义工作流后要将工作流保存到数据库中,UI无法直接访问数据库,通过调用API接口,将工作流元数据保存到数据库中。
3)工作流切分:保存到数据库后,MasterServer要对工作流进行切分,多个MasterServer之间的地位是平等的,都可以去切分工作流(谁抢到谁去切分),工作流是非共享资源,抢到后需要枷锁,防止别的MasterServer再去抢,这里的锁是分布式锁,靠zookeeper实现。
4)分发任务(工作单元):工作流被切分为任务(工作单元)后,MasterServer将工作单元(任务)分发给WorkerServer(将多个任务分发给多个WorkerServer,WorkerServer间可以并行执行)。WorkerServer在接收到任务后,返回给MasterServer确认信息ack和response,表示已经接收到任务了。
5)执行任务:WorkerServer发送完确认信息后,开始执行任务。
6)执行进度的返回:WorkerServer一边执行任务,一边将执行任务的执行进度返回给MasterServer,MasterServer会把相应任务的执行状态写入到数据库,所以UI界面才可以看到每个任务的执行状况。
组件说明:
1)LoggerServer用来做日志服务,它会把日志信息保存到本地,同时提供一个接口,API Server则可以通过整个接口来查看日志,那么UI可以通过API接口来查看日志。
2)当工作流执行中出现错误时,Alter Server会触发相应的报警通知(打电话、发短信、发邮件(v1.0支持)、企业微信(v1.0支持)…)
二、DolphinScheduler部署说明
1.软硬件环境要求
1.1 操作系统版本要求
操作系统 版本 Red Hat Enterprise Linux 7.0 及以上 CentOS 7.0 及以上 Oracle Enterprise Linux 7.0 及以上 Ubuntu LTS 16.04 及以上
1.2 服务器硬件要求
CPU 内存 网络 4核+ 8GB+ 千兆网卡
当然,硬件不满足也可以使用,就是运行的时候可能会出现错误。
2.部署模式
DolphinScheduler支持多种部署模式,包括单机模式(Standalone)、伪集群模式(Pseudo-Cluster)、集群模式(Cluster)等。
2.1单机模式
单机模式下,所有的服务都集中于一个StandaloneServer进程中,并且在其中内置了注册中心Zookeeper和数据库H2,只需要配置JDK环境,就可以一键启动DolphinScheduler。
一般用于快速体验功能。
2.2 伪集群模式
伪集群模式是在单台机器上部署DolphinScheduler各项服务,该模式下master、worker、api server、logger server等服务都只在同一台机器上。Zookeeper和数据库需单独安装并进行相应配置。
适用于公司中正式上线前的测试集群。
2.3 集群模式
集群模式与伪集群模式的区别就是在多台机器上部署DolohinScheduler各项服务,并且可以配置多个Master及多个Worker。
在这里学习按集群模式学习,调度的时候按单机模式调度,因为配置不够,跑起来容易失败~~~
三、DolphinScheduler集群模式部署
1.集群规划
集群模式下,可配置多个Master及多个Worker。通常可配置2~3个Master,若干个Worker。由于集群资源有限,此处配置一个Master(不过可能存在单点故障问题),三个Worker,集群规划如下:
主机名 配置 hadoop102 master、worker hadoop103 worker hadoop104 worker
2.前置准备工作
1)三个节点均需部署JDK(1.8+),并配置相关环境变量
2)需部署数据库,支持MySQL(5.7+),或者PostgreSQL(8.2.15+)
3)需部署Zookeeper(3.4.6+)
4)三个节点军需安装进程管理工具包psmisc:sudo yum install -y psmisc
3.解压DolphinScheduler安装包
1)上传DolphinScheduler安装包到hadoop102节点的/opt/software目录
2)解压安装包到当前目录(解压目录并非最终的安装目录)
tar -zxvf apache-dolphinscheduler-1.3.9-bin.tar.gz
4.初始化数据库
DolphinScheduler 元数据存储在关系型数据库中,故需创建相应的数据库和用户。
1)创建数据库
mysql> CREATE DATABASE dolphinscheduler DEFAULT CHARACTER SET utf8 DEFAULT COLLATE utf8_general_ci;
2)创建用户
mysql> CREATE USER 'dolphinscheduler'@'%' IDENTIFIED BY 'dolphinscheduler';
注:
若出现以下错误信息,表明新建用户的密码过于简单。
ERROR 1819 (HY000): Your password does not satisfy the current policy requirements
可提高密码复杂度或者执行以下命令减低MySQL面膜强度级别。
mysql> set global validate_password_length=4;
mysql> set global validate_password_policy=0;
3)赋予用户相应权限
mysql> GRANT ALL PRIVILEGES ON dolphinscheduler.* TO 'dolphinscheduler'@'%';
mysql> flush privileges;
4)修改数据源配置文件
进入DolphinScheduler解压目录,修改conf目录下的datasource.properties文件,修改内容如下:
spring.datasource.driver-class-name=com.mysql.jdbc.Driver
spring.datasource.url=jdbc:mysql://hadoop102:3306/dolphinscheduler?useUnicode=true&characterEncoding=UTF-8
spring.datasource.username=dolphinscheduler
spring.datasource.password=dolphinscheduler
5)拷贝MySQL驱动到DolphinScheduler的解压目录下的lib中
6)执行数据库初始化脚本
数据库初始化脚本位于DolphinScheduler解压目录下的script目录中,即/opt/software/ds/apache-dolphinscheduler-1.3.9-bin/script/。
5.配置一键部署脚本
修改解压目录下的conf/config目录下的install_config.conf文件,修改内容如下:
# postgresql or mysql
dbtype="mysql"
# db config
# db address and port
dbhost="hadoop102:3306"
# db username
username="dolphinscheduler"
# database name
dbname="dolphinscheduler"
# db passwprd
# NOTICE: if there are special characters, please use the \\ to escape, for example, `[` escape to `\\[`
password="dolphinscheduler"
# zk cluster
zkQuorum="hadoop102:2181,hadoop103:2181,hadoop104:2181"
# Note: the target installation path for dolphinscheduler, please not config as the same as the current path (pwd)
installPath="/opt/module/dolphinscheduler"
# deployment user
# Note: the deployment user needs to have sudo privileges and permissions to operate hdfs. If hdfs is enabled, the root directory needs to be created by itself
deployUser="atguigu"
# resource storage type: HDFS, S3, NONE
resourceStorageType="HDFS"(存放资源的地方)
# resource store on HDFS/S3 path, resource file will store to this hadoop hdfs path, self configuration, please make sure the directory exists on hdfs and have read write permissions. "/dolphinscheduler" is recommended
resourceUploadPath="/dolphinscheduler"(存放资源的路径)
# if resourceStorageType is HDFS,defaultFS write namenode address,HA you need to put core-site.xml and hdfs-site.xml in the conf directory.
# if S3,write S3 address,HA,for example :s3a://dolphinscheduler,
# Note,s3 be sure to create the root directory /dolphinscheduler
defaultFS="hdfs://hadoop102:8020"
# resourcemanager port, the default value is 8088 if not specified
resourceManagerHttpAddressPort="8088"
# if resourcemanager HA is enabled, please set the HA IPs; if resourcemanager is single, keep this value empty
yarnHaIps=
# if resourcemanager HA is enabled or not use resourcemanager, please keep the default value; If resourcemanager is single, you only need to replace ds1 to actual resourcemanager hostname
singleYarnIp="hadoop103"
# who have permissions to create directory under HDFS/S3 root path
# Note: if kerberos is enabled, please config hdfsRootUser=
hdfsRootUser="atguigu"
# api server port
apiServerPort="12345"
# install hosts
# Note: install the scheduled hostname list. If it is pseudo-distributed, just write a pseudo-distributed hostname
ips="hadoop102,hadoop103,hadoop104"
# ssh port, default 22
# Note: if ssh port is not default, modify here
sshPort="22"
# run master machine
# Note: list of hosts hostname for deploying master
masters="hadoop102"
# run worker machine
# note: need to write the worker group name of each worker, the default value is "default"
workers="hadoop102:default,hadoop103:default,hadoop104:default"
(脚本所在的节点得有运行脚本所需的服务,例如DataX或Hive)
# run alert machine
# note: list of machine hostnames for deploying alert server
alertServer="hadoop102"
# run api machine
# note: list of machine hostnames for deploying api server
apiServers="hadoop102"
上面中出现的是要修改的地方,而不是说最终文件内容就是上面的内容。
6.一键部署DolphinScheduler
1)启动Zookeeper集群:zk.sh start
2)一键部署并启动DolphinScheduler:./install.sh
3)查看DolphinScheduler进程
只有hadoop、zookeeper和DolphinScheduler相关进程。
--------- hadoop102 ----------
29139 ApiApplicationServer
28963 WorkerServer
3332 QuorumPeerMain
2100 DataNode
28902 MasterServer
29081 AlertServer
1978 NameNode
29018 LoggerServer
2493 NodeManager
29551 Jps
--------- hadoop103 ----------
29568 Jps
29315 WorkerServer
2149 NodeManager
1977 ResourceManager
2969 QuorumPeerMain
29372 LoggerServer
1903 DataNode
--------- hadoop104 ----------
1905 SecondaryNameNode
27074 WorkerServer
2050 NodeManager
2630 QuorumPeerMain
1817 DataNode
27354 Jps
27133 LoggerServer
4)访问DolphinScheduler的UI页面
DolphinScheduler的UI地址为:http://hadoop102:12345/dolphinscheduler
初始用户的用户名为:admin,密码为:dolphinscheduler123
7.DolphinScheduler启停命令
DolphinScheduler的启停脚本均位于其安装目录的bin目录下。
1)一键启停所有服务
启动:./bin/start-all.sh
停止:./bin/stop-all.sh
2)启停Master
启动:./bin/dolphinscheduler-daemon.sh start master-server
停止:./bin/dolphinscheduler-daemon.sh stop master-server
3)启停Worker
启动:./bin/dolphinscheduler-daemon.sh start worker-server
停止:./bin/dolphinscheduler-daemon.sh stop worker-server
4)启停API
启动:./bin/dolphinscheduler-daemon.sh start api-server
停止:./bin/dolphinscheduler-daemon.sh stop api-server
5)启停Logger
启动:./bin/dolphinscheduler-daemon.sh start logger-server
停止:./bin/dolphinscheduler-daemon.sh stop logger-server
6)启停Alert
启动:./bin/dolphinscheduler-daemon.sh start alert-server
停止:./bin/dolphinscheduler-daemon.sh stop alert-server
四、DolphinScheduler入门
DolphinScheduler的UI页面首页:
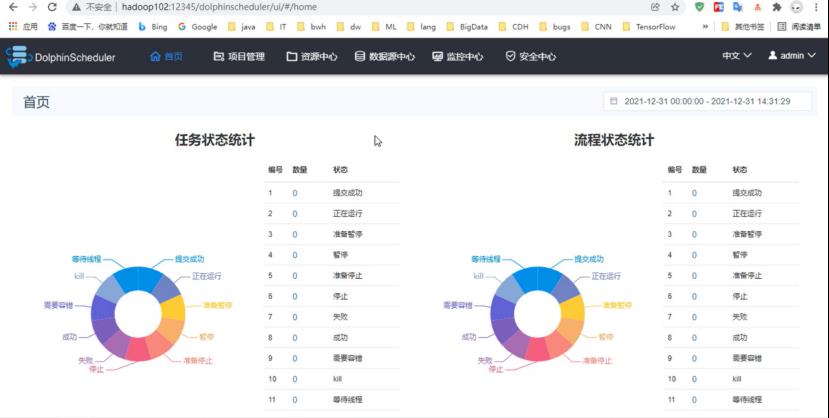
流程:工作流
任务:工作单元
1.安全中心配置
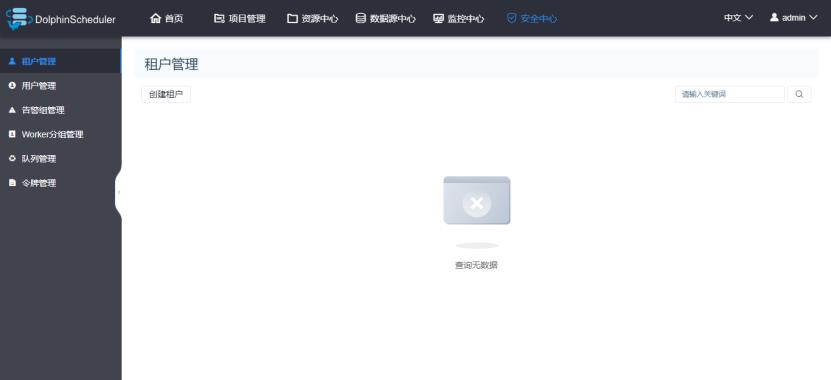
安全中心主要的功能:租户管理、用户管理、告警组管理、Worker分组管理、队列管理、令牌管理等功能。安全中心只有管理员账户才有操作权限。
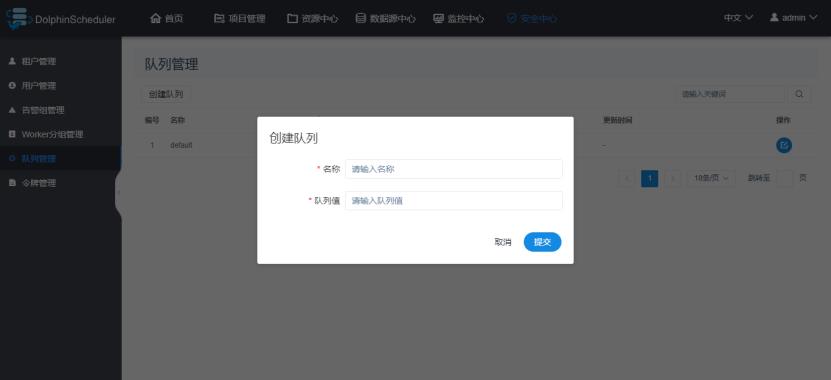
1.1 队列管理
这里的队列管理对应的是Yarn调度器的资源队列。队列只对跑在Yarn上的任务类型有效。在这里创建的队列,对Yarn调度器里的队列没有任何影响。
可以不创建队列,使用默认队列。
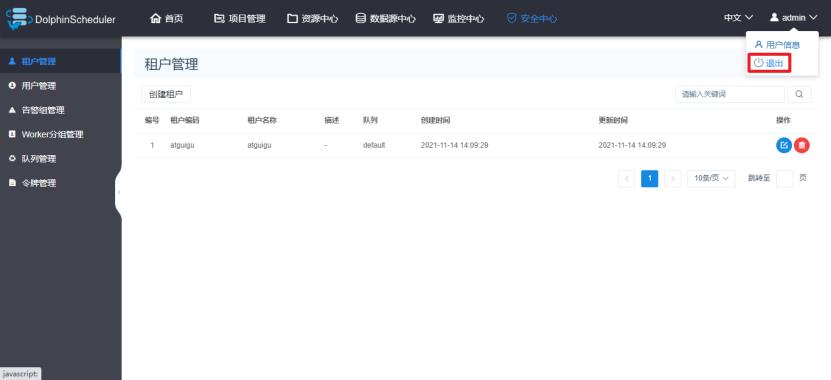
1.2 租户管理
租户指的是Linux系统的用户,是WorkerServer执行任务时使用的用户。如果WorkerServer所在节点不存在这个用户,WorkerServe会在执行任务时自动创建这个用户。

配置说明:
1)租户编码:是WorkerServer执行任务时使用的用户名,也是Linux系统中的用户名,这个用户也是要访问HDFS资源的用户。
2)租户名称:这是在DolphinScheduler中显示的名称,可随便定义。
3)队列:队列就是租户提交Yarn任务时使用的队列,默认为default队列。
1.3 用户管理
用户指的是DolphinScheduler的用户,用来登录DolphinScheduler。用户分为管理员和普通用户。
管理员:可以授权和管理用户等权限。
普通用户:可以创建项目、定义工作流、执行工作流等权限。
此处创建一个普通用户atguigu,如下图:
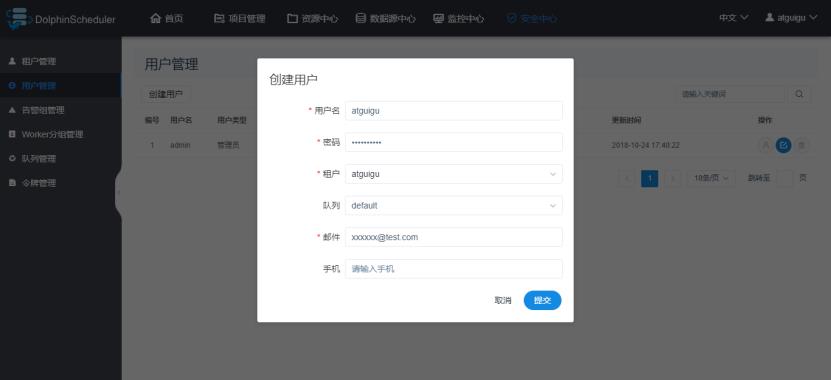
配置说明:
用户名:DolphinScheduler登录的用户名
租户:与该用户关联的租户
队列:默认为租户关联的队列
邮件、手机号:主要用于告警通知
创建结果:
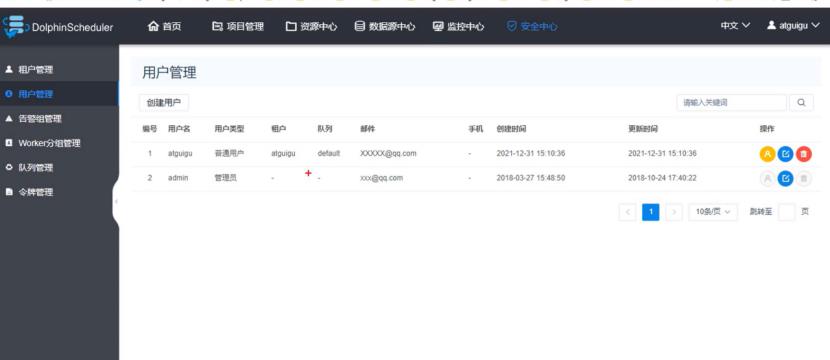
可以看出,管理员用户没有租户,没有队列,不能定义工作流,不能创建项目,无法提交任务。
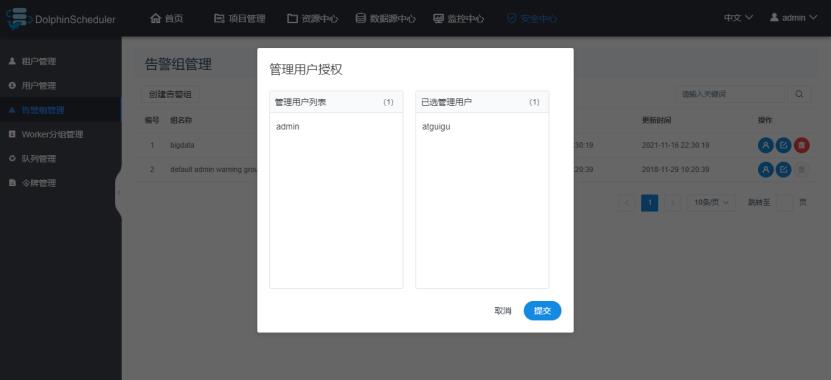
1.4 告警组管理
告警组可以包含多名用户,用于指定告警发送对象。
1)创建告警组
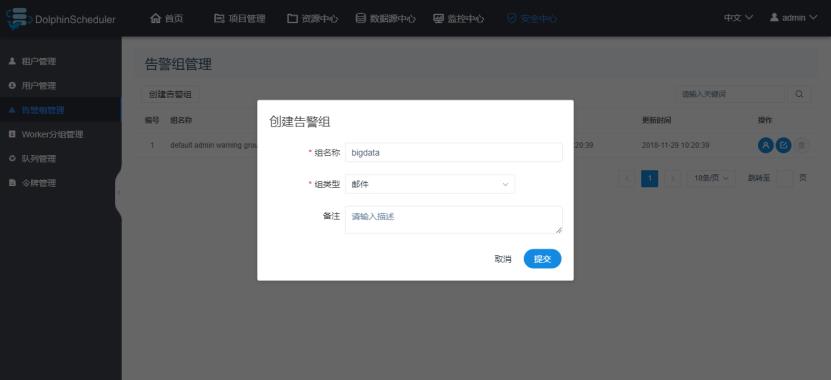
2)增加用户
出现问题时,可以按组进行通知,将消息发送到组内的每一个人。
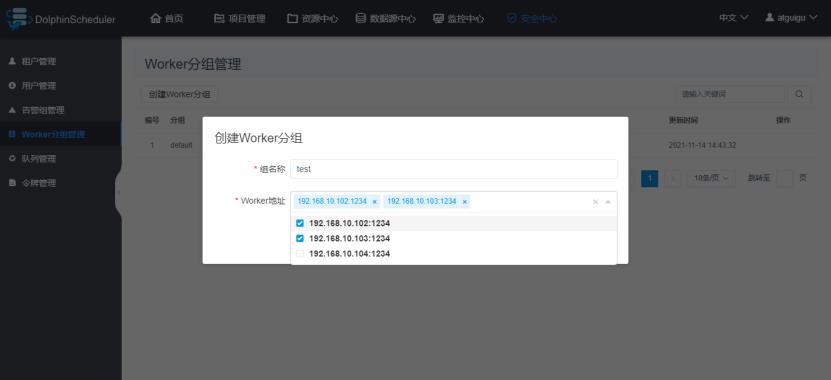
1.5 Worker分组管理
在任务执行时,可以将任务分配给指定的Worker组,最终由该组中的Worker节点执行该任务。默认情况下,所有Worker均位于default组。
此处也可以不做配置。
1.6 令牌管理(一般用不到)
令牌用于通过接口访问DolphinScheduler各项服务时的用户验证。普通用户通过UI页面访问各项服务时,无需使用令牌。若需将DolphinScheduler与第三方服务进行集成,则需调用其接口,此时需使用令牌。
到目前为止,我们真正需要做的只有创建租户和创建用户这两个步骤。
2.项目管理
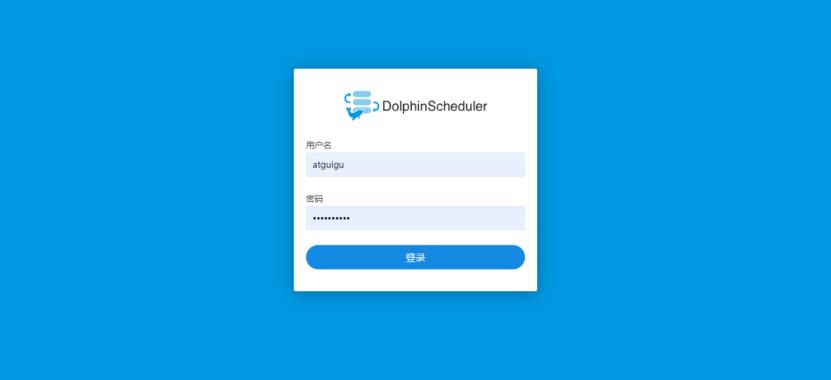
上面说到了管理员用户无法创建项目,所以要退出管理员用户,切换到普通用户。
2.1 切换用户
1)admin用户退出
2)使用atguigu用户登录
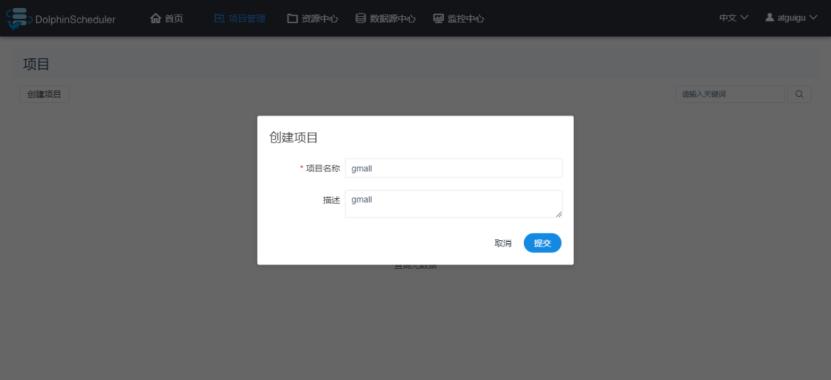
2.2 创建项目
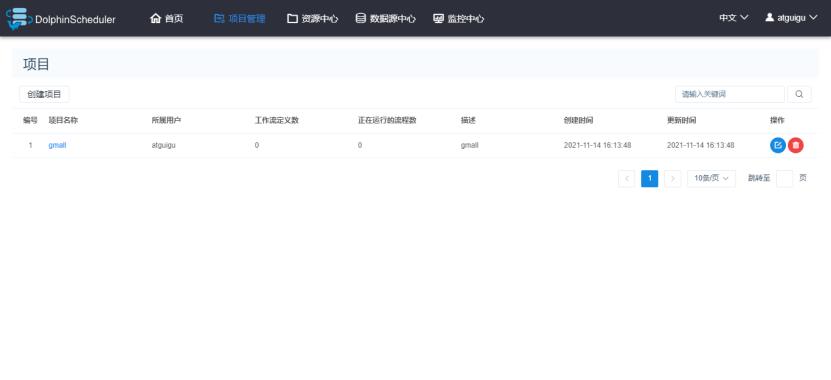
2.3 查看项目
3.工作流基础配置
工作流配置页面,分为三个模块:工作流定义、工作流实例和任务实例。
工作流定义:用于定义工作流,包括工作流各个节点(一个工作单元)任务详情和各个节点的依赖关系。
工作流实例:每执行一次工作流,就会生成一个工作流实例。可以在这个地方查看所有运行过的工作流。
任务实例:工作流中的每个节点(任务),每执行一次就会生成一个任务实例。在这里可以查看所有执行过的节点任务。
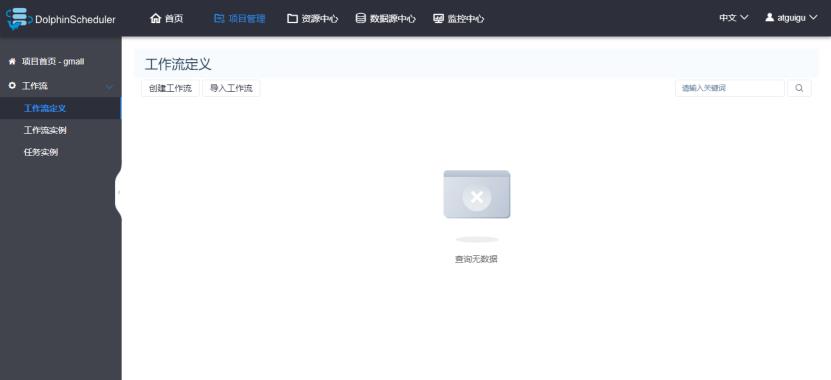
3.1 工作流定义
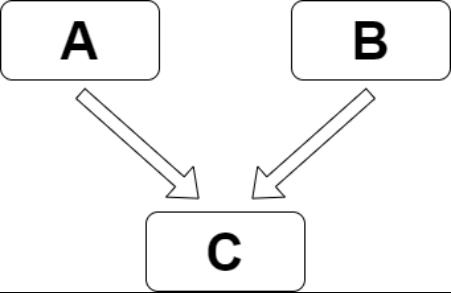
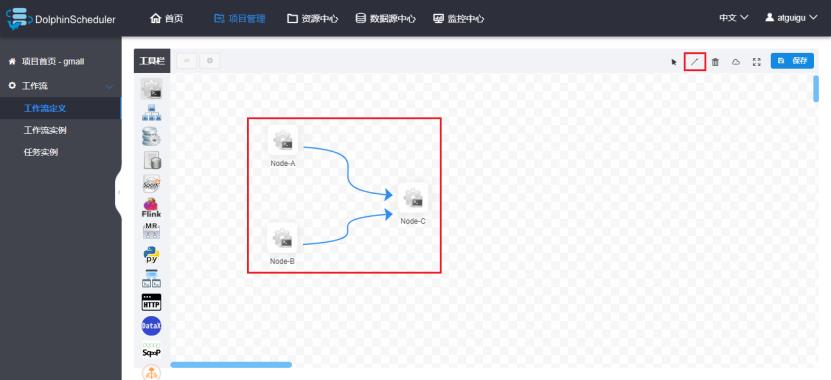
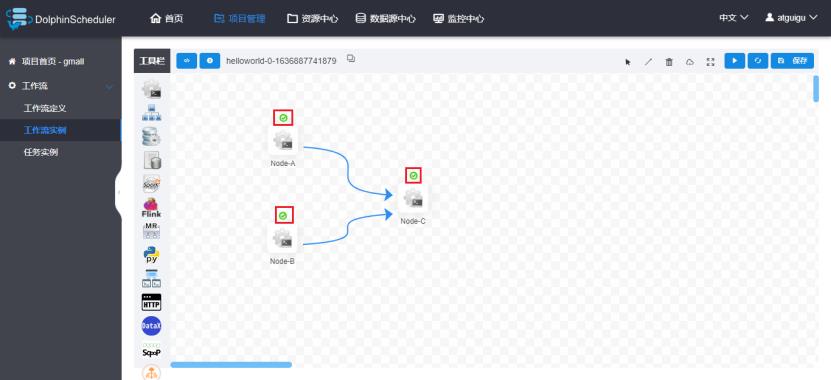
这里模拟一个真实的需求,需要定义三个shell类型的任务节点,分别为A、B、C,它们的关系如下图:
定义过程如下:
1)创建工作流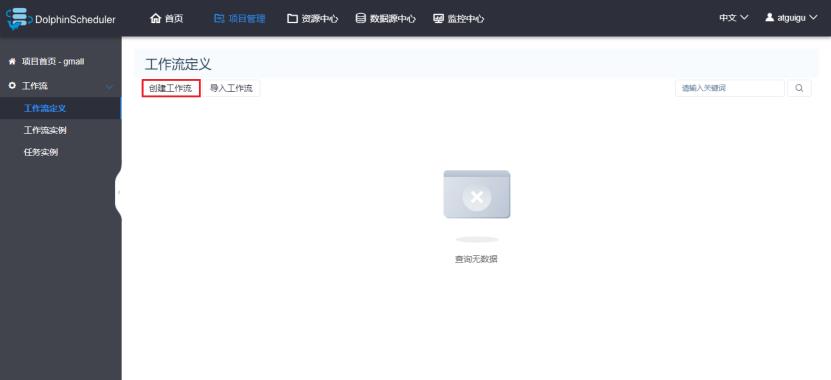
2)配置任务节点
i.节点A
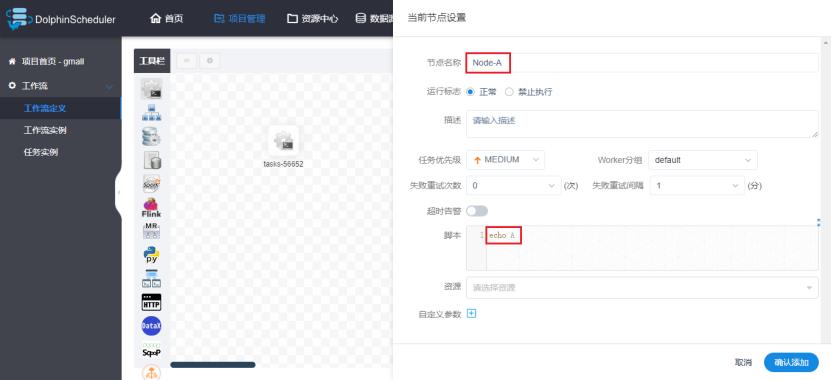
配置说明:
运行标志:指的是这个节点是否要执行,比如由5个节点,只需要后面4个节点执行,第一个节点就可以设置为禁止执行,这样就不会执行了。
失败重试次数:当执行失败时会进行重试,但这只适用于因为资源不够时导致的执行失败。如果是语句有问题,无论重复多少次都没办法成功。
脚本:这就是要执行的脚本内容。
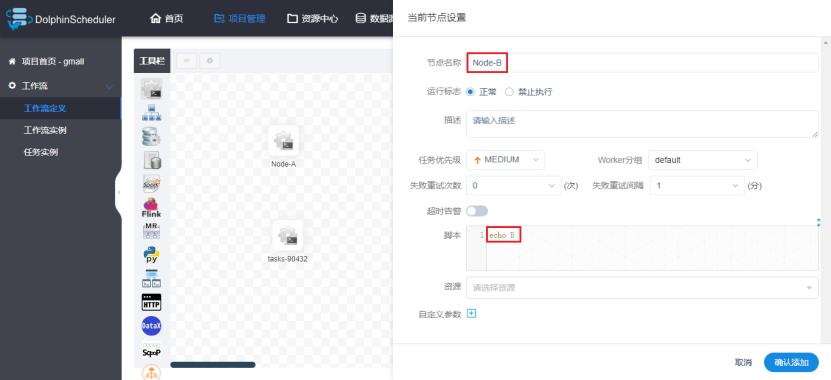
ii.节点B:
iii.节点C

3)配置任务节点的依赖关系
点击右上角的箭头,在图中连线即可。
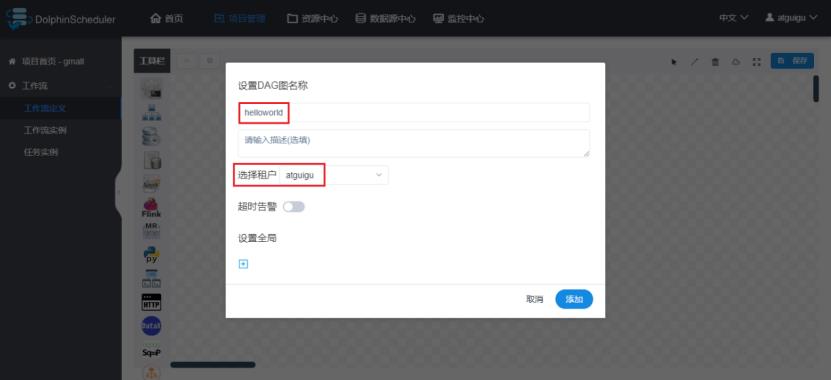
4)保存工作流定义
这里设置整个工作流的名称,选择执行的租户。
3.2 提交执行工作流
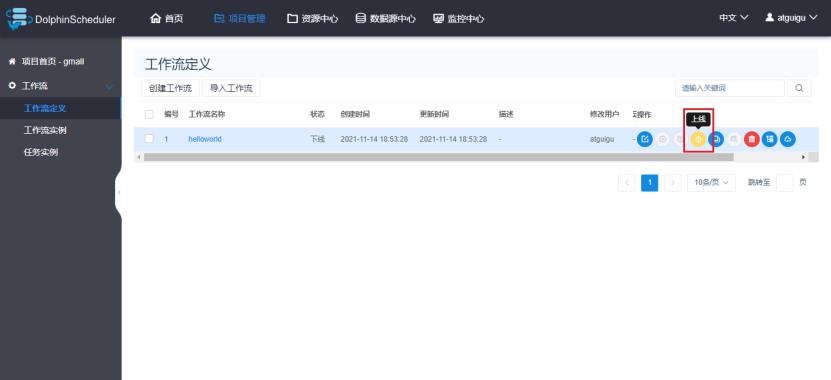
1)上线工作流
工作流必须先上线才能够执行。处于上线状态的工作流的配置不可以修改,如果需要修改,必须先下线。
选择定义好的工作流,点击上线按钮。
2)单次运行工作流

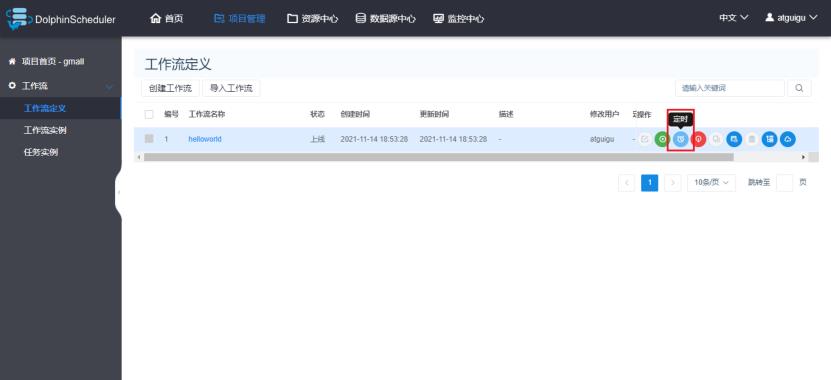
3)定时执行工作流
i.点击定时
ii.配置定时规则
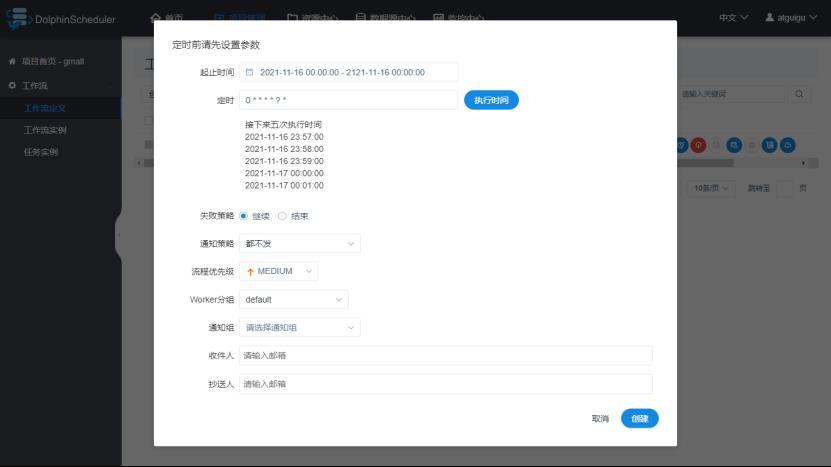
配置说明:
在定时那个位置可以手动选择定时的时间。
失败策略:并行执行的工作单元,一个地方挂了,另外一个是继续执行(但是最终到后面也是无法继续执行下去的)还是结束执行,如下图。

补数:前几天的任务失败了,到今天才发现,这样就需要把之前的任务重新跑一遍,这就叫做补数。
iii.定时管理
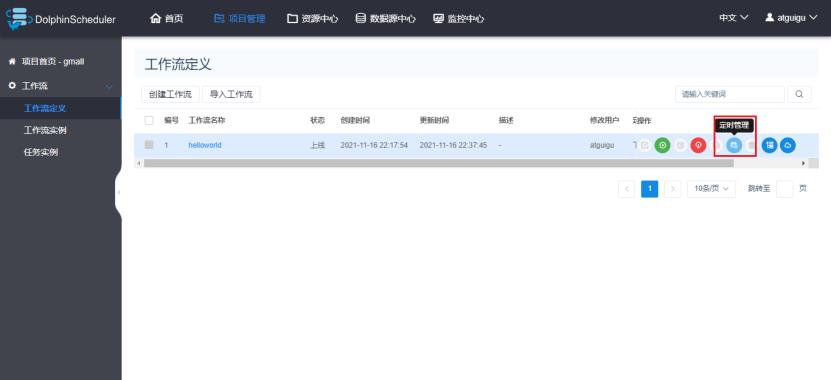
iiii.定时上线
设置了定时的工作流,需要点击上线才真正完成了工作流的定时。

3.3 查看工作流实例
1)查看所有工作流实例
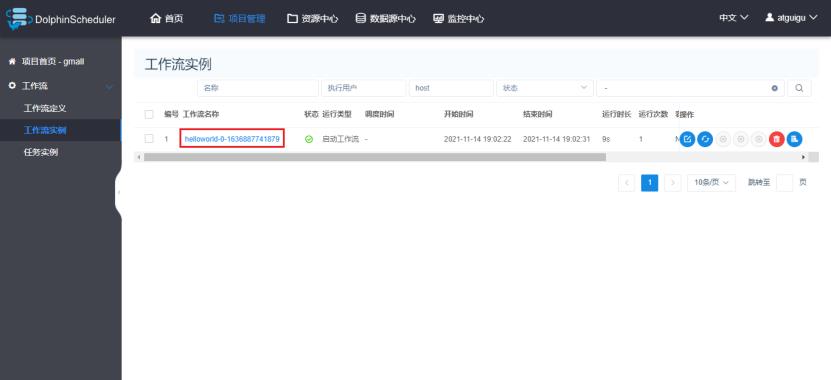
2)查看工作流执行状态
绿色对号代表执行成功,红色叉号代表执行失败。
3.4 查看任务实例
1)查看所有任务实例
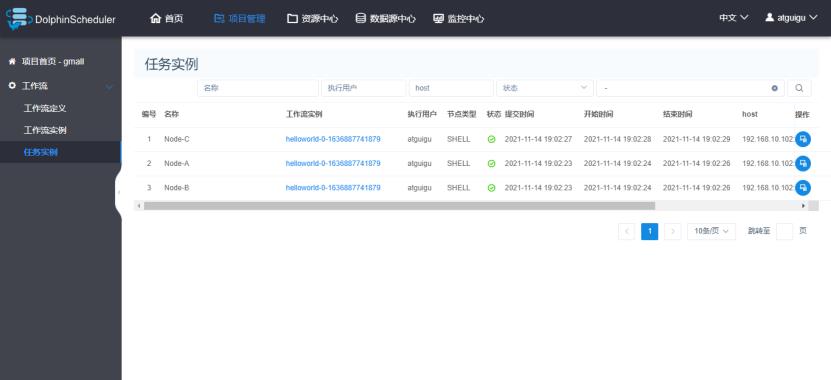
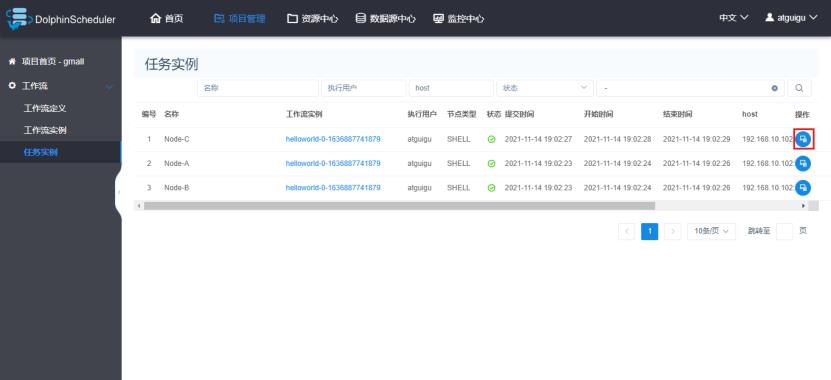
2)查看任务实例日志

五、DolphinScheduler进阶
1.工作流传参
DolphinScheduler支持对任务节点进行灵活的传参,任务节点可通过$参数名引用参数值。
1.1 局部参数
局部参数只是针对单个任务节点有效的参数。
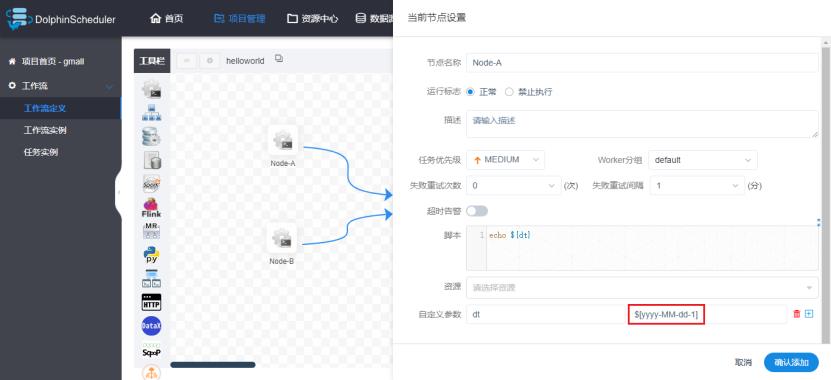
1)修改helloworld工作流Node-A节点如下:
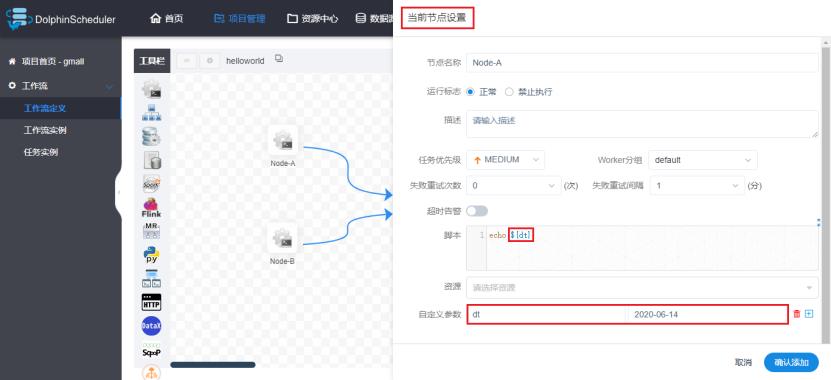
在自定义参数中输入对应的参数名和值,不过这里的值是固定的。
2)保存工作流并运行,查看Node-A输出日志。
1.2 全局参数
全局参数是指对整个工作流的所有任务节点都有效的参数。
1)修改helloworld工作流每个任务节点如下(主要是为了添加参数)


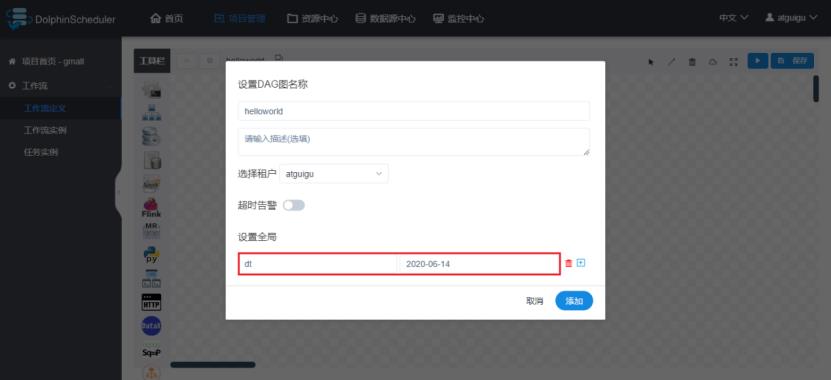
2)保存工作流,在保存时设置全局参数(这里的值也是固定的)
3)执行工作流,查看三个任务节点输出的日志。
1.3 系统内置参数
上面我们可以给参数传一个固定的值,但是使用起来非常不方便,因为一般情况下需要传参的地方的值每天都是变化的。DolphinScheduler提供了一些时间相关的系统参数,方便定时调度使用。
1)系统参数
参数 说明 $system.biz.date 定时时间前一天,格式为 yyyyMMdd $system.biz.curdate 定时时间,格式为 yyyyMMdd $system.datetime 定时时间,格式为 yyyyMMddHHmmss
2)时间自定义参数
上面系统提供的时间参数格式固定,比如2022年3月6日就是20220306,我们很少需要这样格式的数据,因此我们需要自定义时间参数的格式,可以设置任意格式、任意时间的日期。
i.自定义日期格式
$[yyyyMMdd], $[HHmmss], $[yyyy-MM-dd]
ii.自定义时间
参数 说明 $[add_months(yyyyMMdd,12*N)] 后 N 年 $[add_months(yyyyMMdd,-12*N)] 前 N 年 $[add_months(yyyyMMdd,N)] 后 N 月 $[add_months(yyyyMMdd,-N)] 前 N 月 $[yyyyMMdd+7*N] 后 N 周 $[yyyyMMdd-7*N] 前 N 周 $[yyyyMMdd+N] 后 N 天 $[yyyyMMdd-N] 前 N 天 $[yyyyMMdd-N] 后 N 小时 $[HHmmss-N/24] 前 N 小时 $[HHmmss+N/24/60] 后 N 分钟 $[HHmmss-N/24/60] 前 N 分钟
日期格式是在日期时间中使用的。
iii.配置案例
若执行的脚本需要一个格式为yyyy-MM-dd的前一天日期的参数,进行如下配置即可。
2.引用依赖资源
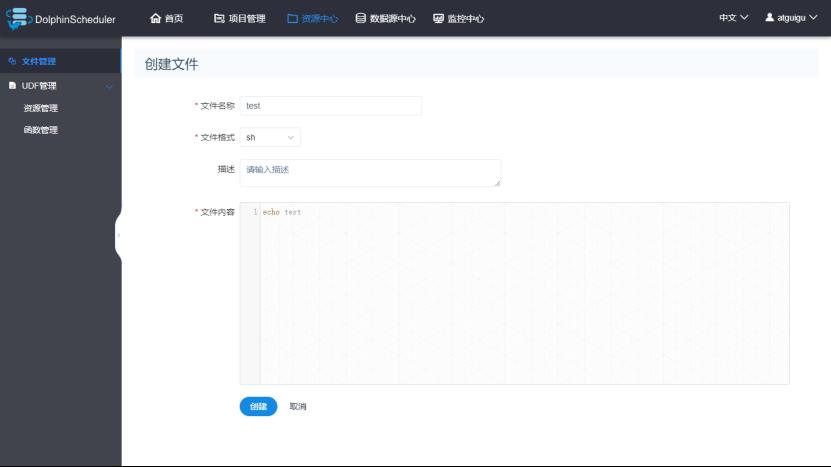
有些任务需要引用一些额外的资源,例如MR、Spark等任务需引用jar包,Shell任务需要引用其他脚本等。或者就像数仓项目中写好的脚本,可以直接在这里上传,然后在工作流里的工作单元里可以直接引用,不用重新写语句。DolphinScheduler提供了资源中心来对这些资源进行统一管理。
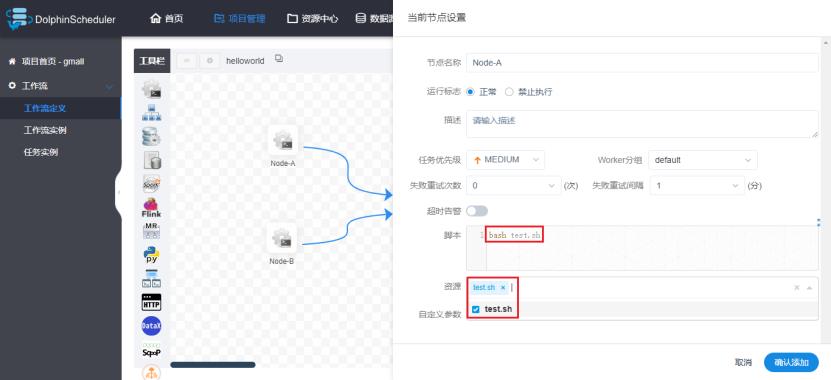
以shell脚本为例,进行一个简单的演示:
1)在资源中心创建脚本(这个脚本实际上是放到HDFS上,路径为/HolphinSchedeler/用户名/resources)
2)配置Shell任务引用脚本
修改工作流,引用上述脚本,要在脚本内容框中写:bash 脚本名称
3)保存工作流并执行,查看对应节点输出日志。
3.告警通知
这里简单介绍使用邮件通知的方式,如果要使用电话通知的方式,需要跟第三方告警系统进行集成。
3.1 准备电子邮箱账户
如需使用DolphinScheduler的邮件告警通知功能,需要准备一个电子邮箱账号,并启用SMTP服务。
1)点击邮箱账号设置
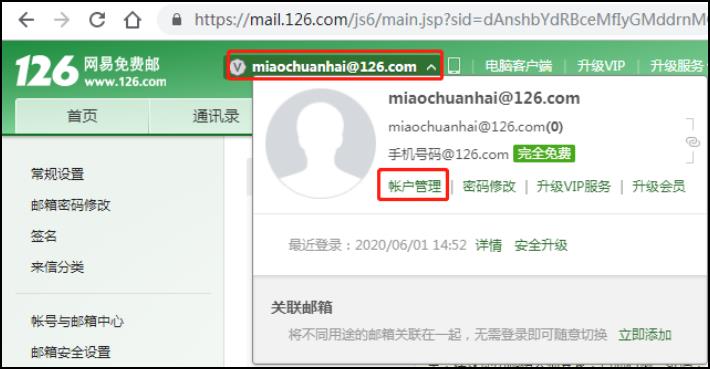
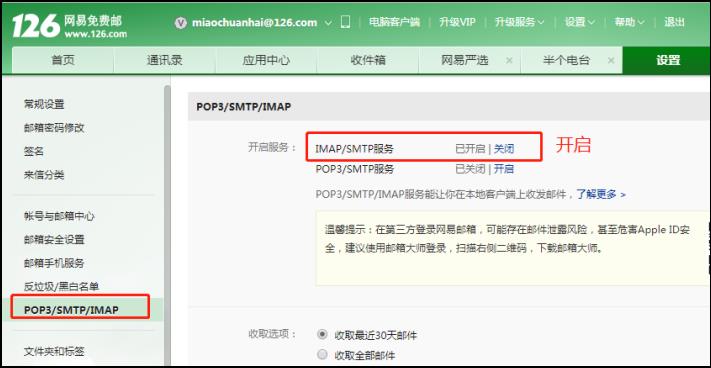
2)开启SMTP服务
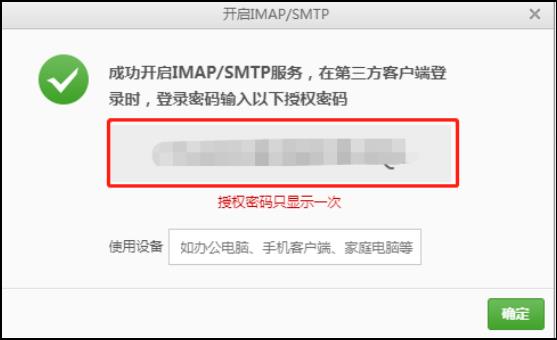
3)获取授权码(是在第三方登录时输入的密码)
3.2 配置AlertServer
修改AlertServer配置文件/opt/module/dolphinscheduler/conf/alert.properties,共有以下几种方式可以选择:
1)不使用加密协议
#alert type is EMAIL/SMS
alert.type=EMAIL
# mail server configuration
mail.protocol=SMTP
mail.server.host=smtp.qq.com
mail.server.port=25
mail.sender=*********@qq.com
mail.user=*********@qq.com
mail.passwd=*************
# TLS
mail.smtp.starttls.enable=false
# SSL
mail.smtp.ssl.enable=false
mail.smtp.ssl.trust=smtp.exmail.qq.com
上面的mail.passwd就是获取的授权码。
TLS和SSL代表两种加密协议,最多只能选择开启一种,也可以不选。
2)使用STARTTLS加密协议
#alert type is EMAIL/SMS
alert.type=EMAIL
# mail server configuration
mail.protocol=SMTP
mail.server.host=smtp.qq.com
mail.server.port=587
mail.sender=*********@qq.com
mail.user=*********@qq.com
mail.passwd=*************
# TLS
mail.smtp.starttls.enable=true
# SSL
mail.smtp.ssl.enable=false
mail.smtp.ssl.trust=smtp.qq.com
3)使用SSL加密协议
#alert type is EMAIL/SMS
alert.type=EMAIL
# mail server configuration
mail.protocol=SMTP
mail.server.host=smtp.qq.com
mail.server.port=465
mail.sender=*********@qq.com
mail.user=*********@qq.com
mail.passwd=*************
# TLS
mail.smtp.starttls.enable=false
# SSL
mail.smtp.ssl.enable=true
mail.smtp.ssl.trust=smtp.qq.com
注:
各邮箱支持的加密协议:https://blog.csdn.net/wustzjf/article/details/52481309
使用阿里云服务器的,需要配置加密协议,因为阿里云把25号端口封禁了,防止发送垃圾邮件。加密后端口发生了改变,可以发送邮件。
3.3 测试
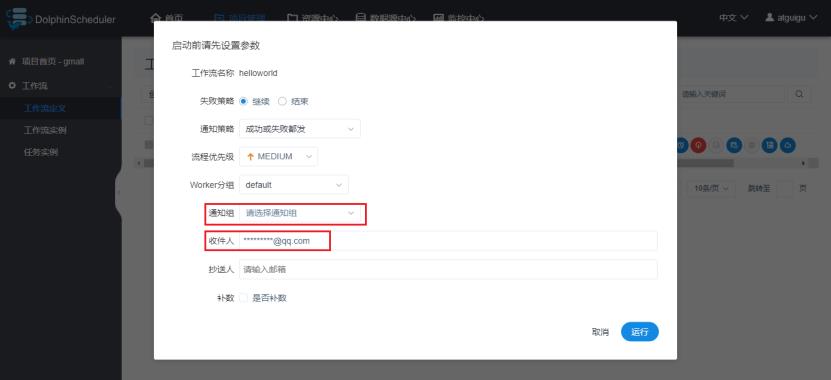
1)运行工作流

2)选择通知策略
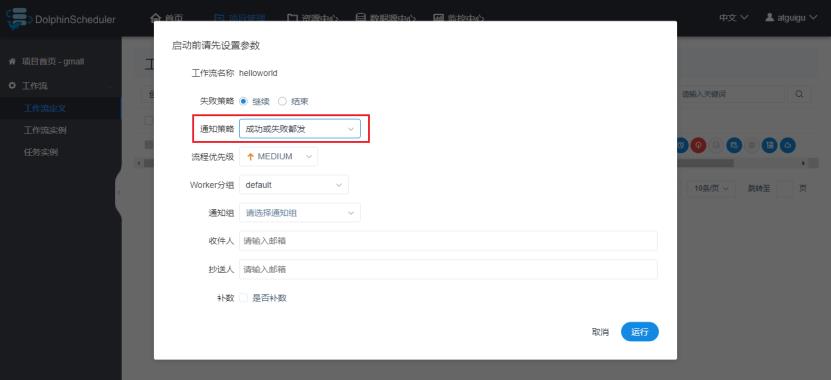
3)选择通知人
通知人可以通过邮箱执行,也可以通过通知组指定。
4.工作流失败重跑
若工作流执行到一半失败了,需要重新启动工作流。重新启动时可选择从起点开始执行,也可选择从断点开始执行。
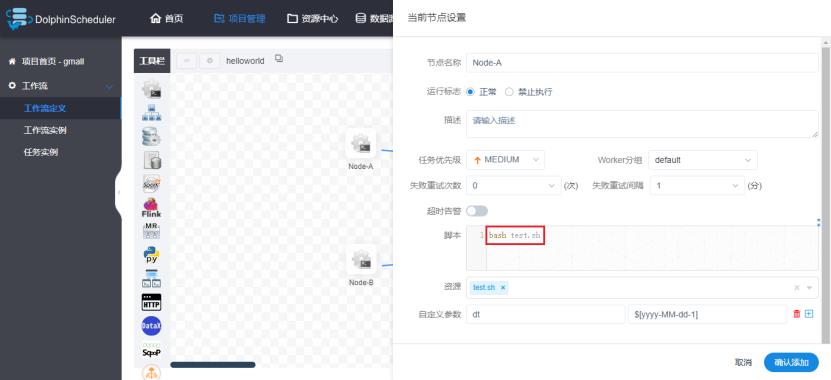
1)模拟失败场景
修改Node-A配置:
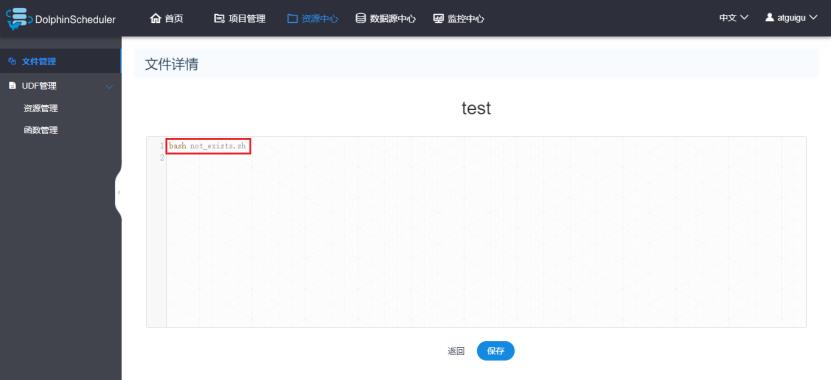
修改资源中心的test.sh文件内容,调用一个不存在的shell文件:
2)运行工作流
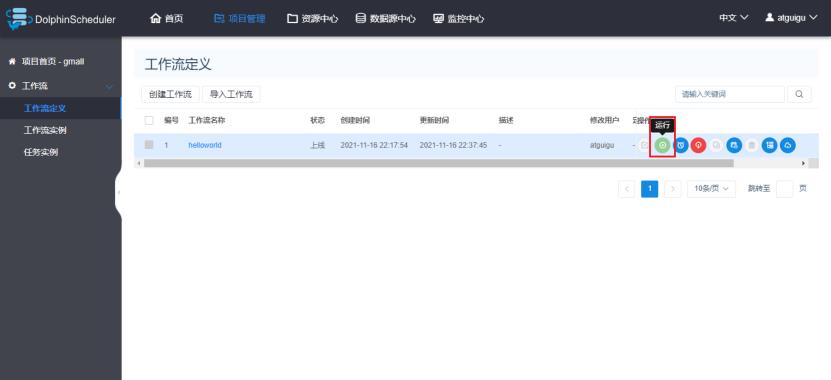
3)查看工作流实例
4)工作失败重跑
点击重跑,可以重跑整个工作流
5)断点处重跑
点击恢复失败按钮,可以从失败的地方进行重跑。其他成功的不会进行重跑。
以上是关于dolphinscheduler 2.0.6 资源中心改造(使用本地文件系统,不再依赖HDFS)的主要内容,如果未能解决你的问题,请参考以下文章