React Native Autolinking 源码深入分析
Posted 薛瑄
tags:
篇首语:本文由小常识网(cha138.com)小编为大家整理,主要介绍了React Native Autolinking 源码深入分析相关的知识,希望对你有一定的参考价值。
目录
关于link
link 就是把 node_modules 中某个库的原生部分,加入到自己的原生项目中,例如:android的autolink是在yourapp/build.gradle、setting.gradle 添加第三方库、生成PackageList
关于 react-native link 、 Manual Linking、 autolink 的更多信息,可以参考这里
What is react-native link?,他们的目的都是link。本篇文章主要分析autolink 的源码,autolinking 是通过React-Native脚手架 来配合实现的,所以源码分析中,第2点,都是关于脚手架源码分析
autolink
autolink 的使用需要在两个文件中引入native_modules.gradle,如下:
setting.gradle
apply from: file("../node_modules/@react-native-community/cli-platform-android/native_modules.gradle");
//调用脚本中的方法
applyNativeModulesSettingsGradle(settings)
yourapp/build.gradle
apply from: file("../../node_modules/@react-native-community/cli-platform-android/native_modules.gradle");
//调用脚本中的方法
applyNativeModulesAppBuildGradle(project)
关于setting.gradle、build.gradle 执行时机的具体分析,可阅读我之前写的Gradle 源码分析
这里我们直接从native_modules.gradle 开始分析
源码分析
1、 native_modules.gradle
首先看一下 脚本中 applyNativeModulesSettingsGradle、applyNativeModulesAppBuildGradle 这两个函数
def projectRoot = rootProject.projectDir

//ReactNativeModules 是native_modules.gradle 中的类,后面会分析
def autoModules = new ReactNativeModules(logger, projectRoot)


/** -----------------------
 *    Exported Extensions
 * ------------------------ */

ext.applyNativeModulesSettingsGradle =  DefaultSettings defaultSettings, String root = null ->
  ...
  //作用是,和 手动在 setting.gradle 中include 第三方库 的效果一样。而是向 Gradle解析setting.gradle的内容时创建 的对象加入 第三方库的信息
  autoModules.addReactNativeModuleProjects(defaultSettings)


ext.applyNativeModulesAppBuildGradle =  Project project, String root = null ->
  ...
  //原理同setting.gradle的一样
  autoModules.addReactNativeModuleDependencies(project)

  def generatedSrcDir = new File(buildDir, "generated/rncli/src/main/java")
  def generatedCodeDir = new File(generatedSrcDir, generatedFilePackage.replace('.', '/'))

  task generatePackageList
    doLast
      autoModules.generatePackagesFile(generatedCodeDir, generatedFileName, generatedFileContentsTemplate)


  //把generatePackageList 任务 放在build之前执行
  preBuild.dependsOn generatePackageList

  android
    sourceSets
      main
        java
          srcDirs += generatedSrcDir
这里先给出整篇的总流程,下面在逐一进入详细分析
1、这两个函数的调用,都是通过类ReactNativeModules 中的方法来实现的。所以会先创建ReactNativeModules对象,在构造函数中,调用getReactNativeConfig来获取所有 node_modules中的原生库信息(包括packageName、构造函数等)
2、调用addReactNativeModuleProjects,向setting.gradle 中引入库
3、调用addReactNativeModuleDependencies,向build.gradle中引入库
4、调用generatePackagesFile,生成PackageList 类,用于在MainApplication 初始化ReactNativeHost时 getPackages 中使用。(关于ReactNativeHost 在RN的作用,可查看我之前写的文章React Native 源码分析(一)——启动流程)
下面就开始分析getReactNativeConfig,如何拿到、以及拿到哪些 原生工程的信息
2、getReactNativeConfig
2.1、getReactNativeConfig
ArrayList<HashMap<String, String>> getReactNativeConfig()
    if (this.reactNativeModules != null) return this.reactNativeModules

    ArrayList<HashMap<String, String>> reactNativeModules = new ArrayList<HashMap<String, String>>()
    HashMap<String, ArrayList> reactNativeModulesBuildVariants = new HashMap<String, ArrayList>()

    //通过 require 引入cli库
    def cliResolveScript = "console.log(require('react-native/cli').bin);"
    String[] nodeCommand = ["node", "-e", cliResolveScript]
    //找到cli库 bin.js 的路径
    def cliPath = this.getCommandOutput(nodeCommand, this.root)
    //调用bin.js 参数是config
    String[] reactNativeConfigCommand = ["node", cliPath, "config"]
    def reactNativeConfigOutput = this.getCommandOutput(reactNativeConfigCommand, this.root)
    //下面对 node bin.js conofig 输出的结果进行处理
    def json
    try
      json = new JsonSlurper().parseText(reactNativeConfigOutput)
     catch (Exception exception)
      throw new Exception("Calling `$reactNativeConfigCommand` finished with an exception. Error message: $exception.toString(). Output: $reactNativeConfigOutput");

    def dependencies = json["dependencies"]
    def project = json["project"]["android"]

    if (project == null)
      throw new Exception("React Native CLI failed to determine Android project configuration. This is likely due to misconfiguration. Config output:\\n$json.toMapString()")


    dependencies.each  name, value ->
      def platformsConfig = value["platforms"];
      def androidConfig = platformsConfig["android"]

      if (androidConfig != null && androidConfig["sourceDir"] != null)
        this.logger.info("$LOG_PREFIXAutomatically adding native module '$name'")

        HashMap reactNativeModuleConfig = new HashMap<String, String>()
        def nameCleansed = name.replaceAll('[~*!\\'()]+', '_').replaceAll('^@([\\\\w-.]+)/', '$1_')
        reactNativeModuleConfig.put("name", name)
        reactNativeModuleConfig.put("nameCleansed", nameCleansed)
        reactNativeModuleConfig.put("androidSourceDir", androidConfig["sourceDir"])
        reactNativeModuleConfig.put("packageInstance", androidConfig["packageInstance"])
        reactNativeModuleConfig.put("packageImportPath", androidConfig["packageImportPath"])
        if (!androidConfig["buildTypes"].isEmpty())
          reactNativeModulesBuildVariants.put(nameCleansed, androidConfig["buildTypes"])

        this.logger.trace("$LOG_PREFIX'$name': $reactNativeModuleConfig.toMapString()")

        reactNativeModules.add(reactNativeModuleConfig)
       else
        this.logger.info("$LOG_PREFIXSkipping native module '$name'")


    return [reactNativeModules, reactNativeModulesBuildVariants, json["project"]["android"]["packageName"]];
使用下面这条命令,来查看node_modules中有哪些使用了原生的依赖
node ./node_modules/@react-native-community/cli/build/bin.js config
输出如下:(只贴出了一个库的信息)
  "root": "/xxxxxxxxxxx",
  "reactNativePath": "/xxxxxx/node_modules/react-native",
  "dependencies":
    "react-native-code-push":
      "root": "/xxxxxx/node_modules/react-native-code-push",
      "name": "react-native-code-push",
      "platforms":
        "ios":
          "sourceDir": "/xxxxx/node_modules/react-native-code-push/ios",
          "folder": "/xxxxx/node_modules/react-native-code-push",
          "pbxprojPath": "/xxxxx/node_modules/react-native-code-push/ios/CodePush.xcodeproj/project.pbxproj",
          "podfile": null,
          "podspecPath": "/xxxxx/node_modules/react-native-code-push/CodePush.podspec",
          "projectPath": "/xxxxx/node_modules/react-native-code-push/ios/CodePush.xcodeproj",
          "projectName": "CodePush.xcodeproj",
          "libraryFolder": "Libraries",
          "sharedLibraries": [],
          "plist": [],
          "scriptPhases": [],
          "configurations": []
        ,
        "android":
          "sourceDir": "/xxxxx/node_modules/react-native-code-push/android",
          "folder": "/xxxxx/node_modules/react-native-code-push",
          "packageImportPath": "import com.microsoft.codepush.react.CodePush;",
          "packageInstance": "new CodePush(BuildConfig.DEBUG ? BuildConfig.CODE_PUSH_KEY_DEV : BuildConfig.CODE_PUSH_KEY, getApplicationContext(), BuildConfig.DEBUG,BuildConfig.CODE_PUSH_SERVER)",
          "buildTypes": []

      ,
      "assets": [],
      "hooks": ,
      "params": []
主要是获取node bin.js conofig 输出的结果,然后按照一定格式输出,最终给addReactNativeModuleProjects、addReactNativeModuleDependencies、generatePackagesFile 使用。下面来分析一下bin.js 的执行过程。
这里拓展一下, 你可能听过react-native脚手架,现在它是指 react-native-community/cli, 全局安装后就可以使用 react-native命令,例如:npx react-native init AwesomeProject ,react-native 是一个js文件。
通过命令which react-native 来查看一下它的位置,最后指向了/node_modules/react-native/cli.js(这里不是全局安装的),cli.js 也很简单,调用了 node_modules/@react-native-community/cli/index.js中的run函数。
分析到这里,我们回过头看看 bin.js,它里面其实也是执行node_modules/@react-native-community/cli/index.js中的run函数。是脚手架的一个入口
关于如何调试
原计划从 node_modules/@react-native-community/cli/build/bin.js 开始分析,因为node_modules中的js代码,是由ts转换的,经常跳到d.ts文件中,看起来不顺畅。而且调试的时候,webstorm很聪明的定位到ts文件,但不知道文件在哪个目录下。所以后来还是决定在 react-native-community/cli 项目中来调试(如果你不会调试TS,看这里)。
如何在调试react-native-community/cli项目,因为部分流程会检测当前是否一个react-native工程,所以直接运行cli,很多流程走不到。我是这样配置的,AwesomeProject和cli在同级目录下
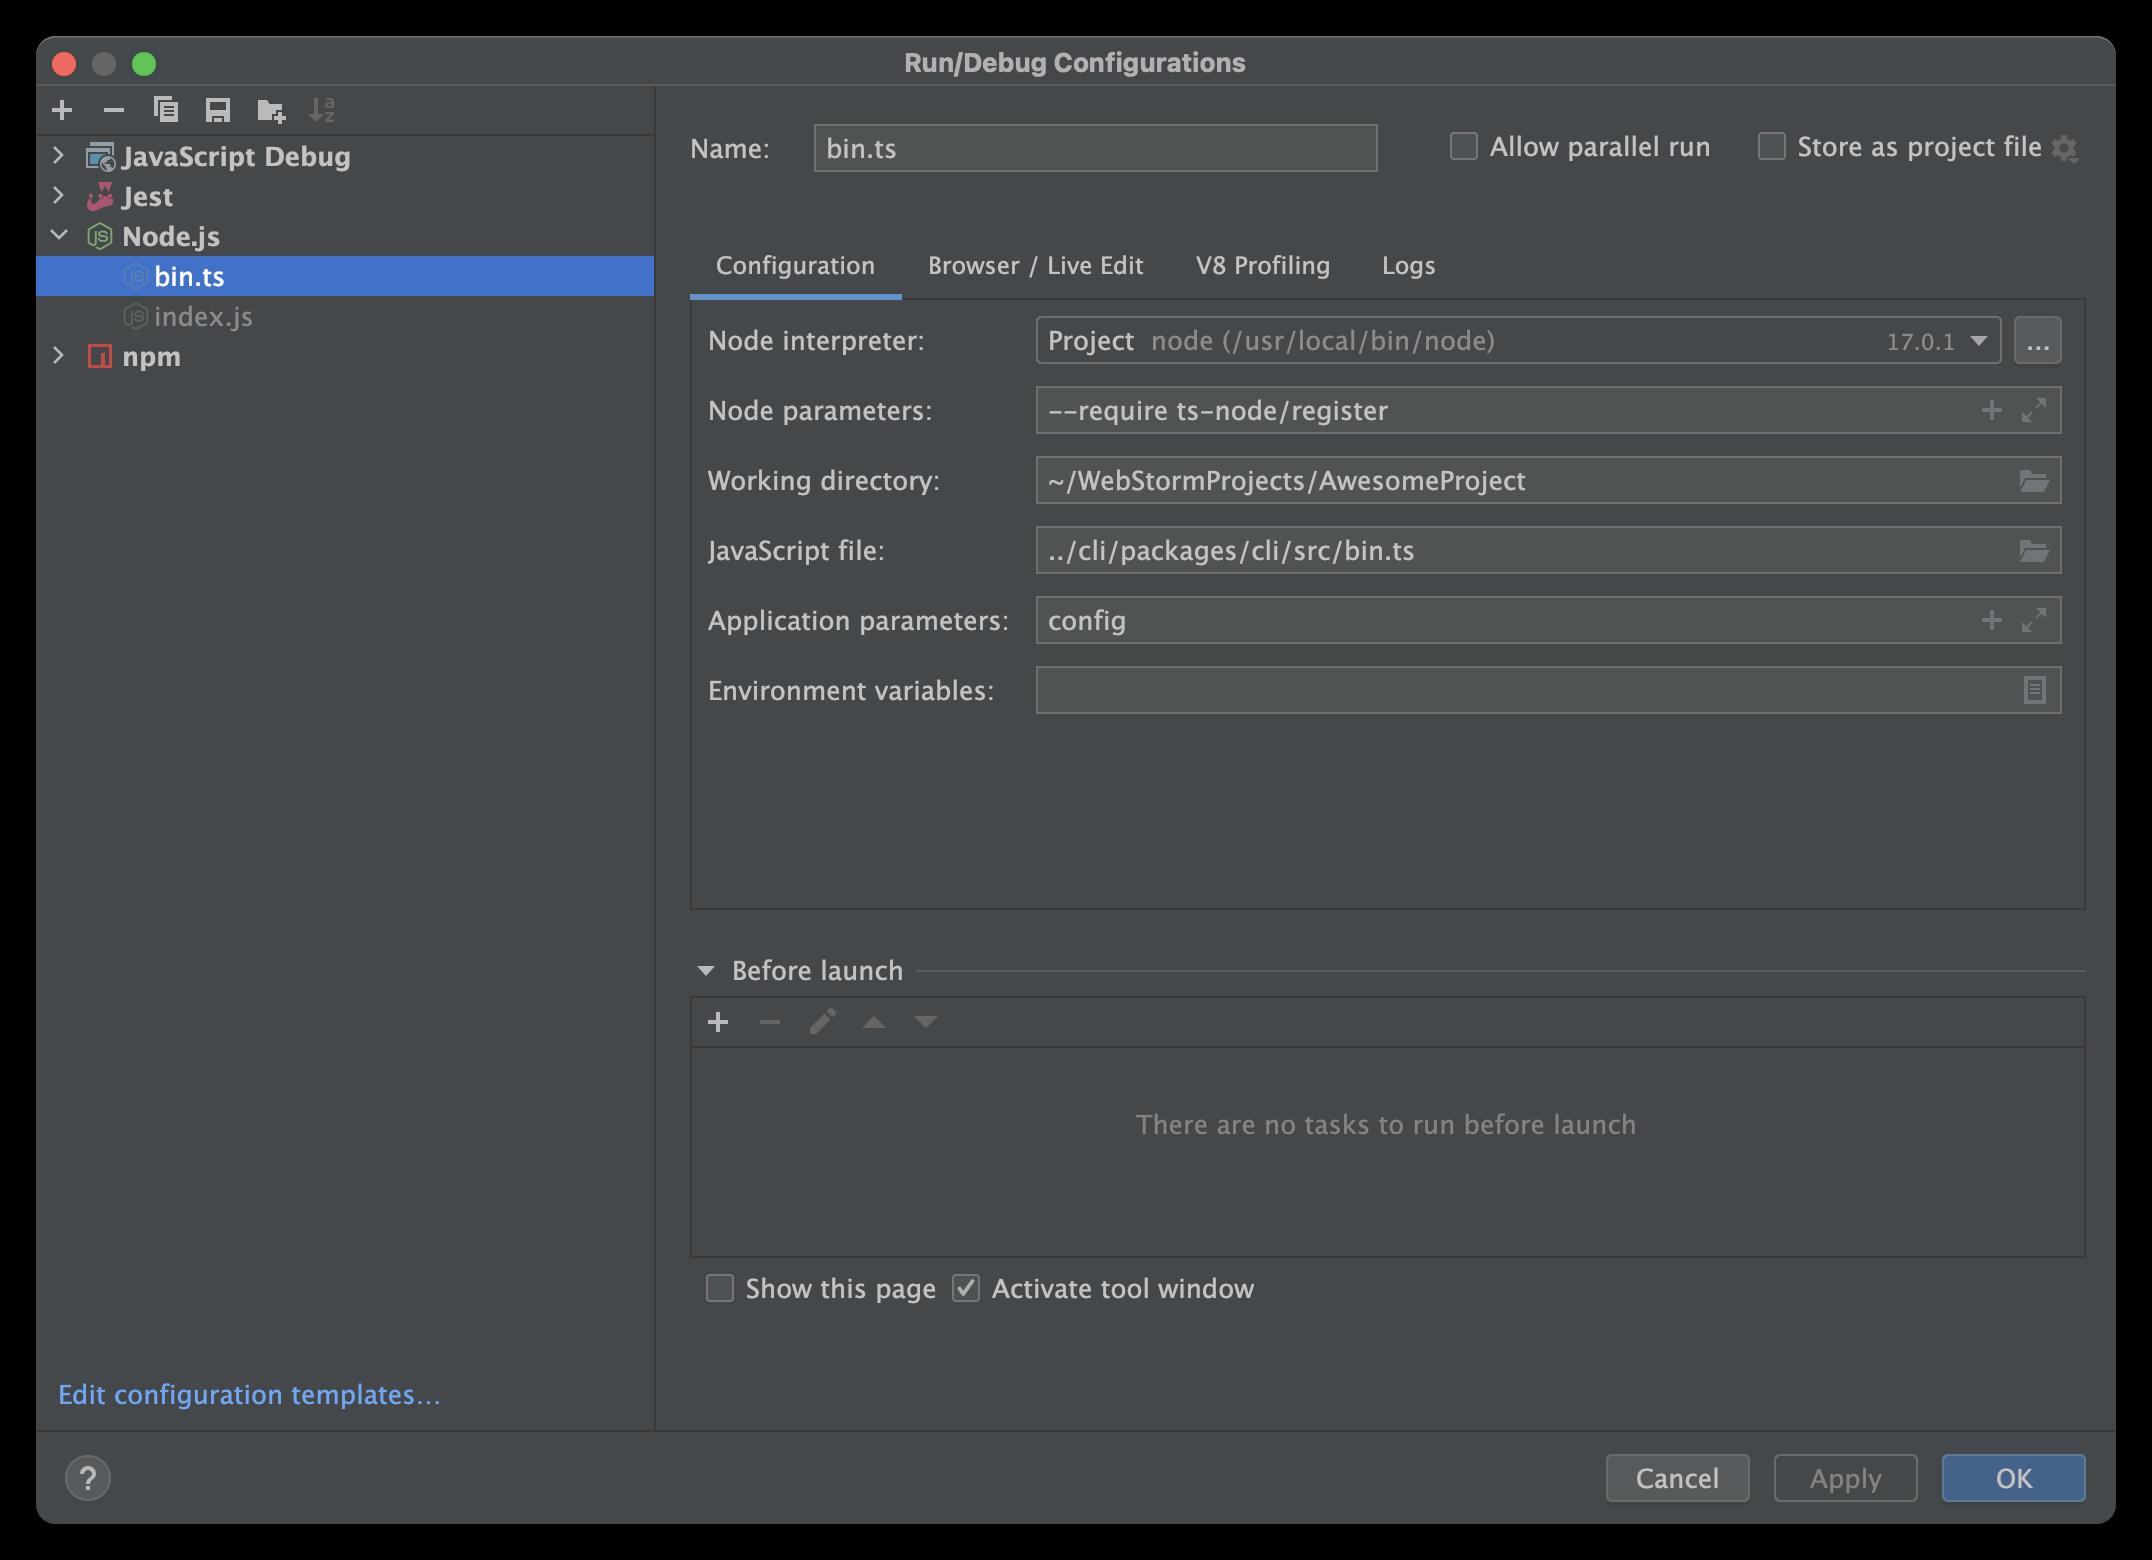
2.2、bin.js
下面就看一下react-native-community/cli 中关于Autolinking的主干流程,进入bin.ts后,流程如下
bin.ts run() -> 同级目录 index.ts run() -> setupAndRun()
2.3 setupAndRun
该函数作用是 添加各种命令,到commander中,commander 是一个命令处理库,先把命令名称、参数 、回调处理函数等 设置给commander。在commander.parse(process.argv) 时,根据命令名,来判断需要commander中的哪个命令来处理(调用回调函数)
下面看下代码:
async function setupAndRun()
   ...省略一些 非主流程 的代码...

  //添加detachedCommands中的每种命令,到commander中,
  //在commander.parse(process.argv); 时
  for (const command of detachedCommands)
    attachCommand(command);


  try
    //加载配置,主要就是通过这里,去获取autolinking的信息。例如:package.json 依赖的第三方库,以及 android、ios项目的信息(包名、资源路径等)
    //代码2.4分析
    const config = loadConfig();
    for (const command of [...projectCommands, ...config.commands])
      attachCommand(command, config);

   catch (error)
    ...省略一些代码...


  //命令行中的参数,会传入到这里。上门已经设置好了,各种命令。这里根据命令行的信息,开始执行命令对应的回调函数
  //代码2.5分析
  commander.parse(process.argv);

  //默认会有两个参数(也就是命令行中没有输入参数),这时输出help结果
  if (commander.rawArgs.length === 2)
    commander.outputHelp();


  ...省略代码...
2.4 loadConfig
function loadConfig(projectRoot: string = findProjectRoot()): Config
let lazyProject: ProjectConfig;
//读取项目的react-native.config.js文件,这里可以配置,依赖库的autolinking规则
const userConfig = readConfigFromDisk(projectRoot);
//初始化的配置,这些配置,最后跟下面的finalConfig 合并后返回
const initialConfig: Config =
root: projectRoot,
//
get reactNativePath()
return userConfig.reactNativePath
? path.resolve(projectRoot, userConfig.reactNativePath)
: resolveReactNativePath(projectRoot);
,
dependencies: userConfig.dependencies,
commands: userConfig.commands,
healthChecks: [],
platforms: userConfig.platforms,
//该函数是在命令执行后(也就是在代码2.5之后),才会执行。
//获取原生项目的信息,例如:包名、.gradle文件路径、manifest文件路径等。代码2.6分析
get project()
if (lazyProject)
return lazyProject;
lazyProject = ;
//finalConfig 在下面创建,
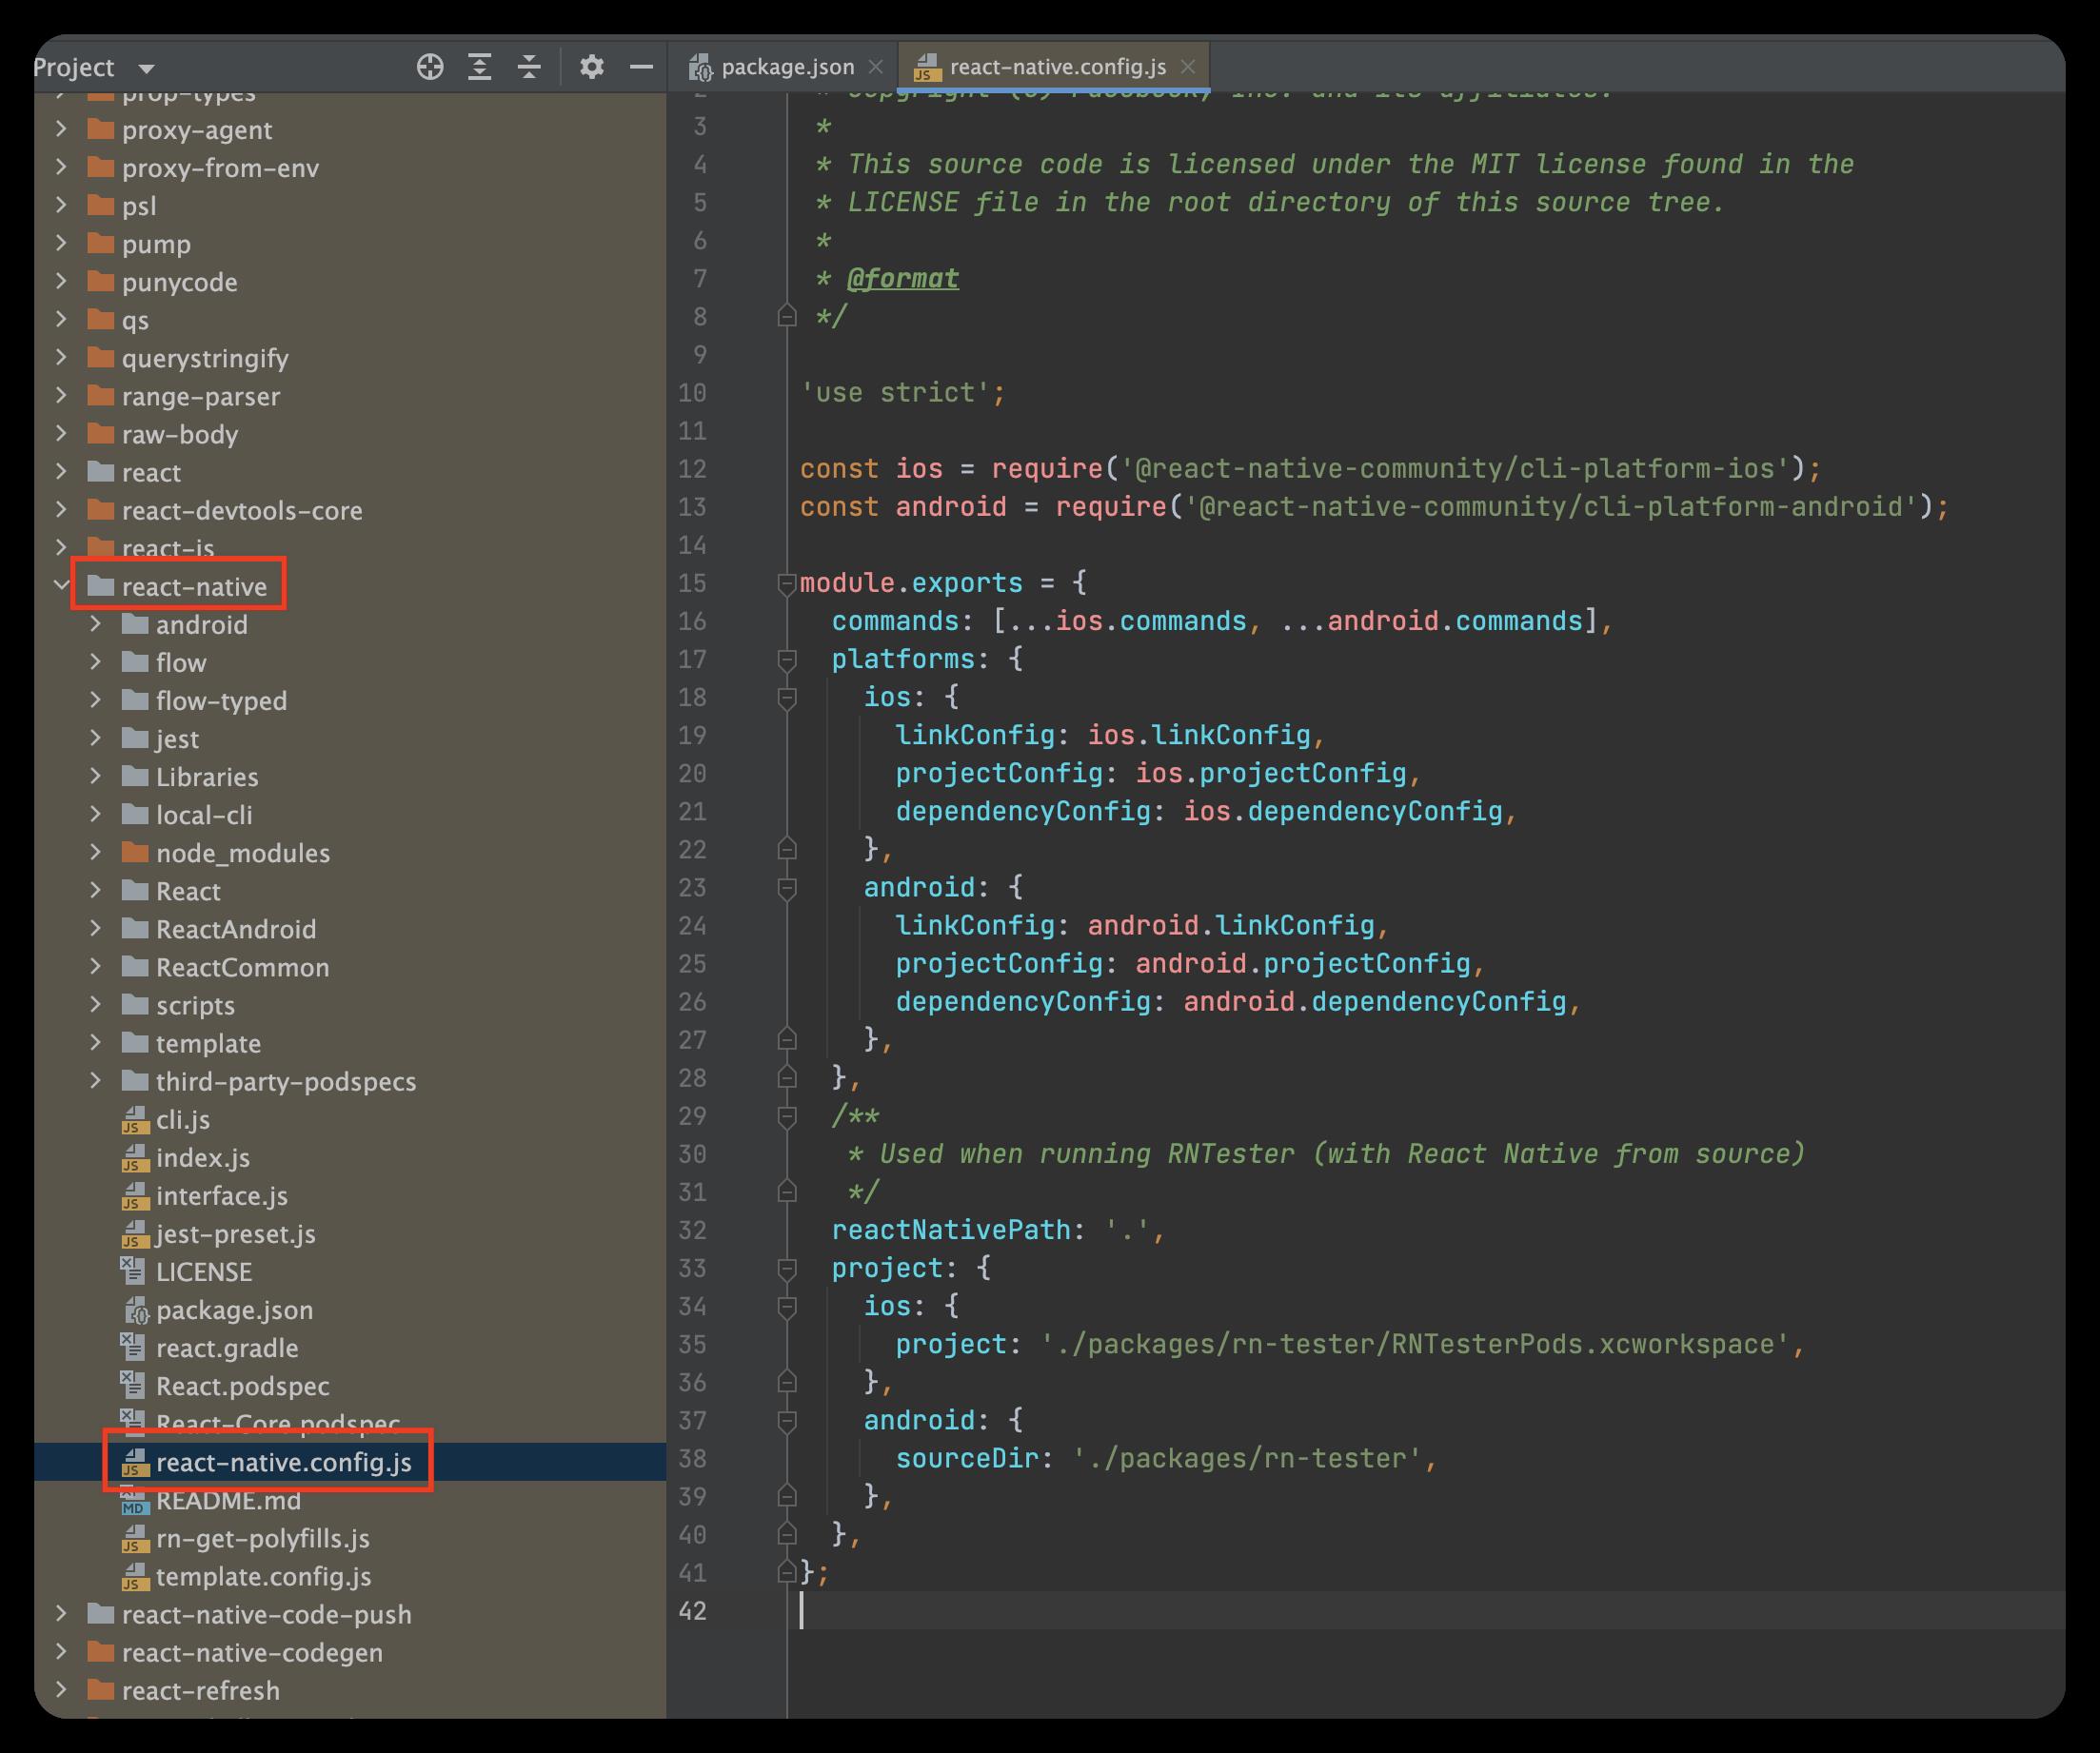
//finalConfig.platforms 内容,根源是在node—module/react-native/react-native.config.js 文件中配置的。详见下图2.4.1
for (const platform in finalConfig.platforms)
const platformConfig = finalConfig.platforms[platform];
if (platformConfig)
//获取原生项目的信息,在代码1.6分析。projectConfig 就是在react-native/react-native.config.js 是传入的
lazyProject[platform] = platformConfig.projectConfig(
projectRoot,
userConfig.project[platform] || ,
);
return lazyProject;
,
;
const finalConfig = Array.from(
new Set([
...Object.keys(userConfig.dependencies),
//这里从package.json中获取 RN依赖的第三方库
...findDependencies(projectRoot),
]),
).reduce((acc: Config, dependencyName) =>
const localDependencyRoot =
userConfig.dependencies[dependencyName] &&
userConfig.dependencies[dependencyName].root;
let root: string;
let config: UserDependencyConfig;
try
root =
localDependencyRoot ||
resolveNodeModuleDir(projectRoot, dependencyName);
//获取当前依赖库下面的react-native.config.js 的配置信息
config = readDependencyConfigFromDisk(root);
catch (error)
...省略代码...
return acc;
const isPlatform = Object.keys(config.platforms).length > 0;
return assign(, acc,
//对每一个三方库,创建一个item,key是库名,value 是函数,用于获取库的原生信息(例如:创建库中类的对象)
dependencies: assign(, acc.dependencies,
//DependencyConfig 将会调用react-native/react-native.config.js 传入的 dependencyConfig
get [dependencyName](): DependencyConfig
return getDependencyConfig(
root,
dependencyName,
finalConfig,
config,
userConfig,
isPlatform,
);
,
),
commands: [...acc.commands, ...config.commands],
// 传入关于平台的信息,例如:React-native 如图2.4.1,projectConfig 获取原生项目的信息,dependencyConfig 获取第三方库的信息
//在2.6 和 2.7 介绍这两个
platforms:
...acc.platforms,
...config.platforms,
,
healthChecks: [...acc.healthChecks, ...config.healthChecks],
) as Config;
, initialConfig);
return finalConfig;
下图 2.4.1
2.5 commander.parse(process.argv);
该函数是触发命令的执行,我们命令行 传入的参数是config,那么就会执行对应的回调
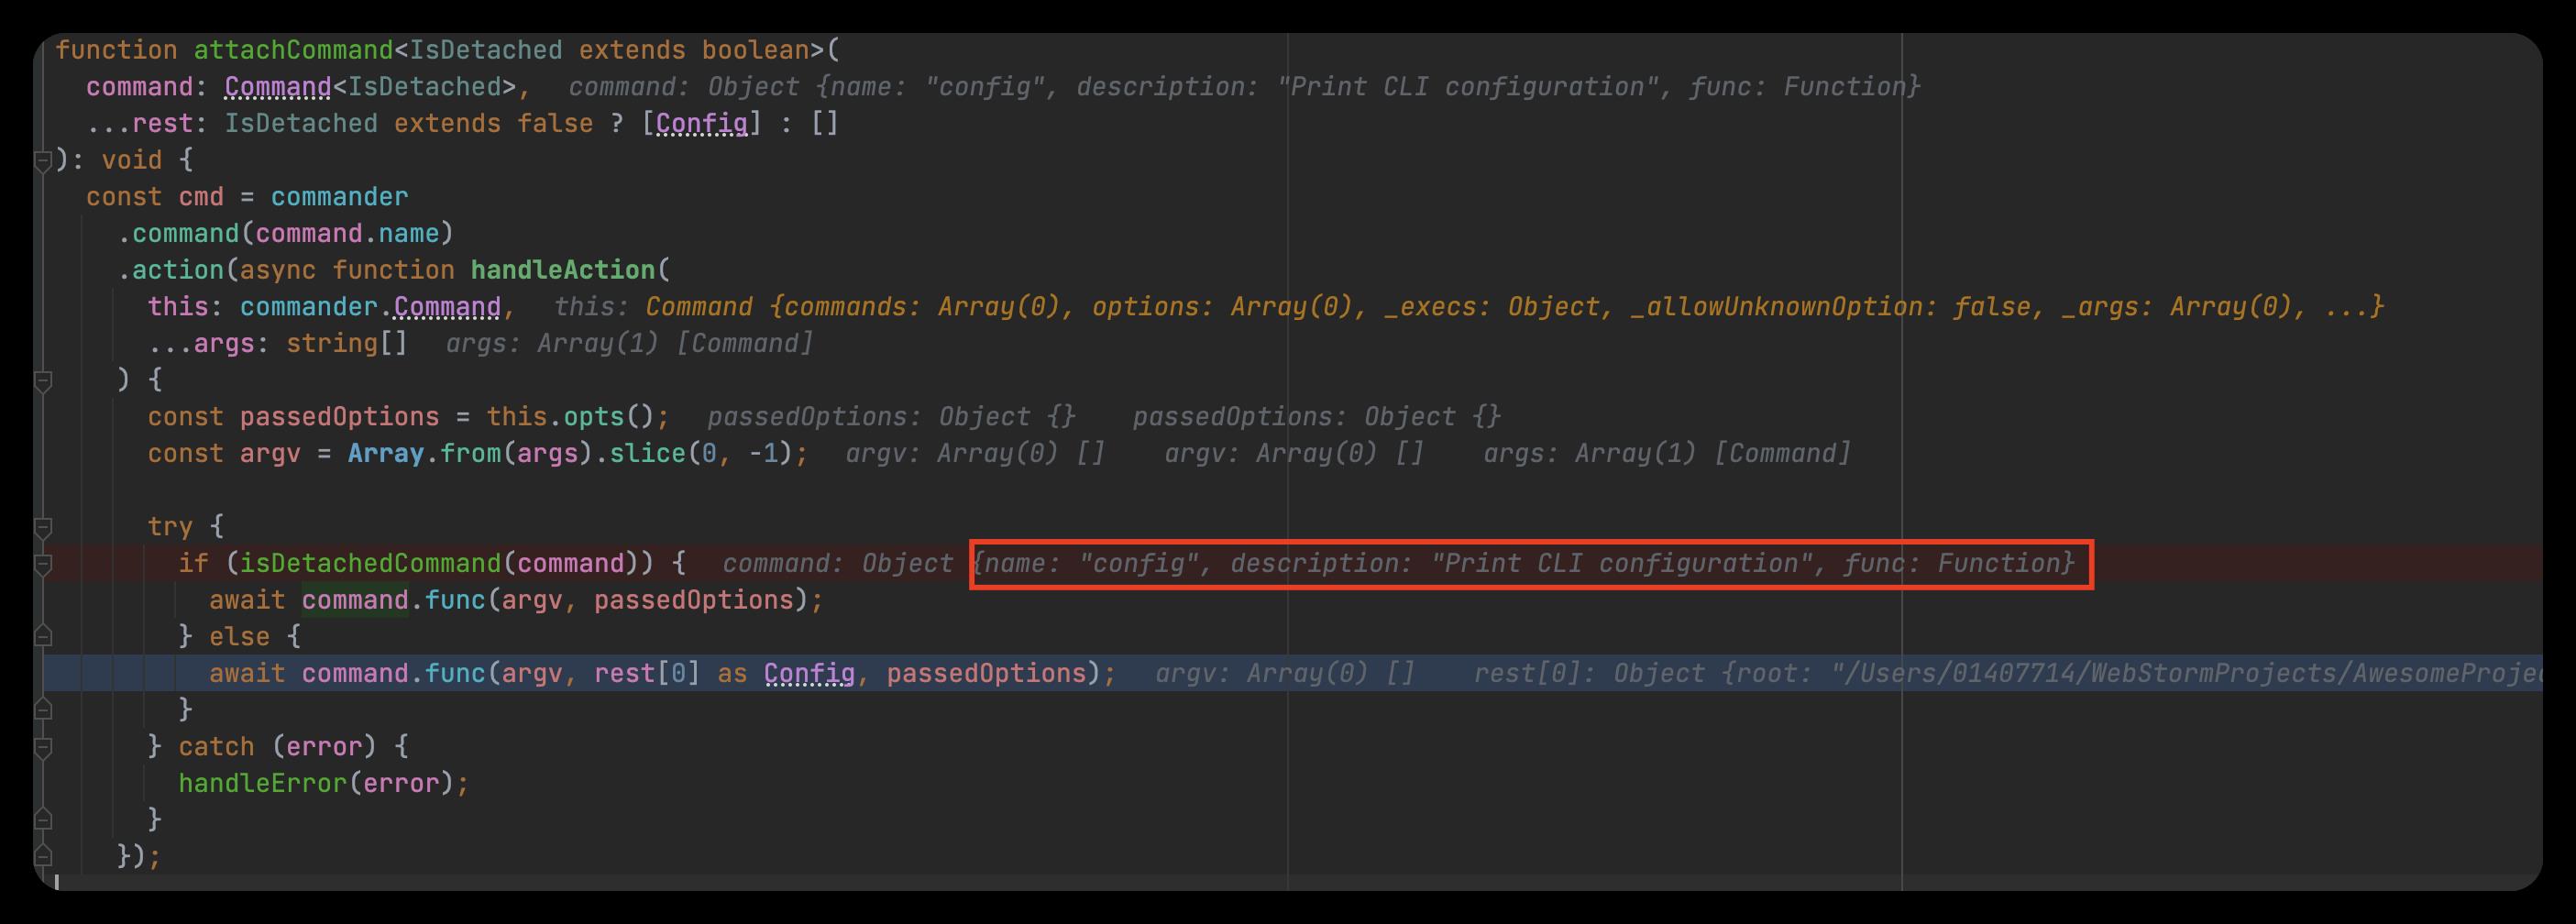
在代码2.3 中 config = loadConfig(); 传入到attachCommand,所以这里的action回调,是已经有了这些信息。下面我们进入cli-config/src/commads/config.ts 看看
config.ts
export default
name: 'config',
description: 'Print CLI configuration',
func: async (_argv: string[], ctx: Config) =>
//filterConfig 就是去获取所有的内容
console.log(JSON.stringify(filterConfig(ctx), null, 2));
,
;
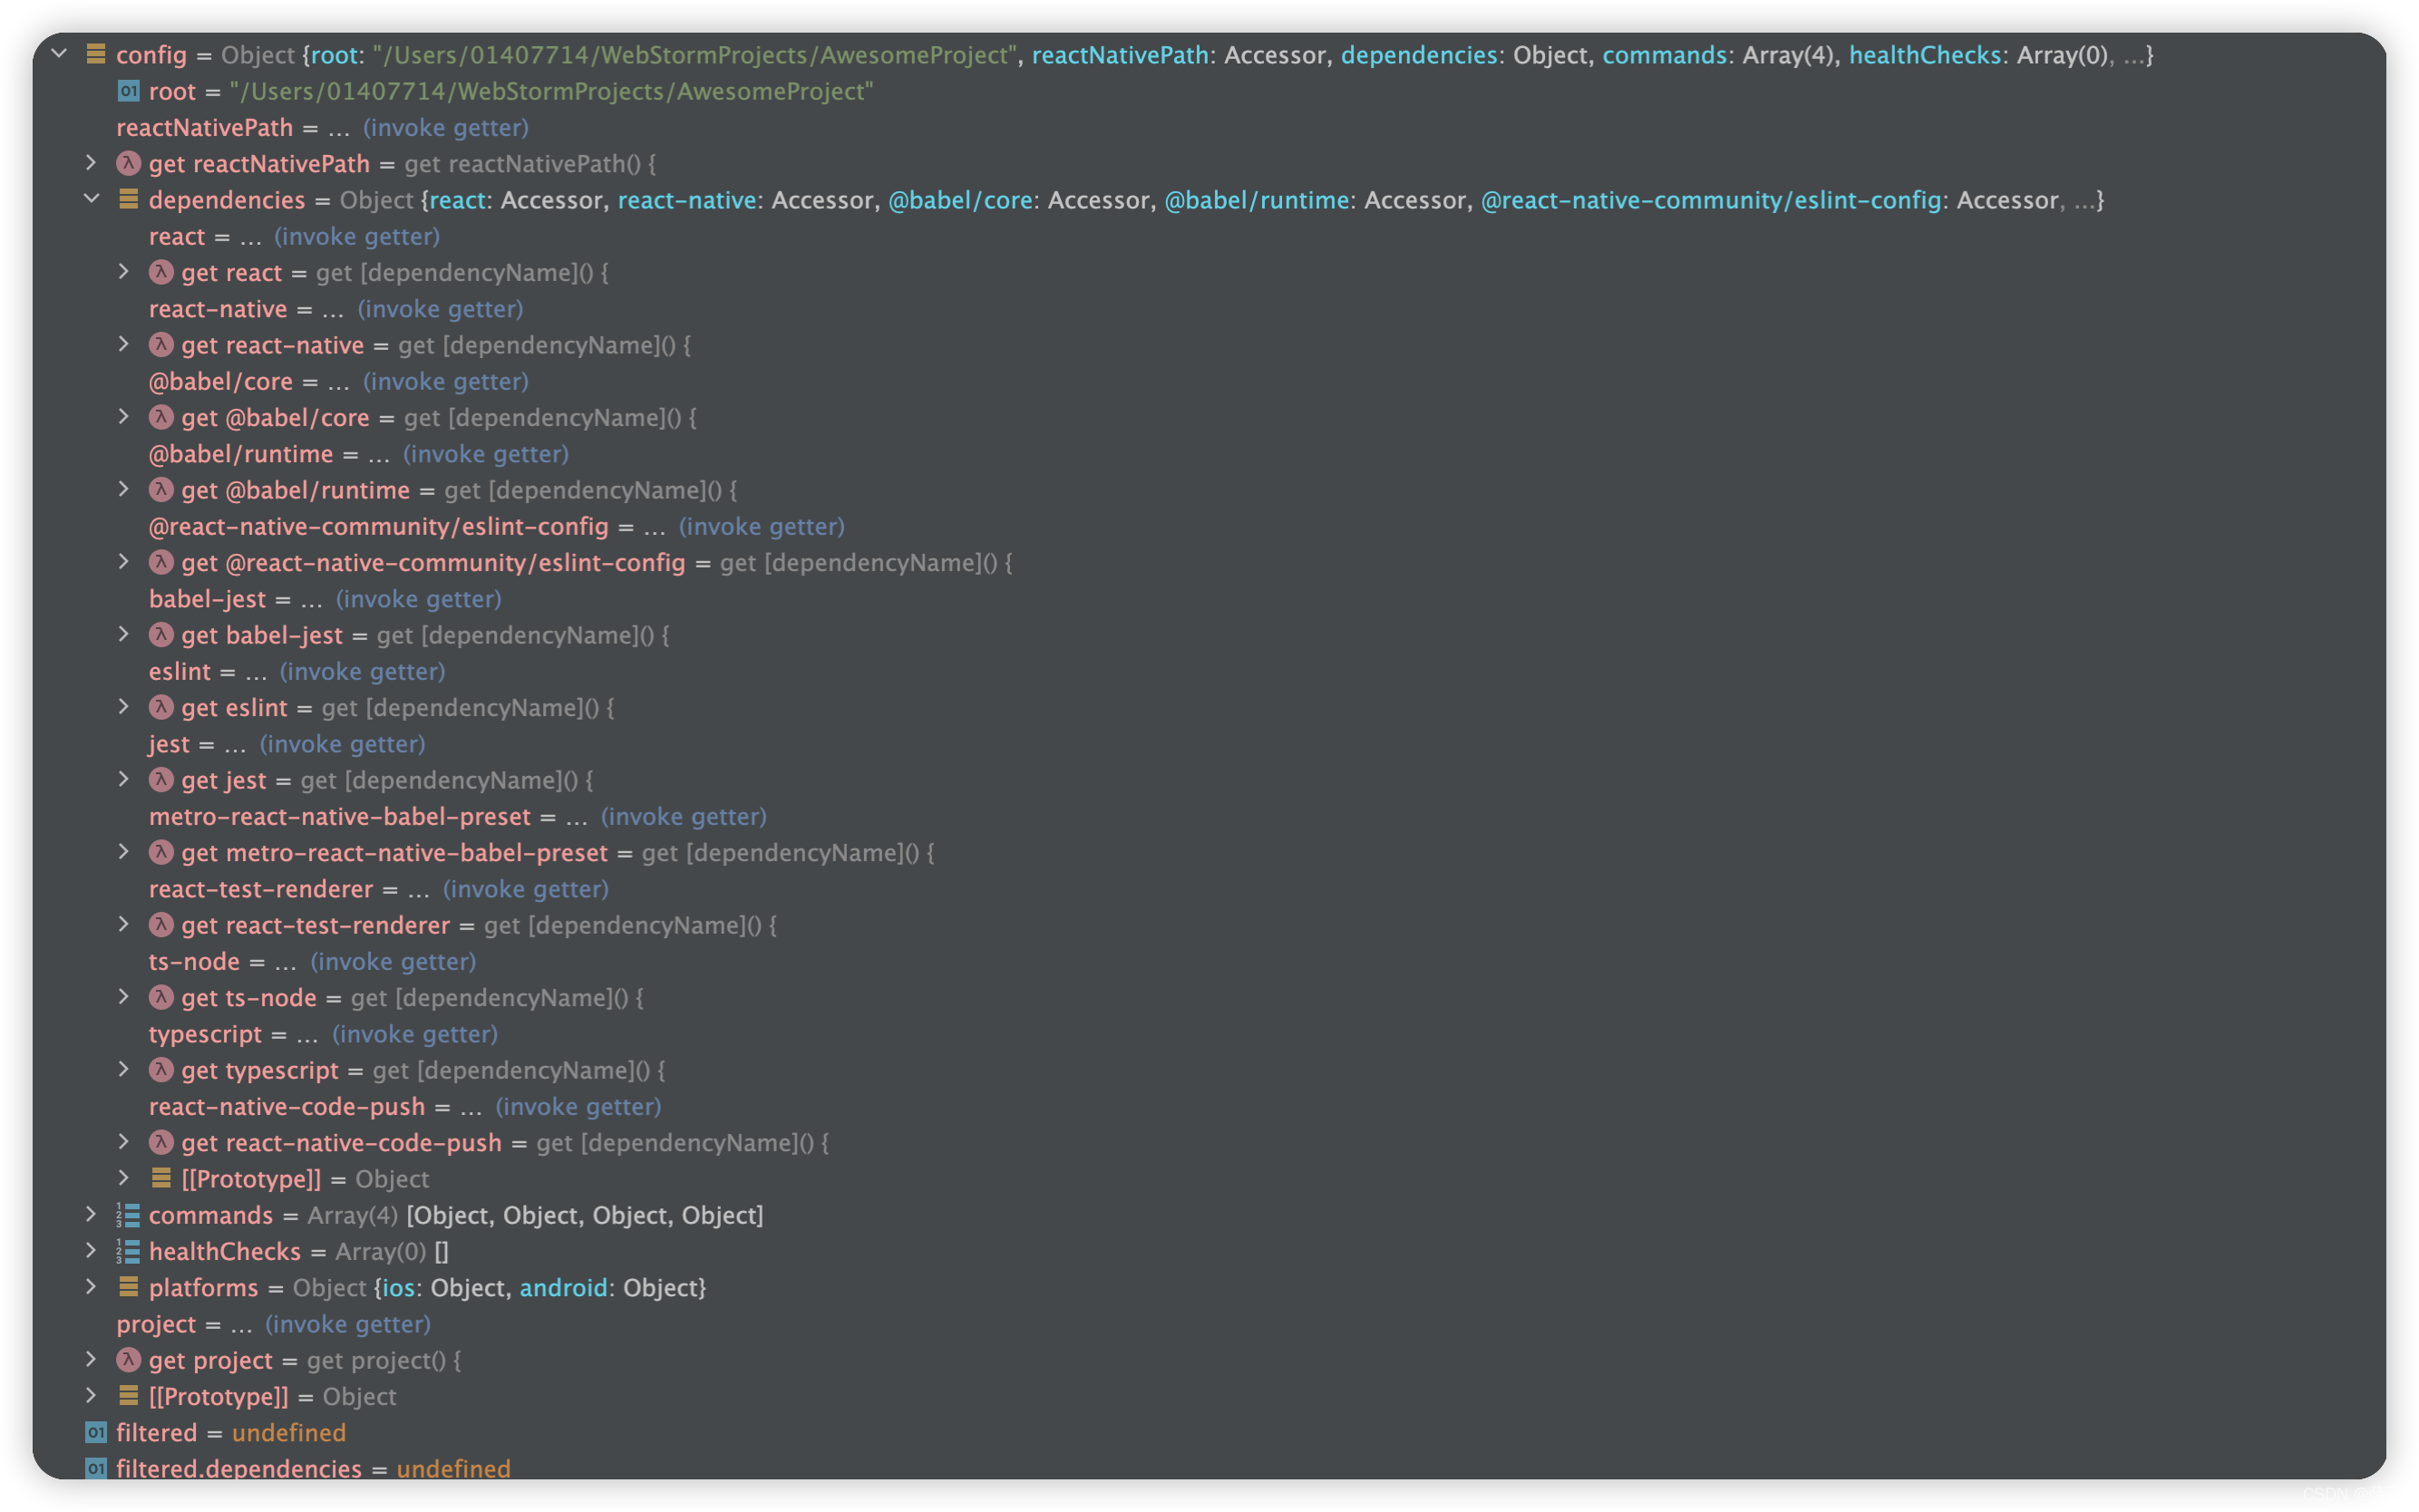
//config 参数内容如下图 1.5.2
function filterConfig(config: Config)
// 触发 project函数
const filtered = ...config;
Object.keys(filtered.dependencies).forEach((item) =>
//触发 dependencies中每项的函数
if (!isValidRNDependency(filtered.dependencies[item]))
delete filtered.dependencies[item];
);
return filtered;
下图 2.5.2,可以看到
- project 是个函数,也就是代码2.4中initialConfig 中传入的。
- dependencies 中的每个item都是一个函数,他是 代码2.4 中finalConfig 传入的
通过代码2.4的分析,可以知道 project函数将会调用 projectConfig 获取原生项目的信息,dependencies中的每个item会调用 dependencyConfig 获取第三方库的信息。他们都是在 filterConfig 中触发的。
下面就来看一下 projectConfig 获取原生项目的信息、dependencyConfig 获取第三方库的信息 的代码
2.6 projectConfig
获取原生项目的信息,该函数是在 react-native/react-native.config.js 配置中传入的
拓展:在调试时发现,代码指向并没有到项目中的 packages/platform-android/src/config/index.ts ,而指向的是node_modules/@react-native-community/cli-platform-android/src/config/index.ts ,后者是前者的一个软连接,一番探索发现了一些技巧 1、 你所不知道的模块调试技巧 - npm link 2、【npm】简化本地文件引用路径
每一个信息的获取,都是优先获取配置文件中的,如果没有,再去调用函数获取。整体逻辑很简单,就不注释了
export function projectConfig(
root: string,
userConfig: AndroidProjectParams = ,
): AndroidProjectConfig | null
const src = userConfig.sourceDir || findAndroidDir(root);
if (!src)
return null;
const sourceDir = path.join(root, src);
const appName = getAppName(sourceDir, userConfig.appName);
const manifestPath = userConfig.manifestPath
? path.join(sourceDir, userConfig.manifestPath)
: findManifest(path.join(sourceDir, appName));
if (!manifestPath)
return null;
const packageName = userConfig.packageName || getPackageName(manifestPath);
if (!packageName)
throw new Error(`Package name not found in $manifestPath`);
return
sourceDir,
appName