OpenCV Java入门二 在Windows10系统上安装OpenCV
Posted TGITCIC
tags:
篇首语:本文由小常识网(cha138.com)小编为大家整理,主要介绍了OpenCV Java入门二 在Windows10系统上安装OpenCV相关的知识,希望对你有一定的参考价值。
准备好痛苦了没有?
痛苦之后是欢乐。因为必竟大多人还是用的WINDOWS来开发的居多。因此如果OpenCV无法在Win10下安装,一样不能起到普及作用。
而Windows下的编译安装OpenCV也是最痛苦的一件事。原因就在于在编译安装OpenCV时很多Extra的模块是被“墙”掉了。
因此整个过程一会这个错一会那个错,开发机电脑也不太好,导致一次编译,30多分钟,然后报了一堆错网上查了半天解决了一个,又来一个。
如此周而复始,让绝大多数开发者放弃了OpenCV。
本篇就是要着重讲述OpenCV在Windows10下的编译全过程和全部坑的排错。
环境准备
- 一台32GB开发机;
- I7 CPU;
- 必须为固态磁盘否则编译过程可以让你怀疑人生;
- 稳定的百兆宽带连接;
- Win10;
- 安装Visual Studio 14 2015 win64版或者更高也可以并安装时选择“Visual C++“,在此过程还会安装.netframework;
- 安装jdk1.8即可,并把JAVA_HOME\\bin加入到环境变量path中去;
- 安装Ant1.9或以上,并把ANT_HOME\\bin加入到环境变量path中去;
- 安装python3,并把python.exe所在的path,加入到环境变量path中去;
- 下载opencv3.4.3稳定版-本人提供了整理的包含全套脱机文件(被墙掉的文件)的安装包在正文中;
- 下载opencv3.4.3-contribute本人提供了整理的包含全套脱机文件(被墙掉的文件)的安装包在正文中;
- 下载cmake-gui(下载后直接双击即可运行不用安装);
截图-python3

截图-系统path环境变量


开始安装
先了解opencv在windows下编译安装的逻辑过程
opencv在windows下任何版本的编译是如下过程的
- 使用cmake进行opencv的configure;
- 寻找ant;
- 寻找jdk;
- 寻找python;
- 加入opencv nonfree包;
- 加入opencv contrib模块;
- 开启opencv java编译项;
- 开启opencv xfeatures2d项;
- 使用windows10上安装的visual studio的编译器生成visual studio项目.sln;
- 使用visual studio打开由cmake gui生成visual studio项目;
- 使用ant编译打包opencv jar包;
- 使用visual studio的vc引擎编译->Install;
开始Configure OpenCV
千万不要去下载网上提供的已经编译好的这两个文件。如果你为了图个方便,网上去下载别人编译安装好的这两个文件

那么在学习过程中运行死机、运行报错、或者干脆一会header找不到一会什么.h文件找不到,不要怪我没有事先提醒。
OpenCV在编译时的安装目录的设置
opencv在编译时会需要很多第3方依赖包,这些额外包有这么大一陀,我给各位看一下。
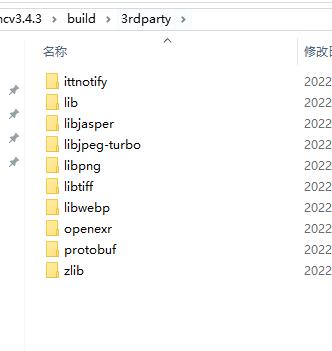
每一个第3方安装包,都在墙外,你在编译安装时一个下载时被卡住、过几分钟后再Failed、再一个。。。。。。再一个。。。。。。这些包全部下载Failed后用了几十分钟,然后你直接会觉得有一种“生无可怜”的味道。
我是一个个自己看着编译报错时的log内容,一个个手动用百度云盘方式先下载后再按照了OpenCV编译安装时所需要的目录结构排列后,并且下载了OpenCV3.4.3的源码(不动任何东西)以及OpenCV3.4.3的contribute包。然后我把三个目录打成了一个包,做了一个脱机包给到大家,算是一种福利吧。
完整全套脱机包在此百度网盘内,请笑纳:
链接:https://pan.baidu.com/s/1mXOEfqykUT2TWk6OXtAEVA?pwd=ioti
提取码:ioti
--来自百度网盘超级会员V6的分享
下载后并解压是这样的一个文件目录结构内容把它放到一个叫opencvinstall的目录内。
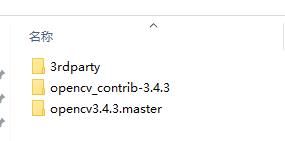
3rdparty为opencv编译安装时必备,这里面我已经把我所有一个个幸苦下载好的文件按照opencv安装时的需要摆放好了。
随后我们单建一个文件夹叫opencvbuild。用来存cmake编译出来的opencv的编译输出的文件夹
届此,即完成了目录设置的准备了。
使用cmake-gui编译
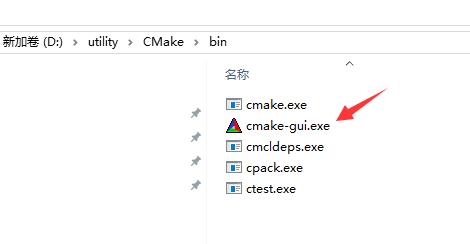
运行起来后是这样的界面

- where is the souce code:指向D:/opencvbuild/opencv3.4.3.master即源码所在目录节点
- where to build the binaries:指向编译生成后所在的目录,在些我们用的是D:/opencvbuild,这是一个空目录,你可以任意指定。
把我网盘里下载下来的3个文件夹中的“3rdparty”里的所有的内容

拷贝到opencv3.4.3.master即源码包下的.cache里,并按照提示覆盖掉里面3rdparty目录内的所有内容。

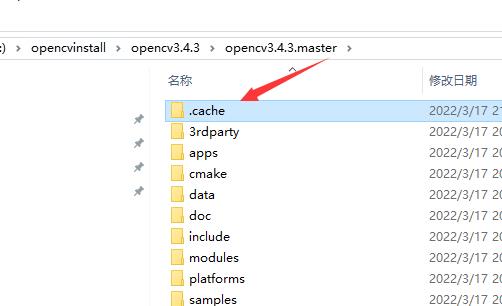
然后点一下这个界面中的【Configure】按钮。

然后cmake-gui会提示你选择visual c的编译器,你此时应该事先已经装好了visual studio 14 2015包含visual c++了,请选择visual studio 14 2015。

然后点【Finish】后你会得到一堆红色的列表,没有关系。跟着我的步骤一步步走,不会有问题的。
在红色的列表中进行相应的选择和填充
确保ant被opencv正确找到
否则就要自己手工指定目录

OPENCV_ENABLE_NONFREE的选择
把OPENCV_ENABLE_NONFREE打勾

OPENCV_EXTRA_MODULES_PATH必须被指定否则不可以用人脸识别

记得这边指定的可是/opencvinstall/opencv_contrib-3.4.3/modules目录,很多人指定到了opencv_contrib-3.4.3这一层,会导致点【configure】按钮时出一个.h文件找不到的错的。
确保python的Executable和Include Dir可以被系统找到
否则就手工指定。

然后再次点击【Configure】

然后看到此处的两个Java都要Success。
此时我们来看opencvbuild目录内,出现了这么多东西,好家伙。

此时,我们在进入下一步前需要做一件事,否则你一会会感觉要疯了。
那就是在之前OpenCV Java入门一 在MAC系统上安装OpenCV里,我说过:opencv会使用最新的javac compiler编译打包opencv for java。
在mac里它打出的jar包我们需要使用jdk17来运行,同时兼顾装有jdk1.8来运行最新版2021-12版的eclipse。
然后:
- 使用eclipse 2021-12+jdk1.8启动eclipse;
- opencv工程使用jd17作jre,同时compile version选17就可以在eclipse内进行开发opencv的项目了。
很可惜,windows下的eclipse 2021-12的compile version只支持到 jdk16,这和mac是有极大的区别的,它比mac上的东西慢了半拍。
因此,如果在windows里编译出来的opencv的jar包也是jdk17编译成的,你的eclipse就算是最新的也会在运行时报一个非常恶心的错“need class version 62, but it support to 61”。
所以,一开始我们就要在这个jar包被编译前就指定jdk编译版本把这个jar包用jdk1.8编译出来。这样我们在windows里就可以使用jdk1.8以及eclipse早期版(只要支持jdk1.8的)可以使用opencv jar了。
指定编译出的opencv jar包的编译器为jdk1.8
在opencvbuild即cmake-gui输出的目录中找到如下的这个文件
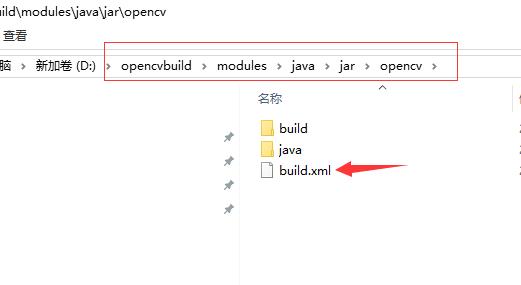
打开它,然后把这一行加上一个target="1.8":
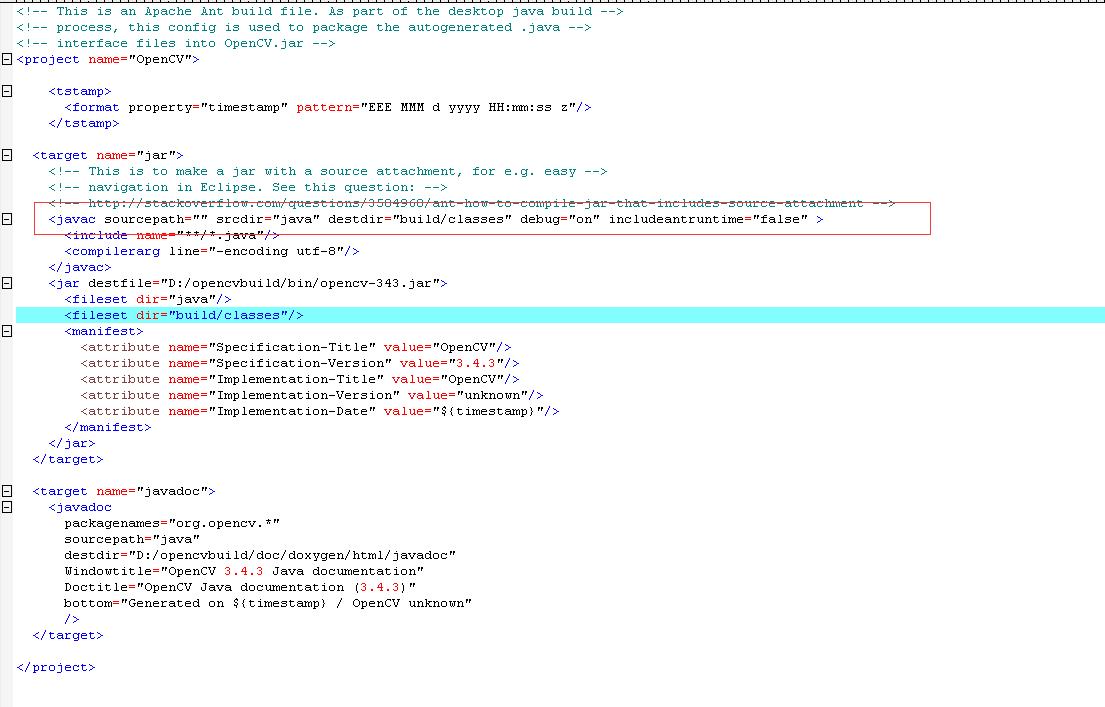
改完后的build.xml全文如下范例
<!-- This is an Apache Ant build file. As part of the desktop java build -->
<!-- process, this config is used to package the autogenerated .java -->
<!-- interface files into OpenCV.jar -->
<project name="OpenCV">

    <tstamp>
      <format property="timestamp" pattern="EEE MMM d yyyy HH:mm:ss z"/>
    </tstamp>

  <target name="jar">
    <!-- This is to make a jar with a source attachment, for e.g. easy -->
    <!-- navigation in Eclipse. See this question: -->
    <!-- http://stackoverflow.com/questions/3584968/ant-how-to-compile-jar-that-includes-source-attachment -->
    <javac target="1.8" sourcepath="" srcdir="java" destdir="build/classes" debug="on" includeantruntime="false" >
      <include name="**/*.java"/>
      <compilerarg line="-encoding utf-8"/>
    </javac>
    <jar destfile="D:/opencv/opencv3.4.3/build/bin/opencv-343.jar">
      <fileset dir="java"/>
      <fileset dir="build/classes"/>
      <manifest>
        <attribute name="Specification-Title" value="OpenCV"/>
        <attribute name="Specification-Version" value="3.4.3"/>
        <attribute name="Implementation-Title" value="OpenCV"/>
        <attribute name="Implementation-Version" value="unknown"/>
        <attribute name="Implementation-Date" value="$timestamp"/>
      </manifest>
    </jar>
  </target>

  <target name="javadoc">
    <javadoc
      packagenames="org.opencv.*"
      sourcepath="java"
      destdir="D:/opencv/opencv3.4.3/build/doc/doxygen/html/javadoc"
      Windowtitle="OpenCV 3.4.3 Java documentation"
      Doctitle="OpenCV Java documentation (3.4.3)"
      bottom="Generated on $timestamp / OpenCV unknown"
      />
  </target>

</project>
在cmake-gui界面点击[Generate]按钮

并得到成功的输出。
然后再点击【Open Project】按钮
此时,visual studio就被打开了。当全部的项目装载完后先把Debug改成Release,然后点击菜单里的“生成”->“生成解决方案”。

全部生成成功在我的台式机上大概也就用了4分钟。

然后在右边的这块树型project explorer界面中
点击【INSTALL】,按鼠标右键,选【仅用于项目】
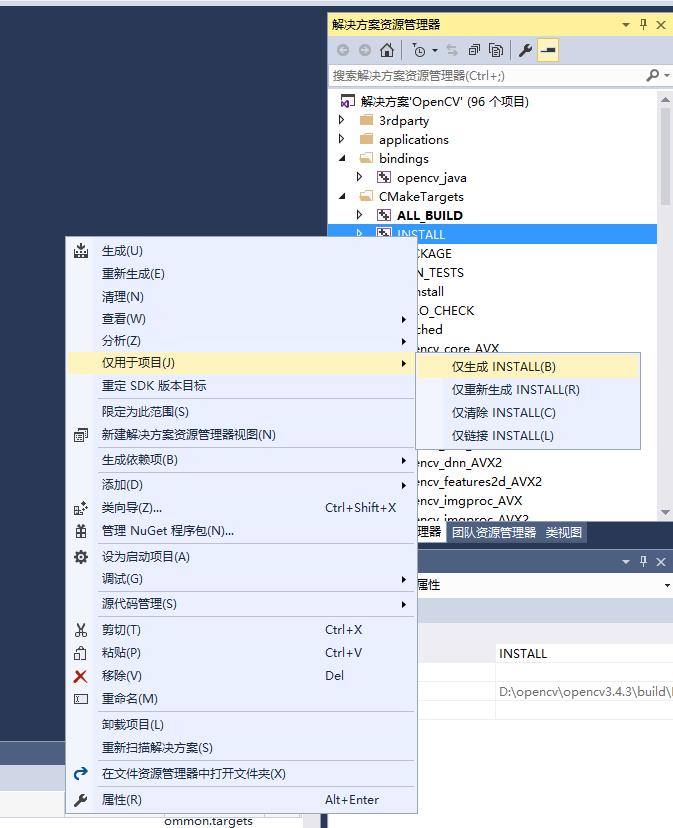
过一会全部编译好的opencv就放置在了opencvbuild\\install目录下了。
java用的两个文件生成在此opencvbuild\\install\\java

在Windows下使用Eclipse创建OpenCV工程
在Native library location处,点击【edit】按钮

把这个路径定位到D:\\opencvbuild\\install\\java目录,这个目录里有opencv-343.jar和opencv_java343.dll文件。
在下面的classpath里点击右边的【Add External JARs】按钮。把它定位到D:\\opencvbuild\\install\\java\\opencv-343.jar文件。

在windows10的控制面板的系统设置里,在系统变量的Path里加入如下内容:
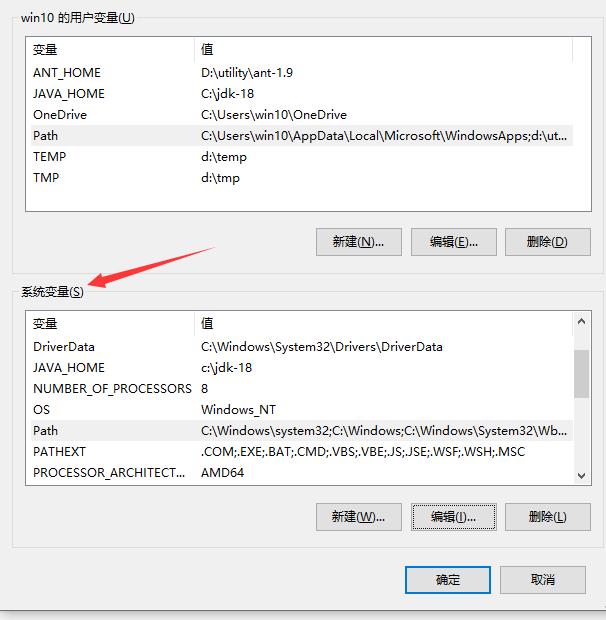
opencvbuild的\\install\\x64\\vc14\\bin
届此,OpenCV Java工程的环境已经全部搭建完毕。
OpenCV入门样例
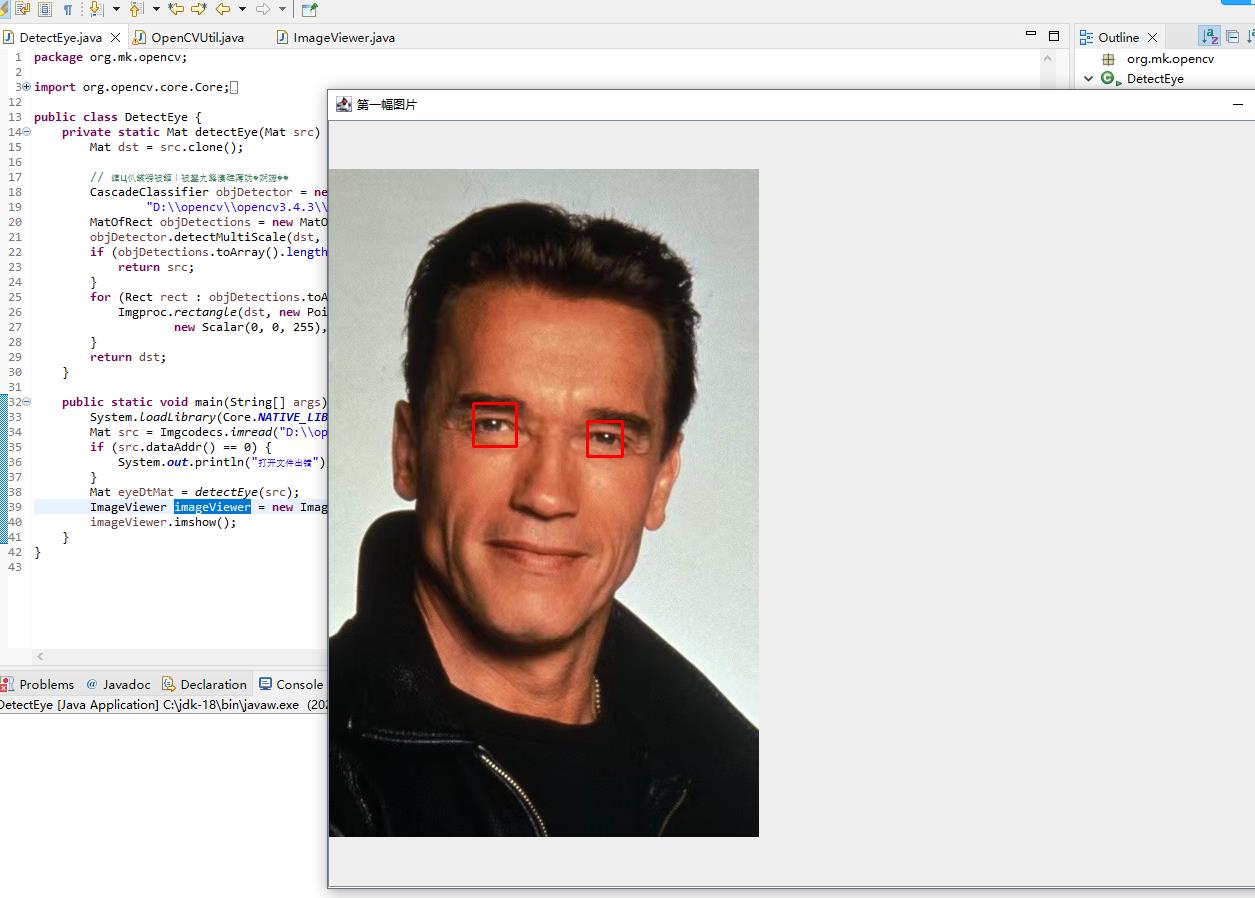
我们来读入一张带有人脸的图片,然后在人脸上把他的眼晴部分给标识出来。
OpenCVUtil.java
package org.mk.opencv.util;

import java.awt.Image;
import java.awt.image.BufferedImage;
import java.awt.image.DataBufferByte;
import java.util.ArrayList;
import java.util.LinkedList;
import java.util.List;
import java.io.File;

import org.apache.log4j.Logger;
import org.opencv.core.CvType;
import org.opencv.core.Mat;


public class OpenCVUtil
	private static Logger logger = Logger.getLogger(OpenCVUtil.class);

	public static Image matToImage(Mat matrix)
		int type = BufferedImage.TYPE_BYTE_GRAY;
		if (matrix.channels() > 1)
			type = BufferedImage.TYPE_3BYTE_BGR;

		int bufferSize = matrix.channels() * matrix.cols() * matrix.rows();
		byte[] buffer = new byte[bufferSize];
		matrix.get(0, 0, buffer); // 获取所有的像素点
		BufferedImage image = new BufferedImage(matrix.cols(), matrix.rows(), type);
		final byte[] targetPixels = ((DataBufferByte) image.getRaster().getDataBuffer()).getData();
		System.arraycopy(buffer, 0, targetPixels, 0, buffer.length);
		return image;


	public static List<String> getFilesFromFolder(String folderPath)
		List<String> fileList = new ArrayList<String>();
		File f = new File(folderPath);
		if (f.isDirectory())
			File[] files = f.listFiles();
			for (File singleFile : files)
				fileList.add(singleFile.getPath());


		return fileList;


	public static String randomFileName()
		StringBuffer fn = new StringBuffer();
		fn.append(System.currentTimeMillis()).append((int) (System.currentTimeMillis() % (10000 - 1) + 1))
				.append(".jpg");
		return fn.toString();


	public static List<FileBean> getPicFromFolder(String rootPath)
		List<FileBean> fList = new ArrayList<FileBean>();
		int fileNum = 0, folderNum = 0;
		File file = new File(rootPath);
		if (file.exists())
			LinkedList<File> list = new LinkedList<File>();
			File[] files = file.listFiles();
			for (File file2 : files)
				if (file2.isDirectory())
					// logger.info(">>>>>>文件夹:" + file2.getAbsolutePath());
					list.add(file2);
					folderNum++;
				 else
					// logger.info(">>>>>>文件:" + file2.getAbsolutePath());
					FileBean f = new FileBean();
					String fileName = file2.getName();
					String suffix = fileName.substring(fileName.lastIndexOf(".") + 1);
					File fParent = new File(file2.getParent());
					String parentFolderName = fParent.getName();
					f.setFileFullPath(file2.getAbsolutePath());
					f.setFileType(suffix);
					f.setFolderName(parentFolderName);
					fList.add(f);
					fileNum++;


			File temp_file;
			while (!list.isEmpty())
				temp_file = list.removeFirst();
				files = temp_file.listFiles();
				for (File file2 : files)
					if (file2.isDirectory())
						// System.out.println("文件夹:" + file2.getAbsolutePath());
						list.add(file2);
						folderNum++;
					 else
						// logger.info(">>>>>>文件:" + file2.getAbsolutePath());
						FileBean f = new FileBean();
						String fileName = file2.getName();
						String suffix = fileName.substring(fileName.lastIndexOf(".") + 1);
						File fParent = new File(file2.getParent());
						String parentFolderName = fParent.getName();
						f.setFileFullPath(file2.getAbsolutePath());
						f.setFileType(suffix);
						f.setFolderName(parentFolderName);
						fList.add(f);
						fileNum++;


		 else
			logger.info(">>>>>>文件不存在!");

		// logger.info(">>>>>>文件夹共有:" + folderNum + ",文件共有:" + fileNum);
		return fList;


	public static BufferedImage matToBufferedImage(Mat matrix)
		int cols = matrix.cols();
		int rows = matrix.rows();
		int elemSize = (int) matrix.elemSize();
		byte[] data = new byte[cols * rows * elemSize];
		int type;
		matrix.get(0, 0, data);
		switch (matrix.channels())
		case 1:
			type = BufferedImage.TYPE_BYTE_GRAY;
			break;
		case 3:
			type = BufferedImage.TYPE_3BYTE_BGR;
			// bgr to rgb
			byte b;
			for (int i = 0; i < data.length; i = i + 3)
				b = data[i];
				data[i] = data[i + 2];
				data[i + 2] = b;

			break;
		default:
			return null;

		BufferedImage image2 = new BufferedImage(cols, rows, type);
		image2.getRaster().setDataElements(0, 0, cols, rows, data);
		return image2;


	public static Mat bufferedImageToMat(BufferedImage bi)
		Mat mat = new Mat(bi.getHeight(), bi.getWidth(), CvType.CV_8UC3);
		byte[] data = ((DataBufferByte) bi.getRaster().getDataBuffer()).getData();
		mat.put(0, 0, data);
		return mat;
ImageViewer.java
这是一个JFrame,用于显示OpenCV的Mat格式图像用的通用类,后面好几个例子都会用到这个通用显示图像类
package org.mk.opencv;

import org.mk.opencv.util.OpenCVUtil;
import org.opencv.core.Mat;
import javax.swing.*;
import java.awt.*;

public class ImageViewer
	private JLabel imageView;
	private Mat image;
	private String windowName;

	/**
	 * 如果使用junit测试时调用该方法,图像会一闪而过,可通过sleep()等方式暂时显示
	 *
	 * @param
	 */
	private JFrame frame = null;

	public ImageViewer()
		frame = createJFrame(windowName, 800, 600);


	public ImageViewer(Mat image)
		this.image = image;


	/**
	 * @param image      要显示的mat
	 * @param windowName 窗口标题
	 */
	public ImageViewer(Mat image, String windowName)
		frame = createJFrame(windowName, 1024, 768);
		this.image = image;
		this.windowName = windowName;


	public void setTitle(String windowName)
		this.windowName = windowName;


	public void setImage(Mat image)
		this.image = image;


	/**
	 * 图片显示
	 */
	public void imshow()
		setSystemLookAndFeel();
		frame.pack();
		frame.setLocationRelativeTo(null);
		frame.setVisible(true);
		frame.setDefaultCloseOperation(JFrame.EXIT_ON_CLOSE);// 用户点击窗口关闭
		if (image != null)
			Image loadedImage = OpenCVUtil.matToImage(image);
			// JFrame frame = createJFrame(windowName, image.width(), image.height());
			imageView.setIcon(new ImageIcon(loadedImage));
			frame.pack();
			// frame.setLocationRelativeTo(null);
			// frame.setVisible(true);
			// frame.setDefaultCloseOperation(JFrame.EXIT_ON_CLOSE);// 用户点击窗口关闭


	private void setSystemLookAndFeel()
		try
			UIManager.setLookAndFeel(UIManager.getSystemLookAndFeelClassName());
		 catch (ClassNotFoundException e)
			e.printStackTrace();
		 catch (InstantiationException e)
			e.printStackTrace();
		 catch (IllegalAccessException e)
			e.printStackTrace();
		 catch (UnsupportedLookAndFeelException e)
			e.printStackTrace();


	private JFrame createJFrame(String windowName, int width, int height)
		JFrame frame = new JFrame(windowName);
		imageView = new JLabel();
		final JScrollPane imageScrollPane = new JScrollPane(imageView);
		imageScrollPane.setPreferredSize(new Dimension(width, height));
		frame.add(imageScrollPane, BorderLayout.CENTER);
		frame.setDefaultCloseOperation(WindowConstants.EXIT_ON_CLOSE);
		return frame;
DetectEye.java
这个类就是用来探测人眼的类了。
它作这么几件事:
- 读入一个jpg图片;
- 调用opencv内置检测器中的眼部检测器,这些检测器一般位于:opencv编译目录如“opencvbuild\\install\\etc”目录内;
- 使用检测器把人眼部位识别出来;
- 在识别的位置汇制一个矩形;
- 然后使用ImageViewer来显示这张图片;
package org.mk.opencv;

import org.opencv.core.Core;
import org.opencv.core.Mat;
import org.opencv.core.MatOfRect;
import org.opencv.core.Point;
import org.opencv.core.Rect;
import org.opencv.core.Scalar;
import org.opencv.imgcodecs.Imgcodecs;
import org.opencv.imgproc.Imgproc;
import org.opencv.objdetect.CascadeClassifier;

public class DetectEye
	private static Mat detectEye(Mat src)
		Mat dst = src.clone();

		// 绾ц仈鍒嗙被鍣ㄧ被鐢ㄤ簬瀵硅薄妫�娴嬨��
		CascadeClassifier objDetector = new CascadeClassifier(
				"D:\\\\opencv\\\\opencv3.4.3\\\\install-mk-pc-with-xfeatures2d\\\\etc\\\\haarcascades\\\\haarcascade_eye.xml");
		MatOfRect objDetections = new MatOfRect();
		objDetector.detectMultiScale(dst, objDetections);
		if (objDetections.toArray().length <= 0)
			return src;

		for (Rect rect : objDetections.toArray())
			Imgproc.rectangle(dst, new Point(rect.x, rect.y), new Point(rect.x + rect.width, rect.y + rect.height),
					new Scalar(0, 0, 255), 2);

		return dst;


	public static void main(String[] args)
		System.loadLibrary(Core.NATIVE_LIBRARY_NAME);
		Mat src = Imgcodecs.imread("D:\\\\opencv-demo\\\\anold.jpg");
		if (src.dataAddr() == 0)
			System.out.println("打开文件出错");

		Mat eyeDtMat = detectEye(src);
		ImageViewer imageViewer = new ImageViewer(eyeDtMat, "第一幅图片");
		imageViewer.imshow();
运行后效果如下
以上是关于OpenCV Java入门二 在Windows10系统上安装OpenCV的主要内容,如果未能解决你的问题,请参考以下文章