Apache ranger 简介原理安装部署
Posted 河南骏
tags:
篇首语:本文由小常识网(cha138.com)小编为大家整理,主要介绍了Apache ranger 简介原理安装部署相关的知识,希望对你有一定的参考价值。
一、Ranger简介
Apache Ranger提供一个集中式安全管理框架, 并解决授权和审计。它可以对Hadoop生态的组件如HDFS、Yarn、Hive、Hbase等进行细粒度的数据访问控制。通过操作Ranger控制台,管理员可以轻松的通过配置策略来控制用户访问权限。
二、Ranger支持服务或组件
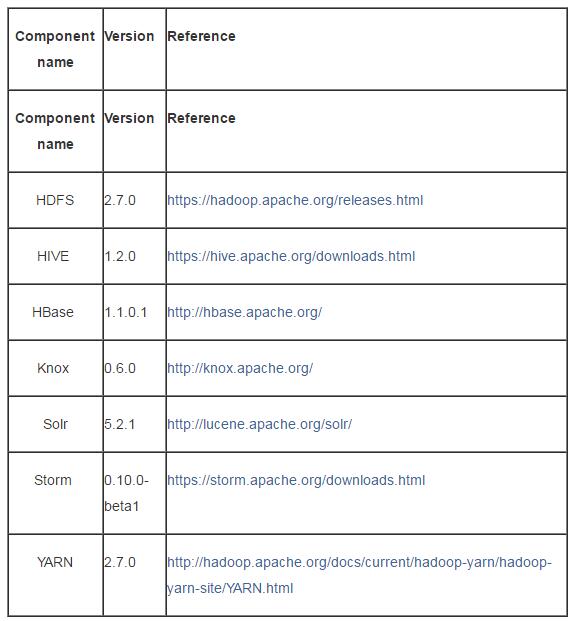
Ranger支持的服务有HDFS、Hbase、Hive、Yarn、Strom、Kafka、Knox、Solor,但要注意各个组件的版本,官网提供的版本如下:
三、Ranger编译
安装Ranger之前要进行编译,首先下载源代码,方式有两种:
(1)命令方式:
git clone https://github.com/apache/incubator-ranger.git

cd incubator-ranger

git checkout ranger-0.5
(2)解压方式:直接下载apache-ranger-incubating-0.5.2.tar.gz 解压得到。
Resource build:

cd  /apache-ranger-incubating-0.5.2

mvn clean compile package assembly:assembly install
Target编译构建的包如下:
cd /apache-ranger-incubating-0.5.2/target

ls  *.tar.gz

ranger-0.5.0-admin.tar.gz

ranger-0.5.0-kms.tar.gz

ranger-0.5.0-storm-plugin.tar.gz

ranger-0.5.0-hbase-plugin.tar.gz

ranger-0.5.0-knox-plugin.tar.gz

ranger-0.5.0-usersync.tar.gz

ranger-0.5.0-hdfs-plugin.tar.gz

ranger-0.5.0-migration-util.tar.gz

ranger-0.5.0-yarn-plugin.tar.gz

ranger-0.5.0-hive-plugin.tar.gz

ranger-0.5.0-solr-plugin.tar.gz

ranger-0.5.0-kafka-plugin.tar.gz

ranger-0.5.0-src.tar.gz注意:a、编译过程中出现测试用例不通过和文件认证错误错误:带上参数-DskipTests=true -Drat.skip=true 重新编译;
b、若编译过程中出现缺少jar包的情况,可能下载不了,需要手动自动添加;
c、编译所需的其他工具如maven等安装配置略。
四、Ranger安装
1、安装Ranger 控制台:Ranger—admin
 tar –zxvf ranger-0.5.0-admin.tar.gz

cd ranger-0.5.0-admin

  vim install.properties
修改的参数如下:
 setup_mode=SeparateDB

db_root_user=root

db_root_password=123456

db_host=localhost

db_name=ranger

db_user=root

db_password=123456

audit_store=db

audit_db_name=ranger_audit

audit_db_user=root

audit_db_password=123456
初始化设置Ranger Admin:执行./setup.sh
启动Ranger Admin:ranger-admin start
验证是否安装成功:访问http://:6080;用admin/admin登录,出现登录界面,登录成功,说明成功!
2、安装Ranger Usersync
同步Linux系统用户到ranger数据库,需要安装Ranger Usersync。安装步骤如下:
tar –zxvfranger-0.5.0-admin.tar.gz

cd ranger-0.5.0-admin

 viminstall.properties
修改的参数如下:
POLICY_MGR_URL=http://<ip:host>:6080

SYNC_SOURCE=unix

SYNC_INTERVAL=1

logdir=/var/log/ranger/usersync
初始化设置Ranger Usersync:执行./setup.sh
启动Ranger Usersync:./ranger-usersync-services.sh start
验证是否安装成功:在Ranger控制台可以看到users中同步的用户信息。
3、组件插件安装
(1)ranger-0.5.0-hdfs-plugin 安装
tar –zxvfranger-0.5.0-hdfs-plugin.tar.gz

cd ranger-0.5.0-hdfs-plugin

 viminstall.properties
修改的参数如下:
POLICY_MGR_URL=http://localhost:6080

REPOSITORY_NAME=hadoopdev

XAAUDIT.DB.IS_ENABLED=true

XAAUDIT.DB.FLAVOUR=mysql

XAAUDIT.DB.HOSTNAME=localhost

XAAUDIT.DB.DATABASE_NAME=ranger_audit

XAAUDIT.DB.USER_NAME=root

XAAUDIT.DB.PASSWORD=123456
启动Ranger HDFS Plugin:./enable-hdfs-plugin.sh
提示: [/usr/local/hadoop/conf] not found.
需要把Hadoop的配置文件conf放到/usr/local/hadoop/conf下面,执行软连接命令:
ln -s /usr/local/hadoop-2.7.2/etc/hadoop//usr/local/hadoop/conf再次执行:./enable-hdfs-plugin.sh
提示: [/usr/local/hadoop/lib] not found.
需要将HDFS Plugin内的jar和HADOOP包含的HDFSjar都指向/usr/local/hadoop/lib,执行如下命令:
cp/usr/local/ranger-0.5.0-hdfs-plugin/lib/ranger-hdfs-plugin-impl/*.jar /usr/local/hadoop-2.7.2/share/hadoop/hdfs/lib/

ln -s /usr/local/hadoop-2.7.2/share/hadoop/hdfs/lib/ /usr/local/hadoop/lib
再次执行:./enable-hdfs-plugin.sh
验证是否安装成功:
a、登录ranger admin
b、点击HDFS plugin 添加按钮,添加服务
c、输入定义的服务名:hadoopdev(在配置参数时设置的,要保持一致)
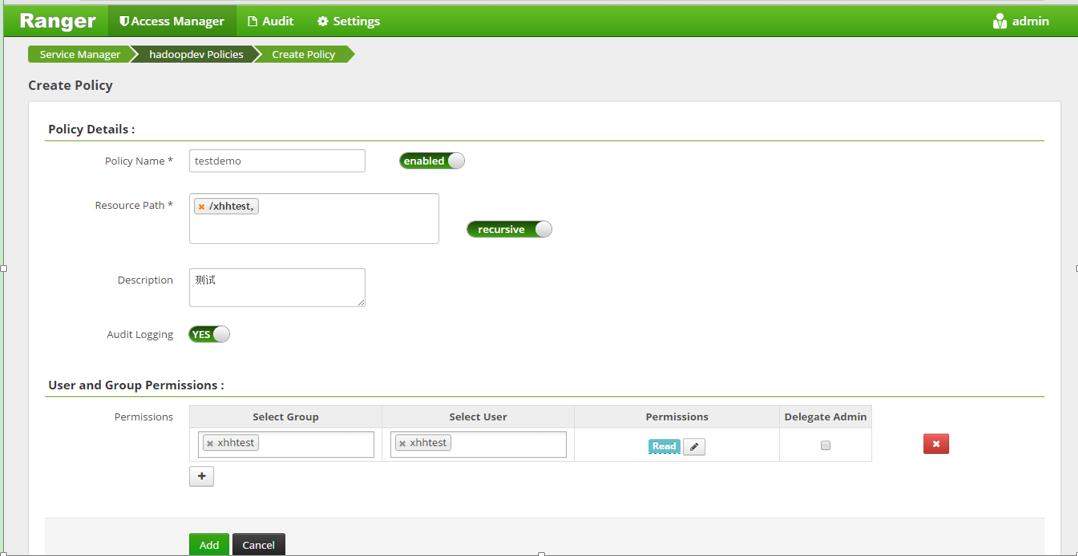
d、点击 Test Connection,弹出窗口Connected Successfully.说明插件安装成功。
(2)ranger-0.5.0-hive-plugin 安装
Hive Plugin 的安装步骤同HDFS Plugin,此处略。
五、Ranger 使用及原理
1、Ranger 控制台
通过控制台web 界面,可以配置策略管理权限。
(1)服务管理(service manager):目前支持的服务有HDFS Hbase Hive Yarn Strom Kafka Knox Solor服务;
(2) 服务(service):通过某一个服务管理如HDFS,创建一个服务service,如hadoopdev,通过这个服务,ranger控制台和具体环境的hdfs相关联;
(3)策略(policy):有了某个服务后,如hadoopdev,可以用这个服务创建相关的策略来管理权限;
(4)审计管理(audit):对所做的操作进行审计,通过界面可以看到操作日志信息;
(5)用户和用户组管理(users and groups):可以增加删除修改用户或用户组信息以便对这些用户或用户组设置权限。
2、Ranger APIs
Ranger提供web界面控制台对服务,策略进行操作配置,以提供安全管理。实质上是调用rest api进行操作。ranger api 主要有三类:
(1)服务定义(rangerServiceDef):
Service Definition APIs
Get Service Definition by id
Get Service Definition by name
Create Service Definition
Update Service Definition by id
Update Service Definition by name
Delete Service Definition by id
Delete Service Definition by name
Search Service Definitions
(2)服务(rangerService)
Service APIs
Get Service by id
Get Service by name
Create Service
Update Service by id
Update Service by name
Delete Service by id
Delete Service by name
Search Services
(3)策略(rangerPolicy)
Policy APIs
Get Policy by id
Get Policy by service-name and policy-name
Create Policy
Update Policy by id
Update Policy by service-name and policy-name
Delete policy by id
Delete policy by service-name and policy-name
Search Policies in a Service
按照其规范定义,这样可以通过rest api直接操作配置安全策略。
如:http:///service/public/v2/api/servicedef/3 ,通过id获取服务定义(要确保先登录Ranger Admin)。
3、Ranger 原理
(1)Ranger hdfs yarn hive 支持的权限
HDFS:ranger-acl支持read write excute三种权限,且支持递归赋权限。
Hive:a、表权限:select update create drop alert index lock
b、hive udf自定义函数权限:selectupdate create drop alert index lock
Yarn:支持submit-app提交队列,admin-queue管理队列两种权限,支持队列递归赋权限
(2)原理分析
a、 ranger插件安装分析
Ranger鉴权本质上是通过读取安装组件时生成的配置文件以及组件自带的jar包,通过hook方式调用各个组件服务达到权限管理。在安装服务组件插件过程中,当执行./enable-xxx-plugin.sh时,主要执行了以下三个步骤:第一、将插件自带的conf更新到系统安装的服务conf下;第二、将插件自带的lib更新到系统安装的服务lib下;第三、将install.properties生成.xml文件,更新到系统安装的服务conf下。
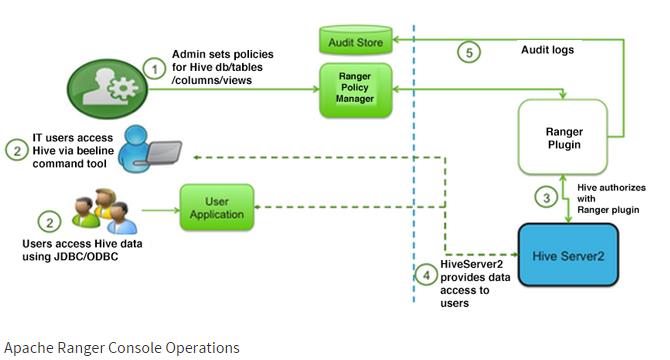
b、Ranger 权限管理流程图分析
以ranger对hive进行权限管理为例,如下图所示:鉴权过程分为五个步骤。
六、Ranger 测试
1、HDFS服务测试
hadoop版本为:2.7.2.
(1)linux环境下添加用户:useradd xhhtest
(2)root用户在hdfs下创建文件夹:hdfsdfs –mkdir /xhhtest
hdfs dfs –mkdir /xhhtest/sub
(3)登录Ranger Admin,在hadoopdev里添加Policy
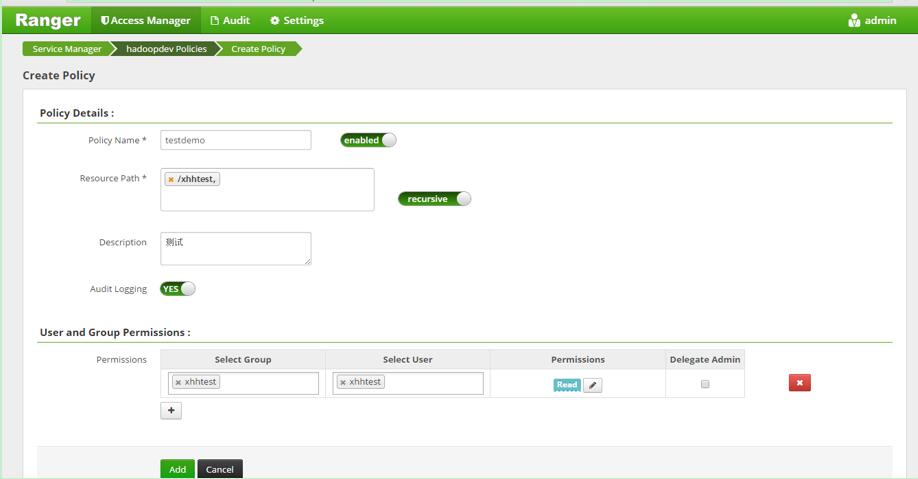
policy:目录/xhhtest 对用户xhhtest只设置读权限
(4)切换到xhhtest用户,执行:hdfs dfs –put my.txt /xhhtest
Error:Permission denied,说明无权限访问。
(5)修改policy,对目录/xhhtest添加write权限给用户xhhtest。执行:hdfs dfs -put my.txt /xhhtest,执行成功。
(6)执行hdfs dfs -put my.txt /xhhtest/sub ,成功,说明可以递归赋予权限。
2、hive服务测试
hive版本为1.2.1,1.1.0;Ranger对通过beeline方式操作hive的用户进行策略控制。
(1)登录Ranger Admin,在hivedev里添加Policy
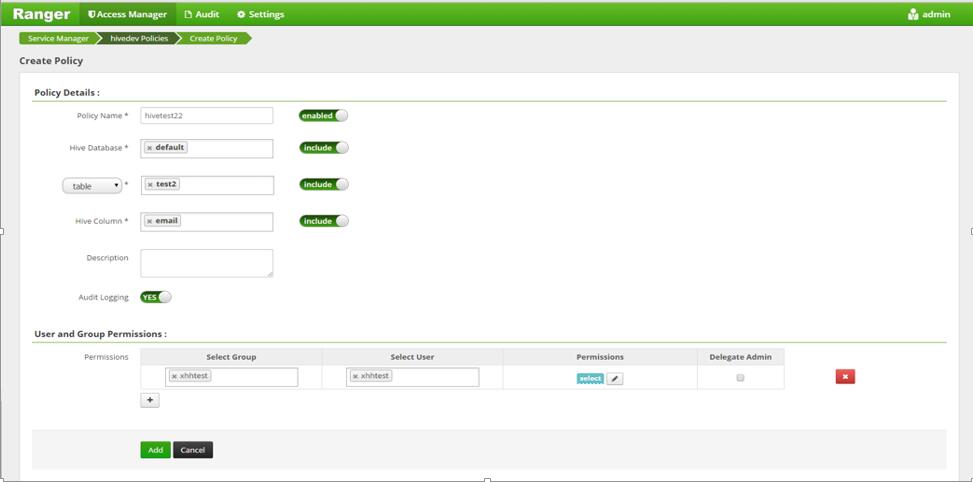
Policy:对default数据库中的test2表的email这列赋予select权限
(2)切换到xhhtest用户,beeline方式操作hive

只能对赋权限的列进行select操作。
(3)修改policy,赋予select update create drop alert权限,对表导入数据,成功!
3、通过代码或jdbc方式测试
首先通过界面设置Hdfs,Hive policy,具体设置policy过程如上所述。通过代码方式操作hdfs文件或hive表,用户只能操作有权限的文件或表,详细步骤略。简单代码如下所示:
public class TestRangerPolicy

    public static void main(String[] args)

        String driver = "org.apache.hive.jdbc.HiveDriver";

        String hiveUrl = "jdbc:hive2://192.168.106.63:10000/default";

        String userName = "xhhtest";

        String password=" ";

       testHivePolicy(driver,hiveUrl,userName,password);


       String url = "hdfs://192.168.106.63:8020/xhhtest";

       testHdfsPolicy(url);


    private static void testHivePolicy(String driver,String hiveUrl,String userName,String password)

       try

           Class.forName(driver);

           Connection conn = DriverManager.getConnection(hiveUrl, userName, password);

           Statement stat = conn.createStatement();

           String sql = "select *from test2";

           ResultSet res = stat.executeQuery(sql);

           System.out.println("----------");

           while(res.next())

              String s = res.getString(0);

              System.out.println("sss= "+s);


        catch (ClassNotFoundException |SQLException e)

           e.printStackTrace();


    private static void testHdfsPolicy(String url)

       Configuration conf = new Configuration();

       try

           FileSystem fs = FileSystem.get(URI.create(url),conf,"xhhtest");

           fs.copyFromLocalFile(new Path("E:\\\\hdfs.txt"), new Path(url));

        catch (IOException | InterruptedExceptione)

           e.printStackTrace();
4、Ranger Rest Api代码测试
(1)通过HttpCLient发送Get请求测试,代码如下:
public static void main(String[] args) throws Exception

       String url = "http://192.168.106.63:6080/service/public/v2/api/service/1";

       testGetRequest(url);


public static void testGetRequest(String url) throws IllegalStateException,IOException

       HttpClient client = new HttpClient();

       GetMethod method = new GetMethod(url);

       method.setRequestHeader("Authorization",

                 "Basic " + Base64.encodeBase64String(("admin:admin").getBytes()));

       method.setDoAuthentication(true);

       int statusCode = client.executeMethod(method);

       System.out.println("statusCode:" + statusCode);

       if (statusCode == HttpStatus.SC_OK)

           String content = method.getResponseBodyAsString();

           System.out.println(content);


       method.releaseConnection();
执行代码结果:
    "id":1,
    "guid":"1465729358055_620_97",
    "isEnabled":true,
    "createdBy":"Admin",
    "updatedBy":"Admin",
    "createTime":1465700558000,
    "updateTime":1466036136000,
    "version":21,
    "type":"hdfs",
    "name":"hadoopdev",
    "description":"",
    "configs":
        "username":"admin",
        "fs.default.name":"hdfs://xhh18020",
        "hadoop.security.authentication":"simple",
        "password":"*****",
        "hadoop.security.authorization":"true",
        "hadoop.rpc.protection":"authentication"
    ,
    "policyVersion":19,
    "policyUpdateTime":1466064936000
(2)发送Post请求测试,代码如下:
public static void testPostRequest(String url) throws HttpException,IOException

       HttpClient client = new HttpClient();

       PostMethod method = new PostMethod(url);

       method.setRequestHeader("Authorization",

                 "Basic " + Base64.encodeBase64String(("admin:admin").getBytes()));

       method.setDoAuthentication(true);

       RangerService  service = new RangerService();

       service.setCreatedBy("Admin");

       service.setCreateTime(new Date().getTime());

       service.setDescription("myservice demo");

       service.setGuid("1465729358055_620_97");

       service.setIsEnabled(true);

       service.setName("myservicedev");

       service.setVersion(Long.parseLong("1"));

       service.setId(Long.parseLong("8"));

       service.setType("hdfs");

       Map<String,String> configs = newHashMap<>();

       configs.put("username", "admin");

       configs.put("password", "admin");

       configs.put("fs.default.name", "hdfs://sgd1:8020");

       configs.put("hadoop.security.authentication", "simple");

       configs.put("hadoop.security.authorization", "true");

       configs.put("hadoop.rpc.protection", "authentication");

       service.setConfigs(configs);

       JSONObject  jsonObject = JSONObject.fromObject(service);

       method.setRequestHeader("Content-Type", "application/json");

       method.setRequestBody(jsonObject.toString());

       int statusCode = client.executeMethod(method);

       System.out.println("statusCode= "+statusCode);

       method.releaseConnection();


执行代码结果:statusCode= 200
七、总结
本文主要介绍了Ranger的编译,安装,使用及原理,并从界面直接操作,代码或jdbc,Ranger rest api三方面阐述对Ranger 的测试
以上是关于Apache ranger 简介原理安装部署的主要内容,如果未能解决你的问题,请参考以下文章