ChatGPT教你搭建多任务模型
Posted 拾一滴清水
tags:
篇首语:本文由小常识网(cha138.com)小编为大家整理,主要介绍了ChatGPT教你搭建多任务模型相关的知识,希望对你有一定的参考价值。
ChatGPT教你搭建多任务模型
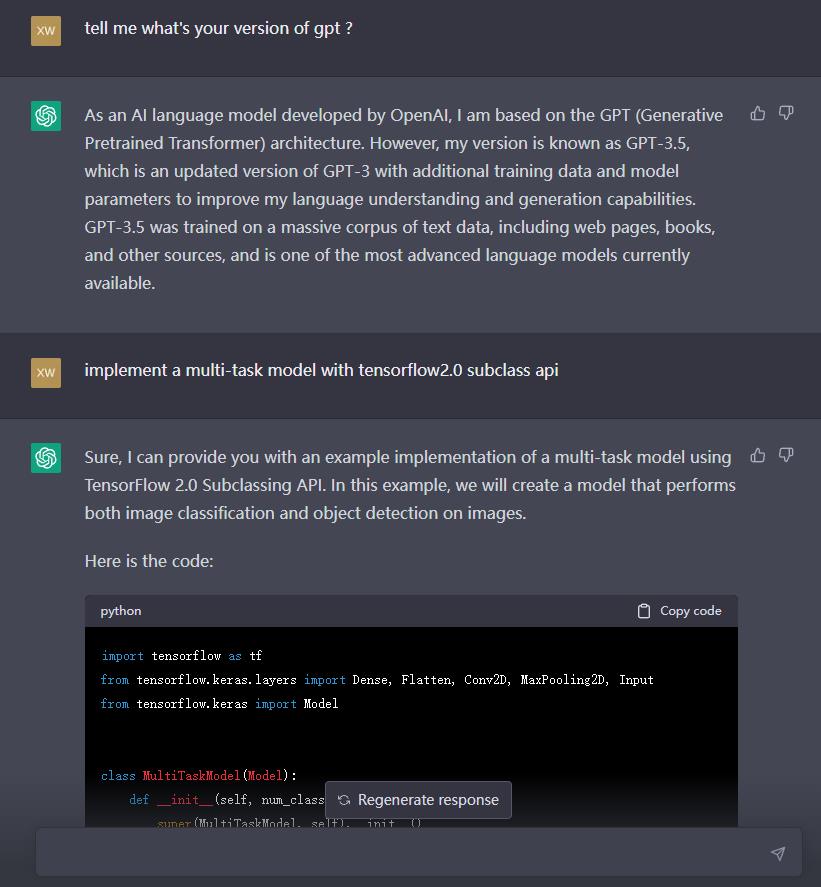
You:
tell me what’s your version of gpt ?
ChatGPT:
As an AI language model developed by OpenAI, I am based on the GPT (Generative Pretrained Transformer) architecture. However, my version is known as GPT-3.5, which is an updated version of GPT-3 with additional training data and model parameters to improve my language understanding and generation capabilities. GPT-3.5 was trained on a massive corpus of text data, including web pages, books, and other sources, and is one of the most advanced language models currently available.
You:
implement a multi-task model with tensorflow2.0 subclass api
ChatGPT:
Sure, I can provide you with an example implementation of a multi-task model using TensorFlow 2.0 Subclassing API. In this example, we will create a model that performs both image classification and object detection on images.
Here is the code:
import tensorflow as tf
from tensorflow.keras.layers import Dense, Flatten, Conv2D, MaxPooling2D, Input
from tensorflow.keras import Model


class MultiTaskModel(Model):
    def __init__(self, num_classes, num_boxes):
        super(MultiTaskModel, self).__init__()
        self.num_classes = num_classes
        self.num_boxes = num_boxes

        # Shared layers
        self.conv1 = Conv2D(32, 3, activation='relu')
        self.maxpool1 = MaxPooling2D()
        self.conv2 = Conv2D(64, 3, activation='relu')
        self.maxpool2 = MaxPooling2D()
        self.conv3 = Conv2D(128, 3, activation='relu')
        self.maxpool3 = MaxPooling2D()

        # Classification head
        self.flat1 = Flatten()
        self.dense1 = Dense(64, activation='relu')
        self.dense2 = Dense(self.num_classes, activation='softmax')

        # Detection head
        self.flat2 = Flatten()
        self.dense3 = Dense(256, activation='relu')
        self.dense4 = Dense(self.num_boxes * 4, activation='linear')

    def call(self, inputs):
        # Shared layers
        x = self.conv1(inputs)
        x = self.maxpool1(x)
        x = self.conv2(x)
        x = self.maxpool2(x)
        x = self.conv3(x)
        x = self.maxpool3(x)

        # Classification head
        y1 = self.flat1(x)
        y1 = self.dense1(y1)
        y1 = self.dense2(y1)

        # Detection head
        y2 = self.flat2(x)
        y2 = self.dense3(y2)
        y2 = self.dense4(y2)

        return y1, y2
In this example, we define a MultiTaskModel class that extends the tf.keras.Model class. The MultiTaskModel class takes two arguments, num_classes and num_boxes, which represent the number of classes for image classification and the number of bounding boxes for object detection, respectively.
We then define the shared layers of the model, which include three convolutional layers followed by max pooling layers. We define two separate heads for the model: one for image classification and another for object detection.
The classification head consists of a flatten layer, followed by two dense layers with relu and softmax activations, respectively. The detection head consists of a flatten layer, followed by two dense layers with relu and linear activations, respectively. The output of the detection head is a tensor of shape (batch_size, num_boxes * 4), where 4 represents the number of parameters needed to define a bounding box (x-coordinate, y-coordinate, width, and height).
In the call method of the model, we pass the inputs through the shared layers and then through the two separate heads to obtain the outputs for classification and detection. Finally, we return the two outputs as a tuple.
To train this model, you would need to define appropriate loss functions for each task and combine them into a joint loss. You would also need to provide training data that includes both labeled images and bounding box annotations.
You:
how can I train the model you built above? and how to generate sample for this model?
ChatGPT:
To train the multi-task model that I provided earlier, you can follow these steps:
-
Prepare the training data: You would need a dataset of labeled images and bounding box annotations. You can use popular datasets such as COCO, Pascal VOC, or OpenImages for this purpose.
-
Define the loss functions: For the classification task, you can use cross-entropy loss, and for the detection task, you can use mean squared error loss or smooth L1 loss. You can combine these losses into a joint loss using a weighting factor or a more complex scheme such as multi-task learning.
-
Compile the model: You can compile the model using the
compilemethod of theMultiTaskModelclass. You would need to specify the optimizer, the loss functions, and any metrics you want to track during training. -
Train the model: You can train the model using the
fitmethod of theMultiTaskModelclass. You would need to pass in the training data, the number of epochs, and any other relevant parameters such as batch size and validation data.
Here is some sample code that demonstrates these steps:
# Load the data
train_data = ...
val_data = ...

# Define the loss functions
class_loss_fn = tf.keras.losses.CategoricalCrossentropy()
detect_loss_fn = tf.keras.losses.MeanSquaredError()

# Define the optimizer
optimizer = tf.keras.optimizers.Adam()

# Compile the model
model = MultiTaskModel(num_classes=10, num_boxes=5)
model.compile(optimizer=optimizer, loss=[class_loss_fn, detect_loss_fn], metrics=['accuracy'])

# Train the model
model.fit(train_data, epochs=10, validation_data=val_data)

# Generate a sample output
input_image = ...
output_classes, output_boxes = model.predict(input_image)
To generate a sample output for the model, you can use the predict method of the MultiTaskModel class. The input to the predict method should be an image tensor of shape (batch_size, height, width, num_channels). The output of the predict method will be a tuple of two tensors: one for the classification probabilities and one for the bounding box parameters.
Here is some sample code that demonstrates how to generate a sample output:
# Generate a sample output
input_image = ...
output_classes, output_boxes = model.predict(input_image)

# Print the predicted classes and bounding boxes
print('Predicted classes:', output_classes)
print('Predicted boxes:', output_boxes)
Note that the output of the predict method will depend on the specific dataset and training data that you used to train the model, so the results may vary.
You:
ok, can you regenerate the model for recommendation scene with a clarified example?
ChatGPT:
Sure, here is an example of how to build a multi-task model for a recommendation system using TensorFlow 2.0’s Subclassing API. This model will have two tasks: rating prediction and item embedding prediction.
Assuming we have a dataset of user-item interactions with ratings, where each user has interacted with multiple items, we can define the following inputs and outputs for our model:
Inputs:
- User ID (integer)
- Item ID (integer)
Outputs:
- Rating (float)
- Item Embedding (vector of floats)
We will use an embedding layer to learn the representations of the users and items, and a shared neural network to predict the rating and item embedding.
import tensorflow as tf

class RecommendationModel(tf.keras.Model):
    def __init__(self, num_users, num_items, embedding_size, hidden_units):
        super(RecommendationModel, self).__init__()
        self.user_embedding = tf.keras.layers.Embedding(num_users, embedding_size)
        self.item_embedding = tf.keras.layers.Embedding(num_items, embedding_size)
        self.shared_nn = tf.keras.Sequential([
            tf.keras.layers.Dense(hidden_units, activation='relu'),
            tf.keras.layers.Dense(hidden_units, activation='relu')
        ])
        self.rating_head = tf.keras.layers.Dense(1)
        self.embedding_head = tf.keras.layers.Dense(embedding_size)

    def call(self, inputs):
        user_ids, item_ids = inputs
        user_embeddings = self.user_embedding(user_ids)
        item_embeddings = self.item_embedding(item_ids)
        concatenated = tf.concat([user_embeddings, item_embeddings], axis=-1)
        shared = self.shared_nn(concatenated)
        rating = self.rating_head(shared)
        embedding = self.embedding_head(shared)
        return rating, embedding
In the RecommendationModel class, we define the __init__ method to create the layers of the model. We first create two embedding layers, one for the users and one for the items, with the specified embedding size. We then create a shared neural network with two hidden layers, each with the specified number of units and ReLU activation. Finally, we create two output heads: one for rating prediction with a single output neuron, and one for item embedding prediction with an output size of the embedding size.
In the call method, we define how to forward pass the inputs through the model. We first look up the embeddings of the users and items using the corresponding embedding layers. We then concatenate these embeddings along the last dimension, and pass the concatenated embeddings through the shared neural network. Finally, we pass the output of the shared network through the rating and embedding output heads, respectively.
To train the model, we need to define the loss functions for each task and the optimizer. Assuming we have a training dataset of user-item interactions with corresponding ratings and item embeddings, we can define the following:
# Load the data
train_data = ...
val_data = ...

# Define the loss functions
mse_loss_fn = tf.keras.losses.MeanSquaredError()
cosine_loss_fn = tf.keras.losses.CosineSimilarity()

# Define the optimizer
optimizer = tf.keras.optimizers.Adam()

# Instantiate the model
model = RecommendationModel(num_users=1000, num_items=10000, embedding_size=32, hidden_units=64)

# Compile the model
model.compile(optimizer=optimizer, loss=[mse_loss_fn, cosine_loss_fn], metrics=['mae', 'cosine_similarity'])

# Train the model
model.fit(train_data, epochs=10, validation_data=val_data)
In this example, we use mean squared error loss for the rating prediction task and cosine similarity loss for the item embedding prediction task. We compile the model with the specified optimizer,
You:
convert above two task with ctr prediction and cvr prediction task? build the training and predicting pipline with python again.
ChatGPT:
Sure, here’s an example of how to modify the recommendation system multi-task model to predict click-through rate (CTR) and conversion rate (CVR) instead.
Assuming we have a dataset of user-item interactions with the following features: user ID, item ID, timestamp, and a binary label indicating whether the user clicked on the item and another binary label indicating whether the user converted after clicking on the item.
We can define the following inputs and outputs for our model:
Inputs:
- User ID (integer)
- Item ID (integer)
- Timestamp (float)
Outputs:
- Click Probability (float)
- Conversion Probability (float)
We will use an embedding layer to learn the representations of the users and items, and a shared neural network with two output heads to predict the click and conversion probabilities.
import tensorflow as tf

class CTRCVRModel(tf.keras.Model):
    def __init__(self, num_users, num_items, embedding_size, hidden_units):
        super(CTRCVRModel, self).__init__()
        self.user_embedding = tf.keras.layers.Embedding(num_users, embedding_size)
        self.item_embedding = tf.keras.layers.Embedding(num_items, embedding_size)
        self.timestamp_embedding = tf.keras.layers.Dense(embedding_size, activation='relu')
        self.shared_nn = tf.keras.Sequential([
            tf.keras.layers.Dense(hidden_units, activation='relu'),
            tf.keras.layers.Dense(hidden_units, activation='relu')
        ])
        self.click_head = tf.keras.layers.Dense(1, activation='sigmoid')
        self.conversion_head = tf.keras.layers.Dense(1, activation='sigmoid')

    def call(self, inputs):
        user_ids, item_ids, timestamps = inputs
        user_embeddings = self.user_embedding(user_ids)
        item_embeddings = self.item_embedding(item_ids)
        timestamp_embeddings = self.timestamp_embedding(timestamps)
        concatenated = tf.concat([user_embeddings, item_embeddings, timestamp_embeddings], axis=-1)
        shared = self.shared_nn(concatenated)
        click_probability = self.click_head(shared)
        conversion_probability = self.conversion_head(shared)
        return click_probability, conversion_probability
In the CTRCVRModel class, we define the __init__ method to create the layers of the model. We first create three input layers: one for the users, one for the items, and one for the timestamps. We then create two embedding layers, one for the users and one for the items, with the specified embedding size. We also create a dense layer for the timestamp feature. We then create a shared neural network with two hidden layers, each with the specified number of units and ReLU activation. Finally, we create two output heads: one for click probability prediction with a single output neuron and sigmoid activation, and one for conversion probability prediction with a single output neuron and sigmoid activation.
In the call method, we define how to forward pass the inputs through the model. We first look up the embeddings of the users and items using the corresponding embedding layers. We also pass the timestamps through the timestamp embedding layer. We then concatenate these embeddings and the timestamp embeddings along the last dimension, and pass the concatenated embeddings through the shared neural network. Finally, we pass the output of the shared network through the click and conversion output heads, respectively.
To train the model, we need to define the loss functions for each task and the optimizer. Assuming we have a training dataset of user-item interactions with the corresponding labels, we can define the following:
# Load the data
train_data = ...
val_data = ...

# Define the loss functions
bce_loss_fn = tf.keras.losses.BinaryCrossentropy()

# Define the optimizer
optimizer = tf.keras.optimizers.Adam()

# Instantiate the model
model = C
You:
continue
ChatGPT:
# Compile the model with two loss functions
model.compile(optimizer=optimizer, loss=[bce_loss_fn, bce_loss_fn])

# Define the training and validation datasets
train_dataset = tf.data.Dataset.from_tensor_slices((train_user_ids, train_item_ids, train_timestamps,
                                                     train_click_labels, train_conversion_labels))
train_dataset = train_dataset.shuffle(buffer_size=len(train_data)).batch(batch_size)
val_dataset = tf.data.Dataset.from_tensor_slices((val_user_ids, val_item_ids, val_timestamps,
                                                   val_click_labels, val_conversion_labels))
val_dataset = val_dataset.batch(batch_size)

# Train the model
history = model.fit(train_dataset, epochs=num_epochs, validation_data=val_dataset)
In the compile method, we specify the optimizer and the loss functions for each task. We use binary crossentropy as the loss function for both tasks.
In the training and validation datasets, we combine all the input features and labels into tuples, and create tf.data.Dataset objects from them. We shuffle the training dataset and batch both datasets. We then use the fit method to train the model, specifying the training dataset, the number of epochs, and the validation dataset.
To generate predictions for new user-item interactions, we can use the following code:
# Load the test data
test_data = ...

# Extract the input features
test_user_ids = test_data['user_id'].values
test_item_ids = test_data['item_id'].values
test_timestamps = test_data['timestamp'].values

# Generate predictions
click_probabilities, conversion_probabilities = model.predict((test_user_ids, test_item_ids, test_timestamps))

# Save the predictions
test_data['click_probability'] = click_probabilities
test_data['conversion_probability'] = conversion_probabilities
test_data.to_csv('predictions.csv', index=False)
In this code, we load the test data and extract the input features. We then use the predict method of the model to generate the click and conversion probabilities for each interaction. Finally, we save the predictions to a CSV file.
You:
great. something may be wrong. how can i solve user or item cold-start problem due to the unseen ids occuring in embedding table?
ChatGPT:
Good question! Cold-start is a common problem in recommender systems, where new users or items have no or very few interactions in the training data, making it difficult to generate accurate recommendations.
One way to handle the cold-start problem is to use a hybrid approach, where we use not only collaborative filtering based on user-item interactions, but also content-based filtering based on item features. This allows us to make recommendations for new items based on their features, even if they have no interactions in the training data.
Another approach is to use pre-trained embeddings for the user and item features. We can use a pre-trained language model like BERT or GPT to generate embeddings for textual features like item titles or user profiles. These pre-trained embeddings can be fine-tuned on the training data to generate task-specific embeddings for our recommender system.
To handle unseen users or items at inference time, we can use a fallback strategy, such as recommending popular items to new users or recommending items similar to the ones the user has interacted with to new items.
Another approach is to use a multi-armed bandit algorithm, where we balance exploration and exploitation by recommending a mix of popular items and items similar to the ones the user has interacted with. As the user interacts more with the system, we can adjust the balance towards exploitation to generate more personalized recommendations.
You:
sounds great.but talk is cheap, show me the code.
ChatGPT:
Sure! Here’s an example of how to implement a hybrid recommender system with user and item embeddings for handling the cold-start problem:
# Import necessary libraries
import tensorflow as tf
from tensorflow.keras.layers import Input, Embedding, Concatenate, Dense, Dropout
from tensorflow.keras.models import Model

# Define the input and embedding sizes
num_users = len(user_id_encoder.classes_)
num_items = len(item_id_encoder.classes_)
embedding_size = 32

# Define the user and item input layers
user_input = Input(shape=(1,), name='user_input')
item_input = Input(shape=(1,), name='item_input')

# Define the user and item embedding layers
user_embedding = Embedding(input_dim=num_users, output_dim=embedding_size, name='user_embedding')
item_embedding = Embedding(input_dim=num_items, output_dim=embedding_size, name='item_embedding')

# Generate the user and item embeddings
user_embedding_output = user_embedding(user_input)
item_embedding_output = item_embedding(item_input)

# Define the MLP layers
concatenated_embeddings = Concatenate(name='concatenated_embeddings')([user_embedding_output, item_embedding_output])
dropout_layer_1 = Dropout(0.2, name='dropout_layer_1')(concatenated_embeddings)
dense_layer_1 = Dense(64, activation='relu', name='dense_layer_1')(dropout_layer_1)
dropout_layer_2 = Dropout(0.2, name='dropout_layer_2')(dense_layer_1)
dense_layer_2 = Dense(32, activation='relu', name='dense_layer_2')(dropout_layer_2)

# Define the output layer
output_layer = Dense(1, activation='sigmoid', name='output_layer')(dense_layer_2)

# Define the model
model = Model(inputs=[user_input, item_input], outputs=output_layer)

# Compile the model
model.compile(optimizer='adam', loss='binary_crossentropy')

# Train the model
model.fit([train_data['user_id'], train_data['item_id']], train_data['label'], epochs=10, validation_split=0.2)
In this code, we define the input and embedding sizes for the user and item features, and define the user and item input layers. We then define the user and item embedding layers using the Embedding class, and generate the embeddings for the user and item features using these layers.
We then define an MLP model using the Concatenate, Dropout, and Dense layers, and concatenate the user and item embeddings as input to this model. We define a sigmoid activation function on the output layer, since we are performing binary classification to predict user-item interactions.
We compile the model using the Adam optimizer and binary crossentropy loss function, and train the model on the training data, using 20% of the data for validation. Note that we use the fit method of the model, and pass the user and item features as a list to the inputs parameter of the method.
To handle the cold-start problem, we can incorporate content-based filtering by including item features, such as the item title or description, in the input to the model. We can use pre-trained language models like BERT or GPT to generate embeddings for these features, or use simpler models like TF-IDF or word2vec.
To handle unseen users or items at inference time, we can use a fallback strategy, such as recommending popular items to new users or recommending items similar to the ones the user has interacted with to new items. We can also use a multi-armed bandit algorithm to balance exploration and exploitation and generate personalized recommendations for cold-start users and items.
You:
can you show the main coding logic for the last two strategy you mentioned above?
ChatGPT:
Sure, here are some code snippets to illustrate the two strategies:
Strategy 1: Recommending popular items to new users
# Get the top N most popular items
popular_items = train_data['item_id'].value_counts().head(N).index.tolist()

# Get the user's interactions
user_interactions = train_data[train_data['user_id'] == user_id]['item_id'].tolist()

# Remove the items the user has already interacted with
popular_items = [item for item in popular_items if item not in user_interactions]

# Recommend the remaining popular items to the user
recommendations = popular_items[:K]
In this code, we first compute the top N most popular items from the training data based on their frequency of interaction. We then get the user’s interactions from the training data, and remove the items that the user has already interacted with from the list of popular items. We then recommend the top K remaining popular items to the user.
Strategy 2: Recommending similar items to new items
# Define the similarity function
def cosine_similarity(vector1, vector2):
dot_product = np.dot(vector1, vector2)
norm1 = np.linalg.norm(vector1)
norm2 = np.linalg.norm(vector2)
return dot_product / (norm1 * norm2)
# Get the embedding of the new item
new_item_embedding = item_embedding.predict(np.array([new_item_id]))
# Compute the cosine similarity between the new item and all other items
similarities = []
for item_id in item_id_encoder.classes_:
if item_id == new_item_id:
continue
item_embedding = item_embedding_layer(np.array(ChatGPT搭建AI网站实战
1.概述
ChatGPT是一款基于GPT-3.5架构的大型语言模型,它能够进行自然语言处理和生成对话等任务。作为一款智能化的聊天机器人,ChatGPT有着广泛的应用场景,如在线客服、智能助手、个性化推荐等。今天笔者给大家分享一下如何使用ChatGPT的API模型快速搭建一个AI网站。
2.内容
在实战中,我发现ChatGPT的最大优势在于其自然流畅的对话交互能力。ChatGPT能够自动理解用户的意图和提出的问题,并针对性地给出回答和建议。同时,它还可以基于已有的上下文信息生成更加丰富的回复,从而实现更加自然和贴近人类的交互效果。
下面我将分享一些关于如何使用ChatGPT的实战经验,大概流程如下所示:

在使用ChatGPT前,我们需要对数据进行预处理。预处理的目的是将原始文本转换为模型可以理解的格式。具体来说,需要进行的预处理步骤包括:分词、标记化、向量化等。这些步骤都可以使用常见的NLP工具库来实现,如NLTK、spaCy、transformers等。在预处理完数据后,我们需要使用训练数据来训练ChatGPT模型。通常情况下,我们会使用一些优秀的深度学习框架来实现模型的训练,如PyTorch、TensorFlow等。在模型训练过程中,我们需要设置一些超参数,如学习率、批量大小、模型深度等。在模型训练完成后,我们需要对模型进行评估。评估的目的是了解模型的性能和表现,从而决定是否需要进行进一步的调整和优化。常见的模型评估指标包括:准确率、召回率、F1值等。在完成模型训练和评估后,我们需要将ChatGPT应用到实际场景中。通常情况下,我们需要将ChatGPT集成到我们的应用程序中,如在线客服、智能助手等。在部署过程中,我们需要考虑一些问题,如性能、可靠性、安全性等。
3.如何使用ChatGPT快速实现一个AI网站呢?
使用ChatGPT实现一个AI网站,大概步骤如下所示:
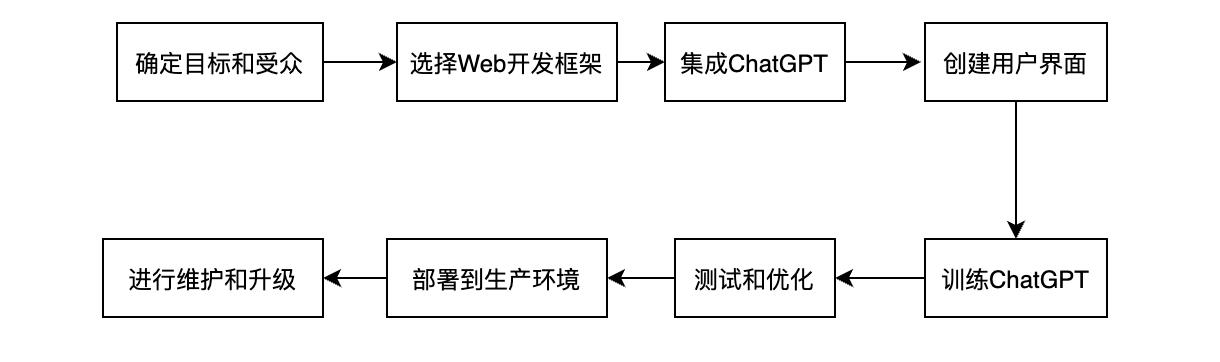
首先,您需要确定您的AI网站将用于哪些目的和哪些受众。您的目标可能是提供在线客服、智能问答、语音识别、自动翻译等功能。您的受众可能是您的客户、读者、访问者等。通过明确您的目标和受众,您可以更好地规划您的网站架构和设计。要构建一个AI网站,您需要选择一个Web开发框架。常用的Web开发框架包括Django、Flask、Express等。这些框架提供了许多常见的功能和模板,可以帮助您更快速地开发网站,并提高开发效率。集成ChatGPT是实现AI网站的关键步骤。您可以使用Python或JavaScript等编程语言来调用ChatGPT API并将其嵌入到您的Web应用程序中。这样,您的网站就可以通过ChatGPT提供更好的用户体验和服务。例如,用户可以通过与ChatGPT交互来获取问题的答案、进行语音交互等。
为了让用户能够更好地与ChatGPT交互,您需要创建一个用户友好的界面。您可以使用HTML、CSS、JavaScript等技术来设计和创建您的用户界面。您需要考虑到用户的需求和体验,并确保您的界面简洁、易用、美观等。为了让ChatGPT能够准确地回答用户的问题,您需要对ChatGPT进行训练。您可以使用自然语言处理技术来训练ChatGPT,以便它能够理解和响应用户的问题。您可以使用开源的数据集和算法来训练ChatGPT,并优化模型以提高精度和效率。
在将您的网站部署到生产环境之前,您需要对它进行测试和优化。您应该检查所有功能并确保它们能够正常运行,同时还应该优化性能和用户体验,以提高用户满意度。您可以使用自动化测试工具来测试您的网站,并使用性能分析工具来识别瓶颈和优化点。您可以收集用户反馈并进行改进,以不断改善您的网站。
当您准备好将您的网站部署到生产环境时,您需要选择一个合适的Web服务器和数据库。常用的Web服务器包括Apache、Nginx等,常用的数据库包括MySQL、PostgreSQL等。您还需要选择一个合适的云服务提供商,如AWS、Google Cloud等,并将您的应用程序部署到云服务器上。一旦您的网站部署到生产环境,您需要进行定期的维护和升级。您应该定期备份您的数据并更新您的应用程序以确保安全性和稳定性。您还应该持续地优化您的用户体验和功能,以满足用户的需求和期望。
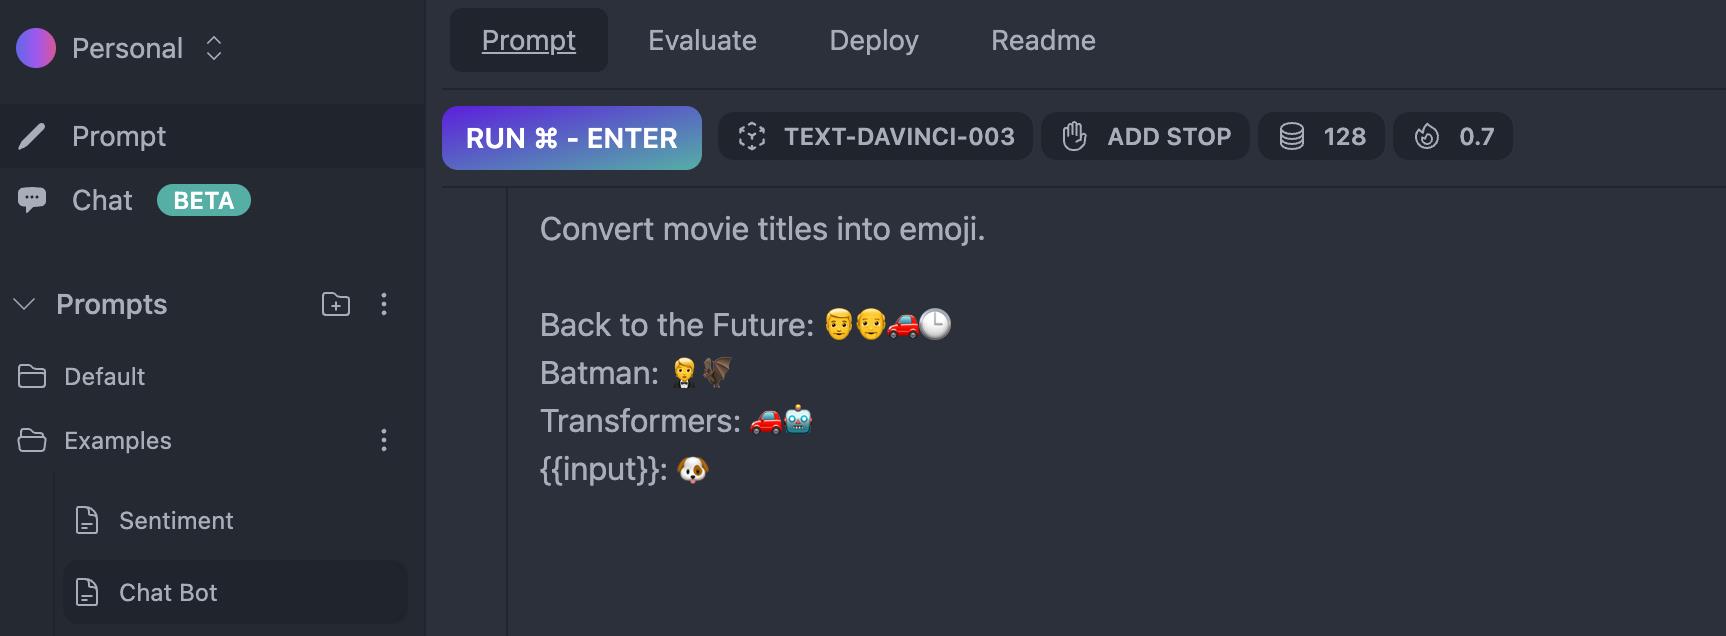
4.基于promptable快速实现
如果你不懂算法,那么可以通过在promptable 快速建立prompt,然后部署生成一个PromptID,通过这个PromptID直接调用OpenAI的接口得到模型输出的结果。操作如下:
4.1 编写一个hook模块
用来调用OpenAI的接口,获取输出结果,实现代码如下所示:
import addMessage, getHistoryString from "@/utils/chatHistory";
import React, useEffect from "react";
export const useChatGpt = (message, promptId, chatHistory) =>
// Send user meesage to api, meesage and prompt in body
// then update state value with response
// console.log("Hook api call", message, promptId);
const [data, setData] = React.useState("");
const [isLoading, setIsLoading] = React.useState(false);
const [isError, setIsError] = React.useState(false);
const [history, setHistory] = React.useState(chatHistory);
const [isSuccess, setIsSuccess] = React.useState(false);
const fetchData = async () =>
setIsLoading(true);
try
const response = await fetch("/api/chatgpt",
method: "POST",
headers:
"Content-Type": "application/json",
,
body: JSON.stringify(
message,
promptId,
chatHistory: getHistoryString(chatHistory),
),
).then((res) => res.json());
if (response.reply)
console.log("Hook api call response", response.reply);
setData(response.reply);
setIsSuccess(true);
setHistory(addMessage(chatHistory, response.reply, "agent"));
else
setIsError(true);
catch (error)
setIsError(true);
setIsLoading(false);
;
useEffect(() =>
setIsError(false);
setIsSuccess(false);
if (message)
fetchData();
, [message]);
useEffect(() =>
setHistory(chatHistory);
, [chatHistory]);
useEffect(() =>
if (promptId)
setIsError(false);
setIsSuccess(false);
setHistory([]);
, [promptId]);
return
data,
isLoading,
isError,
history,
isSuccess,
;
;
4.2 编写一个页面组件
通过编写一个页面组件,用来实现与后台接口服务交互使用,该模块用来调用模型并得到输出结果,实现代码如下所示:
import useChatGpt from "@/hook/useChatGpt";
import addMessage from "@/utils/chatHistory";
import Button, TextField from "@mui/material";
import React, useEffect from "react";
import ChatHistoryFrame from "./ChatHistoryFrame";
const promptId = "xxxxxx"; // 通过Prompt自动生成获取ID
export const ChatContainer = () =>
const [pendingMessage, setPendingMessage] = React.useState("");
const [message, setMessage] = React.useState("");
const [chatHistory, setChatHistory] = React.useState([]);
const isLoading, history, isSuccess, isError = useChatGpt(
message,
promptId,
chatHistory
);
useEffect(() =>
if (isSuccess || isError)
setMessage("");
, [isSuccess, isError]);
return (
<div id="chat-container">
<h1>MOVIE to emoji</h1>
</a>
<ChatHistoryFrame chatHistory=chatHistory isLoading=isLoading />
<div id="chat-input">
<TextField
type="text"
onChange=(e) =>
setPendingMessage(e.target.value);
/>
<Button
style=
backgroundColor: "black",
width: "80px",
variant="contained"
onClick=() =>
setMessage(pendingMessage);
setChatHistory(addMessage(history || [], pendingMessage, "user"));
>
Send
</Button>
<Button
style=
color: "black",
width: "80px",
borderColor: "black",
variant="outlined"
onClick=() =>
setMessage("");
setChatHistory([]);
>
Clear
</Button>
</div>
</div>
);
;
4.3 ChatGPT核心模块
编写一个调用ChatGPT接口逻辑的核心模块,用来与API交互得到输出结果,具体实现细节如下:
import PromptableApi from "promptable";
import Configuration, OpenAIApi from "openai";
import GPT3Tokenizer from "gpt3-tokenizer";
const configuration = new Configuration(
apiKey: process.env.OPENAI_API_KEY,
);
const openai = new OpenAIApi(configuration);
const tokenizer = new GPT3Tokenizer( type: "gpt3" );
const chatgpt = async (req, res) =>
const message, promptId, chatHistory = req.body;
console.log("api call entry", message, promptId);
if (!message)
res.status(400).json( error: "Message is required" );
return;
if (!promptId)
res.status(400).json( error: "Prompt ID is required" );
return;
// call prompt ai api and openai api
const reply = await getReply(message, promptId, chatHistory || "");
res.status(200).json( reply );
return;
;
const getReply = async (message, promptId, chatHistory) =>
// get prompt from prompt ai api based on promptId
if (!promptId)
throw new Error("Prompt ID is required");
const promptDeployment = await PromptableApi.getActiveDeployment(
promptId: promptId,
);
console.log("prompt deployment", promptDeployment);
if (!promptDeployment)
throw new Error("Prompt deployment not found");
// replace prompt with message
const beforeChatHistory = promptDeployment.text.replace("input", message);
const numTokens = countBPETokens(beforeChatHistory);
const afterChatHistory = beforeChatHistory.replace(
"chat history",
chatHistory
);
const finalPromptText = leftTruncateTranscript(
afterChatHistory,
4000 - numTokens
);
const revisedPrompt =
...promptDeployment,
text: finalPromptText,
;
console.log("revised prompt", revisedPrompt);
// call openai api
const response = await openai.createCompletion(
model: revisedPrompt.config.model,
prompt: revisedPrompt.text,
temperature: revisedPrompt.config.temperature,
max_tokens: revisedPrompt.config.max_tokens,
top_p: 1.0,
frequency_penalty: 0.0,
presence_penalty: 0.0,
stop: revisedPrompt.config.stop,
);
console.log("openai response", response.data);
if (response.data.choices && response.data.choices.length > 0)
return response.data.choices[0].text;
else
return "I\'m sorry, I don\'t understand.";
;
function countBPETokens(text)
const encoded = tokenizer.encode(text);
return encoded.bpe.length;
function leftTruncateTranscript(text, maxTokens)
const encoded = tokenizer.encode(text);
const numTokens = encoded.bpe.length;
const truncated = encoded.bpe.slice(numTokens - maxTokens);
const decoded = tokenizer.decode(truncated);
return decoded;
export default chatgpt;
4.4 使用依赖
最后,我们工程所使用的依赖包,如下所示:
"dependencies":
"@emotion/react": "^11.10.5",
"@emotion/styled": "^11.10.5",
"@mui/material": "^5.11.6",
"@next/font": "13.1.6",
"eslint": "8.32.0",
"eslint-config-next": "13.1.6",
"gpt3-tokenizer": "^1.1.5",
"next": "13.1.6",
"openai": "^3.2.1",
"promptable": "^0.0.5",
"react": "18.2.0",
"react-dom": "18.2.0"
4.5 编写Prompt
在完成核心模块的后台逻辑编写后,可以访问Prompt后台,通过编写Prompt来获取ID,操作如下:
4.6 部署Prompt
完成Prompt编写后,我们就可以部署Prompt了,部署成功后会生成一个PromptID,如下图所示:

这里,在部署Prompt里面有参考代码实现,具体如下:
import axios from \'axios\'
// 这里面的xxxxxxx是部署Prompt自动生成的ID,这里我用xxxxxxx替换了
const data = await axios.get(\'https://promptable.ai/api/prompt/xxxxxxx/deployment/active\')
const prompt = data.inputs?.reduce((acc, input) =>
// Replace input.value with your value!
return acc.replaceAll(`$input.name, $input.value`)
, data.text)
const res = await axios.get(\'https://openai.com/v1/completions\',
data:
// your prompt
prompt,
// your model configs from promptable
config:
...data.config,
// add any other configs here
)
// Your completion!
console.log(res.data.choices[0].text)
4.7 ChatGPT实现的AI网站预览
最后,我们基于OpenAI最新的gpt-3.5-turbo模型,开发一个AI网站,效果如下:
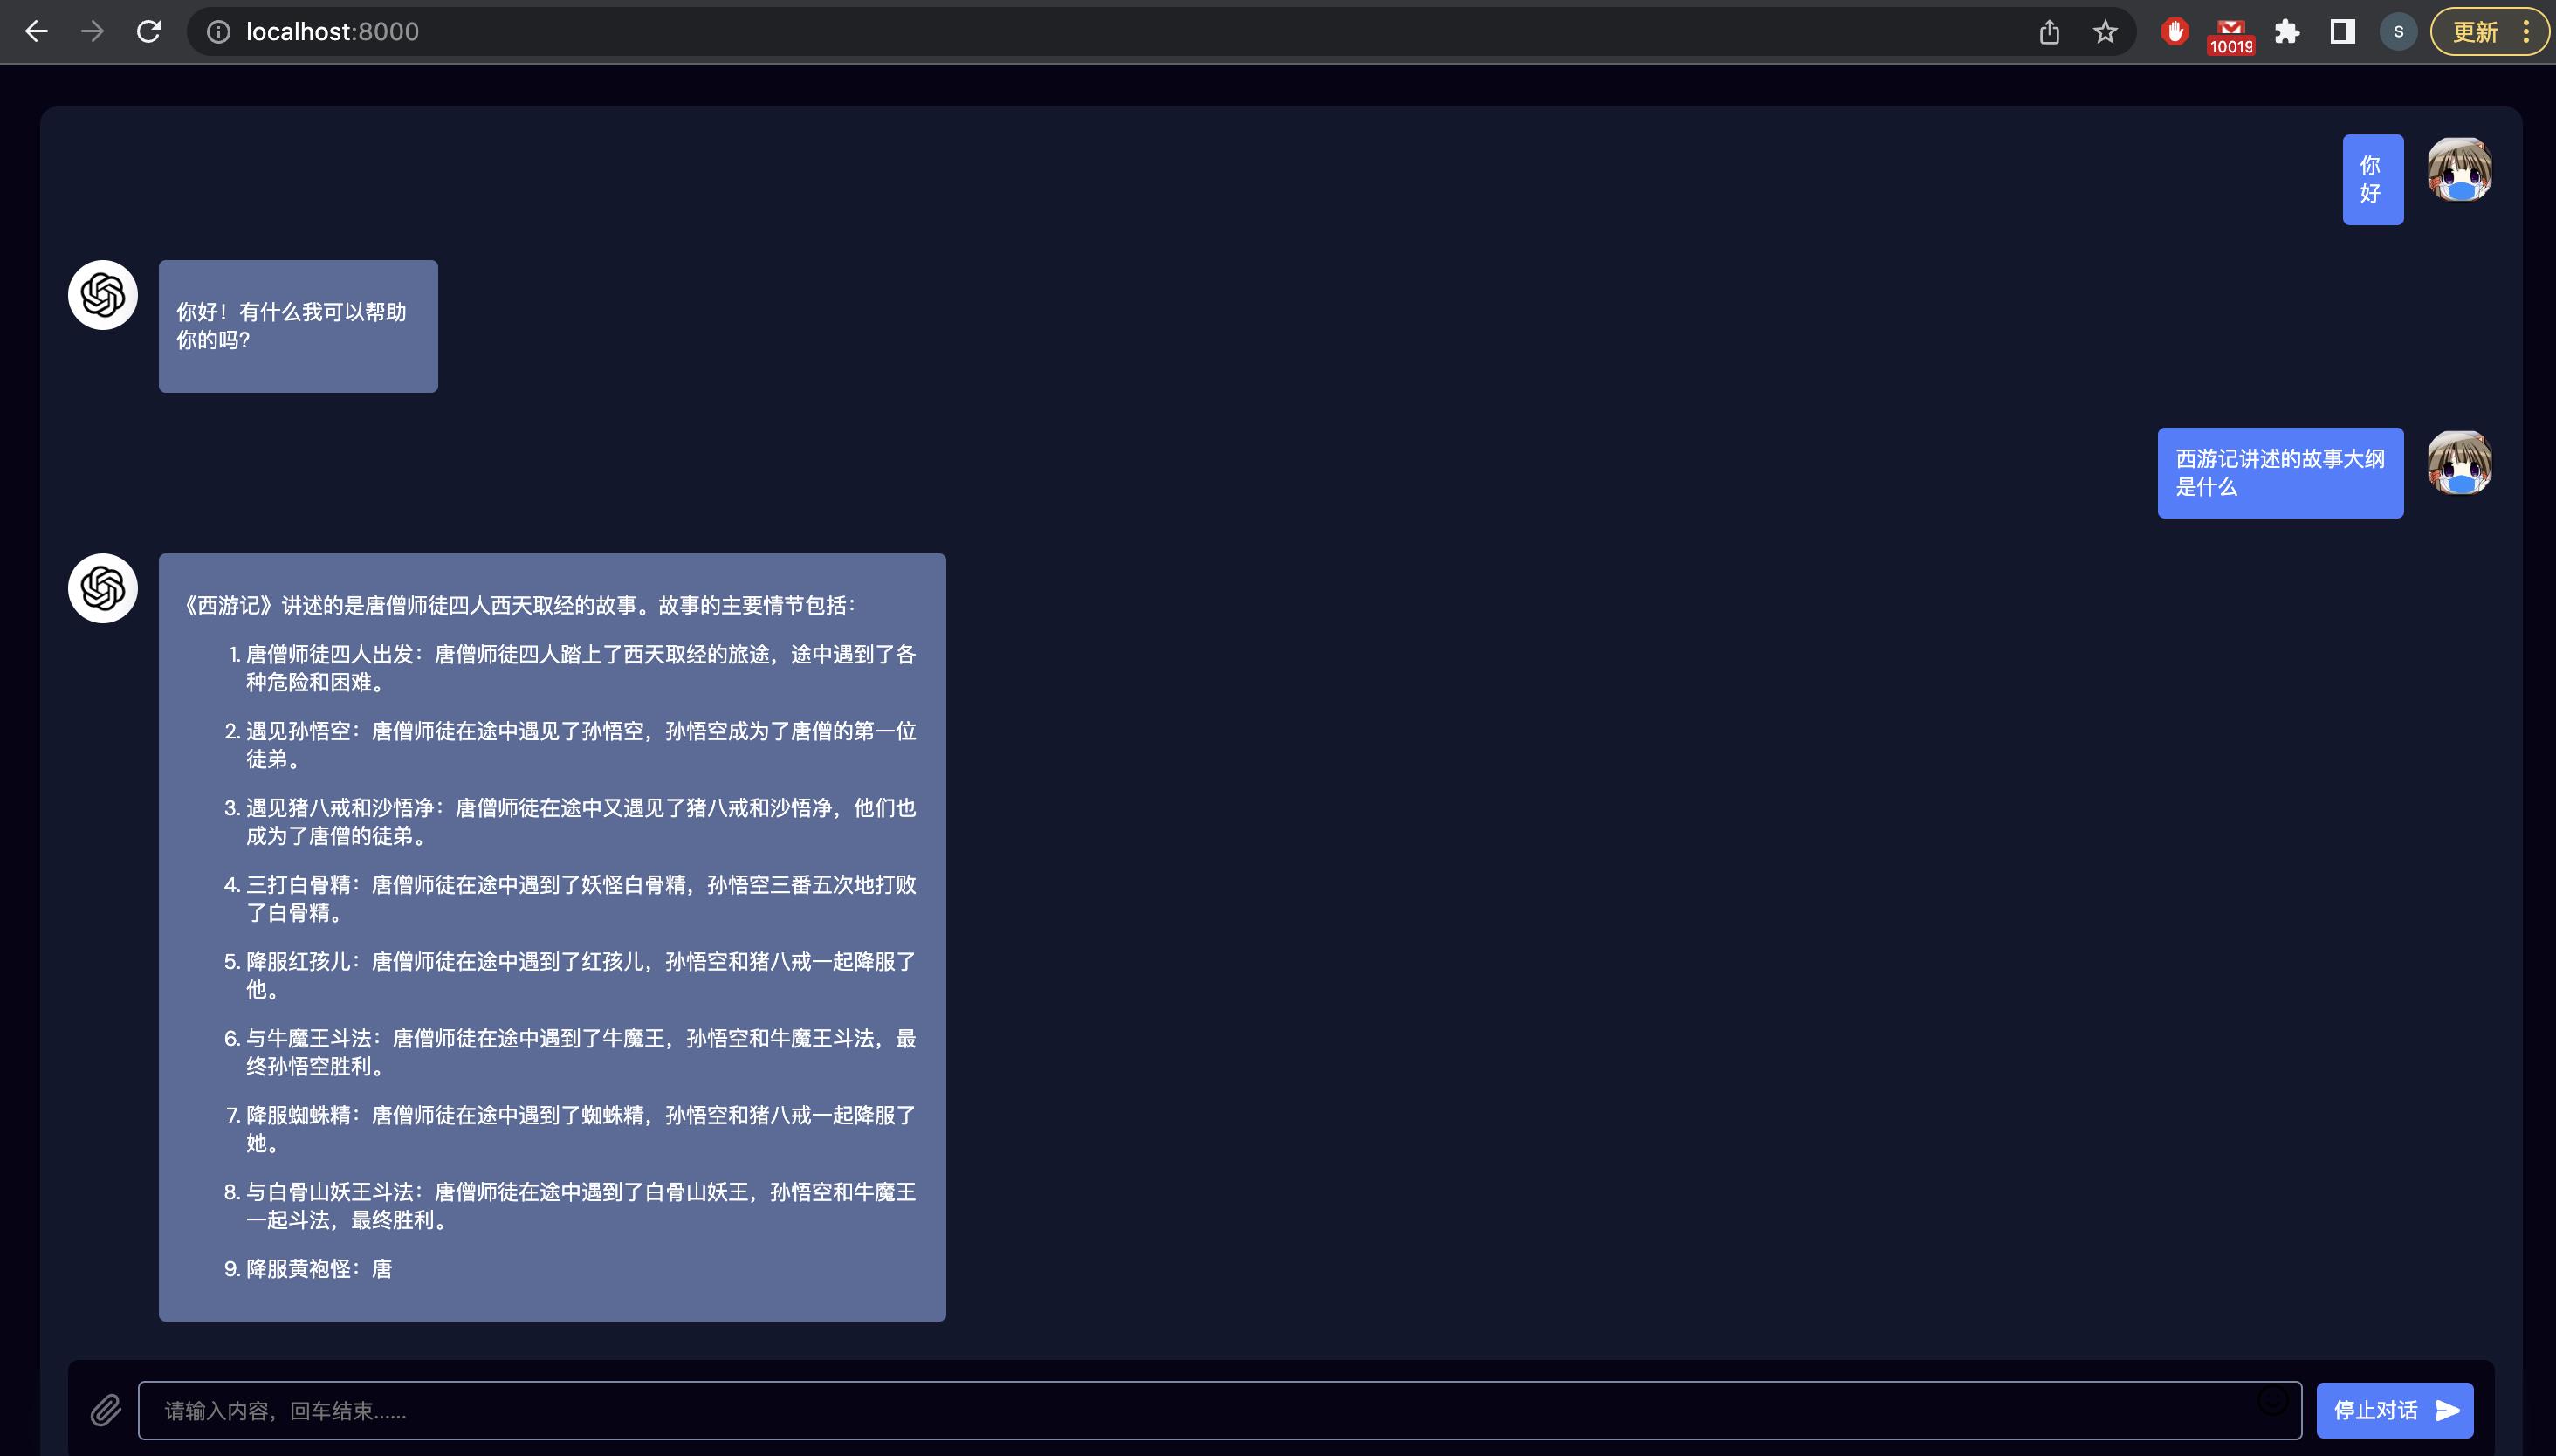
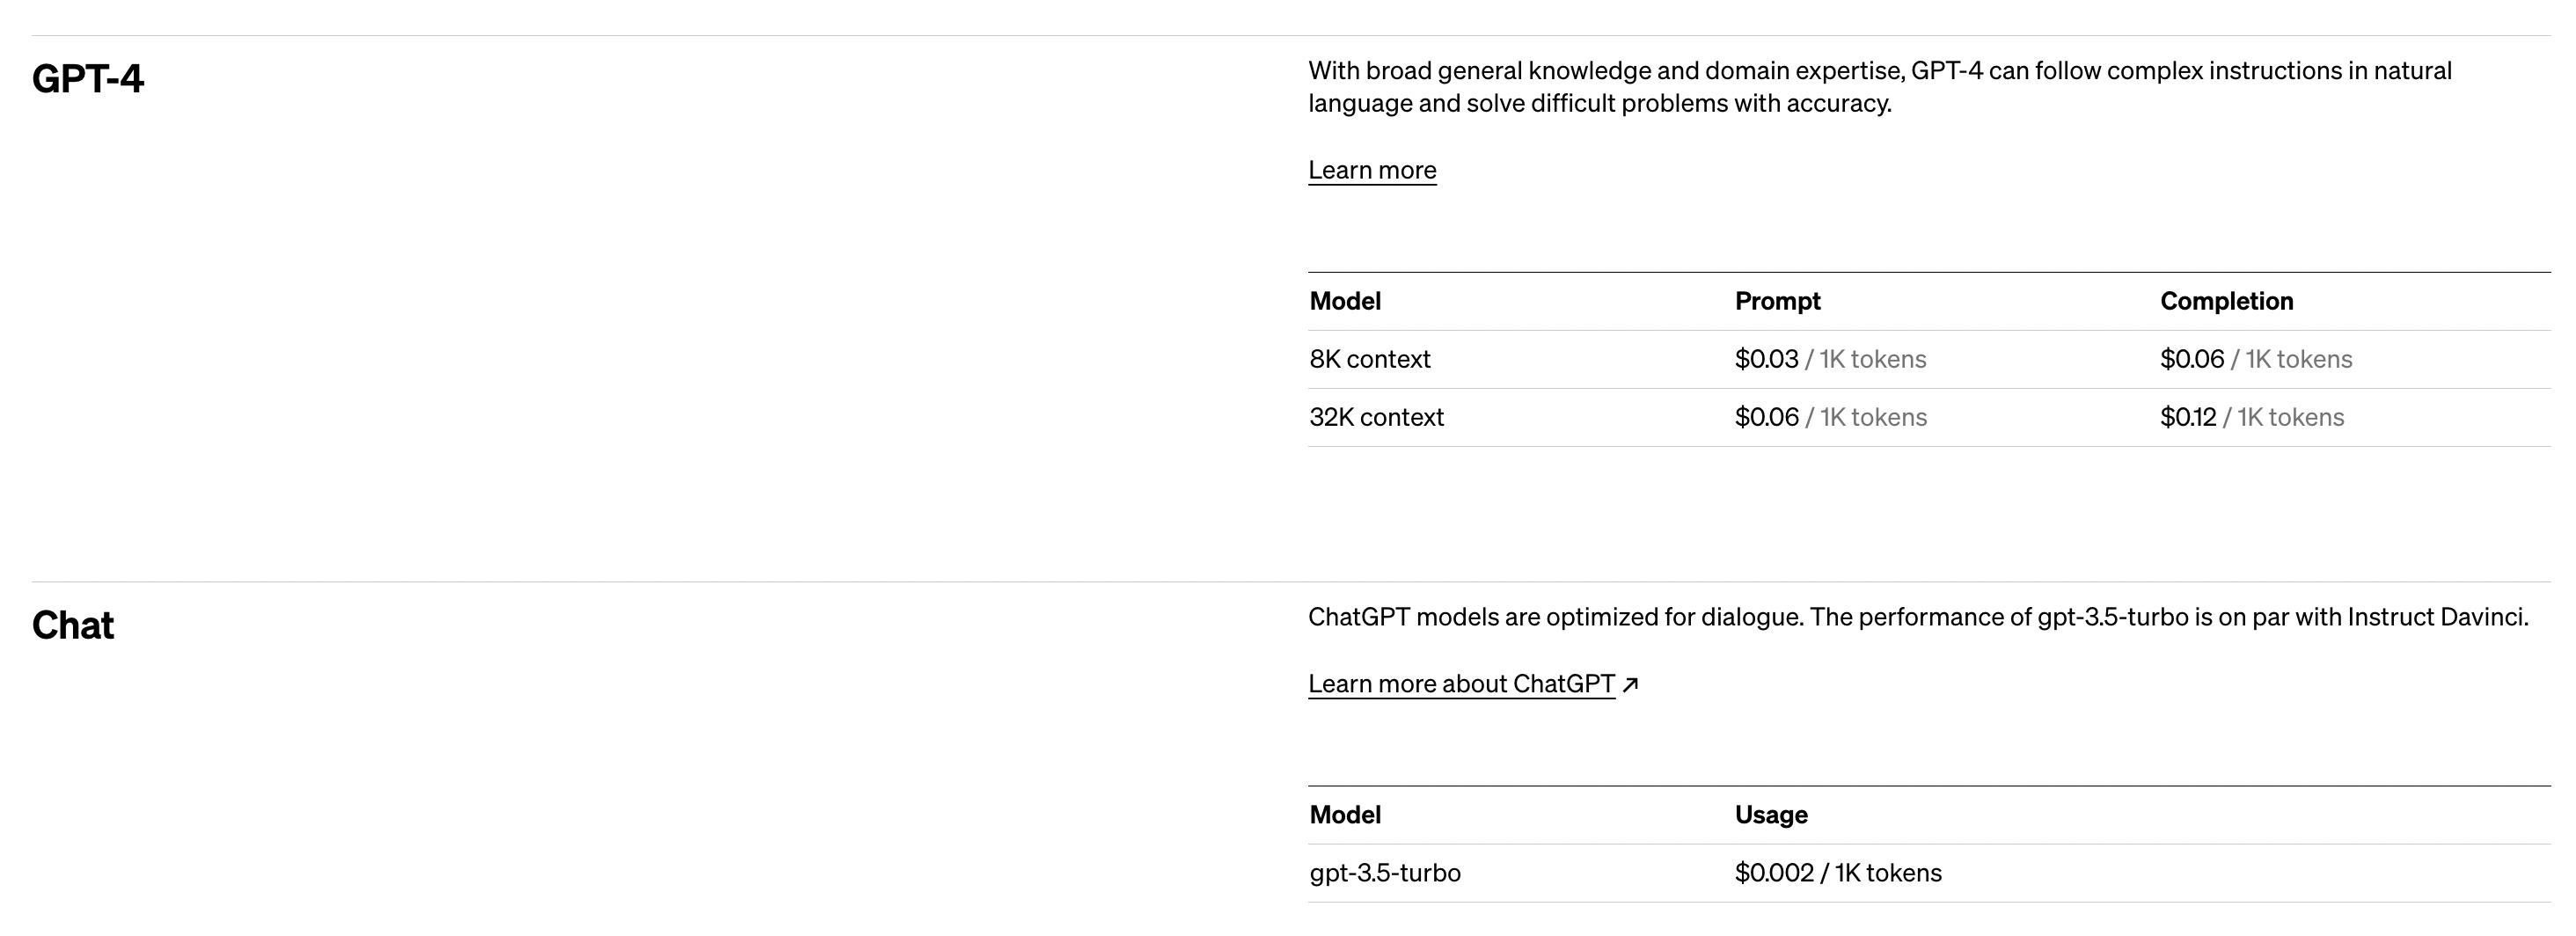
这里为了节省token费用,通过点击“停止对话”按钮暂时输出了。因为使用OpenAI的接口是按照token来算费用的,英文字母算一个token,一个汉字算两个token,收费明细如下:
5.总结
本文介绍了如何使用ChatGPT来实现一个AI网站。通过选择合适的Web开发框架、集成ChatGPT、创建用户界面、训练ChatGPT、测试和优化、部署到生产环境以及进行维护和升级等步骤,您可以构建一个功能强大的AI网站,并提供更好的用户体验和服务。
联系方式:
邮箱:smartloli.org@gmail.com
Twitter:https://twitter.com/smartloli
QQ群(Hadoop - 交流社区1):424769183
QQ群(Kafka并不难学): 825943084
温馨提示:请大家加群的时候写上加群理由(姓名+公司/学校),方便管理员审核,谢谢!
热爱生活,享受编程,与君共勉!
公众号:

以上是关于ChatGPT教你搭建多任务模型的主要内容,如果未能解决你的问题,请参考以下文章