SpringBoot整合ElasticSearch之Java High Level REST Client
Posted ClinEvol
tags:
篇首语:本文由小常识网(cha138.com)小编为大家整理,主要介绍了SpringBoot整合ElasticSearch之Java High Level REST Client相关的知识,希望对你有一定的参考价值。
1 搭建SpringBoot工程
2 引入ElasticSearch相关坐标。
<properties>
    		<!--一定重新定义版本   版本号一定要和您所安装的ES版本号一致-->
        <elasticsearch.version>7.4.0</elasticsearch.version>
</properties>
<dependencies>
    <!--引入es的坐标-->
    <dependency>
        <groupId>org.elasticsearch.client</groupId>
        <artifactId>elasticsearch-rest-high-level-client</artifactId>
        <version>7.4.0</version>
    </dependency>
    ................
3 编写核心配置类
编写核心配置文件:
这里可以不写在配置,可以直接写在代码中,只是一般都是写在配置文件中
#这个是我们自写的,如果看有es提示,不要用
elasticsearch:
  host: 192.168.126.20
  port: 9200
编写核心配置类
@Configuration
@ConfigurationProperties(prefix="elasticsearch")
public class ElasticSearchConfig

    private String host;
    private int port;

    @Bean
    public RestHighLevelClient client()
        return new RestHighLevelClient(RestClient.builder(
                new HttpHost(host,port,"http")
        ));


    public String getHost()
        return host;


    public void setHost(String host)
        this.host = host;


    public int getPort()
        return port;


    public void setPort(int port)
        this.port = port;
4 测试客户端对象
记得把maven的单元测试关了

注意:使用@Autowired注入RestHighLevelClient 如果报红线,则是因为配置类所在的包和测试类所在的包,包名不一致造成的
@SpringBootTest
class SpringElasticsearchApplicationTests

    @Autowired
    private RestHighLevelClient restHighLevelClient;

    @Test
    void contextLoads()
        System.out.println(restHighLevelClient);
(二)操作ElasticSearch
操作索引要索引的对象来进行操作
//获取索引对象     这个对象提供操作索引的方法
IndicesClient indices = client.indices();
//添加索引对象    RequestOptions.DEFAULT默认的动作
indices.create(new CreateIndexRequest("offcn_index3"),RequestOptions.DEFAULT);
//查询索引对象
indices.get(new GetIndexRequest("offcn_index3"),RequestOptions.DEFAULT);
//删除索引对象
indices.delete(new DeleteIndexRequest("offcn_index3"),RequestOptions.DEFAULT);
1 添加索引
/**
 * 添加索引:
 * @throws Exception
 */
@Test
   public void addindex() throws IOException
       // 获取索引对象
       IndicesClient indices = client.indices();
       //create()  CreateIndexRequest("索引名称")    RequestOptions.DEFAULT默的行为
       CreateIndexResponse indexResponse = indices.create(new CreateIndexRequest("student123"), RequestOptions.DEFAULT);
       System.out.println(indexResponse.isAcknowledged());
2 添加索引,并添加映射
/**
  * 创建索引并且添加映射
  * @throws IOException
  */
@Test
public void addIndexAndMapping() throws IOException
    //1.使用client获取操作索引的对象
    IndicesClient indicesClient = restHighLevelClient.indices();
    //2.具体操作,获取返回值
    CreateIndexRequest createRequest = new CreateIndexRequest("offcn");
    //2.1 设置mappings
    String mapping = "\\n" +
        "      \\"properties\\" : \\n" +
        "        \\"address\\" : \\n" +
        "          \\"type\\" : \\"text\\",\\n" +
        "          \\"analyzer\\" : \\"ik_max_word\\"\\n" +
        "        ,\\n" +
        "        \\"age\\" : \\n" +
        "          \\"type\\" : \\"long\\"\\n" +
        "        ,\\n" +
        "        \\"name\\" : \\n" +
        "          \\"type\\" : \\"keyword\\"\\n" +
        "        \\n" +
        "      \\n" +
        "    ";
    createRequest.mapping(mapping, XContentType.JSON);
    //2.2执行创建,返回对象
    CreateIndexResponse response = indicesClient.create(createRequest, RequestOptions.DEFAULT);
    //3.根据返回值判断结果
    System.out.println(response.isAcknowledged());
3 查询、删除、判断索引
3.1 查询索引
/**
  * 查询索引
  */
@Test
public void queryIndex() throws IOException
    //1:使用client获取操作索引的对象
    IndicesClient indices = restHighLevelClient.indices();
    //2:获得对象,执行具体的操作
    //2.1 创建获取索引的请求对象,设置索引名称
    GetIndexRequest getReqeust = new GetIndexRequest("offcn");
    //2.2 执行查询,获得返回值
    GetIndexResponse response = indices.get(getReqeust, RequestOptions.DEFAULT);
    //3:获取结果,遍历
    Map<String, MappingMetaData> mappings = response.getMappings();
    for (String key : mappings.keySet())
        System.out.println(key + ":" + mappings.get(key).getSourceAsMap());
3.2 删除索引
/**
  * 删除索引
  */
@Test
public void deleteIndex() throws IOException
    IndicesClient indices = restHighLevelClient.indices();
    DeleteIndexRequest deleteRequest = new DeleteIndexRequest("offcn");
    AcknowledgedResponse response = indices.delete(deleteRequest, RequestOptions.DEFAULT);
    System.out.println(response.isAcknowledged());
3.3 索引是否存在
/**
  * 判断索引是否存在
  */
@Test
    public void getIndex() throws IOException
        IndicesClient indices = client.indices();
        GetIndexRequest student0517 = new GetIndexRequest("student0517");
        boolean exists = indices.exists(student0517, RequestOptions.DEFAULT);
        if(exists)
            GetIndexResponse indexResponse = indices.get(student0517, RequestOptions.DEFAULT);
            Map<String, MappingMetaData> mappings = indexResponse.getMappings();
            System.out.println(mappings);
        else
            System.out.println("索引不存在");
4 操作文档
4.1 添加文档
添加文档,使用map作为数据
/**
  * 添加文档,使用map作为数据
  */
@Test
public void addDoc() throws IOException
    //数据对象,map   key要与映射属性对应
    Map data = new HashMap();
    data.put("address", "北京昌平");
    data.put("name", "马同志");
    data.put("age", 20);

    //1:获取操作文档的对象
    IndexRequest request = new IndexRequest("offcn").id("1").source(data);
    //2:添加数据,获取结果
    IndexResponse response = restHighLevelClient.index(request, RequestOptions.DEFAULT);
    //3:打印响应结果
    System.out.println(response.getResult());
添加文档,使用对象作为数据
添加依赖
<dependency>
            <groupId>com.alibaba</groupId>
            <artifactId>fastjson</artifactId>
            <version>1.2.76</version>
        </dependency>
创建实体类,属性名与映射字段名对应
@Data
@AllArgsConstructor
@NoArgsConstructor
public class Student
    private String brand;
    private Integer price;
    private String title;


  "sutdent78" :
    "mappings" :
      "properties" :
        "brand" :
          "type" : "keyword"
        ,
        "price" :
          "type" : "integer"
        ,
        "title" :
          "type" : "text",
          "analyzer" : "ik_max_word"
/**
  * 添加文档,使用对象作为数据
  */
@Test
public void addDoc2() throws IOException
    //数据对象,javaObject
    Student student=new Student("kaka",22,"南沙中公教育");

    //将对象转为json
    String data = JSON.toJSONString(p);
    //1:获取操作文档的对象
    IndexRequest request = new IndexRequest("offcn").id(p.getId()).source(data, XContentType.JSON);
    //2:添加数据,获取结果
    IndexResponse response = restHighLevelClient.index(request, RequestOptions.DEFAULT);
    //3:打印响应结果
    System.out.println(response.getId());
4.2 修改文档:添加文档时,如果id存在则修改,id不存在则添加
/**
  * 修改文档:添加文档时,如果id存在则修改,id不存在则添加
  */
@Test
public void updateDoc() throws IOException
    //数据对象,map
    Map data = new HashMap();
    data.put("address", "北京昌平");
    data.put("name", "朱同志");
    data.put("age", 20);

    //1:获取操作文档的对象
    IndexRequest request = new IndexRequest("offcn").id("1").source(data);
    //2:添加数据,获取结果
    IndexResponse response = restHighLevelClient.index(request, RequestOptions.DEFAULT);
    //3:打印响应结果
    System.out.println(response.getId());
4.3 根据id查询文档
    @Test
    public void getDoc() throws IOException
        GetRequest getRequest = new GetRequest("sutdent78").id("1002");
        GetResponse documentFields = restHighLevelClient.get(getRequest, RequestOptions.DEFAULT);
        //集合方式
        Map<String, Object> source = documentFields.getSource();
        for (String key : source.keySet())
            System.out.println(source.get(key));

        //字符串  -----JSON
        String sourceAsString = documentFields.getSourceAsString();
        System.out.println(sourceAsString);
        //把JSON转换为 stuent
        //JSON字符串-->JSON对象
        JSONObject jsonObject = JSONObject.parseObject(sourceAsString);
        //JSON对象-->Java对象
        Student student = JSONObject.toJavaObject(jsonObject, Student.class);
        System.out.println(student);
4.4 根据id删除文档
/**
  * 根据id删除文档
  */
@Test
public void delDoc() throws IOException
    DeleteRequest deleteRequest = new DeleteRequest("offcn", "1");
    DeleteResponse response = restHighLevelClient.delete(deleteRequest, RequestOptions.DEFAULT);
    System.out.println(response.getId());
总结:
//添加、修改   第一个:索引名称   第二个是文档id     第三个是文档内容
restHighLevelClient
    .index( new IndexRequest("offcn_index2").id("as1122").source(data),RequestOptions.DEFAULT)
//查询    第一个参数是索引名称   第二个是文档id
restHighLevelClient.get( new GetRequest("offcn_index2","as1122"),RequestOptions.DEFAULT)
//删除    第一个参数是索引名称   第二个是文档id
restHighLevelClient.delete( new DeleteRequest("offcn_index2","as1122"),RequestOptions.DEFAULT)
(三)ElasticSearch的文档批量操作
1 bulk文档 批量操作脚本实现
需求:同时完成【删除,更新,添加】操作 这里的JSON格式不能格式化
POST _bulk
"delete":"_index":"person1","_id":"4"
"create":"_index":"person1","_id":"5"
"name":"八号","age":18,"address":"北京"
"update":"_index":"person1","_id":"2"
"doc":"name":"2号"

查询运行结果~
2 bulk批量操作JavaAPI 实现
/**
* Bulk 批量操作
*/
@Test
public void test2() throws IOException
//创建bulkrequest对象,整合所有操作
BulkRequest bulkRequest =new BulkRequest();
/*
# 1. 删除5号记录
# 2. 添加6号记录
# 3. 修改3号记录 名称为 “三号”
*/
//添加对应操作
//1. 删除5号记录
DeleteRequest deleteRequest=new DeleteRequest("person1","5");
bulkRequest.add(deleteRequest);
//2. 添加6号记录
Map<String, Object> map=new HashMap<>();
map.put("name","六号");
IndexRequest indexRequest=new IndexRequest("person1").id("6").source(map);
bulkRequest.add(indexRequest);
//3. 修改3号记录 名称为 “三号”
Map<String, Object> mapUpdate=new HashMap<>();
mapUpdate.put("name","三号");
UpdateRequest updateRequest=new UpdateRequest("person1","3").doc(mapUpdate);
bulkRequest.add(updateRequest);
//执行批量操作
BulkResponse response = client.bulk(bulkRequest, RequestOptions.DEFAULT);
System.out.println(response.status()
elasticsearch整合springboot
es官网: https://www.elastic.co/guide/index.html
安装es
# 若启动不了,则需要加上下面的参数
# -e ES_JAVA_OPTS="-Xms512m -Xmx512m" #指定默认内存大小
docker run -d --rm --name elasticsearch elasticsearch:6.8.12
docker cp elasticsearch:/usr/share/elasticsearch/config/ /usr/local/es/
docker cp elasticsearch:/usr/share/elasticsearch/data/ /usr/local/es/
docker stop elasticsearch
docker run -d --name elasticsearch \\
-p 9200:9200 -p 9300:9300 \\
-v /usr/local/es/data:/usr/share/elasticsearch/data \\
-v /usr/local/es/config:/usr/share/elasticsearch/config \\
-e "discovery.type=single-node" \\
elasticsearch:6.8.12
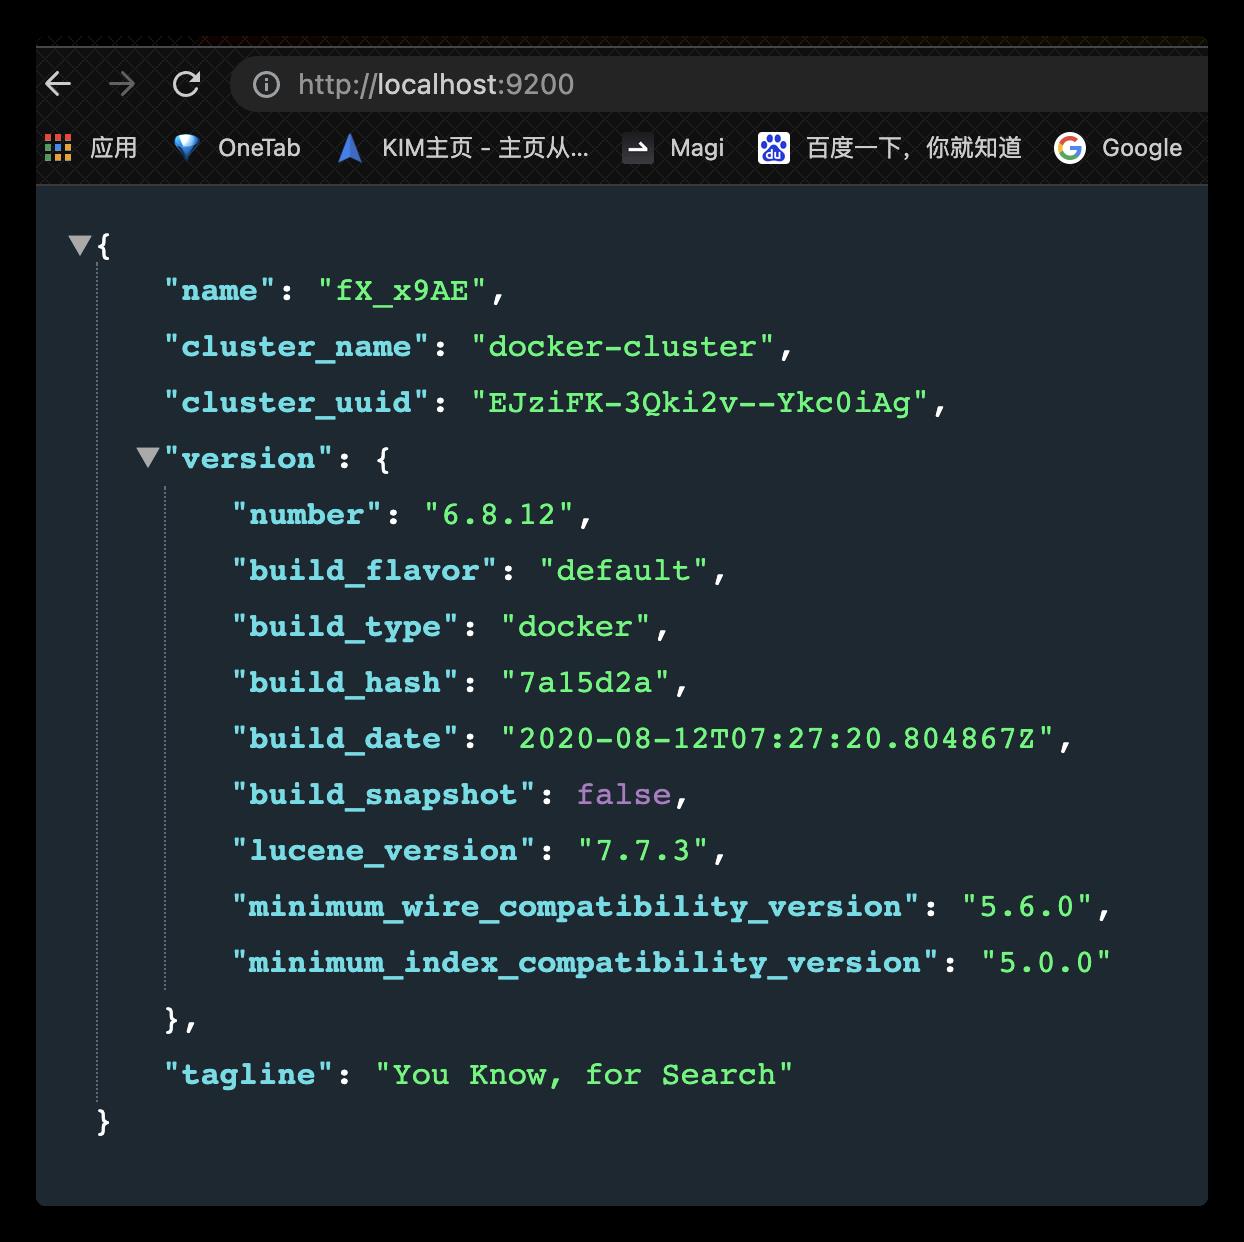
访问 http://localhost:9200 安装成功则显示

安装图形化界面–Dejavu
cat >>/usr/local/es/config/elasticsearch.yml <<EOF
http.port: 9200
http.cors.allow-origin: 'http://localhost:1358'
http.cors.enabled: true
http.cors.allow-headers: X-Requested-With,X-Auth-Token,Content-Type,Content-Length,Authorization
http.cors.allow-credentials: true
EOF
# Dejavu es图形化界面
docker run -d -p 1358:1358 -d --name dejavu appbaseio/dejavu
# open http://localhost:1358/
整合springboot
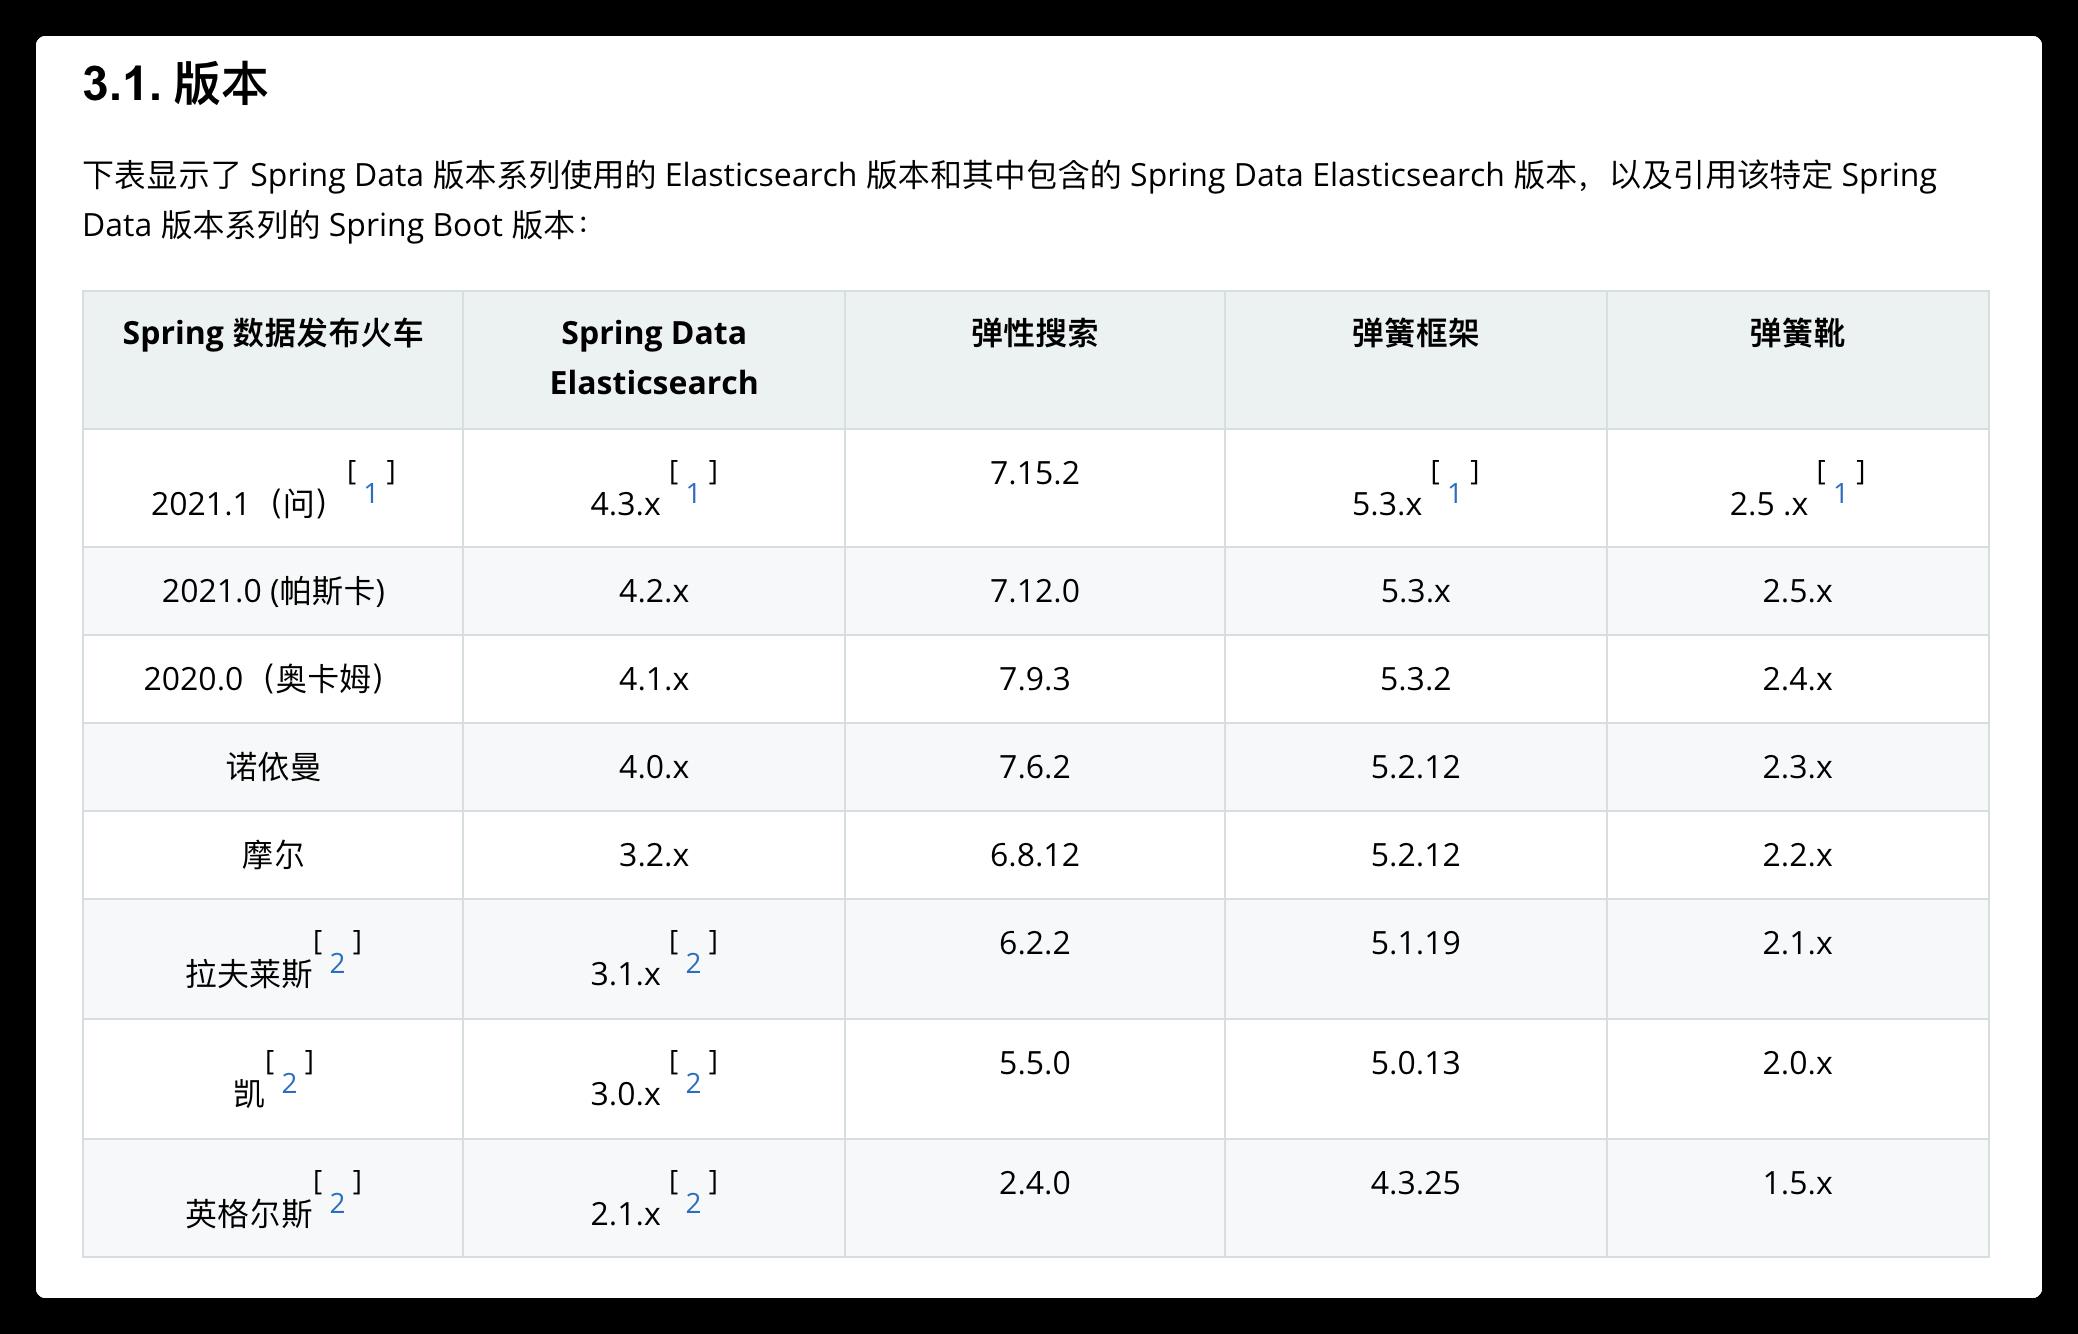
spring官方工具包 - Spring Data Elasticsearch: https://docs.spring.io/spring-data/elasticsearch/docs/current/reference/html/
版本说明

示例
可参考简单示例代码
- 当前springboot版本
2.2.13.RELEASE - 依赖导入
<dependency>
<groupId>org.springframework.data</groupId>
<artifactId>spring-data-elasticsearch</artifactId>
<version>3.2.13.RELEASE</version>
</dependency>
- es配置文件
spring:
data:
elasticsearch:
repositories:
enabled: true
# 集群名称
# 如果不配会导致cluster-nodes的节点找不到
cluster-name: docker-cluster
# 集群节点
cluster-nodes: 127.0.0.1:9300
项目整合方式
采用无入侵的方式,通过切面编程以注解方式实现数据的同步
- 增删改:注意根据数据库返回结果来同步操作es数据,例如:新增、删除根据结果同步数据,修改根据id同步
注解参数:操作类型、实体类型
- 查询:分为
单索引查询、多索引聚合查询 - 单索引查询:数据与实体类关联,直接查询
- 聚合查询:定义好返回的通用数据结构
