C对ASN.1的编解码环境搭建
Posted Leonban
tags:
篇首语:本文由小常识网(cha138.com)小编为大家整理,主要介绍了C对ASN.1的编解码环境搭建相关的知识,希望对你有一定的参考价值。
操作系统环境:Windows + Linux
软件支持:Eclipse(Windows)+ASNlab插件、gcc(Linux)
一、Eclipse安装 :
可以从Eclipse Downloads | The Eclipse Foundation下载
二、ASN.1 SDK和插件安装说明
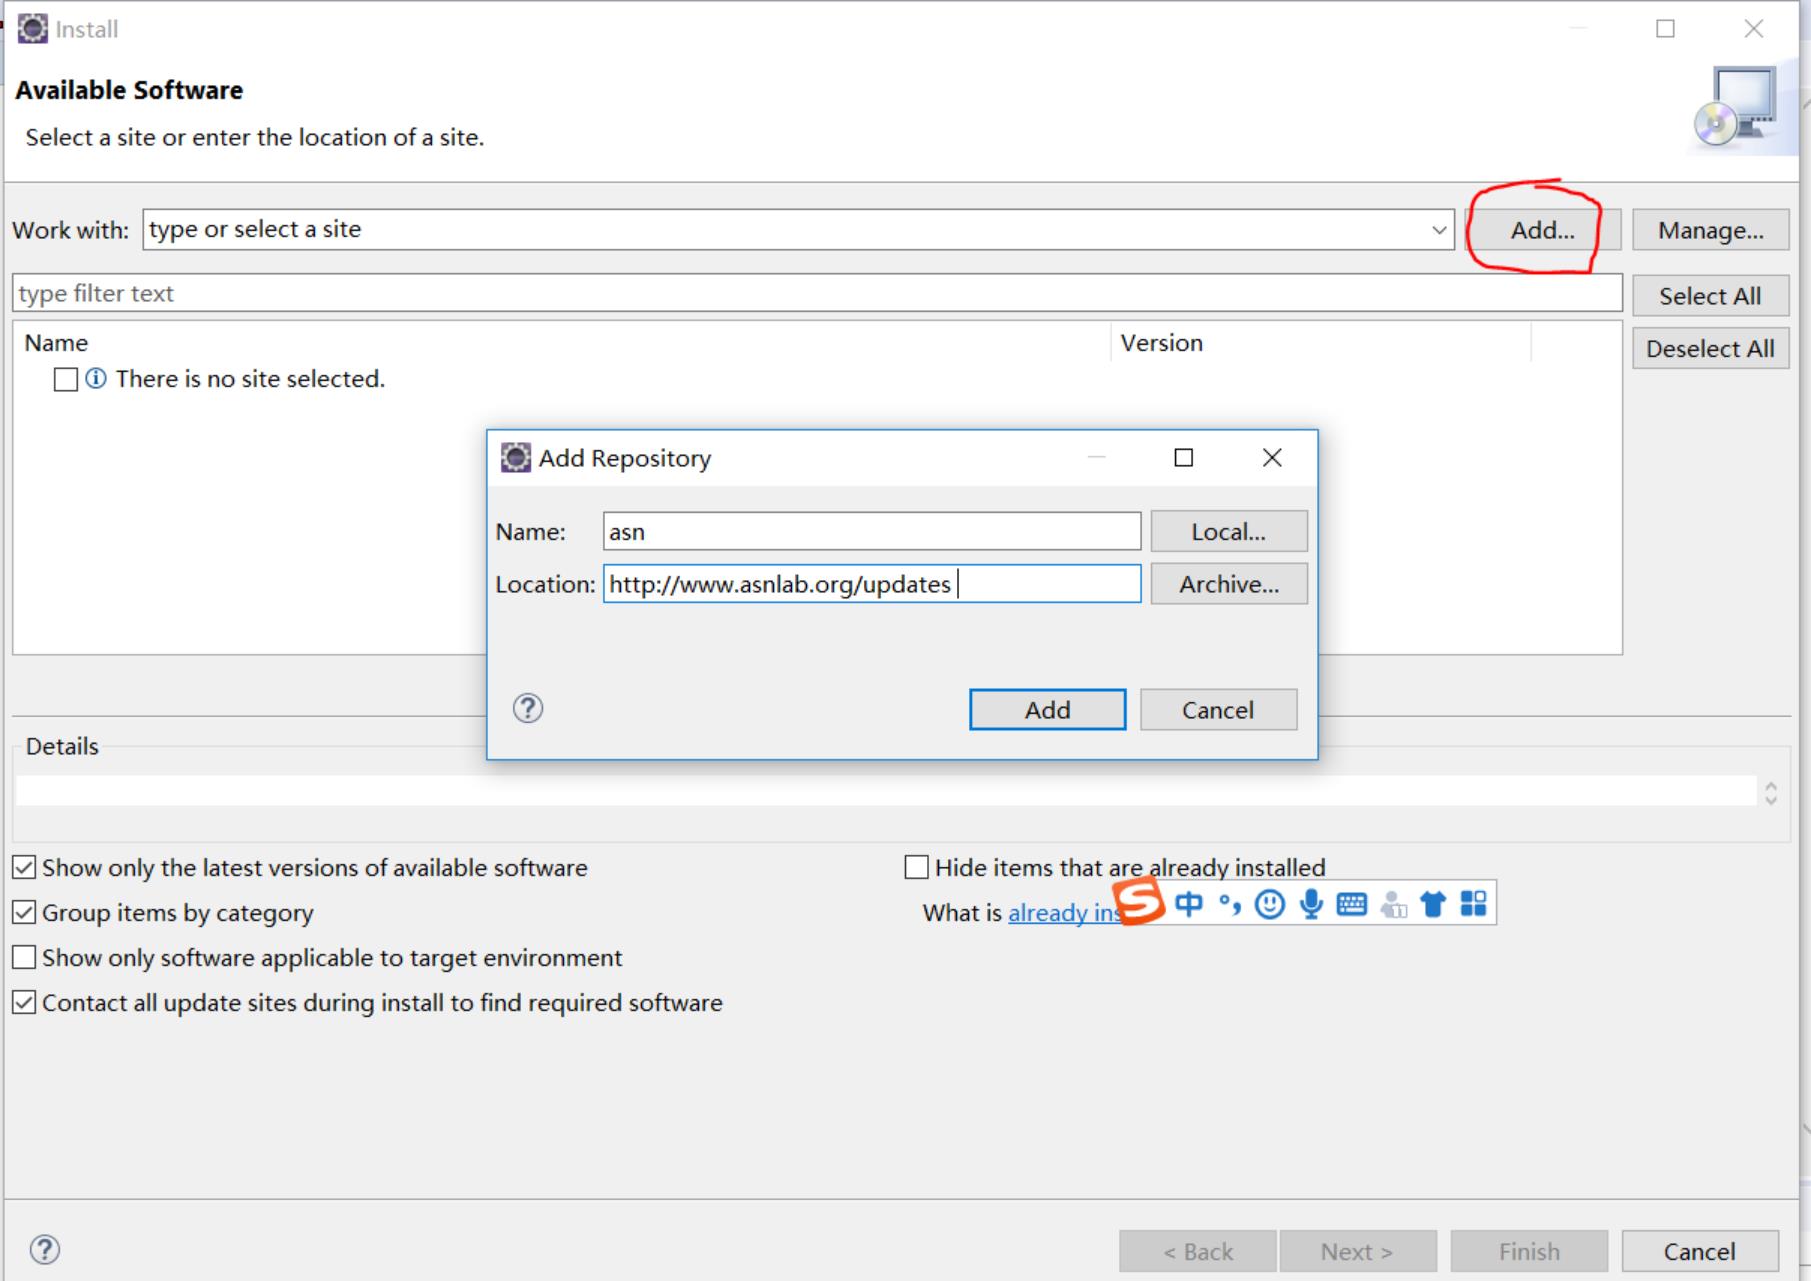
(1)点击Help->Install New Software
(2)新建一个work with

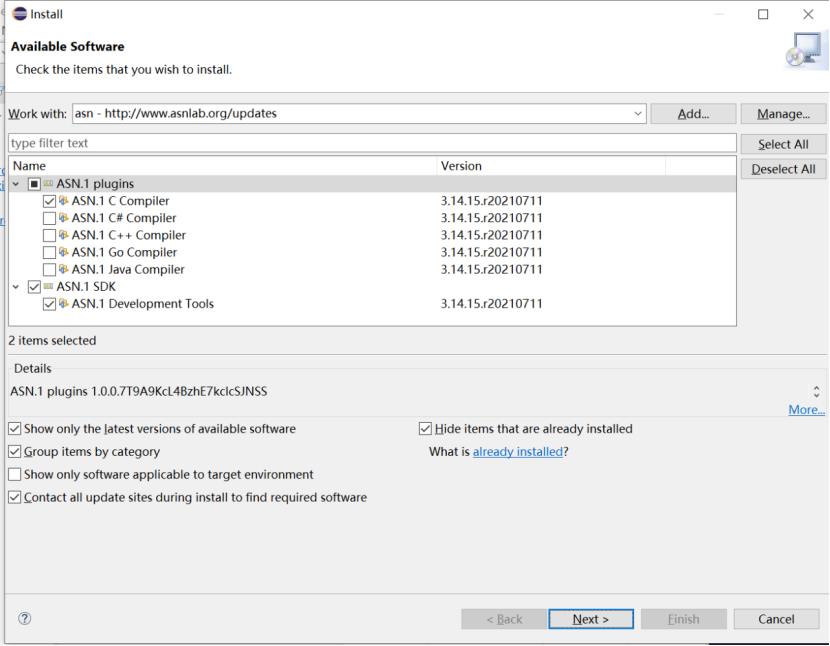
(3)选择需要的编译器和SDK
本文需要C和Java的编译器,需要只勾选这两个和下面的SDK

(4)插件的下载(我已经安装完了,会提醒我已经安装)

三、申请License并设置
首先进行申请www.asnlab.cn/freetrial.html?product=asncc

一次只能申请一个语言的编译器,C和Java需要分别进行申请。
然后是Eclipse设置
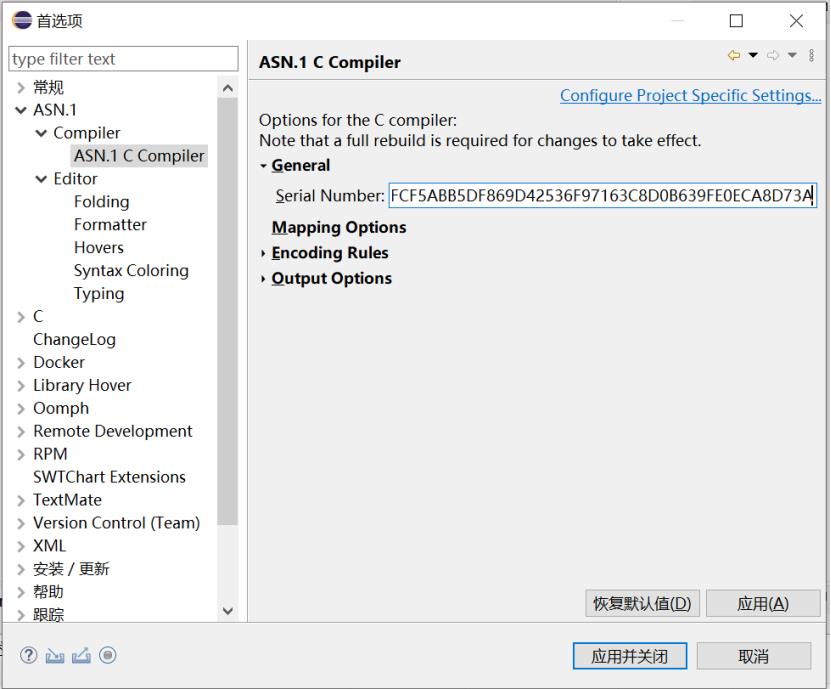
设置License步骤:
打开Eclipse,在Windows > Preferences, 复制并粘贴试用License到ASN.1 > > General > Serial Number.

四、下载编译器命令行
下载ASN.1编译器命令行ja包r:
| 可执行jar包 | 版本 | 大小 | MD5校验和 |
| 3.14.15 - 2020-05-29 | 1.33 MB | 5c019ab021335f0f288a311910b0c201 |
1.调用ASN.1编译器命令行的格式:
java -jar asncl.jar options
where options are:
 -lang       compile to the given target language, c/java
 -source         use given source folder
 -output         use given output folder
 -prefs          use given preference file
 -D    use value for given property
 -verbose              be extra verbose
2.或者通过ant脚本调用,示例:
<target name="compile">
<taskdef name="asncl" classpath="asncl.jar"
classname="org.asnlab.asndt.core.ant.AsnCompilerTask" />
<asncl language="java" verbose="false"
sourceFolder="source"
outputFolder="output"
prefsFile="org.asnlab.asndt.core.prefs"/>
</target>
3.配置文件'org.asnlab.asndt.core.prefs'可以通过以下方法获得:
在ASN.1项目右击菜单选择'Properties'打开项目属性对话框,选中ASN.1 > [ASN.1 Compiler]的'Enable project specific settings'选项。 这使得Eclipse在.setting目录生成'org.asnlab.asndt.core.prefs'文件(如果看不到此文件,请配置过滤器显示.*资源)
五、MyHTTP例子
MyHTTP例子改编自 Introduction to ASN.1 and the Packed Encoding Rules, 它是一个FHTTP GET请求的简化形式。 对于我们的例子,假设我们需要应用以下我们已经在ASN.1开发工具 使用入门中看到过的ASN.1模块。
选择 File > New > Project...
在 ASN.1 类目中, 选择 ASN.1 Project, 然后点击 Next.
工程名输入 'MyHTTP' 然后点击 Finish.
现在ASN.1 文件可以添加到项目中,通过从其他地方复制到项目的源目录,或者按从以下步骤零开始创建ASN.1文件:
选择 File > New > Other...
在 ASN.1 类目中, 选择 ASN.1 Module, 然后点击 Next.
模块名中输入 'MyHTTP' 然后点击Finish.
在开启的编辑器中输入以下的源代码:
MyHTTP DEFINITIONS AUTOMATIC TAGS ::=BEGIN
   GetRequest ::= SEQUENCE
      header-only   BOOLEAN,
      lock          BOOLEAN,
      accept-types  AcceptTypes,
      url           Url,
      ...,
      timestamp     GeneralizedTime


   AcceptTypes ::= SET
      standards   BIT STRING  html(0), plain-text(1), gif(2), jpeg(3)  (SIZE(4)) OPTIONAL,
      others      SEQUENCE OF VisibleString (SIZE(4)) OPTIONAL


   Url ::= VisibleString (FROM("a".."z"|"A".."Z"|"0".."9"|"./-_~%#"))
   myRequest GetRequest ::=
      header-only  TRUE,
      lock         FALSE,
      accept-types
         standards  html, plain-text
      ,
      url          "www.asnlab.org",
      timestamp    "20121221121221Z"

END
保存 ASN.1 文件, 编译好的C数据结构文件将自动生成(如果没有,请检查License Key是否设置好)。
六、下载ASN.1 C运行库
| 平台 | 版本 | 包 | 大小 | MD5校验和 |
| Mac OS X 64-bit | 3.14.15 - 2019-06-20 | 78.54 KB | 6e0c378643521ca4fde40e195aa8b408 | |
| Mac OS X 32-bit | 3.14.15 - 2019-06-20 | 85.67 KB | ee288ea1b1d7924350985cdac52868ff | |
| Linux 64-bit | 3.14.15 - 2019-06-20 | 72.09 KB | 0da52be1f3e18229670ca8ed439d101c | |
| Linux 32-bit | 3.14.15 - 2019-06-20 | 74.27 KB | 2de2d8254a7bdbd01b77cd34043d21ce | |
| Windows 64-bit | 3.14.15 - 2019-06-20 | 203 KB | 2527e3f2694bb3c1c7407f07ded35fb4 | |
| Windows 32-bit | 3.14.15 - 2019-06-20 | 172.81 KB | 94f1de27af895cf44a59f026612b0f66 |
七、linux下调用ans.1编译后文件
创建一个test.c文件,输入如下内容:
#include "stdio.h"
#include "stdlib.h"
#include "stdarg.h"
#include "GetRequest.h"

static int print(AsnPrinter* printer, const char* __format, ...);

AsnPrinter printer =  0, print ;

int main(void)
   int result;

   char bytes[1] =  0xC0 ;
   Bits standards =  4, bytes ;
   struct GetRequest myRequest =
      true /* header_only */,
      false /* lock */,

         &standards /* standards */,
         NULL /* others */
       /* accept_types */,
      "www.asnlab.org" /* url */,
       2012, 12, 21, 12, 12, 21, 0, 0, 0  /* timestamp */
   ;

   /*

    * Allocate the memory for the buffer

    */
   AsnBuffer* buffer = alloc_buffer(160, true, BASIC_ENCODING_RULES);

   /*

    * Do the encoding

    */

   result = encode_GetRequest(buffer, &myRequest);

   if(result==0)
      /*
       * Print out the content of the buffer
       */
      int i;
      for(i=0; i<buffer->limit; i++)
         char byte = buffer->array[i];
         printf("%02X ", byte & 0xFF);


   else
      fprintf(stderr, "Error in encoding, error code: %d.\\n", result);
      print_problem_marks(buffer, &myRequest, &GETREQUEST_TYPE, &printer);


   /*

    * Deallocate the memory for the buffer

    */
   free_buffer(buffer);
   return 0;


static int print(AsnPrinter* printer, const char* __format, ...)
   va_list arg_ptr;
   int cnt;
   va_start(arg_ptr, __format);
   cnt = vprintf(__format, arg_ptr);
   va_end(arg_ptr);
   return cnt;
复制运行库和头文件(从ASN.1 C运行库包解压)到编译产生文件的目录。
编译所有.c文件:
$ gcc -c *.c
连接.o文件和运行库:
$ gcc -o test *.o -L. -lasnrt
运行:
$ ./test
30 2D 80 01 FF 81 01 00 A2 04 80 02 04 C0 83 0E 77 77 77 2E 61 73 6E 6C 61 62 2E 6F 72 67 84 0F 32 30 31 32 31 32 32 31 31 32 31 32 32 31 5A
BER编码后的逐字节逐比特的含义:
0x30 -- [0011|0000], [UNIVERSAL, CONSTRUCTED, 16(SEQUENCE)] - GetRequest
0x2D -- [0010|1101], length 45

0x80 -- [1000|0000], [CONTEXT, PRIMITIVE, 0(BOOLEAN)] GetRequest.header_only
0x01 -- [0000|0001], length 1
0xFF -- [0000|1111], value TRUE

0x81 -- [1000|0001], [CONTEXT, PRIMITIVE, 1(BOOLEAN)] GetRequest.lock
0x01 -- [0000|0001], length 1
0x00 -- [0000|0000], value FALSE

0xA2 -- [1010|0010], [CONTEXT, CONSTRUCTED, 2(SET)] - GetRequest.accept_types
0x04 -- [0000|0100], length 4

0x80 -- [1000|0000], [CONTEXT, PRIMITIVE, 0(BIT STRING)] AcceptTypes.standards
0x02 -- [0000|0010], length 2
0x04 -- [0000|0100], 4 unused bits
0xC0 -- [1100|0000], html, plaint_text

0x83 -- [1000|0011], [CONTEXT, PRIMITIVE, 3(VisibleString)] GetRequest.url
0x0E -- [0000|1100], length 14
0x77 0x77 0x77 0x2E 0x61 0x73 0x6E 0x6C 0x61 0x62 0x2E 0x6F 0x72 0x67 -- www.asnlab.org

0x84 -- [1000|0011], [CONTEXT, PRIMITIVE, 4(GeneralizedTime)] GetRequest.timestamp
0x0F -- [0000|1100], length 15
0x32 0x30 0x31 0x32 0x31 0x32 0x32 0x31 0x31 0x32 0x31 0x32 0x32 0x31 0x5A -- 20121221121221Z
以上是关于C对ASN.1的编解码环境搭建的主要内容,如果未能解决你的问题,请参考以下文章