《果然新鲜》电商项目(33)-动静分离的实现
Posted IT刘老师
tags:
篇首语:本文由小常识网(cha138.com)小编为大家整理,主要介绍了《果然新鲜》电商项目(33)-动静分离的实现相关的知识,希望对你有一定的参考价值。
文章目录
1.动静分离与前后分离
首先必须理解动静分离与前后分离区别?
动静分离: 动态资源(jsp、thymeleaf)与静态资源(js、img、css)分开部署
前后分离: 前端进行开发接口与视图(例如分开独立 VUE),后端开发实际的业务代码。
我们知道在一个网站中,如果把动静态资源都放在一个服务器是很占宽带资源的。比如:1M的带宽,实际下载的速度是128kb/s,而我们的静态资源(css、js、img)文件大小比较大,比如要下载一张图片512kb,那么:
当前带宽1M=128kb/s
一张图片512kb/128=4s
可想而知,客服端仅加载一张图片,显示的时间都需要4s了,这是用户体验极差的,那么该如何解决呢?
方案:
- 使用nginx做动静分离(比较少公司用,不能做
CDN内容分发,占用带宽与没动静分离一样大) - 让第三方服务商帮我们处理静态资源(如七牛云、阿里云
oos、腾讯云等等)、
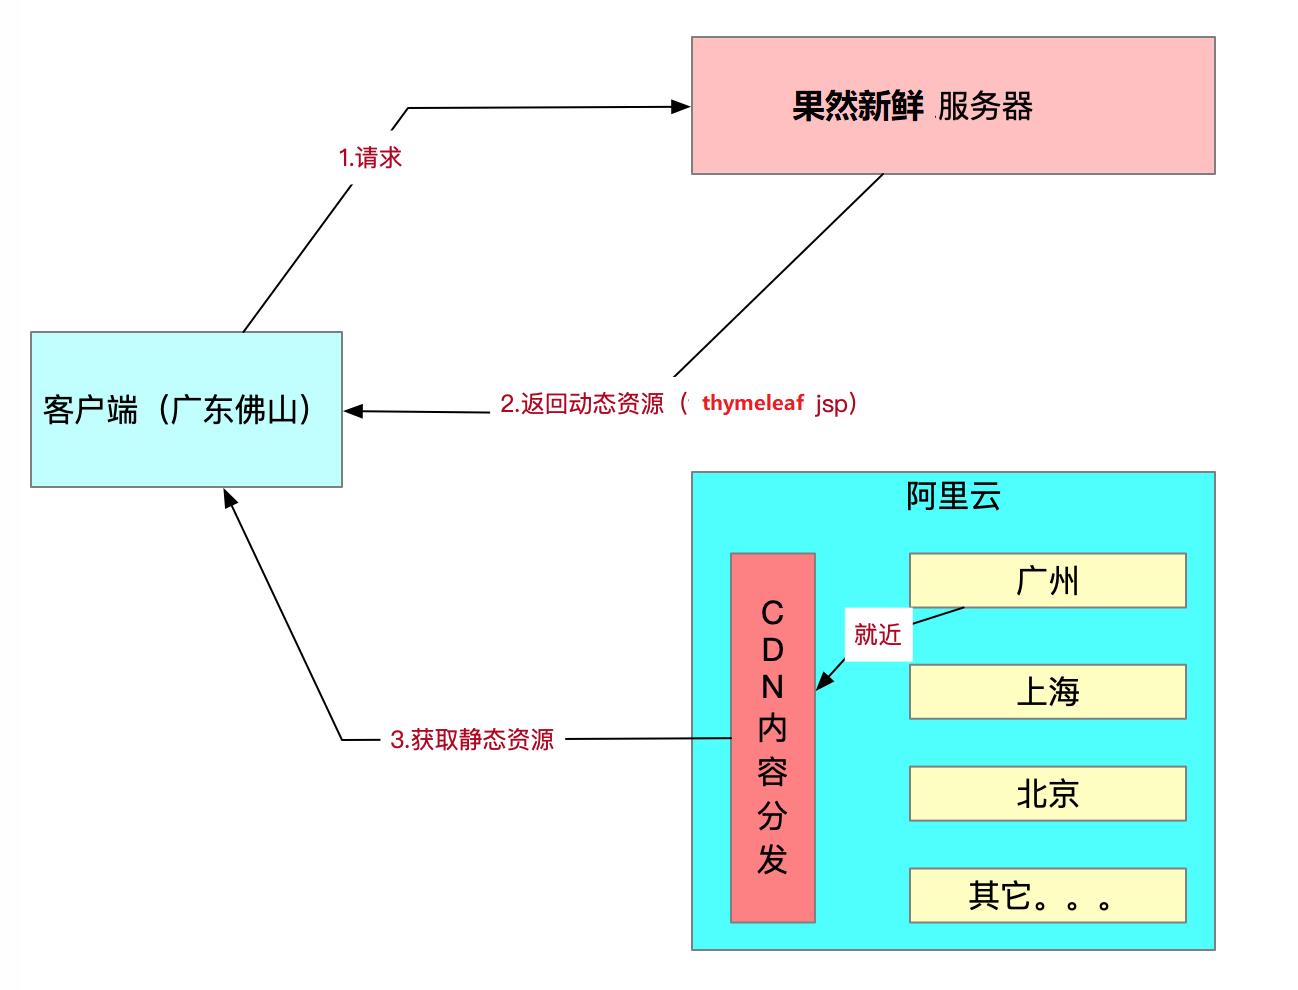
像七牛云、阿里云、腾讯云这些服务商,它们提供了静态资源存储服务器外,还内置了CDN内容分发功能( 所谓的CDN内容分发:就是将静态资源服务器会部署全国各个服务器节点,用户访问的时候,遵循就近原则就近原则,提高网络速率),这样不仅提高了服务器的响应时间,也很有效的提高了用户的体验,我以阿里云为例子画了一张动静分离的原理图,如下:
2.那么动静分离有什么缺点呢?
- 跨域问题(可以使用Nginx解决)
- 如果服务商宕机了,导致资源加载不了
3.第三方服务商的地址
七牛云:https://www.qiniu.com/
阿里云:https://www.aliyun.com/
加粗样式:https://cloud.tencent.com/
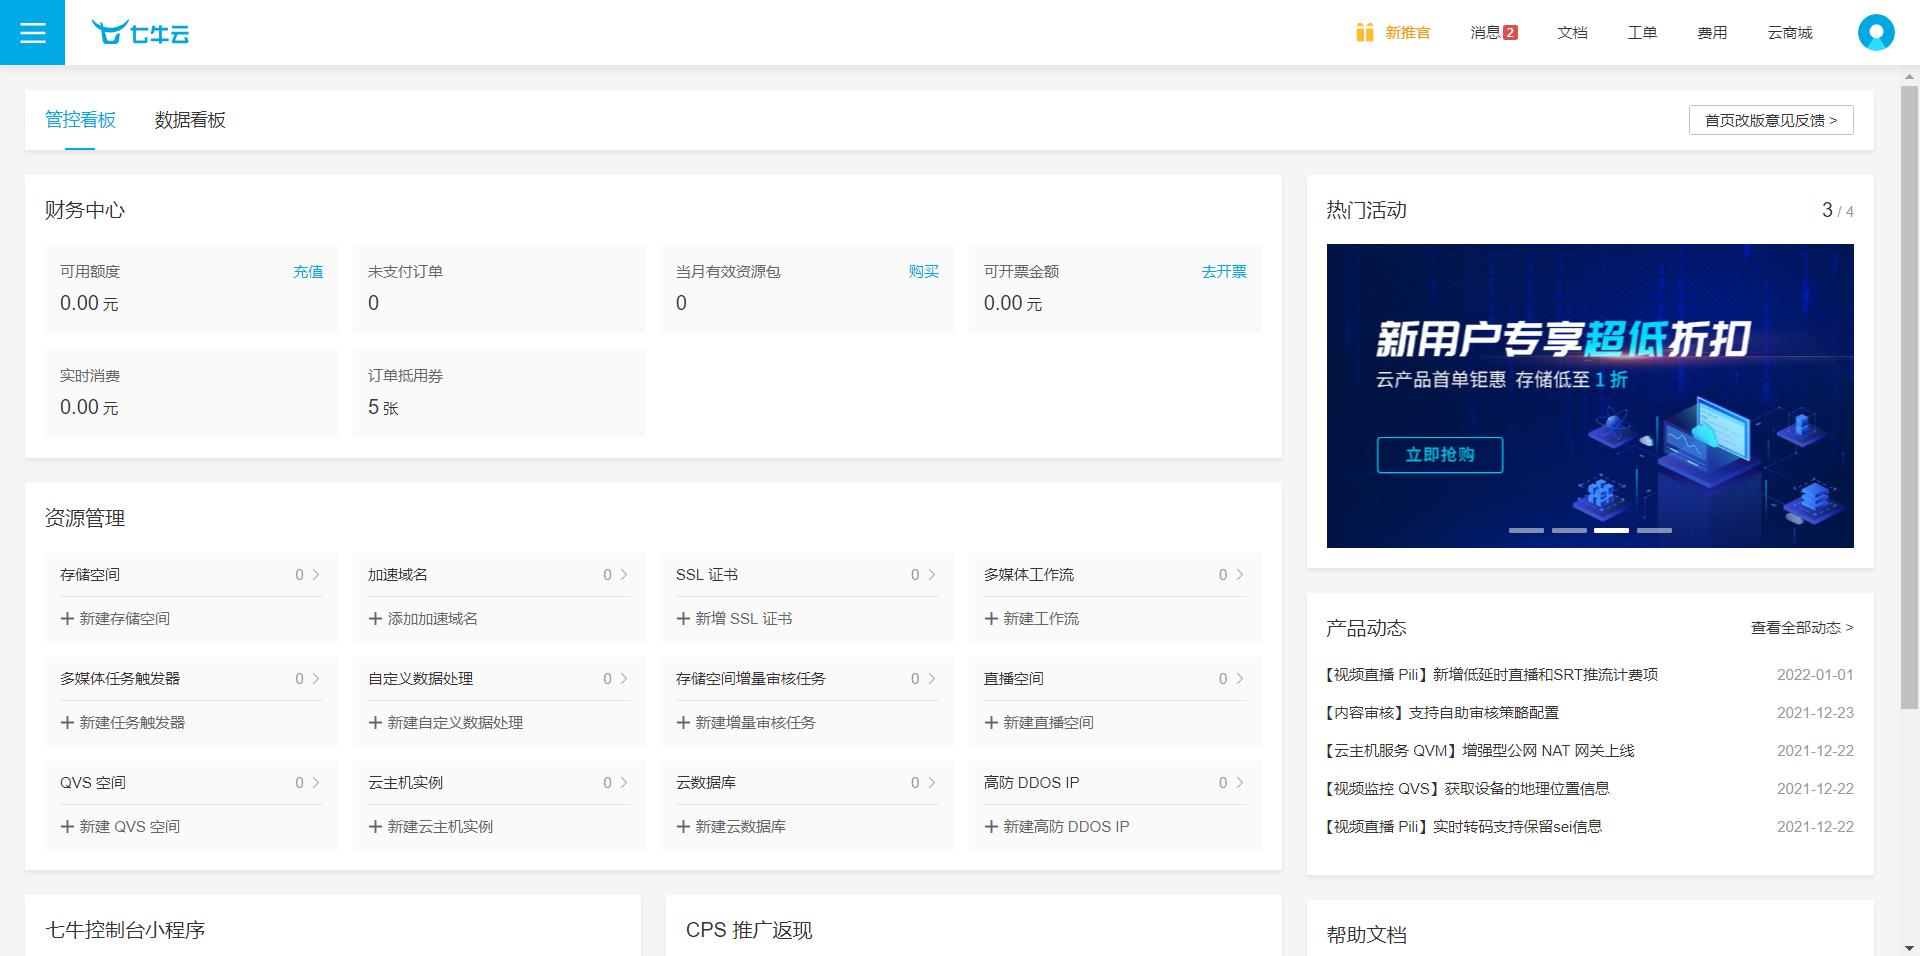
4.七牛云使用
4.1.注册并登录七牛云平台
4.2.注册并登录七牛云平台
点击对象存储

空间管理—>新建空间

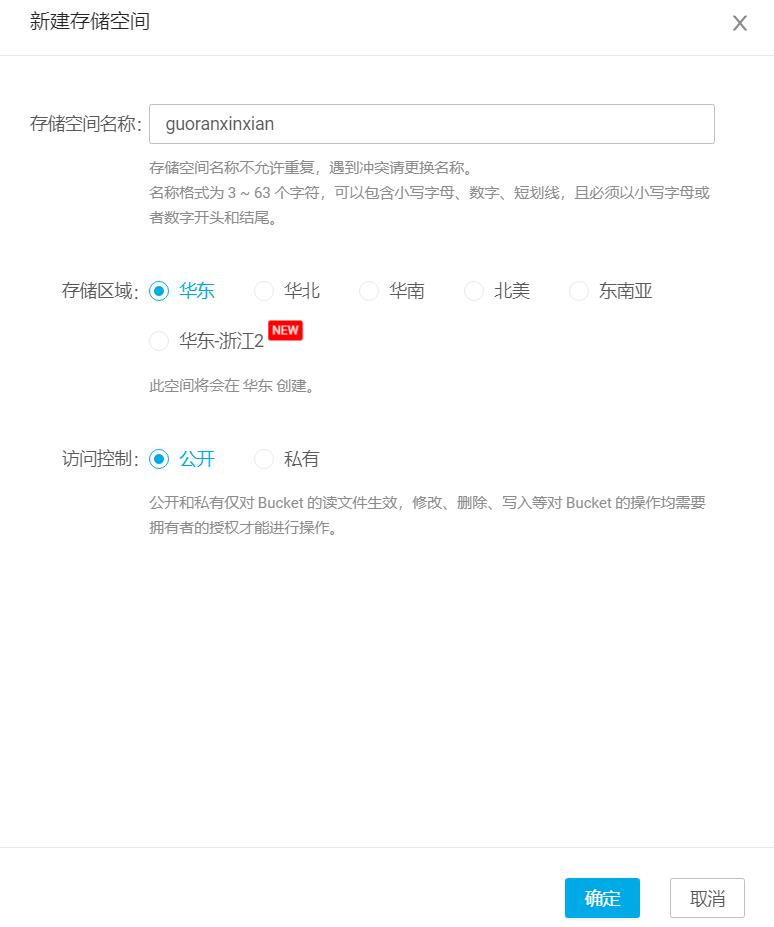

上传资源文件


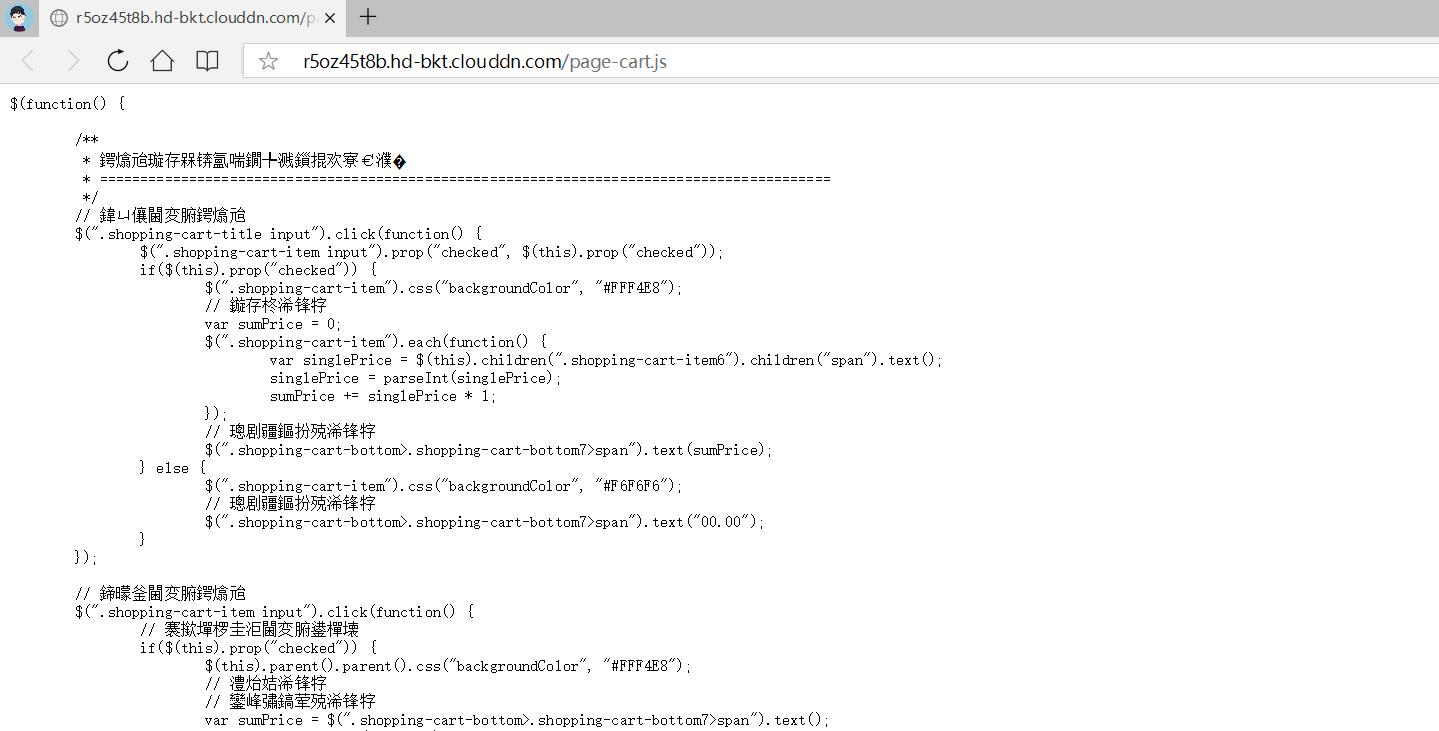
文件查看
5.绑定域名
未绑定域名的文件外链是只可以临时,所以需要绑定域名,并且域名是需要已经备案成功了域名
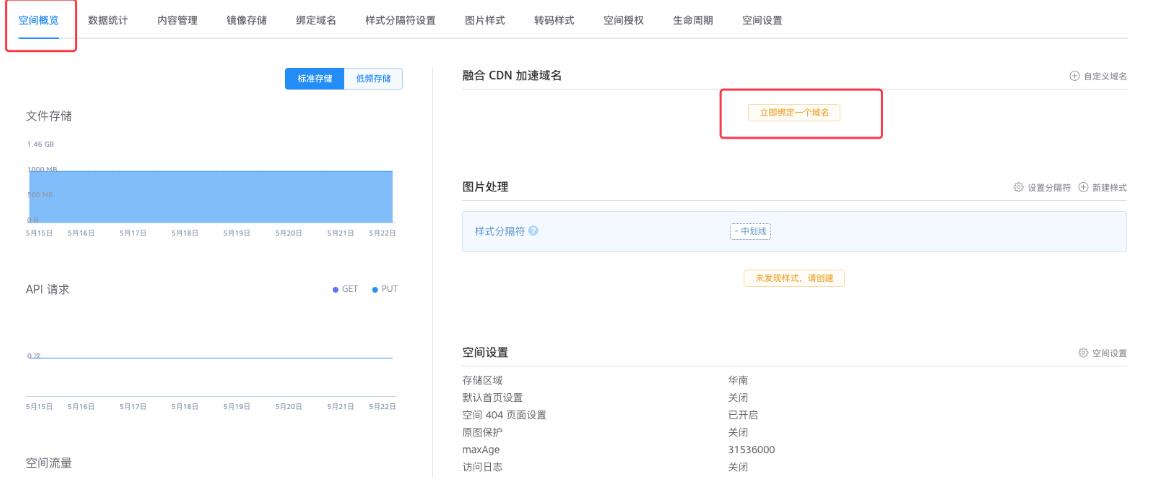
1、点击空间预览,点击立即绑定域名
2、在这里填写您要绑定的域名
这里的域名填一个二级域名就可以了,例如您的域名是www.baidu.com ,就填一个file.baidu.com ,填好之后点击创建
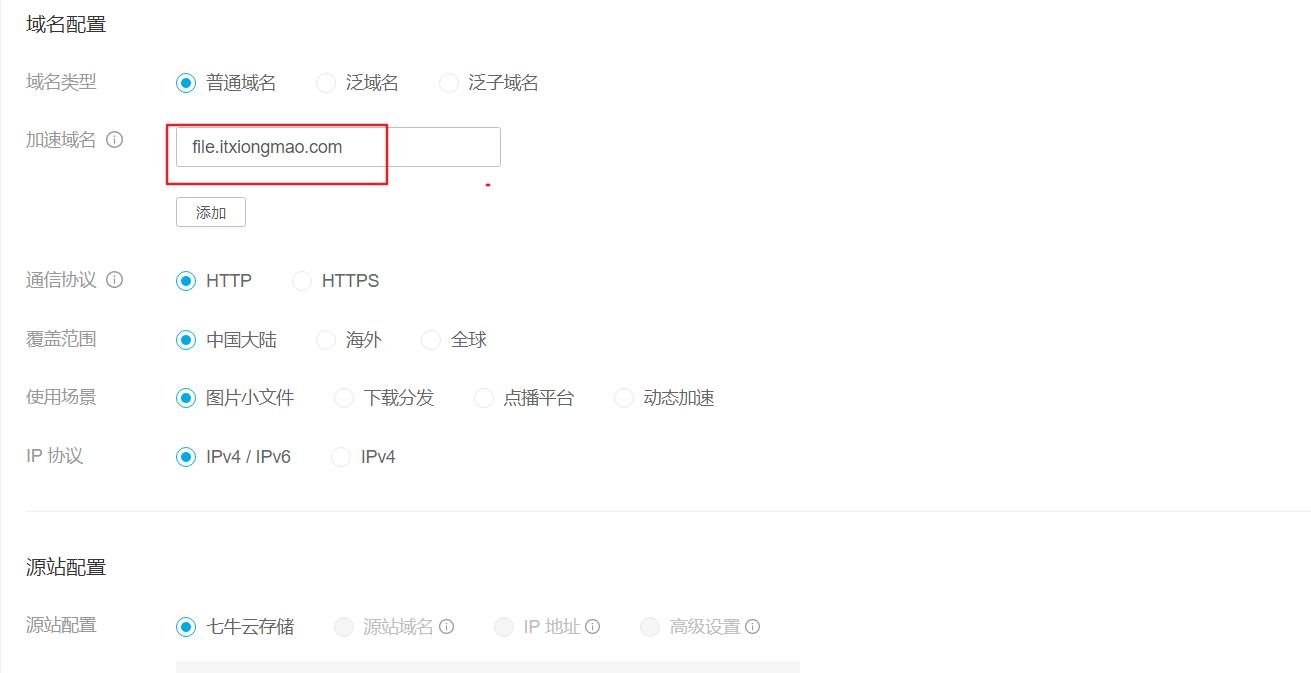
3、创建成功之后七牛云会生成一个cname解析地址

6、配置cname
1、登录您的域名管理的地址(例如您的域名是在阿里云,就登录阿里云)
2、进入管理控制台,找到域名管理,添加一条解析

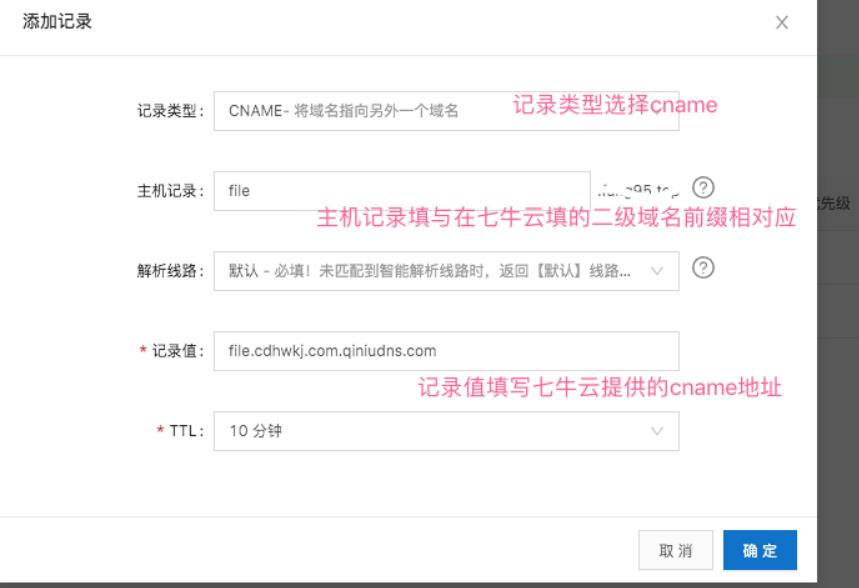
这是在七牛云填的域名前缀和七牛云提供的cname地址
4、解析成功后,返回七牛云看域名状态,如显示成功,那么文件外链就可以正常使用了

7.springboot整合七牛云实现图片上传
7.1.依赖
  <dependencies>
        <!--Web开发场景启动器:把Web开发相关的依赖全部一起整合导入-->
        <dependency>
            <groupId>org.springframework.boot</groupId>
            <artifactId>spring-boot-starter-web</artifactId>
        </dependency>

        <!-- 七牛云SDK -->
        <!-- 七牛云 -->
        <dependency>
            <groupId>com.qiniu</groupId>
            <artifactId>qiniu-java-sdk</artifactId>
            <version>[7.2.0, 7.2.99]</version>
        </dependency>

        <dependency>
            <groupId>org.projectlombok</groupId>
            <artifactId>lombok</artifactId>
        </dependency>

        <dependency>
            <groupId>com.google.code.gson</groupId>
            <artifactId>gson</artifactId>
            <version>2.6</version>
        </dependency>

        <!--thymeleaf场景启动器-->
        <dependency>
            <groupId>org.springframework.boot</groupId>
            <artifactId>spring-boot-starter-thymeleaf</artifactId>
        </dependency>

    </dependencies>
2.2.配置文件
# 如果SpringBoot不写配置文件,那么使用SpringBoot默认的配置文件的值
server.port=8080

# thymeleaf 配置
# 模板引擎的位置
spring.thymeleaf.prefix=classpath:/templates/
# 启动是否检查位置
spring.thymeleaf.check-template-location=true
# 模板引擎的后缀
spring.thymeleaf.suffix=.html
spring.thymeleaf.encoding=UTF-8
spring.thymeleaf.servlet.content-type=text/html
spring.thymeleaf.mode=HTML5
# 开发阶段不需要缓存
spring.thymeleaf.cache=false

qiniu.accessKey=xxxxxxxxxxxxxxxxxxxxxxxxxxxxxxxxx
qiniu.secretKey=xxxxxxxxxxxxxxxxxxxxxxxxxx
qiniu.bucket=guoranxinxian
qiniu.path=http://up.qiniup.com
qiniu.webPath=http://file.itxiongmao.com
2.3.配置类
package com.bruce.config;

import com.google.gson.Gson;
import com.qiniu.common.QiniuException;
import com.qiniu.common.Zone;
import com.qiniu.http.Response;
import com.qiniu.storage.Configuration;
import com.qiniu.storage.UploadManager;
import com.qiniu.storage.model.DefaultPutRet;
import com.qiniu.util.Auth;
import lombok.Data;
import org.springframework.beans.factory.annotation.Value;
import org.springframework.boot.context.properties.ConfigurationProperties;
import org.springframework.stereotype.Component;

import java.io.FileInputStream;

@Data
@Component
public class QiNiuYunConfig

    @Value("$qiniu.accessKey")
    private String accessKey;

    @Value("$qiniu.secretKey")
    private String secretKey;

    @Value("$qiniu.bucket")
    private String bucket;

    @Value("$qiniu.path")
    private String path;

    @Value("$qiniu.webPath")
    public String webPath;

    public String uploadImgToQiNiu(FileInputStream file, String filename)
        // 构造一个带指定Zone对象的配置类,注意后面的zone各个地区不一样的
        Configuration cfg = new Configuration(Zone.zone0());
        // 其他参数参考类注释
        UploadManager uploadManager = new UploadManager(cfg);
        // 生成密钥
        Auth auth = Auth.create(accessKey, secretKey);
        try
            String upToken = auth.uploadToken(bucket);
            try
                Response response = uploadManager.put(file, filename, upToken, null, null);
                // 解析上传成功的结果
                DefaultPutRet putRet = new Gson().fromJson(response.bodyString(), DefaultPutRet.class);
                // 这个returnPath是获得到的外链地址,通过这个地址可以直接打开图片
                String returnPath = getWebPath() + "/" + putRet.key;
                return returnPath;
             catch (QiniuException ex)
                Response r = ex.response;
                System.err.println(r.toString());
                try
                    System.err.println(r.bodyString());
                 catch (QiniuException ex2)
                    //ignore


         catch (Exception e)
            e.printStackTrace();

        return "";
关于地区的编码 可查看官方文档七牛云:https://developer.qiniu.com/kodo/1671/region-endpoint-fq
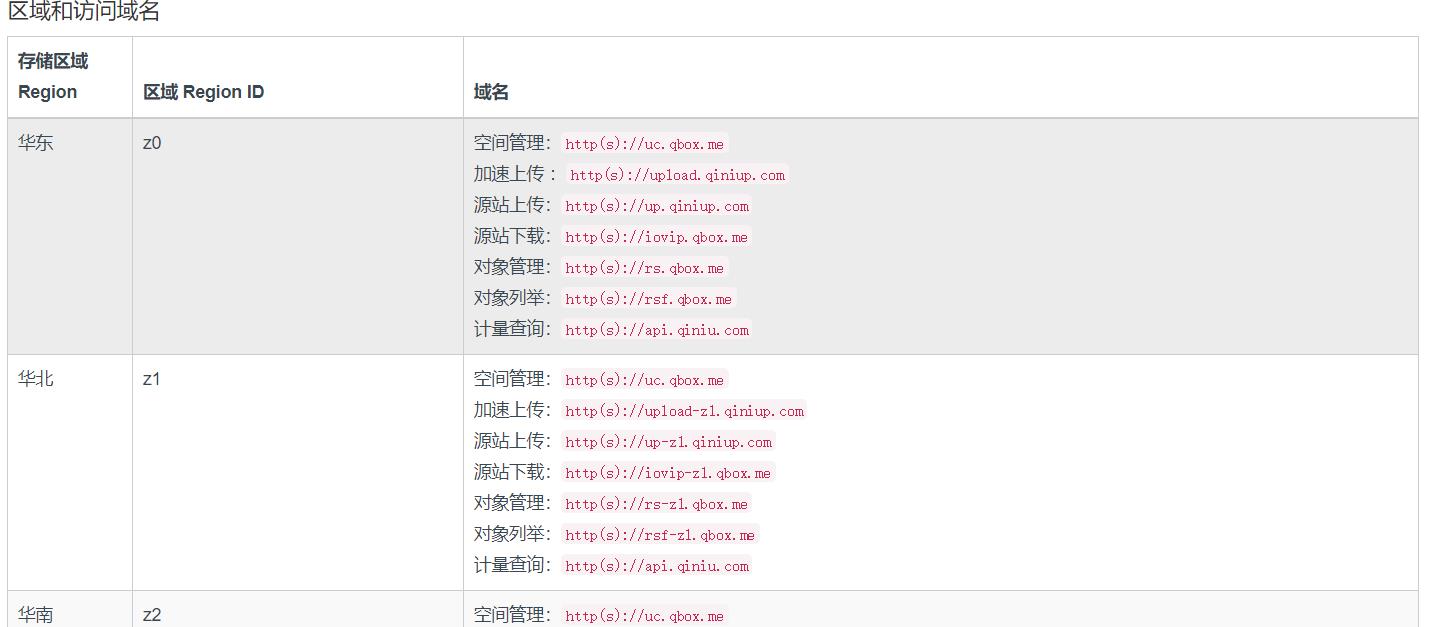
// 构造一个带指定Zone对象的配置类, 注意这里的Zone.zone0需要根据主机选择
Configuration cfg = new Configuration(Zone.zone0());
2.4.控制器
package com.bruce.controller;

import com.bruce.config.QiNiuYunConfig;
import org.springframework.beans.factory.annotation.Autowired;
import org.springframework.stereotype.Controller;
import org.springframework.ui.Model;
import org.springframework.web.bind.annotation.GetMapping;
import org.springframework.web.bind.annotation.PostMapping;
import org.springframework.web.bind.annotation.RequestParam;
import org.springframework.web.multipart.MultipartFile;

import java.io.FileInputStream;
import java.io.IOException;
import java.util.UUID;

@Controller
public class QiNiuYunController

    @Autowired
    private QiNiuYunConfig qiNiuYunConfig;

    @GetMapping("/upload","/")
    public String upload()
        return "upload";


    @PostMapping("/qiniu")
    public String qiNiuYunUpload(@RequestParam("file") MultipartFile file,
                                 Model model) throws IOException
        String filename = file.getOriginalFilename();
        FileInputStream inputStream = (FileInputStream) file.getInputStream();
        //为文件重命名:uuid+filename
        filename = UUID.randomUUID()+ filename;
        String link = qiNiuYunConfig.uploadImgToQiNiu(inputStream, filename);
        model.addAttribute("link", link);
        return "upload";
2.5.前端页面
<!DOCTYPE html>
<html lang="en" xmlns:th="http://www.thymeleaf.org">
<head>
    <meta charset="UTF-8">
    <title>上传文件</title>
</head>
<body>
<form action="/qiniu" method="post" enctype="multipart/form-data">
    <label>上传图片</label>
    <input type="file" name="file"/>
    <input type="submit" value="上传"/>
    <p>回显图片:</p>
    <img th:src="$link"/>
</form>
</body>
</html>
以上是关于《果然新鲜》电商项目(33)-动静分离的实现的主要内容,如果未能解决你的问题,请参考以下文章