吃透Mybatis源码-面试官问我Spring是怎么整合Mybatis的
Posted 墨家巨子@俏如来
tags:
篇首语:本文由小常识网(cha138.com)小编为大家整理,主要介绍了吃透Mybatis源码-面试官问我Spring是怎么整合Mybatis的相关的知识,希望对你有一定的参考价值。
2021一路有你,2022我们继续加油!你的肯定是我最大的动力
博主在参加博客之星评比,点击链接 , https://bbs.csdn.net/topics/603957267 疯狂打Call!五星好评 ⭐⭐⭐⭐⭐ 感谢
- 吃透Mybatis源码-Mybatis初始化(一)
- 吃透Mybatis源码-Mybatis执行流程(二)`
- 吃透Mybatis源码-缓存的理解(三)
- 吃透Mybatis源码-通过分析Pagehelper源码来理解Mybatis的拦截器(四)
- 吃透Mybatis源码-面试官问我mapper映射器是如何工作的(五)
- 吃透Mybatis源码-面试官问我Spring是怎么整合Mybatis的(六)
前言
我们在项目中都是使用Spring整合Mybatis进行数据操作,而不会直接使用SqlSession去操作数据库,因为这样操作会显得特别的麻烦。Spring整合Mybatis之后,Spring对Mybatis的核心进行了封装和适配,让我们用起来更加简单。本篇文章将带你了解Spring整合Mybatis的核心原理,从此再也不用担心面试官问我“Spring是如何整合Mybatis的?”

Spring整合Mybatis案例
第一步,导入需要的依赖包括:驱动包,mybatis包;Spring包;测试包
<dependency>
    <groupId>org.springframework</groupId>
    <artifactId>spring-test</artifactId>
    <version>4.3.0.RELEASE</version>
</dependency>
<dependency>
    <groupId>org.springframework</groupId>
    <artifactId>spring-jdbc</artifactId>
    <version>4.3.0.RELEASE</version>
</dependency>

<dependency>
    <groupId>org.springframework</groupId>
    <artifactId>spring-context</artifactId>
    <version>4.3.0.RELEASE</version>
</dependency>
<dependency>
    <groupId>org.springframework</groupId>
    <artifactId>spring-tx</artifactId>
    <version>4.3.0.RELEASE</version>
</dependency>
<dependency>
    <groupId>org.mybatis</groupId>
    <artifactId>mybatis-spring</artifactId>
    <version>2.0.0</version>
</dependency>
<!-- https://mvnrepository.com/artifact/org.mybatis/mybatis -->
<dependency>
    <groupId>org.mybatis</groupId>
    <artifactId>mybatis</artifactId>
    <version>3.4.6</version>
</dependency>
<!-- https://mvnrepository.com/artifact/mysql/mysql-connector-java -->
<dependency>
    <groupId>mysql</groupId>
    <artifactId>mysql-connector-java</artifactId>
    <version>5.1.47</version>
</dependency>
<dependency>
    <groupId>junit</groupId>
    <artifactId>junit</artifactId>
    <version>4.12</version>
    <scope>test</scope>
</dependency>
第二步:编写实体类,mapper映射器,mapper.xml 文件 ,这里省略
第三步:编写数据库配置文件
#mysql
mysql.driver=com.mysql.jdbc.Driver
mysql.url=jdbc:mysql://localhost:3306/test?useSSL=false
mysql.username=root
mysql.password=admin
第四步:编写Spring核心配置文件
<?xml version="1.0" encoding="UTF-8"?>
<beans xmlns="http://www.springframework.org/schema/beans"
       xmlns:xsi="http://www.w3.org/2001/XMLSchema-instance"
       xmlns:p="http://www.springframework.org/schema/p"
       xmlns:aop="http://www.springframework.org/schema/aop"
       xmlns:context="http://www.springframework.org/schema/context"
       xmlns:tx="http://www.springframework.org/schema/tx"
       xsi:schemaLocation="http://www.springframework.org/schema/beans
        http://www.springframework.org/schema/beans/spring-beans.xsd
        http://www.springframework.org/schema/context
        http://www.springframework.org/schema/context/spring-context-4.3.xsd
        http://www.springframework.org/schema/aop
        http://www.springframework.org/schema/aop/spring-aop-4.3.xsd
        http://www.springframework.org/schema/tx
        http://www.springframework.org/schema/tx/spring-tx-4.3.xsd">

    <!--1 引入属性文件,在配置中占位使用 -->
    <context:property-placeholder location="classpath*:db.properties" />

    <!--2 配置数据源 -->
    <bean id="datasource" class="org.apache.ibatis.datasource.pooled.PooledDataSource">
        <!--驱动类名 -->
        <property name="driver" value="$mysql.driver" />
        <!-- url -->
        <property name="url" value="$mysql.url" />
        <!-- 用户名 -->
        <property name="username" value="$mysql.username" />
        <!-- 密码 -->
        <property name="password" value="$mysql.password" />
    </bean>

    <!--3 会话工厂bean sqlSessionFactoryBean -->
    <bean id="sqlSessionFactory" class="org.mybatis.spring.SqlSessionFactoryBean">
        <!-- 数据源 -->
        <property name="dataSource" ref="datasource"></property>
        <!-- 别名 -->
        <property name="typeAliasesPackage" value="cn.whale.domian"></property>
        <!-- sql映射文件路径 -->
        <property name="mapperLocations" value="classpath*:mapper/*Mapper.xml"></property>
<!--        <property name="configLocation" value="classpath*:mybatis-config.xml"></property>-->
<!--        <property name="plugins"></property>-->
    </bean>

    <!--4 自动扫描对象关系映射 -->
    <bean class="org.mybatis.spring.mapper.MapperScannerConfigurer">
        <!-- 指定要自动扫描接口的基础包,实现接口 -->
        <property name="basePackage" value="cn.whale.mapper"></property>
    </bean>

    <!--5 声明式事务管理 -->
    <!--定义事物管理器,由spring管理事务 -->
    <bean id="transactionManager" class="org.springframework.jdbc.datasource.DataSourceTransactionManager">
        <property name="dataSource" ref="datasource"></property>
    </bean>
    <!--支持注解驱动的事务管理,指定事务管理器 -->
    <tx:annotation-driven transaction-manager="transactionManager"/>

</beans>
第五步:编写测试类
@RunWith(SpringJUnit4ClassRunner.class)
@ContextConfiguration("classpath:applicationContext.xml")
public class SpringTest
	//注入Mapper接口
    @Autowired
    private StudentMapper studentMapper ;

    @Test
    public void test()
        Student student = studentMapper.selectById(1L);
        System.out.println(student);
Spring整合Mybatis和单纯使用Mybatis做了哪些改变?
- 除了增加了Spring的包以外,增加了一个比较关键的依赖mybatis-spring , 它是Spring整合Mybatis核心的一个包
- SqlSessionFactory不在手动创建,而是在Spirng的配置文件中通过注册一个SqlSessionFactoryBean来创建
- 以前mybatis-config.xml中配置的DataSource 数据源 和 事务管理 现在在Spring的配置文件中配置了
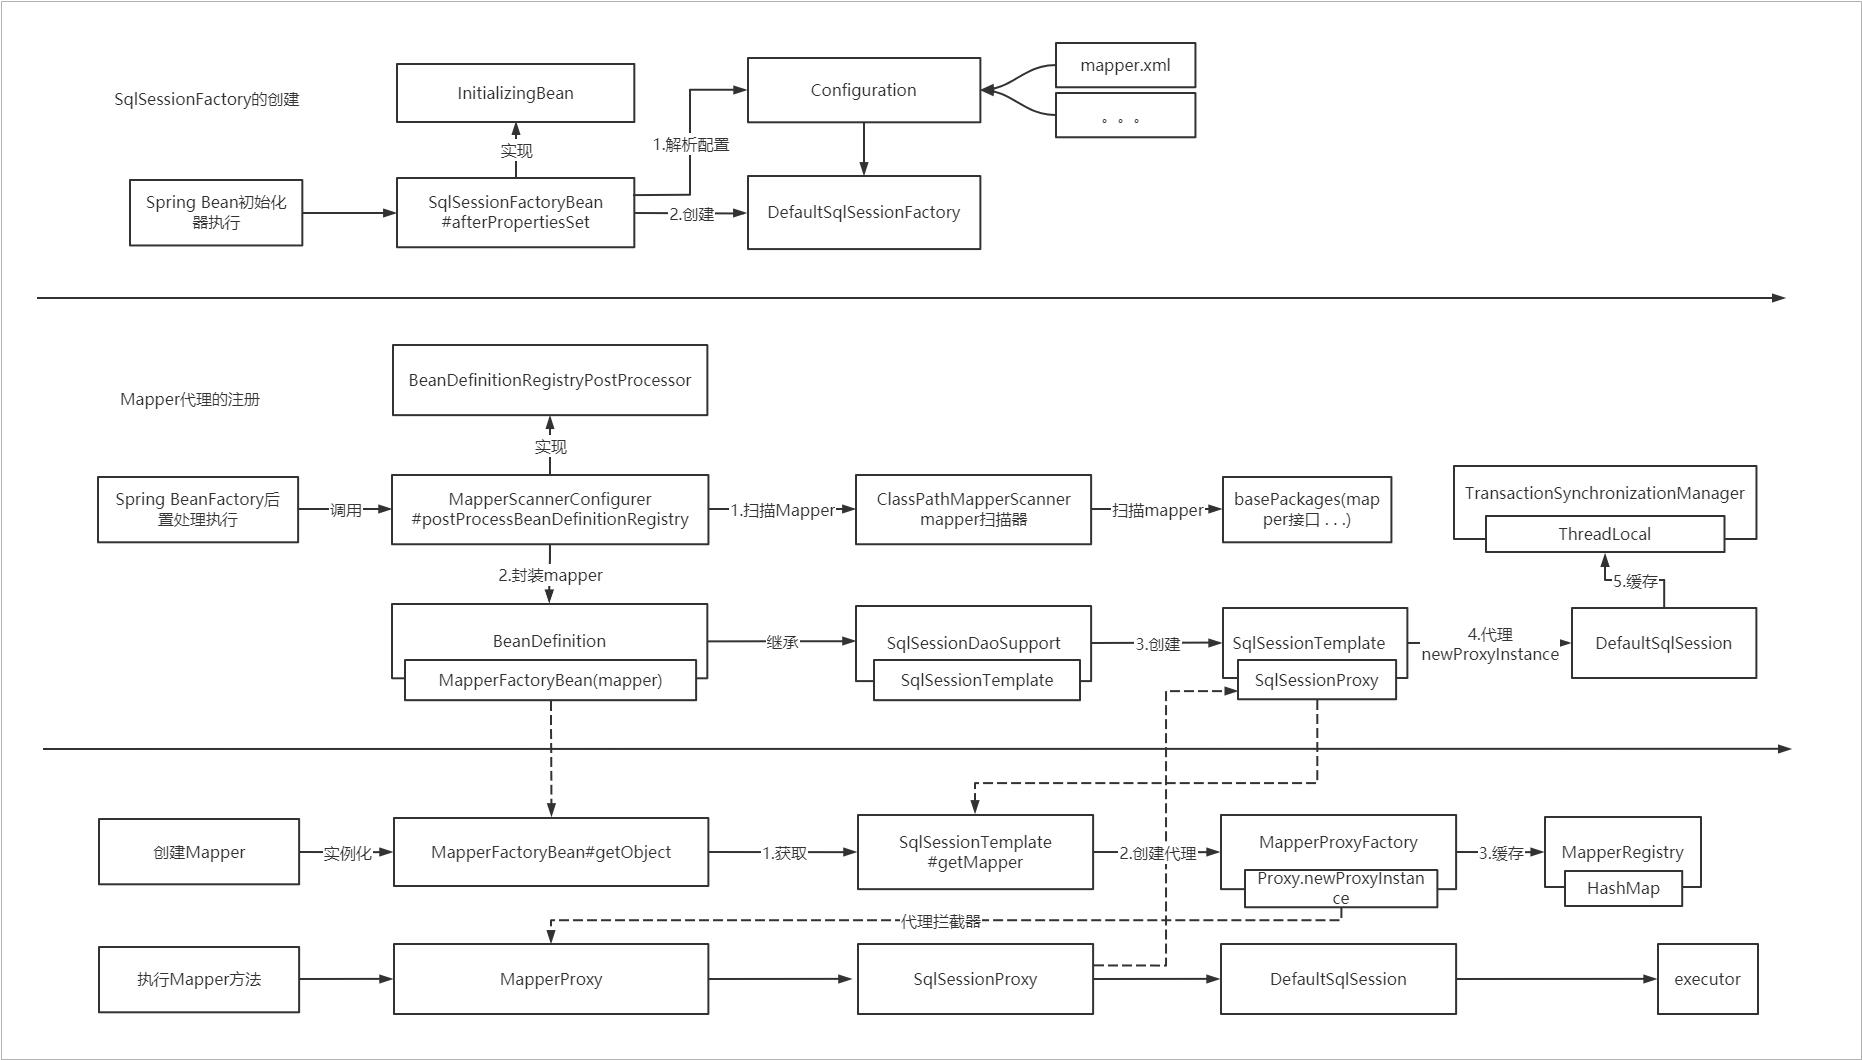
Spring只是对Mybatis做了整合或者包装,简单点理解就是整合Spring之后只是改变了对Mybatis的配置方式和使用方式,其本质还是使用的是Mybatis的核心,那么我们思考一下,之前在使用Mybatis的时候有几个核心的东西
- SqlSessionFactory的创建
- SqlSession的创建
- MapperPorxy的创建
- 事务的管理
那么理解Spring是如何整合Mybatis的就是理解上面的几个核心在Spring中是如何创建和工作的。
SqlSessionFactory的创建
在之前的Mybatis案例中我们是通过 SqlSessionFactoryBuilder.buider(inputStream) 来加载Mybatis配置文件和创建SqlSessionFactory的,在Spring中不一样了,我们在Spring的配置文件中 配置了一个Bean SqlSessionFactoryBean ,如下
<!--3 会话工厂bean sqlSessionFactoryBean -->
<bean id="sqlSessionFactory" class="org.mybatis.spring.SqlSessionFactoryBean">
    <!-- 数据源 -->
    <property name="dataSource" ref="datasource"></property>
    <!-- 别名 -->
    <property name="typeAliasesPackage" value="cn.whale.domian"></property>
    <!-- sql映射文件路径 -->
    <property name="mapperLocations" value="classpath*:mapper/*Mapper.xml"></property>
<!--        mybatis配置文件-->
<!--        <property name="configLocation" value="classpath*:mybatis-config.xml"></property>-->
<!--        插件配置-->
<!--        <property name="plugins"></property>-->
</bean>
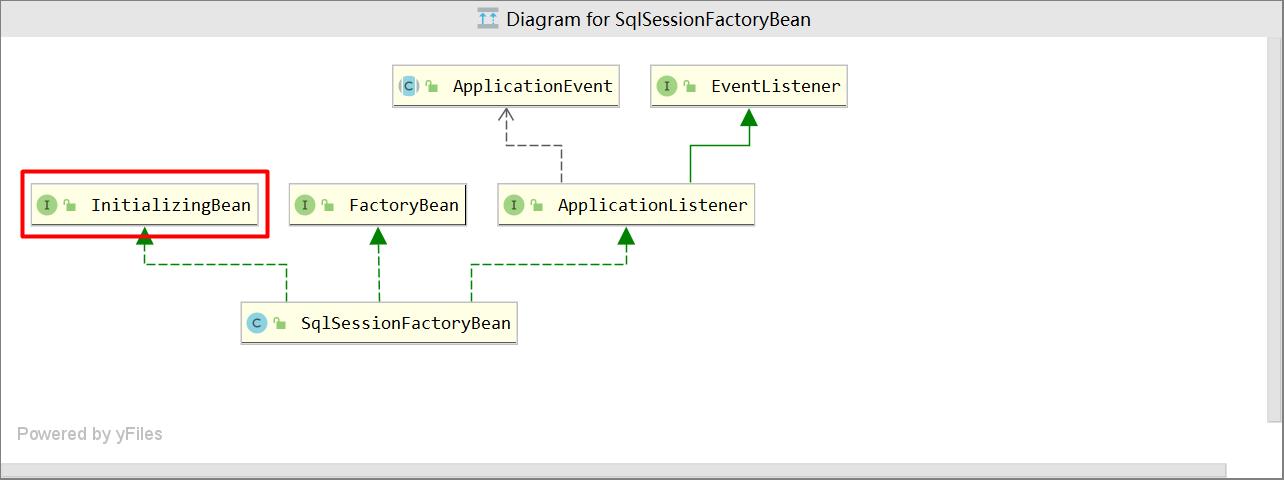
那么我们源码分析的入口就是它了,下面是SqlSessionFactoryBean的继承体系图

首先SqlSessionFactoryBean是一个FactoryBean的子类,它提供了一个 getObject 来返回SqlSessionFactory 的实例,这个是Spring创建Bean的一种方式,相信使用过Spring的童靴都清楚。
SqlSessionFactoryBean实现类一个InitializingBean接口,该接口提供了一个 afterPropertiesSet 方法,当Bean在初始化的时候会触发afterPropertiesSet方法调用。也就是说 SqlSessionFactoryBean在Bean初始化的过程中会调用其afterPropertiesSet方法。下面是SqlSessionFactoryBean的源码
public class SqlSessionFactoryBean implements FactoryBean<SqlSessionFactory>, InitializingBean, ApplicationListener<ApplicationEvent>

  private static final Logger LOGGER = LoggerFactory.getLogger(SqlSessionFactoryBean.class);
  //mybatis-config.xml 配置文件
  private Resource configLocation;
  //Mybatis的configuration对象
  private Configuration configuration;
  //mapper.xml 映射文件
  private Resource[] mapperLocations;
  //数据源
  private DataSource dataSource;
  //mybatis的事务工厂
  private TransactionFactory transactionFactory;
  //配置sqlSessionFactory Properties
  private Properties configurationProperties;
  //mybatis的SqlSessionFactory的构造器
  private SqlSessionFactoryBuilder sqlSessionFactoryBuilder = new SqlSessionFactoryBuilder();
  //mybatis的SqlSession工厂
  private SqlSessionFactory sqlSessionFactory;

  //EnvironmentAware requires spring 3.1
  private String environment = SqlSessionFactoryBean.class.getSimpleName();

  ...省略...

  //初始化SqlSessionFactoryBean
  public void afterPropertiesSet() throws Exception
    notNull(dataSource, "Property 'dataSource' is required");
    notNull(sqlSessionFactoryBuilder, "Property 'sqlSessionFactoryBuilder' is required");
    state((configuration == null && configLocation == null) || !(configuration != null && configLocation != null),
              "Property 'configuration' and 'configLocation' can not specified with together");
   //构建 SqlSessionFactory
    this.sqlSessionFactory = buildSqlSessionFactory();


  ...省略...
  //获取对象,通过FactroyBean来实例化
  @Override
  public SqlSessionFactory getObject() throws Exception
    if (this.sqlSessionFactory == null)
      //如果sqlSessionFactory 是空的就触发afterPropertiesSet方法
      afterPropertiesSet();


    return this.sqlSessionFactory;
SqlSessionFactoryBean 是Mybatis-Spring这个jar包提供的。里面使用到了Mybatis的一些核心类,比如:Configuration , SqlSessionFactory。 在 afterPropertiesSet 方法中 调用 buildSqlSessionFactory() 去buid sqlSessionFactory 。
你可能会问,afterPropertiesSet 和 getObject 这两个方法又什么关系呢?谁先执行呢? afterPropertiesSet 是对 SqlSessionFactoryBean的初始化 ,而getObject 方法是用来创建 SqlSessionFactory 的。这里其实有有俩个Bean,一个是 SqlSessionFactoryBean ,一个是 SqlSessionFactory ,所以是先创建SqlSessionFactoryBean,然后执行afterPropertiesSet 初始化,最后调用getObject 来创建SqlSessionFactory 。所以是afterPropertiesSet 先执行。
下面是org.mybatis.spring.SqlSessionFactoryBean#buildSqlSessionFactory 的源码
protected SqlSessionFactory buildSqlSessionFactory() throws IOException
    //Mybatis的配置类
    final Configuration targetConfiguration;

    XMLConfigBuilder xmlConfigBuilder = null;

    if (this.configuration != null)
      targetConfiguration = this.configuration;
      if (targetConfiguration.getVariables() == null)
        targetConfiguration.setVariables(this.configurationProperties);
       else if (this.configurationProperties != null)
        targetConfiguration.getVariables().putAll(this.configurationProperties);

    //1.判断是否有配置configLocation,如果有就创建一个XMLConfigBuilder来解析mybatis-config.xml配置文件
     else if (this.configLocation != null)
      xmlConfigBuilder = new XMLConfigBuilder(this.configLocation.getInputStream(), null, this.configurationProperties);
      targetConfiguration = xmlConfigBuilder.getConfiguration();
     else
      LOGGER.debug(() -> "Property 'configuration' or 'configLocation' not specified, using default MyBatis Configuration");
      targetConfiguration = new Configuration();
      Optional.ofNullable(this.configurationProperties).ifPresent(targetConfiguration::setVariables);

   //如果this.objectFactory不为空,就把this.objectFactory设置给 targetConfiguration
    Optional.ofNullable(this.objectFactory).ifPresent(targetConfiguration::setObjectFactory);
    Optional.ofNullable(this.objectWrapperFactory).ifPresent(targetConfiguration::setObjectWrapperFactory);
    Optional.ofNullable(this.vfs).ifPresent(targetConfiguration::setVfsImpl);
    //2.处理别名
    if (hasLength(this.typeAliasesPackage))
      String[] typeAliasPackageArray = tokenizeToStringArray(this.typeAliasesPackage,
          ConfigurableApplicationContext.CONFIG_LOCATION_DELIMITERS);
      Stream.of(typeAliasPackageArray).forEach(packageToScan ->
       //别名还是注册到Configuration#typeAliasRegistry 中
        targetConfiguration.getTypeAliasRegistry().registerAliases(packageToScan,
            typeAliasesSuperType == null ? Object.class : typeAliasesSuperType);
        LOGGER.debug(() -> "Scanned package: '" + packageToScan + "' for aliases");
      );


    if (!isEmpty(this.typeAliases))
      Stream.of(this.typeAliases).forEach(typeAlias ->
        targetConfiguration.getTypeAliasRegistry().registerAlias(typeAlias);
        LOGGER.debug(() -> "Registered type alias: '" + typeAlias + "'");
      );

   //3.处理插件 ,还是通过 Configuration.addInterceptor 来注册插件
    if (!isEmpty(this.plugins))
      Stream.of(this.plugins).forEach(plugin ->
        targetConfiguration.addInterceptor(plugin);
        LOGGER.debug(() -> "Registered plugin: '" + plugin + "'");
      );

     //4.处理插件 ,处理typeHandlersPackage,还是注册到Configuration#TypeHandlerRegistry
    if (hasLength(this.typeHandlersPackage))
      String[] typeHandlersPackageArray = tokenizeToStringArray(this.typeHandlersPackage,
          ConfigurableApplicationContext.CONFIG_LOCATION_DELIMITERS);
      Stream.of(typeHandlersPackageArray).forEach(packageToScan ->
        targetConfiguration.getTypeHandlerRegistry().register(packageToScan);
        LOGGER.debug(() -> "Scanned package: '" + packageToScan + "' for type handlers");
      );


    if (!isEmpty(this.typeHandlers))
      Stream.of(this.typeHandlers).forEach(typeHandler ->
        targetConfiguration.getTypeHandlerRegistry().register(typeHandler);
        LOGGER.debug(() -> "Registered type handler: '" + typeHandler + "'");以上是关于吃透Mybatis源码-面试官问我Spring是怎么整合Mybatis的的主要内容,如果未能解决你的问题,请参考以下文章