Prometheus概述以及安装
Posted 礁之
tags:
篇首语:本文由小常识网(cha138.com)小编为大家整理,主要介绍了Prometheus概述以及安装相关的知识,希望对你有一定的参考价值。
文章目录
一、普罗米修斯简介
(1)Prometheus简介
-
prometheus受启发于Google的Brogmon监控系统(相似kubernetes是从Brog系统演变而来), 从2012年开始由google工程师Soundcloud以开源形式进行研发,并且与2015年早起对外发布早期版本。 2016年5月继kubernetes之后成为第二个加入CNCF基金会的项目,童年6月正式发布1.0版本。2017年底发布基于全兴存储层的2.0版本,能更好地与容器平台、云平台配合。

(2)prometheus的优势
prometheus是基于一个开源的完整监控方案,其对传统监控系统的测试和告警模型进行了彻底的颠覆,形成了基于中央化的规则计算、统一分析和告警的新模型。 相对传统的监控系统有如下几个优点。
- 易于管理: 部署使用的是go编译的二进制文件,不存在任何第三方依赖问题,可以使用服务发现动态管理监控目标。
- 监控服务内部运行状态: 我们可以使用prometheus提供的常用开发语言提供的client库完成应用层面暴露数据, 采集应用内部运行信息。
- 强大的查询语言promQL: prometheus内置一个强大的数据查询语言PromQL,通过PromQL可以实现对监控数据的查询、聚合。同时PromQL也被应用于数据可视化(如grafana)以及告警中的。
- 高效: 对于监控系统而言,大量的监控任务必然导致有大量的数据产生。 而Prometheus可以高效地处理这些数据。
- 可扩展: prometheus配置比较简单, 可以在每个数据中心运行独立的prometheus server, 也可以使用联邦集群,让多个prometheus实例产生一个逻辑集群,还可以在单个prometheus server处理的任务量过大的时候,通过使用功能分区和联邦集群对其扩展。
- 易于集成: 目前官方提供多种语言的客户端sdk,基于这些sdk可以快速让应用程序纳入到监控系统中,同时还可以支持与其他的监控系统集成。
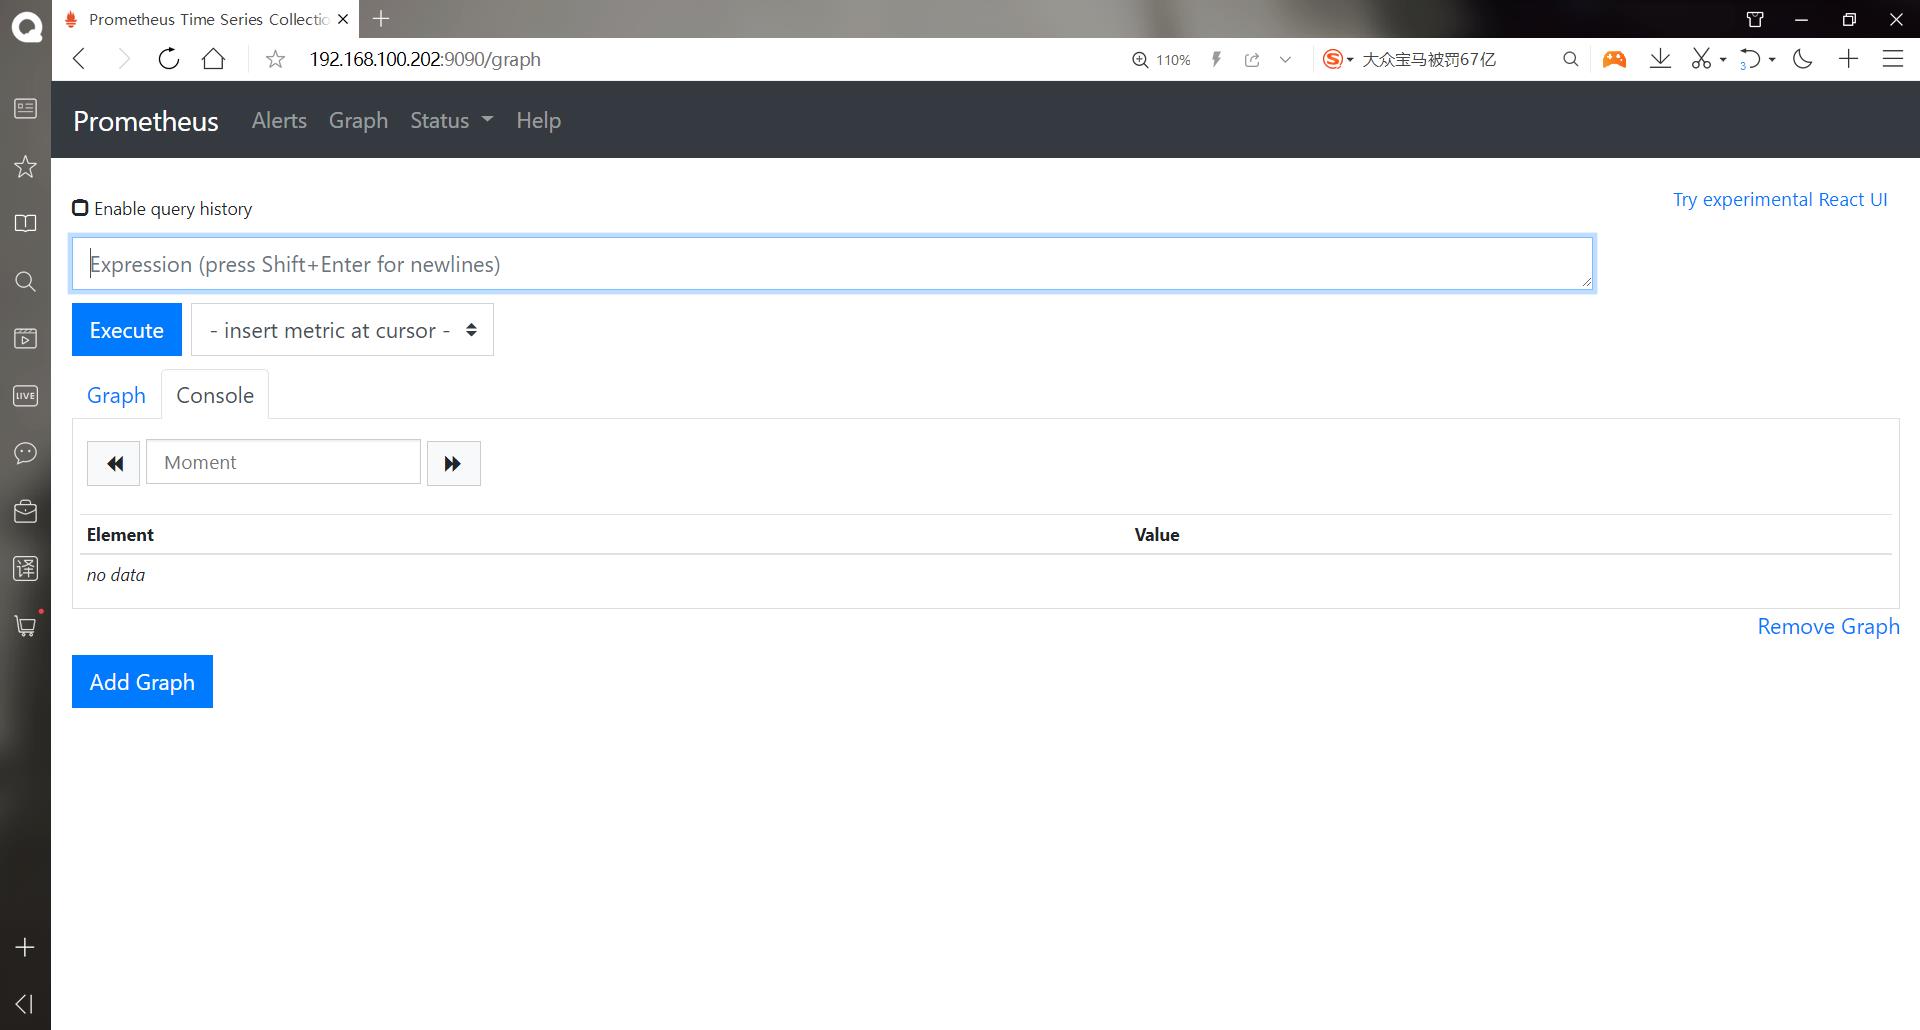
- 可视化: prometheus server自带一个ui, 通过这个ui可以方便对数据进行查询和图形化展示,可以对接grafana可视化工具展示精美监控指标。
(3)Prometheus基础架构

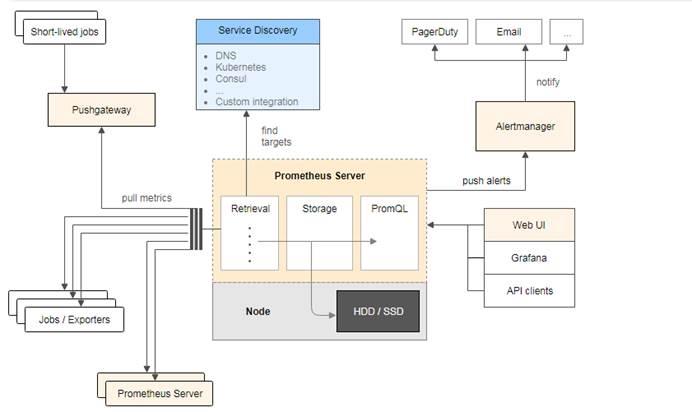
- prometheus Server负责从pushgateway和jobs(Exporters)中采集数据, 存储到后端Storatge中,可以通过PromQL进行查询, 推送alerts信息到AlertManager。 AlertManager根据不同的路由规则进行报警通知。
(4)核心组件
-Prometheus
-
Prometheus Server是Prometheus组件中的核心部分,负责实现对监控数据的获取,存储以及查询。
Prometheus Server可以通过静态配置管理监控目标,也可以配合使用Service Discovery的方式动态管理监控目标,并从这些监控目标中获取数据。其次Prometheus Server需要对采集到的监控数据进行存储,Prometheus Server本身就是一个时序数据库,将采集到的监控数据按照时间序列的方式存储在本地磁盘当中。最后Prometheus Server对外提供了自定义的PromQL语言,实现对数据的查询以及分析。 -
Prometheus Server内置的Express Browser UI,通过这个UI可以直接通过PromQL实现数据的查询以及可视化。但是这个UI还需要通过PromQL去查询数据,所以一般可以配合Grafana来使用
-exporters
exporter简单说是采集端,通过http服务的形式保留一个url地址,prometheus server 通过访问该exporter提供的endpoint端点,即可获取到需要采集的监控数据。exporter采集分为2大类。
- 直接采集:这一类exporter直接内置了对Prometheus监控的支持,比如cAdvisor,Kubernetes等。
- 间接采集: 原有监控目标不支持prometheus,需要通过prometheus提供的客户端库编写监控采集程序,例如mysql Exporter, JMX Exporter等。
-AlertManager
- 在prometheus中,支持基于PromQL创建告警规则,如果满足定义的规则,则会产生一条告警信息,进入AlertManager进行处理。可以集成邮件,Slack或者通过webhook自定义报警。
-PushGateway
- 由于Prometheus数据采集采用pull方式进行设置的, 内置必须保证prometheus server 和对应的exporter必须通信,当网络情况无法直接满足时,可以使用pushgateway来进行中转,可以通过pushgateway将内部网络数据主动push到gateway里面去,而prometheus采用pull方式拉取pushgateway中数据。
(5)应用场景
-适合场景
- 普罗米修斯可以很好地记录任何纯数字时间序列。它既适合以机器为中心的监视,也适合高度动态的面向服务的体系结构的监视。
- 在微服务的世界中,它对多维数据收集和查询的支持是一个特别的优势。普罗米修斯是为可靠性而设计的,它是您在停机期间使用的系统,允许您快速诊断问题。每台普罗米修斯服务器都是独立的,不依赖于网络存储或其他远程服务。
- 当您的基础设施的其他部分被破坏时,您可以依赖它,并且您不需要设置广泛的基础设施来使用它。
-不适合场景
- 普罗米修斯值的可靠性。您总是可以查看有关系统的统计信息,即使在出现故障的情况下也是如此。
- 如果您需要100%的准确性,例如按请求计费,普罗米修斯不是一个好的选择,因为收集的数据可能不够详细和完整。在这种情况下,最好使用其他系统来收集和分析用于计费的数据,并使用Prometheus来完成剩下的监视工作。
二、部署普罗米修斯
(1)实验环境
| 系统 | 主机名 | ip | 实验软件 |
|---|---|---|---|
| Centos7.4 | prometheus | 192.168.100.202 桥接网卡 | prometheus-2.16.0.linux-amd64.tar.gz influxdb-1.7.8.x86_64.rpm |
(2)实验步骤
-安装普罗米修斯
******(1)做基础配置
[root@Centos7 ~]# hostnamectl set-hostname prometheus
[root@Centos7 ~]# su
[root@prometheus ~]# systemctl stop firewalld
[root@prometheus ~]# setenforce 0
setenforce: SELinux is disabled
[root@prometheus ~]# mount /dev/cdrom /mnt/
mount: /dev/sr0 写保护,将以只读方式挂载
mount: /dev/sr0 已经挂载或 /mnt 忙
       /dev/sr0 已经挂载到 /mnt 上
[root@prometheus ~]# yum -y install ntpdate  #在做监控之前必须要先进行时间同步
。。。。。。
完毕!
[root@prometheus ~]# ntpdate ntp1.aliyun.com
10 Jul 17:00:15 ntpdate[1154]: adjust time server 120.25.115.20 offset 0.006842 sec

******(2)上传软件包进行安装
[root@prometheus ~]# ll
总用量 58216
-rw-------. 1 root root     1264 1月  12 18:27 anaconda-ks.cfg
-rw-r--r--  1 root root 59608515 7月  10 17:01 prometheus-2.16.0.linux-amd64.tar.gz
[root@prometheus ~]# tar xf prometheus-2.16.0.linux-amd64.tar.gz
[root@prometheus ~]# mv prometheus-2.16.0.linux-amd64 /usr/local/prometheus
[root@prometheus ~]# cd /usr/local/prometheus/
[root@prometheus prometheus]# ./prometheus   #开启普罗米修斯
level=info ts=2021-07-10T09:02:33.312Z caller=main.go:295 msg="no time or size retention was set so using the default time retention" duration=15d
level=info ts=2021-07-10T09:02:33.312Z caller=main.go:331 msg="Starting Prometheus" version="(version=2.16.0, branch=HEAD, revision=b90be6f32a33c03163d700e1452b54454ddce0ec)"
level=info ts=2021-07-10T09:02:33.312Z caller=main.go:332 build_context="(go=go1.13.8, user=root@7ea0ae865f12, date=20200213-23:50:02)"
level=info ts=2021-07-10T09:02:33.312Z caller=main.go:333 host_details="(Linux 3.10.0-693.el7.x86_64 #1 SMP Tue Aug 22 21:09:27 UTC 2017 x86_64 prometheus (none))"
level=info ts=2021-07-10T09:02:33.313Z caller=main.go:334 fd_limits="(soft=1024, hard=4096)"
level=info ts=2021-07-10T09:02:33.313Z caller=main.go:335 vm_limits="(soft=unlimited, hard=unlimited)"
level=info ts=2021-07-10T09:02:33.314Z caller=main.go:661 msg="Starting TSDB ..."
level=info ts=2021-07-10T09:02:33.329Z caller=web.go:508 component=web msg="Start listening for connections" address=0.0.0.0:9090
level=info ts=2021-07-10T09:02:33.329Z caller=head.go:577 component=tsdb msg="replaying WAL, this may take awhile"
level=info ts=2021-07-10T09:02:33.341Z caller=head.go:625 component=tsdb msg="WAL segment loaded" segment=0 maxSegment=0
level=info ts=2021-07-10T09:02:33.342Z caller=main.go:676 fs_type=XFS_SUPER_MAGIC
level=info ts=2021-07-10T09:02:33.342Z caller=main.go:677 msg="TSDB started"
level=info ts=2021-07-10T09:02:33.342Z caller=main.go:747 msg="Loading configuration file" filename=prometheus.yml
level=info ts=2021-07-10T09:02:38.796Z caller=main.go:775 msg="Completed loading of configuration file" filename=prometheus.yml
level=info ts=2021-07-10T09:02:38.796Z caller=main.go:630 msg="Server is ready to receive web requests."
#使用./prometheus --help可以获取帮助信息
- 测试访问

******(3)编写启动脚本,因为按照上面那样启动是在前端启动的
#使用Ctrl+C退出
#Promtheus作为一个时间序列数据库,其采集的数据会以文件的形似存储在本地中,默认的存储路径为data/,因此我们需要先手动创建该目录:
[root@prometheus prometheus]# mkdir data
[root@prometheus prometheus]# ll
总用量 140984
drwxr-xr-x 2 3434 3434       38 2月  14 2020 console_libraries
drwxr-xr-x 2 3434 3434      173 2月  14 2020 consoles
drwxr-xr-x 3 root root       51 7月  10 17:02 data
-rw-r--r-- 1 3434 3434    11357 2月  14 2020 LICENSE
-rw-r--r-- 1 3434 3434     3184 2月  14 2020 NOTICE
-rwxr-xr-x 1 3434 3434 82329106 2月  14 2020 prometheus
-rw-r--r-- 1 3434 3434      926 2月  14 2020 prometheus.yml
-rwxr-xr-x 1 3434 3434 48417809 2月  14 2020 promtool
-rwxr-xr-x 1 3434 3434 13595766 2月  14 2020 tsdb
[root@prometheus prometheus]# useradd -s /sbin/nologin prometheus
[root@prometheus prometheus]# chown -R prometheus:prometheus /usr/local/prometheus/
[root@prometheus prometheus]# cd /usr/lib/systemd/system
[root@prometheus system]# vim prometheus.service
[Unit]
Description=prometheus
After=network.target

[Service]
User=prometheus
Group=prometheus
WorkingDirectory=/usr/local/prometheus
ExecStart=/usr/local/prometheus/prometheus
[Install]
WantedBy=multi-user.target
#保存退出
[root@prometheus system]# systemctl restart prometheus   #重新启动普罗米修斯
[root@prometheus system]# systemctl enable prometheus
Created symlink from /etc/systemd/system/multi-user.target.wants/prometheus.service to /usr/lib/systemd/system/prometheus.service.
[root@prometheus system]# netstat -anpt | grep 9090  #检查监听端口
tcp        0      0 127.0.0.1:50068         127.0.0.1:9090          ESTABLISHED 1226/prometheus
tcp6       0      0 :::9090                 :::*                    LISTEN      1226/prometheus
tcp6       0      0 ::1:57674               ::1:9090                ESTABLISHED 1226/prometheus
tcp6       0      0 ::1:9090                ::1:57674               ESTABLISHED 1226/prometheus
tcp6       0      0 127.0.0.1:9090          127.0.0.1:50068         ESTABLISHED 1226/prometheus
-安装influxdb数据库
数据库下载地址(同时也是官网文档):https://docs.influxdata.com/influxdb/v1.7/introduction/downloading/
******(1)上传软件包进行安装
#默认情况下prometheus会将采集的数据存储到本机的data目录, 存储数据的大小受限和扩展不便,所以可以使用influxdb数据库作为后端的数据库来存储数据。
[root@prometheus system]# cd
[root@prometheus ~]# ll
总用量 108032
-rw-------. 1 root root     1264 1月  12 18:27 anaconda-ks.cfg
-rw-r--r--  1 root root 51010897 7月  10 17:11 influxdb-1.7.8.x86_64.rpm
-rw-r--r--  1 root root 59608515 7月  10 17:01 prometheus-2.16.0.linux-amd64.tar.gz
[root@prometheus ~]# yum -y install influxdb-1.7.8.x86_64.rpm  #安装influxdb数据库
。。。。。。
完毕!

******(2)备份默认的配置文件,并且启动数据库
[root@prometheus ~]# cp /etc/influxdb/influxdb.conf /etc/influxdb/influxdb.conf.default
[root@prometheus ~]# systemctl start influxdb
[root@prometheus ~]# systemctl enable influxdb
[root@prometheus ~]# influx   #输入influx可以进入数据库就说明安装成功
Connected to http://localhost:8086 version 1.7.8
InfluxDB shell version: 1.7.8
> show databases;
name: databases
name
----
_internal
> create database prometheus ;    #创建普罗米修斯的数据库
> show databases;
name: databases
name
----
_internal
prometheus
> exit

******(3)配置普罗米修斯集成influxdb数据库
#官方的帮助文档:https://docs.influxdata.com/influxdb/v1.7/supported_protocols/prometheus/
[root@prometheus ~]# cd /usr/local/prometheus/
[root@prometheus prometheus]# cp prometheus.yml prometheus.yml.defalut
[root@prometheus prometheus]# vim prometheus.yml
。。。。。。#在末尾直接添加
remote_write:
  - url: "http://localhost:8086/api/v1/prom/write?db=prometheus"  #这是influxdb数据库的api接口

remote_read:
  - url: "http://localhost:8086/api/v1/prom/read?db=prometheus"
#保存退出
————————————————————————————————————————————————————————————————
#如果influxdb有密码的配置:
remote_write:
  - url: "http://localhost:8086/api/v1/prom/write?db=prometheus&u=username&p=password"

remote_read:
  - url: "http://localhost:8086/api/v1/prom/read?db=prometheus&u=username&p=password"
————————————————————————————————————————————————————————————————
[root@prometheus prometheus]# systemctl restart prometheus  #重启服务
[root@prometheus prometheus]# systemctl status prometheus   #查看服务状态
● prometheus.service - prometheus
   Loaded: loaded (/usr/lib/systemd/system/prometheus.service; enabled; vendor preset: disabled)
   Active: active (running) since 六 2021-07-10 17:17:40 CST; 8s ago
 Main PID: 1351 (prometheus)
   CGroup: /system.slice/prometheus.service
           └─1351 /usr/local/prometheus/prometheus

7月 10 17:17:41 prometheus prometheus[1351]: level=info ts=2021-07-10T09:17:41.056Z caller=head.go:577 component=tsdb msg="rep...awhile"
7月 10 17:17:41 prometheus prometheus[1351]: level=info ts=2021-07-10T09:17:41.058Z caller=web.go:508 component=web msg="Start....0:9090
7月 10 17:17:41 prometheus prometheus[1351]: level=info ts=2021-07-10T09:17:41.060Z caller=head.go:625 component=tsdb msg="WAL...gment=2
7月 10 17:17:41 prometheus prometheus[1351]: level=info ts=2021-07-10T09:17:41.062Z caller=head.go:625 component=tsdb msg="WAL...gment=2
7月 10 17:17:41 prometheus prometheus[1351]: level=info ts=2021-07-10T09:17:41.063Z caller=head.go:625 component=tsdb msg="WAL...gment=2
7月 10 17:17:41 prometheus prometheus[1351]: level=info ts=2021-07-10T09:17:41.063Z caller=main.go:676 fs_type=XFS_SUPER_MAGIC
7月 10 17:17:41 prometheus prometheus[1351]: level=info ts=2021-07-10T09:17:41.063Z caller=main.go:677 msg="TSDB started"
7月 10 17:17:41 prometheus prometheus[1351]: level=info ts=2021-07-10T09:17:41.063Z caller=main.go:747 msg="Loading configurat...eus.yml
7月 10 17:17:41 prometheus prometheus[1351]: ts=2021-07-10T09:17:41.064Z caller=dedupe.go:112 component=remote level=info remo...=0283ed
7月 10 17:17:41 prometheus prometheus[1351]: ts=2021-07-10T09:17:41.065Z caller=dedupe.go:112 component=remote level=info remo...=0283ed
Hint: Some lines were ellipsized, use -l to show in full.

******(4)测试数据是否存储到了influxdb数据库中
[root@prometheus prometheus]# cd
[root@prometheus ~]# influx
Connected to http://localhost:8086 version 1.7.8
InfluxDB shell version: 1.7.8
> use prometheus;   #进入数据库
Using database prometheus
> show MEASUREMENTS;  #查看数据
name: measurements
name
----
go_gc_duration_seconds
go_gc_duration_seconds_count
go_gc_duration_seconds_sum
go_goroutines
go_info
go_memstats_alloc_bytes
。。。。。。
promhttp_metric_handler_requests_total
scrape_duration_seconds
scrape_samples_post_metric_relabeling
scrape_samples_scraped
scrape_series_added
up
> select * from prometheus_http_requests_total limit 10 ;    #做个简单查询
name: prometheus_http_requests_total
time                __name__                       code handler  instance       job        value
----                --------                       ---- -------  --------       ---        -----
1625908702484000000 prometheus_http_requests_total 200  /metrics localhost:9090 prometheus 1
1625908717484000000 prometheus_http_requests_total 200  /metrics localhost:9090 prometheus 2
1625908732484000000 prometheus_http_requests_total 200  /metrics localhost:9090 prometheus 3
1625908747484000000 prometheus_http_requests_total 200  /metrics localhost:9090 prometheus 4
1625908762483000000 prometheus_http_requests_total 200  /metrics localhost:9090 prometheus 5
1625908777483000000 prometheus_http_requests_total 200  /metrics localhost:9090 prometheus 6
1625908792483000000 prometheus_http_requests_total 200  /metrics localhost:9090 prometheus 7
1625908807483000000 prometheus_http_requests_total 200  /metrics localhost:9090 prometheus 8
1625908822483000000 prometheus_http_requests_total 200  /metrics localhost:9090 prometheus 9
1625908837495000000 prometheus_http_requests_total 200  /metrics localhost:9090 prometheus 10
三、部署node_exporter与普罗米修斯集成
-
在Prometheus的架构设计中,Prometheus Server并不直接服务监控特定的目标,其主要任务负责数据的收集,存储并且对外提供数据查询支持。因此为了能够能够监控到某些东西,如主机的CPU使用率,我们需要使用到Exporter。Prometheus周期性的从Exporter暴露的HTTP服务地址(通常是/metrics)拉取监控样本数据。
-
从上面的描述中可以看出Exporter可以是一个相对开放的概念,其可以是一个独立运行的程序独立于监控目标以外,也可以是直接内置在监控目标中。只要能够向Prometheus提供标准格式的监控样本数据即可。
-
这里为了能够采集到主机的运行指标如CPU, 内存,磁盘等信息。我们可以使用Node Exporter。
(1)实验环境
| 系统 | 主机名 | ip | 实验软件 |
|---|---|---|---|
| Centos7.4 | prometheus | 192.168.100.202 桥接网卡 | prometheus-2.16.0.linux-amd64.tar.gz influxdb-1.7.8.x86_64.rpm |
| Centos7.4 | node | 192.168.100.203 | node_exporter-0.18.1.linux-amd64.tar.gz |
(2)实验步骤
-安装exporter节点
******(1)这里继续上面的步骤,上面已经安装普罗米修斯了,所以这里直接部署节点即可,先做节点的基础配置
[root@Centos7 ~]# hostnamectl set-hostname node
[root@Centos7 ~]# su
[root@node ~]# systemctl stop firewalld
[root@node ~]# setenforce 0
setenforce: SELinux is disabled
[root@node ~]# mount /dev/cdrom /mnt/
mount: /dev/sr0 写保护,将以只读方式挂载
mount: /dev/sr0 已经挂载或 /mnt 忙
       /dev/sr0 已经挂载到 /mnt 上

******(2)上传软件包安装exporter
[root@node ~]# ll
总用量 7900
-rw-------. 1 root root    1264 1月  12 18:27 anaconda-ks.cfg
-rw-r--r--  1 root root 8083296 7月  12 11:48 node_exporter-0.18.1.linux-amd64.tar.gz
[root@node ~]# tar xf node_exporter-0.18.1.linux-amd64.tar.gz
[root@node ~]# mv node_exporter-0.18.1.linux-amd64 /usr/local/exporter

******(3)启动exporter
[root@node exporter]# ./node_exporter  #在前台启动exporter
。。。。。。
使用Ctrl+C退出

#复制一个node节点终端,进行测试
[root@node ~]# curl 127.0.0.1:9100/metrics
#使用这个命令可以看到node_exporter节点暴露出来的数据,这是查看本地的

******(3)编写启动脚本
[root@node exporter]# cd /usr/lib/systemd/system
[root@node system]# vim node_exporter.service   #写入
[Unit]
Description=node_exporter
After=network.target

[Service]
User=prometheus
Group=prometheus
ExecStart=/usr/local/exporter/node_exporter --web.listen-address=:20001 --collector.systemd --collector.systemd.unit-whitelist=(sshd|nginx).service --collector.processes --collector.tcpstat
[Install]
WantedBy=multi-user.target
#保存退出
[root@node system]# systemctl daemon-reload  #重载系统服务
[root@node system]# useradd prometheus   #因为这里的系统脚本是用普罗米修斯用户启动的,所以需要创建
[root@node system]# systemctl start node_exporter  #启动
[root@node system]# systemctl status node_exporter  #查看状态
● node_exporter.service - node_exporter
   Loaded: loaded (/usr/lib/systemd/system/node_exporter.service; disabled; vendor preset: disabled)
   Active: active (running) since 一 2021-07-12 12:01:03 CST; 8s ago
 Main PID: 1413 (node_exporter)
   CGroup: /system.slice/node_exporter.service
           └─1413 /usr/local/exporter/node_exporter --web.listen-address=:20001 --collector.systemd --collector.systemd.unit-whitelist...

7月 12 12:01:03 node node_exporter[1413]: time="2021-07-12T12:01:03+08:00" level=info msg=" - systemd" source="node_exporter.go:104"
7月 12 12:01:03 node node_exporter[1413]: time="2021-07-12T12:01:03+08:00" level=info msg=" - tcpstat" source="node_exporter.go:104"
7月 12 12:01:03 node node_exporter[1413]: time="2021-07-12T12:01:03+08:00" level=info msg=" - textfile" source="node_exporter.go:104"
7月 12 12:01:03 node node_exporter[1413]: time="2021-07-12T12:01:03+08:00" level=info msg=" - time" source="node_exporter.go:104"
7月 12 12:01:03 node node_exporter[1413]: time="2021-07-12T12:01:03+08:00" level=info msg=" - timex" source="node_exporter.go:104"
7月 12 12:01:03 node node_exporter[1413]: time="2021-07-12T12:01:03+08:00" level=info msg=" - uname" source="node_exporter.go:104"
7月 12 12:01:03 node node_exporter[1413]: time="2021-07-12T12:01:03+08:00" level=info msg=" - vmstat" source="node_exporter.go:104"
7月 12 12:01:03 node node_exporter[1413]: time="2021-07-12T12:01:03+08:00" level=info msg=" - xfs" source="node_exporter.go:104"
7月 12 12:01:03 node node_exporter[1413]: time="2021-07-12T12:01:03+08:00" level=info msg=" - zfs" source="node_exporter.go:104"
7月 12 12:01:03 node node_exporter[1413]: time="2021-07-12T12:01:03+08:00" level=info msg="Listening on :20001" source="node_e...go:170"
Hint: Some lines were ellipsized, use -l to show in full.
[root@node system]# netstat -anpt | grep 20001   #查看监听端口,20001是因为在启动文件中指的就是20001
tcp6       0      0 :::20001                :::*                    LISTEN      1413/node_exporter
[root@node system]# systemctl enable node_exporter
Created symlink from /etc/systemd/system/multi-user.target.wants/node_exporter.service to /usr/lib/systemd/system/node_exporter.service.
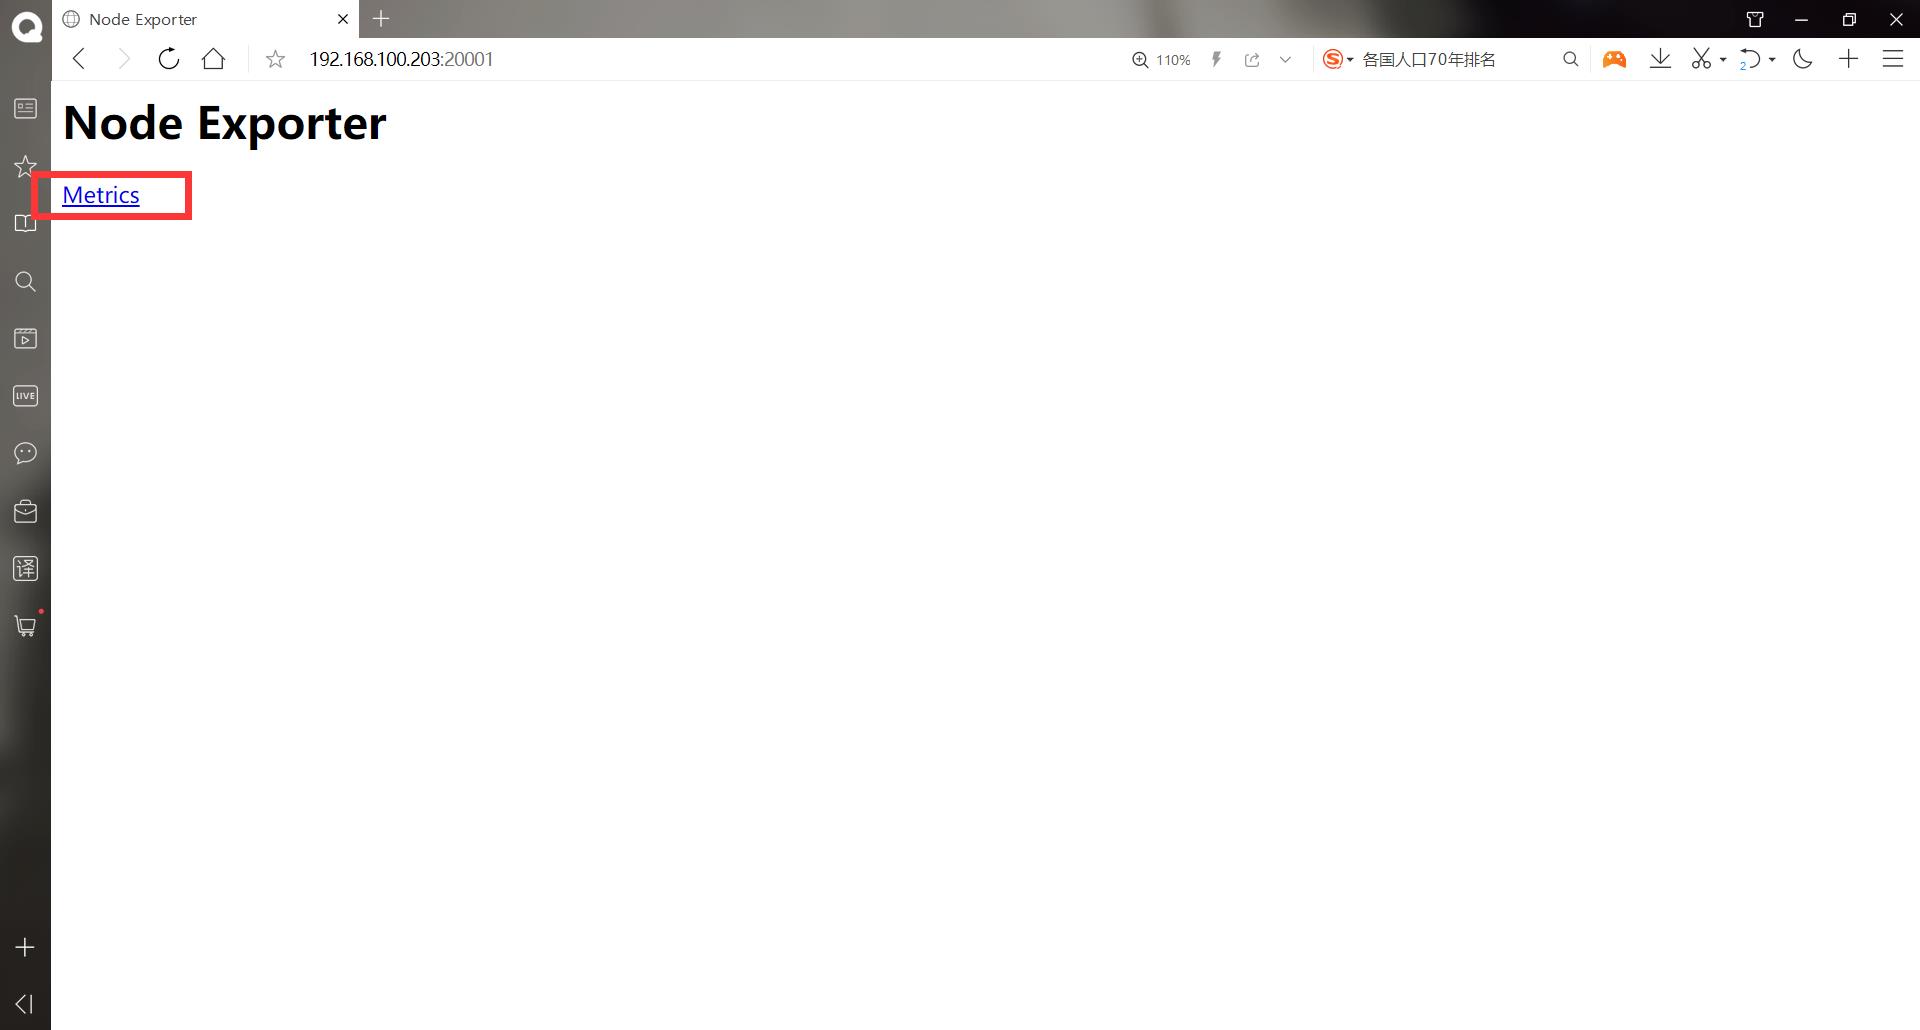
- 使用浏览器访问测试


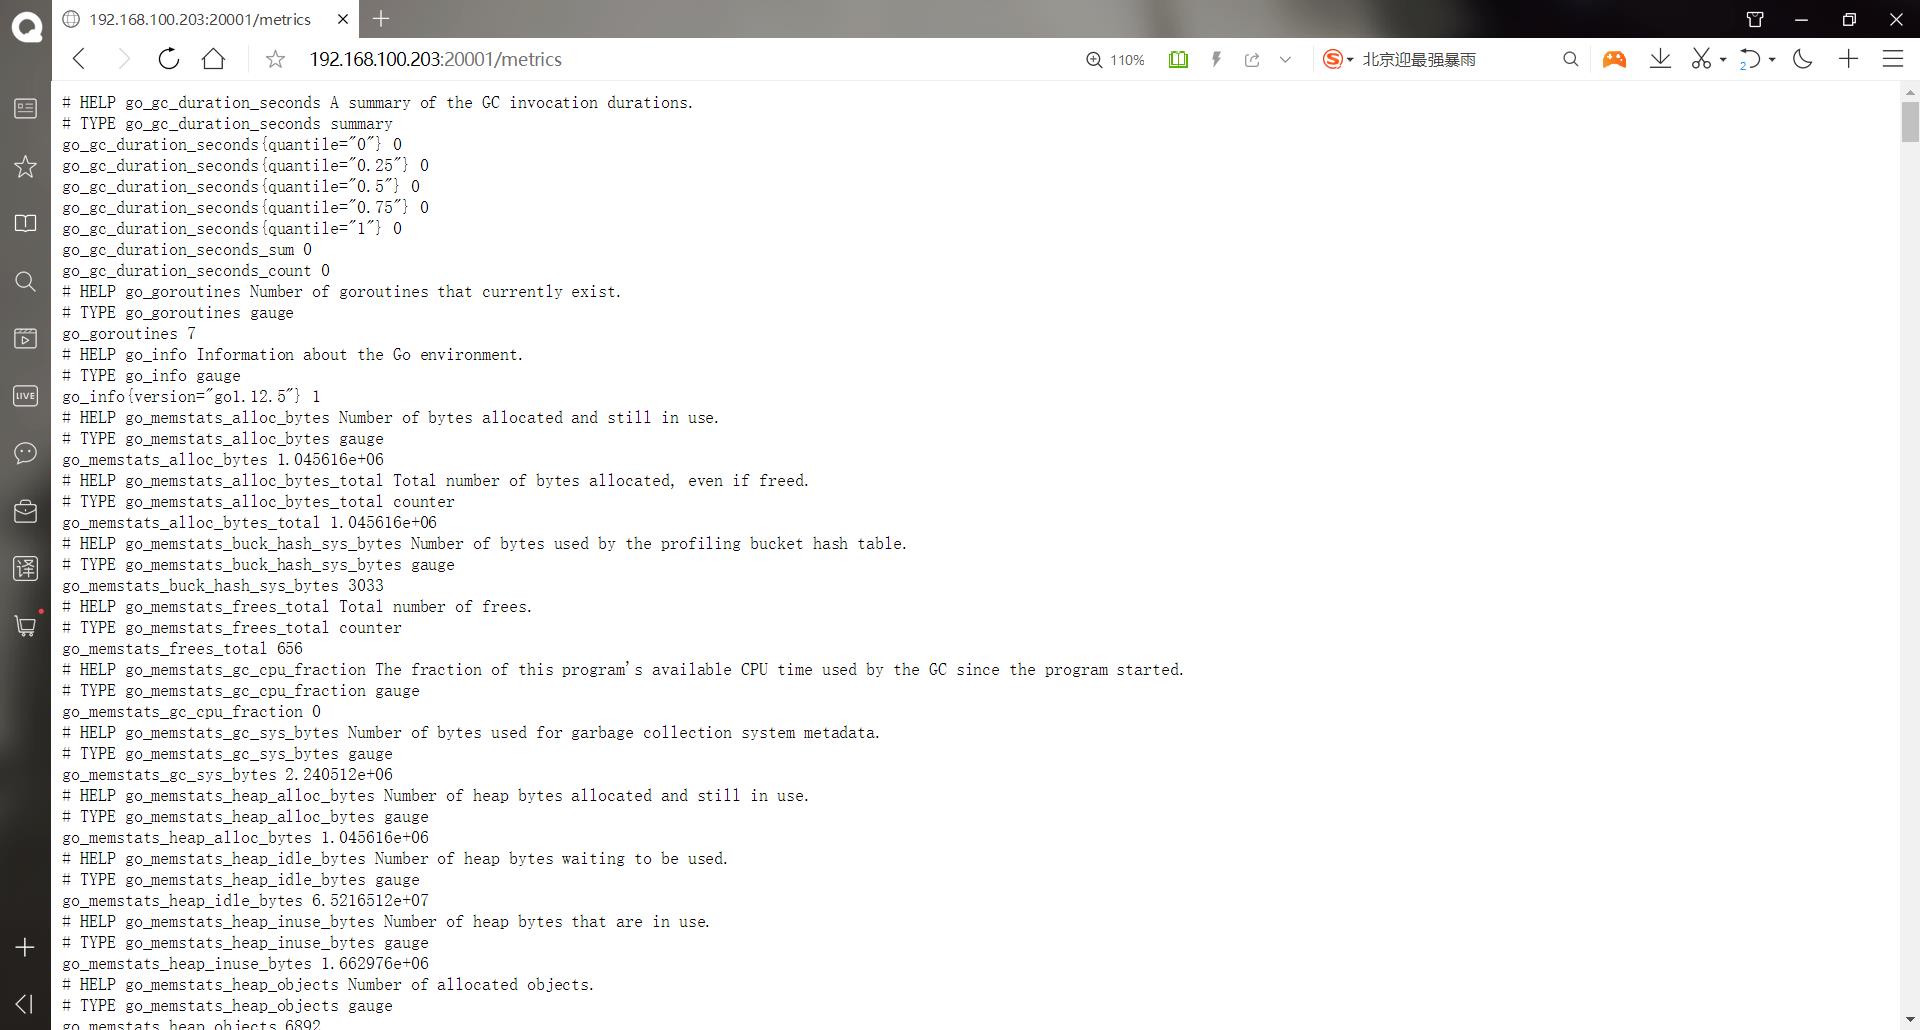
可以看到node节点的信息
每一个监控指标之前都会有一段类似于如下形式的信息:
1.	# HELP node_cpu Seconds the cpus spent in each mode.
2.	# TYPE node_cpu counter
3.	node_cpucpu="cpu0",mode="idle" 362812.7890625
4.	# HELP node_load1 1m load average.
5.	# TYPE node_load1 gauge
6.	node_load1 3.0703125
其中HELP用于解释当前指标的含义,TYPE则说明当前指标的数据类型。在上面的例子中node_cpu的注释表明当前指标是cpu0上idle进程占用CPU的总时间,CPU占用时间是一个只增不减的度量指以上是关于Prometheus概述以及安装的主要内容,如果未能解决你的问题,请参考以下文章